¶ Overview
Servers are an integral part of BeamMP; players are connected to each other through the server. They run natively on Windows and Linux.
You can make private servers, which only people you invite can join, or public servers, which will show in our official server list.
Getting a server up and running is a process with a few steps! It’s quite easy, but if you run into any issues, feel free to ask on our Forum or on our Discord server in the #server-support channel. Also refer to the Server Maintenance section for more info.
Please make sure to read the LICENSE of the server before use.
Note: The server only supports IPv4. If you don’t know which one you have, look at the IP address you see on whatsmyip.org — if it contains : colons, it’s IPv6. In that case, you should investigate further whether you also have an IPv4. You can call your ISP to find this out, or ask someone who lives with you (if they’re tech-savvy, they might know!). IPv6 support is planned.
¶ Setting up the Server
Setup consists of a few steps, you should follow all of them.
¶ 1. Port forwarding
If you are on a VPS (Virtual Private Server) or Rootserver, you can usually skip this step. If you’re unsure about what a VPS or Rootserver is, you aren’t on one.
This step is necessary if you want someone outside of your household to join («outside of your local network»).
This step is the same for almost every game’s server, such as Minecraft Servers, so you can find many tutorials online for this, even for your specific router model. A good full guide is this tutorial. Make sure you forward port 30814, as TCP and UDP.
While the default Port you want to “forward” is 30814, you can choose any other number >1024, but you need to note down what you picked if it’s not 30814. You need to forward both TCP and UDP.
If you have issues, also feel free to ask on our Forum or on our Discord server in the #server-support channel.
¶ 1.1 Firewall
Depending on your setup, you may need to let BeamMP-Server through your firewall. This is the case on Windows (turning the firewall off does not work usually), and on a lot of preinstalled Linux servers.
There, just like with the port forwarding, you want to allow the BeamMP-Server through the firewall, both incoming and outgoing connections, and both TCP and UDP. If your firewall asks for a port instead, that will have to be the same port you used in step “1. Port Forwarding” (usually 30814).
¶ 2. Obtaining an Authentication Key
The “Authentication Key”, often called “AuthKey”, is necessary for making a public server, but should be done for private servers, too.
You will need a Discord account for this step. This is necessary to prevent spam.
To get your key, head to the Keymaster, click on «Keys” on the left (key symbol) and then click on the blue ‘here‘ text.

Next, fill out the Server Name field (this is just the key name not the actual name of the server on the list). Example:
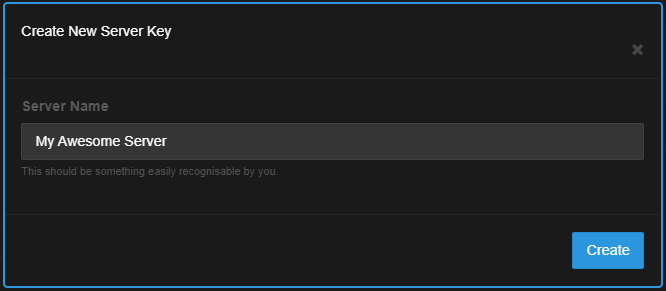
It should, in the end, look something like this:

Ignore the IP field as it doesn’t do anything.
DO NOT EVER SHARE THIS KEY OR SHOW IT TO ANYONE. TREAT THIS LIKE A PASSWORD.
You have a limited number of keys. One key can be used on one server at a time, so you cannot start two servers at the same time with the same key.
Now copy the text in the “Key” field, in this example that is 3173a2e-6az0-4542-a3p0-ddqq5ff95558 and hold onto it for the next step.
¶ 3. Installation
The BeamMP-Server is available for Windows and Linux. The next two sections are dedicated to Windows and Linux each.
¶ 3.a. Installation on Windows
For the Linux installation, see the next step.
Please ensure you have port-forwarded before attempting to host a server! Without you ports being forwarded, you cannot host a server to the public!
- Download the server zip from beammp.com. You should end up with a compressed .zip archive, called something like BeamMP-Server.zip .
- Extract the BeamMP-Server.zip . You will end up with a BeamMP-Server.exe file, among others which you can ignore for now. Make a folder somewhere and put the BeamMP-Server.exe there. This is where your server will live.
- Start the server once by double-clicking on it. This will generate all the necessary files for you, once you see text you can close it and proceed to the next step. You should see a Server.log file and a ServerConfig.toml file next to your BeamMP-Server.exe .
- (optional) For quick access in the future you can easily create a desktop shortcut to BeamMP-Server.exe using [Right click] > Send to > Desktop (create shortcut).
Now proceed to the next step.
¶ 3.b. Installation on Linux
Skip this if you did “Installation on Windows”.
¶ Using our build (recommended)
This step will work on Debian, Ubuntu, and similar Debian-derivatives on x86_64. If you’re on a different distribution or architecture, refer to the «Building from source” step below.
- Ensure you have the dependencies installed which are listed here.
- Download the server zip from beammp.com. You should end up with a compressed .zip archive, called something like BeamMP-Server.zip .
- Extract the BeamMP-Server.zip . You will end up with a BeamMP-Server-linux file, among others which you can ignore for now. Make a folder somewhere and put the BeamMP-Server-linux there. This is where your server will live.
- Open a terminal, go to that folder you put the BeamMP-Server-linux in, and run chmod +x BeamMP-Server-linux . This ensures that you have permissions to run it.
- Start the server once by running it with ./BeamMP-Server-linux . This will generate all the necessary files for you, once you see text you can close it and proceed to the next step. You should see a Server.log file and a ServerConfig.toml file next to your BeamMP-Server-linux .
- (optional) It is heavily recommended to set up a user called beammpserver (or similar), as we do NOT recommend running the server as root, sudo or with your personal user account. You should then take steps to make sure that you start the server as this user only.
Now proceed to the next step.
¶ Building from source
BeamMP-Server for Linux can be officially built on both Debian, Ubuntu, other Debian-derivatives, and ArchLinux. Other distributions are likely to work, too, but aren’t officially supported. If you want to build it yourself you can do it by downloading the source on our GitHub, a tutorial can be found here.
At the end, make sure to run your server once with ./BeamMP-Server and then proceed to the next step.
¶ 4. Configuration
Now that you ran the server once, it should have created some files and probably uttered an error or two. This is because we are not yet done. Your folder should have these files:
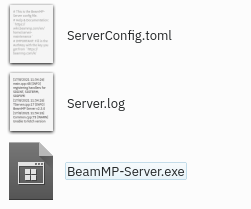
They might be called “ServerConfig”, “Server” and “BeamMP-Server” (no extensions like “.exe”), but that’s correct, too!
Open the ServerConfig.toml with a text editor such as Notepad . You can do this with [Right Click] → “Open With…” and then selecting a text editor.
You should see something like this:
This is your configuration file. It uses a format called TOML. Refer to the Server Maintenance section for more info on this file.
For now, we only care about the AuthKey field. Between the quotes » , you want to paste in your AuthKey you copied in the first step.
For our example key, it should then look like this:
Give your server a name, too, in the Name field. You can format this with colors and more, please refer to this section on Name customization in the server maintenance page.
If you picked a different Port other than 30814, make sure to replace it here under Port .
IMPORTANT: Your server will NOT show in the server list as long as Private = True . If you want it to show in the list, set that to Private = False .
¶ 5. Validation
Now run your server again, and see if it spits out any more [ERROR] messages. It should just stay open. At this point, you can start BeamMP through the BeamMP-Launcher and you should find your server by the Name you entered in the ServerConfig.toml in the server list.
¶ How to add mods to your server
Vehicle mods and map mods are different to install, but both require you to put them in your server’s ( Resources/Client ) folder. Simply slide any mod you want to add in that folder.
¶ General Mods
If you only wanted to add modded vehicles, you simply put the zip file of the mod in the Resources/Client folder. They will automatically be downloaded by anyone who joins your server.
All default maps (maps which aren’t mods) work out-of-the-box and do not have to be installed. You simply change the Map setting in the ServerConfig.toml file to any of these. For any other modded maps, do this:
- Put your map’s .zip file in your server’s ( Resources/Client ) folder.
- Next, have a look inside the map’s zip file (don’t extract it) and open the levels folder. In this folder there should be simply one other folder with the name of the map, for example “myawesomedriftmap2021”. Make sure to copy or remember this name exactly as it is written in that folder’s name.
- Open your ServerConfig.toml . In the Map setting, you should see /levels/MAPNAME/info.json , where MAPNAME is likely something like gridmap_v2 . You want to now replace this MAPNAME with the name of the folder from the last step, in that example it was myawesomedriftmap2021 . In the end it should look like this (for this example) and should have /info.json at the end.
Now, when someone joins your server, it should download the map automatically and work as expected.
If this does NOT work, install the map in your singleplayer BeamNG.drive, launch it and enter the map. Then, open the Console by pressing the
(tilde) key (if you’re on a non-US keyboard, look at the Toggle System Console action in the Options > Controls > Bindings menu, under the General Debug section), and run print(getMissionFilename()) . This should then show you the name to use.
That’s it! Your modded map should now be available to join!
¶ How to join your server
How you and other people can join your server.
¶ Joining your own server
You must join your server by direct connecting, to do this, click the Direct Connect Tab on the left from the server list. Leave the default info in there (should be 127.0.0.1 and a port of 30814) then hit connect. If you server is hosted outside of your house you must find your IP on that machine and direct connect that way.
¶ Other people joining your server (Public)
For anyone else to join your server, it first must be port forwarded (A good guide here). To join your public server they can simply go to the server list, type the name of the server, and click connect. If you are unsure of what your server name is, it will be the name you put in the ServerConfig.toml
¶ Other people joining your server (Private)
For anyone else to join your server, it first must be port forwarded (A good guide here). To join your private server they must go to the Direct Connect Tab in BeamMP, then type your IP and Port. If you are unsure of your IP here’s a good website. If you are unsure of your port the default is 30814, the port will be the same as the port you port forwarded.
¶ Other people joining your server (Hamachi)
For someone to join your server, they must be on your Hamachi network, you do not need to be port forwarded for this. After joining your Hamachi network they will use the Hamachi IP and default port to direct connect to your server. For more info see our Hamachi guide.
Как создать сервер в beam mp

 11
11
 1
1
 1
1
 3
3
 2
2
 1
1
 1
1

| 29,722 | уникальных посетителей |
| 772 | добавили в избранное |

Недавно проект BeamMP был обнародован. Этот мод наконец-то включает многопользовательскую онлайн-игру для BeamNG.drive.
В этом руководстве рассматриваются основы настройки мода и подключения к вашему первому серверу BeamMP.
При входе в мультиплеер вам будет предложено два варианта авторизации.
[PLAY AS GUEST] Вы можете зайти с рандомным никнеймом guest нажав PLAY AS GUEST, а затем PLAY.
[LOGIN] или зарегистрироваться на форуме [forum.beammp.com] , чтобы играть с уникальным никнеймом нажав REGISTER, а после регистрации LOGIN.
Чтобы подключиться к онлайн-серверам, вам необходимо скачать и установить мод BeamMP. Мод можно скачать с официального сайта BeamMP website [beamng-mp.com] .
После того, как необходимые файлы будут загружены, мод необходимо установить. Это можно сделать, просто дважды щелкнув загруженный установщик и выполнив действия мастера установки.
По завершении процесса установки мастер установки создаст ярлык на вашем рабочем столе, дважды щелкните ярлык и позвольте моду автоматически обновиться (да, теперь это так!).
Поскольку мод BeamMP в основном действует как отдельный профиль для существующей установки BeamNG.drive, при желании вы можете скопировать старые настройки профиля (графика, управление и т.д.).
Ваши настройки BeamNG.drive обычно можно найти по адресу:
Теперь, когда мод установлен, пришло время присоединиться к вашему первому серверу. Откройте BeamMP с помощью ярлыка запуска и нажмите PLAY MP в главном меню. Это откроет список серверов.
В настоящее время серверы могут размещать моды на стороне клиента и могут быть дополнительно настроены разработчиками с помощью сценариев на стороне сервера.
В настоящее время единственный сервер, на котором запущен полностью настраиваемый игровой режим (Demolition Derby) — это Uncle Joey’s World, создатель которого также является автором этого руководства;)!
Чтобы присоединиться к серверу, выберите сервер из списка, щелкнув на неего, и нажмите CONNECT. BeamMP загрузит все необходимые моды для этого сервера. После завершения вы успешно подключитесь к своему первому серверу BeamMP!
HERE TO HELP!
This knowledgebase provides useful information to help you get up and running a enjoyable BeamMP server.
BeamMP Server Hosting Documentation.
This chapter will explain how to get things started from a blank slate.
Choosing A Server
So you have decided you want to host your own BeamMP server, that’s great! There are some things to consider when starting to host a server so let’s start off by deciding what your overall intentions are. Currently, we offer three BeamMP server hosting plans and each plan fits a users different needs.
If you are wanting a private server for you and your friends or just want to start small then the Basic plan is probably right for you.
Other plans such as our Club and Community plans are more fit for public communities and users wanting to host servers for the general public.
Accessing Your Server
You have now purchased your desired BeamMP server and need to configure it. This may seem overwhelming to some but we have done our best to make our server panel as streamlined as possible.
NOTE: If at any point you get stuck navigating your server panel or need assistance navigating the panel please see our Panel Documentation
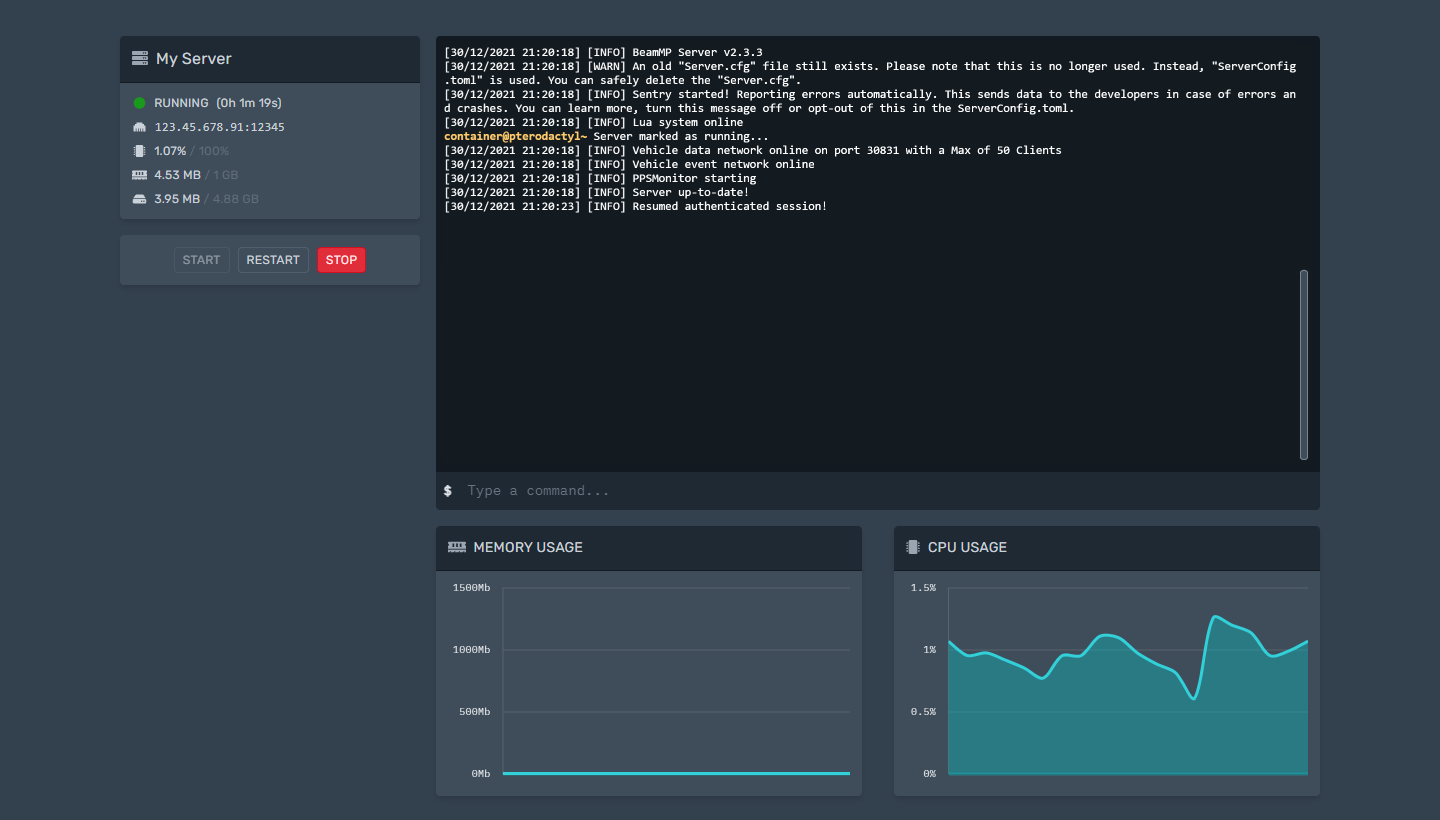
Once you have successfully purchased your own BeamMP server you should have gotten an email including login information to access your game panel. Once you have successfully set a password for your game Panel and login you will see your servers listed along with the IP, port and general server performance stats.

You can now click on the server you want to manage. You should now see your server console along with other various server information and graphs.
Configuring Your Server Key
The first step to setting your server up is to add your BeamMP server key to your config. A BeamMP server key is a key provided to your by BeamMP to authenticate your server to their backend. You can get a key for free from the BeamMP Keymaster and create one. You can always get additional server keys by becoming a BeamMP Patreon.
Now that you have your key created and copied you can go back to your BeamHost game panel and using the top navigation bar go to the Startup tab. You can now paste your server key in the authentication Key field.
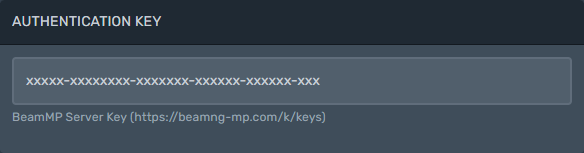
Now that your server key is configured you should now have a functioning server after a simple server restart. But let’s continue to configure the rest of your server first such as the server name, description and more.
You can set all this up at the same location as you did for your server key.
Configuring Your Name & Description
let’s start by adding a server name and description. In your game panel under the Server Config tab, you should find a text field labeled «Name». This is where you will set your server name that will show up in the BeamMP public server list (If the server is a public server).
Next up we will be adding a server description. The server description is completely optional but is recommended as it will let users know what your server is about. You can add your server description in the text field labeled «Description».
Private Or Public Server
The next step is determining if you want your server to be a private server or a public server. A private server is a server that is hidden from the public BeamMP server list and is only joinable by using the direct connect functions in the BeamMP launcher.
In order to connect to a private server, you must navigate to the direct connect tab in your BeamMP server browser and enter your server’s IP:PORT. You can find your server IP and Port in your game panel under the «Console» tab. When connecting to your server you can use your numeric IP address or you can use «play.beamhost.net» as an IP address.
A public server on the other hand is much easier to connect to as it will be displayed in the public server list and can be joined by anybody on BeamMP.
Once you decide what style of server you want you can set the «Private» option to true or false.
true=Server Is Private
false=Server Is Public
Configure The Server Map
We will now need to set the map on your server. This is done in the Server Config tab under the MAP text field. For a vanilla map we have some of the entries listed below.
All you need to do is copy the map that you want below such as /levels/gridmap_v2/info.json and paste it in your server config MAP text field.
- /levels/gridmap_v2/info.json
- /levels/automation_test_track/info.json
- /levels/east_coast_usa/info.json
- /levels/johnson_valley/info.json
- /levels/hirochi_raceway/info.json
- /levels/italy/info.json
- /levels/jungle_rock_island/info.json
- /levels/industrial/info.json
- /levels/small_island/info.json
- /levels/smallgrid/info.json
- /levels/utah/info.json
- /levels/west_coast_usa/info.json
- /levels/driver_training/info.json
- /levels/derby/info.json
In order to add a custom map you will have to open the map’s .zip file and copy the name from the /levels/
Configure Max Cars
The «Max Cars» configuration field is to set the amount of cars each player can spawn. If you only want to allow each player to spawn 1 vehicle then set this value to 1. Otherwise, change this value to your desired amount of vehicles per player.
CONGRATULATIONS
Advanced Configuration.
This chapter will explain how to use some of the more advanced features that come with your BeamMP server.
Server Name Colors
There are many colors you can use to make your server stand out. BeamMP uses special formatting to allow you to easily create custom color names and descriptions for your servers. To use these colors is simple, all you need to do is add the color code of your desired color before your name.
For example, if you wanted to color your server name (My Server Name) red you would enter your name in the configuration as: «^4My Server Name» which would result in My Server Name.
There are many ways to get creative with this and make your server really stand out. Feel free to use our server name generator below to create your own custom name.
Copy this using ‘CTRL+C’ and paste it in your server config
Updating Your Server
There are two ways you can go about updating your server after a BeamMP update is released. Method 1 is by simply reinstalling your server from your game panel in the «Settings» tab. This will NOT erase your mods, settings or anything else you may have configured on your server.
Method 2 requires you to download the BeamMP server mod from HERE. Once you have the BeamMP_Server.zip file downloaded open it and extract the BeamMP-Server-linux file to your desktop temporarily. Now navigate to your server’s game panel and stop your server from running. Next, open the File Manager and delete the existing «BeamMP-Server-linux» file from your server.
Now you need to upload the new updated BeamMP-Server-linux file from your Desktop to your server. Do this by simply dragging and dropping the file in the same location you deleted the old «BeamMP-Server-linux» file.
Now before starting your server you need to change the permissions level for the new BeamMP-Server-linux file. Do this by pressing the three small doth to the right of the file name in your file manager and clicking «Permissions». A window should pop up stating «File Mode», In the text field enter 755 and press «Update».
Once complete your server should be updated and ready to start.
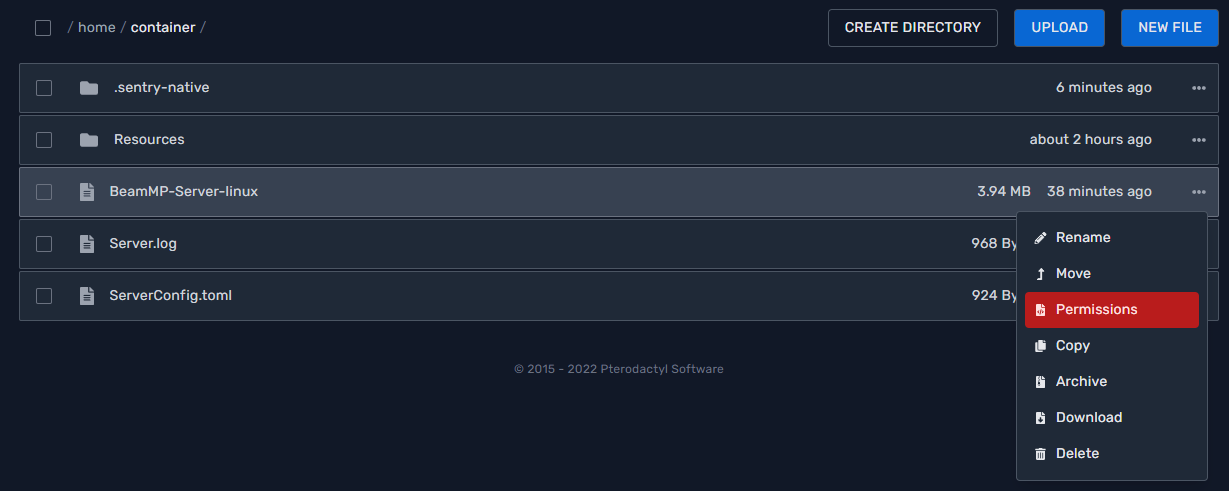
NOTE: We do not always recommend updating to the latest versions immediately due to bugs & crashes that may not be fixed. Always keep up with BeamMP updates & progress on the Official BeamMP Discord server
Adding Mods To Your Server
Adding mods to your server can be tricky sometimes. There are lots of mods that are outdated out there that if installed on your server, could cause instabilities or crashes to your server. Please be cautious about what mods you decide to install on your server.
With that said there are also tons of really great and amazing mods out there so let’s go over how to install them. First, you will need to navigate to your game panel and shut down your server. Next enter the File Manager. You should see many folders & files, open the Resources folder.
Once there you will find two folders named Client and Server. In most cases you will be using the Client folder as the Server folder is dedicated to server add-ons and scripts. Once you have the Client folder opened up you are ready to start installing your desired mods. All you need to do at this point is drag & drop or use the upload button to install your mods into this directory.
When installing mods it is important to keep them in their .zip compressed format. Do not extract them in any way.
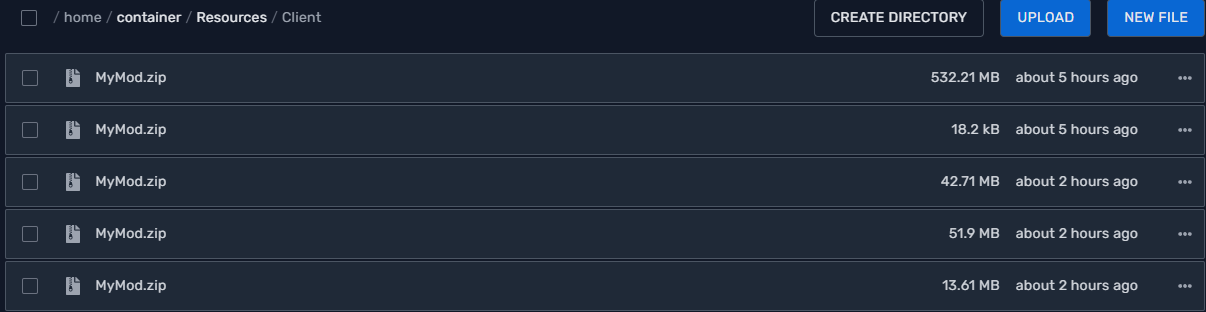
Now that you have your mods installed it’s time to start your server back up and try them out!
Как создать и настроить сервер Beam MP: подробное руководство для игроков
Beam MP (Multiplayer) — это модификация для популярной автомобильной симуляции BeamNG.drive, которая позволяет игрокам играть вместе в режиме многопользовательской игры. Чтобы создать и настроить свой собственный сервер Beam MP, следуйте данному подробному руководству.
Шаг 1: Загрузка и установка модификации Beam MP
Прежде чем начать, вам нужно скачать и установить модификацию Beam MP. Вы можете найти ее на официальной странице BeamMP: (https://beammp.com/). Загрузите соответствующую версию для вашей операционной системы и запустите установщик. Следуйте инструкциям, чтобы установить модификацию на ваш компьютер.
Шаг 2: Создание сервера
- Запустите BeamNG.drive и выберите режим "Steam" или "No Steam" в зависимости от типа вашей игровой версии.
- Откройте вкладку "Мультиплеер" в главном меню игры.
- Нажмите кнопку "Host Server" (Создать сервер), чтобы создать свой собственный сервер.
- Установите желаемые параметры сервера, такие как имя сервера, порт, пароль (если требуется), максимальное количество игроков и т.д. Можно также установить общие настройки игры, такие как режим игры и сценарий.
- Нажмите кнопку "Start Server" (Запустить сервер), чтобы начать работу сервера Beam MP.
Шаг 3: Настройка сервера
После создания сервера Beam MP вам может потребоваться настроить его для достижения лучшего игрового опыта. Вот некоторые настройки, которые вы можете изменить: