How To Fix HAXM Error In Android Studio
HAXM errors are very common issues while developing apps in Android studio, but they can be easily fixed with some tools and methods. Today we will look into almost all the methods by which we can fix HAXM errors in Android Studio. I hope this guide will help you fix this error and you will continue in your app-building journey.
Some Common HAXM errors and their fixes
First of all, let me tell you what HAXXM is. As you know Android emulator is used to run and test your apps and games in android studio, so to properly run the Android emulator, your PC or laptop uses a virtualization tool which is called HAXM(Hardware Accelerated Execution Manager).
Following are some common errors and fixes that I have personally seen and tested.
1. Virtualization Technology (VT-x) is turned off
This shows that the Virtualization Technology is not active on your PC or laptop. It’s a very common issue for first-time android studio users, it happens more than usual.
There is a simple and very easy way to fix this issue, you just have to go to your system’s BIOS settings and enable Virtualization from there.
Let me show you how:-
a. First of all, restart your system and press a particular key to enter the BIOS setup. That particular key can vary depending on your PC brand and model but common BIOS setup keys are F2, F10, or Delete.
b. Once entered the BIOS setup, look for the Advanced or Security tab there you will find Virtualization Technology or VT-x.
Let me remind you that the location may change according to your PC and laptop brand and model.
c. Now you will see that Virtualization is disabled just click on it and change it to enable. If it shows auto then that means it is already activated, leave it as it is.
d. Now save the settings using the save and exit option or using the F10 key.
e. The system will now boot automatically. Once the system boots up try installing HAXM again and you will see the error has been fixed.
2. Failed to open the driver
This occurs when installing the HAXM, it shows that there is an a. issue with the HAXM driver itself. To fix this follow the following methods.
a. First of all uninstall any HAXM drivers installed on your system, those outdated or corrupt drivers may be causing this issue.
b. The next thing you can do is go to Intel official site (https://software.intel.com/en-us/articles/intel-hardware-accelerated-execution-manager-intel-haxm) and download and install the new updated HAXM driver.
c. Also you should check for the system requirements to install the HAXM. Normally HAXM requires a 64-bit Operating system, a minimum of 4GB of ram, and vt-x compatible CPU.
d. After downloading the HAXM installer, run this installer as an admin to ensure the installer has proper permissions to install HAXM.
e. After successful installation, you will see that HAXM is working properly.
3. Disable Hyper-V
The most common and underrated solution to fix HAXM errors is Disabling Hyper-V. I have tried and tested it, and 8 out of 10 times the HAXM error occurs due to Hyper-V.
To disable Hyper-V just go to Control panel>Turn Windows features on or off>Hyper-v
After finding Hyper-V just disable it or uncheck it. This will solve all your problems regarding HAXM installation.
You can also try some additional methods to fix this issue:
- Update android studio
- Try using another emulator
- Contact Support
Conclusion
So there you go, these are all the steps and methods that I have personally used to fix HAXM errors in android studio. I know this error can be frustrating and irritating but you just have to be patient and hardworking enough to overcome these errors. Now still if you have any issues or complaints do let me know in the comments I will try to help you out. Till then keep learning keep Hustling.
HAXM Installation Failed. Install Intel HAXM in Windows
HAXM Installation Failed is a very common error that occurs when installing Android Studio. This guide explains what is Intel HAXM and how to install Intel HAXM. We will also look at various issues that may result in HAXM installation failed error and how to solve them.
Table of Contents
What is Intel HAXM
The HAXM stands for Hardware Accelerated Execution Manager. It is a cross-platform hardware-assisted virtualization engine (hypervisor), The Android Emulator use HAXM in intel platforms to speedup & improve performance
Why HAXM Installation Fails
The Android Studio Installs Intel HAXM when you install Android Studio. But you may get the HAXM Installation Failed message because of the following reasons
- Android emulator is already running
- The processor is not Intel-based
- Unsupported OS
- Hyper-V Manager must be disabled
- Virtualization must be enabled in Bios ( VT-x )
- The PC must support Virtualisation
- Antivirus (Avast) may interfere with HAXM Installation
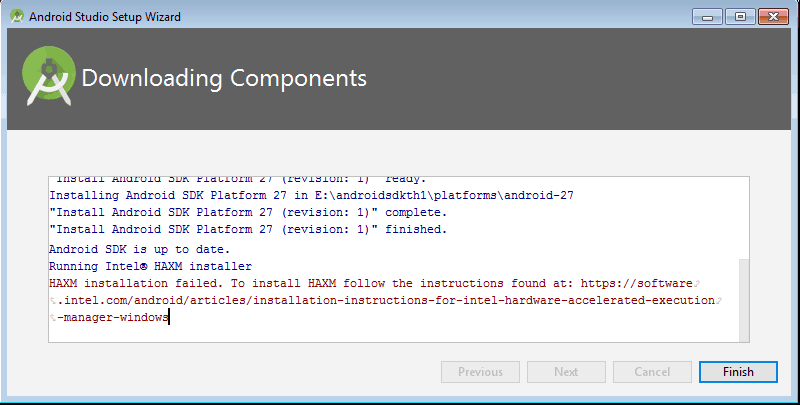
HAXM Installation Failed
Android emulator is already running
You should stop the Android emulator, if it is already running.
You can stop it from the AVD Manager. On the action, column click down-arrow on the right and click Stop. This stops the emulator.
Or you can restart the computer.
The processor is not Intel-based
Intel HAXM cannot be used on systems without an Intel processor. Even if the processor is Intel, it still needs to have the support VT-x, EM64T, and Execute Disable Bit
OS Not supported
- Supported Windows OS is 7, 8, 8.1 & 10.
- Supported macOS is 10.12, 10.13 & 10.14
- Only 64 bit OS is supported.
Disable the Hyper-V Manager
Hyper-V is another Virtualisation technique just like Intel HAXM. You cannot use both at the same time. Hence, It is necessary to Disable Hyper-V. You can follow these steps to disable Hyper-V
- Go to Control Panel -> Programs and Features -> Turn Windows features on or off
- From the window disable Hyper-V options
- Reboot your machine
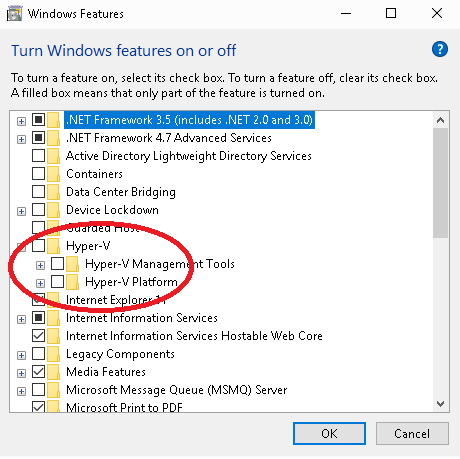
Disabling the HyperV. One of the main reasons for HAXM Installation Failed message
Hyper-V might not be disabled
If you have windows 10 features such as Device Guard and Credential Guard is enabled, it can prevent Hyper-V from being completely disabled.
The Device Guard and Credential Guard hardware readiness tool released by Microsoft can disable the said Windows 10 features along with Hyper-V:
- Download the latest version of the Device Guard and Credential Guard hardware readiness tool.
- Unzip
- Open the Command Prompt using Run as administrator
- Run the following command
- @powershell -ExecutionPolicy RemoteSigned -Command «X:\path\to\dgreadiness_v3.6\DG_Readiness_Tool_v3.6.ps1 -Disable»
- Reboot.
Virtualization is disabled in Bios
If virtualization is disabled in the BIOS, you need to enable it.
Turn off the PC and then turn it On. Press either F2, DEL, F10 ( The key may differ in your PC) key to enter the BIOS at the startup. You will likely to see a message at the startup regarding the key to press to enter the BIOS
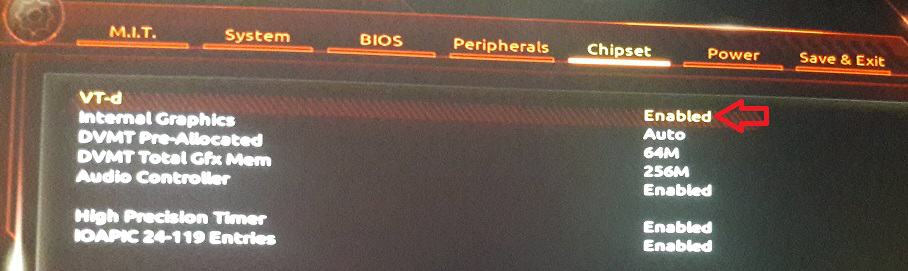
Enabling Virtualisation in Bios
You may see the Virtualisation under any of the following menus.
- Chipset
- Northbridge
- Advanced Chipset Control
- Advanced CPU Configuration
The feature may go by the name
- VT-x
- VT-d (as in the above image)
- Intel Virtualization Technology
- Intel VT
- Virtualization Extensions
- Vanderpool
PC Does not support Virtualisation
Your CPU may not support Virtualisation. You can refer to Does My Processor Support Intel® Virtualization Technology? article to check if your PC Supports Virtualisation
Antivirus interferes with HAXM Installation
The Avast Antivirus interferes with the HAXM installation. It may also slow down the Android Emulator. The workaround is goto Avast Settings > Troubleshooting and uncheck “Use nested virtualization where available” option
How to Install HAXM
There are two ways in which you can install Intel HAXM.
- Using the Android SDK Manager
- Direct Download & Install
Installing from Android SDK Manager
Go to Android SDK Manager (Tools -> SDK Manager) and select SDK Tools. You will find the Intel x86 Emulator Accelerator HAXM installer listed here. Select it and click on OK.
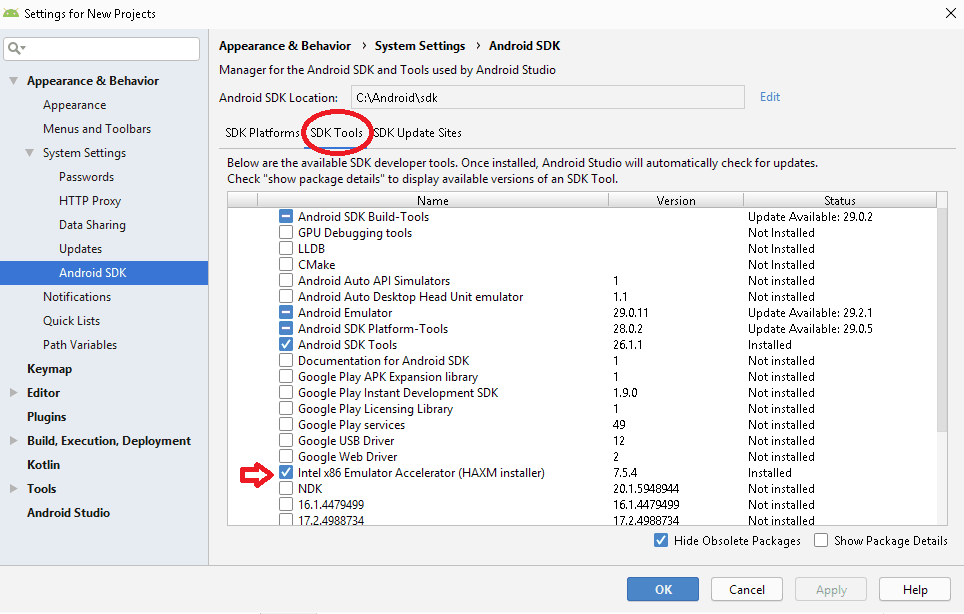
Intel x86 Emulator Accelerator HAXM installer
The clicking OK button does not install the HAXM Always. But it will copy the downloaded files to the under the SDK Location /sdk/extras/intel/Hardware_Accelerated_Execution_Manager/
You can then click on the intelhaxm-android.exe to install as shown below
Direct Download & Install
You can directly download the Installer from the link HAXM Releases
Once you unzip the file, you will find the intelhaxm-android.exe
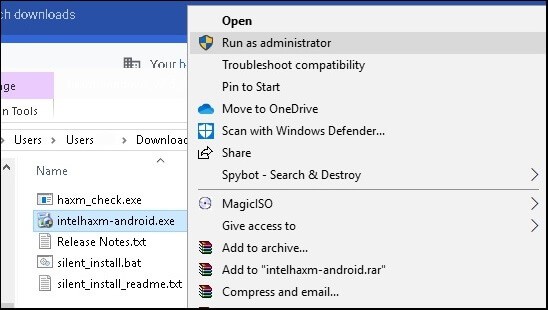
Install Intel HAXM
Welcome to the Intel HAXM setup wizard
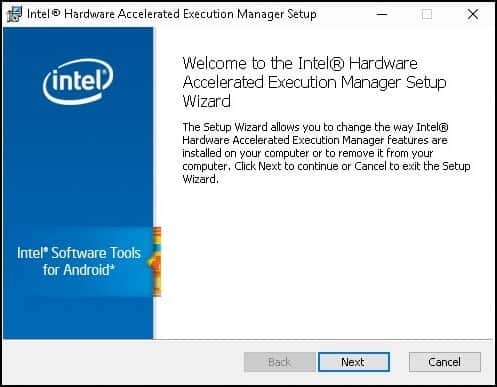 Welcome to HAXM Setup
Click on Next to complete the installation.
Check if Intel HAXM Can be installed
Use the haxm_check.exe to check if VT is supported in your PC

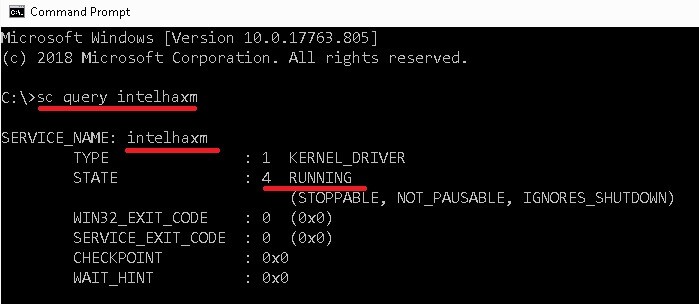
Check if HAXM is installed
Finally, you need to check if HAXM is installed and running. You can do it from the command prompt by using the command
Reference
Summary
Installing Intel HAXM is a must if you want to run Android Emulator in Windows PC. Without which the Android Emulator will run very slowly. It is installed, when Android Studio is installed, but you get the HAXM Installation Failed error message. The most common error is due to the fact that Virtualisation is not enabled on your PC. Or because HyperVisor is running or the processor is not intel based. We learned how to solve all these issues in this guide
42 thoughts on “HAXM Installation Failed. Install Intel HAXM in Windows”
Nothing worked for me, I have tried everything to the letter
->Check if HAXM is installed (works according to CMD)
-> HAXM (manually installed successfully)
-> Installing from Android SDK Manager (it did not allow to install it, so I did it manually)
-> Virtualization is enabled
-> Disable the Hyper-V Manager ready
I DO NOT KNOW WHAT’S HAPPENING
:C
I had the same issue. For me worked to uninstall HAXM in Apps & Features and then install it again directly from Android Studio.
como vc fez pelo Android Studio.
It worked same for me
Also work for me. Thanks
I did as you said and it is working for me, thanks a lot
Great! This worked for me at last.
well thats worked
Thanks it works. Your comment is very helpful!
Wow! Great, it took me a couple of hours but I finally came to install HAMX after Enabling virtualization in BIOS. It’s a matter of patience I almost gave up
What is the issue in here please help
Version: 7.6.5
Output folder: C:\Program Files\Intel\HAXM
Extract: checktool.exe… 100%
Execute: C:\Program Files\Intel\HAXM\checktool.exe –verbose
CPU vendor * GenuineIntel
Intel64 supported * Yes
VMX supported * Yes
VMX enabled – No
EPT supported * Yes
NX supported * Yes
NX enabled * Yes
Hyper-V disabled * Yes
OS version * Windows 10.0.22000
OS architecture * x86_64
Guest unoccupied * Yes. 0 guest(s)
The system requirements are not satisfied.
how do I solve “The system requirements are not satisfied.” when installing intel haxm on windows
Disable Hyper-V
and that’s it :_)
Can you please help me determine which component is causing an issue here? Are the requirements without a * still needing to state “Yes”? Any advice would be greatly appreciated.
Last line states “The system requirements are not satisfied.” with the below log after failing install:
Version: 7.6.5
Output folder: C:\Program Files\Intel\HAXM
Extract: checktool.exe… 100%
Execute: C:\Program Files\Intel\HAXM\checktool.exe –verbose
CPU vendor * GenuineIntel
Intel64 supported * Yes
VMX supported – No
VMX enabled – No
EPT supported – No
NX supported * Yes
NX enabled * Yes
Hyper-V disabled – No
OS version * Windows 10.0.19042
OS architecture * x86_64
Guest unoccupied * Yes. 0 guest(s)
The system requirements are not satisfied.
Ah I think it is the Hyper-V, although the Windows Features for Hyper-V are turned off.
I am having trouble running this script though still:
@powershell -ExecutionPolicy RemoteSigned -Command “X:\path\to\dgreadiness_v3.6\DG_Readiness_Tool_v3.6.ps1 -Disable”
– Is this run as 2 separate commands or all together? And I did replace the “X:\…” with the “C:\…DG_Readiness_Tool_v3.6.ps1 -Disable”
Issue solved, HAXM successfully solved. Thanks!
Ended up just needing to uncheck the Windows Feature “Virtual Machine Platform” as well.
Good luck everyone!
hii, may i know how u solve this problem? I have entered all the commands and also unchecked the “Virtual Machine Platform”, but i still cannot install HAXM.
hii maaf saya juga masih gagal boleh minta tolong kak
Please how did you solve the HAXM issue on android studio
Hi, I also faced the issue and couldn’t solve with any solution in this site as well as few others. I tried to bcdedit command mentioned in www[.]nakivo[.]com/blog/uninstalling-or-disabling-hyper-v-in-windows-10/ and could able to solve the issue. This site gives all the options/way in one place to disble hyper-v
This was an outstanding article. I was off track for a few hours setting up my Android emulator. I followed your steps to the letter and discovered virtualization was turned off in the BIOS. Back on track. Thanks!
Sir I have created a problem here in Failed to install Intel HAXM (package / file) during Android Studio installation complete it.
and manually Intel HAXM install run it then error showing to him the system requirement are not supported them.
How can i solve this problem for Emulator run for Android Studio.
You should be able to install hxam when you fully enable virtualization in your bios ( cpu performance tab ) ..disable hyper visor and windows virtual platform( win 10 and win 11)
No post talks about the windows home edition. In this edition there is no possibility to deactivate Hyper Viewer. Hyper-V does not exist in W10Home.
spanish:Ningun post habla de la edicion “windows home”. En esta edicion no hay posibilidad de desactivar Hyper Visor. Hyper-V no existe en W10Home
Thanks Bro it’s realy works
I appreciate you for this useful content, it helped me solve the issue. Thanks alot
Thank you so much. It really helps me a lot. Thank you.
Thank you so much. I was looking for its solution and it really helps me. Thank you.
I had the most strange situation:
– In Bios, virtualization was enabled
– the intel processor I use virtualization VT-X, but the Intel® Processor Identification Utility was showing the virtualization greyed out as if my computer did not have it at all
– Windows 10 task manager shows Virtualization is available
– Haxm couldn’t be installed
I removed docker, went to Turn Windows Features on or off to uncheck Containers, Hyper-V, rebooted, run the DG_Readiness_Tool_v3.6.ps1 script, but still did not work.
The only thing that could be possibly blocking Virtualization (VT-X) from being found by HAXM installer was the Windows Subsystem for Linux, which I unchecked from Windows features. Now finally I have virtualization support enabled. So the solution in my case was to completely remove WSL from Windows 10.
PS C:\temp\haxm> .\haxm_check.exe
VT support — yes
NX support — yes
I was able to install Intel x86 Emulator Accelerator (HAXM installer) in Android Studio > Android SDK > SDK Tools:
Haxm the system requirements are not satushfied, как исправить?
Всем привет, хотел установить эмулятор андроид в android studio, вылетает ошибка 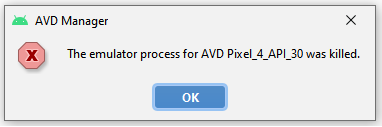
Насколько я понял, проблема в том что у меня в SDK Manager не установлен Intel x86. (haxm). Пытался его установить внутри Android Studio, вылетала ошибка, скачал отдельно установщик. через него так же вылетает ошибка 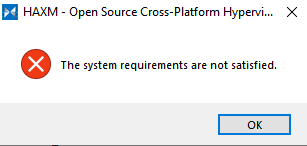
Вот лог:
Output folder: C:\Program Files\Intel\HAXM
Extract: checktool.exe
Execute: C:\Program Files\Intel\HAXM\checktool.exe —verbose
CPU vendor * GenuineIntel
Intel64 supported * Yes
VMX supported — No
VMX enabled — No
EPT supported — No
NX supported * Yes
NX enabled * Yes
Hyper-V disabled — No
OS version * Windows 10.0.19042
OS architecture * x86_64
Guest unoccupied * Yes. 0 guest(s)
Execute: cmd.exe /c type «C:\Users\ВИКТОР\Desktop\haxm_install-20210518_1715.log» > «C:\Users\40B2
1\AppData\Local\Temp\haxm_install-20210518_1715.log»
Delete file: C:\Users\ВИКТОР\Desktop\haxm_install-20210518_1715.log
VMX supported — No, смотрел на моем процессора должно поддерживаться, да и в диспетчера задач написано, что включено 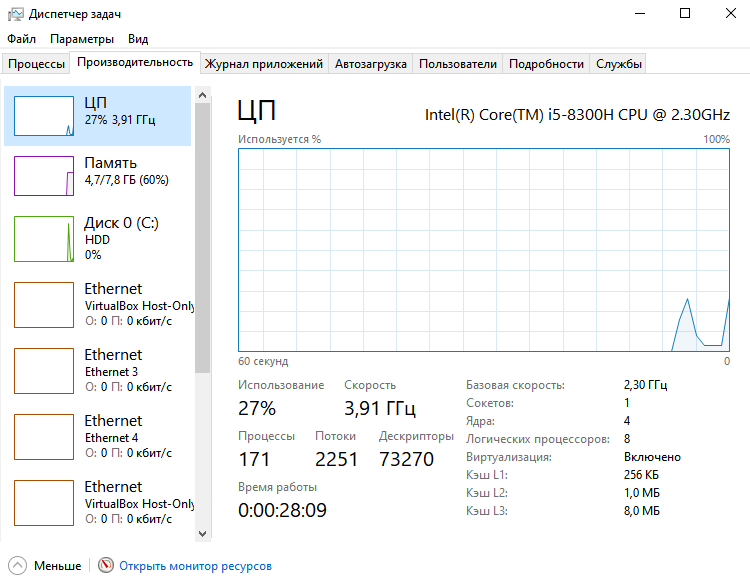
Пробовал отключать антивирус Avast, перезагружал ноутбук и заново устанавливал — не помогло
Saved searches
Use saved searches to filter your results more quickly
You signed in with another tab or window. Reload to refresh your session. You signed out in another tab or window. Reload to refresh your session. You switched accounts on another tab or window. Reload to refresh your session.
intel / haxm Public archive
The system requirements are not satisfied. #407
The system requirements are not satisfied. #407
Comments
Version: 7.7.0
Output folder: C:\Program Files\Intel\HAXM
Extract: checktool.exe. 100%
Execute: C:\Program Files\Intel\HAXM\checktool.exe —verbose
The system requirements are not satisfied.
The text was updated successfully, but these errors were encountered:
Thanks for your report. Could you find the installation log in %TEMP% folder and check your system configuration according to the wiki page?

Essentials
Product Collection
9th Generation Intel® Core™ i7 Processors
Code Name
Products formerly Coffee Lake
Vertical Segment
Mobile
Processor Number
i7-9750H
Launch Date
Q2’19
Lithography
14 nm
Recommended Customer Price
$395.00
CPU Specifications
of Cores
of Threads
Processor Base Frequency
2.60 GHz
Max Turbo Frequency
4.50 GHz
Cache
12 MB Intel® Smart Cache
Bus Speed
8 GT/s
Configurable TDP-down
35 W
Supplemental Information
Embedded Options Available
No
Datasheet
View now
Memory Specifications
Max Memory Size (dependent on memory type)
128 GB
Memory Types
DDR4-2666, LPDDR3-2133
Max # of Memory Channels
2
Max Memory Bandwidth
41.8 GB/s
ECC Memory Supported ‡
No
Processor Graphics
Processor Graphics ‡
Intel® UHD Graphics 630
Graphics Base Frequency
350 MHz
Graphics Max Dynamic Frequency
1.15 GHz
Graphics Video Max Memory
64 GB
Graphics Output
eDP/DP/HDMI/DVI
4K Support
Yes, at 60Hz
Max Resolution (HDMI)‡
4096 x 2304@30Hz
Max Resolution (DP)‡
4096 x 2304@60Hz
Max Resolution (eDP — Integrated Flat Panel)‡
4096 x 2304@60Hz
Max Resolution (VGA)‡
N/A
DirectX* Support
12
OpenGL* Support
4.5
Intel® Quick Sync Video
Yes
Intel® InTru™ 3D Technology
Yes
Intel® Clear Video HD Technology
Yes
Intel® Clear Video Technology
Yes
of Displays Supported ‡
Device ID
0x3E9B
Expansion Options
PCI Express Revision
3.0
PCI Express Configurations ‡
Up to 1×16, 2×8, 1×8+2×4
Max # of PCI Express Lanes
16
Package Specifications
Sockets Supported
FCBGA1440
Max CPU Configuration
1
Package Size
42mm x 28mm
Advanced Technologies
Intel® Optane™ Memory Supported ‡
Yes
Intel® Speed Shift Technology
Yes
Intel® Thermal Velocity Boost
No
Intel® Turbo Boost Technology ‡
2.0
Intel vPro® Platform Eligibility ‡
No
Intel® Hyper-Threading Technology ‡
Yes
Intel® Virtualization Technology (VT-x) ‡
Yes
Intel® Virtualization Technology for Directed I/O (VT-d) ‡
Yes
Intel® VT-x with Extended Page Tables (EPT) ‡
Yes
Intel® Transactional Synchronization Extensions
No
Instruction Set
64-bit
Instruction Set Extensions
Intel® SSE4.1, Intel® SSE4.2, Intel® AVX2