How to configure python kivy for pycharm on windows?
Kivy is an open-source Python library used for creating multi-platform graphical user interfaces. PyCharm is a popular integrated development environment (IDE) for Python programming. The combination of Kivy and PyCharm can provide a powerful tool for GUI development in Python. However, setting up Kivy to work with PyCharm can be a challenge for new users, especially on Windows.
Method 1: Installing Kivy in a Virtual Environment
- Install Python 3.7 or higher on your Windows machine.
- Open the command prompt and install virtualenv by typing pip install virtualenv .
- Create a new virtual environment by typing virtualenv kivyenv .
- Activate the virtual environment by typing kivyenv\Scripts\activate .
- Install the dependencies required for Kivy by typing pip install docutils pygments pypiwin32 kivy.deps.sdl2 kivy.deps.glew .
- Install Kivy by typing pip install kivy .
- Open PyCharm and create a new project.
- In the project interpreter settings, select the option to use a virtual environment.
- Select the virtual environment you just created.
- In the terminal window, activate the virtual environment by typing kivyenv\Scripts\activate .
- Run your Kivy application and enjoy!
This code imports Kivy and creates a simple "Hello World" label. When you run this code, it should display the label on the screen.
By following these steps, you should now be able to configure Python Kivy for PyCharm on Windows using a virtual environment.
Method 2: Adding Kivy to the PyCharm Interpreter
This tutorial will guide you on how to configure Python Kivy for PyCharm on Windows by adding Kivy to the PyCharm Interpreter.
Step 1: Install Python
First, you need to install Python on your Windows machine. You can download the latest version of Python from the official website https://www.python.org/downloads/.
Step 2: Install PyCharm
Next, you need to install PyCharm, the popular Python IDE. You can download the latest version of PyCharm from the official website https://www.jetbrains.com/pycharm/download/.
Step 3: Install Kivy
Now, you need to install Kivy, the Python library for creating user interfaces. You can install Kivy using the following command:
Step 4: Add Kivy to the PyCharm Interpreter
To add Kivy to the PyCharm Interpreter, follow these steps:
Open PyCharm and create a new project.
Go to File > Settings > Project: <project_name> > Project Interpreter.
Click on the "+" button to add a new interpreter.
Select "Existing environment" and click on the ". " button to browse for the Python executable.
Navigate to the Python installation directory and select the "python.exe" file.
Click on the "OK" button to add the interpreter.
Once the interpreter is added, click on the "+" button again to install Kivy.
Type "kivy" in the search box and select the "kivy" package.
Click on the "Install Package" button to install Kivy.
Once Kivy is installed, you can import it in your Python code using the following statement:
Method 3: Configuring the Kivy Path in PyCharm
If you want to use Kivy in PyCharm, you need to configure the Kivy path first. Here's how you can do it:
First, download and install Kivy. You can download the latest version of Kivy from the official website: https://kivy.org/#download
After installing Kivy, open PyCharm and create a new project.
Go to File -> Settings -> Project -> Project Interpreter.
Click on the gear icon and select "Add".
In the "Add Python Interpreter" dialog, select "System Interpreter" and click on "OK".
In the "Project Interpreter" window, click on the gear icon and select "Show All".
Select the interpreter that you just added and click on the "Paths" tab.
Click on the "+" icon and add the path to the Kivy installation directory. For example, if you installed Kivy in "C:\Kivy", add "C:\Kivy\kivy" to the list.
Click on "OK" to save the changes.
Now you can start using Kivy in your PyCharm project. For example, you can create a new Python file and add the following code:
This code will create a simple Kivy application that displays a label with the text "Hello, Kivy!".
That's it! You have successfully configured the Kivy path in PyCharm and created a simple Kivy application.
AlexKorablev.ru
Александр Кораблев о разработке ПО, ИТ-индустрии и Python.
Проект на Kivy. Часть 1. Настройка окружения
Опубликовано 16 May 2016 в Python
Kivy — интересный проект, который позволяет делать кроссплатформенные GUI приложения, включая мобильные. По слухам. Я решил выяснить можно ли использовать его для создания маленьких приложений на питоне. В этой серии статей я попробую поисследовать Kivy на примере клона "конструктора слов" — одного из упражнений для LingvoLeo.
Эта серия — не учебник, а исследовательский лог моих попыток. В результате я планирую получить собранные приложения для трех платформ минимум: Windows, Mac, Android. Будет здорово, если я соберу еще и iOS версию. В качестве основной платформы для разработки я использую Mac. Так что, все инструкции по установке и настройке окружения будут для этой операционной системы.
Установка
Под мак есть два способа поставить Kivy: скачать бандл или установить зависимости из homebrew, а kivy поставить с помощью pip.
Первый способ (быстрый):
Скачать с http://kivy.org/#download Kivy2.7z (использует системный питон 2.7) или Kivy3.7z (включает в себя Python 3.5)
Копируем в приложения
Минус этого способа установки в том, что создается только одно виртуальное окружение на все Kivy проекты. Для маленьких проектов такой способ подойдет, для больших — сомневаюсь. Так что лучше сразу ставить фремворк в свое окружение.
Второй способ (правильный):
Подразумеваю, что вы пользуетесь pyenv и pyenv-virtualenv.
Первым делом ставим зависимости.
Ставим свежий питончик.
Иногда установка падает:
В этом случае поможет:
Как только свежий питон стоит, создаем виртуальное окружение для нашего проекта.
Активируем созданное окружение
Проверим, что все работает. Создадим файлик main.py в папке с проектом с таким содержимым:
Если открылось окно с заголовком WordConstructor, все установилось и работает как надо.
PyCharm
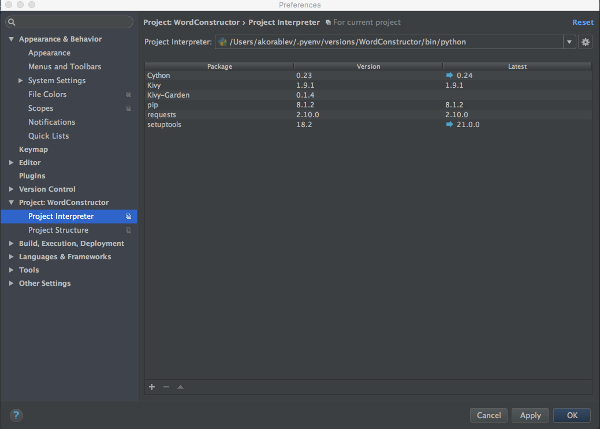
Теперь настроим проект в пайчарме.
В Preferences выбираем Project interpreter соответствующий нашему виртуальному окружению.
Для описания интерфейсов в Kivy используется свой язык Kv Design Language. Неплохо бы добавить для него подсветку синтаксиса и автокомплит.
How To Write Android Apps In Python?

Want to build Android Apps in Python? More than 3 billion devices in this world run on android. That makes it one of the most or probably the most important smartphone OS in the world. Assuming the importance of android, there are a lot of android building tools such as Android Studio, Kotlin, etc.
But ever wondered if android apps can be made in Python as well?
Yes, that is possible and this article is directed towards explaining and demonstrating to the readers how an android app can be written in Python.
The framework for this task will be employed as Kivy and APK packaging will be executed by Buildozer.
Using Kivy To Build Android Apps in Python
Kivy is used to create mobile apps and is usually adopted as the framework in Python. This software is free to use and certified under MIT License. We will start by understanding the installation procedure of Kivy.
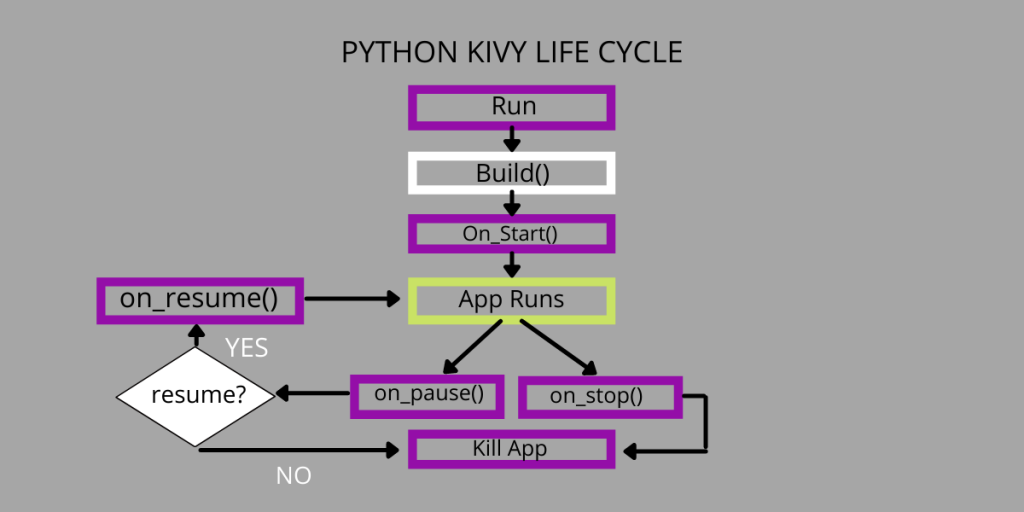
Python Kivy Life Cycle
Setting up and Configuring Kivy
We will be initiating the installation of Kivy in PyCharm for its ease of use.
Note: Linux distribution is required in all the steps below, and at the time of packing the app into android, we would be using Buildozer which is heavily dependent on Linux. If you are on Windows, then you don’t need to worry, you can install a virtual machine to produce a Linux environment, whereas if you are on windows 10 then you can simply download ubuntu distribution directly from the Microsoft store.
Reference to configuring WSL(Windows Subsystem to Linux) – Here
Steps to installation:
- The first step requires setting up Linux distribution for Windows users, Linux users can skip this step.
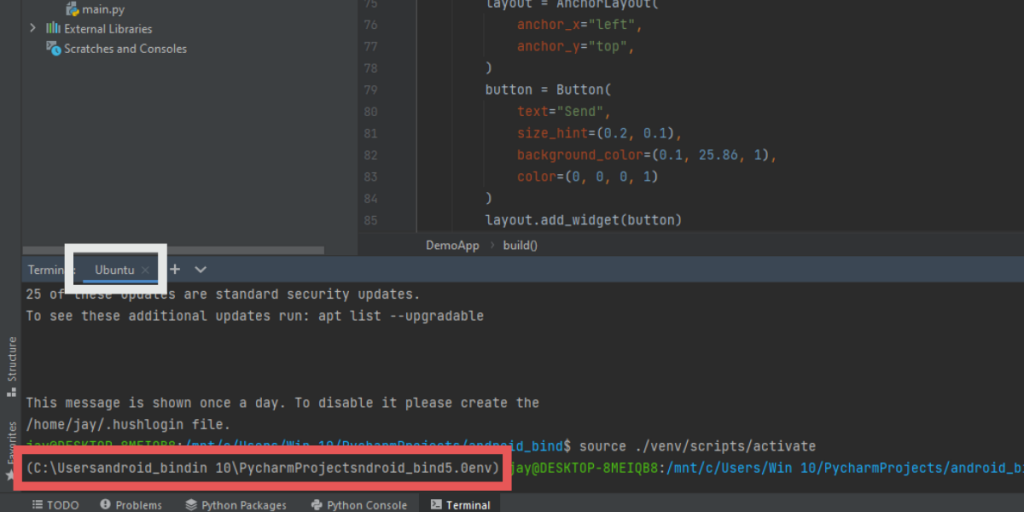
- In the beginning we will start by forming a fresh project in PyCharm, then go to PyCharm terminal (for windows users, choose Ubuntu instead of ‘local’ in the terminal drop down).
- We will have to set up a virtual environment. A virtual environment is a collection of Python directories that store all the required libraries and scripts in one place. If a virtual environment is already active, we will deactivate it and create a new one where Kivy can be installed. To deactivate type ‘deactivate’ in the terminal. Then type:
Installation of virtualenv will be initiated by the above command, then:
The above command will form a virtual environment for your project, ‘venv’ is the name we gave for this virtualenv but you can use any name that is suitable.
- Now we need to activate this virtualenv for our project. Once activated, whatever library we install, it will get activated for this project.
For windows type:
In windows, the script directory is present inside the virtualenv directory.
If everything is executed in the way described above, the virtual environment will get activated and the path location of your virtualenv will appear in closed brackets. In the image below, the red highlight shows the path location of venv after it has been activated.
Virtual environment
Couldn’t get your virtual environment set up? Check the references section for further guidance.
Once everything is set up, type the command
To check if successfully installed, enter the command python and press enter
Inside python, type ‘import kivy’. If the terminal throws no errors, that means kivy is successfully installed
After the installation is completed, we will be understanding the fundamentals of Kivy and the different ways through which it will be implemented in Python. Below is a rudimentary python program that produces the string stored in the variable ‘text’ and shows it in a new dialog box.
Import packages: kivy.app import App, kivy.uix.label import Label
TrialApp = It is the name of the class.
text = variable
demo=object created
def build(self): It is a method inside which widgets will be called
label: text displaying widget
Understanding Widgets
Widgets are simply selections, that initiate a response when a specific event is fired in (like when the user gives a click/keystroke input). It allows the users to get the specific task done without the need to type lots of code or event-specific commands each time. There are numerous widgets in Kivy to use such as labels, text boxes, buttons, etc.
Mainly two types of widgets are there:
Property event widgets: Fires up a response when an alteration in the characteristics of the widget takes place such as a modification in scale, outline, color.
Widget defined event: Fires up a response when a modification in widget takes place, such as writing something in a textbox and getting output for it.
Understanding layouts of Kivy
Grid layout
The grid layout allows you to form a matrix and place your widgets in a table-like structure adding rows and columns into it. The placement of widgets can be done specifically in rows and columns through this layout.
The program below demonstrates how a grid layout is implemented to add widgets.
Anchor Layout:
Anchor layout lets you place or ‘anchor’ your widgets at either 4 corners or in the center of the output screen. It can be set using anchor_x and anchor_y codes.
Float layout
This layout lets us place our widgets wherever we want to. Unlike grid layout which required rows and columns or anchor layout which only lets us place widgets at corners or center, with float layout we can place widgets at whichever position we want. Though by default all widgets are placed at the bottom left corner in this layout, and proper x,y values must be given to properly adjust all widgets.
Page Layout
This layout is a little different from the other layouts we have discussed so far. This layout lets us create different pages and place multiple widgets on different pages, and also lets the user slide through the pages. The size or other properties of the page cannot be altered in this layout.
Creating an app
As we have covered the basics of Kivy and discussed the widely used layouts and widgets present. Now we will be looking at how we can create a standalone app that can run on android phones. In the example below, we will be creating a search engine that takes user input and uses google API to output results.
Note: The API used here is a user-specific API and is no more functional. To get a functional API, click here
Packaging the app
Once your code is complete, the last step is to bundle the application and package it into an Android APK. To do that, we would be employing Buildozer.
Buildozer is a Linux-based application packaging software that bundles your app into an Android package (APK) or IOS-based application. We cannot run Buildozer in windows and it only works in Linux machines and Mac OS machines.
To install Buildozer, you need to follow the steps mentioned in Buildozer’s official Documentation.
Once installation is completed, packaging can be done in two ways:
- If you are on a mac/Linux machine, you can follow the steps mentioned in official documentation to target the package and build the app.
- If you are on a windows machine, then running building process in virtual machine or linux distribution would throw multiple errors in between. To overcome this situation, you can use google Collab. It is a shared linux server that does the job for you.
Few things to note:
- File name where source code is written should be renamed to ‘main.py’, and any other file with the same name should be removed.
- The command ‘buildozer init’ creates a gradle file which consists all the necessary app building data in it. You need to fill in: title, package.name, package.domain lines with your own details.
- The command ‘buildozer -v android debug’ starts the process of building the application. It’s a lengthy process that takes 17-20 minutes, where in between you need to give permissions by typing ‘y’ and pressing enter.
- After the building process is completed, the app will be created in the ‘lib’ folder.
Conclusion
We have learned in this article how android apps can be written in Python. We got to learn about the rudimentary fundamentals of Kivy – about different layouts and widgets, setting up WSL on windows, and packaging of our application with Buildozer. Hope this article helpd you.
How to configure Python Kivy for PyCharm on Windows?
I’m having trouble getting Kivy to work with PyCharm on Windows 7. I’ve managed to add most of the external libraries through File > Settings > Python interpreters > Paths Tab.
I’m using the Kivy version of Python. When I run a Kivy app that works fine with using the [right click > send to > kivy.bat] method in PyCharm, it gives me this error:
I think that the problem might be something to do with cython, as my file fails to recognise the kivy.properties file, which is of the Cython *.pxd format.
![]()
7 Answers 7
Install and open PyCharm
- If you already had it installed and have a project open, click File -> Settings (Ctrl + Alt + S) . (If not, create a new project, and click the ‘ . ‘ (or
 ) next to interpreter, and skip step 2)
 - Under Project Settings, click Project Interpreter -> Python Interpreters
- Click the little green + and select local (You can also set up an interpreter to your installed python from this list)
- Point it to ..\Kivy\Python\python.exe and click ok (my path was c:\Program files (x86)\Kivy\Python\python.exe since that is where I unzipped the kivy zip file to)
I have also attached a settings.jar file. This is the kv language definition. It is not complete, but it helps a lot. Click File->Import and select the settings.jar file. Only FileTypes will be ticked. Import this and you will have » kv language file » definition under File->Settings-IDE Settings->File Types
Open a kv file to see the differentiation in colours, as well as autocomplete
- Widgets are type 1
- Properties are type 2
- all events (on_something) are type 3
- type 4 is just self and root.
That is all for PyCharm, the rest is Windows 7 specific
- open a command prompt and browse to your ..\Kivy\Python\lib folder
- type mklink /D kivy «..\Kivy\kivy\kivy» (my line was mklink /D kivy «c:\Program files (x86)\Kivy\kivy\kivy» ) This will set up a symlink so that your all your kivy python files are read and their definitions are included, in order to get autocomplete
Now we need to set up the environment variables. You could do this per project inside PyCharm, but might as well do it in windows, so you only need to select the python interpreter each time.
Click start and type envir Select the second one. (System variables) (You could also get here with Win+PauseBreak -> Click Advanced system settings ) Click Environment variables
Now add these (once again, just point to wherever you have your kivy folder. You can also find all these in the kivy.bat file, just find and replace the variables with your path)
Restart your machine. (For the environment variables to load)
Now when you open your kivy project, just select the Kivy interpreter you set up earlier, and bobs your uncle.