OpenSSH Server
OpenSSH is a powerful collection of tools for the remote control of, and transfer of data between, networked computers. You will also learn about some of the configuration settings possible with the OpenSSH server application and how to change them on your Ubuntu system.
OpenSSH is a freely available version of the Secure Shell (SSH) protocol family of tools for remotely controlling, or transferring files between, computers. Traditional tools used to accomplish these functions, such as telnet or rcp, are insecure and transmit the user’s password in cleartext when used. OpenSSH provides a server daemon and client tools to facilitate secure, encrypted remote control and file transfer operations, effectively replacing the legacy tools.
The OpenSSH server component, sshd, listens continuously for client connections from any of the client tools. When a connection request occurs, sshd sets up the correct connection depending on the type of client tool connecting. For example, if the remote computer is connecting with the ssh client application, the OpenSSH server sets up a remote control session after authentication. If a remote user connects to an OpenSSH server with scp, the OpenSSH server daemon initiates a secure copy of files between the server and client after authentication. OpenSSH can use many authentication methods, including plain password, public key, and Kerberos tickets.
Installation
Installation of the OpenSSH client and server applications is simple. To install the OpenSSH client applications on your Ubuntu system, use this command at a terminal prompt:
To install the OpenSSH server application, and related support files, use this command at a terminal prompt:
Configuration
You may configure the default behavior of the OpenSSH server application, sshd, by editing the file /etc/ssh/sshd_config . For information about the configuration directives used in this file, you may view the appropriate manual page with the following command, issued at a terminal prompt:
There are many directives in the sshd configuration file controlling such things as communication settings, and authentication modes. The following are examples of configuration directives that can be changed by editing the /etc/ssh/sshd_config file.
Tip
Prior to editing the configuration file, you should make a copy of the original file and protect it from writing so you will have the original settings as a reference and to reuse as necessary.
Copy the /etc/ssh/sshd_config file and protect it from writing with the following commands, issued at a terminal prompt:
Furthermore since losing an ssh server might mean losing your way to reach a server, check the configuration after changing it and before restarting the server:
The following is an example of a configuration directive you may change:
- To make your OpenSSH server display the contents of the /etc/issue.net file as a pre-login banner, simply add or modify this line in the /etc/ssh/sshd_config file:
After making changes to the /etc/ssh/sshd_config file, save the file, and restart the sshd server application to effect the changes using the following command at a terminal prompt:
Warning
Many other configuration directives for sshd are available to change the server application’s behavior to fit your needs. Be advised, however, if your only method of access to a server is ssh, and you make a mistake in configuring sshd via the /etc/ssh/sshd_config file, you may find you are locked out of the server upon restarting it. Additionally, if an incorrect configuration directive is supplied, the sshd server may refuse to start, so be extra careful when editing this file on a remote server.
SSH Keys
SSH allow authentication between two hosts without the need of a password. SSH key authentication uses a private key and a public key.
To generate the keys, from a terminal prompt enter:
This will generate the keys using the RSA Algorithm. At the time of this writing, the generated keys will have 3072 bits. You can modify the number of bits by using the -b option. For example, to generate keys with 4096 bits, you can do:
During the process you will be prompted for a password. Simply hit Enter when prompted to create the key.
By default the public key is saved in the file
/.ssh/id_rsa is the private key. Now copy the id_rsa.pub file to the remote host and append it to
/.ssh/authorized_keys by entering:
Finally, double check the permissions on the authorized_keys file, only the authenticated user should have read and write permissions. If the permissions are not correct change them by:
You should now be able to SSH to the host without being prompted for a password.
Import keys from public keyservers
These days many users have already ssh keys registered with services like launchpad or github. Those can be easily imported with:
The prefix lp: is implied and means fetching from launchpad, the alternative gh: will make the tool fetch from github instead.
Two factor authentication with U2F/FIDO
OpenSSH 8.2 added support for U2F/FIDO hardware authentication devices. These devices are used to provide an extra layer of security on top of the existing key-based authentication, as the hardware token needs to be present to finish the authentication.
It’s very simple to use and setup. The only extra step is generate a new keypair that can be used with the hardware device. For that, there are two key types that can be used: ecdsa-sk and ed25519-sk . The former has broader hardware support, while the latter might need a more recent device.
Once the keypair is generated, it can be used as you would normally use any other type of key in openssh. The only requirement is that in order to use the private key, the U2F device has to be present on the host.
For example, plug the U2F device in and generate a keypair to use with it:
Now just transfer the public part to the server to
/.ssh/authorized_keys and you are ready to go:
FIDO2 resident keys
FIDO2 private keys consist of two parts: a “key handle” part stored in the private key file on disk, and a per-device key that is unique to each FIDO2 token and that cannot be exported from the token hardware. These are combined by the hardware at authentication time to derive the real key that is used to sign authentication challenges.
For tokens that are required to move between computers, it can be cumbersome to have to move the private key file first. To avoid this, tokens implementing the newer FIDO2 standard support resident keys, where it is possible to retrieve the key handle part of the key from the hardware.
Using resident keys increases the likelihood of an attacker being able to use a stolen token device. For this reason, tokens normally enforce PIN authentication before allowing download of keys, and users should set a PIN on their tokens before creating any resident keys. This is done via the hardware token management software.
OpenSSH allows resident keys to be generated using the ssh-keygen -O resident flag at key generation time:
This will produce a public/private key pair as usual, but it will be possible to retrieve the private key part (the key handle) from the token later. This is done by running:
It will use the part after ssh: from the application parameter from before as part of the key filenames:
If you set a passphrase when extracting the keys from the hardware token, and later use these keys, you will be prompted for both the key passphrase, and the hardware key PIN, and you will also have to touch the token:
It is also possible to download and add resident keys directly to ssh-agent by running
In this case no file is written, and the public key can be printed by running ssh-add -L .
NOTE
If you used the -O verify-required option when generating the keys, or if that option is set on the SSH server via /etc/ssh/sshd_config ‘s PubkeyAuthOptions verify-required , then using the agent currently in Ubuntu 22.04 LTS won’t work.
Two factor authentication with TOTP/HOTP
For the best two factor authentication (2FA) security, we recommend using hardware authentication devices that support U2F/FIDO. See the previous section for details. However, if this is not possible or practical to implement in your case, TOTP/HOTP based 2FA is an improvement over no two factor at all. Smartphone apps to support this type of 2FA are common, such as Google Authenticator.
Background
The configuration presented here makes public key authentication the first factor, the TOTP/HOTP code the second factor, and makes password authentication unavailable. Apart from the usual setup steps required for public key authentication, all configuration and setup takes place on the server. No changes are required at the client end; the 2FA prompt appears in place of the password prompt.
The two supported methods are HOTP and TOTP. Generally, TOTP is preferable if the 2FA device supports it.
HOTP is based on a sequence predictable only to those who share a secret. The user must take an action to cause the client to generate the next code in the sequence, and this response is sent to the server. The server also generates the next code, and if it matches the one supplied by the user, then the user has proven to the server that they share the secret. A downside of this approach is that if the user generates codes without the server following along, such as in the case of a typo, then the sequence generators can fall “out of sync”. Servers compensate by allowing a gap in the sequence and considering a few subsequent codes to also be valid; if this mechanism is used, then the server “skips ahead” to sync back up. But to remain secure, this can only go so far before the server must refuse. When HOTP falls out of sync like this, it must be reset using some out of band method, such as authenticating using a second backup key in order to reset the secret for the first one.
TOTP avoids this downside of HOTP by using the current timezone independent date and time to determine the appropriate position in the sequence. However, this results in additional requirements and a different failure mode. Both devices must have the ability to tell the time, which is not practical for a USB 2FA token with no battery, for example. And both the server and client must agree on the correct time. If their clocks are skewed, then they will disagree on their current position in the sequence. Servers compensate for clock skew by allowing a few codes either side to also be valid. But like HOTP, they can only go so far before the server must refuse. One advantage of TOTP over HOTP is that correcting for this condition involves ensuring the clocks are correct at both ends; an out-of-band authentication to reset unfortunate users’ secrets is not required. When using a modern smartphone app, for example, the requirement to keep the clock correct isn’t usually a problem since this is typically done automatically at both ends by default.
Note
It is not recommended to configure U2F/FIDO at the same time as TOTP/HOTP. This combination has not been tested, and using the configuration presented here, TOTP/HOTP would become mandatory for everyone, whether or not they are also using U2F/FIDO.
Install software
From a terminal prompt, install the google-authenticator PAM module:
Note
The libpam-google-authenticator package is in Ubuntu’s universe archive component, which receives best-effort community support only.
Configure users
Since public key authentication with TOTP/HOTP 2FA is about to be configured to be mandatory for users, each user who wishes to continue using ssh must first set up public key authentication and then configure their 2FA keys by running the user setup tool. If this isn’t done first, users will not be able to do it later over ssh, since at that point they won’t have public key authentication and/or 2FA configured to authenticate with.
Configure users’ key-based authentication
To set up key-based authentication, see “SSH Keys” above. Once this is done, it can be tested independently of subsequent 2FA configuration. At this stage, user authentication should work with keys only, requiring the supply of the private key passphrase only if it was configured. If configured correctly, the user should not be prompted for their password.
Configure users’ TOTP/HOTP 2FA secrets
Each user needs to run the setup tool to configure 2FA. This will ask some questions, generate a key, and display a QR code for the user to import the secret into their smartphone app, such as the Google Authenticator app on Android. The tool creates the file
/.google-authenticator , which contains a shared secret, emergency passcodes and per-user configuration.
As a user that needs 2FA configured, from a terminal prompt run the following command:
Follow the prompts, scanning the QR code into your 2FA app as directed.
It’s important to plan for the eventuality that the 2FA device gets lost or damaged. Will this lock the user out of their account? In mitigation, it’s worth each user considering doing one or more of the following:
- Use the 2FA device’s backup or cloud sync facility if it has one.
- Write down the backup codes printed by the setup tool.
- Take a photo of the QR code.
- (TOTP only) Scan the QR code on multiple 2FA devices. This only works for TOTP, since multiple HOTP 2FA devices will not be able to stay in sync.
- Ensure that the user has a different authentication path to be able to rerun the setup tool if required.
Of course, any of these backup steps also negate any benefit of 2FA should someone else get access to the backup, so the steps taken to protect any backup should be considered carefully.
Configure the ssh server
Once all users are configured, configure sshd itself by editing /etc/ssh/sshd_config . Depending on your installation, some of these settings may be configured already, but not necessarily with the values required for this configuration. Check for and adjust existing occurences of these configuration directives, or add new ones, as required:
Note
On Ubuntu 20.04 “Focal Fossa” and earlier, use ChallengeResponseAuthentication yes instead of KbdInteractiveAUthentication yes .
Restart the ssh service to pick up configuration changes:
Edit /etc/pam.d/sshd and replace the line:
Changes to PAM configuration have immediate effect, and no separate reloading command is required.
Log in using 2FA
Now when you log in using ssh, in addition to the normal public key authentication, you will be prompted for your TOTP or HOTP code:
Special cases
On Ubuntu, the following settings are default in /etc/ssh/sshd_config , but if you have overridden them, note that they are required for this configuration to work correctly and must be restored as follows:
Remember to run sudo systemctl try-reload-or-restart ssh for any changes make to sshd configuration to take effect.
Настройка SSH в Ubuntu

Технология SSH (Secure Shell) позволяет проводить безопасное удаленное управление компьютером через защищенное соединение. SSH производит шифровку всех передаваемых файлов, включая пароли, а также передает совершенно любой сетевой протокол. Для корректной работы инструмента его необходимо не только установить, но еще и настроить. Именно о произведении главной конфигурации мы и хотели бы поговорить в рамках данной статьи, взяв за пример последнюю версию операционной системы Ubuntu, на которой будет располагаться сервер.
Настраиваем SSH в Ubuntu
Если вы еще не выполнили инсталляцию на серверный и клиентский ПК, следует это сделать первоначально, благо осуществляется вся процедура достаточно просто и не займет много времени. С детальным руководством по этой теме знакомьтесь в другой нашей статье по следующей ссылке. В ней также показана процедура редактирования файла конфигурации и тестирование работы SSH, поэтому сегодня мы остановимся немного на других задачах.
Создание пары ключей RSA
В только что установленном SSH еще нет заданных ключей для осуществления подключения от сервера к клиенту и наоборот. Все эти параметры необходимо задать вручную сразу же после добавления всех компонентов протокола. Пара ключей работает с помощью алгоритма RSA (сокращение от фамилий разработчиков Rivest, Shamir и Adleman). Благодаря этой криптосистеме через специальные алгоритмы производится шифрование ключей. Для создания пары открытых ключей вам нужно лишь ввести соответствующие команды в консоль и следовать появившимся инструкциям.
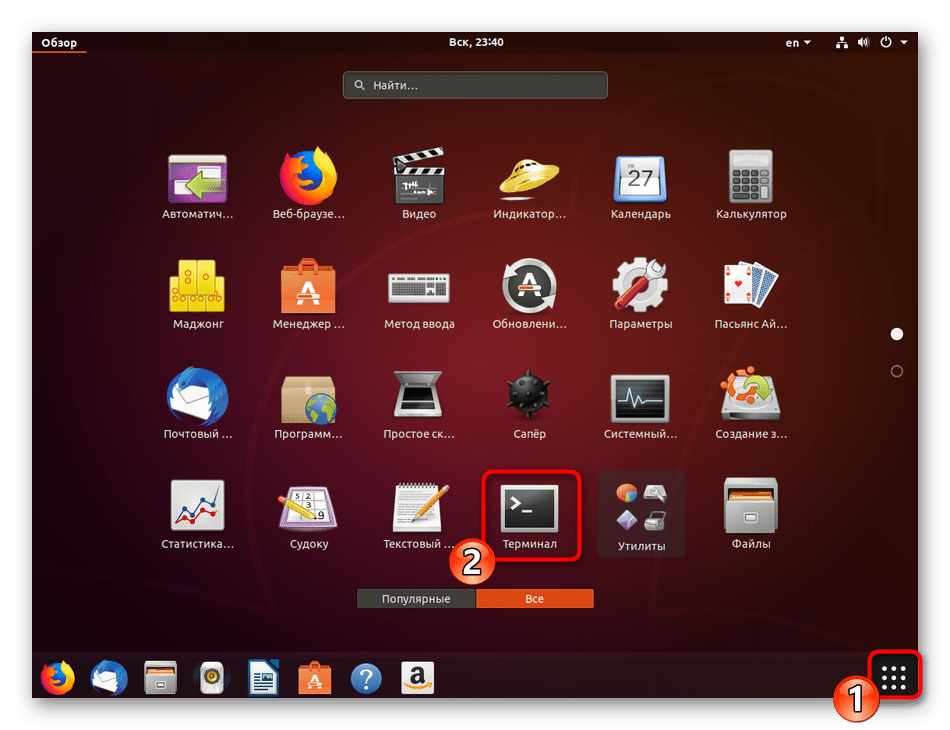
- Перейдите к работе с «Терминалом» любым удобным методом, например, открыв его через меню или комбинацию клавиш Ctrl + Alt + T.
- Введите команду ssh-keygen , а затем нажмите на клавишу Enter.
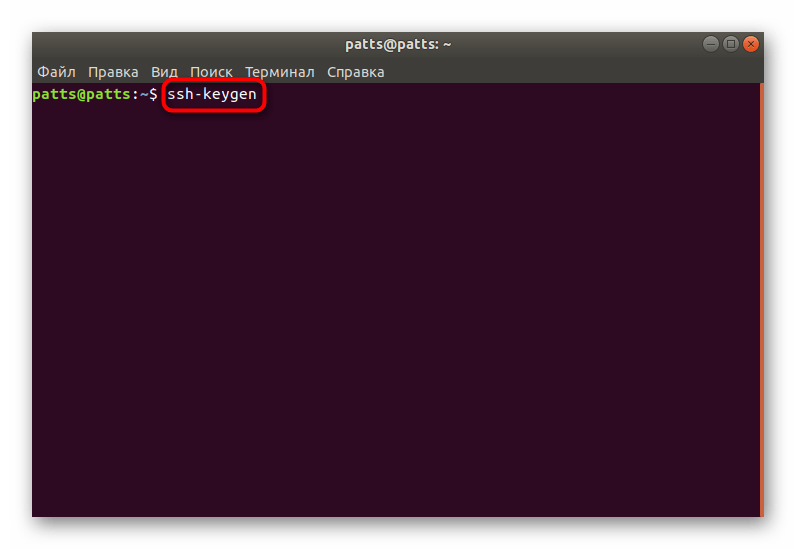
Теперь имеется созданная пара ключей — секретный и открытый, которые будут использоваться для дальнейшего подключения между компьютерами. Нужно лишь поместить ключ на сервер, чтобы аутентификация SSH проходила успешно.
Копирование открытого ключа на сервер
Существует три метода копирования ключей. Каждый из них будет наиболее оптимален в различных ситуациях, когда, например, один из способов не работает или не подходит для определенного пользователя. Мы предлагаем рассмотреть все три варианта, начав с самого простого и действенного.
Вариант 1: Команда ssh-copy-id
Команда ssh-copy-id встроена в операционную систему, поэтому для ее выполнения не нужно устанавливать никаких дополнительных компонентов. Соблюдайте простой синтаксис, чтобы скопировать ключ. В «Терминале» необходимо ввести ssh-copy-id username@remote_host , где username@remote_host — имя удаленного компьютера.
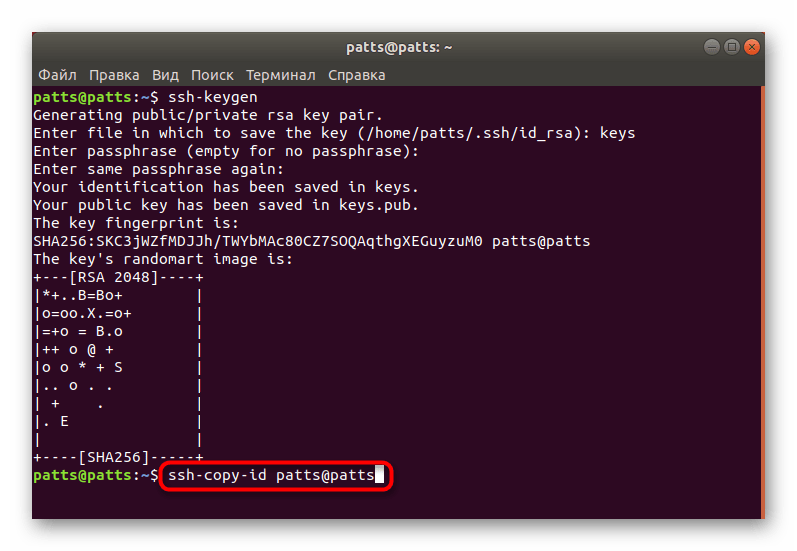
При первом подключении вы получите уведомление текстом:
The authenticity of host ‘203.0.113.1 (203.0.113.1)’ can’t be established.
ECDSA key fingerprint is fd:fd:d4:f9:77:fe:73:84:e1:55:00:ad:d6:6d:22:fe.
Are you sure you want to continue connecting (yes/no)? yes
Надо указать вариант yes для продолжения соединения. После этого утилита самостоятельно займется поиском ключа в виде файла id_rsa.pub , который был создан ранее. При успешном обнаружении отобразится такой результат:
/usr/bin/ssh-copy-id: INFO: attempting to log in with the new key(s), to filter out any that are already installed
/usr/bin/ssh-copy-id: INFO: 1 key(s) remain to be installed — if you are prompted now it is to install the new keys
username@203.0.113.1’s password:
Укажите пароль от удаленного хоста, чтобы утилита смогла войти в него. Инструмент будет копировать данные из файла публичного ключа
/.ssh/id_rsa.pub, а после этого на экране появится сообщение:
Number of key(s) added: 1
Now try logging into the machine, with: «ssh ‘username@203.0.113.1′»
and check to make sure that only the key(s) you wanted were added.
Появление такого текста означает, что ключ был успешно загружен на удаленный компьютер, и теперь не возникнет никаких проблем с соединением.
Вариант 2: Копирование открытого ключа через SSH
Если у вас не получается воспользоваться упомянутой выше утилитой, но имеется пароль для входа на удаленный сервер SSH, можете загрузить свой пользовательский ключ вручную, тем самым обеспечив дальнейшую стабильную аутентификацию при соединении. Используется для этого команда cat, которая прочитает данные из файла, а потом они будут отправлены на сервер. В консоли потребуется ввести строку
/.ssh/id_rsa.pub | ssh username@remote_host «mkdir -p
/.ssh/authorized_keys && chmod -R go=
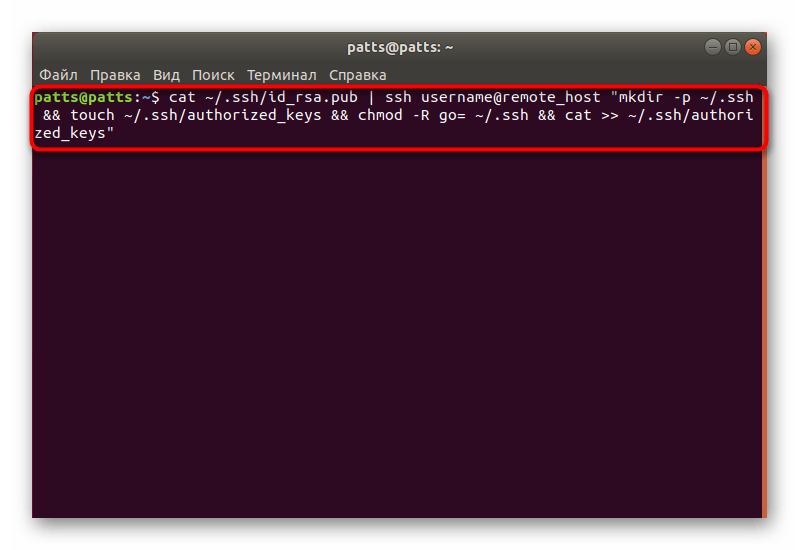
При появлении сообщения
The authenticity of host ‘203.0.113.1 (203.0.113.1)’ can’t be established.
ECDSA key fingerprint is fd:fd:d4:f9:77:fe:73:84:e1:55:00:ad:d6:6d:22:fe.
Are you sure you want to continue connecting (yes/no)? yes
продолжите подключение и введите пароль для входа на сервер. После этого открытый ключ будет автоматически скопирован в конец файла конфигурации authorized_keys.
Вариант 3: Ручное копирование открытого ключа
В случае отсутствия доступа к удаленному компьютеру через SSH-сервер, все описанные выше действия выполняются вручную. Для этого сначала узнается информация о ключе на серверном ПК через команду cat
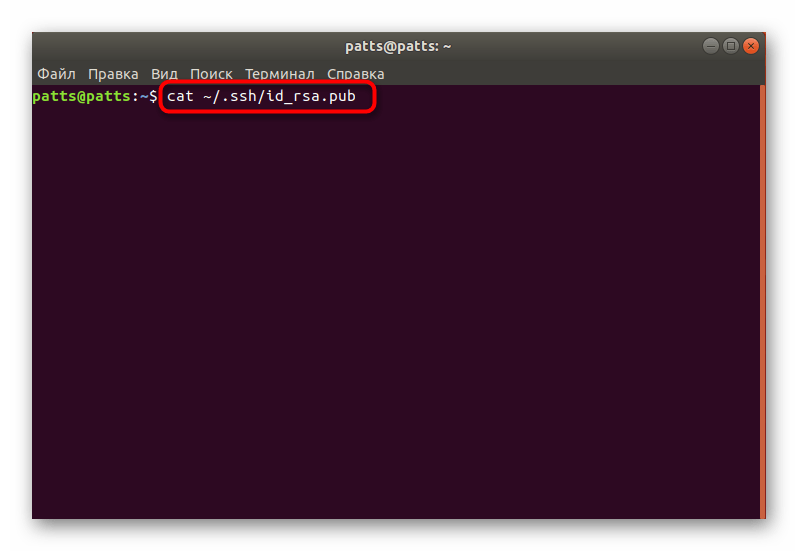
На экране будет отображена примерно такая строка: ssh-rsa + ключ в виде набора символов== demo@test . После этого перейдите к работе на удаленное устройство, где создайте новую директорию через mkdir -p
/.ssh . В ней дополнительно создается файл authorized_keys . Далее вставьте туда ключ, который вы узнали ранее через echo + строка публичного ключа >>
/.ssh/authorized_keys . После этого можно пробовать проводить аутентификацию с сервером без использования паролей.
Аутентификация на сервере через созданный ключ
В предыдущем разделе вы узнали о трех методах копирования ключа удаленного компьютера на сервер. Такие действия позволят подключиться без использования пароля. Выполняется эта процедура через командную строку путем ввода shh ssh username@remote_host , где username@remote_host — имя пользователя и хост нужного компьютера. При первом подключении вы будете уведомлены о незнакомом соединении и можете продолжить, выбрав вариант yes.
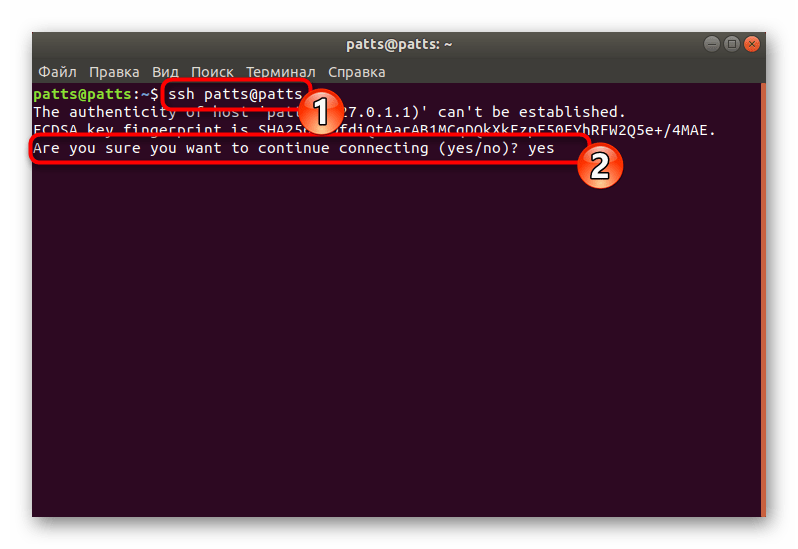
Подключение произойдет автоматически, если во время создания пары ключей не была задана ключевая фраза (passphrase). В противном случае сначала придется ввести ее, чтобы продолжить работу с SSH.
Отключение аутентификации по паролю
Успешной настройка копирования ключей считается в той ситуации, когда удается войти на сервер без использования пароля. Однако возможность аутентификации таким образом позволяет злоумышленникам использовать инструменты для подбора пароля и взламывать защищенное соединение. Обезопасить себя от таких случаев позволит полноценное отключение входа по паролю в конфигурационном файле SSH. Для этого потребуется:
- В «Терминале» откройте конфигурационный файл через редактор с помощью команды sudo gedit /etc/ssh/sshd_config .
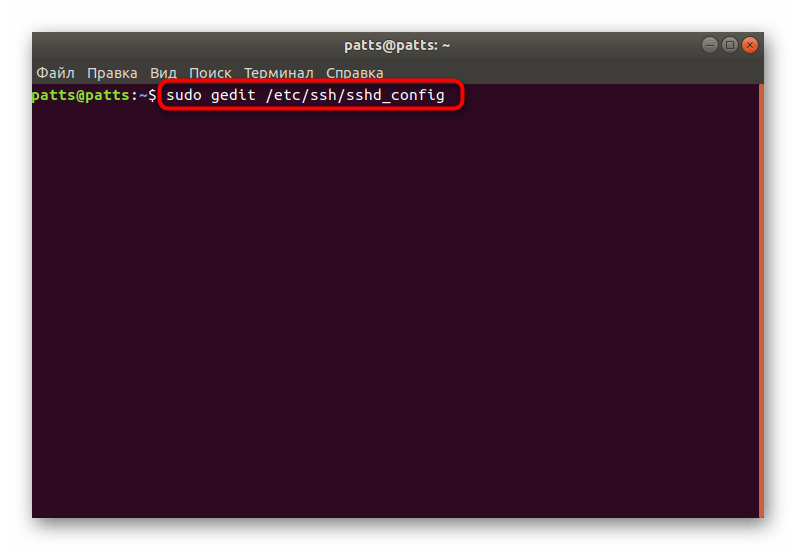
- Найдите строку «PasswordAuthentication» и уберите знак # в начале, чтобы раскомментировать параметр.
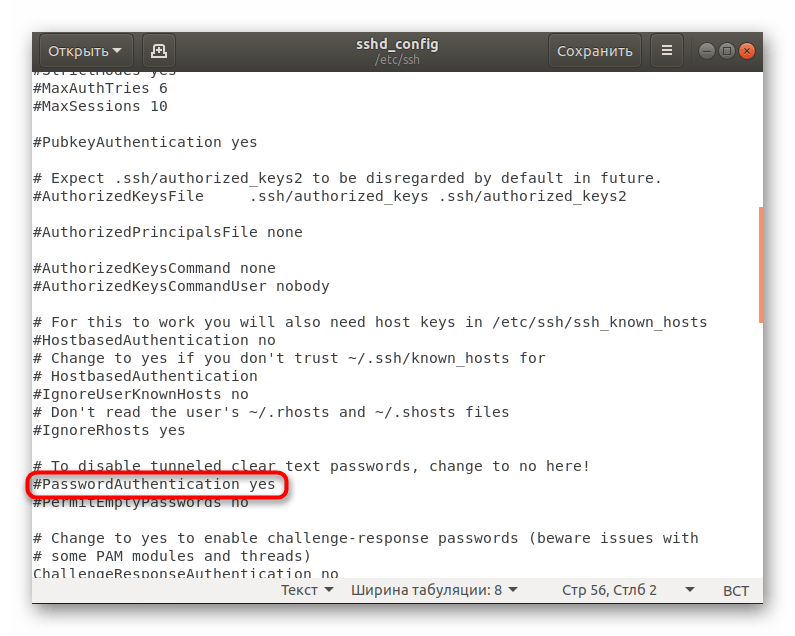
- Измените значение на no и сохраните текущую конфигурацию.
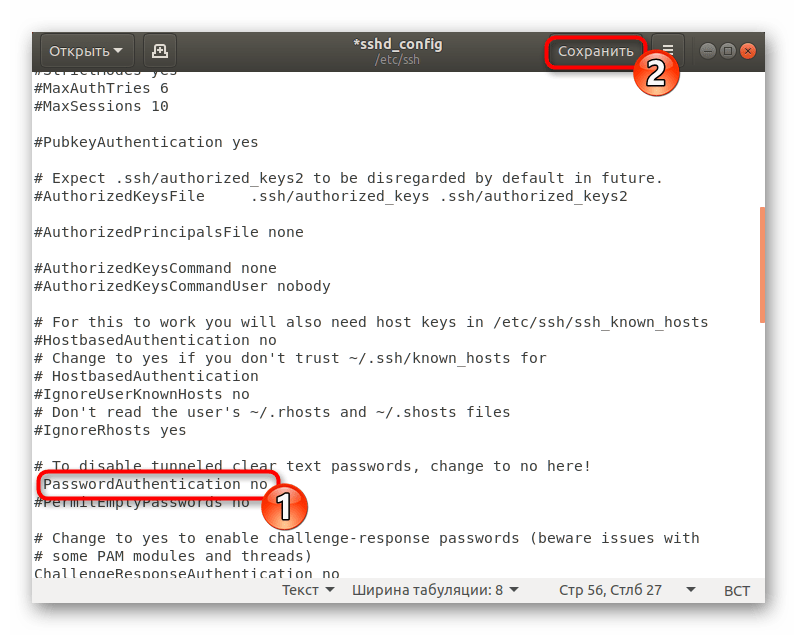
- Закройте редактор и перезапустите сервер sudo systemctl restart ssh .
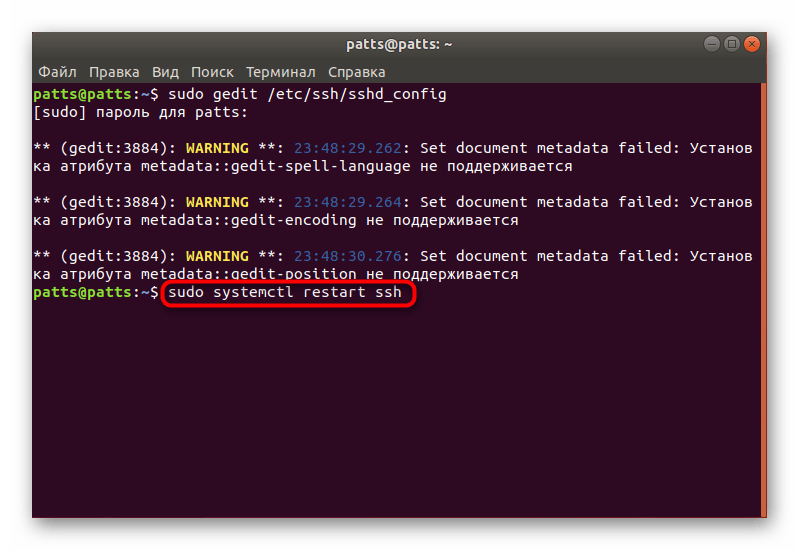
Аутентификация по паролю отключится, и войти на сервер можно будет только с использованием специально созданных для этого ключей с алгоритмом RSA.
Настройка стандартного firewall
В Убунту сетевой защитой по умолчанию выступает фаервол Uncomplicated Firewall (UFW). Он позволяет разрешать соединения для избранных сервисов. Каждое приложение создает свой профиль в этом инструменте, а UFW управляет ими, разрешая или запрещая подключения. Настройка профиля SSH путем добавления его в список осуществляется так:
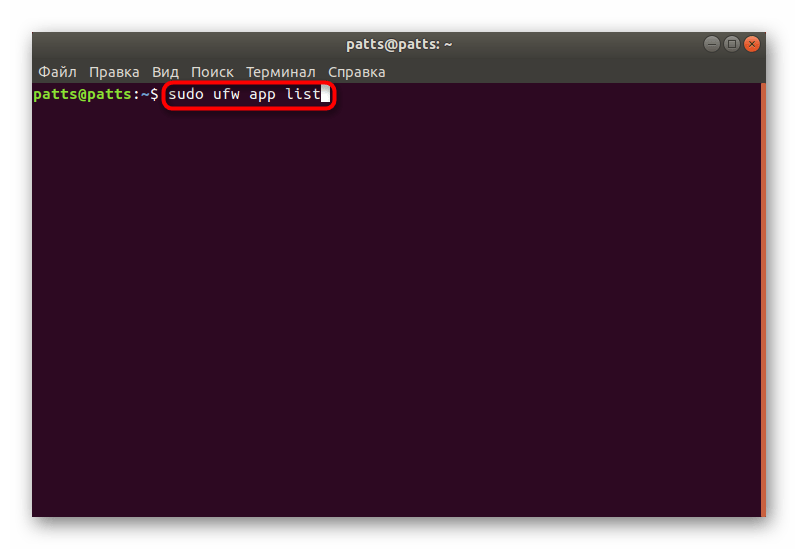
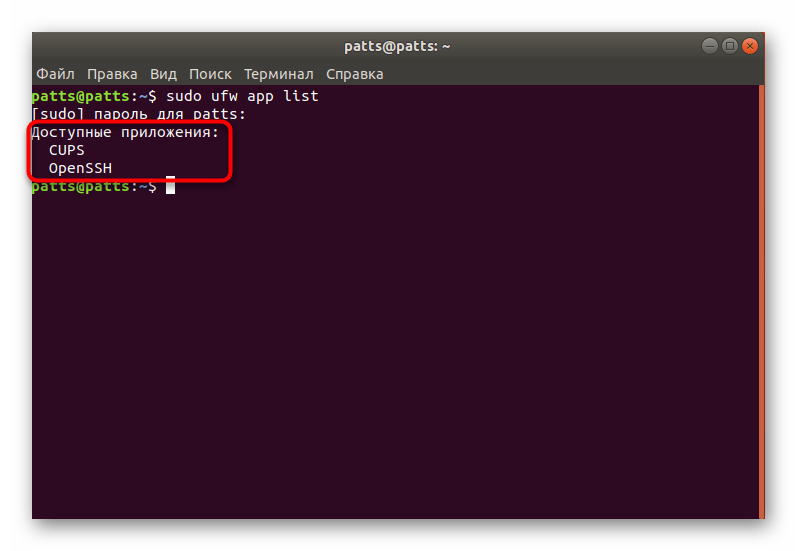
- Откройте список профилей firewall через команду sudo ufw app list .
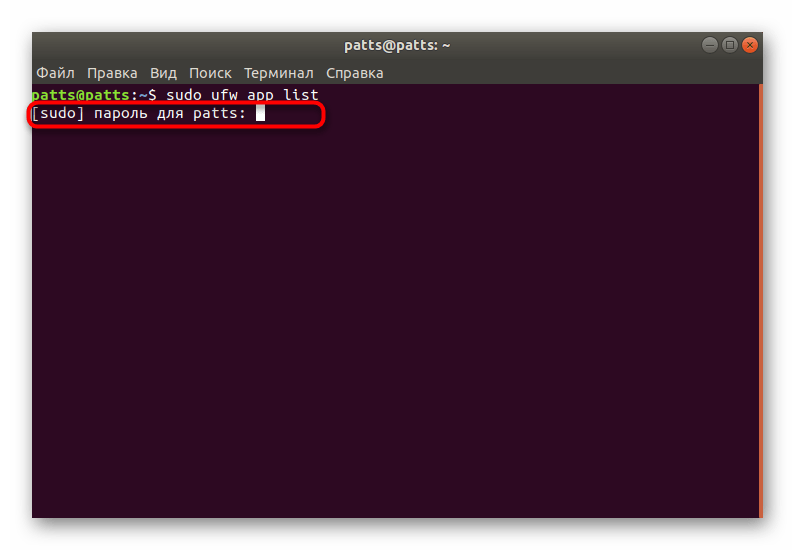
- Введите пароль от учетной записи для отображения информации.
- Вы увидите лист доступных приложений, среди них должен находиться и OpenSSH.
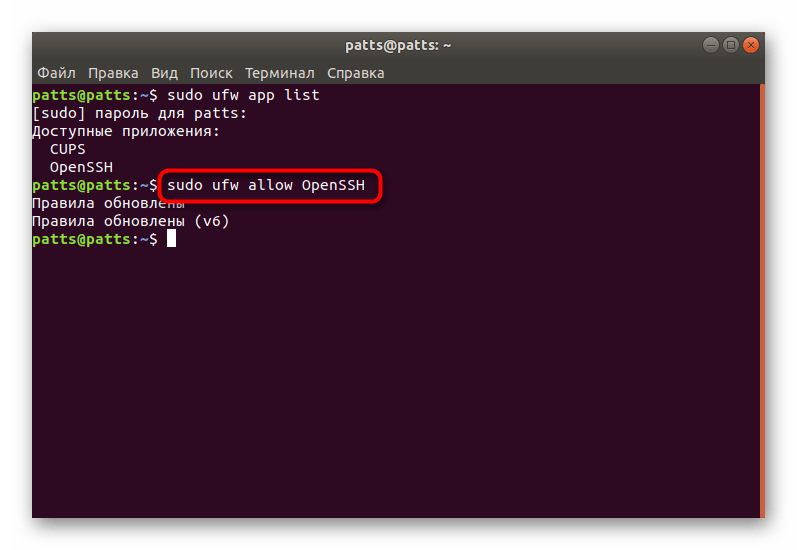
- Теперь следует разрешить соединения через SSH. Для этого добавим его в список разрешенных профилей с помощью sudo ufw allow OpenSSH .
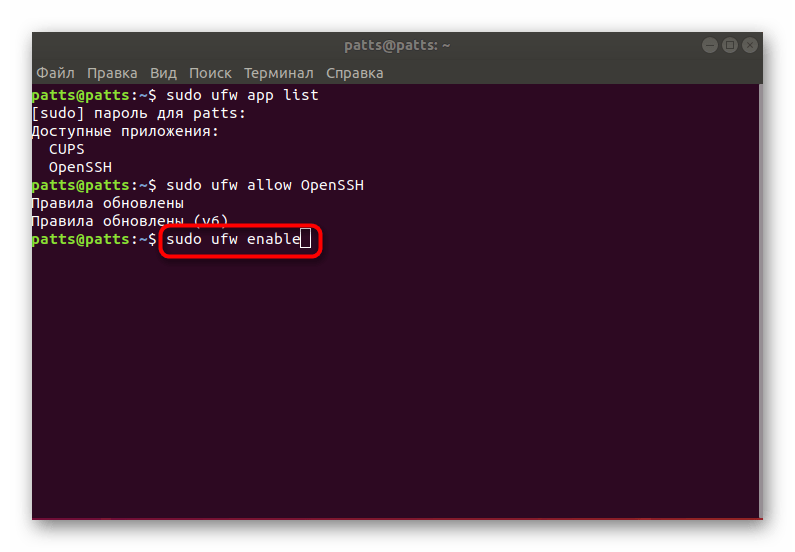
- Включите firewall, обновив правила, sudo ufw enable .
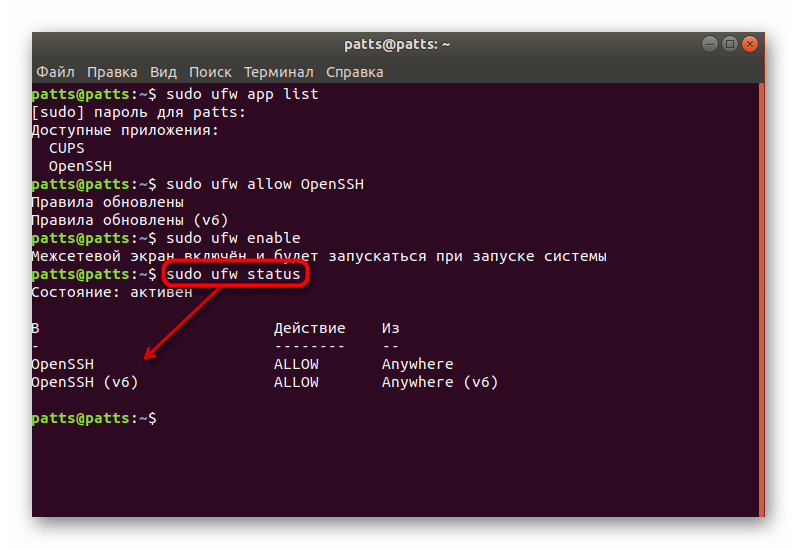
- Для убеждения в том, что соединения разрешены, следует прописать sudo ufw status , после чего вы увидите состояние сети.
На этом наши инструкции по конфигурации SSH в Ubuntu завершены. Дальнейшие настройки конфигурационного файла и других параметров осуществляются лично каждым пользователем под его запросы. Ознакомиться с действием всех составляющих SSH вы можете в официальной документации протокола.
Установка и настройка подключения по SSH
Если openssh-server еще не установлен и не запущен на хосте, его можно добавить с помощью следующих команд.
Подключение по ssh
Осуществляется командой ssh user@host Например: ssh user@192.168.1.72 , в этом случа подключение будет осуществляться на стандартный порт 22. Если ты уже изменил порт подключения на сервере, то подключаться нужно к этом порту, например: ssh user@192.168.1.72 -p 1111
Настройка клиента ssh
Для начала на своей машине сгенерируем пару ключей: публичный и приватный:
После ввода этой команды появится запрос на имя файла для ключей.
А после ввода имени ключа запрос на passphrase — фразу для шифрования ключа. Ее нужно будет вводить каждый раз, когда вы обращаетесь к этому ключу. Для реальных серверов очень рекомендуется использовать сложную фразу. Для серверов, находящихся в локальной сети, к которым нет доступа из интернета можно не использовать и оставить пустой — просто нажать Enter.
Важно обратить внимание: стандартное имя id_rsa и id_rsa_pub Эти стандартные файлы ssh пытается открыть каждый раз, когда мы устанавливаем новое соединение с сервером. Если мы хотим создать несколько ключей для нескольких серверов, нам нужно изменить имя ключа. Например, используем vpn_server_keys . Мы получили 2 файла
Если мы использовали стандартное имя для ключа id_rsa, то файл config можно не редактировать. Но если мы изменили имя ключа, то нужно указать в файле config, для какого сервера подходит ключ vpn_server_keys . Идем в
И вносим в него информацию о сервере и имени файла ключа
Теперь для этих хостов ssh будет открывать указанные файлы ключа. А для всех остальных будет искать ключь в id_rsa.
Мы можем упроситить себе подключение к серверу, например, добавив в файл config не только файл ключей, но и другую информацию. Можем создать никнейм для сервера, чтобы не набирать его ip каждый раз вручную. Например:
Настройка сервера ssh
Теперь нам нужно передать ключь на сервер.
Для этого Три способа: Первый Это отправить пароль на сервер с помощью команды ssh-copy :
Второй Скоприровать содержимое файла одной командой
Выглядит сложно, но на самом деле это простая операция:
-
Сначала вы выводите содержимое файла — cat
/.ssh Или дать пользователю правильные права chmod 600
Третий Которым я и воспользуюсь, перейти в папку
/.ssh/config и вручную с помощью текстового редактора вставить ключ в файл authorized_keys . Сначала копируем ключ из файла ключа с расширением .pub , а затем вставляем его в файл authorized_keys на сервере. В этом файле каждая новая строка — новый публичный ключ доступа.
На этом этапе мы уже можем подключаться к серверу без пароля, только по ключу, введя парольную фразу, если мы ее указывали.
Теперь нам нужно позаботиться о безопасности сервера. Переходим на сервере в /etc/ssh/ и находим файл sshd_config . Будь очень внимателен, не ssh_config — это настройки клиента ssh. Мы ищем настройки сервера sshd_config .
Редактируем sshd_config
В первую очередь меняем номер порта. По умолчанию это порт 22. Номер порта не должен превышать 65535. Также удостоверьтесь, что выбранное вами значение не конфликтует с другими сервисами в системе, например mysqld использует порт 3306, httpd — 80, ftpd — 21. В качестве номера порта вы можете использовать любой номер порта больше, чем 1024. Значения меньше 1024 являются привилегированными портами и могут использоваться только пользователем root. Рекомендуем выбрать пятизначное значение.
Также можно проверить, не занят ли выбранный порт другим приложением. Скорее всего net-tools у тебя уже установлен, так что переходи ко второй строке. Вывод либо покажет действующие приложения с этим портом, либо не покажет. Если вывод пуст — порт свободен.
Этой же командой можно проверить, изменился ли порт после перезагрузки сервера — теперь порт должен быть занят sshd — сервером. Также обрати внимание на раздел [[1 — Настройка SSH#Файрвол и sshd]], если используешь файрвол на сервере.
Теперь нужно запретить доступ к пользователю root
Запрещаем пустые пароли
И запрещаем доступ по паролю, чтобы доступ можно было получить только по ключу, который мы создали:
Обрати внимание, чтобы была разрешена авторизация по SSH-ключам.
Также серверу можно явно указать, где хранятся открытые ключи пользователей. Это может быть как один общий файл для хранения ключей всех пользователей (обычно это файл etc/.ssh/authorized_keys), так и отдельные для каждого пользователя ключи. Второй вариант предпочтительнее в силу удобства администрирования и повышения безопасности.
Для общего файла:
Для каждого пользователя. Благодаря шаблону автоподстановки с маской «%h» будет использоваться домашний каталог пользователя.
Обратите внимание, что вариант по-умолчанию
Сохраняем файл. И перезапускаем sshd сервер service sshd restart или sudo systemctl restart ssh Если эта команда не сработала можем просто перезапустить всю систему. Это сработает наверняка.
Файрвол и sshd
Если на вашем компьютере работает файрвол, не забудьте добавить в его исключения новый порт, назначенный SSH-серверу. Если вы изначально работаете удалённо по SSH-протоколу, сделать это нужно ещё до того, как вы перезапустите демон SSH на сервере, к которому подключены. Если у вас в качестве файрвола установлен UFV, выполните команду: sudo ufw allow 53489/tcp
Для тех, кто использует iptables, необходимо разрешить новый порт с помощью команды: sudo /sbin/iptables -A INPUT -m state —state NEW -m tcp -p tcp —dport 53489 -j ACCEPT
В операционных системах, использующих firewalld, выполните такую команду:
SCP передача файлов
После того, как мы запретили доступ без пароля у нас больше не будет работать доступ по ftp и sftp. Так что нам нужно освоить утилиту scp , которая позволяет перевать файлы на удаленный сервер и обратно.
Команда чтобы передать файл на удаленный сервер
Подключение будет осуществляться с помощью ключа ssh , так что нужно будет подготовить passphrase. С помощью -P мы указываем порт, ведь мы его меняли. Затем имя или адрес файла. Затем имя пользователя и адрес хоста и после двоеточия место назначения. В нашем примере это домашняя папка.
Команда чтобы передать файл с удаленного сервера на локальной устройство:
Указываем номер порта, адрес файла на удаленном сервере (после двоеточия, после адреса хоста), и адрес назначения. В нашем случае “точка” — это значит, что положить нужно в ту директорию, в которой мы находимся.
How to Enable SSH on Ubuntu 20.04

Safe Shell (SSH) is a community protocol used for a safe connection between a shopper and a server. Every interplay between the server and a shopper is encrypted.
This tutorial explains the way to allow SSH on an Ubuntu machine.
Enabling SSH will permit you to connect with your system remotely and carry out administrative duties. You’ll additionally be capable to securely switch information through scp and sftp .
Enabling SSH on Ubuntu #
By default, when Ubuntu is first put in, distant entry through SSH isn’t allowed. Enabling SSH on Ubuntu is pretty simple.
Carry out the next steps as root or person with sudo privileges to put in and allow SSH in your Ubuntu system:
Open the terminal with Ctrl+Alt+T and set up the openssh-server bundle:
When prompted, enter your password and press Enter to proceed with the set up.
As soon as the set up is full, the SSH service will begin mechanically. You’ll be able to confirm that SSH is working by typing:
The output ought to let you know that the service is working and enabled to start out on system boot:
Press q to get again to the command line immediate.
Ubuntu ships with a firewall configuration software known as UFW. If the firewall is enabled in your system, be certain that to open the SSH port:
That’s it! Now you can connect with your Ubuntu system through SSH from any distant machine. Linux and macOS programs have SSH purchasers put in by default. To attach from a Home windows machine, use an SSH shopper akin to PuTTY.
Connecting to the SSH Server #
To hook up with your Ubuntu machine over LAN invoke the ssh command adopted by the username and the IP handle within the following format:
Be sure to change username with the precise person title and ip_address with the IP Handle of the Ubuntu machine the place you put in SSH.
In the event you don’t know your IP handle you’ll be able to simply discover it utilizing the ip command:
As you’ll be able to see from the output, the system IP handle is 10.0.2.15 .
When you’ve discovered the IP handle, log in to distant machine by working the next ssh command:
While you join the primary time, you will notice a message like this:
When you enter the password, you’ll be greeted with the default Ubuntu message:
You are actually logged in to your Ubuntu machine.
Connecting to SSH behind NAT #
To hook up with your own home Ubuntu machine over the Web you will have to know your public IP Handle and to configure your router to simply accept knowledge on port 22 and ship it to the Ubuntu system the place the SSH is working.
To find out the general public IP handle of the machine you’re making an attempt to SSH to, merely go to the next URL: https://api.ipify.org .
On the subject of establishing port forwarding, every router has a unique solution to setup port forwarding. You must seek the advice of your router documentation about the way to arrange port forwarding. In brief, you might want to enter the port quantity the place requests might be made (Default SSH port is 22) and the non-public IP handle you discovered earlier (utilizing the ip a command) of the machine the place the SSH is working.
When you’ve discovered the IP handle, and configured your router you’ll be able to log in by typing:
In case you are exposing your machine to the Web it’s a good suggestion to implement some safety measures. Essentially the most primary one is to configure your router to simply accept SSH visitors on a non-standard port and to ahead it to port 22 on the machine working the SSH service.
You can even arrange an SSH key-based authentication and connect with your Ubuntu machine with out coming into a password.
Disabling SSH on Ubuntu #
To disable the SSH server in your Ubuntu system, merely cease the SSH service by working:
Later, to re-enable it, sort:
Conclusion #
We’ve proven you the way to set up and allow SSH in your Ubuntu 20.04. Now you can login to your machine and carry out on a regular basis sysadmin duties via the command immediate.
In case you are managing a number of programs, you’ll be able to simplify your workflow by defining your entire connections within the SSH config file. Altering the default SSH port provides an additional layer of safety to your system, by decreasing the danger of automated assaults.
For extra details about the way to configure your SSH server, learn the Ubuntu’s SSH/OpenSSH/Configuring information and the official SSH manual web page.
We hope the How to Enable SSH on Ubuntu 20.04 help you. If you have any query regarding How to Enable SSH on Ubuntu 20.04 drop a comment below and we will get back to you at the earliest.
We hope this post helped you to find out Best Cloud Hosting . You may also want to see — How to Install Git on Ubuntu 20.04