Как предотвратить несанкционированный доступ к устройству cisco через консольный порт
понедельник, декабря 24, 2012
Обеспечению безопасности устройств Cisco Systems
7 коммент.:
Зравствуйте, а как Вы считаете пароль "gjkgbpls" считается надежным или нет?
Конечно Виталий, но лучше все же будет 123=)
интересно было прочитать
Рад что вам было интересно=)
Пароли зашифрованные алгоритмом Cisco 7 поддаются расшифровке, в отличие от хеша, в данном случае MD5. Можете сами попробовать на password-decrypt.com (не реклама=)). Над паролем gjkgbpls на русской раскладке поржал. Спасибо за статьи.
Да что же это такое, уже второй раз с комментарием не попадаю! Опять следующая статья об этом =)
Ничего страшного, самое главное что вы читаете статьи! Причем судя по тому, что вы находите неточности, читаете вы их действительно внимательно и вдумчиво!
Configure Telnet, Console and AUX Port Passwords on Routers
The documentation set for this product strives to use bias-free language. For the purposes of this documentation set, bias-free is defined as language that does not imply discrimination based on age, disability, gender, racial identity, ethnic identity, sexual orientation, socioeconomic status, and intersectionality. Exceptions may be present in the documentation due to language that is hardcoded in the user interfaces of the product software, language used based on RFP documentation, or language that is used by a referenced third-party product. Learn more about how Cisco is using Inclusive Language.
Contents
Introduction
This document describes sample configurations to configure password protection for inbound EXEC connections to the router.
Prerequisites
Requirements
In order to perform the tasks described in this document, you must have privileged EXEC access to the router command line interface (CLI). For information about the command line and to understand command modes, seeUse the Cisco IOS Command-Line Interface.
For instructions on connection of a console to your router, refer to the documentation that accompanied your router, or refer to theonline documentationfor your equipment.
Components Used
The information in this document is based on these software and hardware versions:
Cisco 2509 router
Cisco IOS® Software Version 12
The information in this document was created from the devices in a specific lab environment. All of the devices used in this document started with a cleared (default) configuration. If your network is live, ensure that you understand the potential impact of any command.
Conventions
For more information on document conventions, refer to theCisco Technical Tips Conventions.
Background Information
The use of password protection to control or restrict access to the command line interface (CLI) of your router is one of the fundamental elements of an overall security plan.
To protect the router from unauthorized remote access, typically Telnet, is the most common security that needs to be configured, but to protect the router from unauthorized local access cannot be overlooked.
Note: Password protection is just one of the many steps to use in an effective in-depth network security regimen. Firewalls, access-lists, and control of physical access to the equipment are other elements that must be considered when you implement your security plan.
Command line, or EXEC, access to a router can be made in a number of ways, but in all cases the inbound connection to the router is made on a TTY line. There are four main types of TTY lines, as seen in this sampleshow lineoutput:
TheCTYline-type is the Console Port. On any router, it appears in the router configuration asline con 0and in the output of theshow linecommand ascty. The console port is mainly used for local system access with a console terminal.
TheTTYlines are asynchronous lines used for inbound or outbound modem and terminal connections and can be seen in a router or access server configuration asline x. The specific line numbers are a function of the hardware built into or installed on the router or access server.
TheAUXline is the Auxiliary port, seen in the configuration asline aux 0.
TheVTYlines are the Virtual Terminal lines of the router, used solely to control inbound Telnet connections. They are virtual, in the sense that they are a function of software — there is no hardware associated with them. They appear in the configuration asline vty 0 4.
Each of these types of lines can be configured with password protection. Lines can be configured to use one password for all users, or for user-specific passwords. User-specific passwords can be configured locally on the router, or you can use an authentication server to provide authentication.
There is no prohibition against a configuration of different lines with different types of password protection. It is, in fact, common to see routers with a single password for the console and user-specific passwords for other inbound connections.
This is an example of router output from theshow running-configcommand:
Configure Passwords on the Line
To specify a password on a line, use thepasswordcommand in line configuration mode. To enable a password check at login, use thelogincommand in line configuration mode.
Configuration Procedure
In this example, a password is configured for all users who attempt to use the console.
From the privileged EXEC (or enable) prompt, enter configuration mode and then switch to line configuration mode with these commands. Notice that the prompt changes to reflect the current mode.
Configure the password, and enable password checking at login.
Exit configuration mode.
Note: Do not save configuration changes to line con 0 until your ability to log in has been verified.
Note: Under the line console configuration,loginis a required configuration command to enable a password check at login. Console authentication requires both thepasswordand thelogincommands to work
Verify the Configuration
Examine the configuration of the router to verify that the commands have been properly entered:
show running-config— displays the current configuration of the router.
To test the configuration, log off the console and log in again, and use the configured password to access the router:
Note: Before you perform this test, ensure that you have an alternate connection into the router, such as Telnet or dial-in, in case there is a problem during log in back into the router.
Troubleshoot Login Failure
If you cannot log back into the router and you have not saved the configuration, reload the router to eliminate any configuration changes you have made.
If the configuration changes were saved and you cannot login to the router, perform a password recovery. SeePassword Recovery Proceduresto find instructions for your particular platform.
Configure Local User-Specific Passwords
To establish a username-based authentication system, use theusernamecommand in global configuration mode. To enable a password check at login, use thelogin localcommand in line configuration mode.
Configuration Procedure
In this example, passwords are configured for users who attempt to connect to the router on the VTY lines with Telnet.
From the privileged EXEC (or enable) prompt, enter configuration mode and enter username/password combinations, one for each user for whom you want to allow access to the router:
Switch to line configuration mode, and use these commands. Notice that the prompt changes to reflect the current mode.
Configure a password check at login.
Exit configuration mode.
Note: In order to disable auto Telnet when you type a name on the CLI, configureno logging preferredon the line that is used. Whiletransport preferred noneprovides the same output, it also disables auto Telnet for the defined host that are configured with theip hostcommand. This is unlike theno log preferredcommand, which stops it for undefined hosts and lets it work for the defined ones.
Verify the Configuration
Examine the configuration of the router to verify that the commands have been properly entered:
show running-config— displays the current configuration of the router.
To test this configuration, a Telnet connection must be made to the router. This can be done if you connect from a different host on the network, but you can also test from the router itself through telnet to the IP address of any interface on the router that is in an up/up state as seen in the output of theshow interfacescommand.
Here is a sample output if the address ofinterface ethernet 0were 10.1.1.1:
Troubleshoot User-specific Password Failure
Usernames and passwords are case-sensitive. Users who attempt to log in with an incorrectly cased username or password are rejected.
If users are unable to log into the router with their specific passwords, reconfigure the username and password on the router.
Configure AUX Line Password
In order to specify a password on the AUX line, issue thepasswordcommand in line configuration mode. In order to enable a password check at login, issue thelogincommand in line configuration mode.
Configuration Procedure
In this example, a password is configured for all users who attempt to use the AUX port.
Issue theshow linecommand in order to verify the line used by the AUX port.
In this example, the AUX port is on line 65. Issue these commands in order to configure the router AUX line:
Verify Configuration
Examine the configuration of the router in order to verify that the commands have been properly entered:
Theshow running-configcommand displays the current configuration of the router:
Configure AAA Authentication for Login
To enable authentication, authorization, and accounting (AAA) authentication for logins, use thelogin authenticationcommand in line configuration mode. AAA services must also be configured.
Configuration Procedure
In this example, the router is configured to retrieve users’ passwords from a TACACS+ server when users attempt to connect to the router.
Note: Configuration of the router to use other types of AAA servers (RADIUS, for example) is similar. SeeConfigure Authenticationfor additional information.
Note: This document does not address configuration of the AAA server itself.
From the privileged EXEC (or enable) prompt, enter configuration mode and enter the commands to configure the router to use AAA services for authentication:
Switch to line configuration mode and use these commands. Notice that the prompt changes to reflect the current mode.
Configure a password check at login.
Exit configuration mode.
Verify the Configuration
Examine the configuration of the router to verify that the commands have been properly entered:
show running-config— displays the current configuration of the router.
To test this particular configuration, an inbound or outbound connection must be made to the line. See theModem — Router Connection Guidefor specific information on configuration of async lines for modem connections.
Alternately, you can configure one or more VTY lines to perform AAA authentication and perform your test thereupon.
Troubleshoot AAA Login Failure
Before you issuedebugcommands, seeImportant Information on Debug Commands.
To troubleshoot a failed login attempt, use thedebugcommand appropriate to your configuration:
Базовые настройки безопасности Cisco
При настройке сетевого оборудования важно помнить о настройке базовых параметров безопасности оборудования, так как именно они предотвращают большую часть угроз безопасности. Встроенный функционал защиты обеспечивает базовый и необходимый уровень безопасности, который предотвращает распространённые виды атак злоумышленников. Сетевые администраторы не забывают это делать, но простые системные администраторы часто пренебрегают данными настройками и оставляют настройки без изменений.
В данной статье приведена таблица базовых настроек c пояснением и примером для настройки базовых параметров безопасности Cisco.
R0(config)#ip domain-name cisco-dmn
R0(config)#crypto key generate rsa
R0(config)#line vty 0 4
R0(config-line)#transport input ssh
R0 (config)# banner exec # text #
R0 (config)# banner incoming # text #
R0 (config-archive)# log config
R0 (config-archive-log-cfg)# logging on
R0 (config-archive-log-cfg)# hidekeys
R0 (config)#ip ssh time-out 60
R0 (config)#ip ssh logging events
R0 (config)#ip ssh authentication-retries 3
Логирование удачных и неудачных попыток авторизации:
R0 (config)#login on-failure log every
R0 (config-line)# exec-timeout <minutes> [seconds]
DHCP snooping — функция коммутатора, предназначенная для защиты от атак с использованием протокола DHCP.
Sw (config)# ip arp inspection vlan 1
Настройка доверенного порта:
Sw(config)# interface gigabitethernet1/0/1
Sw(config-if)# ip arp inspection trust
Включить DHCP snooping:
sw(config)# ip dhcp snooping
Включить DHCP snooping в VLAN, которые должны быть защищены с его помощью:
Повышаем безопасность коммутаторов и маршрутизаторов Cisco
Сетевая инфраструктура (роутеры, коммутаторы, МСЭ, АТС и так далее) являются очень важными ресурсами организации, и поэтому очень важно корректно настроить доступ к данным устройствам – для достижения нужного уровня защиты.
Множество корпораций фокусируются на защите своих серверов, приложений, баз данных и прочих компонентов сети, но они могут совершенно забыть о том, что часть установленных у них устройств содержат, к примеру, дефолтные логин и пароль.
К примеру, скомпрометированный маршрутизатор может доставить гигантское количество проблем – злоумышленники могут получить доступ к информации, трафик может улетать на другое направление и так далее. Так что корректная настройка устройств с точки зрения сетевой безопасности является крайне важным моментом при обеспечении защиты информации вашей организации.
К примеру Cisco разделяет любое сетевое устройство на 3 функциональных плоскости, а именно:
- Плоскость менеджмента – это все о том, как непосредственно управлять железкой. То есть данная плоскость используется для доступа, настройки и мониторинга устройства. В нашей статье мы непосредственно расскажем, как защитить данную плоскость;
- Плоскость управления – данная плоскость содержит в себе сигнальные протоколы и процессы, которые отвечают за связность между устройствами – например такие известные вам протоколы как OSPF, EIGRP и так далее;
- Плоскость данных – плоскость, ответственная за перемещение информации по сети от источника до ее назначения. В данной плоскости и происходит, как правило, обмен пакетами между устройствами;
Из этих трех плоскостей наиболее защитить первую и вторую плоскости, однако в нашей статье мы сконцентрируемся на плоскости менеджмента и обсудим 10 важных шагов по улучшению защищенности сетевого устройства Cisco с IOS.
Десять пунктов ниже не являются избыточными, но они включают в себя наиболее важные команды и настройки, которые позволят «закрыть» устройство от нежелательного доступа и повысить степень защищенности. Данные пункты применимы как к маршрутизаторам, так и к коммутаторам.
Создание секретного пароля
В целях предоставления доступа к IOS устройству только людям, имеющим право (например, сисадмину/эникею/инженеру) всегда нужно создавать сложный «секретный» пароль (enable secret). Мы советуем придумать/сгенерировать пароль минимум 12 знаков, содержащий цифры, буквы и специальные символы. Проверьте, что вы вводите именно — тогда в конфиге пароль будет отображаться в зашифрованном виде.
Зашифруйте пароли на устройстве
Все пароли, настроенные на устройстве (за исключением «секретного»), не шифруются от слова совсем и легко видны в конфиге. Чтобы зашифровать все пароли в конфиге, необходимо использовать глобальную команду
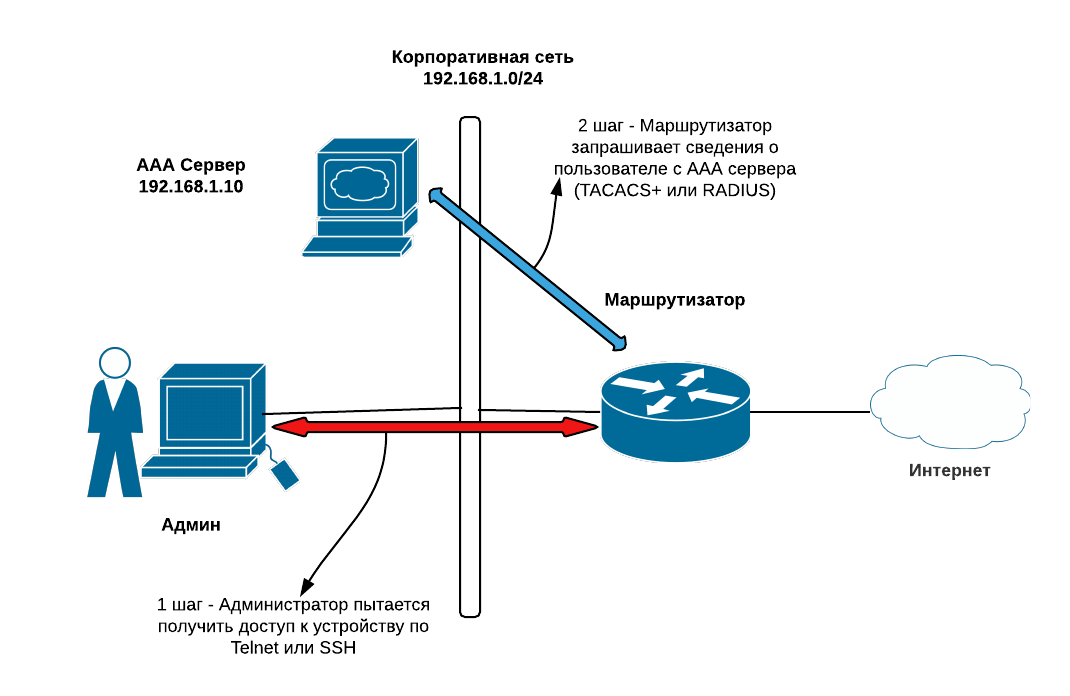
Используйте внешний сервер авторизации для аутентификации пользователей
Вместо использования локальных учетных записей на каждом устройстве для доступа администратора, мы рекомендуем использование внешнего AAA сервера (TACACS+ или RADIUS) для обеспечения Аутентификации, Авторизации и Учета (вольный перевод Authentication, Authorization, Accounting).
С централизованным ААА сервером гораздо проще управлять учетными записями, реализовывать политики безопасности, мониторить использование аккаунтов и многое другое.
Ниже на схеме вы можете видеть как настроить TACACS+ и RADIUS серверы с использованием enable secret пароля в случае отказа этих серверов.
Создайте отдельные аккаунты для пользователей
Если у вас отсутствует возможность использовать внешний ААА сервер, по инструкции, описанной в предыдущем шаге, то как минимум, вам необходимо создать несколько отдельных локальных аккаунтов для всех, у кого должен быть доступ к устройству. Приведем пример создания трех локальных аккаунтов для троих системных администраторов.
Ниже пример настройки трех учетных записей:
Настройте лимит возможных попыток подключения
Для того, чтобы избежать взламывания вашей учетной записи на маршрутизаторе с помощью брутфорса, вы можете настроить ограничение количества попыток подключения, когда после определенного предела система заблокирует пользователя. Это работает для локальных учетных записей.
Открытие доступа на управление устройством только для определенных IP – адресов
Данный пункт является одним из наиболее важных для сетевых устройств Cisco – необходимо оставить доступ к Telnel или SSH только для определенных сетевых адресов (например, рабочей станции системного администратора). В нашем примере сисадмин находится в пуле 192.168.1.0/28
Включить логирование
Логирование является очень полезной функцией для отслеживания, аудита и контроля инцидентов. Вы можете включить логирование во внутренний буфер устройства или на внешний лог-сервер. Вторая опция является более предпочтительной, так как вы можете хранить там больше информации и проще производить различного рода аналитику.
Всего существует 8 уровней логирования (от 0 до 7), каждый из которых делает лог более насыщенным деталями. Лучше всего избегать 7 уровень логирования (дебаг), т.к это может легко потратить все ресурсы вашего устройства.
Ниже пример, как включить логирование и на внешний сервер, и на сам девайс (можно использовать два варианта одновременно).
Включение NTP (Network Time Protocol)
Данный шаг необходим для корректной работы логирования – т.к вам необходимо синхронизированное и точное системное время на всех сетевых устройствах, для правильного понимания ситуации при траблшутинге. Вы можете использовать как публичный, так и свой собственный NTP cервер.
Использование безопасных протоколов управления
По умолчанию, протоколом, с помощью которого можно управлять устройством является Telnet. Однако весь трафик передается в незашифрованном виде – поэтому предпочтительно использовать SSH.
Защитить SNMP доступ
Про SNMP мы писали в одной из наших статей – это протокол для управления сетью, который, однако, также может служить «дырой» для доступа в вашу сеть. Для защиты данного направления, вам необходимо установить сложную Community String (что-то вроде пароля для SNMP) и разрешить доступ только с определенных рабочих станций.
Давайте настроим две Community String – одну с правами на чтение, и другую с правами на чтение и изменение. Также добавим ACL с нужными сетевыми адресами.
Команды выше позволят сети сисадмина 192.168.1.0/28 иметь доступ на чтение и хосту 192.168.1.12 иметь полный доступ на SNMP чтение / запись к устройствам.