How to save a mixdown and export tracks in Reaper
Recording multiple tracks has been made very accessible and inexpensive by the likes of DAW (Digital Audio Workstation) software such as Reaper. Once you have recorded and mixed all your tracks, you will very likely want to turn those multiple tracks into a single stereo mixdown file.
To save a mixdown in Reaper, go to File->Render. Select “Master mix” in the “Source:” dropdown list. Select a directory and filename for your mixdown file. Select the output format such as WAV or MP3. Click “Render 1 file”, and a single stereo mixdown file will be saved in your chosen format.
Saving a mixdown file that can be played on any computer, phone or mp3 player is very easy in Reaper. There are however many options you can specify, and many ways to export parts of your song or individual tracks. Read on for details of exporting your mixes and individual tracks in Reaper.
Related to this article, if you are having any performance issues with Reaper you will probably want to check out my ways to improve Reaper’s performance article. This is recommended reading if you are having any issues, or just want to set up your computer to get the very best out of Reaper.
If you are interested in checking out the best recording gear such as audio interfaces, studio monitor speakers, microphones, etc., you can find them at Amazon by clicking here.
How to save a mixdown in Reaper
Here is the easiest way to save a mixdown in Reaper, for those who aren’t bothered with the details…
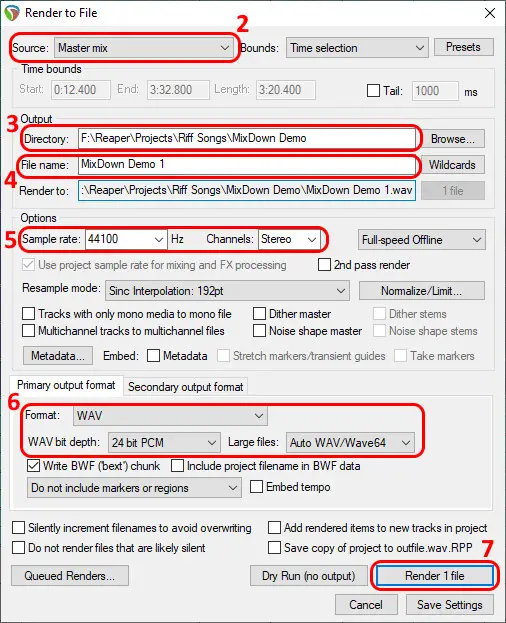
- Go to File->Render…, or press Ctrl+Alt+R; the “Render to File” dialog will launch.
- Select “Master mix” in the “Source:” dropdown list
- Select a directory to output your mixdown file into
- Specify a name for your mixdown file
- Select the sample rate and number of channels – if you are unsure leave these at the defaults
- Select the Format: for your file from the dropdown list, such as WAV or MP3
- Click the “Render 1 file” button
This is typically what you would do when you have finished mixing your song, and want a file you can play on other systems, burn to a CD, share with someone else, etc.
As a quick aside, when preparing your project for mixdown you are almost certainly going to want to place some reverb on some tracks or on the song as a whole. That’s why I have a whole beginner’s guide to reverb in Reaper. I highly recommend checking it out if are a relative Reaper novice and want to improve the sound of your track with this classic effect.
Reaper’s mixdown and render to file options
Even if you only did the above and accepted most of the defaults, you’d have a mixdown file ready to go. However, there are so many options for rendering to file in Reaper we’ve only just scratched the surface so far.
Here are explanations of the more commonly used render-to-file options in Reaper…
Bounds – select just part of your song to mixdown
You don’t have to export the whole length of your song. If you want you could export just the 1st 30 seconds, or the last 30 seconds, or the middle 2 minutes…you get the idea.
Why would you want to do that? Well, you could be wanting to send the intro to a writing partner to get their opinion on it. Or maybe you just want to hear the guitar solo section in the middle on some other audio systems such as a car stereo or a kitchen Bluetooth speaker. I’m sure you can think of some uses applicable to you.
The “Bounds” list in the “Render to File” dialog has the following options…
- Custom time range : select this option and the “Time bounds” settings just underneath will become enabled. These let you specify exact start and end time stamps for your mixdown in minutes, seconds and milliseconds. e.g. you could export a section of 53s length from 1:20:00 to 2:13:00.
- Entire project : does what you would expect; renders the entire length of your song from beginning to end
- Time selection : this one renders the section between the time selectors in Reaper’s track view. Time selectors are those lines you can set by shift-clicking or dragging, and the grey selected area between them is what will get rendered to file.
- Project regions : regions are a feature of Reaper where you can mark a section of your song e.g. verse 1, chorus 2, bridge, etc. This option will render all the regions in your project.
- Selected regions : this option only outputs the regions you have selected. You can select regions by clicking the Region Matrix button, and clicking on the relevant Master Mix square at the top of the grid for the regions you want to include.
By the way, one essential piece of equipment to use with Reaper or any other DAW is a good audio interface. I have been using Focusrite Scarlett interfaces for years, and they have always given me great sounding recordings for not very much money. You can buy the Focusrite Solo from Amazon (affiliate link) for a very reasonable price.
Source – saving a file for each track
So far, we have only really considered selecting exporting one stereo mixdown file. But Reaper is much more flexible than that. You can output one file from each track, only output selected tracks, only output selected media items, etc.
The “Source:” dropdown list in the Render to file dialog is the setting to use to specify the file(s) to export from which tracks.
Here are some of the more commonly used options…
- Master mix : we have already discussed this one. It exports a single stereo mixdown file from the master track. It will export a file that sounds exactly like when you play your song in Reaper. So if you have any tracks muted for example, you will not hear them in the mixdown file.
- Selected tracks (stems) : For every file you have selected in the tracks view, separate file will be saved for each one of those tracks. For example, if you have 5 tracks selected, 5 files will be output. These will include any insert effects you have on those tracks, but not send effects. You can export just one individual track from Reaper using this option.
- Master mix + stems : A combination of the above two options.
- Selected tracks via master : Like selected tracks (stems), but this option will include any send effects on the tracks.
- Region render matrix : If you have any regions set up in your project, you can click the “Region Matrix…” button and select which regions on which tracks you want to export.
- Selected media items : Each track’s content is made up of “media items”. You can select which of these you want to render – you don’t have to have the whole track. This option will export with insert effects included, but not send effects.
- Selected media items via master : Like the above option, but will output with send effects.
These are not all the “Source:” options, but the ones you are most likely to need.
Most of the time, you will be saving a single stereo mixdown file (the “Master mix” option).
Before you export your mix to a file, hearing your mix through a quality pair of headphones or studio monitor speakers is essential. I highly recommend the AKG K-702 Reference Headphones (affiliate link), which you can get at Amazon for a very reasonable price. These are the headphones that I have been mixing on for years, with great results.
From time to time, perhaps you are looking to produce a set of files, one per track, to give to someone else to work on. You could use “Selected tracks (stems)” for this, which is one way you can export multitracks from Reaper. But there is actually a better way – see the later section on “Consolidate/Export tracks…“.
Output and output format options
I have lumped together the Render to File dialog’s “Output” and “Output Format” sections. This is because they are very closely related. There are also a lot of options here, and I didn’t want to just reproduce the User Guide in this article, so I will only cover the most useful and commonly used options here.
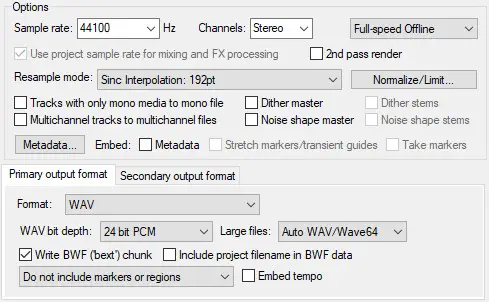
- Sample rate: The sample rate of your output file(s). 44100 Hz (44.1kHz) and 48000Hz (48kHz) are the most commonly chosen options.
- Channels: Most of the time you will choose stereo here.
- Format: The format for your output file, such as WAV, AIFF, FLAC, MP3, Ogg Vorbis, etc.
The available options in the Output Format section change dependent on which output format you have chosen. I’ll talk through the options of the two most commonly used output formats – WAV and MP3…
Exporting to WAV from Reaper
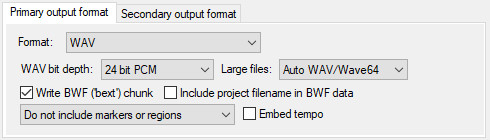
The main option of concern here is the WAV bit depth. You would usually choose either 16 bit PCM or 24 bit PCM. If you are intending to burn your song to a CD then 16 bit PCM bit depth and a 44.1kHz sample rate should be used. For DVD audio, use 24 bit PCM bit depth with a 48kHz sample rate.
WAV format would typically be used when you want to retain the highest possible quality. With WAV, no audio information is lost because it is a lossless format, unlike something like mp3. WAV would be ideal for sending your mix to be mastered, for example.
Exporting to MP3 from Reaper
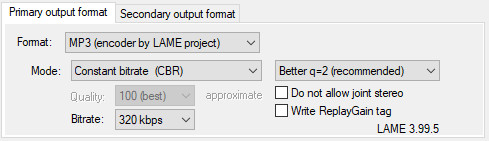
Export to mp3 from Reaper by selecting the MP3 (encoder by LAME project) option in the output format tab in the “Render to File” dialog.
When saving your reaper file as an mp3, the options are concerned with output quality. When mp3s first started to be used, hard disks were a lot smaller and internet speeds a lot slower than they are today, so it was acceptable to use low-quality settings to keep file sizes small.
These days, hard disks are enormous and internet speeds are much faster. Therefore, there is no need to keep the file sizes small – even the highest quality mp3 will still be about 5 times smaller than the equivalent WAV file.
Because mp3 is a lossy format, it is important to choose high-quality settings for the best possible sound. I would choose Constant bitrate mode with a bit rate of 320kbps, and would go no lower than q=2 (the recommended setting) for decent audio quality in the exported mp3 file.
Note that since the Render to File dialog has Primary and Secondary output format tabs, you can actually select two formats to output to at the same time. This way, you could output a WAV and an MP3 file with 1 click of the Render button.
If you are exporting mp3 from Reaper, you may be interested in how to do the reverse operation. Make sure to check out my article on how to import an mp3 into Reaper if you think you might want to do this.
Export tracks from Reaper for someone else to work on
I mentioned earlier that if you wanted to export all your tracks to individual files (i.e. one file per track) for someone else to work with, there was a better way than using the “Selected tracks (stems)” option on the Render to File dialog.
The best way of doing this, especially if they are using a different DAW to you, is to use the Consolidate/Export tracks… feature.
Consolidate/Export tracks in Reaper
Go to “File->Consolidate/Export tracks…”
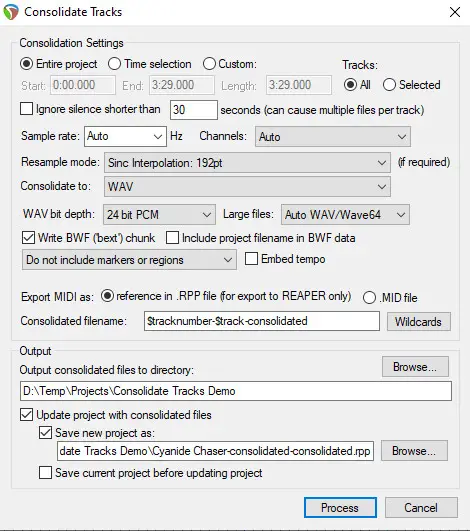
This is a better method than the “Selected tracks (stems)” option, as consolidation is automatically done for you. This means making sure all the tracks start at the start of the project, and everything will sound at the right time in relation to each other when imported into another DAW.
This is vital to get right when giving your tracks to someone else to work with. For more details on consolidation and why it is so important, I wrote an article on what it means to consolidate a track. I highly recommend reading it if you are going to be sharing your tracks with anyone else.
You can see a lot of the options are similar to the Render to File dialog options…selecting which part of your project to export, which tracks to export, file format, bit depth, etc.
In the output section at the bottom of the dialog, you can choose to bring the consolidated files into your current project, or to save a new project with the consolidated tracks in it.
You will end up with a set of files that you can give to a work partner, for them to import into their DAW. They will then be able to work on the song in their just like you have been in Reaper.
Note that the files exported will not have any effects or virtual instruments on them. If you wanted the exported files to include your effects and instruments, you could first Freeze or Render your tracks. Select those tracks to consolidate/export, and you will have a set of files that sound exactly like they do in your Reaper project.
While we’re on the subject of virtual instruments, you will probably be interested in what, if any, virtual instruments or similar plugins Reaper comes with. If that’s the case, check out these two articles for more information…
Here are a few tips to bear in mind when giving your tracks to someone else to work with…
- Number your tracks – give them names such as “01 – Drums”, “02 – Bass”, “03 – Rhy Gtr 1”, “04 – Rhy Gtr 2”, etc. This means that when imported into another DAW, they will appear in the order of the numbers, rather than any random order that the user will have to sort manually.
- Name tracks what they are – give another user a chance of understanding what the track is. For example, call a track “Ld Gtr 1” rather than “Tony Sat Morning solo”.
- Group like tracks together – helps with organization and finding things quickly. I like to start with Drum tracks first, then bass, then harmony instruments such as guitars and keyboards, then vocals. The order doesn’t really matter, as long as it’s logical and you keep it consistent.
Exporting the project for another Reaper user
Finally, there is an easy way to export your whole project (project file, tracks, media files) if you want to share it with another Reaper user…
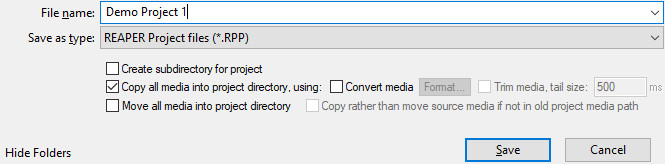
- Go to File->Save Project As…
- Check the “Copy all media into project directory” checkbox
- Choose a folder to save to, along with a project filename
- Click “Save”
This will save everything needed to open that project in Reaper on another computer, including all the recorded audio, midi and media files. Give that folder to another Reaper user, and they can load in the project file and retain all your audio and midi tracks, your plugins and their settings, project settings etc.
You could even create a “.zip” file from the folder to email or share the project with them.
One thing to be aware of, is that the other user would have to have the same plugins installed on their computer as you have used in your project. Otherwise, tracks that use plugins that they do not have will obviously not be there on the track in the other user’s project. You can get round this by rendering tracks first, depending on exactly how you want to work together.
Conclusion
Exporting a mixdown or individual tracks in Reaper is very easy, and can be done in multiple different ways. Reaper also provides flexible ways of exporting your project and/or its contents. This enables multiple people to work on your song, whether they are using Reaper or another DAW entirely.
Perhaps you’ve read this article because you are investigating Reaper’s capabilities with a view to using it as your DAW. If so, I highly recommend reading these beginner Reaper articles…
Here is some of my favorite home studio gear…
Thanks for reading this article. I hope you found it helpful in your home music-making activities. Here are a few of the tools that I personally use in my home studio. These are affiliate links, so if you decide to use any of them I’ll earn a small commission.
Audio interface: My personal choice for audio interfaces are the Focusrite Scarlett series. I have been using these for years, and they have always given me great-sounding recordings. For a very reasonable price from Amazon you can buy the excellent Focusrite Scarlett 4i4, or if you don’t need MIDI capability the Focusrite Solo is a great choice.
Amp sim: Guitar amplifier simulator software has come on leaps and bounds in recent years, such that I record all my electric guitar parts using amp sims these days. One of the very best is the incredible Amplitube from IK Multimedia, which I have used on many of my songs.
Headphones for recording: My favorite headphones for recording are the Sony MDR-7506s, which I use for monitoring during all my recording sessions. They can also be found in many pro recording studios. Get the Sony MDR-7506 headphones from Amazon here.
General-purpose microphone: You can’t go wrong with a good ol’ Shure SM-57, one of the most versatile and ubiquitous microphones around. I’ve been using one in my home studio for as long as I can remember. Amazon offers the Shure SM-57 for a very competitive price.
To see all of my most up-to-date recommendations, check out this resource I made for you!
1.5. Запись в формате mp3
Если вы намереваетесь записывать и/или объединять в один аудиофайл (mixdown) ваши записи или
конвертировать другой записанный материал в формат MP3, необходимо установить MP3 кодек.
Рекомендуемый бесплатный кодек — LAME, который включен в инсталляционный пакет.
Примите во внимание: если вы используете 32-х битную версию REAPER даже на 64-х битном
компьютере, необходимо загрузить 32-х битный кодек, а не 64-х битный.
Пользователям Mac: после загрузки файла необходимо распаковать файл и перетащить файл динамической
библиотеки (примерно именованный libmp3lame.dylib) в папку с установленной программой.
Пользователям Windows: файл необходимо скопировать в папку с установленной программой REAPER по
умолчанию, например, C:\Program Files \REAPER. Данный кодек можно скопировать в другие приложения,
которые в нем нуждаются (например, Audacity).
Расскажите подробно, как сохранять в Reaper!
Чтобы сохранить целый трек или его часть в отдельный музыкальный файл, вам нужно:
1. После обработки файла, выделить ту часть, которую желаете сохранить в качестве отдельного файла и нажать Ctrl+Alt+R.
2. Откроется специальное окно, в котором следует назвать ваш файл, выбрать для него нужный формат, указать качество звука. Подробнее смотрите на скриншоте:
3. После всех установок и настроек, нажмите на кнопку Render 1 file и программа начнет автоматически конвертировать выбранный вами участок по заданным параметрам.
Reaper как сохранить в mp3
Сохраненные дорожки композиции позволяют детально обработать их при сведении и мастеринге музыки. Передача рабочих проектов (в исходном состоянии) — не всегда эффективно в силу широкого спектра используемых плагинов/синтезаторов/эффектов, а также программ, доступных на рынке. Мы собрали базовые инструкции по быстрому решению данного вопроса.

Извлечь дорожки можно двумя способами:
- Ручной: выделите каждую дорожку с помощью кнопки «S» (solo) и экспортируйте в заданном формате путем стандартного сохранения аудио. Это требует некоторого времени, но также эффективно как и программное извлечение. При небольшом объеме, может выступать как основной и самый простой метод.
- Программный: современные DAW программы поддерживают экспорт дорожек, с сохранением обработок и эффектов (их предварительно необходимо отключить, если они не являются художественными авторскими идеями). Рассмотрим прямые пути среди самых популярных рабочих станций (будем обновлять по мере поступления запросов).
Важно заметить, дорожки экспортируются в том виде и формате, который Вы установили, потому для сведения и мастеринга, снимите все обработки, кроме автоматизации и FX. Полученный пак материалов, достаточно заархивировать, затем загрузить на любой файло-обменник (или прикрепить документом к электронному письму) и прислать в нам через контактную форму! Исходя из конечного объема, можно самостоятельно просчитать стоимость за работу в калькуляторе дорожек , отметив дополнительные услуги.
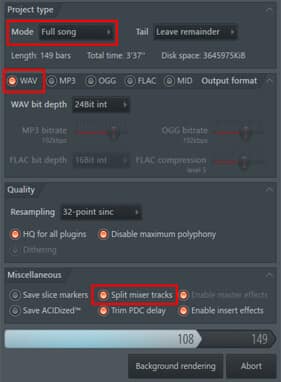
File -> Export -> Wave file. -> Создайте отдельную папку под дорожки проекта -> В выпавшем меню установите следующие значения: Mode = Full Song; Формат = wav; Битрейт = согласно тому, в котором трек создавался; В разделе Miscellaneous установить галочку на «Split mixer tracks» и нажать «Start», после чего программа самостоятельно извлечет материалы в должном виде.
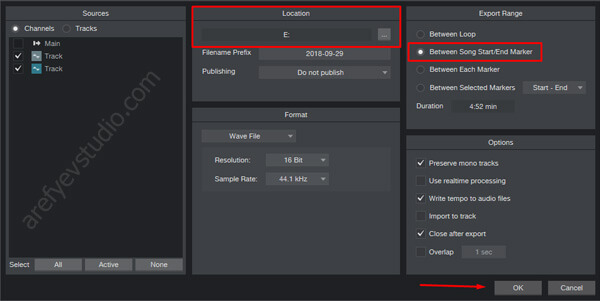
Установите маркеры на начало и конец композиции (учитывая затухающие хвосты реверберации и отражений, если они присутствуют). Затем: Song -> Export stems. -> В области Export Range выберите «Between Song Start/End Marker» -> Локацию сохранения -> OK.
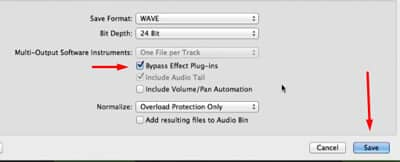
File -> Export -> All tracks as audio files. -> Создайте папку под материалы -> Установите значение «Bypass Effect Plug-ins» (прочие оставьте деактивированными) -> Normalize: Overload Protection Only -> Save.
File -> Export Audio/Video -> значение Rendered Track с «Master» необходимо сменить на «All Individual Tracks» -> Export (остальные настройки оставляем незатронутыми).
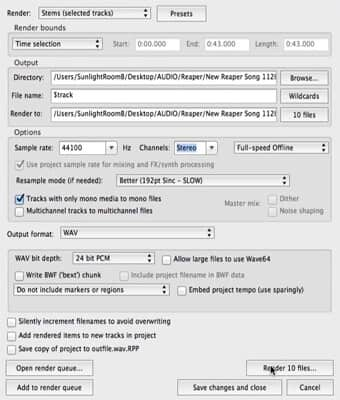
Данная программа представляет собой наиболее углубленный/сложный метод извлечения дорожек. Пошагово:
- File -> Render. (или горячие клавиши: Ctrl+Alt+R).
- В выпавшему меню, значение Sourse с «Master Mix» сменить на «Stems (selested tracks)».
- В Bounds (в ранних версиях программы — Render Bounds) — установите «Time Selection».
- В Directory выберите локацию сохранения материала, создав отдельную папку;
- В File name укажите «$track».
- Кнопка — Render ** file.
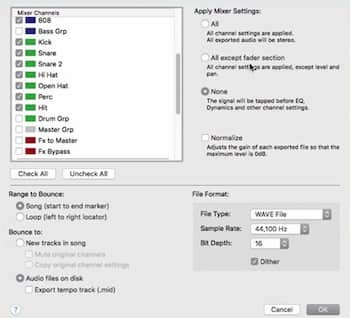
Установите маркеры на начало и окончание композиции. Затем: File -> Bounce Mixer Channels -> В окне «File Format» выберите Wave file; Под окном «Mixer Channels» нажмите Check All (выбрать все); В «Apply Mixer Settings» — All (сохранение с эффектами) / None (без эффектов) -> OK -> Выбор локации сохранения дорожек -> Choose. Готово!
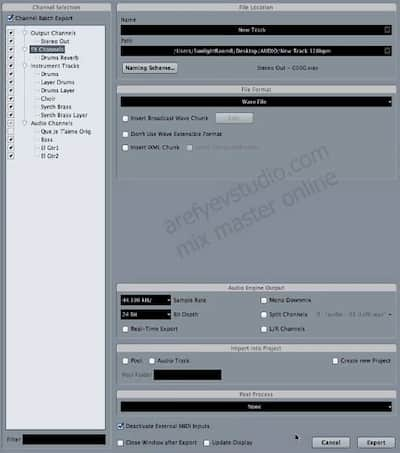
Перед сохранением, установите маркеры с первой до последней секунды проекта. Путь: File -> Export -> Audio Mixdown. -> поставьте галочку на Channel Batch Export (чтобы активировались все инструменты и дорожки) -> Установите название и папку сохранения -> Формат = Wave File -> Все остальные чекбоксы оставьте пустыми (кроме Deactivate External MIDI Inputs) -> Export.
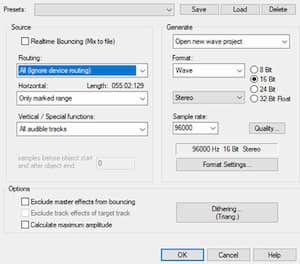
File (в левом верхнем углу) -> Track Bouncing -> во вкладке Routing сменить «Master» на «All» -> OK -> Выбор локации сохранения -> OK.
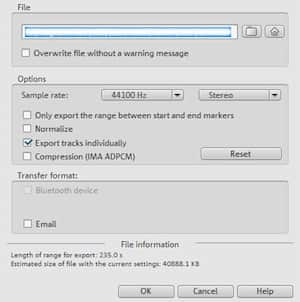
File -> Export -> Audio tracks as single WAV files -> В опциях необходимо убрать все чекбоксы, кроме «Export tracks individually -> Выберите папку для сохранения -> OK. Готово! Программа сама пронумерует поочередно все активные дорожки.
1.5. Запись в формате mp3
Если вы намереваетесь записывать и/или объединять в один аудиофайл (mixdown) ваши записи или
конвертировать другой записанный материал в формат MP3, необходимо установить MP3 кодек.
Рекомендуемый бесплатный кодек – LAME, который включен в инсталляционный пакет.
Примите во внимание: если вы используете 32-х битную версию REAPER даже на 64-х битном
компьютере, необходимо загрузить 32-х битный кодек, а не 64-х битный.
Пользователям Mac: после загрузки файла необходимо распаковать файл и перетащить файл динамической
библиотеки (примерно именованный libmp3lame.dylib) в папку с установленной программой.
Пользователям Windows: файл необходимо скопировать в папку с установленной программой REAPER по
умолчанию, например, C:\Program Files \REAPER. Данный кодек можно скопировать в другие приложения,
которые в нем нуждаются (например, Audacity).
Скачать бесплатно русскую версию Reaper
Reaper — цифровая звуковая рабочая станция DAW для пользователей со средним уровнем навыков. Программа обеспечивает запись живого звука и виртуальных инструментов, поддерживает микширование и редактирование аудиозаписей. Скачать бесплатно русскую версию Reaper можно на ПК с Windows XP, 7, 8 и 10 с разрядностью 64-бита.
Приложение является универсальным средством для записи и работы с файлами миди, сведения треков, редактирования и мастеринга. Благодаря поддержке большинства моделей контроллеров софт позволяет записывать живые инструменты. Хотя программа не отличается простым интерфейсом, это отчасти решается тем, что софт обладает управляемым интерфейсом, позволяя добавлять и удалять рабочие панели и настраивать горячие клавиши.
Reaper позволяет проводить аудиозахват нескольких инструментов и аудиоканалов одновременно и с нескольких интерфейсных входов. Софт способен записывать диапазоны из пяти частей, если у вас есть достаточное количество предусилителей. Во время записи можно сразу применять и прослушивать аудиоэффекты и собственный вокал.
Среди множества полезных инструментов можно найти уровень громкости, пакетную обработку, FX-плагины, изменение темпа, автоматическое растяжение времени, графические диаграммы. Софт позволяет подгружать сторонние расширения, в том числе в форматах VST3, AU, DirectX и JS. Встроенный микшер предлагает такие нужные опции, как компрессор, эквалайзер, реверберация и прочее. Reaper включает в себя возможности автоматизации, во время работы можно замораживать или отключать дорожки, чтобы освободить память процессора.
Полная версия Reaper доступна в двух версиях: для частного и коммерческого использования. Если вы хотите предварительно опробовать функционал, то можете скачать Рипер на русском языке для бесплатного периода длительностью 60 дней. Хотя в программе отсутствуют некоторые продвинутые функции вроде библиотеки звуков и инструментов, она позволяет добиться качественного уровня записи даже на маломощных процессорах.