How to Add Fonts to Premiere Pro in a Few Easy Steps
Subtitles and captions are widely used in today’s film and video production. Whether you want to convey more information on your documentary or simply attempt to make the viewers comprehend your movie better, there are various reasons why you might need to include text on the screen.
Adobe Premiere Pro is one of the tools that film and video makers use to add text to their work. One advantage of using the software is that you may choose custom fonts. So, in this article, we’ll go over how to add fonts to Premiere Pro and use them for captions and subtitles.
Importing Fonts to Premiere Pro

There are already many useful and fascinating default typefaces in Adobe Premiere Pro, but that should not stop you from adding more font styles. Follow the steps below to learn how to add fonts to Premiere Pro so you can use them for captions and subtitles.
1. Obtaining the typeface’s “.zip” file
The first step, like with importing a font into any other program, is to download the typeface’s “.zip” file. It is available from websites such as DaFont, Google Fonts, and Abstract Fonts.
These websites offer zip files containing numerous typefaces that you may download for free. However, you should be aware of their copyrights because many of the fonts are only free for personal use and not for commercial use.
2. Install the font to your computer

The next step is installing the font on your computer. This can be accomplished by unzipping the file and installing the font files inside one at a time. Remember to close any Adobe apps before proceeding with this step.
3. Check if the font works on Premiere Pro
Now that you have installed the new font into your computer, you should be able to use it within any program. To see if the font has been properly installed, launch Premiere Pro and go to the font toolbar. Check to see if the new typeface is available in the font options list.
4. Import subtitle file for your video
In this step, let us assume that you already have a subtitle file prepared for your video. Now, on the toolbar, select “Import” from the “File” section and click “Open.”
Locate and load the subtitle file into your video. After that, you should notice a subtitle section below your video clip.
To display the subtitle on your video, select the “wrench” symbol in the bottom right corner of the screen. Click the icon, then click “Closed Captions Display” and choose “Enable”.
It’s worth noting that “.TTML” subtitle files work best with Premiere Pro. If the subtitle file you’re using lacks a proper encoding format, you can get an error during playback. Because of the incorrect encoding, your movie will only display asterisks or blocks instead of text.
5. See how the subtitles work on the video

Before proceeding, we must ensure that the subtitles display correctly in the video. This is necessary so that the subtitles do not confuse the audience.
The most important thing to look at here is how the text flows about the video’s dialogue and audio. Also, double-check the subtitles for any misspelt words.
If you find an error in the subtitles, return to the subtitle editor and have it corrected. After the adjustment, you must re-import the subtitle file.
6. Changing the subtitles’ font
Go to the “Sequence” section to see the subtitle on the editing screen. You can change the font type, size, and color of the subtitles using the available options.
7. Reviewing the final result

Congrats! You’ve now learned how to add fonts to Premiere Pro and use them correctly for captions and subtitles.
It is now time to do a final review of your work before it is published. Aside from misspellings and grammatical errors, make sure that all of the subtitles are visible throughout the video.
The Best Fonts for Premiere Pro
Using inappropriate fonts for your captions and subtitles can result in poor visibility. Here are seven suggested typefaces for your videos, along with some more information to help you choose.
1. Arial
Arial is the best choice for a safe and visible typeface. Because of its serious lack of differentiation, it has been a favorite choice for years.
You can also use Arial Black font if your subtitles have a lot of gaps. When working with lengthier sentences, however, this font style may become a little bulky because of the larger and bolder form.
2. STIXGeneral
This font style is popular among those who want a clean, professional image for their documentaries or video journalistic works. It’s also perfect for titles to help set the tone.
If you want to add some credibility to your project, it’s worth a go. Depending on the type of clip you’re creating, this font can also help elevate the image.
3. Futura
Futura is a versatile sans serif font that works well in almost any circumstance. It’s very clear and visible on a variety of backdrops.
It’s common in online promotional videos with a lot of text on the screen. It is popular among video producers as a regular font, but its condensed typeface form is also handy when cramming a lot of text into a tiny space.
Final Thoughts
Now that you’ve learned how to add fonts to Premiere Pro and use them for captions and subtitles, it’s time to experiment with different typefaces to make your clips more engaging and inclusive.
However, when choosing a font for your film, keep in mind that it should be clear and informative. The aim here is to avoid using typefaces that are distracting or detract from the other spatial elements on the screen. More importantly, you must provide high-quality captions and subtitles to your audience. If you don’t know how to create one, GoTranscript can produce it for you, so all you need to do is learn how to add fonts to Premiere Pro and work on the visual components.
Как добавить шрифты в Adobe Premiere Pro
Использование уникальных шрифтов в вашем проекте не только выделит ваше видео среди зрителей, но и может стать отличным способом создать бренд. К счастью, вы не застряли только со шрифтами по умолчанию, которые уже есть в Adobe Premiere Pro . Вы можете использовать любой доступный шрифт для загрузки и установки на свой компьютер.
Adobe Premiere загружает предварительно установленные шрифты с вашего компьютера. В этом уроке мы покажем вам, как установить шрифты в Adobe Premiere и использовать их в своем видео.

Добавление шрифтов в Adobe Premiere Pro (Adding Fonts to Adobe Premiere Pro)
Чтобы добавить шрифты в Premiere , вам просто нужно установить их на свой компьютер. Вы можете скачать бесплатные шрифты онлайн или заказать индивидуальный шрифт (a custom font) , который вы можете загрузить. Вот как установить их после того, как вы их загрузили.
- Откройте файл .zip с помощью такой программы, как 7zip. Внутри должен быть файл шрифта .ttf или .otf .
- Извлеките (Extract) файл .ttf (.ttf) или .otf куда (.otf) — нибудь, где вы его помните, и щелкните по нему, чтобы открыть.
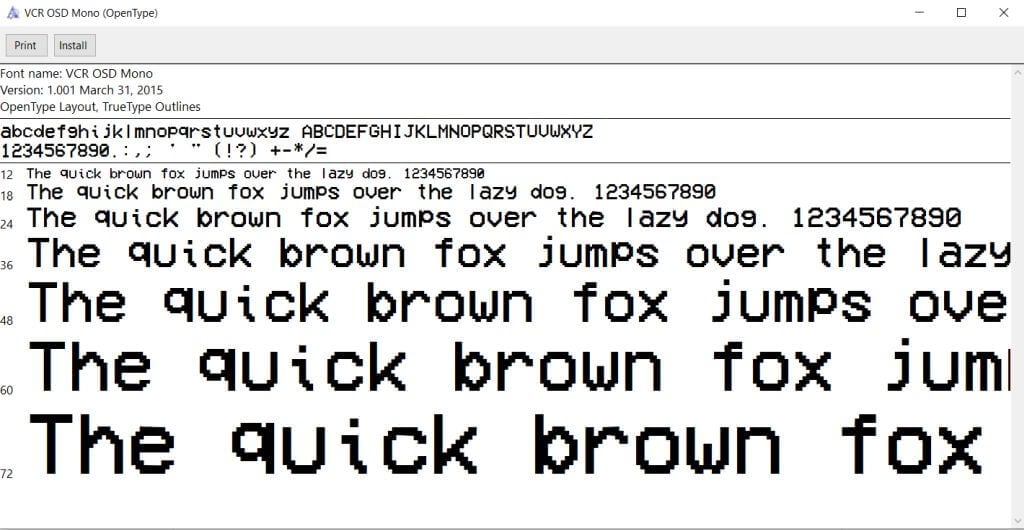
- Вы увидите пример шрифта в новом окне. В левом верхнем углу нажмите кнопку « Установить ». (Install )

- После установки вы можете закрыть окно.
Установите шрифт перед (before) открытием Premiere . Если Premiere уже открыт при установке нового шрифта, возможно, вам придется перезапустить Premiere , чтобы программа обнаружила новый шрифт.
Добавляйте новые шрифты через Adobe Fonts (Add New Fonts Through Adobe Fonts)
Еще один способ быстро добавить шрифты для использования в проектах Premiere — загрузить их через Adobe Fonts , ранее называвшуюся Typekit . Это функция, которую вы можете использовать в приложении Creative Cloud , и вы можете использовать загруженные шрифты во всех приложениях Adobe .
- Откройте Adobe Creative Cloud и перейдите в раздел Stock & Marketplace (Stock & Marketplace) .

- Выберите « Шрифты» (Fonts) в верхней строке меню.

- Просмотрите (Browse) , чтобы найти шрифт, который вы хотите использовать. Вы попадете на сайт Adobe Fonts .
- Нажмите (Click) на шрифт, который хотите загрузить.
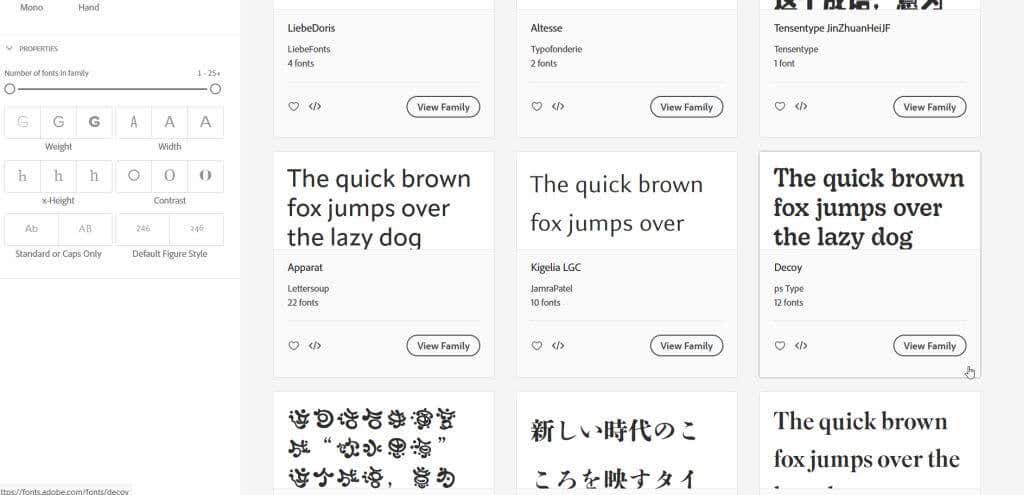
- Справа от названия шрифта можно щелкнуть ползунок « Активировать шрифт (Activate Font) » , чтобы добавить его в Creative Cloud . Теперь он будет доступен в Adobe Premiere .

- Если шрифт имеет несколько стилей, вы можете прокрутить вниз и активировать только те, которые хотите использовать.
Вы можете просмотреть загруженные шрифты в Creative Cloud, выбрав « Приложения (Apps ) » в верхней строке меню, а затем « Управление шрифтами ( Manage Fonts) » на боковой панели. Открыв Premiere , вы можете использовать свои новые шрифты, используя методы, описанные ниже.
Использование новых шрифтов в Adobe Premiere Pro (Using New Fonts in Adobe Premiere Pro)
Теперь, когда вы загрузили новый шрифт, вы можете открыть Adobe Premiere , чтобы использовать его в своем проекте. Вот как использовать его несколькими способами.
- При использовании функции « Устаревшие заголовки (Legacy Title) » вы можете выбрать раскрывающийся список « Семейство шрифтов» (Font Family) и выбрать новый шрифт, который вы только что установили.

- При использовании шаблонов панелей (panel templates) Essential Graphics перейдите на панель « Элементы управления (Effect Controls) эффектами». Откройте раскрывающийся список « Текст (Text) », затем раскрывающийся список « Исходный текст (Source Text) ». Нажмите (Click) на поле чуть ниже, чтобы изменить шрифт.

- Если вы используете инструмент (Type Tool) «Текст », вы можете выполнить шаг 2 на панели « Элементы управления (Effect Controls) эффектами».
Ваш недавно установленный шрифт должен появиться в раскрывающемся списке при использовании текста. Если вы не можете его найти, попробуйте ввести название шрифта в поле и выбрать его таким образом.
Почему мой шрифт не отображается в Adobe Premiere Pro? (Why Won’t My Font Show Up in Adobe Premiere Pro?)
Если у вас возникли проблемы с добавлением нового шрифта в Premiere , вы можете решить эту проблему несколькими способами. Если ваш шрифт не отображается в раскрывающихся списках выбора шрифта даже после его поиска, попробуйте выполнить некоторые из этих действий, чтобы исправить это.
- Убедитесь (Make) , что вы правильно установили шрифт. Вы можете увидеть, установлен ли шрифт, открыв исходный файл .ttf . Нажмите (Click) на кнопку « Установить ( Install) » в верхнем левом углу. Если вы получаете сообщение об ошибке, в котором говорится, что шрифт уже установлен, попробуйте другое решение. Вы также можете заменить установленный шрифт и установить его снова.
- Перезапустите Adobe Premiere (Restart Adobe Premiere) . Обязательно (Make) сохраните, а затем выберите « File > Exit . Затем снова откройте Premiere и свой видеопроект.
- Перезагрузите компьютер. Если Premiere по-прежнему не подбирает новый шрифт, перезагрузка компьютера может позволить ему это сделать.
Эти исправления должны позволить Premiere распознавать ваш недавно установленный шрифт, чтобы вы могли использовать его в своем проекте.
Сделайте ваши видео выделяющимися, добавив шрифты (Make Your Videos Stand Out by Adding Fonts)
Важная часть создания внешнего вида видео, безусловно, может включать в себя шрифты, которые вы решите использовать, и то, как вы их используете. Дизайн шрифта (Font) может сыграть ключевую роль в сообщении, которое вы пытаетесь донести. Так почему бы не сделать все правильно и не добавить идеальный шрифт для вашего проекта с помощью этого руководства.
How to Add Fonts to Adobe Premiere Pro
Using unique fonts in your project will not onlу make уour video stand oυt to vіewers, but it can also be a great way to establish a brand. Thankfully, you aren’t stuck with only the default fonts alreаdy in Adobe Premiere Pro. You can use any available font to download and install on your computer.
Adobe Premiere pulls pre-installed fonts from your computer. We’ll show you how to install the fonts in Adobe Premiere and use them in your video in this tutorial.
Adding Fonts to Adobe Premiere Pro
To add fonts to Premiere, you just need to install them onto your computer. You can download free fonts online or have a custom font made for you that you can download. Here’s how to install these after you’ve downloaded them.
- Open the .zip file using a program such as 7zip. Inside there should be a .ttf or .otf font file.
- Extract the .ttf or .otf file somewhere you’ll remember it, and click on it to open it.
- You’ll see an example of the font in a new window. In the top-left corner, select the Install button.
- Once installed, you can close the window.
Install the font before opening Premiere. If Premiere is already open when you install the new font, you may have to restart Premiere for the program to detect the new font.
Add New Fonts Through Adobe Fonts
Another way to quickly add fonts to use in Premiere projects is by downloading them through Adobe Fonts, previously called Typekit. This is a feature you can use in the Creative Cloud app, and you can use your downloaded fonts throughout all Adobe apps.
- Open Adobe Creative Cloud and go to Stock & Marketplace.
- Select Fonts from the top menu bar.
- Browse to find the font you’d like to use. You’ll be taken to the Adobe Fonts website.
- Click on the font you want to download.
- To the right of the font name, you can click on the Activate Font slider to add it to Creative Cloud. It will now be available in Adobe Premiere.
- If the font has multiple styles, you can scroll down and activate only those you wish to use.
You can see your downloaded fonts in Creative Cloud by going to Apps in the top menu bar and then Manage Fonts in the sidebar. Once you open Premiere, you can use your new fonts using the methods outlined below.
Using New Fonts in Adobe Premiere Pro
Now that you have your new font downloaded, you can open Adobe Premiere to use it in your project. Here’s how to use it in a few different ways.
- When using the Legacy Title feature, you can select the Font Family dropdown and select the new font you have just installed.
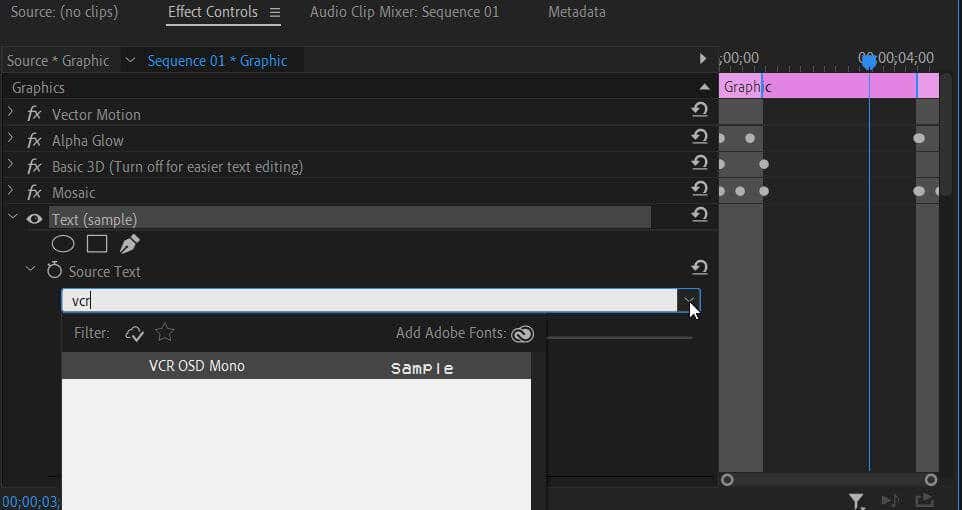
- When using Essential Graphicspanel templates, go into the Effect Controls panel. Open the Text dropdown, then the Source Text dropdown. Click on the box just beneath to change the font.
- If you use the Type Tool, you can follow step 2 in the Effect Controls panel.
Your newly installed font should appear in the dropdown selection when using text. If you can’t find it, try typing the font’s name into the box and selecting it that way.
Why Won’t My Font Show Up in Adobe Premiere Pro?
If you’re having trouble with adding a new font to Premiere, there are a few things you can do to solve the problem. If your font isn’t showing up in the font selection dropdown boxes, even after you search for it, try some of these steps to fix it.
- Make sure you installed the font correctly. You can see if a font is installed by opening the source .ttf file. Click on the Install button in the top-left corner. If you get an error message saying the font is already installed, try a different fix. You can also choose to replace the installed font and install it again.
- Restart Adobe Premiere. Make sure to save, then go to File > Exit. Then, open Premiere again and your video project.
- Restart your computer. If Premiere still isn’t picking up the new font, restarting your computer may allow it to do so.
These fixes should allow Premiere to recognize your newly installed font so that you can use it in your project.
Make Your Videos Stand Out by Adding Fonts
An important part of establishing a look or feel in a video can certainly include the fonts you choose to use and how you use them. Font design can play a pivotal role in the message you’re trying to get across. So why not get it just right and add the perfect font for your project using this guide.

Алина Разумовская
About the author
Я компьютерный техник с более чем 10-летним опытом, в том числе 3 года в качестве 店員. У меня есть опыт работы с устройствами Apple и Android, и я особенно хорошо разбираюсь в ремонте и обновлении компьютеров. Я также люблю смотреть фильмы на своем компьютере и использовать свой iPhone для съемки фотографий и видео.
Как добавить шрифты в Adobe Premiere Pro
Использование уникальных шрифтов в вашем проекте не только сделает ваше видео заметным для зрителей, но и может стать отличным способом создать бренд. К счастью, вы не застряли только со шрифтами по умолчанию, которые уже установлены. Адоб Премьер Про. Вы можете использовать любой доступный шрифт для загрузки и установки на свой компьютер.
Adobe Premiere загружает предварительно установленные шрифты с вашего компьютера. В этом уроке мы покажем вам, как установить шрифты в Adobe Premiere и использовать их в своем видео.
Добавление шрифтов в Adobe Premiere Pro
Чтобы добавить шрифты в Premiere, вам просто нужно установить их на свой компьютер. Вы можете скачать бесплатные шрифты онлайн или иметь пользовательский шрифт сделанный для вас, который вы можете скачать. Вот как установить их после того, как вы их загрузили.
Программы для Windows, мобильные приложения, игры — ВСЁ БЕСПЛАТНО, в нашем закрытом телеграмм канале — Подписывайтесь:)
- Откройте файл .zip с помощью такой программы, как 7zip. Внутри должен быть файл шрифта .ttf или .otf.
- Извлеките файл .ttf или .otf куда-нибудь, где вы его помните, и щелкните по нему, чтобы открыть.
- Вы увидите пример шрифта в новом окне. В левом верхнем углу нажмите кнопку «Установить».
- После установки вы можете закрыть окно.
Установите шрифт перед открытием Premiere. Если Premiere уже открыт при установке нового шрифта, возможно, вам придется перезапустить Premiere, чтобы программа обнаружила новый шрифт.
Добавляйте новые шрифты через Adobe Fonts
Еще один способ быстро добавить шрифты для использования в проектах Premiere — загрузить их через Adobe Fonts, ранее называвшуюся Typekit. Это функция, которую вы можете использовать в приложении Creative Cloud, и вы можете использовать загруженные шрифты во всех приложениях Adobe.
- Откройте Adobe Creative Cloud и перейдите в раздел Stock & Marketplace.
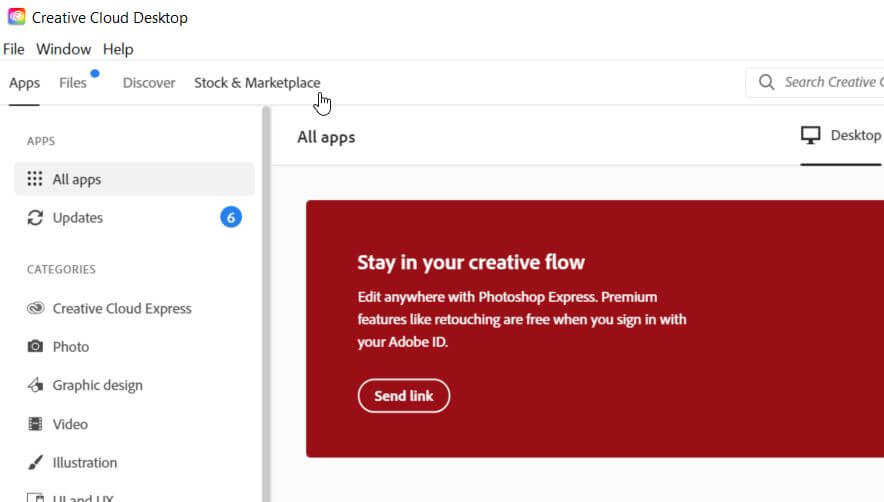
- Выберите «Шрифты» в верхней строке меню.
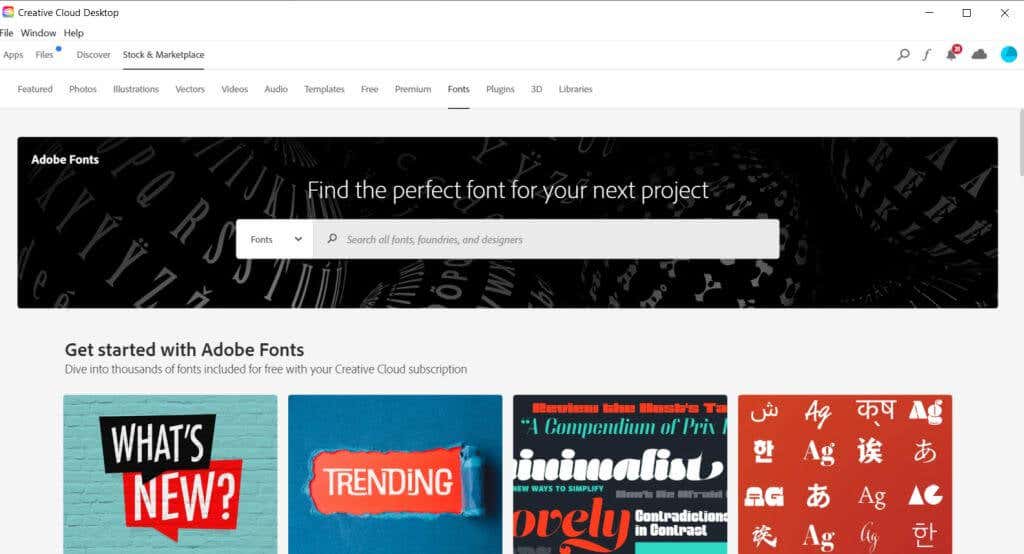
- Просмотрите, чтобы найти шрифт, который вы хотите использовать. Вы попадете на сайт Adobe Fonts.
- Нажмите на шрифт, который хотите загрузить.
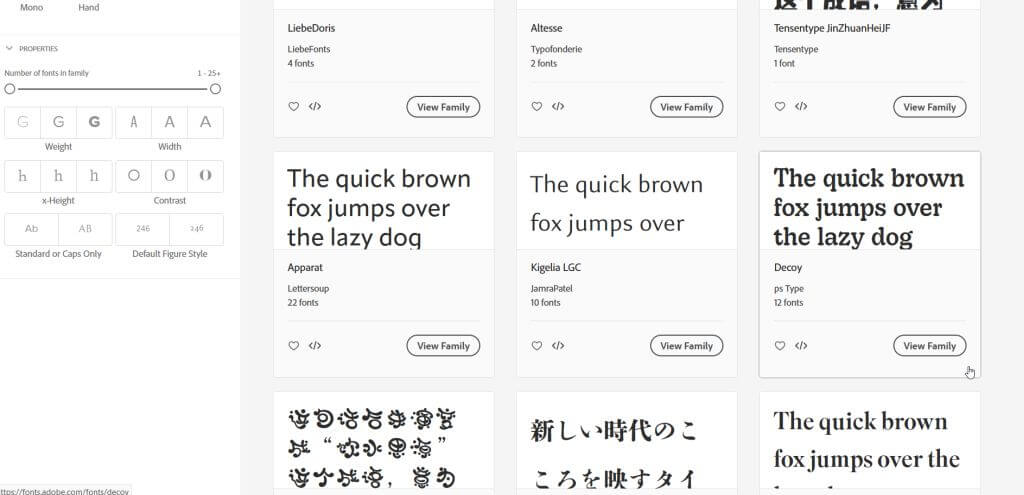
- Справа от имени шрифта вы можете щелкнуть ползунок «Активировать шрифт», чтобы добавить его в Creative Cloud. Теперь он будет доступен в Adobe Premiere.
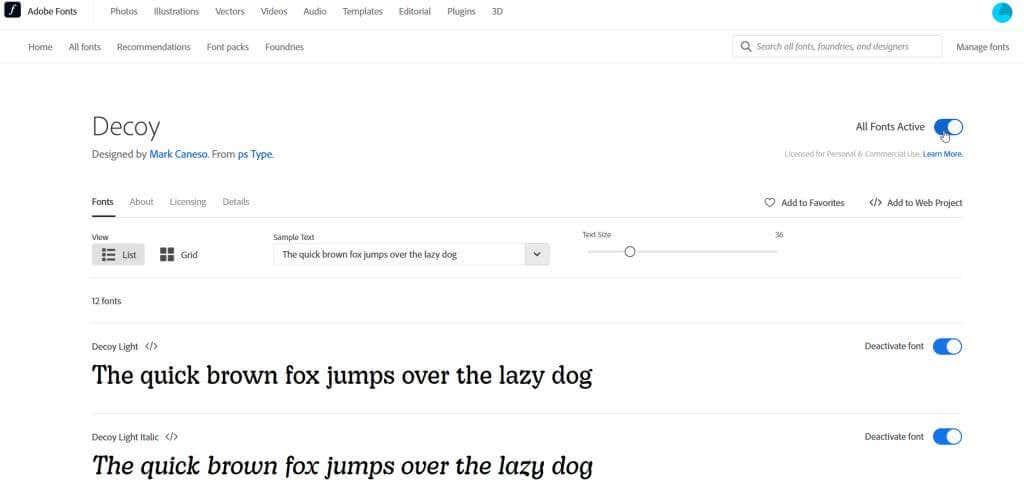
- Если шрифт имеет несколько стилей, вы можете прокрутить вниз и активировать только те, которые хотите использовать.
Вы можете просмотреть загруженные шрифты в Creative Cloud, выбрав «Приложения» в верхней строке меню, а затем «Управление шрифтами» на боковой панели. Открыв Premiere, вы можете использовать свои новые шрифты, используя методы, описанные ниже.
Использование новых шрифтов в Adobe Premiere Pro
Теперь, когда вы загрузили новый шрифт, вы можете открыть Adobe Premiere, чтобы использовать его в своем проекте. Вот как использовать его несколькими способами.
- При использовании функции «Устаревшие заголовки» вы можете выбрать раскрывающийся список «Семейство шрифтов» и выбрать новый шрифт, который вы только что установили.
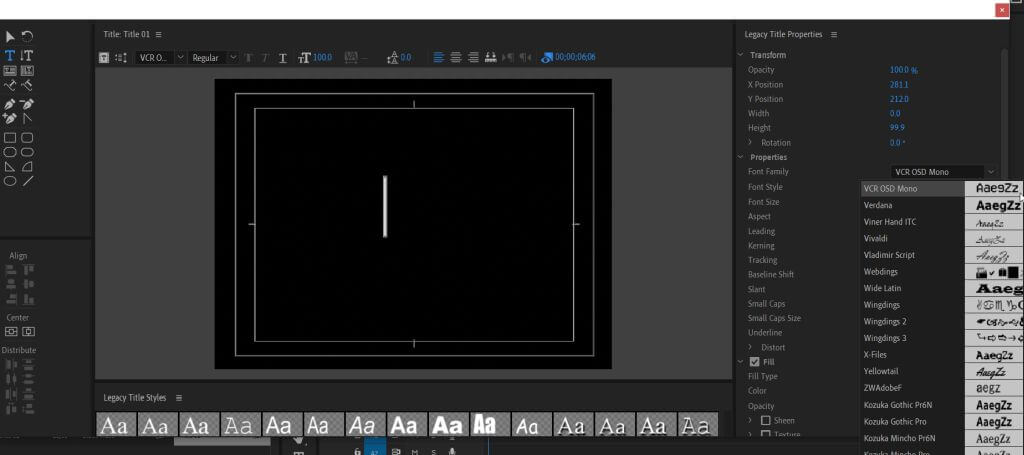
- При использовании основной графики шаблоны панелей, перейдите на панель «Элементы управления эффектами». Откройте раскрывающийся список «Текст», затем раскрывающийся список «Исходный текст». Нажмите на поле чуть ниже, чтобы изменить шрифт.
- Если вы используете инструмент «Текст», вы можете выполнить шаг 2 на панели «Элементы управления эффектами».
Ваш недавно установленный шрифт должен появиться в раскрывающемся списке при использовании текста. Если вы не можете его найти, попробуйте ввести название шрифта в поле и выбрать его таким образом.
Почему мой шрифт не отображается в Adobe Premiere Pro?
Если у вас возникли проблемы с добавлением нового шрифта в Premiere, вы можете решить эту проблему несколькими способами. Если ваш шрифт не отображается в раскрывающихся списках выбора шрифта даже после его поиска, попробуйте выполнить некоторые из этих действий, чтобы исправить это.
- Убедитесь, что вы правильно установили шрифт. Вы можете увидеть, установлен ли шрифт, открыв исходный файл .ttf. Нажмите кнопку «Установить» в верхнем левом углу. Если вы получаете сообщение об ошибке, в котором говорится, что шрифт уже установлен, попробуйте другое решение. Вы также можете заменить установленный шрифт и установить его снова.
- Перезапустите Adobe Premiere. Обязательно сохраните, затем перейдите в «Файл»> «Выход». Затем снова откройте Premiere и свой видеопроект.
- Перезагрузите компьютер. Если Premiere по-прежнему не подбирает новый шрифт, перезагрузка компьютера может позволить ему это сделать.
Эти исправления должны позволить Premiere распознавать ваш недавно установленный шрифт, чтобы вы могли использовать его в своем проекте.
Сделайте ваши видео выделяющимися, добавив шрифты
Важная часть создания внешнего вида видео, безусловно, может включать в себя шрифты, которые вы выбираете, и то, как вы их используете. Дизайн шрифта может сыграть решающую роль в сообщении, которое вы пытаетесь донести. Так почему бы не сделать все правильно и не добавить идеальный шрифт для вашего проекта с помощью этого руководства.
Программы для Windows, мобильные приложения, игры — ВСЁ БЕСПЛАТНО, в нашем закрытом телеграмм канале — Подписывайтесь:)
How to Add Fonts to Premiere Pro for Captions and Subtitles
From bombastic opening crawls in movies such as Star Wars to simple captions for YouTube, text is a great way to add a sense of professionalism to creative content. It’s one thing to plop text into a video and something entirely different to make sure that text stands out.
This is where choosing the right font comes into play. This post will cover the importance of fonts in visual media as well as tips and tricks for adding and managing new fonts on both Windows and Mac operating systems.
There will also be some great tips for captioning and creating subtitles. Everything needed to bring out the very best in a video’s text can be found right here.
Why are fonts important for visual media?
Fonts can make or break how a viewer perceives a piece of media. It is one of the easiest tells to figure out if the creator is an amateur in video editing programs such as Adobe Premiere Pro.
Think of fonts in the same way a baker looks at decorations on a cake. In theory, it shouldn’t matter what the cake looks like as long as it tastes great. If there isn’t a visual appeal to the cake though, will anyone eat it?
The same can be said for the text in a video. It doesn’t matter how good the content of the text actually is; if the visual appeal isn’t there, will anyone read it?
Here are some of the other reasons fonts are a key part of visual media:
Readability
Certain fonts are much easier to read than others. While super stylized fonts might look cool and be fun to play around with, it’s best to keep fonts as simple as possible for the sake of readability. Naturally, there will always be exceptions to this, but as a general rule of thumb, it’s a good rule to follow.
Conveying a certain tone
Different fonts also convey various types of tones. Simple changes such as making the font bold or italic can emphasize tone as well. A larger and heavier font can show power and strength while something in cursive can represent a more dramatic tone. This is why figuring out the content’s tone is from the start can be so important.
Consistency and establishing recognition
Every brand needs consistency. Something as seemingly simple as fonts can be incredibly glaring if there’s no consistency within the videos being produced. A lot of incredibly successful companies use the power of fonts to establish brand dominance and loyalty.
Companies like Disney, Coke and Marvel have logos that are instantly recognizable because of the font choice.
How to add fonts to Adobe Premiere Pro
It’s now easier than ever to find the perfect font for video content. Businesses like Adobe make finding the right fit simple thanks to sites such as Adobe Fonts (previously known as Typekit).
The best part is that most of the fonts available on the web are completely free. There are also plenty of amazing, high quality ways to caption and transcribe videos through programs such as Simon Says which sync up beautifully with Adobe Premiere Pro. These programs usually only take a few clicks to use and are intuitive as well as time saving.
1. Find your fonts
For Adobe Creative Cloud users, adobe fonts is a one stop shop for everything font related, housing a whopping 20,000 different typefaces. These free fonts are available for all Adobe Creative Cloud members regardless of the subscription plan and sync up with all Adobe apps. Finding these fonts can only be done via the Adobe Fonts web app (what was once Typekit).
This web app syncs with the Adobe Creative Cloud app which is available for both Mac and Windows devices. Look up tools such as visual search make Adobe Fonts incredibly versatile to use.

For people not inside the Creative Cloud family, Google fonts is an excellent free alternative. While the library is smaller than that of adobe fonts, it’s an amazing free and easy tool, offering more than 1,300 different font families.
Much like Adobe Fonts, the robust search function makes finding the right font for creative content a breeze.
It’s important to remember though that finding the right font is a very creative choice and needs to be treated in the same manner as any other creative decision.
2. Download and install fonts
Adobe Creative Cloud makes downloading fonts as easy as one click. To import fonts on the Adobe Fonts web app, simply find a font and click the activate fonts button in the right hand corner. It’s as easy as that.
These fonts are then put inside the Adobe Creative Cloud app and can be viewed by clicking the font icon in the upper right hand corner. Here, there are tabs for both active fonts and previously active fonts.
Once activated, these fonts will sync up with all adobe creative cloud apps (programs such as Adobe Premiere Pro, After Effects, Photoshop, and much more).

Sites such as Google Fonts require the font to be downloaded directly to the computer. While downloaded fonts are not as intuitive as Adobe Fonts, it’s still a straightforward and easy process.
For Windows users:
- Select a font and click on “download family”.
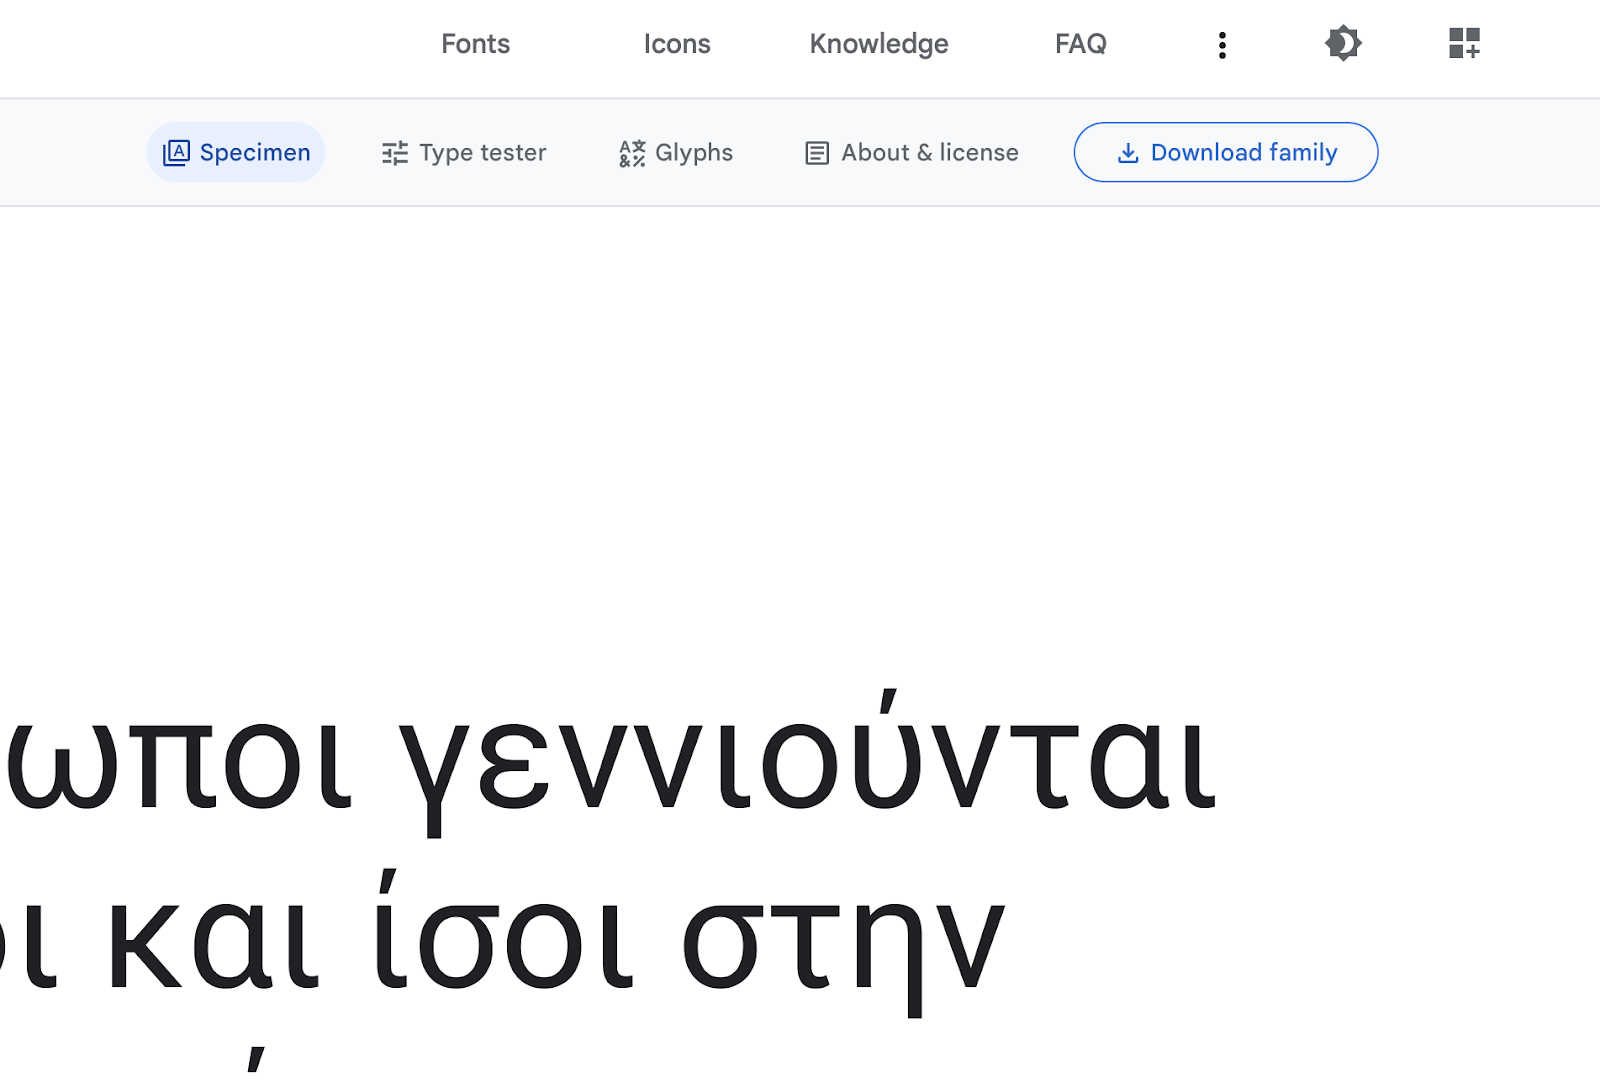
- Unzip the downloaded zip file anywhere on the computer.
- Double click the folder. Inside should be various files containing the various fonts within that family.
- Right-click on these files and then click on install.
For Windows, the font files within the folder will either be TrueType (.ttf), OpenType (.otf), or PostScript (.ps).
- Select a font and click on “download family”.
- Open up the downloaded folder on the computer.
- Double click the file. This will open up the font in mac’s font book.
- Within the font book, click the install button on the lower right hand corner.

Much like windows, mac also supports both TrueType (.ttf) and OpenType (.otf) file formats. Once this process is completed, the font will now be on the computer.
4. Organize your fonts
Organizing fonts in Adobe Premiere Pro is a breeze. Once the fonts are installed, they’ll show up in the essential graphics panel in Adobe Premiere Pro right underneath the “text” icon.
Clicking on it will show a long dropdown list of fonts, including the ones just installed (this may require restarting Adobe Premiere Pro in some cases).
There are a plethora of default fonts to play with already in the fonts window, no installation is required.

Each font in this dropdown list has a star next to it. Clicking the star next to the font will highlight that font type in blue. These fonts can be easily viewed by clicking the star icon at the very top of the dropdown list.
This is a great way to sort through favorite fonts which can be incredibly handy the more and more fonts that are downloaded.

Managing your fonts in Adobe Premiere
Managing fonts in Adobe Premiere is an important way to keep organized with an abundance of projects. Every font that is downloaded is listed under My Adobe Fonts.
Here, Adobe makes it incredibly simple to activate fonts as well as look at previously active fonts, web projects, and purchased fonts. Adobe has a great how-to site explaining how to manage all of these elements in further detail.
Quickly caption your videos with Simon Says
In short, finding and managing fonts is now easier today than it’s ever been. Programs like Adobe fonts are great tools for searching for fonts that make text engaging and fun to look at. There are no shortages of tools to spice up your video content.
Plus, programs such as Simon Says are great and affordable ways to add an extra layer of professionalism to videos.
In today’s climate where video content is quicker and easier than ever to pump out, it’s important to stand out from the crowd. Creating engaging captions is a great method to engage viewers online and go from amateur video maker to professional content creator.