FBI 3DS
FBI is an open source title manager for the 3DS, which allows you to install/uninstall homebrews in CIA format.
Features
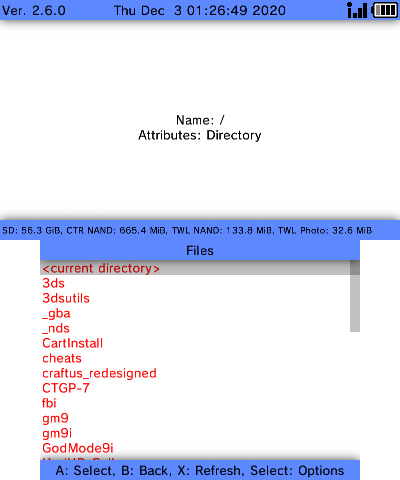
- Browse and modify the SD card, TWL photos, TWL sounds, save data, and ext save data.
- Export, import, and erase save data from DS cartridges.
- Export, import, and delete save data secure values.
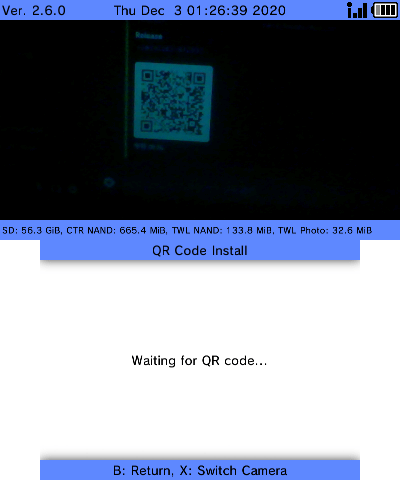
- Install titles/tickets from a file system, over a local network, or over the Internet with a URL or QR code.
- Automatically imports title seeds on installation, either from the Internet or the SD card.
- Browse and modify CTR NAND, TWL NAND, and system save data.
- Dump the raw NAND image to the SD card.
- Launch titles installed to the system.
Installation
Installing
Available in CIA, 3DS and 3DSX formats.
To use the 3DSX version, ensure the required services are accessible by either using Luma3DS’s homebrew launcher support or running a kernel exploit beforehand, such as fasthax or waithax.
Building
Requires devkitARM, along with 3ds-curl, 3ds-zlib, and 3ds-jansson from the devkitPro pacman repository, to build.
User guide
Servefiles
servefiles is a Python script included with FBI for serving CIA files via a local HTTP server and sending the URLs to FBI over the network. See the included README.md file for more information.
For Android users, a modified version of servefiles made by DMSalesman can be found here.
Q. Can I install any CIA I want?
In order to install unsigned/custom CIAs, you must be running a CFW with signature patches.
Otherwise, you can only install legitimate, signed CIAs.
Q. FBI is failing to boot or has issues as a 3DSX!
If you use Luma3DS, make sure you are running the latest version.
Otherwise, make sure to run a kernel exploit, such as fasthax or waithax, before running FBI.
Q. FBI is failing to install my CIA!
Make sure your CIA file is valid.
Also, make sure your SD card isn’t a counterfeit, check for filesystem issues, and try a different SD card if possible.
Screenshots
Media
How To Get FBI On 3DS 11.16+ (CFW REQUIRED!!) (Crushkai)
Changelog
v2.6.1 2021/05/18
- Fix inability to cancel ext save data deletion.
v2.6.0 2019/01/02
- Remove TitleDB support.
- Add TLSv1.2 support.
- In testing, speeds were
- Hope to investigate the matter further and improve speeds in the future, but wanted to finally get something out for the time being.
v2.5.3 2018/09/07
- Fix lack of support for HTTP relative redirects.
- Fix multi-file actions not respecting file list filters.
- Fix title list crash related to loading the metadata of DS(i) titles.
v2.5.2 2018/08/21
- Fix URL installation.
v2.5.1 2018/08/21
- Add option to mark installed TitleDB entries as updated.
- Add option to sort TitleDB list by installation status.
- Display installed version and date from TitleDB cache.
- Remove CDN installer due to recent server-side changes requiring tickets.
- Titles not present in the TitleDB installation cache are no longer considered as installed by the TitleDB list.
- Fix inaccurate battery level icons.
- Fix main menu updater getting confused by another TitleDB entry named FBI.
- Fix main menu updater not updating FBI’s TitleDB installation status.
- Fix potential crash from trying to display unsupported text characters.
v2.5.0 2018/02/23
- Clean up various bits of core code.
- Fix font size on CHN/KOR/TWN devices.
- HTTP operations now support gzip/deflate compression, which should reduce bandwidth usage when supported by the server.
- Load file metadata after populating full list. Directories containing a lot of CIAs should populate faster now, although detailed information will not be immediately available for all files until loading has finished.
- File operations for which file metadata is unnecessary should also load faster.
- Titles can be installed as a 3DSX and/or a CIA, depending on availability.
- Descriptions and categories are displayed in the main TitleDB list, and detailed information is displayed for CIA and 3DSX versions after selecting a title.
- All outdated titles can be updated at once by pressing Y in the TitleDB list.
Credits
Banner: Originally created by OctopusRift, touched up by Apache Thunder, updated for new logo by PabloMK7.
Прошивка 3DS
Сразу отмечу, что автор статьи не несет ответственности за работоспособность Ваших девайсов! Помните: все, что Вы делаете — Вы делаете на свой страх и риск!
Мне удалось заполучить 3DS в 2022 году, ко мне в руки она попала уже взломанная, но мне было интересно как же можно обновить прошивку и как это работает. В этот момент я начал смотреть видео гайды на ютубе и везде была одна и та же проблема, за основу брался некий архив, в котором уже было что-то установлено. Автор предлагает скачать архив, закинуть все содержимое в корень флеш карты и забыть об этом. Меня этот подход не очень устроил, поэтому я решил попытался разобраться что же находится в этом загадочном архиве, а за одно расписать по пунктам как же делается прошивка.
Весь процесс делится на два простых шага: подмена bootloader’а, чтобы он позволял запускать нам свои прошивки и установка прошивки на флешку с окружением для дальнейшей работы.
Замена bootloader’a
1) Обновляем прошивку консоли до последней версии (на данный момент это 11.15.0)
2) Подготавливаем флеш карту
Нам нужно отформатировать флеш карту в формат fat32.
Инструкция для Linux
Открываем устройство через fdisk
1) «o» — выбираем DOS partition table
2) «n» — создаем партицию на весь размер флеш карты
3) «t» — запускаем смену типа партиции и выбираем ‘c’ — W95 FAT32 (LBA)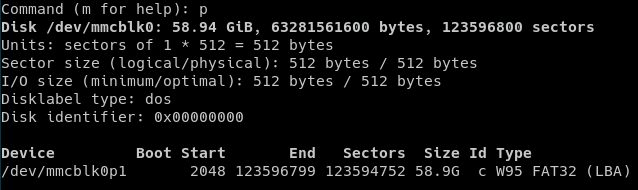
В итоге должно выглядеть примерно так
Скачиваем rufus https://rufus.ie
Выбираем флеш карту в выпадающем списке
Выставляем следующие настройки:1) Метод загрузки — Незагрузочный образ
2) Метка — оставляем пустым
3) Файловая система — FAT32
4) Убираем галочку — Создать расширенную метку и значок устройства
3) Как только у нас есть готовая флешка, устанавливаем ее в консоль и запускаем ее. Приставка создаст на флеш карте папки, которые нам потребуются в дальнейшем. После этого консоль можно выключать и подключать флеш карту обратно к ПК.
4) На флешке в корне должна появиться папка Nintendo 3DS, а внутри нее будет папка содержащая в названии 32 шестнадцатеричных цифры — это идентификатор консоли, нужно его сохранить. Для удобства назовем его ID0.
5) Так же нам нужно получить свой friend code. Для этого нужно будет создать аккаунт в консоли, если он у вас отсутствовал, либо же просто скопировать его, если аккаунт уже есть.
6) Заходим на сайт https://seedminer.hacks.guide/, там нужно будет указать свой friend code и ID0. После этого на консоли к нам в друзья добавится бот, нужно принять заявку. После добавления бота в друзья, смотрим за прогрессом на сайте и ожидаем завершения процесса. Как только все завершится, появится возможность скачать файл movable.sed, скачиваем его.
7) После получения файла заходим на другой сайт https://3ds.nhnarwhal.com/3dstools/unsafemode.php и указываем ранее полученный movable.sed файл. Нажимаем кнопку Build and Download, скачиваем полученный архив unSAFE_MODE.zip. Архив содержит в себе два файла: F00D43D5.bin и usm.bin
8) Файл usm.bin помещаем в корень флеш карты.
9) В корне флешки, внутри папки Nintendo 3DS находится папка с именем ID0, который мы до этого скопировали. А внутри папки ID0, находится еще одна папка содержащая в названии 32 шестнадцатеричных цифры (пусть будет ID1), вот внутри нее нам нужно создать еще одну директорию Nintendo DSiWare и поместить туда F00D435.bin
Т.е. итоговый путь должен выглядеть как-то так:
Nintendo 3DS/ID0/ID1/Nintendo DSiWare/F00D435.bin10) Скачиваем zip архив прошивки luma https://github.com/LumaTeam/Luma3DS/releases из последнего релиза. Внутри архива находится два файла boot.firm и boot.3dsx, оба файла помещаем в корень флешки — это и есть новая прошивка, которая будет запускаться вместо стандартной нинтендовской.
11) Скачиваем boot9strap https://github.com/SciresM/boot9strap/releases/ релизную версию. В корне флеш карты создаем папку boot9strap и копируем в нее из архива файлы boot9strap.firm и boot9strap.firm.sha
12) Скачиваем SafeB9SInstaller https://github.com/d0k3/SafeB9SInstaller/releases/ последнюю версию. Из архива копируем файл SafeB9SInstaller.bin в корень флеш карты.
13) Подготовка завершена, вставляем флеш карту назад в консоль и запускаем ее.
В следующих шагах произойдет подмена bootloader’а консоли на новый.
14) Заходим в “Системные настройки” (System Settings) -> “Управление данными” (Data Management) -> “DSiWare”
Выбираем на нижнем экране вкладку сверху «SD Card«
Выбираем «Inject Haxx» и приставка должна перезагрузиться.15) Теперь зажимаем одновременно 4 клавиши: L + R + крестовину вверх + A, а затем, не отпуская указанные кнопки, включите приставку. Когда подсветка экранов засветится, отпустите кнопки. Приставка загрузиться в режим восстановления.
16) В меню восстановления:
Нажмите “OK”, чтобы начать поиск точки доступа
Согласитесь с условиями пользования и нажмите ОК
Поиск завершится с ошибкой 003-109. Так и задумано, нажмите ОК
На запрос “Выполнить Интернет-настройки” (Would you like to configure Internet settings?), нажмите “Выполнить”
В появившемся меню нажмите несколько раз “Далее”, затем выберите Связь 1 (Connection 1) -> Изменить настройки (Change Settings) -> перейдите на следующую страницу (стрелка в правой части экрана) -> Настройки прокси (Proxy Settings) -> Подробнее (Detailed Setup)
Когда верхний экран окрасится в серый и на нём появится сообщение B9S install SUCCESS, нажмите любую кнопку
17) После рестарта консоли вы должны попасть в меню настройки Luma3DS. Можно просто нажать Start и ничего не изменять. Вы в любой момент можете зайти в него, при выключенной консоли зажать и держать клавишу Select и после этого клавишу Power, дождаться включения консоли и вы должны увидеть это же меню.

Как выглядит экран настройки Luma3DS
Если все прошло успешно, то поздравляю, вы обладатель взломанной консоли!
Так же хочу отметить, если вы сторонник чистой флеш карты как и я, из-за чего я, собственно, и сел разбираться как работает установка прошивки, то на этом этапе вы спокойно можете удалять с флеш карты все, кроме загрузчика Luma, который мы установили на шаге 10.
Настройка окружения
В данном блоке мы выполним установку приложений, которые помогут нам пользоваться нашей консолью на полную. Краткое описание каждого приложения:
FBI — установщик пакетов *.cis, с помощью которого и будут производиться все установки
Homebrew Launcher Loader — приложение, которое позволяет запускать *.3dsx файлы без установки в систему
Checkpoint — приложение, позволяющее делать бэкапы своих сохранений
GodMode9 — утилита, которую можно запустить при старте консоли. Вообще обладает мощным функционалом, но для нас самое главное, что она позволяет конвертировать *.3dsx в *.cis файлы, чтобы их можно было устанавливать полноценно в систему
ndsForwarder — позволяет создавать иконки для DS приложений и запускать их
Anemone3DS — менеджер тем
По сути — это главное приложение, которое будет позволять нам, устанавливать другие приложения. Поэтому его мы и устанавливаем первым делом.
Для начала скачиваем архив из последнего релиза https://github.com/TheRealZora/FBI-Reloaded/releases нам понадобятся оба файла FBI-Reloaded.3dsx и FBI-Reloaded.cia, светлую или же темную тему — это уже на ваш выбор.
Дело в том, что FBI мы установим при помощи FBI. В новой прошивке можно хитрым образом запустить Homebrew Launcher, который позволит нам, запустить FBI-Reloaded.3dsx приложение, при помощи которого мы уже и установим FBI-Reloaded.cia.В корне флеш карты создаем две папки 3ds и cias. FBI-Reloaded.3dsx помещаем в 3ds, а FBI-Reloaded.cia в cias.
Теперь нам нужно запустить Homebrew Launcher, делается это следующим способом. Запускаем в консоли приложение Download Play, после этого зажимаем комбинацию клавиш L + вниз на крестовине + Select.
На нижнем экране вы должны увидеть черный экран с меню.
Выбираем пункт Miscellaneous options -> Switch the hb. title to the current app.
После этого выходим из меню несколько раз нажав B, а затем закрываем приложение.
То что мы выполнили временно заменяет приложение Download Play на Homebrew Launcher. После закрытия приложения повторно запускам его и должны увидеть заветный Homebrew Launcher.На нижнем экране в списке приложений мы должны увидеть FBI, запускаем его.
После запуска FBI на нижнем экране заходим в верхний пункт SD, далее выбираем папку cias, внутри нее выбираем FBI-Reloaded.csi, в контекстном меню выбираем либо Install CIA, либо же Install and delete CIA если не планируете сохранять эти файлы после установки.Если все прошло успешно, то на главном экране мы должны увидеть новое приложение.
Так же нам больше не требуются файлы, которые мы изначально копировали в 3ds и cias, их можно удалять.Так же можно не переживать по поводу приложения Download Play, после перезагрузки консоли Homebrew Launcher больше не будет запускаться вместо него.
Homebrew Launcher
В этот раз все гораздо проще. Скачиваем Homebrew_Launcher.cia https://github.com/PabloMK7/homebrew_launcher_dummy/releases, помещаем в /cias, запускаем FBI и устанавливаем с удалением или же оставляем cia файл.
Checkpoint
Скачиваем Checkpoint.cia https://github.com/FlagBrew/Checkpoint/releases, помещаем в /cias, устанавливаем через интерфейс FBI.
В интерфейсе приложения вы можете создавать точки возврата сохранений для каждой игры по отдельности.
GodMode9
Как и было указано выше — это утилита с мощным функционалом, но мы не будем рассматривать его весь. Дело в том, что в интернете очень часто встречаются приложения в формате *.3dsx, которые мы не можем установить к себе в систему. Через GodMode9 мы будем конвертировать их в *.cia, а потом обычным способом будем устанавливать их через интерфейс приложения FBI.
Скачиваем zip архив https://github.com/d0k3/GodMode9/releases из последнего релиза. В этом архиве нам интересен файл GodMode9.firm и папка gm9. Сам файл GodMode9.firm — это приложение, которое и будет запускаться, а в gm9 лежат скрипты для этого приложения, которые могут быть исполнены в интерфейсе.
Папку gm9 помещаем в корень флеш карты. А файл GodMode9.firm должен лежать по пути /luma/payloads/GodMode9.firm
Чтобы проверить как работает эта утилита, поместим какой-нибудь *.3dsx файл в /cias, например test.3dsx.
Чтобы попасть в GodMode9 нам нужно выключить консоль, а затем зажать и удерживать клавишу Start и включить консоль, дождаться загрузки и мы должны увидеть интерфейс приложения.
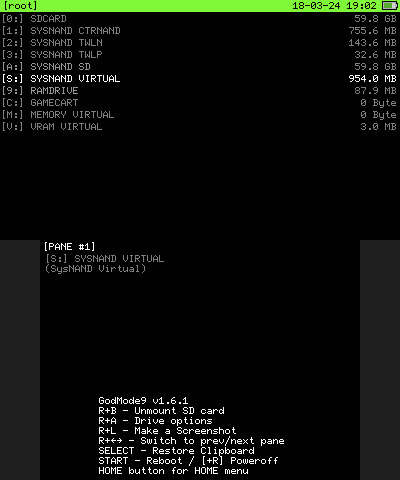
Интерфейс приложения GodMode9
Выбираем первый пункт SDCARD, далее заходим в папку cias, выбираем test.3dsx, в контекстном меню выбираем пункт NCSD image options -> Build CIA from file, ждем завершения процесса и нажимаем клавишу A для подтверждения. Готовый *.cia файл будет находиться по пути /gm9/out/test.cia
Теперь мы можем перезагрузить консоль нажав Start.
Дальше открываем FBI, переходим в директорию /gm9/out и устанавливаем приложение.Больше нам test.3dsx и test.cia не нужны, можем удалять их.
ndsForwarder
Для запуска DS приложений можно установить эмулятор и через его контекстное меню можно заходить в папку с ромами, запускать нужный, но это неудобно. Лаконичнее выглядит вариант, когда для каждой игры на главном экране присутствует иконка, через которую мы и можем запускать приложение. ndsForwarder по сути не производит установку приложения как это делает FBI с *.cia файлами, а просто создается иконка для приложения, которая автоматически запускает эмулятор с указанием *.nds файла.
Скачиваем ndsForwarder.3dsx https://github.com/MechanicalDragon0687/ndsForwarder/releases и помещаем в папку 3ds.
Скачиваем TWLFix-CFW.3dsx https://github.com/MechanicalDragon0687/TWLFix-CFW/releases и помещаем в папку 3ds.
Скачиваем 7z архив https://github.com/RocketRobz/NTR_Forwarder/releases, внутри архива находится папка _nds, ее помещаем в корень флеш карты.Теперь нам нужно поместить какое-нибудь *.nds приложение на флеш карту в любое удобное место. Например создадим директорию DS Apps в корне флеш карты и поместим туда файл test.nds
Загружаем консоль, открываем Homebrew Launcher, находим в списке NDS Forwarder Generator, запускаем его. Переходим в директорию DS Apps, соглашаемся на установку приложения и можем выходить на главный экран, там должна появиться иконка только что созданного ярлыка.
Если вы хотите, чтобы изображение при запуске DS приложения не растягивалось на весь экран, то вы можете зажать клавишу Start перед запуском и тогда у вас по бокам появятся рамки, но зато картинка будет в оригинальном разрешении.
Замечу еще раз, в данном случае мы не можем удалять файлы из папки DS Apps т.к. сами эти приложения и запускаются.
Для того, чтобы удалить ярлык с главного экрана, в настройках нужно заходить в пункт Data Management -> DSiWare
Anemone3DS
И завершим наш список приложением для установки кастомных тем для главного меню.
Скачиваем Anemone3DS.cia https://github.com/astronautlevel2/Anemone3DS/releases, помещаем в cias и устанавливаем через FBI.В корне флешки создаем две папки themes и splashes.
Найти готовые темы можно тут https://themeplaza.art/themes. Скаченные zip архивы кладем в папку themes.Единственный подвох, с которым вы можете столкнуться — это при первом запуске в приложении отображается ошибка «Theme extdata does not exist! Set a default theme from the home menu.» Для решения этой проблемы выходим в главное меню, в левом верхнем углу нажимаем на кнопку «HOME Menu Settings» и изменяем тему на любую из представленных, например красную. После этого снова заходим в приложение и устанавливаем загруженную.
3DS: How to install FBI (For CIA Files)
Note from Wololo: This tutorial on How to install FBI on your 3DS (For CIA Files) was initially published by /Talk member genxmur, as part of our monthly tutorial contest. Genxmur won the June tutorial contest for the 3DS (a $10 Amazon gift code) with this entry. You can find the original post here.
In case you don’t have or can’t afford a gateway or sky3ds this can be an easy way to install Games (mainly). CIA files are basically unsigned code that you can run, so you run anything without any ‘checks’. You must already have a CFW installed for this to work, you can’t run unsigned code on OFW. Once you do that, come back here.
- Go here and download FBI.zip
- Extract the contents and copy the FBI Folder to the 3ds folder on your SD Card.
- There should be a file called fbi.cia inside the Extracted content, copy this file to the root of your SD Card OR you can create a specific folder for .cia files inside the root and copy it there.
- Put your SD Card back into your 3ds and go into your homebrew launcher. Open FBI and navigate to the location of the .cia you just copied and install it.
- You should now have an FBI app in your home menu so you don’t have to use homebrew launcher every time you wanna install something new
- .
- Profit! ��

For installing CIA files or games, just copy xyz.cia file to your SD card (again in root or a new folder you created in root).
NOTE:Installing large .cia files takes time, don’t worry if it says that the estimated time for installing is 20-30 minutes. It’s completely normalWant a chance to win a $10 Amazon Gift Code and be featured on the blog with your own guide? Join our monthly tutorial contest here!
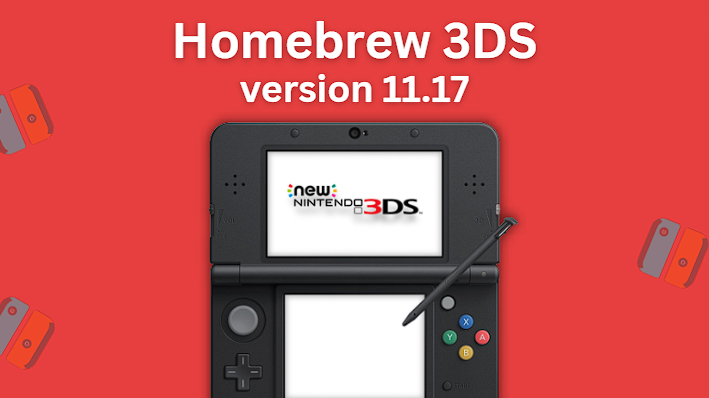
How To Homebrew 3DS Guide | Version 11.17
0
If you’re looking for how to Homebrew 3DS handhelds for the New 3DS, New 3DS XL, and New 2DS XL that have firmware version 11.17.0 and are from the EUR, JPN, and USA regions, you’ve definitely come to the right place. In this guide, we’ll be breaking down how to hack your 3DS for version 11.17.0.
Note: 3DS firmware 11.17.0 is the most recently released version for the Nintendo 3DS. There are many system versions available, so make sure you have 11.17.0 installed.
We do not condone piracy or downloading ROMs illegally. Before you do any tinkering with your 3DS, be sure to check applicable laws for where you live to ensure you’re not doing anything you shouldn’t be.
Necessary disclaimer: We will not be held responsible if anything goes wrong while following this guide. If you follow the instruction laid out in it correctly, you shouldn’t have any problems, however exceptions do occur. This guide is only for New 3DS, New 3DS XL, and New 2DS XL systems – if you do not have one of these, this guide will not work for your 3DS.
It is uncommon for 3DS systems to be bricked using the latest methods available, however you should know the risks associated with hacking your 3DS before you try. Also, if you do choose to hack your 3DS, be weary of playing games online because there is a chance Nintendo could end up banning you if they realize you’re on a hacked 3DS.
Lastly, before we get started, if you are looking to emulate the 3DS, be sure to check out our list of the best 3DS emulators.
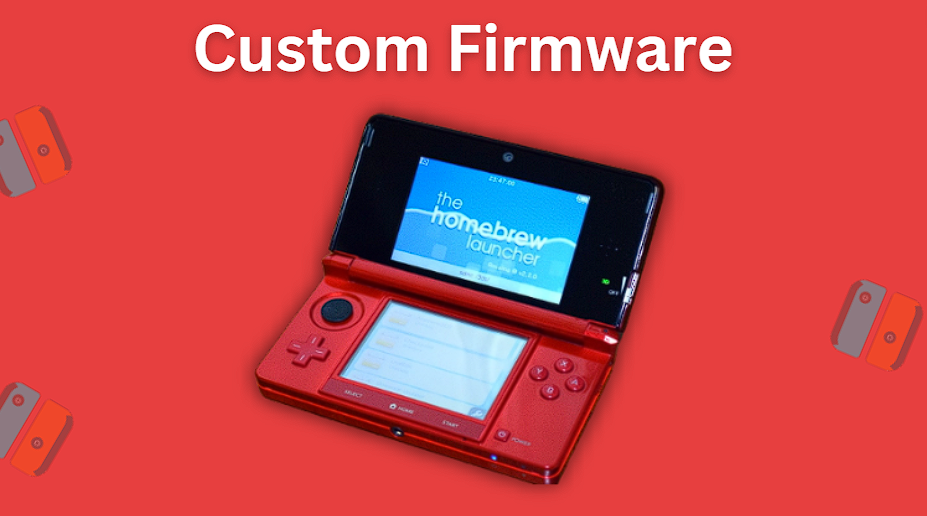
What Is Custom Firmware?
What is custom firmware?
Custom Firmware is a software modification that you install onto your 3DS device, allowing you to do anything that the 3DS is capable of. Nintendo’s firmware by default has certain safeguards in place that prevent certain actions from being able to take place. By installing custom firmware, you’re enabling your 3DS to do other actions that are required in order to homebrew it.
The following is a list of typical uses for custom firmware:
- Installing and running the homebrew launcher to play games
- Getting around region locked titles that are bound to specific regions of the world
- Being able to customize the 3DS home screen and install custom themes and badges
- Ability to play ROM hacks
- Edit your save data management and your backup files
- Ability to emulate games from other systems and enable playing Nintendo DS and Gameboy Advance games
- Ability to install games from your physical games directly onto your 3DS console
What We’ll Be Installing In This Guide
Throughout this guide, you’ll be installing a couple of different things:
- Boot9strap: a modified firmware that uses Sighax and a vulnerability in the console’s NDMA engine to gain code execution access (sounds confusing, but it’s really not)
- Luma3DS: a program that patches the system software for New 2DS and 3DS handhelds
- Other homebrew software like the package installer, save file manager, and the homebrew launcher app store
- Also, make sure that you have a spare SD card lying around that you can overwrite the files on
Getting Started
First we’ll need to check our 3DS to see if any custom firmware has previously been installed.
1. Checking Your 3DS for Custom Firmware
- Turn your 3DS off completely
- While holding down the Select button, turn your 3DS back on with the Select button still held down
- If you don’t see any menu popup, you’re good to go and can continue to section 3 below – if you do see a menu popup, this means your 3DS already has custom firmware installed and you’ll want to upgrade your firmware to the most modern one
2. Upgrading your Custom Firmware
If you don’t have any custom firmware already installed on your 3DS, you can skip this section and jump down to section 3 below. If you do have custom firmware installed (arm9loaderhax or boot9strap), read on so that you can upgrade it and continue the guide.
- Turn off your 3DS completely
- Hold down the Select button and turn the console on with the Select button held down
- You should see a menu pop up
The next steps will depend on which version of custom firmware you have installed.
Luma Version 7.0.5 or Lower
If you see a Luma3DS version of 7.0.5 or lower:
- First, download the following files (for magnet files you need to use a torrent client like qBittorrent or Deluge, they will start with magnet:):
New 3DS Users Only:secret_sector.bin (magnet link)The latest release of Luma3DS (the Luma3DS .zip file)The v7.0.5 release of Luma3DS (direct download)The latest release of SafeB9SInstaller (direct download)The latest release of boot9strap (direct download) - Now that you have the above files downloaded on your computer, turn off your 3DS completely (you will be overwriting any existing files on your SD card)
- Insert your SD card into your computer
- Copy the boot.firm and boot.3dsx files from the latest version of the Luma3DS .zip file that you downloaded to the root directory of your SD card
- Now copy arm9loaderhax.bin from the v7.0.5 Luma3DS .7z file to the root of your SD card
- You’ll also need to copy SafeB9SInstaller.bin fromt he SafeB9SInstaller .zip to the /luma/payloads/ folder on your SD card (If either the luma or payloads folders don’t already exist on your memory card, you’ll need to create them)
- Check your SD card for any other .bin payloads in the /luma/payloads folder on your SD card and make sure you delete them (for example: GodMode9.bin, Decrypt9WIP.bin, etc)
- Next, create a folder named boot9strap in your SD card’s root directory
- You’ll now want to copy boot9strap.firm and boot9strap.firm.sha from the boot9strap .zip to the /boot9strap/ folder on your SD card
- Now copy secret_sector.bin to the /boot9strap/ folder on your SD card
- Remove your SD card from your computer and put it back into your 3DS
- Hold down the Start button while turning on your 3DS to launch SafeB9SInstaller (If you see the Luma configuration screen instead of SafeB9SInstaller, press the Start button and shut down your 3DS to try again to refresh it)
- Let all of the safety checks complete
- When the screen prompts you to do so, add the key combo shown on the top screen to install boot9strap
- After installation has complete, press the A button to restart your 3DS
- Your console should now restart intot he Luma3DS configuration menu
- Press the Start button to save and restart
Luma Version 7.1
If you see a Luma3DS version of 7.1:
- Download the following files:
The latest release of SafeB9SInstaller (direct download)The latest release of boot9strap (direct download)The latest release of Luma3DS (the Luma3DS .zip file)
- After you have downloaded the above files, insert your SD card into your computer (you will be overwriting any existing files on this SD card)
- Create a folder called boot9strap in the SD card’s root directory
- Copy boot9strap.firm and boot9strap.firm.sha from the boot9strap .zip to the /boot9strap/ folder on your SD card
- Copy SafeB95Installer.firm from the SafeB95SInstaller .zip to the root directory on yoru SD card and rename it to boot.firm
- Now go ahead and remove your SD card from your computer and put it into your 3DS that is turned off
- Turn your 3DS on (you should see it launch SafeB9SInstaller)
- When asked, put in the key combo shown on the top screen to install boot9strap
- Once it finishes, hold down your 3DS power button to turn the console off again
- Remove your SD card from your 3DS and put it back into your computer
- Copy boot.firm and boot.3dsx from the Luma3DS .zip to your SD card’s root directory (you will replace any existing files)
- Remove your SD card from your computer and now put it back into your 3DS
- Turn your 3DS on and when it boots into the Luma 3DS configuration screen, press the Start button to save and restart your 3DS
Luma Version 8.0 or higher
If you see a Luma3DS version of 8.0 or higher:
First make sure that your SD card you’re using is formatted as FAT32 (if it’s not, it won’t be compatible with your 3DS)
- First head over to this link and download the Luma3DS .zip file
- Now insert your SD card into your computer and copy boot.3dsx and boot.firm from the Luma3DS .zip to your SD card’s root directory (replace any already existing files on the SD card)
- Remove your SD card from your computer and put it into your 3DS
- Turn your 3DS on and once the Luma3DS configuration menu appears on screen, press the Start button to save and restart your 3DS
3. Installing The 3DS Homebrew Launcher Super-Skaterhax
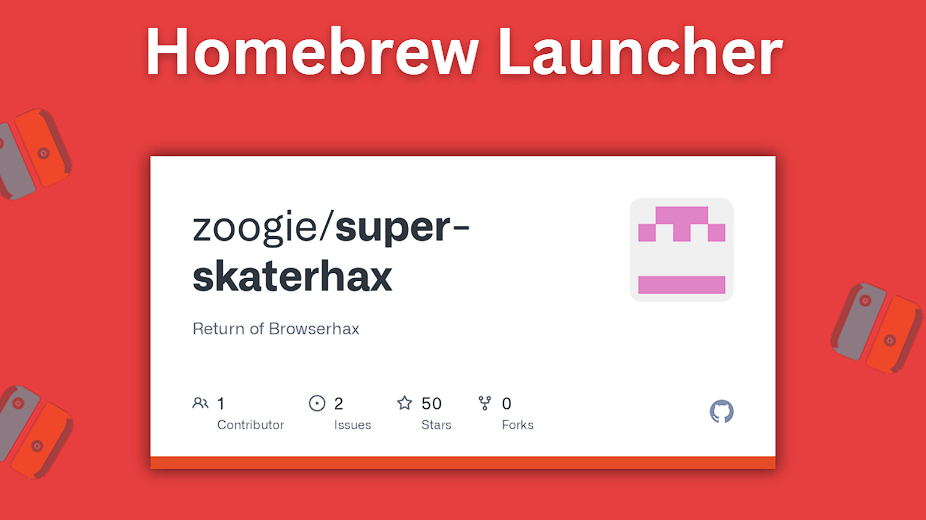
Installing the 3DS Homebrew Launcher Super-Skaterhax
First you’ll need to make sure you have downloaded the following files:
- The latest release of Luma3DS (the Luma3DS .zip file)
- The latest release of super-skaterhax (the release .zip file)
Once the above files are downloaded on your computer, you can now begin:
- Turn off your 3DS completely and insert your SD card into your computer
- Copy boot.firm and boot.3dsx from the Luma3DS .zip to your SD card’s root directory
- Be sure to copy everything inside the folder for your 3DS’s region (and also system version if your region is USA) in the super-skaterhax .zip to your SD card’s root directory
- Remove your SD card from your computer and place it in your 3DS
- Turn your 3DS on
- Open up your 3DS’s web browser and type the following URL in manually: https://zoogie.github.io/web/super
- Press the Select button or tap the Star icon on the screen to open the bookmark tab and choose Bookmark this page
- Press the B button to go back to the 3DS browser and then press the Start button to open the context menu
- Tap Settings, then Delete Cookies, and then press the A button to continue
- Press the Home icon to return the Home menu and immediately press the A button to launch the browser again
- Select the GO GO! button that you see on the top screen (if any prompts appear, be sure to approve them all)
- If successful, your 3DS should boot into the homebrew Launcher
- You can now turn off your 3DS
4. Installing Boot9strap HBL-USM
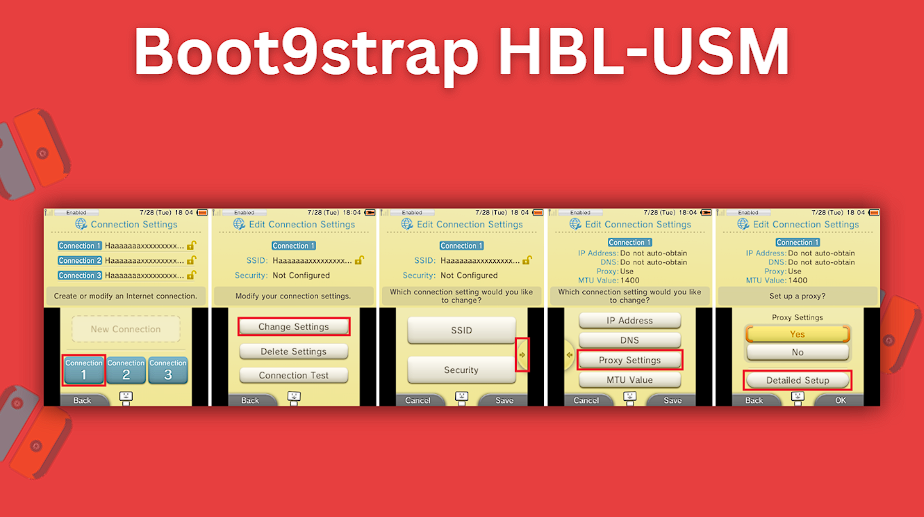
Image credit 3ds.hacks.guide
First make sure that you have the following downloaded on your computer:
- The latest release of SafeB9SInstaller (direct download)
- The latest release of unSAFE_MODE (direct download)
Now we’ll be copying the necessary files we need to enable the unSAFE_MODE exploit on our 3DS’s SD card. After that, we’ll go ahead and use the Homebrew Launcher to launch slotTool and overwrite our Wi-Fi slots with hacked data. Keep in mind that your 3DS’s Wi-Fi connections will be temporarily overwritten while the exploit is active.
- Go ahead and insert your SD cart into your computer
- Create a folder named boot9strap in your SD card’s root directory
- Copy boot9strap.firm and boot9strap.firm.sha from the RELEASE .zip into the /boot9strap/ folder on your SD card
- Now go ahead and create a folder and name it 3ds on the root of your SD card if you don’t already have one there (this is different than the Nintendo 3DS folder that the console automatically generates – this will store homebrew apps and data)
- Copy slotTool.3dsx from the slotTool folder inside the RELEASE .zip into the /3ds/ folder on your SD card
- Now copy usm.bin from the RELEASE .zip to the root folder on the SD card
- Also copy SafeB9SInstaller.bin from the SafeB9SInstaller .zip onto your SD card’s root directory
- Now go ahead and remove your SD card from your computer and put it back into your 3DS
- Turn your 3DS on and open up the Homebrew Launcher by visiting your Internet Browser
- Select slotTool from the list of homebrew to launch it and then select the INSTALL exploit to wifi slots 1,2,3 & shutdown option (some text will show on your screen and then the system should shut down)
We’ll now be entering Safe Mode and navigating to a menu to trigger unSAFE_MODE which will launch the boot9strap installer.
- Make sure your 3DS is turned off and hold down the following buttons: Left Shoulder + Right Shoulder + Up (D-Pad) + A (button) and while holding all of these buttons down at the same time, turn your 3DS on – be sure to keep holding all of these buttons down until the console boots up into Safe Mode
- Press the OK button to accept the update (there won’t actually be any update to install)
- Select I accept to accept the terms and conditions
- The update should fail and show an error code on screen 003-1099 (this is expected and normal)
- When you are asked Would you like to configure Internet settings? be sure to select Yes
- Now head to Connection 1 > Change Settings > Next Page (press the right arrow) > Proxy Settings > Detailed Setup
- Your console should now boot into SafeB9SInstaller
Now we’ll install custom firmware onto our 3DS.
- When you get asked, enter the key combo shown on the top screen to install boot9strap
- After it finishes, press the A button to restart your 3DS
- Your 3DS should boot up into the Luma3DS configuration menu (go ahead and leave these options to the default settings and don’t check or uncheck any of them)
- Press the Start button to save and restart your 3DS
- Your 3DS should now boot directly into Luma3DS by default (keep in mind, Luma3DS doesn’t visually look any different from the normal Home Menuso if it boots into the Home Menu, it should be running the custom firmware as expected)
We’ll now go ahead and restore the Wi-Fi profiles on the 3DS.
- Select and launch the Download Play application
- Wait until the two buttons appear (don’t press either of these buttons)
- Press Left Shoulder + Down (D-Pad)b + Select all at the same time to open the Rosalina menu
- Choose Miscellaneous options and then select Switch the hb. title to the current app
- Now press the B button to continue and then again press the B button to return to the Rosalina main menu
- Press the B button again to exist the Rosalina menu and then press Home
- After that, close Download Play and then relaunch the Download Play app
- Your 3DS should launch the Homebrew Launcher
- Select to launch slotTool from the list of Homebrew
- Select RESTORE original wifi slots 1,2,3
- Your console will restart and your Wi-Fi slots should be restored
5. Completing Setup
We’re now on the final section of this guide. We’ll be making some system file backups and installing some additional homebrew programs.
Be sure to first install the following:
- The latest release of Anemone3DS (the .cia file)
- The v3.7.4 release of Checkpoint (the .cia file)
- The latest release of Homebrew Launcher Wrapper (the .cia file)
- The latest release of Universal-Updater (the .cia file)
- The latest release of FBI (both the .cia and .3dsx files)
- The latest release of GodMode9 (the GodMode9 .zip file)
After you’ve downloaded all of the above, you can continue:
- Turn off your 3DS completely and also insert your SD card into your computer
- Create a folder in the root directory of your SD card called cias if you don’t already have one
- Copy all the CIA files Anemone3DS.cia, Checkpoint.cia, FBI.cia, Homebrerw_launcher.cia, and Universal-Updater.cia to the /cias/ folder on your SD card
- Now go ahead and copy FBI.3dsx into the /3ds/ folder on your SD card
- Also create a folder named payloads inside the luma folder on your SD card if it doesn’t already have one there
- Now copy GodMode9.firm from the Godmode9 .zip into the /luma/payloads/ folder on your SD card
- Also copy the gm9 folder from the GodMode9 .zip to your SD card’s root directory
- Go ahead and take your SD card out of your computer and put it into your 3DS that is now powered off
- Turn your console back on
Now we’ll be updating the 3DS to the latest version.
- Go to System Settings > Other Settings and then go all the way to the right and select System Update (if you see a message that your system is up to date, you’re good to go, otherwise update your system)
We’ll now be temporarily replacing Download Play with the Homebrew Launcher which we’ll be using to launch FBI. Don’t worry, Download Play will be available again after restarting the 3DS once we finish.
- Launch the Download Play app
- Wait until you see the Nintendo 3DS and Nintendo DS buttons
- Press and hold Left Shoulder + Down (D-Pad) + Select all at the same time to open up the Rosalina menu again
- Now choose Miscellaneous options and then select Switch the hb. title to the current app
- Press the B button to continue and then press the B button again to return to the Rosalina main menu
- Press the B button again to exit the Rosalina menu and then press Home to suspend Download Play
- At this point, press the Close button on the bottom screen to close out Download Play
- Now you need to launch Download Play again and your console should load up the Homebrew Launcher
Now we’ll be syncing the 3DS internal clock with the actual time and dumping the sound firmware required for some homebrew applications to use sound correctly.
- Hold the Left Shoulderbutton + Down (D-Pad) + Select all at the same time to open up the Rosalina menu
- Choose Miscellaneous options and then select Dump DSP Firmware
- Press the B button to continue and then select Nullify user time offset
- Press the B button to continue and then press the B button again to go back to the Rosalina main menu
- Press the B button one last time to exit the Rosalina menu
We’ll now be installing some useful homebrew apps from the Home Menu.
- Launch FBI from the list of homebrew
- Head to SD > cias
- Choose <current directory>
- Choose Install and delete al CIAs and press the A button to confirm your choice
- Now press Home and close Download Play
We’ll now be setting up our 3DS to be able to access some of the Luma3DS’s files even when an SD card isn’t inserted.
- Turn off your 3DS console
- Press down and hold the Start button and turn off your 3DS to launch GodMode9
- If you’re asked to create an essential files backup, press the A button to do it and then press the A button again to continue after it finishes
- If you’re asked to fix the RTC date&time, press the A button to do it and then press the A button to continue once it finishes
- Press Home to bring up the action menu and then select Scripts…
- Choose GM9Megascript and then choose Scripts from Plailect’s Guide
- Select Setup Luma3DS to CTRNAND
- When asked, press the A button to continue
- Press the A buttona gain to unlock SysNAND (lvl1) writing and then use the key combo shown
- Press the A button again to continue
We’ll now be removing some unneeded files from our SD card
- Select Cleanup SD Card and when asked, press the A button to go ahead
- Press the A button again to continue and then press the B button to go back to the main menu
Now we’ll be making some backups of files that we can use in the future if we ever need to recover data.
- Select Backup Options and then choose SysNAND Backup
- Press the A button to confirm (this will take a while so be patient at this step)
- Once it finishes, press the A button to continue and then press the B button to go back to the main menu
- Choose Exit
- Press the A button to relock write permissions if asked
- Head to [S:] SYSNAND Virtual and press the A button on Essential.exefs to choose it
- Choose Copy to 0:/gm9/out (if it shows you that this already exists, press the A button to overwrite the files)
- Press the A button to continue and then press Home to bring up the action menu
- Choose Poweroff system to turn off your 3DS
- With your 3DS still turned off, insert your SD card into your computer
- Copy <date>_<serialnumber>_sysnand_##.bin, <date>_<serialnumber>_sysnand_##.bin.sha, and essential.exefs from the /gm9/out/ folder on your SD card to a safe location on your computer
- Copy these backups to multiple locations (such as online file storage like Google Drive, an external hard drive that you have lying around, or somewhere else that you can access in the future if you need to)
And just like that, you have now successfully completed the guide and have hacked your 3DS!
Frequently Asked Questions
How Do I Install 3DS Games Onto My System?
Installing games from 3DS game cartridges directly onto your handheld is pretty straightforward. Assuming you have already followed the steps in this guide, you should already have your 3DS hacked. If so, follow the steps below.
- Press down and hold the Start button
- While still holding down Start, turn on your 3DS to launch GodMode9
- Head to [C:] GAMECART
- Press down the A button on [TitleID].trim.3ds to choose it and then choose NC0SD image options…, and then select Install game image
- Press the A button to unlock SysNAND (lvl1) writing and then enter the key combo shown
- Once finished, your game will show up in the HOME Menu as an installed title
How Do I Dump 3DS Games Onto My System?
- Press down and hold the Start button and while keeping it held down turn on your 3DS to start up GodMode9
- Head to [C:] GAMECART
- Press the A button on [TitleID].trim.3ds to choose it and then choose NCSD image options… and then choose Build CIA from file
- The installable .cia formatted file will be output to the /gm9/out/ folder on your SD card for you
Now that you’ve successfully homebrewed your 3DS, you’re now ready to check out this list of the best 3DS homebrew apps you can install. If you want to emulate the 3DS on your PC, be sure to check out how to setup the RetroArch 3DS core Citra.
�� Trending
Jonathan Zarra
A lover of gaming and all things Nintendo, Jonathan has 20+ years of retro gaming expertise. Not only has he been playing games his whole life, but he has dedicated his life to it as well — founding multiple video game related companies. When not working on a new project, you can find him playing the Switch, tinkering around with emulation, and building out his retro game collection.