Удаление Autodesk Genuine Service в Windows 10

Чтобы полностью удалить приложение Autodesk Genuine Service, первостепенно необходимо завершить все процессы, связанные с ним. Проще всего это сделать в «Диспетчере задач», но в Windows 10 есть еще три дополнительных возможности выполнить поставленную задачу. Подробно об этом написано в отдельной статье на нашем сайте.
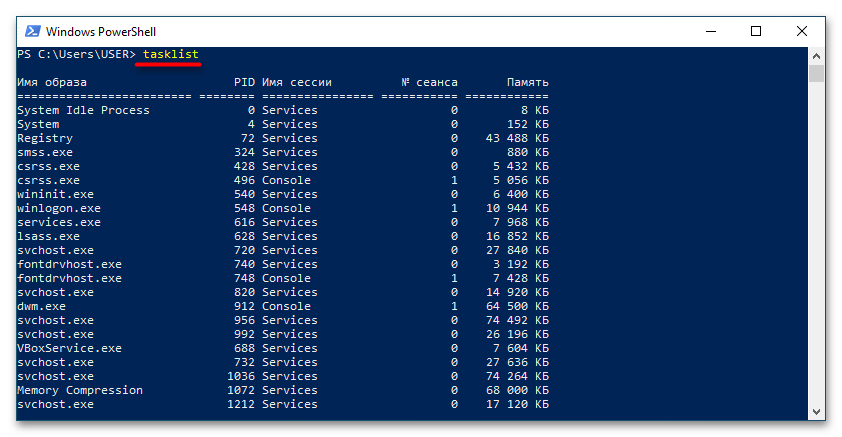
Здесь будет приведен наглядный пример с пошаговым выполнением всех действий:
- Откройте «Диспетчер задач» любым доступным способом, например, с помощью комбинации горячих клавиш Ctrl + Shift + Esc.
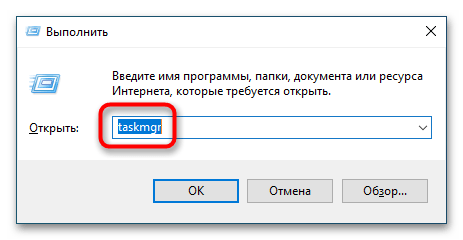
Важно! После выполнения всех описанных действий не перезагружайте операционную систему, так как процессы снова запустятся и их нужно будет повторно завершать.
Шаг 2: Удаление вспомогательных файлов
После того как все процессы пакета Autodesk будут завершены, потребуется удалить несколько вспомогательных файлов на системном диске, чтобы в будущем деинсталлятор смог удалить утилиту «Autodesk Genuine Service». Нужные данные размещены в скрытых папках, поэтому сначала нужно включить их отображение. На эту тему есть отдельная статья, при необходимости перед выполнением дальнейших указаний ознакомьтесь с ней.
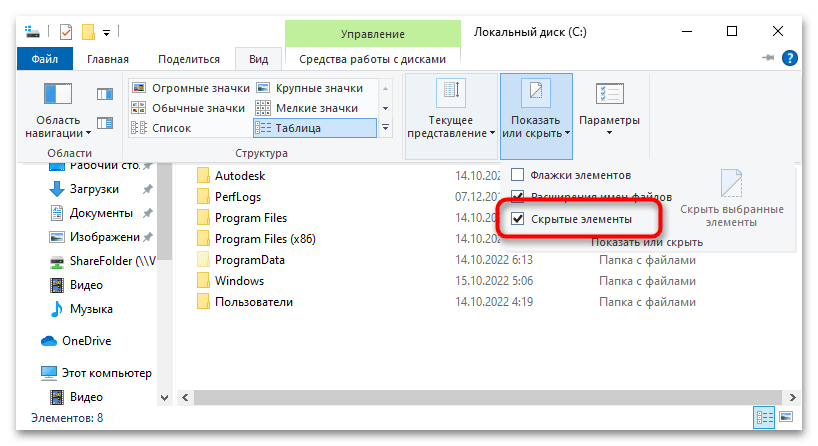
После этого проследуйте в нужную папку, расположенную по нижеуказанному пути:
В ней найдите файл «ProductInformation.pit» и переместите его в корзину. Для этого достаточно выделить объект и нажать клавишу Delete.
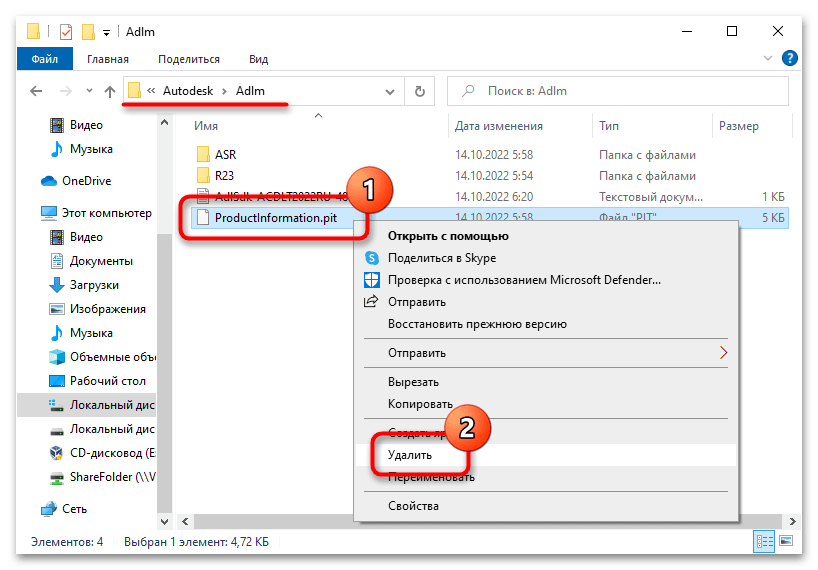
Повторите такие же действия с файлом «id.dat», который находится в другом месте на системном диске, по этому адресу:
C:\Users\<имя пользователя>\AppData\Local\Autodesk\Genuine Autodesk Service\
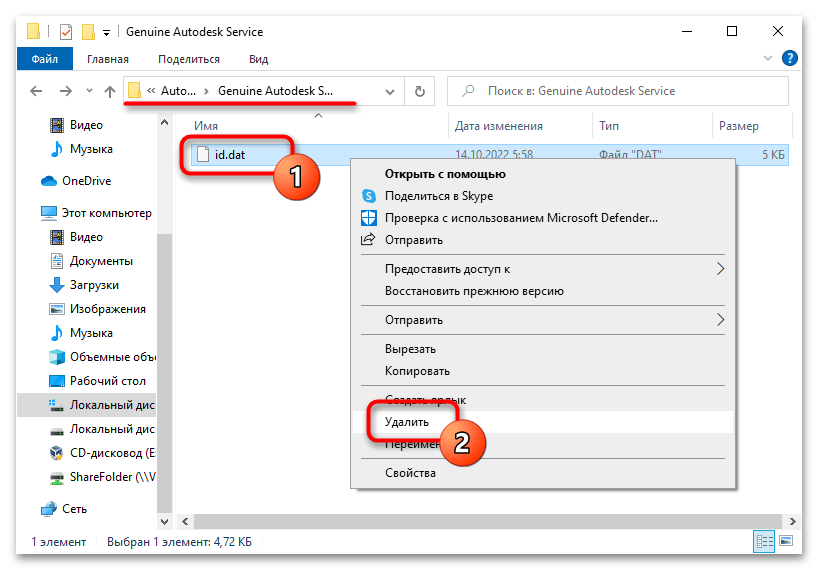
Обратите внимание! В некоторых случаях зависимых файлов может находиться больше, поэтому если деинсталляция не пройдет успешно, рекомендуется удалить папки Autodesk со всеми вложенными данными:
C:\ProgramData\Autodesk\
C:\Users\<имя пользователя>\AppData\Local\Autodesk\
Шаг 3: Деинсталляция
После проведения всех подготовительных мероприятий можно приступать непосредственно к удалению приложения Autodesk Genuine Service, но важно это сделать правильно. В Windows 10 есть несколько системных разделов, предоставляющих необходимые инструменты для деинсталляции программного обеспечения. В другой статье на сайте описаны способы их открытия и даны краткие руководства по использованию.
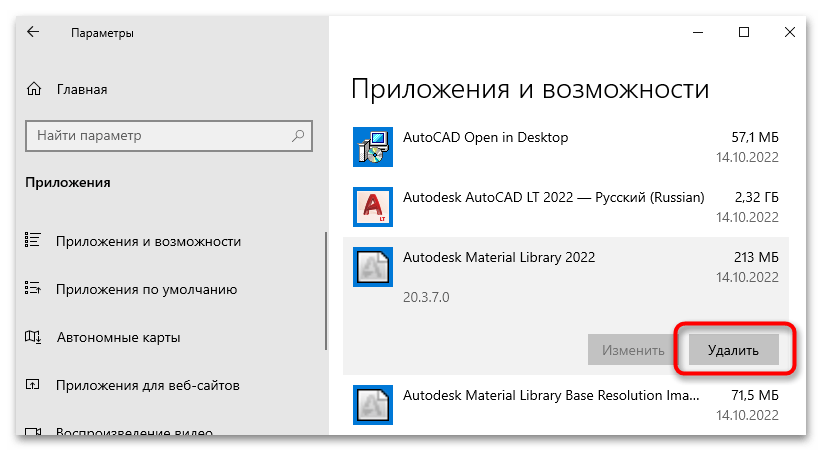
Если опыта работы за компьютером не хватает для выполнения поставленной задачи, рекомендуем обратиться к другому материалу на нашем сайте, в котором более детально описываются методы установки и удаления программного обеспечения в Windows 10.
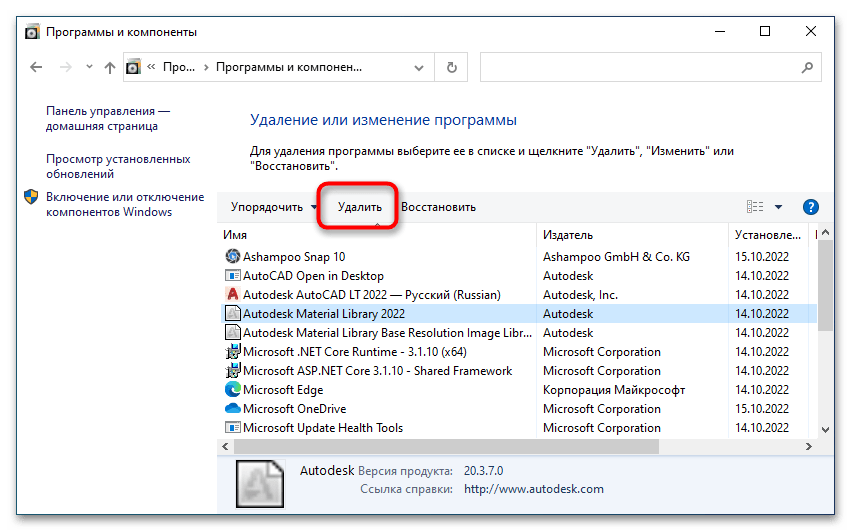
Обратите внимание! Если эта статья не помогла удалить приложение Autodesk Genuine Service, можно попробовать выполнить принудительную деинсталляцию. Для этого можно воспользоваться как встроенными средствами операционной системы, так и сторонним софтом. В отдельной статье на сайте даны все указания.
Подробнее: Методы принудительного удаления программ в Windows 10
Autodesk access core как удалить
When you download and open Windowexeallkiller you may find these files. To remove them, read the instructions below, then download Windowexeallkiller and run the program. ID:93958
What is Windowexeallkiller? Windowexeallkiller is a free utility that I have created as a general service to the public.
A vast commercial apparatus, mostly of legitimate companies, is putting products into commercial software that interferes with the operation of laptops and desktops. Thes speed and flexibility of these sophisticated machines and their service to their owners is compromised by software junk that is often difficult to remove. To make matters worse, companies that offer to help you remove this junk in many cases do so because they want to install their own junk.
Windows operating systems are prone to a great deal of malware that can slow down your computer and make it difficult to use. It is not always easy to remove this malware. Windowexeallkiller is a way to remove unwanted malware from your computer. It is not highly automated: It requires the user to be able to identify what it is that he or she wants to remove from the computer, and the assumption is that the user has done some research and carefully considered what to remove.
If you have found this web site because you are searching on the specific file name of a browser help object or commercial pop ups that are making it difficult to use your computer, this is a good utility for you to try. More Instructions are CLICK HERE.
A word of caution: Windowexeallkiller is a utility that returns control of your machine to you. You must *actively approve* —by placing a check mark—the utilities that *stay* on your computer. The program check marks a few automatically. Many of the things that you might choose to remove are from legitimate companies that provide a valuable service.
For example, you can remove the Adobe update reminder that pops up very frequently on most pcs. But remember that Adobe is a necessary web tool for reading pdf file formats and that often times the automatic Adobe updates are used to fix security issues.
A beginner user of Windowexeallkiller should concentrate, the first time, on the one or two most serious problems in order to learn the program.
Once you are familiar with the program, you may find it is a way to remove a large number of unwanted programs at once. To be an effective user of windowexeallkiller you need to have a clear idea of what you wish to remove from your computer; once you have gotten rid of active malware, you might use windowexeallkiller to customize your computer’s operations by setting aside certain operations to do manually, such as updates.
If you are completely new to computers this utility is not for you. If you have reached the point of doing extensive research on how to remove a difficult object, and such obvious steps as UNINSTALL in the windows control box have not worked for you, this may help you out.
More experienced users may realize that Windowexeallkiller is a way to neutralize programs more quickly than the UNINSTALL utility allows, because you can neutralize many programs at once. Windowexeallkiller is therefore a time saving device or advanced users who want to customize the operations of their computer.
Before you use Windowexeallkiller make sure you CREATE A RESTORE POINT in your version of windows. This will allow you to start over if there are problems. You will find many instructions on how to do create a restore point on the Internet. When you have later removed objects successfully you might wish to CREATE A RESTORE POINT so that you have a clean version of your computer to return to in the future.
System Requirements : .Net framework 4.0, Windows 2000/XP/Vista/7/8/10 32/64bit
License : Freeware
Refer to the below user’s detailed guide and introduction video. It will be help.
You need to read More Introductions before running WindowexeAllkiller. CLICK HERE
WindowexeAllkiller Introduction Video
How to Remove Starup-registry, Browser Helper Object(BHO), Toolbar, Services, Task Scheduler, Global-startup at once.
Autodesk Access Silent Uninstall (PowerShell)
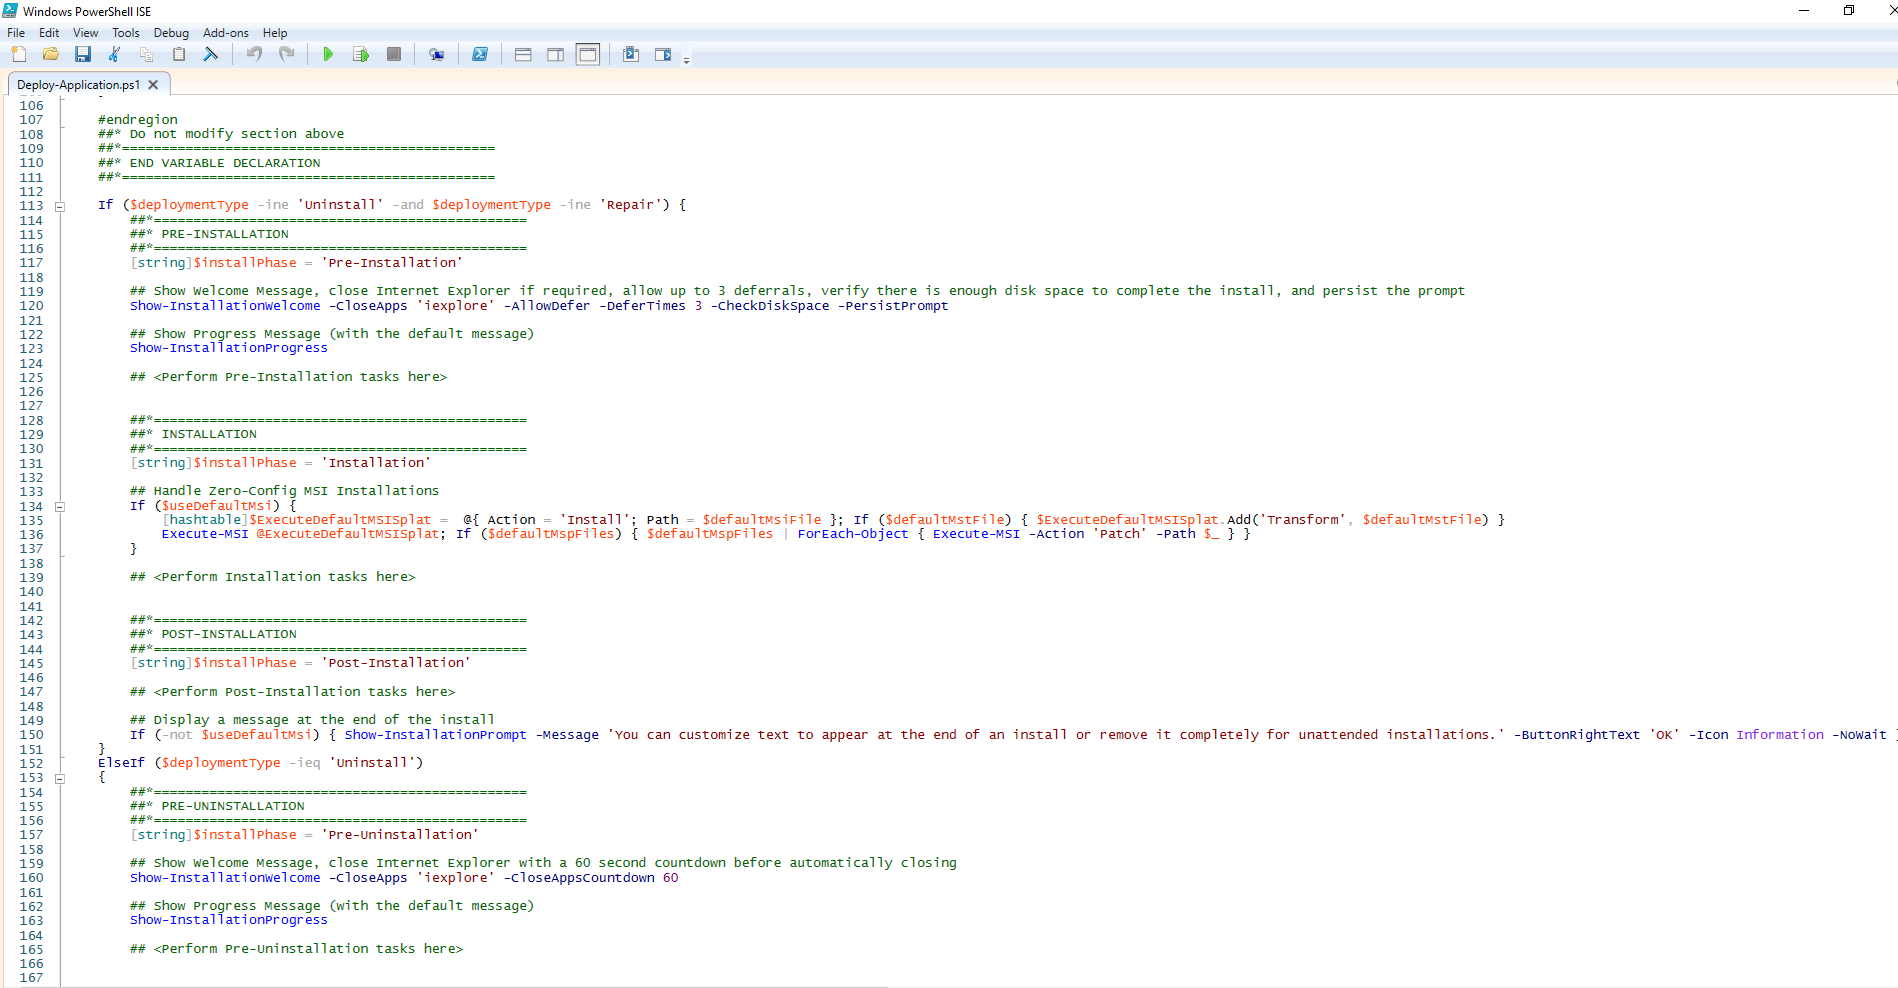
This article will serve as an informative guide and give you a clear understanding of how to perform silent or interactive uninstalls of Autodesk Access using the Powershell App Deployment Toolkit. The PowerShell App Deployment Toolkit can be used to replace your WiseScript, VBScript and Batch wrapper scripts with one versatile, re-usable and extensible tool. This tool is an absolute must for Microsoft Endpoint Manager Configuration Manager (MEMCM) / (SCCM) Administrators or anyone who is responsible for packaging and deploying software.
How to Uninstall Autodesk Access Using the PowerShell App Deployment Toolkit
- Download the Powershell App Deployment Toolkit 3.8.4:
- Download the zip file to a folder created at (C:\Downloads)
- OpenWindows PowerShell by Right-Clicking on Windows PowerShell and selecting Run as Administrator
- Enter the following command to remove the Zone.Identifier:
- Unblock-File -Path C:\Downloads\PSAppDeployToolkit_v3.8.4.zip
- Enter the following command to extract the contents of the zip file:
- Expand-Archive -Path C:\Downloads\PSAppDeployToolkit_v3.8.4.zip -DestinationPath C:\Downloads\PADT
- Enter the following commands to copy the AppDeployToolkit folder to “C:\Downloads\Uninstall-AutodeskAccess“:
- Copy-Item -Path «C:\Downloads\PADT\Toolkit\AppDeployToolkit» -Destination «C:\Downloads\Uninstall-AutodeskAccess\AppDeployToolkit» -Recurse
Please enable JavaScript
You should now see the AppDeploymentToolkit folder with files at “C:\Downloads\Uninstall-AutodeskAccess”
- Copy the PowerShell script below to “C:\Downloads\Uninstall-AutodeskAccess“ & name it Uninstall-AutodeskAccess.ps1
Ok, all the hard work is done and now you can uninstall any version of Autodesk Access using one single PowerShell script. Logging functionality is built-in automatically and you can view the log files under “C:\Windows\Logs\Software”
Autodesk Access NonInteractive Uninstall (PowerShell)
NonInteractive means Very Silent, i.e. no blocking apps. This is automatically set if it is detected that the process is not running in the user session and it is not possible for anyone to provide input using a mouse or keyboard.
- OpenWindows PowerShell by Right-Clicking on Windows PowerShell and selecting Run as Administrator
- Change the directory to “C:\Downloads\Uninstall-AutodeskAccess“
- PS C:\Downloads\Uninstall-AutodeskAccess>
Autodesk Access Silent Uninstall (PowerShell)
Silent means no dialogs (progress and balloon tip notifications are suppressed).
- OpenWindows PowerShell by Right-Clicking on Windows PowerShell and selecting Run as Administrator
- Change the directory to “C:\Downloads\Uninstall-AutodeskAccess“
- PS C:\Downloads\Uninstall-AutodeskAccess>
Autodesk Access Interactive Uninstall (PowerShell)
Interactive means the install will show dialogs including progress and balloon tip notifications.
- OpenWindows PowerShell by Right-Clicking on Windows PowerShell and selecting Run as Administrator
- Change the directory to “C:\Downloads\Uninstall-AutodeskAccess“
- PS C:\Downloads\Uninstall-AutodeskAccess>
Always make sure to test everything in a development environment prior to implementing anything into production. The information in this article is provided “As Is” without warranty of any kind.
I am an accomplished Software Engineer at Patch My PC, leveraging more than 17 years of hands-on experience in Configuration Manager administration and application packaging. I am driven by a genuine passion for solving complex problems and consistently strive to discover innovative and effective solutions. Sharing my extensive knowledge of application deployments is a true joy for me, and I am honored to contribute to the community here at Silent Install HQ.
Recent Posts
This article will serve as an informative guide and give you a clear understanding of how to perform silent or interactive installs and uninstalls of Gamestar Mechanic using the Powershell App.
This article will serve as an informative guide and give you a clear understanding of how to perform silent or interactive installs and uninstalls of Windows PC Health Check using the Powershell App.
Как удалить Autodesk из автозагрузки?
В меню «Пуск» (Windows) щелкните «Параметры» > «Панель управления». В Панели управления дважды щелкните Программы и компоненты. Выберите продукт Autodesk, а затем нажмите Удалить/Изменить. Когда установщик запустится, нажмите «Восстановить» или «Переустановить».
Как отключить приложение Autodesk?
Выход из приложения Autodesk для ПК
- На панели задач щелкните правой кнопкой мыши .
- Щелкните Выход.
Что произойдет, если я удалю приложение Autodesk для настольных ПК?
Если вы удалите настольное приложение Autodesk, никакие другие продукты Autodesk на вашем компьютере не удаляются; они продолжают работать как прежде. Однако обновления не будут доставляться для этих продуктов. Вам потребуется загрузить обновления и продукты с Autodesk Account (http://www.autodesk.com/account).
Нужно ли приложение Autodesk для ПК?
Приложение для настольных ПК — это просто способ оставаться в системе A360, а также управлять обновлениями для всего программного обеспечения Autodesk и отслеживать их. Что касается Fusion, АДА особо не нужен, но в зависимости от других продуктов Autodesk обновление может быть проще.
Где находится инструмент удаления Autodesk?
Для некоторых продуктов Mac можно запустить утилиту Remove ProductName, расположенную в папку Finder > Приложения > Autodesk. Если средство удаления не предусмотрено для вашего программного обеспечения, переместите файл ProductName. app из папки «Программы» в корзину.
Почему я не могу удалить Autocad?
Решение. Чтобы принудительно удалить программное обеспечение, загрузите инструмент исправления Microsoft. Откройте его после завершения загрузки. Нажмите «Далее», затем нажмите «Удалить», когда появится возможность.
Как удалить сразу все продукты Autodesk?
Используйте средство удаления Autodesk
- Прежде чем начать, закройте все запущенные программы и отключите антивирусное программное обеспечение.
- В меню «Пуск» найдите «Инструмент удаления».
- Щелкните, чтобы открыть инструмент и выбрать все компоненты для удаления.
- Нажмите «Удалить».
Что делает приложение Autodesk для ПК?
Приложение Autodesk для настольных ПК является сопутствующим приложением Microsoft. ® Продукты Autodesk на базе Windows, которые доставляет продукты, обновления и исправления безопасности на ваш рабочий стол.
Должен ли я удалить Autodesk?
Можно переместить или удалить папка C: Папка Autodesk в зависимости от будущих ситуаций.
Что произойдет, если я удалю рабочий стол A360?
Это зависит от того, какую версию AutoCAD или вертикали на основе AutoCAD вы используете. Если вы перейдете в раздел «Установка и удаление программ» и увидите A360 Desktop, вы должны прекрасное удаление Это. И если вы передумаете, вы можете установить версию 9.5 по следующей ссылке.
Не удается установить приложение Autodesk для ПК?
Чтобы обойти эту проблему, удалите и переустановите приложение Autodesk для ПК. См. раздел Удаление и повторная установка приложения Autodesk для ПК. Если проблема сохраняется, a. lock может мешать установке.
Можно ли удалить рабочий стол A360?
Go в Панель управления и выберите «Удалить программу». (В Windows 10 перейдите к логотипу Windows и введите «Приложения и функции») Выберите «A360 Desktop» из списка и удалите его. Перезагрузите компьютер.