Selections
Selections allow you to pick a specific area of your artwork to change. This is useful when you want to move a section of the painting, transform it, or paint on it without affecting the other sections. There are many selection tools available that select in different ways. Once an area is selected, most tools will stay inside that area. On that area you can draw or use gradients to quickly get colored and/or shaded shapes with hard edges. The selections in Krita are not limited to the canvas boundary, so you can also select portions of the painting that are beyond the canvas boundary.
Creating Selections
The most common selection tools all exist at the bottom of the toolbox. Each tool selects things slightly differently. The links for each tool go into a more detailed description of how to use it.
Select the shape of a square.
Select the shape of a circle.
Click where you want each point of the Polygon to be. Double click to end your polygon and finalize your selection area. Use the Shift + Z shortcut to undo last point.
freehand/Lasso tool is used for a rough selection by drawing the selection outline freehand on the canvas.
Similar Color Selection Tool.
Contiguous or “Magic Wand” selects a field of color. Adjust the Fuzziness to allow more changes in the field of color, by default limited to the current layer.
Path select an area based on a vector path, click to get sharp corners or drag to get flowing lines and close the path with the Enter key or connecting back to the first point.
Magnetic selection makes a free hand selection where the selection snaps to sharp contrasts in the image.
You can also use the transform tools on your selection, a great way to try different proportions on parts of your image.
Editing Selections
The tool options for each selection tool gives you the ability to modify your selection.
Replace the current selection.
Get the overlapping section of both selections.
Add the new selection to the current selection.
Subtract the selection from the current selection.
Make a selection where both the new and current do not overlap.
You can change this in Tools Settings .
If you hover over a selection with a selection tool and no selection is activated, you can move it. To quickly go into transform mode,  and select Edit Selection .
Removing Selections
If you want to delete the entire selection, the easiest way is to deselect everything. Select ‣ Deselect . Shortcut Ctrl + Shift + A . When you have one of the selection tool active, and the mode of selection is in intersect, replace or symmetric difference then you can also deselect by just  anywhere on the canvas.
Display Modes
In the bottom left-hand corner of the status bar there is a button to toggle how the selection is displayed. The two display modes are the following: (Marching) Ants and Mask. The red color with Mask can be changed in the preferences. You can edit the color under Settings ‣ Configure Krita… ‣ Display ‣ Selection Overlay . If there is no selection, this button will not do anything.
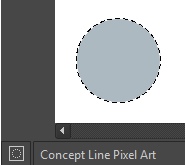
Ants display mode (default) is best if you want to see the areas that are not selected.
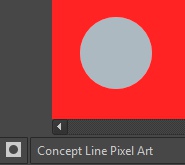
Mask display mode is good if you are interested in seeing the various transparency levels for your selection. For example, when you have a selection with very soft edges due using feathering.
Changed in version 4.2: Mask mode is activated as well when a selection mask is the active layer so you can see the different selection levels.
Global Selection Mask (Painting a Selection)
The global Selection Mask is your selection that appears on the layers docker. By default, this is hidden, so you will need to make it visible via Select ‣ Show Global Selection Mask .
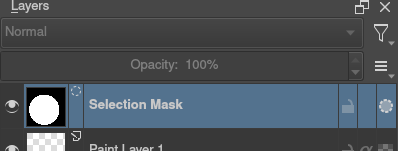
Once the global Selection Mask is shown, you will need to create a selection. The benefit of using this is that you can paint your selection using any of the normal painting tools, including the transform and move. The information is saved as grayscale.
You can enter the global selection mask mode quickly from the selection tools by doing and select Edit Selection .
Selection from layer transparency
You can create a selection based on a layer’s transparency by right-clicking on the layer in the layer docker and selecting Select Opaque from the context menu.
New in version 4.2: You can also do this for adding, subtracting and intersecting by going to Select ‣ Select Opaque , where you can find specific actions for each.
If you want to quickly select parts of layers, you can hold the Ctrl + shortcut on the layer thumbnail. To add a selection do Ctrl + Shift + , to remove Ctrl + Alt + and to intersect Ctrl + Shift + Alt + . This works with any mask that has pixel or vector data (so everything but transform masks).
Pixel and Vector Selection Types
Vector selections allow you to modify your selection with vector anchor tools. Pixel selections allow you to modify selections with pixel information. They both have their benefits and disadvantages. You can convert one type of selection to another.
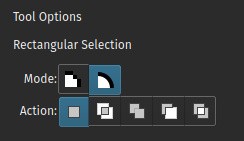
When creating a selection, you can select what type of selection you want from the Mode in the selection tool options: Pixel or Vector. By default this will be Vector.
Vector selections can be modified as any other vector shape with the Shape Selection Tool , if you try to paint on a vector selection mask it will be converted into a pixel selection. You can also convert vector shapes to selection. In turn, vector selections can be made from vector shapes, and vector shapes can be converted to vector selections using the options in the Selection menu. Krita will add a new vector layer for this shape.
One of the most common reasons to use vector selections is that they give you the ability to move and transform a selection without the kind of resize artifacts you get with a pixel selection. You can also use the Shape Edit Tool to change the anchor points in the selection, allowing you to precisely adjust bezier curves or add corners to rectangular selections.
If you started with a pixel selection, you can still convert it to a vector selection to get these benefits. Go to Select ‣ Convert to Vector Selection .
If you have multiple levels of transparency when you convert a selection to vector, you will lose the semi-transparent values.
Common Shortcuts while Using Selections
Copy – Ctrl + C or Ctrl + Ins
Paste – Ctrl + V or Shift + Ins
Cut – Ctrl + X , Shift + Del
Copy From All Layers – Ctrl + Shift + C
Copy Selection to New Layer – Ctrl + Alt + J
Cut Selection to New Layer – Ctrl + Shift + J
Display or hide selection with Ctrl + H
Select Opaque – Ctrl + on layer thumbnail.
Select Opaque (Add) – Ctrl + Shift + on layer thumbnail.
Select Opaque (Subtract) – Ctrl + Alt + on layer thumbnail.
Select Opaque (Intersect) – Ctrl + Shift + Alt + on layer thumbnail.
© Copyright licensed under the GNU Free Documentation License 1.3+ unless stated otherwise. Build 2436.
Как убрать выделение в krita?
Нажмите сочетание клавиш Ctrl+Num + (или, соответственно, Ctrl+Num –) или выберите команду Выделить всё / Снять всё выделение в меню Выделение.
Как убрать область выделения?
Щелкните кнопкой мыши. Это действие снимает выделение и переводит курсор в ту область, на которой вы щелкнули кнопкой мыши. Подходит для случаев, когда операция выделения выполняется с помощью мыши или клавиши . Нажмите клавишу , а затем клавишу .
Как переместить рисунок в Крите?
Поместите новый слой под слой, содержащий контурный рисунок (перетащите или используйте для этого стрелки вверх/вниз) и порисуйте на нём… . И заметьте, что ничего не происходит.
Как скопировать часть изображения в Крите?
- Скопировать – Ctrl + C or Ctrl + Ins.
- Вставить – Ctrl + V or Shift + Ins.
- Вырезать – Ctrl + X, Shift + Del.
- Скопировать из всех слоев – Ctrl + Shift + C.
- Скопировать Выделение из текущего слоя для вставки в Новый слой – Ctrl + Alt + J.
Как двигать слой в Крите?
4.2.3.
Если режим перемещения установлен на «Слой», необходимо нажать и держать клавишиCtrl+Alt. Если режим перемещения установлен на «Выделение», то можно нажать на любую точку холста, чтобы переместить выделение.
Как снять выделение лассо?
Чтобы снять выделение нужно зайти в верхнем меню выбрать “Выделение” -> “Отменить выделение”. Также это можно сделать через сочетание клавиш Ctrl+D.
Как снять выделение с области в фотошопе?
Чтобы снять выделение с области независимо от того, какой инструмент активизирован, воспользуйтесь командой Select > Deselect (Выделить > Снять выделение), либо нажмите комбинацию клавиш Ctrl+D, либо щелкните внутри выделенной области с помотцью любого инструмента из группы инструментов выделения (рис.
Как убрать цвет выделения текста при копировании?
- В верхнем пункте меню откройте вкладку «Главная».
- Выделите нужный текст.
- Нажмите на стрелочку возле кнопки «Цвет выделения текста». .
- Нажмите на «Нет цвета».
Как убрать выделение в ворде если оно не убирается?
Либо же после выделения текста с фоном переходим на вкладку “Разметка страницы” и выбираем кнопку “Границы страниц”. В открывшемся окне на вкладке “Заливка” раскрываем стрелку с цветами и выбираем “нет цвета”. Далее жмем “Ок” и цветовое выделение с текста пропадет.
Как убрать выделение содержания в ворде?
- Откройте документ Word во вкладке «Главная».
- Выделите весь текст в документе, или нужный фрагмент текста, который выделен цветом.
- В группе «Шрифт» нажмите на маленькую стрелку, находящуюся на кнопке «Цвет выделения текста».
- В выпадающем меню с палитрой цветов нажмите на пункт «Нет цвета».
Как увеличить рисунок в Крите?
Для этого выберите Image &rarr Scale Image To New Size (1) (или нажмите комбинацию Ctrl + Alt + I . В качестве единицы измерения выберите проценты (2) и введите значение 200 для ширины (3). Высота изображения при этом должна автоматически увеличиться в 2 раза.
Как выделить объект в Крите?
Как и положено «взрослым» редакторам в Крита есть так называемая «волшебная палочка», В программе она носит имя Выделение смежных областей. Ее удобнее всего использовать, когда объект расположен на более-менее однородном фоне. Просто выберите инструмент и кликните на фоновую точку. Нажмите Ctrl + X.
Как убрать лассо в Крите?
Нравится. 3комментария. Посмотрите еще 6 ответов. DELETED DELETED, 6 лет назад. Искусственный Интеллект. везде отмена это ctrl+Z, может в крите пойдет.
Как отменить лассо в Крите?
4.3. Снять выделениеЭта команда находится в меню изображения Выделение → Снять.У неё также есть клавиша быстрого доступа Shift+Ctrl+A.В добавок, в Редакторе выделения эту команду можно вызвать через Меню закладки: Меню редактора выделения → Снять или нажатием на кнопку с пиктограммой внизу этого диалога.
Как снять лассо?
Решение Для версий AutoCAD/AutoCAD LT для Windows введите команду ПАРАМЕТРЫ, чтобы открыть диалоговое окно «Параметры». В диалоговом окне «Параметры» перейдите на вкладку «Выбор» и снимите флажок с режима «Лассо», как показано на снимке экрана ниже.
Как пользоваться лассо в Крита?
Последнюю точку задайте сочетанием Shift + Z. Еще этот инструмент называется лассо. Он подойдет для чернового этапа, когда четкое выделение не принципиально. Инструмент выделения по цвету выделяет области с похожим цветом.
Как убрать лассо в Крите? Ответы пользователей
В Крите довольно широкий выбор инструментов для выделения. . Лассо. Еще этот инструмент называется лассо. Он подойдет для чернового этапа, когда четкое .
Так как маска является изображением в градациях серого, “марширующие муравьи” будут отображаться вокруг всех областей, которые не являются чисто .
В Крите не показывает границы выделения ( лассо ), галочка на «показывать выделение» . Помогите пожалуйста как убрать этот чёртов круг?
В крите это не отдельные иконки на панели, а «кистевые движки» внутри brush . как обычное лассо в фш позволяет делать произвольные формы.
Надо выбрать наиболее контрастный край, настроить «Магнитное лассо» в зависимости от параметров изображения, как описывается здесь, и приступить .
е вот прямо конкретный цвет без переходов? Тогда всё просто, «волшебная палка» или «лассо» вырежут что надо. Если есть переходы, то надёжнее .
Внешне, это работает, примерно так же, как и в других графических редакторах: пользователь выделяет объект, после чего, умная программа пытается .
12.1 справа). Рисовать пером и специальными инструментами можно как невидимые векторные контуры, так и цветные векторные фигуры. Режим рисования выбирается с .
Транслит, Крита. Разработка, Krita Foundation и KDE. Версия, 5.0.6. Размер, 135 Мб. Лицензия, Бесплатно. Обновлено, 15 мая 2022. Язык, Русский, Английский.
Как снять выделение в крите
Reddit and its partners use cookies and similar technologies to provide you with a better experience.
By accepting all cookies, you agree to our use of cookies to deliver and maintain our services and site, improve the quality of Reddit, personalize Reddit content and advertising, and measure the effectiveness of advertising.
By rejecting non-essential cookies, Reddit may still use certain cookies to ensure the proper functionality of our platform.
For more information, please see our Cookie Notice and our Privacy Policy .