Introduction
A UV texture is a picture (image, sequence or movie) that is used to color the surface of a mesh. The UV texture is mapped to the mesh through one or more UV maps. There are three ways to establish the image used by the UV texture:
Use any image editing program to create an image. In the Image Editor, select the UV texture and load the image. Blender will then use that texture’s UV map to transfer the colors to the faces of the mesh.
Paint a flat image in the Image Editor onto the currently selected UV texture, using its UV map to transfer the colors to the faces of the mesh.
Paint the mesh in the 3D Viewport, and let Blender use the currently selected UV map to update the UV texture (as discussed below).
Blender features a built-in paint mode called Texture Paint which is designed specifically to help you edit your UV textures and images quickly and easily in either the Image Editor or the 3D Viewport. Since a UV texture is just a special-purpose image, you can also use any external paint program, like GIMP or Krita.
Texture painting in Blender.
Since a mesh can have layers of UV textures, there may be many images that color the mesh. However, each UV texture only has one image.
Texture Paint works in both a 3D Viewport and the Image Editor. In the 3D Viewport in Texture Paint Mode, you paint directly on the mesh by projecting onto the UVs.
Texture Paint is fast and responsive when working in the 3D Viewport and when your image is sized as a square where the side lengths are a power of two, e.g. 256×256, 512×512, 1024×1024, etc.
Getting Started
The object to be painted on must first be unwrapped . UVs can be added traditionally, with standard Unwrapping Tools , or by adding Simple UVs in Texture Paint mode.
When no UV layers can be detected, Blender will display a warning message.
Once you have unwrapped your model to a UV map, you can begin the texturing process. To use texture paint you may do any of the following:
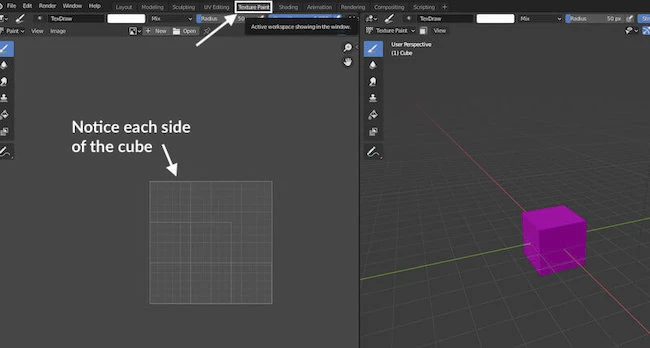
Activate the Texture Paint workspace. Here the 3D Viewport has the Texture Paint Mode enabled and the Image Editor is already switched to Paint mode.
In the 3D Viewport, select Texture Paint Mode from the mode selector in the header, and you can paint directly onto the mesh.
In the Image Editor, switch the mode to Paint (shown in the image to the right).
Enabling Paint mode.
Once you enable Texture Painting, your mouse becomes a brush. As soon as you enable Texture Painting or switch to Texture Paint Mode, different tools become available in the Toolbar.
In the Image Editor, you paint on a flat canvas that is wrapped around the mesh using UV coordinates. Any changes made in the Image Editor show up immediately in the 3D Viewport, and vice versa.
To work with the UV layout (for example, to move coordinates) you must use the UV Editor .
A full complement of brushes and colors can be selected from the Sidebar region in the Image Editor. Brush changes made in either panel are immediately reflected in the other panel. However, the modified texture will not be saved automatically; you must explicitly do so by Image Editor ‣ Image ‣ Save .
Texture Preview
If your texture is already used to color, bump map, displace, alpha-transparent, etc., a surface of a model in your scene (in other technical words, is mapped to some aspect of a texture via a texture channel using UV as a map input), you can see the effects of your painting in the context of your scene as you paint.
To do this, set up side-by-side areas, one Area in 3D Viewport set to Texture shading option, and in the second Area the Image Editor loaded with your image. Position the 3D Viewport to show the object that is UV-mapped to the loaded image. In the image to the right, the texture being painted is mapped to the “Normal” attribute, and is called “bump mapping”, where the grayscale image is used to make the flat surface appear bumpy. See Texture Mapping Output for more information on bump mapping.
Saving
If the header menu item Image has an asterisk next to it means that the image has been changed, but not saved. Use the Image ‣ Save Image option to save your work with a different name or overwrite the original image.
Since images used as UV textures are functionally different from other images, you should keep them in a directory separate from other images.
The image format for saving is independent of the format for rendering. The format for saving a UV image is selected in the header of the File Browser, and defaults to PNG ( .png ).
If Packing is enabled in the File Browser’s header, or if you manually Image ‣ Pack Image , saving your images to a separate file is not necessary.
Using an External Image Editor
If you use an external program to edit your UV texture, you must:
Run that paint program (GIMP, Krita, etc.).
Load the image or create a new one.
Change the image.
And re-save it within that program.
Back in Blender, you reload the image in the Image Editor.
You want to use an external program if you have teams of people using different programs that are developing the UV textures, or if you want to apply any special effects that Texture Paint does not feature, or if you are much more familiar with your favorite paint program.
Known Limitations
UV Overlap
In general overlapping UVs are not supported (as with texture baking).
However, this is only a problem when a single brush stroke paints onto multiple faces that share a texture.
Perspective View & Faces Behind the View
When painting onto a face which is partially behind the view (in perspective mode), the face cannot be painted on. To avoid this, zoom out or use an orthographic viewport.
Perspective View & Low Poly
When painting onto a face in perspective mode onto a low-poly object with normals pointing away from the view, painting may fail; to workaround disable the Normal Falloff option in the stroke settings.
Typically this happens when painting onto the side of a cube (see Blender bug #34665).
© Copyright : This page is licensed under a CC-BY-SA 4.0 Int. License. Last updated on 09/04/2023.
Текстурная живопись в Blender — Шаги по использованию режима Texture Paint в Blender

Blender является одним из бесплатных программ, которые можно использовать для создания 3D-анимации, настройки движущейся графики и инструментов компьютерной графики и атрибутов, которые можно использовать для всех аспектов и требований проекта. Из этого сегодня существует множество атрибуции и методов работы. Мы рассмотрим детали рабочего инструмента рисования текстур, его производительность, его характеристики и его многократное использование. Инструмент рисования текстур немного похож на параметры рисования ms, и этот созданный цвет будет применен к моделям, которые уже будут иметь Lambert по умолчанию (цвет по умолчанию для моделей — серый). Рисование текстур — это традиционный метод текстурирования, доступный в Blender.
Как использовать режим рисования текстур в Blender?
Текстурное рисование аналогично инструменту рисования ms, где есть небольшая разница в использовании инструмента, поскольку этот инструмент интегрирован с анимационным программным обеспечением Blender. Мы можем использовать текстурное рисование слишком напрямую, чтобы рисовать на опции модели, а также с помощью окраски UV-окном, которую мы увидим подробно ниже. В начальном процессе мы сделаем программное обеспечение блендера доступным на наших устройствах, а затем откроем его.
Шаг 1: Создайте модель с использованием линии, многоугольника, а также вершин и фигур с помощью Blender и создайте модель, как требуется, перед использованием инструмента рисования текстуры. Создайте модель, по которой ее следует использовать. Здесь, в демоверсии, мы собираемся сделать портрет рамки с краской. И мы будем использовать инструмент рисования текстур, чтобы рисовать картинки на его лицевой стороне портрета.

Шаг 2: Создайте 2 новых окна экрана, перетаскивая углы рабочего экрана. Итак, теперь у нас будет 3 предполагаемых модели для просмотра одновременно. 1- й остается в режиме модели, 2- й — в режиме УФ, а 3- й — в режиме редактора узлов, как показано ниже.

Шаг 3: Измените механизм рендеринга, который используется по умолчанию для рендеринга Blender на рендеринг Cycles. Чтобы выполнить динамику быстрее, тогда цвет, примененный в УФ, будет отражаться на модели, и если мы применяем цвет к модели, он быстро отражается на карте текстуры UV. Скорость также отражает конфигурацию системы, поэтому используйте хорошо работающую систему. Для лучшего опыта, чтобы сделать вещи удивительными и визуально реалистичными для просмотра и опыта.

Шаг 4. Включите параметр « Использовать узлы», который доступен в инструменте редактирования на основе узлов в левом нижнем углу. Это создает базовый текстурный сток между обеими моделями и картами текстур UV. Всякий раз, когда цвет окрашен, он будет в раковине в обоих местах. Мы можем сделать еще несколько правок, используя редактор на основе Node, мы увидим их в дальнейших беседах ниже.

Шаг 5: Кроме текстуры по умолчанию Ламберта (Файл) мы можем создать наш собственный файл текстуры с основным цветом фона в качестве фона. Используйте параметры материала в правой части приложения, как показано на рисунке ниже, и создайте новый файл, нажав кнопку + на типе материала. Новый материал создается как «Material1», переименуйте его, полностью используя выделение мыши, и введите желаемое имя текстуры.

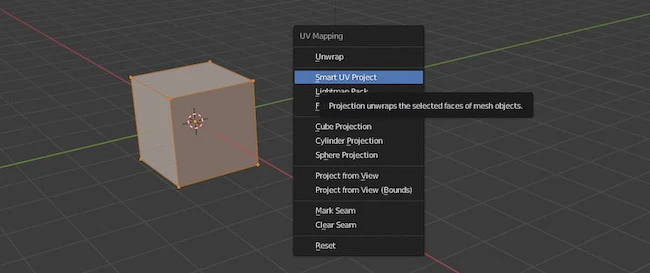
Шаг 6: Развернем модель, используя умный проект UV. Для этого перейдем к окну модели. Измените режим редактирования на объект. Всякий раз, когда мы разворачиваем модель, нам нужно изменить режим, чтобы объект полностью развернул объекты. Принимая во внимание, что если мы разворачиваем в режиме редактирования, только выбранное лицо будет развернуто, а оставшееся лицо должно быть развернуто снова, что может привести к наложению, или потребуется время, чтобы развернуть каждый раз, и это не лучший способ для разворачивания.
Установите режим для объекта и перейдите к затенению и ультрафиолетовому излучению из правого угла панели. Нажмите на раскрывающийся список UV mapping и выберите «Smart UV Project», который помогает плавно развернуть лицо и выполнить несколько основных настроек.

После нажатия на Smart UV Project мы видим, что это окно всплывает, где мы можем изменить некоторые настройки, такие как Angle Limit, Island Margin, Area Area Weight и т. Д. Теперь мы поговорим об Island Margin, который помогает поддерживать расстояние между каждой гранью. в УФ при распаковке.

После нажатия Ok мы видим, что все грани в окне UV-карты были развернуты вместе с полем, как и планировалось.

Шаг 7: Теперь мы будем работать на панели UV-картографирования. Нажмите на кнопку + New, чтобы создать новую текстуру по умолчанию. Если у нас уже есть текстура, мы можем добавить ее, используя опцию open рядом с ней. После нажатия + Новый открывается новое окно, показывающее детали ниже. Создайте имя для текстуры, установите ширину и высоту, как требуется, цвет можно выбрать, если мы хотим дать сплошной цвет фона, мы можем пойти с ним, выбрав черный. И нажмите Ok, чтобы отразить это на УФ-картировании.

Шаг 8: Как мы уже видели, новая созданная текстура применяется к UV, и теперь мы сохраним текстуру на нашем ПК в локальном дисковом пространстве для прямой загрузки в будущем, чтобы избежать потери файлов. Нажмите на изображение и выберите « Сохранить как изображение». Откроется окно сохранения браузера, чтобы сохранить файл в соответствии с требованиями и легко получить доступ к загрузке.

Шаг 9: Мы можем использовать инструмент рисования текстур, чтобы напрямую рисовать на модели, изменив режим Объект на режим Текстурной краски, как показано ниже.

Шаг 10: Мы видим, что вся модель превращается в пурпурный, поскольку ей не назначена текстура, поэтому она прозрачна. Чтобы добавить текстуру, сохраненную ранее. Откройте окно узлов, нажмите «Добавить», нажмите «Текстура» и выберите «Текстура изображения». Новое окно текстуры изображения загружается в панель узлов.

Шаг 11: Нажмите на open и загрузите текстуру в узел и синхронизируйте, присоединившись к ним.

Шаг 12: Установите UV-карту также в режим рисования из нижнего угла, как показано. Теперь мы можем рисовать по области текстуры UV-карты, а также напрямую, рисуя модель, которая будет в приемнике, когда мы отобразили те, которые использовали узлы. Используйте различные цвета и параметры обводки, радиус кисти и т. Д., Чтобы сделать текстуру более привлекательной и привлекательной.

Мы можем даже вращать ультрафиолетовые лучи, основываясь на привычках и практиках, для демонстрационной картины, которую мы сделали.

Вывод — рисование текстур в Blender
Это помогает сделать наши собственные творческие вещи привлекательными и продемонстрировать в резюме, чтобы использовать возможности интервью. Эта техника больше используется при создании игр, небольших обучающих анимационных видеороликов, рассказывании историй и т. Д., Так как они выглядят более ручными и привлекают клиентов, и мы можем использовать нестандартные идеи, чтобы добавить творчества в практику.
Рекомендуемые статьи
Это руководство по рисованию текстур в Blender. Здесь мы обсуждаем Введение и как использовать режим рисования текстур в Blender вместе с его шагами. Вы также можете посмотреть следующие статьи, чтобы узнать больше
Texture Painting In Blender – The Guide To Getting Started
With texture painting on Blender, there are a few steps to take before pulling out that pain brush and painting your model.
Also, the complexity of texture painting will also depend on the complexity of your model. So in this mini guide I opt to demonstrate these steps using a very basic model such as a cube.
The assumption here is that if you are a decent to good modeller, then you likely know how to texture paint. In essence, this is a starting guide and using a basic model will likely get the message across which you can then replicate on more complex shapes and geometry.
What Is Blender Texture Paint?
As the name suggests, [highlight-it color-1]Blender’s texture paint is a built-in paint feature designed to physically paint over your UV textures, which then transposes onto your model[/highlight-it]. Alternatively, you can physically paint over your model which then transposes over your UV textures.
Of course, there is an other option, where you can download your UV texture and edit that externally using photo editing tools like Photoshop or Gimp, and then re-upload to your 3D model.
In essence, we’re physically adding the texture, shadows and colors onto the model, so the render engine uses that data to generate the render. This is very much different to other means of rendering where you incorporate external factors to your scene, such as different lightings, materials and even HDRI backgrounds to replicate real-world conditions.
So without further ado, let’s take a look at the steps we shall be covering in this texture painting tutorial.
- Step 1 : UV unwrapping your model
- Step 2 : Accessing Blender’s texture painting panel
- Step 3 : Adding a base color (a little like a primer coat before painting)
- Step 4 : Choosing different brush and paint types
- Step 5 : Painting directly on your model
Blender Secrets E-book
How To Use Blender Texture Paint?
So let’s get started with the step-by-step guide… remember we’ll be using a simple cube for demonstrational purposes.
Step 1 : UV Unwrapping Your Blender Model
Load up Blender and conveniently the default cube shows up.
Go into ‘Edit Mode’ by left clicking the cube and then choosing ‘Edit Mode’ at the top menu.

In the newer version of Blender (2.92.0) the cube will already be highlighted in orange. If not highlighted in orange, simply hit the ‘A’ key on the keyboard to highlight it.

Now we want to UV unwrap the model, which is essentially the process of turning your 3D model and flattening it into 2D sections.
To do this, while in ‘Edit Mode’ (and model highlighted in orange), simply hit ‘U’ on your keyboard and then click ‘Smart UV Project’ from the menu.
Step 2: Accessing Blender’s Texture Paint Panel
At this point it would appear nothing happened, but you will now need to click the ‘Texture Paint’ tab on the top menu to see the texture paint panel AND your model in flat pack!
Step 3: How To Add A Base Color (like a primer coat before painting)
Notice above how your model has turned purple?
That means it has no texture to paint on. So at it stands we cannot paint anything on our model until we add a base color.
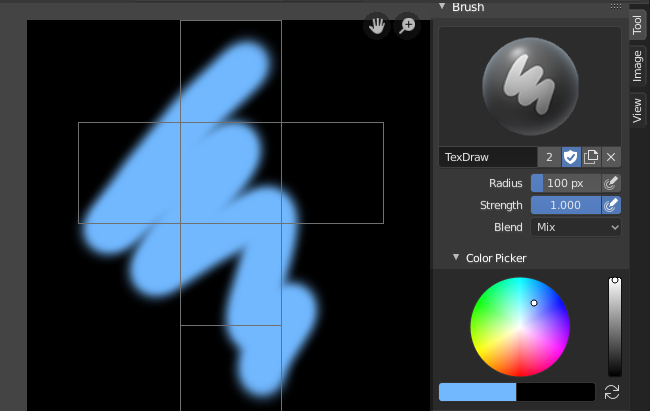
To do this, click on the ‘texture draw’ tab, then the ‘+’ button and finally select ‘Base Color‘ from the drop down list!
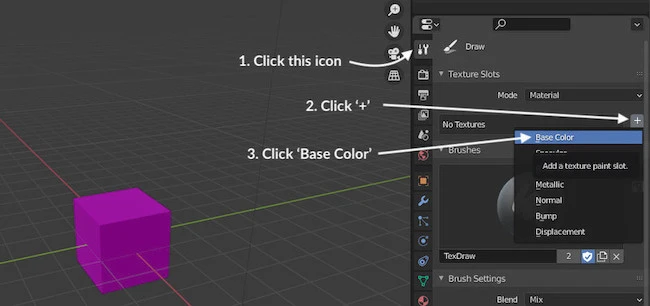
You’ve finally added a base color and your model should have turned grey!
Step 4: Choosing Different Brushes & Paint Types
What we are going to do is select a color from the color wheel (in this case blue) and then move our cursor (which is now a circle) over our model and start painting it but left clicking the mouse button and holding it down.
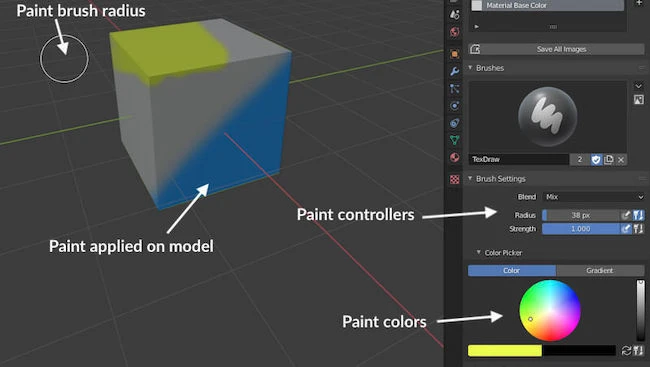
Note: The cursor circle (aka brush stroke diameter) can be increased or decreased in size using ‘[‘ or ‘]’ keys on your keyboard.
Step 5: Seeing Your Paint On UV Unwrap
One thing your might notice is that while painting your model, you will not see the paint show up on your UV unwrap.
That’s because you need to change one setting and everything is sorted.
Simply click the arrow pointing downwards and select ‘Material Base Color’ from the drop down menu.
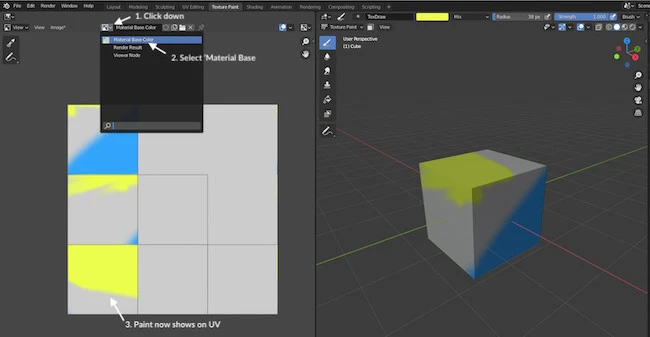
Note: Now while you continuing drawing on your model, you will see your UV unwrap update in real time
You are done!
Texture Paint Brushes
By default, there is only one brush type on Blender, which limits the type of stroke you may want to paint on your model. It looks like this:
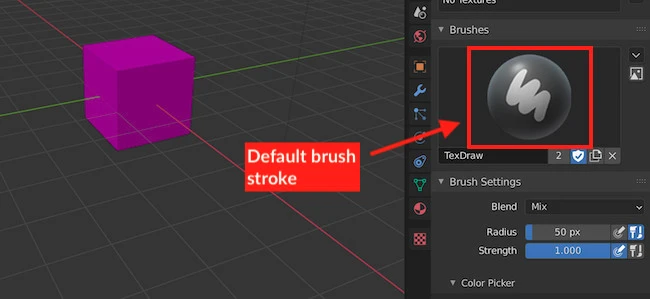
It’s possible to customize your own paint brush stroke. However, why do that when you can use a photo editing tool such as GIMP that already has an array of predefined brushes at hand?
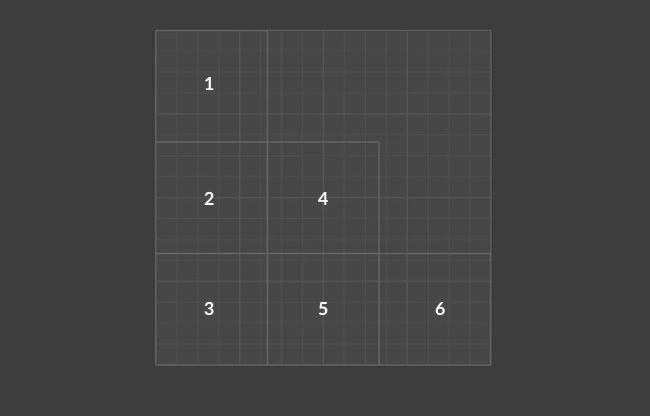
In Step 2, we have UV unwrapped the model. This essentially breaks the model down into a flat pack. In the case of a 3D cube, the model has been broken down into 6 squares and laid down flat.
Export the flat pack (unwrapped map) and then import into GIMP. From there simply paint your texture using the array of brushes available.
Once completed, import it back into Blender and all your work will reflect onto your 3D model.
Blender Texture Paint Not Working
A common complaint by Blender users is the texture paint feature often not working. As far as I can tell, there is no bug or issue with the feature itself and it’s often the user not following the instructions properly.
I believe the biggest culprit is forgetting to set the model to “Base Color”. Miss this step and you’ll not be able to paint on the model, giving the impression the feature is broken and not working.
For a better understanding, go to Step 3 in the instructions above.
Closing Thoughts On Texture Painting
This is yet an other powerful feature that Blender has on offer. And as you may have guessed, this skill is vitally important for the making of games in the gaming industry.
The primary advantage of texture paining is it allows for the creation of highly detailed models that are made up of low polygon count.
Essentially, the texture design can be detailed enough to hide the fact the model has a low polygon count. Low polygon count models allow for faster render times and nicer texture designs provide a better gaming experience.
Is Blender good for texture painting?
Blender has a built-in feature called Texture Paint that allows you to either paint directly on your model, or on the UV unwrapped (flat pack) version of the model. Work on one and the other automatically updates!
However, photo-editing tools such as GIMP provide more flexibility when it comes to texture creations and have an abundance of brush strokes. Your flat pack version of your model can be important onto GIMP, worked on, and then reintroduced into Blender.
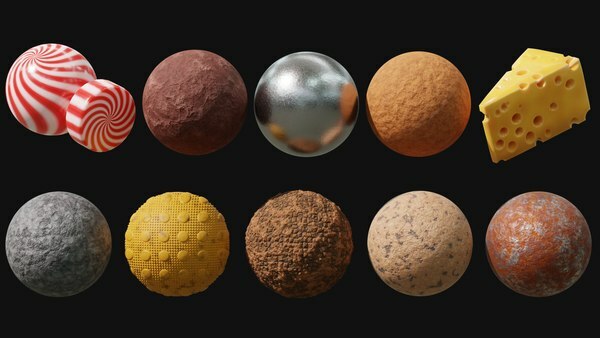
Can I get free textures for Blender?
Sure, there are many places that provide free textures that can be used on your scene. Note, that these textures aren’t just limited for Blender users, they can also be used for other 3D modelling packages. Here are some recommendations:
Blender: как рисовать текстуры
После применения текстур к объекту, можно приступать к рендерингу сцены с использованием текстур. В окне Render (рендеринг) настройте параметры рендеринга и нажмите кнопку Render, чтобы получить окончательное изображение с примененными текстурами.
Работа с текстурами в Blender предоставляет огромные возможности для создания уникальных и реалистичных сцен. Оперируя различными инструментами рисования, слоями текстур и настройками, вы можете достичь высокого уровня детализации и качества визуализации своих 3D-моделей. Этот процесс может быть творческим и увлекательным, а результаты впечатляющими.