Как установить vcpkg в visual studio
Краткая инструкция по установке Visual Studio, Qt SDK, а также других инструментов и библиотек
Содержание
Установка Visual Studio 2017
Microsoft предоставляет несколько редакций Visual Studio: большинство из них платные, но мы будем использовать бесплатную редакцию — Community Edition.
Редакция Community Edition предназначена для индивидуальных разработчиков, обучающихся и для разработчиков OpenSource проектов. Для коммерческой разработки в команде потребуются другие редакции либо среда MonoDevelop.
Загрузите онлайн-инсталлятор Visual Studio 2017 Community Edition: visualstudio.com/downloads
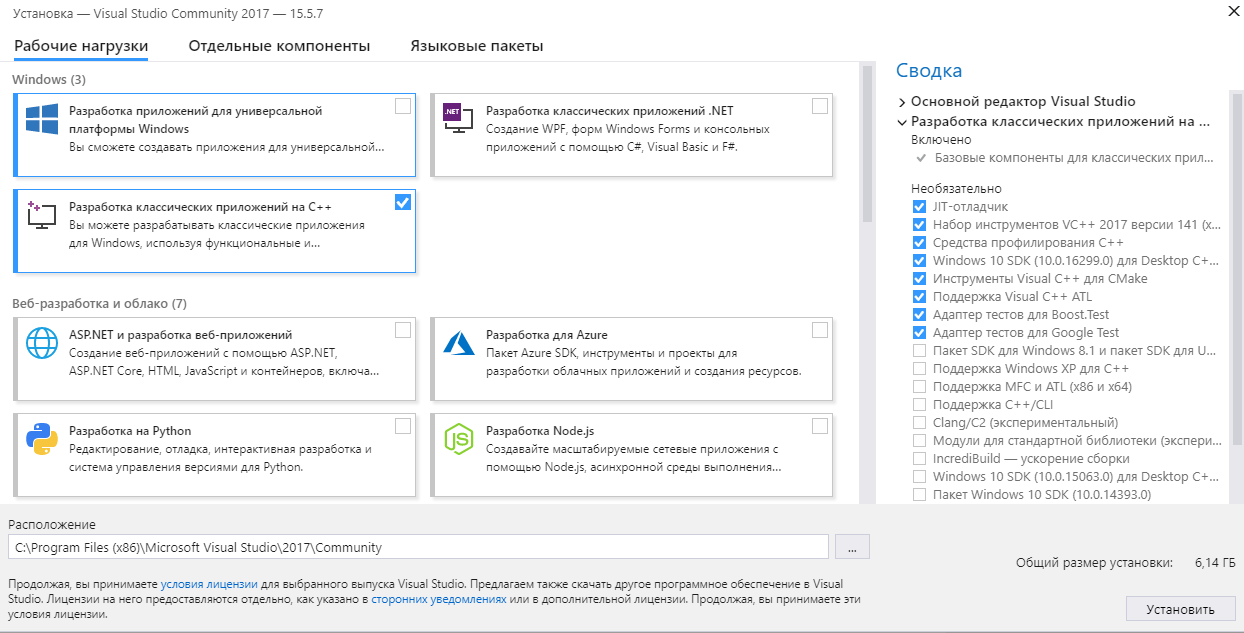
После загрузки запустите (на медленных машинах запуск может быть долгим). В установщике выберите один компонент — “Разработка классических приложений на C++”:
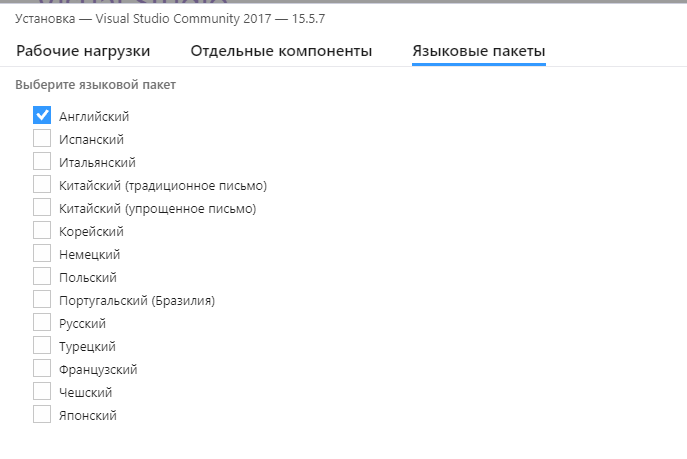
На вкладке языковых пакетов уберите пакет “Русский”, выберите “Английский” — с англоязычным интерфейсом гораздо легче найти решение какой-либо проблемы в Интернете:
Запустите установку Visual Studio. Процесс установки может занять 1-2 часа.
После установки Visual Studio вы можете установить плагины, загрузив их с сайта visualstudio и запустив:
Установка Git
Git — это OpenSource система контроля версий, представленная пакетом инструментов командной строки. Скачайте и установите Git для Windows: https://git-scm.com/download/win
Для более комфортной работы с git вы можете установить какой-нибудь графический клиент для Git:
- Source Tree (https://www.sourcetreeapp.com/)
- Tortoise Git (https://tortoisegit.org/)
- клиент для работы с Github (https://desktop.github.com/).
Установка Qt
Загрузить Qt 5.10 можно по адресу download.qt.io/archive/qt/5.10/5.10.1/ (файл “qt-opensource-windows-x86-5.10.1.exe”). После загрузки пройдите через стандартные шаги установщика.
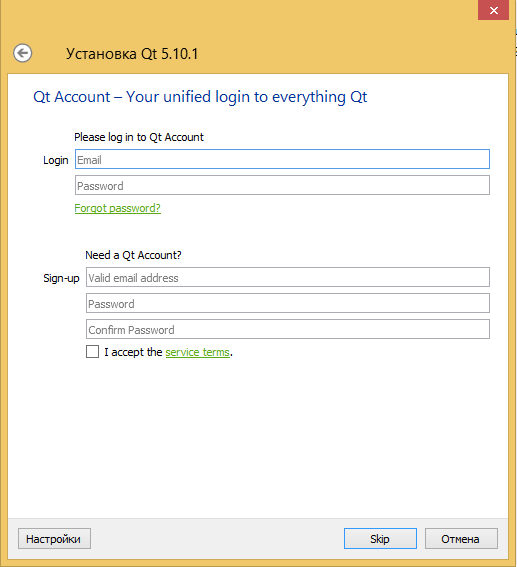
Чтобы избежать регистрации на сайте Qt Project, вы можете просто стереть email в соответствующем окне, и кнопка Skip станет активной.
При установке Qt потребуется установить два компонента: Qt для VS2017 в x64 версии и интеграцию с CDB для QtCreator:

Кроме того, потребуется плагин к Visual Studio для разработки на Qt, который можно загрузить на download.qt.io/official_releases/vsaddin/ (файл “qt-vsaddin-msvc2017-2.2.0.vsix”).
Установка CMake
Для сборки примеров потребуется CMake. Свои работы также рекомендуется делать с помощью CMake.
- Скачайте Cmake с официального сайта
- При установке не забудьте поменять опцию, чтобы путь к CMake был добавлен в переменную PATH

Переменные окружения, такие как PATH, передаются приложению при старте. Если вы поменяли переменную PATH, изменения вступят в силу после перезапуска программ.
Установка и использование vcpkg
Пакетный менеджер vcpkg распространяется в исходниках и собирается на машине разработчика. Для сборки потребуется установленная Visual Studio с инструментами C++ разработчика.
Порядок установки описан в консольных командах:
После того, как вы получили vcpkg.exe , вы можете устанавливать пакеты командой install .
В частности, нам потребуется установить GLBinding и GLM:
В команде, представленной выше, имена пакетов перечисляются по порядку, а в качестве суффикса используется так называемый “триплет”: имя_пакета:триплет .
- Имя пакета задаёт одно из множества имён доступных библиотек, полный список есть в блоге Visual C++ Team
- Триплет задаёт архитектуру и режим сборки
Для данного курса рекомендуются триплеты x86-windows для сборки 32-битной версии программы и x64-windows для сборки 64-битной версии. Вместо явного указания триплета для каждой библиотеки можно разом указать триплет для всех:
Последняя, но крайне важная деталь: включите автоматическую интеграцию пакетов vcpkg во все проекты Visual C++:
Get started with vcpkg
Installing vcpkg is a two-step process: first, clone the repo, then run the bootstrapping script to produce the vcpkg binary. The repo can be cloned anywhere, and will include the vcpkg binary after bootstrapping as well as any libraries that are installed from the command line. It is recommended to clone vcpkg as a submodule for CMake projects, but to install it globally for MSBuild projects. If installing globally, we recommend a short install path like: C:\src\vcpkg or C:\dev\vcpkg , since otherwise you may run into path issues for some port build systems.
Step 1: Clone the vcpkg repo
git clone https://github.com/Microsoft/vcpkg.git
Make sure you are in the directory you want the tool installed to before doing this.
Step 2: Run the bootstrap script to build vcpkg
Install libraries for your project
vcpkg install [packages to install]
Using vcpkg with MSBuild / Visual Studio (may require elevation)
vcpkg integrate install
After this, you can create a new project or open an existing one in the IDE. All installed libraries should already be discoverable by IntelliSense and usable in code without additional configuration.
Using vcpkg with CMake
cmake -B [build directory] -S . -DCMAKE_TOOLCHAIN_FILE=[path to vcpkg]/scripts/buildsystems/vcpkg.cmake
Then build with:
cmake —build [build directory]
With CMake, you will need to use find_package() to reference the libraries in your Cmakelists.txt files.
Installing vcpkg is a two-step process: first, clone the repo, then run the bootstrapping script to produce the vcpkg binary. The repo can be cloned anywhere, and will include the vcpkg binary after bootstrapping as well as any libraries that are installed from the command line. It is recommended to clone vcpkg as a submodule to an existing project if possible for greater flexibility.
Step 1: Clone the vcpkg repo
git clone https://github.com/Microsoft/vcpkg.git
Make sure you are in the directory you want the tool installed to before doing this.
Step 2: Run the bootstrap script to build vcpkg
vcpkg install [packages to install]
cmake -B [build directory] -S . -DCMAKE_TOOLCHAIN_FILE=[path to vcpkg]/scripts/buildsystems/vcpkg.cmake
Then build with:
cmake —build [build directory]
With CMake, you will need to find_package() to reference the libraries in your Cmakelists.txt files.
Installing vcpkg is a two-step process: first, clone the repo, then run the bootstrapping script to produce the vcpkg binary. The repo can be cloned anywhere, and will include the vcpkg binary after bootstrapping as well as any libraries that are installed from the command line. It is recommended to clone vcpkg as a submodule to an existing project if possible for greater flexibility.
Step 1: Clone the vcpkg repo
git clone https://github.com/Microsoft/vcpkg.git
Make sure you are in the directory you want the tool installed to before doing this.
Sorry, you have been blocked
This website is using a security service to protect itself from online attacks. The action you just performed triggered the security solution. There are several actions that could trigger this block including submitting a certain word or phrase, a SQL command or malformed data.
What can I do to resolve this?
You can email the site owner to let them know you were blocked. Please include what you were doing when this page came up and the Cloudflare Ray ID found at the bottom of this page.
Cloudflare Ray ID: 802730eb5c2f3ca1 • Your IP: Click to reveal 86.107.21.84 • Performance & security by Cloudflare
The way you should install C++ libraries and install Visual Studio on Windows 10
In this tutorial, I will show you the way to install Visual Studio as small as minimum as possible.
Install Visual Studio
When in Visual Studio Installer GUI windows, I suggest you tick like this
It will consume your diskspace at most 4gb.
Install vcpkg
vcpkg is a cross-platform C++ libraries manager. It will do the hard work for you such as building, importing, setting up PATHS, ..etc.
To install vcpkg
Exit fullscreen mode
To install the libraries for your project, run:
Exit fullscreen mode
You can also search for the libraries you need with the search subcommand:
Exit fullscreen mode
In order to use vcpkg with Visual Studio,
run the following command (may require administrator elevation):
Exit fullscreen mode
All installed libraries are immediately ready to be #include ‘d and used in your project without additional configuration.