How To Save Patterns In FL Studio (Simple Guide)
How To Save Patterns In FL Studio
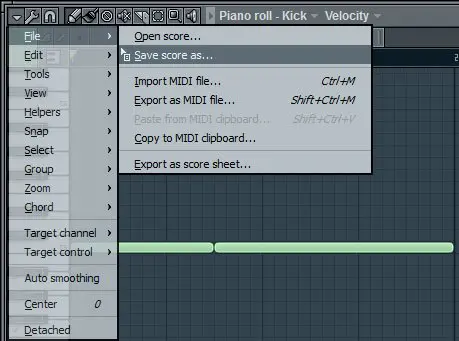
The easiest way to save patterns in FL Studio is to access the drop-down menu on the top left toolbar in the piano roll view. From this menu, you can then select ‘file’ and ‘save score as,’ which will allow you to access that pattern in other FL Studio projects.
When producing in FL Studio, there are occasions when you might want to save a particular pattern that you like or that does not fit in with your current track.
You are likely looking to save the pattern in these cases, which we will discuss in this FL Studio tutorial.
This process is pretty obscure when first trying to find it, but you won’t need to think about it again after you have done it once.
Saving Patterns In FL Studio – Method 1
This method allows you to easily save a specific pattern for use in a different FL Studio project by saving it as a midi file. However, it only copies the note data and not other information such as the instrument used.
Selecting The Pattern
Suppose you are looking to save a pattern, for example, the synth midi notes shown in the image below.
In that case, you will first want to locate the correct pattern and have it open in the piano roll view.

You can see that I have the ‘Main Synth’ instrument selected and in a pattern with the same name.
Ensure that the correct pattern name is shown in the indicator and that you have the right VST instrument selected from the drop-down menu.
Before moving on to the next step, It is also worth noting that this technique works if you have used the step sequencer buttons to place notes instead of the piano roll.
In this case, you will want to open up the pattern in the piano roll, where you will see the notes you have placed in the step sequencer displayed as midi notes.
From this point, all the steps will be the same as mentioned.
Step 2 – Saving The Pattern
After locating the pattern you are looking to save in the FL Studio piano roll, you will want to find the save ‘save score as‘ option. This is found by opening up the ‘options’ drop-down menu, the small triangle located at the top right of the piano roll view (1).
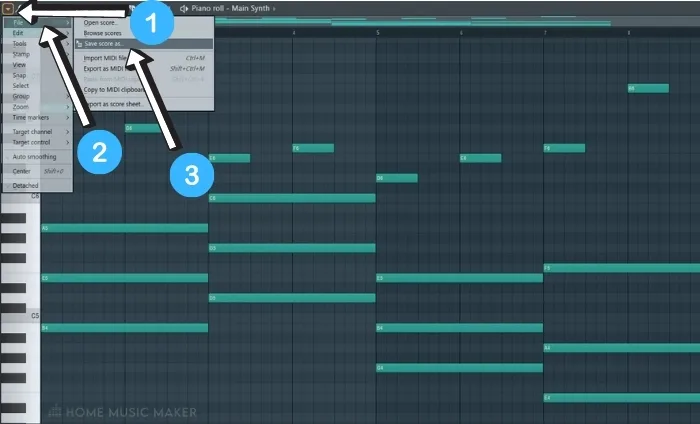
Once the drop-down menu is open, you can select the ‘file’(2) drop-down and choose the ‘Save score as.’ (3)
You will then be given the option to choose where you save the pattern.
Step 3 – Retrieving The Pattern
After saving the pattern, you can retrieve it either using your desktop file browser or the FL Studio file browser.
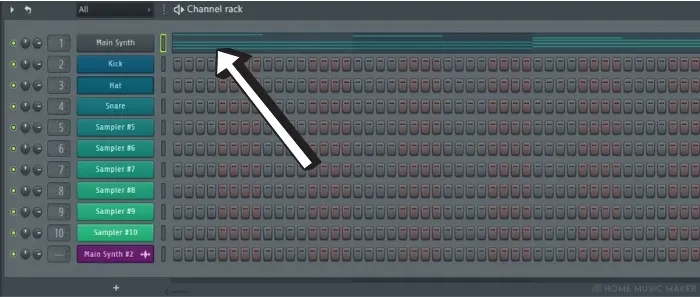
When you have located the saved pattern, you can simply click and drag it into your project.
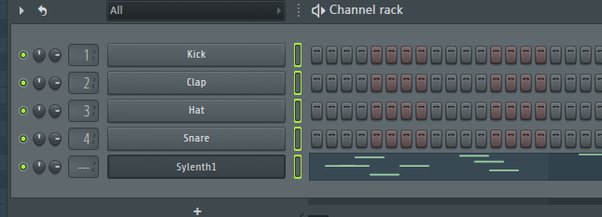
Dragging the pattern into the ‘channel rack‘ tab will add the notes just as they were saved.
important
You will have to make sure you are using the same sound as when you first made the pattern if you want it to be precisely the same.
Saving Patterns In FL Studio – Method 2
This method is more straightforward but is best used if you are 100% certain of the pattern.
Make sure you are not looking to change any of the notes or timings when saving it for use in another FL Studio project file. This is because this method involves saving the pattern into an audio file instead of midi data.
Step 1 – Selecting The Pattern
As with the first method, you will want to ensure that you have the correct pattern selected.
This is indicated by the pattern indicator located in the top toolbar.
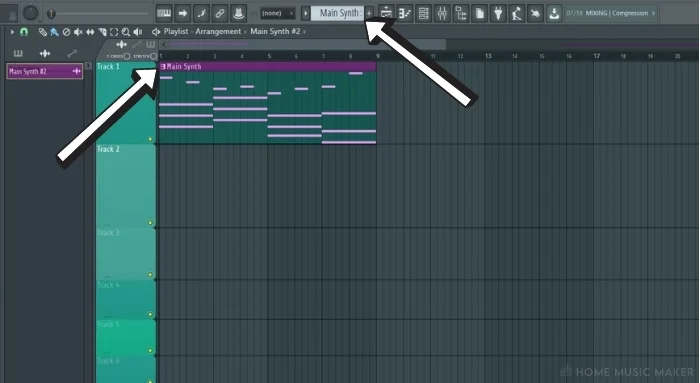
In the image above, I have a chord pattern called ‘Main Synth‘ selected.
Step 2 – Rendering The Pattern As Audio
Once you have located the desired pattern, you will want to then render the pattern out into audio.
To do this, you will want to click on the drop-down arrow just to the left of the pattern indicator (1).
Once you have opened this drop-down menu, you will see options at the bottom labeled ‘render as audio clip’(2) and ‘render and replace.’(3)
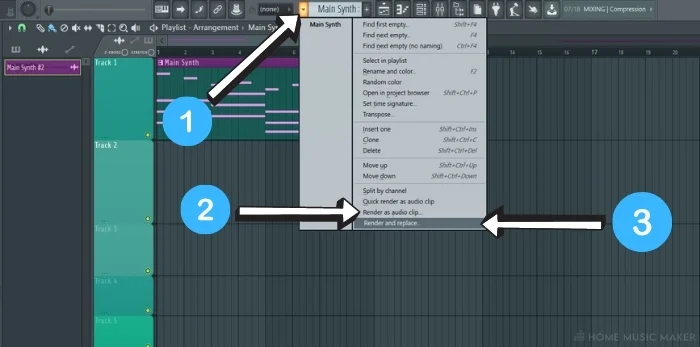
Use ‘render as audio clip’ if you want to retain the original pattern, and use ‘render and replace’ if you’re going to replace the pattern with the audio render.
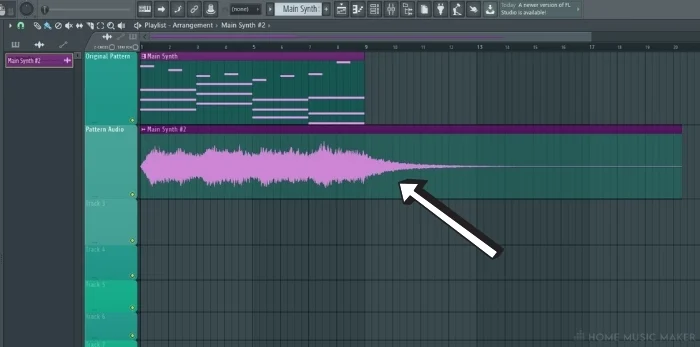
After selecting one of these options, you will be able to render the pattern out into audio, as seen in the playlist view in the image above.
Step 3 – Saving The Rendered Audio
The easiest way to save the rendered audio is to click on the small waveform icon in the piano roll view at the top left of the audio. (1)
This will open up the sample options menu, from which you can select ‘Make unique as sample.’ (2)
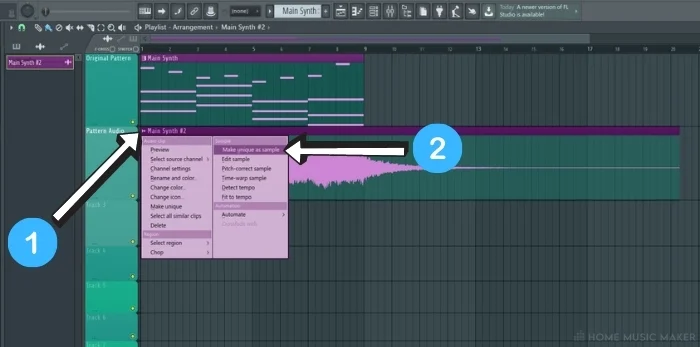
Once selected, you can then choose the destination to save the rendered audio to, making it easily accessible whenever you want to use it next.
Related Questions
How do you add effects to patterns in FL studio?
Effects can be added to patterns by assigning the sound you want to a mixer track and then loading the desired effects on the mixer track.
How do you copy a melody to another pattern in FL Studio?
Using the ‘save score as‘ method that was discussed in the above article.
Should I get the producer or signature edition of FL Studio?
It depends on if you think you will use the additional features that the signature addition grants you.
How do you import a song from iTunes to FL Studio?
You would have to convert the audio into an MP3 or WAV file to use in FL Studio.
How do you convert midi to audio in FL Studio?
I am using the render audio method detailed in method 2 in the article above.
Can you save projects in FL Studio trial mode?
You can save FL Studio projects; however, you will not be able to open them again without purchasing the full version.
Ableton or FL Studio, which DAW should you use?
Both have their benefits and downsides. Download the free trials that they both offer and form your preference.
Final Words
With both of these methods, you will now be able to save specific patterns and loops from one project to another within FL Studio.
This is a handy tool to have in your arsenal as a music producer using FL Studio. It allows you to save specific ideas for use in different projects down the line.
This can be used for anything from a drum loop to a catchy melody that maybe doesn’t quite fit in with your current project.
Once you have a library of saved patterns, it can be a great place to start a whole new project idea from.
FL Studio — Горячие клавиши
Для чего нужны горячие клавиши? Казалось бы, выбрать необходимую команду в меню с помощью мышки гораздо проще. Но это только на первый взгляд. во-первых эту самую команду нужно еще найти и знать, где она находится. Во-вторых нужно пройти через несколько выпадающих меню, чтобы открыть нужную. Ну и наконец — все профи используют хоткеи:)
Ниже представлен полный список горячих клавиш, не обязательно запоминать все — можно выбрать 5-10 наиболее используемых и со временем зададите себе вопрос: «Почему раньше я ими не пользовался?»
Announcing How To Save A Pattern In FL Studio Like The Pros
So you want to learn how to save a pattern in FL Studio? How about how to save a pattern in FL Studio 12?
This comprehensive tutorial guide would break down the process in the simplest form possible. Walking you from what you need to save a pattern to the different methods of saving these patterns in FL Studio.
In addition to that:
You would also uncover answers to FAQs as they relate to saving patterns in FL Studio.
Let’s get right into it.
Fancy to know if FL Studio is worth it? Click here (is fl studio worth it)
How To Save A Pattern In FL Studio
Don’t have much time to spare? Simply do this to save a pattern in FL Studio.
- Access the drop-down menu on the top left-hand side of the Piano Roll view’s toolbar.
- Chose “File”.
- Then click on “Save Score As”.
You will be able to access the saved pattern from anywhere in your FL Studio once you follow this procedure.
What if the pattern you intend to save is not a part of your ongoing project? In that case, you would need to continue reading.
Alternative A: Saving The Pattern Into MIDI Note
What you should know:
- This method allows you to save patterns as a MIDI file.
- Only the note data is copied.
- You can save patterns for use in other tracks different from your ongoing project.
Open the pattern
Highlight the correct pattern in the playlist view of your FL Studio by dragging your cursor from the top right corner of the piano roll diagonally to the left bottom corner of the piano roll.
Here, you should ensure that the correct pattern name is indicated. Also, the right professional VST instrument must be chosen.
This method best works where the step sequencer instead of the piano rolls button to place the notes. Got that, right?
Access the pattern in the Piano Roll view to see if the notes placed in the step sequencer appear as MIDI notes.
Open the drop-down button to access the “save score as” option. It is directly under te “File” option.
Now, let’s consider the second alternative.
Method B: Save As Audio File
Highlight and choose the pattern
Follow step one in method A discussed above to highlight the duration of the pattern you are looking to save.
Render the pattern as audio
Open the drop-down button on the left-hand side of the toolbar. Click on the “Render As Audio Clip” label and the “Render and replace” label.
Choose the “Render as audio clip” if you want to retain the original pattern. Use the “Render and replace” if you’re going to replace the pattern with the audio render.
Saving
The final step is to save the rendered audio. A wave-like icon is located on the top left-hand side of the Piano Roll view of your FL Studio. Select it, and then click on “Make unique as a sample.”
What Do You Need To Save A Pattern In FL Studio?
- FL Studio
- A pattern
- The ability to practice.
Nothing more, nothing less!
So now, let’s proceed to FAQs.
Answers To Related Questions On How To Save A Pattern In FL Studio
Can you save a pattern in FL Studio?
Yes, you can save a pattern as a MIDI note or as audio files in FL Studio. Depending on your choice, drag your cursor to highlight the part of the track you want to save as a pattern and choose the drop-dwon button to follow the necessary prompts.
How do I save a WAV pattern in FL Studio?
If you want to save a pattern of one or more instruments in .wav format then you can take either of these approaches.
You can simply open the song mode and put that pattern in the playlist channel then mute all other playlist racks. Hit render and export as .wav.
Mute all other instruments in the pattern maker, by going to song mode and render and export as .wav if you want to render all presence of a single instrument into a single sample.
Just send each instrument to individual mixer tracks and from there access the render options window and choose ‘Split Mixer Tracks’ if what you desire is to render all instruments present in the entire project into individual samples.
Can you save projects in FL Studio trial mode?
Yes, but you would not be able to open such files after saving.
Can you copy patterns in FL Studio?
Yes, you can. Using the keyboard shortcut(Ctrl+C) and (Ctrl+V) or following other routes to copy and paste notes from sound to sound, or pattern to pattern.
Can you pirate FL Studio?
Yes, there are a number of websites where you can download the hacked version of FL Studio. However, you should not do this for your own good. You may be exposing your PC to potential threats in the form of spyware, virus, malware, spam, among others.
However, you can sign up for the FL Studio trial version if you so desperately want a free version.
In Conclusion
You would find this tutorial on how to save a pattern in FL Studio whether you are a new or old user of FL Studio. This guide is tailored to help you maximize your experience with this DAW and you can use either of the methods discussed.
Published by Josh
Josh here, I am a lover of music and musical instrument. I've been a choir since I was a little boy. I later went to the university to study music and I share everything I know about music and musical instruments on this blog. View all posts by Josh
Fl Studio сохранение проекта
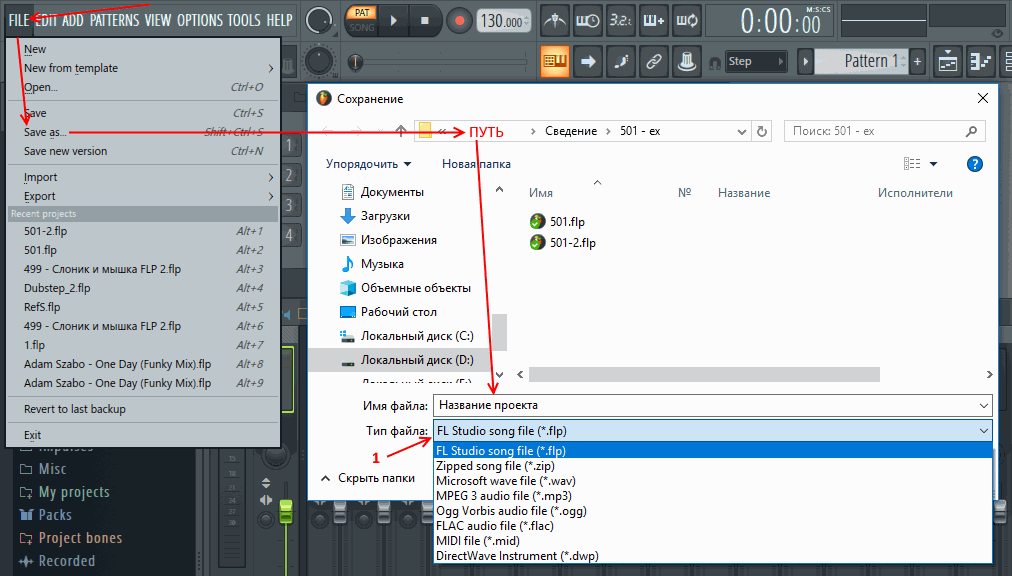
В этом разделе давайте рассмотрим как правильно сохранять ваш проект, для того чтобы вы могли продолжить работу, заархивировать проект, или дать его кому-нибудь послушать. Для сохранения проекта откройте меню File (см. картинку ниже), далее выберите Save as. . В появившемся окне укажите путь, куда вы хотите сохранить ваш проект/аудиофайл, введите желаемое название. Далее обратите внимание на тип файла (1 на картинке ниже), здесь вы выбираете как будет сохранен ваш проект, мы с вами рассмотрим самые необходимые форматы (описание вариантов см. ниже).
Содержание
Сохранение проекта для дальнейшей работы [ править ]
Есть 2 варианта *.flp и *.zip. Эти файлы нельзя послушать в машине или просто на компьютере через плеер, они откроются только в FL Studio.
*.flp [ править ]
Всё что нужно сделать для сохранения, это указать путь и название для файла. *.flp это файл где хранятся настройки всех параметров проекта которые вы настраивали (положения ручек, ноты пианоролла, последовательность клипов в плейлисте и т.д.). Этот формат не содержит никаких сэмплов, синтезаторов или эффектов (только их настройки). Если вы сохраните проект в этот формат и захотите продолжить над ним работу завтра или к примеру через неделю, то у вас он откроется как и до сохранения. Всё будет так пока вы не поменяете что-либо на своём компьютере.
А вот если вы к примеру переустановите систему или поудаляете сэмплы которые использовали в проекте, то у вас ничего не выйдет, потому как сэмплы которые были в проекте или перемещены или удалены с вашего компьютера. Тоже самое произойдет если вы отправите кому-либо ваш *.flp файл, если у человека нет сэмплов используемых в проекте их у него и не будет. Проект откроется не полноценно.
То есть данный формат предназначен для временного сохранения вашего проекта, что вскоре продолжить над ним работу.
*.zip [ править ]
Всё что нужно сделать для сохранения, это указать путь и название для файла. При сохранении в *.zip формат FL Studio создаёт zip архив, который содержит в себе *.flp файл и все сэмплы которые были использованы в проекте. Если вы поделитесь таким файлом с кем-нибудь, то открыв этот файл проект откроется правильно, со всеми сэмплами.
То есть данный формат предназначен для долгого архивирования вашей работы, чтобы можно было открыть её через год и не потерялись никакие внешние звуки которые вы использовали.
Важные примечания:
- *.zip формат содержит только *.flp и сэмплы. В проекте не сохраняются сами синтезаторы и эффекты. То есть если вам к примеру дали проект в формате *.zip, и там допустим использовался (сторонний синтезатор) Spire (о сторонних компонентах мы поговорим позже), и у вас на компьютере не установлен этот синтезатор. То при открытии проекта программы сообщит, что не смогла найти этот синтезатор. Чтобы проект открылся правильно вам нужно обязательно установить этот синтезатор.
- Также в подобных сторонних инструментах могут быть использованы сэмплы. И при сохранении в *.zip эти сэмплы (из сторонних инструментов) не будут включены в *.zip архив, потому как FL Studio просто не знает о том, что они были использованы. Вам нужно позаботится об этом и сохранить необходимые файлы (используемые в сторонних инструментах) в ручную.
- Тоже самое относится к библиотекам. Некоторые сторонние инструменты используют библиотеки (это не сэмплы, а другой формат понятный только самому инструменту). И если вы сохранили проект в *.zip формат, дали этот файл другу, чтобы он открыл его у себя. Он его откроет, программы сообщит, что нет инструмента, он его установит. Но вы допустим в этом инструменте использовали библиотеку гитар. Ну и так вот пока ваш друг не установит эту библиотеку в свой инструмент он не сможет правильно открыть проект.
Сохранение проекта в звуковой файл [ править ]
Если вы закончили работу и хотите дать послушать вашу музыку друзьям, которые даже не знают о существовании FL Studio, то вам необходимо выбрать формат *.mp3 или *.wav. При выборе этих форматов из меню тип файла (см. 1 на картинке выше), после нажатия кнопки Сохранить у вас появится диалоговое окно рендеринга (см. картинку ниже).
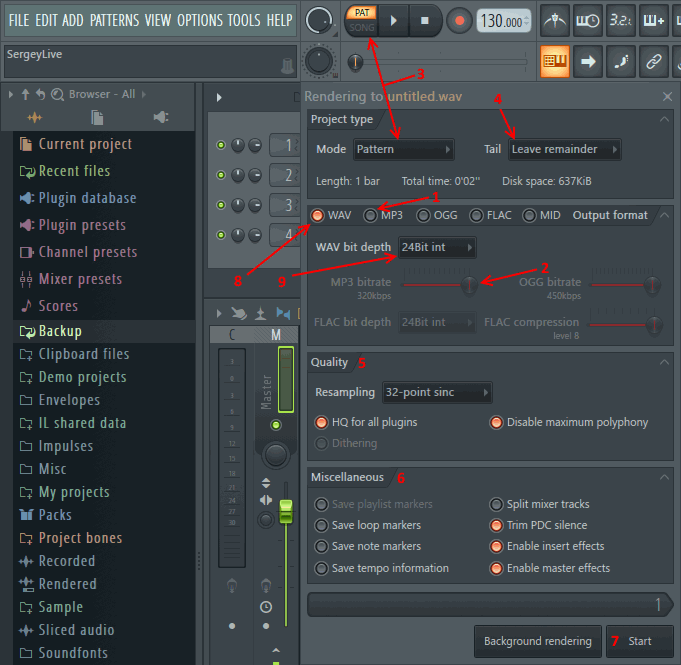
 Рендеринг — если сказать просто это сохранение того, что вы сделали в звуковой файл. Тоже самое баусинг (используется реже).
Есть и другие форматы, но мы их пропустим, это самые важные и нужные.
*.mp3 [ править ]
Формат *.mp3 предназначен для «обычного прослушивания» (дома, на плеере, в машине. ), практически вся музыка которую вы скачиваете/слушаете на компьютере имеет именно этот формат. И если вы сделали финальную песню, полностью закончили над ней работу, и хотите загрузить её в интернет или дать послушать друзьям, то надо выбрать именно этот формат. Это так сказать «потребительский» формат.
Для сохранения в *.mp3 формат:
- Выберите сам формат (1 на картинке выше).
- Установите желаемое качество 2 (чем выше качество тем лучше звук и больше размер файла).
- Далее выберите, что вы будете сохранять (3) или текущий выбранный паттерн (вариант Pattern) или всю песню (вариант Full song).
- Pattern— сохранится только выбранный в текущий момент паттерн.
- Full song — сохранится вся песня из плейлиста. Если в плейлисте выделен временной диапазон, то вместо Full song будет вариант Song selection и сохранится только этот временной интервал (то есть часть песни).
*.wav [ править ]
Это тоже звуковой формат как и *.mp3. Но данный формат уже не «потребительский», а предназначен для сохранения рабочего материала (который будет подвергаться изменениям). Разница между *.mp3 и *.wav в том, что *.mp3 теряет качество звука, часто это для слуха незаметно, но для работы уже такой материал не подходит. Тогда как *.wav сохраняет всю оригинальность изначального звука без потерь. Естественно это не проходит без последствий и *.wav значительно больше по размеру чем *.mp3.