How to Make Circle Round Webcam in OBS Studio
elcome back to my blog. In this post, I'm going to show you how to use OBS to turn your regular square webcam into something prettier (like a round-shaped webcam) that has a shadow attached to it. If you enjoy this video, give the thumbs up subscribe to the channel for future content, without further Ado. Let's get into it.
Circle Webcam w/ Shadow
First of all, make sure you have OBS installed on your computer.
If you don't have OBS installed, you can grab it here. Click on it, download it and install it on your machine. Fire up your OBS and click on add.

We want to add a new scene. So I named this new scene round webcam YouTube. Right now I'm going to introduce a new source. Click on display capture. This is going to display one of my monitors.

This is my monitor desktop display, and now I'm going to insert one more item this time is going to be a video capture device, and that is my webcam. What you're going to do now is that, you are going to find another link below and I want you to click on download and get this zip file and unzip it. There are two images in this folder.
FREE Overlay Download
One of them is called OBS Webcam Circle. This is just a pure black circle, and the other one is called OBS Webcam Circle Shadow that has this beautiful, already premade shadow to it. What you want to do is you want to save this folder somewhere safe in your machine that you're not going to when they accidentally delete that folder. Otherwise, it won't be able to load this. Okay, click on this video capture.

By the way, you can rename this to Webcam. In my case, let's just quickly rename this webcam so that's my webcam.
And now what do you want to do is you want to click on Plus (+), we want to add an image mask blend. This is the main item you want to do. Just give it a name. Call it round.

And now what we want to do is it's going to ask you, Where is the path of this file? Click on the browser and locate that specific folder you just downloaded and saved safely. And then you want to click on the first image, which is the Webcam circle.
Don't open the shadow yet. I'll show you that's the next step. But just for this step, you only want to select the shadow. Click on. Open.
Just click on the type and come to the second option says Alpha Channel.

And now our square image has beautifully turned around. However, we're not done yet, so everything else is as default. Everything is as is. And what I'm going to do is close on this. Now our boring square webcam has turned to a round one.
Add Shadow
Now what we're going to do is we want to click on plus one more time. This time you want to add an image instead, click on that. It's going to say, what is the name? I'm going to name this round shadow and click on. Ok, it's going to ask you, where is the location of this image?
Click on browse. Remember earlier we have the second file here. It says shadow. Png click on that open, and now we just loaded. Click on.

Okay, we just loaded this beautiful shadow. So the little trick here is simply you want to put this black realm that has a shadow right below the webcam. Okay, so this way, when you put it behind it, you can kind of adjust the size of it just to fit right close to this round. So let's just quickly shrink it a little bit. Adjust the size a little bit.
Okay, a little bit more on this side. Let the black barely show and hide right behind that image. So now that's it. What you want to do now, at this point is you want to click on Round shadow. Hold shift.

You want a group of selected items. And now let's name this a group called this Round Webcam plus shadow. So that is my entire folder. So these two items right now are sitting in my folder. The reason I want to put it in the folder is that now if I move one around, I can move the other one too.
The shadow and the round together, and you can adjust the size and the position. You can let it sit in different corners as you wish. So that's it. Guys. Hope you enjoyed this video and turned your boring square webcam into a realm with a shadow.
Conclusion
If you enjoyed this video, give the thumbs up and subscribe to the channel for future content. By the way, I will link a couple more videos just right on the side. Go ahead and watch them. And I'll see you guys in the next one.
Rounded Camera OBS Studio – Easiest Way 2022
There are a ton of articles and videos out there that overcomplicate the process of creating a Rounded Camera in OBS Studio. If you have no desire to follow unnecessarily complicated things like creating masks with Photoshop, read on.
Table of Contents
Please enable JavaScript
How do you get a Rounded Camera in OBS Studio?
Creating a Rounded Camera in OBS Studio requires you to create a filter for your camera that will transform your squared camera input into a circle using an Image Mask/Blend filter, which is a built-in function of OBS Studio.
The only additional things you need are one (without shadow), or two (with shadow) rounded mask image files that we will provide you with in this article. You do not need to create your own.
Rounded Camera in OBS Studio
We go through this process step-by-step to make sure you get it right.
Step 1 – Download Rounded Masks
We provide you with two image files. One serves for the actual rounding of our camera. The other one serves as a background shadow effect. You can choose to leave the shadow effect out if you don’t want it.
Step 2 – OBS Studio Setup
In OBS Studio, either create a new scene or use one that you have already set up. For the sake of this tutorial, we created a new scene called “Rounded Demo” and added a demo background to it:
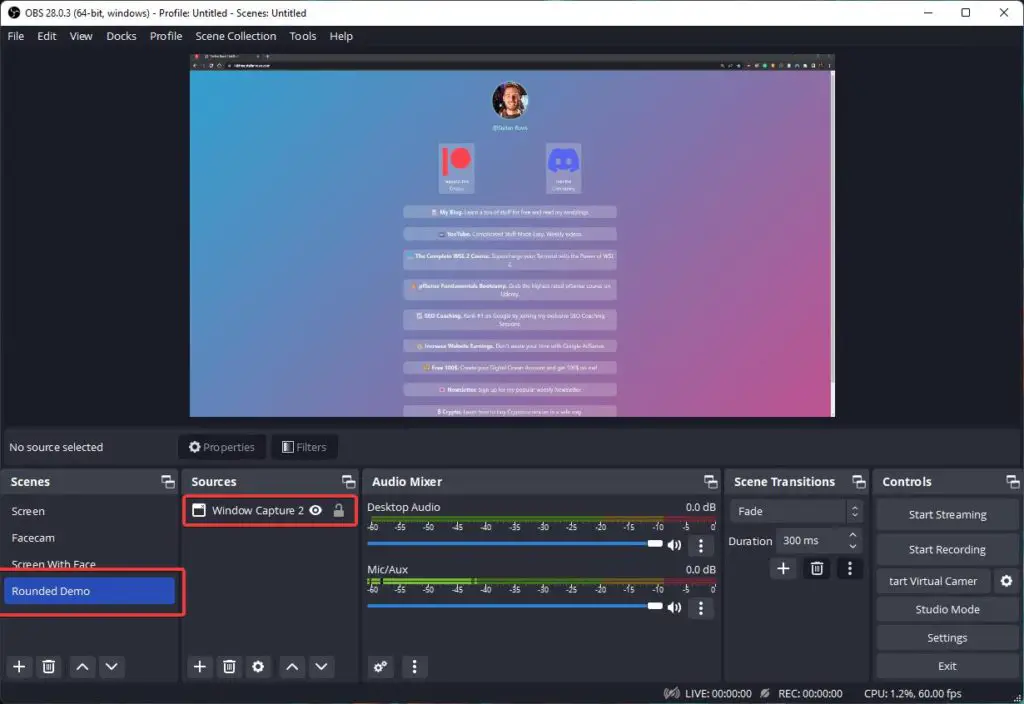
Step 3 – Adding a Camera Source
Now we need to add a Video Capture Device (your camera). Once you have added it, resize it to approximately the size you want your rounded camera image to be at the end:
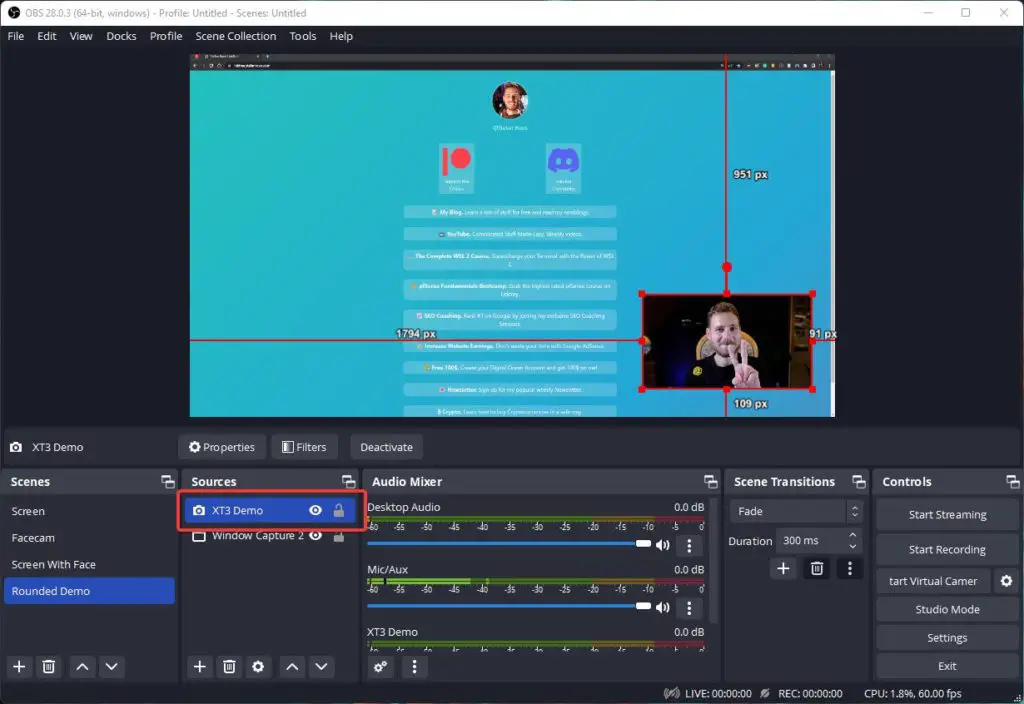
Step 4 – Adding an Image Mask
Now we will use the Webcam Circle.png file you downloaded earlier to create an Image Mask:
- Right-click on your Video Capture Device in OBS Studio and click on Filters.
- Click on the + button in the lower-left corner underneath Effect Filters.
- Select Image Mask/Blend.
- Click on OK.
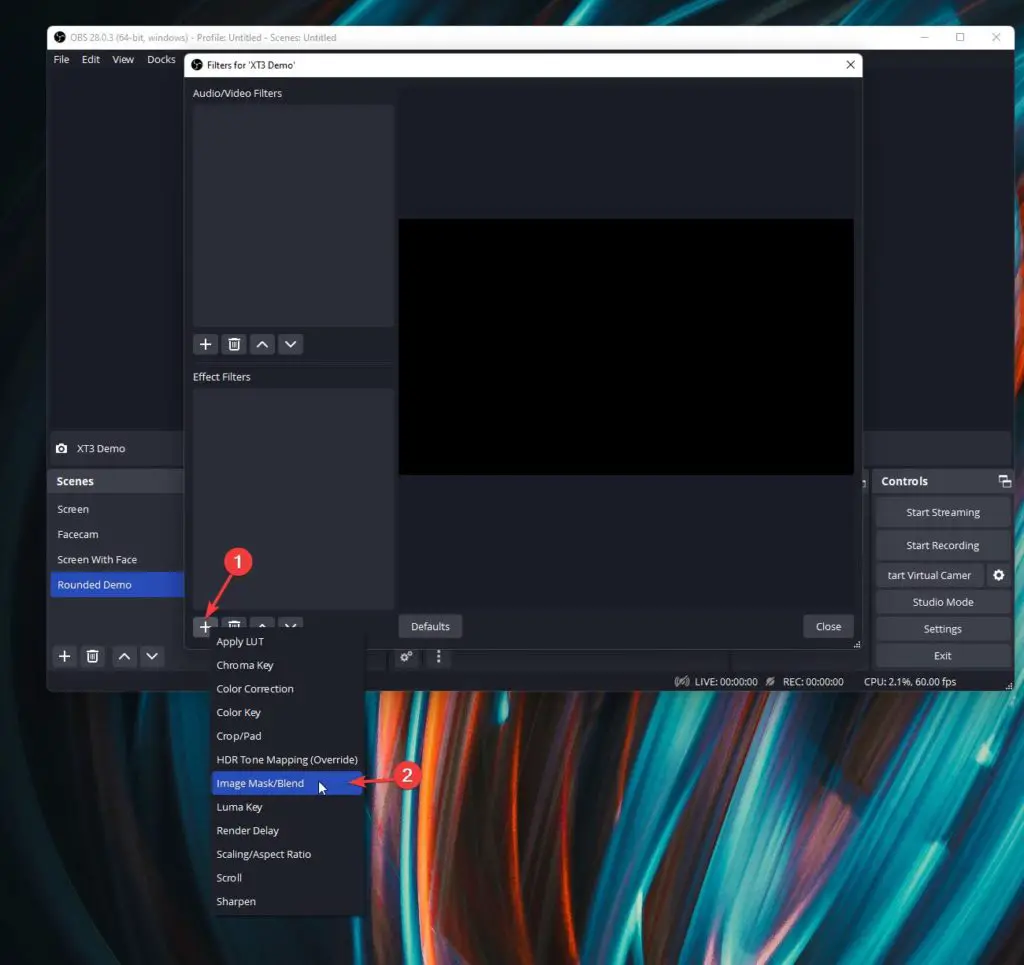
Next, click on Browse next to Path and select the Webcam Circle.png file. Then, next to Type, select Alpha MAsk (Alpha Channel). You should already see a rounded webcam as a result:
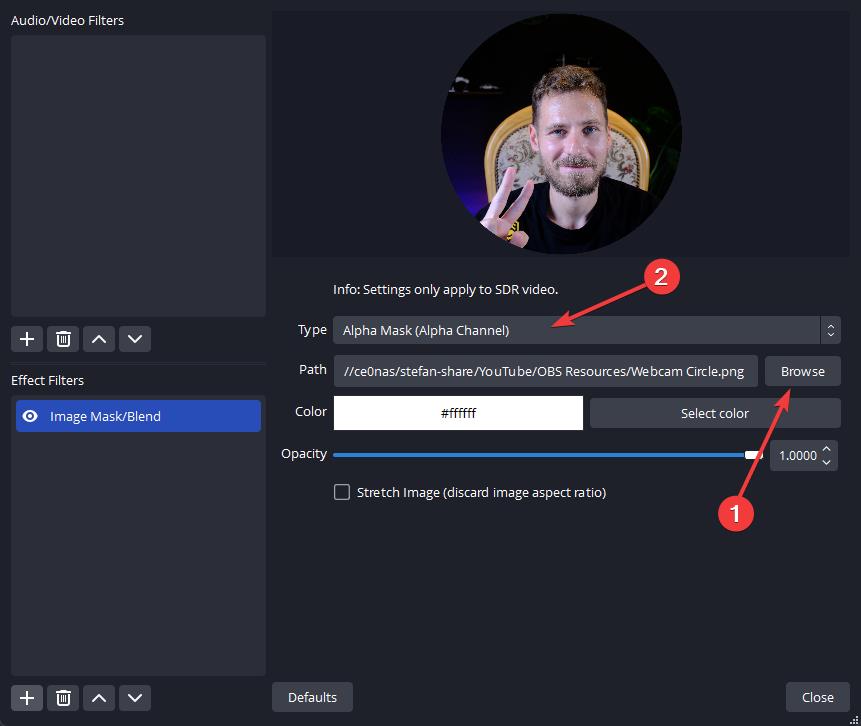
Click on close to finish the process. As a result, you should already see a rounded webcam. You can now go ahead and simply resize and move the camera symbol as you like.
Step 5 – Adding a Background Shadow (Optional)
- Add a new source, choose Image as the type and call it Background Shadow.
- For the Image File, choose the Webcam Circle Shadow.png file you downloaded earlier.
- Click on OK.
You should now see a big black circle appearing in your scene. Make sure to drag the Background Shadow source below your Video Capture Device inside of the Sources panel:
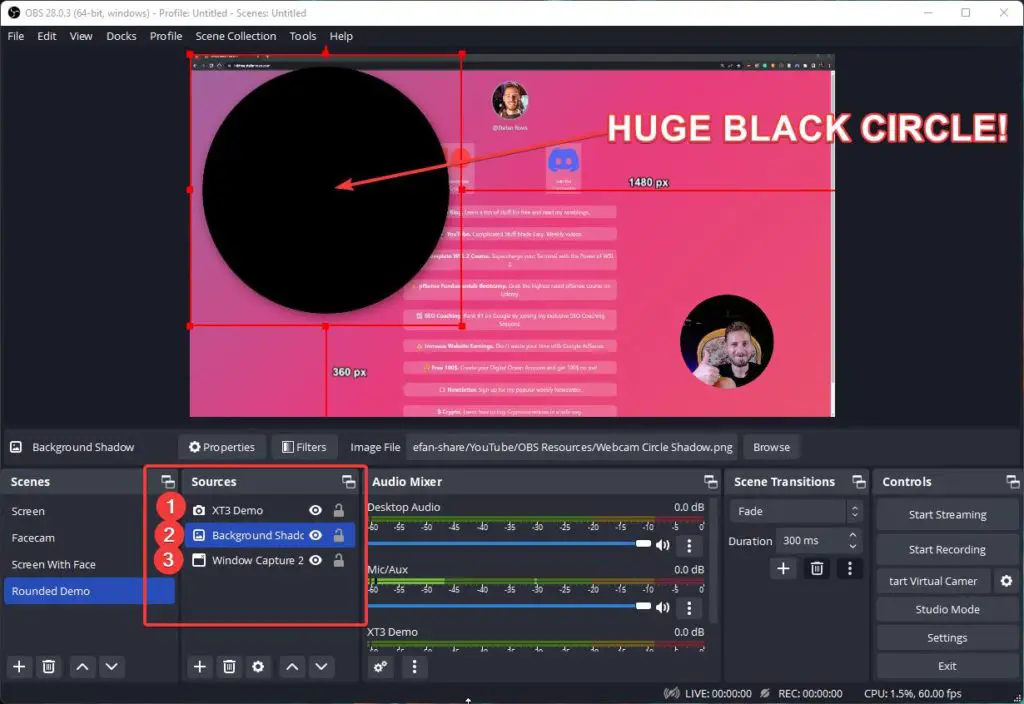
Next, we drag the circle behind your Rounded Camera and let the edges slightly stand out like so:
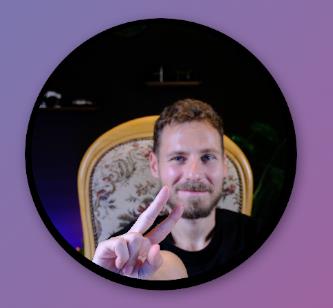
Next, right-click Background Shadow in your Sources and click on Filters once again. Click on the + button to add a filter and select Color Correction.
On the Opacity slider, reduce the opacity until you are satisfied with the shadow effect. You can also play around with the other sliders to create an even better effect. Once you are satisfied, click on Close.
Step 6 – Grouping Camera and Background
To be able to resize and drag around your Rounded Camera without having to adjust the background shadow again every time, we are going to group these two together.
Select both your Input Device and your Background Shadow by pressing the Shift key. Right-click on them and select Group Selected Items.
Finally, rename the Group to Rounded Webcam by right-clicking on Group and selecting Rename. The end result should look like this:
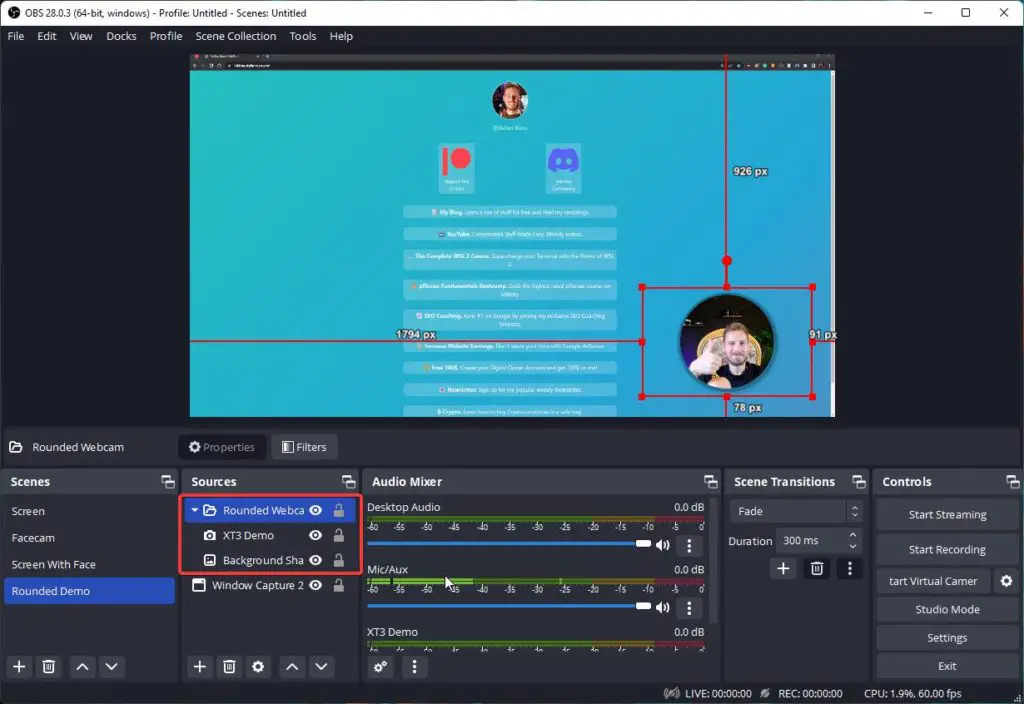
Every time you want to move or resize your camera from now on, make sure to always select the Group Rounded Webcam to adjust both the Shadow and the Camera at the same time!
Conclusion
This is it. No need to fiddle around with Photoshop or anything like that. This is how easily you can create rounded corners for your Camera in OBS Studio. If you want to check out the Best OBS Settings for streaming, make sure to read this article!
Stefan is the founder & creative head behind Ceos3c. Stefan is a self-taught Software Engineer & Cyber Security professional and he helps other people to learn complicated topics.
How to Crop Your Webcam in OBS Studio
Cropping in OBS allows you to cut out areas from your webcam or source. The standard crop will cut out areas from the sides of the camera. Cropping your camera can help make it fit better in an overlay or scene. The crop feature is also used to remove any unwanted background clutter from view.
Quick Cropping with the Alt Key
The easiest way to crop your webcam in OBS is to hold the Alt key on your keyboard, left-click, and drag the sides. To crop the image with this method you will need to have the source selected and ensure that it is visible.
With the webcam source selected, the border of the source will be red. Once a side has been cropped the outline will turn green.
Holding the Alt key and dragging in a corner will allow you to crop two sides at once. This is helpful as it speeds up

Precise Cropping with Edit Transform
The edit transform menu can be used for a precise cropping. This allows you to choose the exact amount of pixels to be removed from each side. The transform window also allows you to choose the exact positioning and size of the webcam.
The transform menu can be opened by right-clicking on the webcam source, and going to transform, then edit transform. Alternatively, select the source and press Ctrl + E.

At the bottom, you will see the crop input boxes. Each input allows you to crop from one side. You can manually input the amount of pixels you wish to crop or use the arrows to adjust the values.

The webcam source will be positioned to hug the top left corner by default. This can be changed using the “Positional Alignment” drop menu.
With the edit transform menu open you can still use the Alt crop method. The crop values will manually adjust in the transform menu as you drag the sides in. Combining the two methods allow you to quickly and precisely adjust the crop on your camera.
Abstract Shape Webcam Crop Masks
Some streamers prefer to use abstract shapes for their camera. It allows the webcam to fit nicely in overlay designs. Unique camera shapes can be created using the image mask filter.
The filter uses a black and white image to define a mask for the webcam. The white areas on the image will be visible, with the black areas cropped out.
1. The filter menu can be opened by right-clicking on the webcam source and choosing the filter option. All the audio and effect filters for the layer will be shown on this page.

2. Press the plus icon under the Effect Filters panel, and choose to add the “Image Mask/Blend” filter.

3. Ensure the type is set to Alpha Mask (Color Channel), and the color is set to white. These should be set by default.

4. Click the “Browse” button to open the file explorer window.
5. Locate and open the mask image file. The moment the file is loaded, the webcam will be masked accordingly.

The easiest way to create a mask for your webcam is using a raster graphics editor like photoshop. It is recommended to match the size of the mask to your OBS canvas resolution. The resolution is typically set to 1920 pixels wide, by 1080 high.
Green Screen Alternative
Often the purpose of cropping a webcam is to remove enough of the background as possible. Too much cropping can cause the person to move out of frame during their stream or recording session.
A green screen can be used in an effort to hide the background while still capturing a wide view of the camera. The green screen needs to be placed behind you while you stream or record. The green area can be removed in OBS using the Chroma Key filter.
To achieve the cleanest mask possible on your webcam, good lighting is required. Correct lighting allows more information to be picked up from the camera. The added color and definition help the filter to distinguish between the background and foreground easier.
Removing a Crop in OBS
The quickest way to remove an existing crop is to select the source and press Ctrl + R on your keyboard. Alternatively, you can right click on a source, and go to “Transform”, then “Reset Transformation”. All crop changes will then be removed, restoring the source to its default state.

Resetting the transformation will also rescale your cropped media. Another plausible method is to hold the Alt key on your keyboard, then left-click and drag the side. Dragging out the sides or corners while holding the Alt key will fill out the crop, effectively removing your changes.
Resizing Your Webcam in OBS
Resizing your webcam works differently than cropping. Instead of cutting off a portion of the camera, you’re making the entire source smaller. Combining resizing and cropping may be required to position your camera neatly behind an overlay.
The camera can be scaled by clicking and dragging one of the sides or corners. Naturally, the source will retain its aspect ratio. If you want the ratio to be changed, then you will need to hold the shift key as you rescale the source.
Exact sizing changes can be made by using the edit transformation window. The fastest way to open the transform window is by pressing Ctrl + E on your keyboard.
Using a Crop in Multiple Scenes
Instead of adding your camera to each scene as a source, you can create a webcam scene. This is a scene that will only feature your webcam and overlay. This is often referred to as scene nesting.

Because the webcam is nested you can make crop and mask adjustments in full size. The scene can then be added as a source and scaled-down in other scenes without losing quality.
Using a webcam scene can help if you ever change the cropping of your camera. Rather than having to change every scene individually, all adjustments can be made in one scene.
Another option is to copy and paste the source transform settings into another scene. Both the copy and paste transform options can be found by right clicking on the layer and expanding the transform menu.
Final Thoughts
The crop feature is quick to learn, and helpful if you’re going to be streaming or recording content with OBS. While cropping can be used to make adjustments to a camera, you can also crop out any visual source. This allows for more customization and can be a helpful tool when setting up advanced scenes in OBS.
How to Crop Your Webcam in OBS Studio
Does your webcam exceed the dimensions of your custom overlay? Do you need to crop out an area of your room? Sometimes you need to crop a webcam image in OBS Studio (Open Broadcaster Software) before you can stream on Twitch, Facebook Gaming, or YouTube Gaming.
OBS Studio has been the leading program for streaming and capturing video since its launch. Many people have used it to showcase their game play with the hope of making it big on Twitch. Fortunately, you can use this simple method to quickly change the size of your video source with your mouse.
This article will cover how you can crop or resize the source selected in OBS Studio so that you can create the content you wish.
How to Crop Webcam Source on OBS Studio
Whether you use a green screen or show your background, it is important to know how to crop your webcam in OBS. This way, you can ensure that your viewers are able to see the rest of your screen. This will allow you to show off more of the game you are playing.
To crop your webcam image in OSB Studio, use the inbuilt crop feature by following these steps:
If you haven’t already, add your webcam to OBS Studio by adding it as a source. Once you can see it in your preview window, you’ll be able to move on to the next step.

Press the “alt” key on your keyboard as you adjust the camera, then right-click on one of the red lines and drag the edges you want to crop. (The lines will turn green as you crop them).
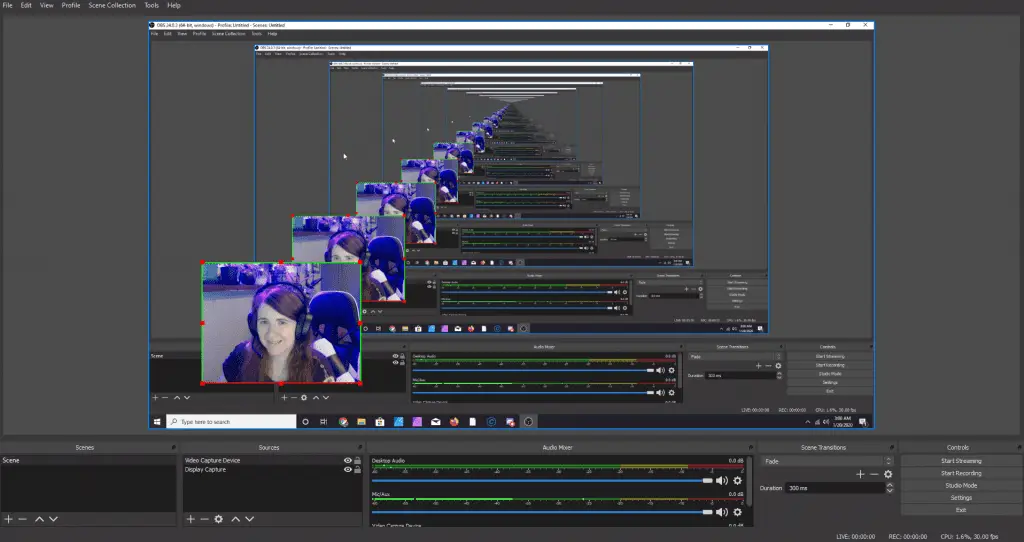
Press “alt” again to remove the cropping, then adjust the camera until the lines turn red again.
Stop cropping when you are satisfied. While you can keep to the aspect ratio if you choose, you can make your webcam in OBS Studio any rectangular shape you wish when using the edit transform option.
Decorate Your Cropped Screen
Once you have cropped your webcam, you can remove the background with a chroma key screen or decorate it with stickers or overlays. Try to keep things on brand, matching your colors, themes, and the style of content you produce.
Other Tutorials for OBS
If you want to learn more about OBS or find new tips on how you can improve the look of your screen, check out the following guides: