C++ Development Tutorial 4: Static and Dynamic Libraries

In this tutorial, we will talk about libraries in C++ and how to create/use them. A library is a collection of pre-compiled code that can be re-used by programs. There are 2 types of libraries: static library and dynamic library.
1. Static Library vs Dynamic Library
A static library (or archive) contains code that is linked to users’ programs at compile time. The executable file generated keeps its own copy of the library code.
A dynamic library (or shared library) contains code designed to be shared by multiple programs. The content in the library is loaded to memory at runtime. Each executable does not maintain its replication of the library.
Here is the illustration of using a static library vs dynamic library. You can see the static library is included to be part of the executable. Whereas a dynamic library only needs to create a table of the symbols (functions, variables referenced in library code) in the program.
At runtime, the dynamic library is loaded to the memory only once in modern operating systems and shared across all programs depends on it. In contrast, when using static libraries, every executable must load the library code to the memory. The former can lead to more efficient memory utilization when there are more than one executables running. The comparison can be explained by the following graph.
Using static libraries lead to 2 obvious drawbacks:
1. Increasing the size of the application. The problem gets worse if the application contains multiple executables. You may end up keeping several copies of the same library.
2. Modifying/upgrading the library code requires rerun compiling/linking of other parts of the application. This can be a pain for deploying/maintaining purpose. Most of the time, a (non-interface related) dynamic library upgrade does not require recompiling other parts.
Normally, people choose dynamic libraries over static due to the above reasons. However, dynamic libraries are not perfect. They have their own hurdle for developers — requiring extra concern on installing. Unlike a static library that generates a monolithic package, a dynamic library must be located appropriately to make sure the executable can find libraries at runtime.
2. Create and Use a Static Library
In this example, we will create a toy library with one reciprocal function. The library sources contain a header file my_math.h and source file my_math.cpp:
The header file my_math.h is included in main.cpp which calls the function from the library:
In the first compile, we treat my_math.cpp just like a common source file and everything works as expected:
Now let’s wrap my_math as a static library. The process involves 2 steps. Step 1 is to generate the object file my_math.o using the same command above. Step 2 involves using ar (a Linux archive utility tool) to create the library file:
The “cr” flag is to indicate creating a new static library file. It is followed by the output file name first as a request. Notice the name of output is “libmy_math.a”. It is a convention to name the file libXXX.a in Linux, please always do it. When the library is used, the command line tool actually relies on this convention for the linker to work properly.
Now we want to use the static library file. One way is to put the file together with other object files in the g++/gcc linking command.
Another method more often used is to explicitly specify library path using (-L) and library name (-l):
This tells the compiler to look for libraries in path (.) with name libmy_math.a. Notice here we use -lmy_math. The linker will treat this as specifying file name libmy_math.a (Remember the naming convention for creating library we just talked about).
We can verify that the library has been copied to the executable by deleting the library and running:
It works. We just created a static library and used it in our program!
3. Create and Use a Dynamic Library
Let’s use the same sample code and instead create a dynamic library this time. Here is the command:
The “-shared” flag instructs to generate a shared library. Again, the output file naming convention libXXX.so is a must and will be utilized by the linker later.
Similar to static libraries, we have 2 ways to use it. 1. Put it as an input to the linker/compiler. 2. Explicitly specify library location (-L) and name (-l):
Simple, right? Let’s run it:
Oops, we got an error (with either executable generated). The runtime is trying to find a shared library named libmy_math.so but can’t. What happened and how to fix it?
Turns out the user must provide hints to the executable or OS for the runtime to find the shared library (libmy_math.so). There are 2 ways in Linux:
- Append the shared library path to the environment variable LD_LIBRARY_PATH.
- Use -rpath flag to specify the shared library path when building the executable.
- Add library path to LD_LIBRARY_PATH:
At runtime, OS searches through every path in LD_LIBRARY_PATH (separated by “:”) to find the dynamic library it needs. By appending the path to LD_LIBRARY_PATH, we fixed it.
2. Use -rpath flag:
Here “-Wl flag” means what follows it (which is a comma-separated list of flags) will be are passed to the linker. In this case, “-rpath /home/cpp_tutorial/static_library” is passed to the linker. The linker inserts this path information to the executable’s (a.out) own search path. This also works.
Compare the 2 methods, modifying LD_LIBRARY_PATH involves changing global variables which affects all programs. Using -rpath is usually a preferred way because it is a local change and does not alter behaviors of other executables. To know more about how shared library search path works, you can read Shared Libraries: Understanding Dynamic Loading.
Creating and Using .NET Class Library (DLL) in C# Using Visual Studio
Join Techieclues community and access the complete membership experience.
In this article, we will see how to create and use the .Net class library (DLL) in C# using visual studio. A class library is a collection of class definitions contained in a *.DLL or *.Exe format. We can easily use the class library in any visual studio project.
We are going to discuss 2 parts in this article.
- Creating a Class Library (DLL) in C#
- Using the Class Library in other Visual Studio Project
1. Creating a Class Library (DLL) in C#
First, we will create a class library project using visual studio and add the math function methods to it.
Step 1:
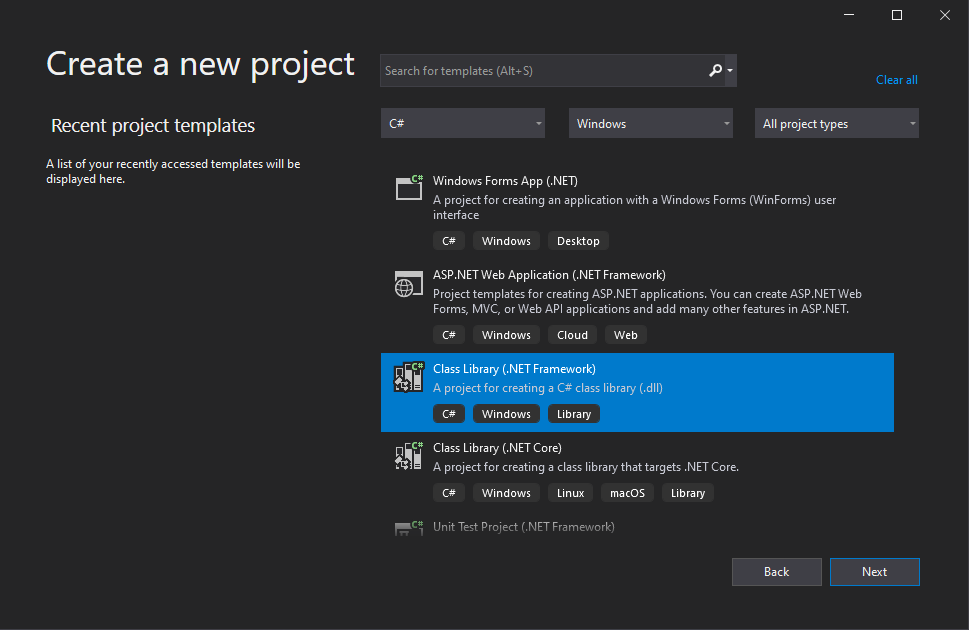
Open Visual Studio 2019 and click "Create a new project" and choose Class Library (.Net Framework).
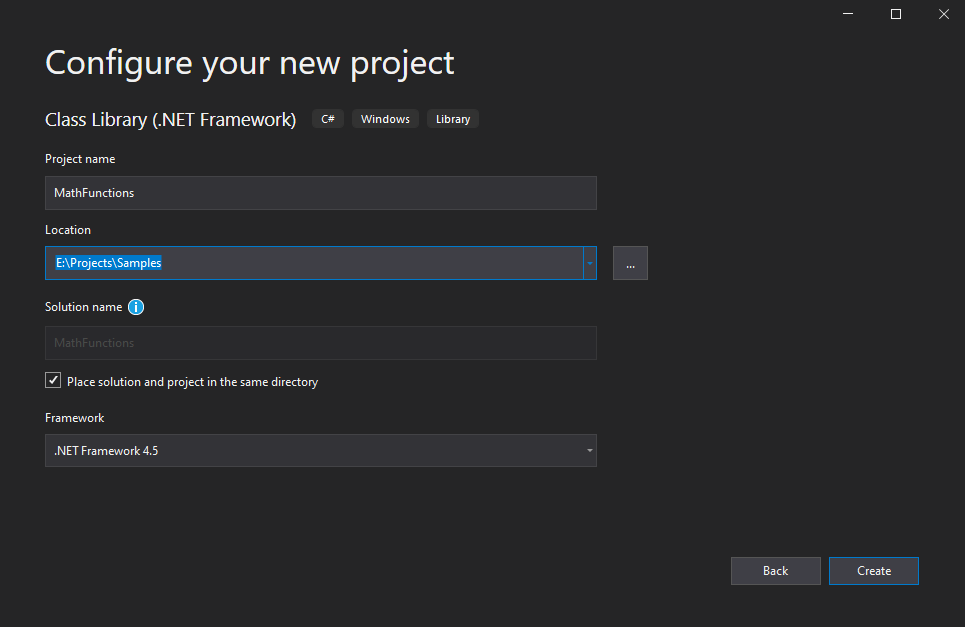
Provide the project name and location and click "Create" as shown below,
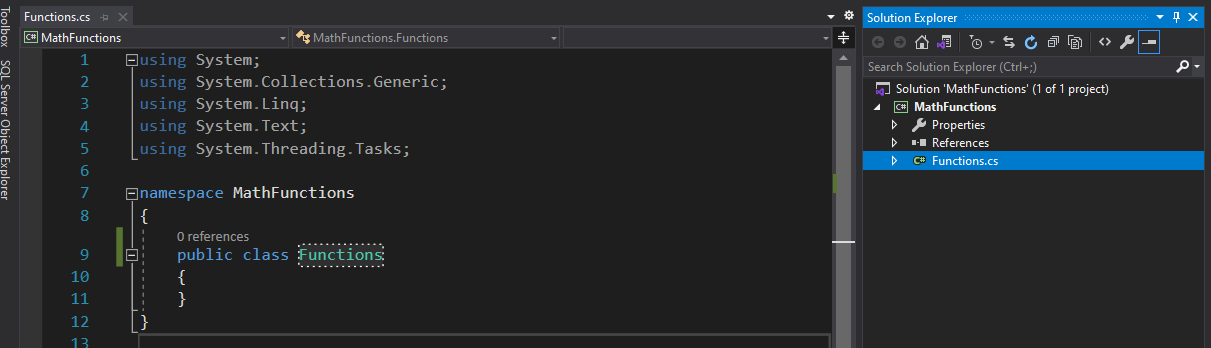
Once the class library project is created, you will see the below file structure. Add class file "Functions.cs" or rename "Class1.cs" to "Functions.cs"
Step 2: Adding math functions
Add below math functions (Add, Subtract, Multiply and Divide) to the class file as shown below,
Step 3:
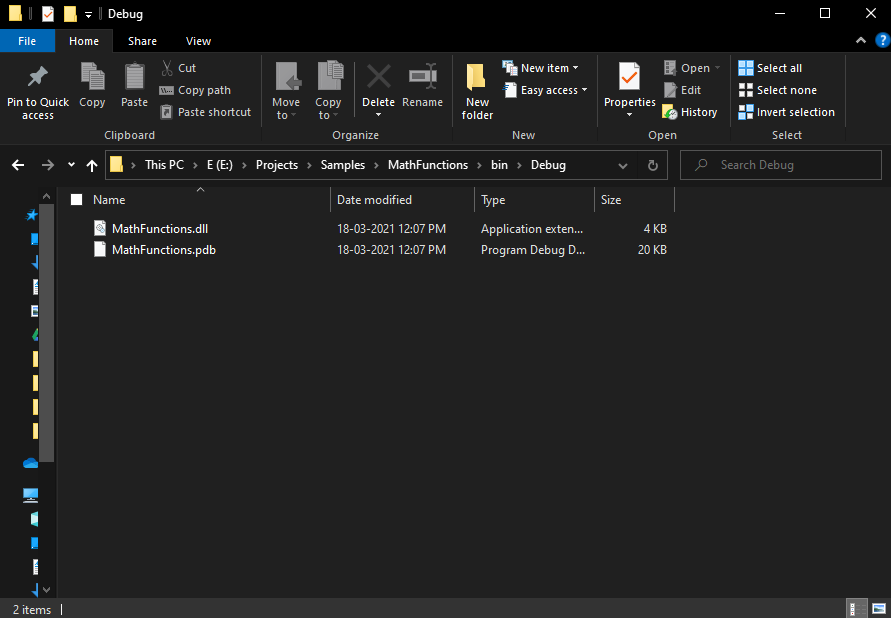
Next, build the class library project and see the bin folder of the application for the DLL as shown below,
Now, we are ready to consume this class library in other visual studio projects.
2. Using the Class Library in other Visual Studio Project
Step 1:
Open Visual Studio 2019 and click "Create a new project" and choose Console App (.Net Framework).
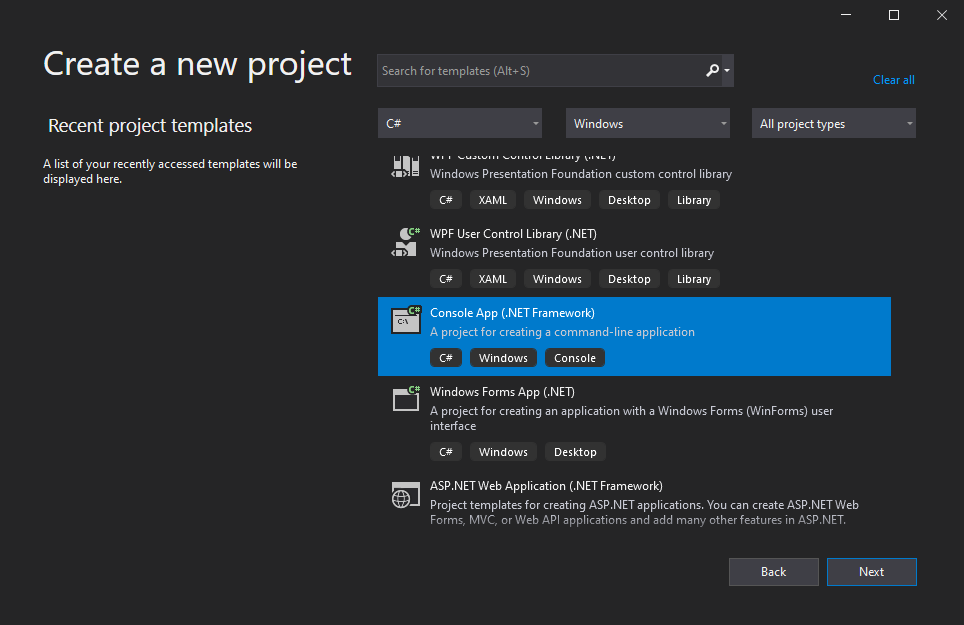
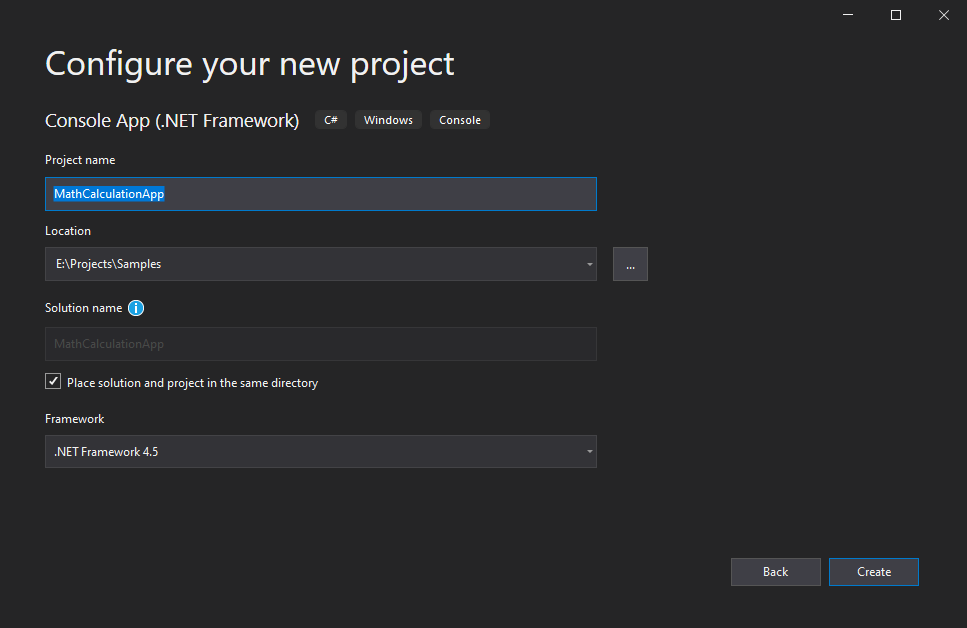
Provide the project name and location and click "Create" as shown below,
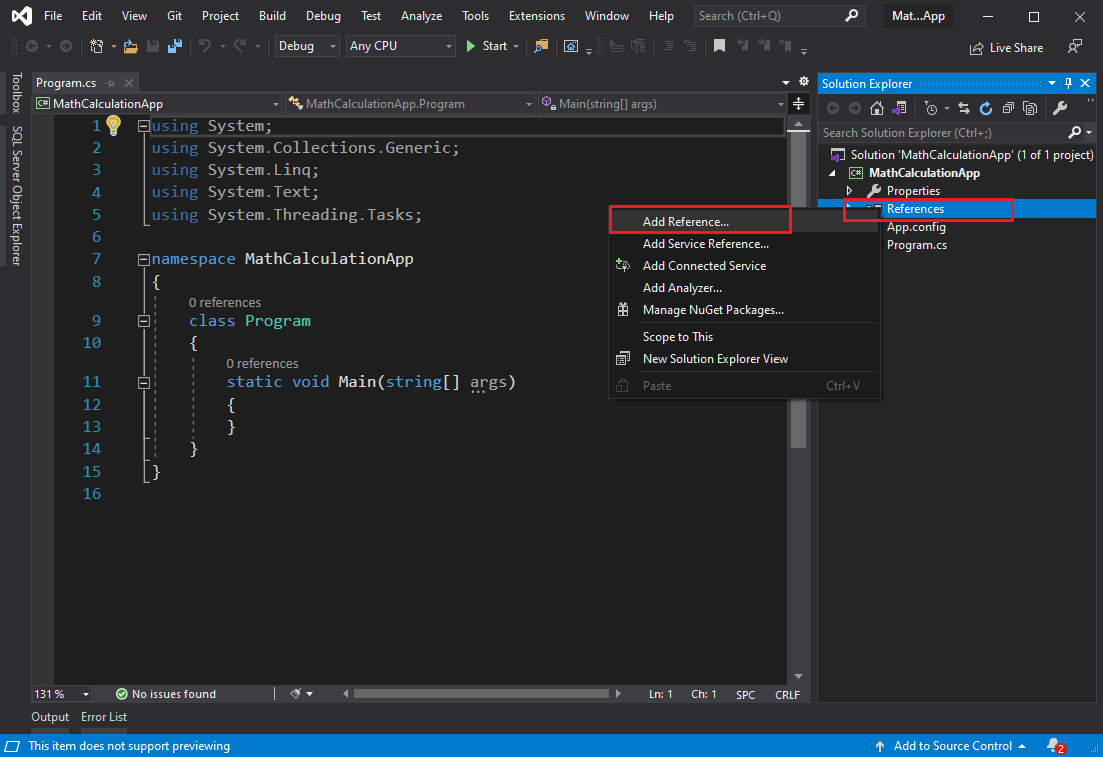
Step 2: Adding "MathFunctions.DLL" as a reference
To add reference "MathFunctions.DLL", right-click the "References" tab and choose the "Add Reference" option as shown below,
Step 3:
The "Reference Manager" will appear, then you have to choose the "Browse" tab on the left side of the dialog and then click "Browse" in the dialog as shown below,
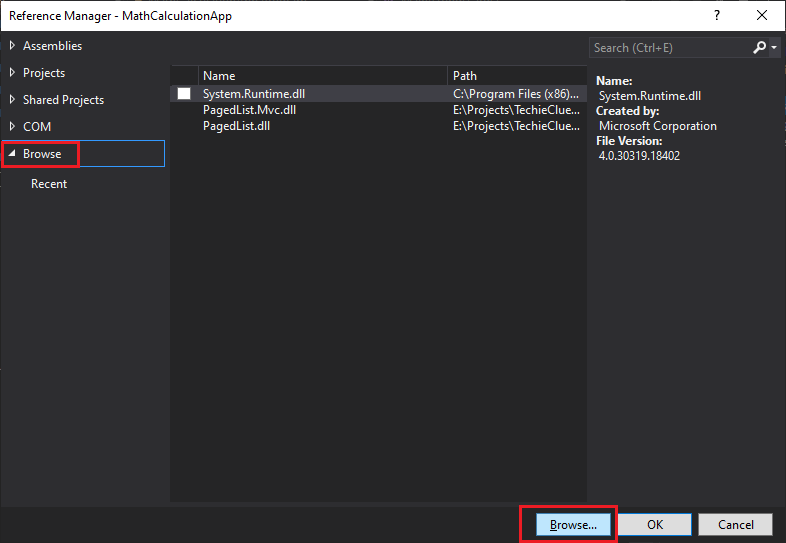
The below dialog will appear to select the DLL, (you have to go to your class library bin folder to choose the DLL),
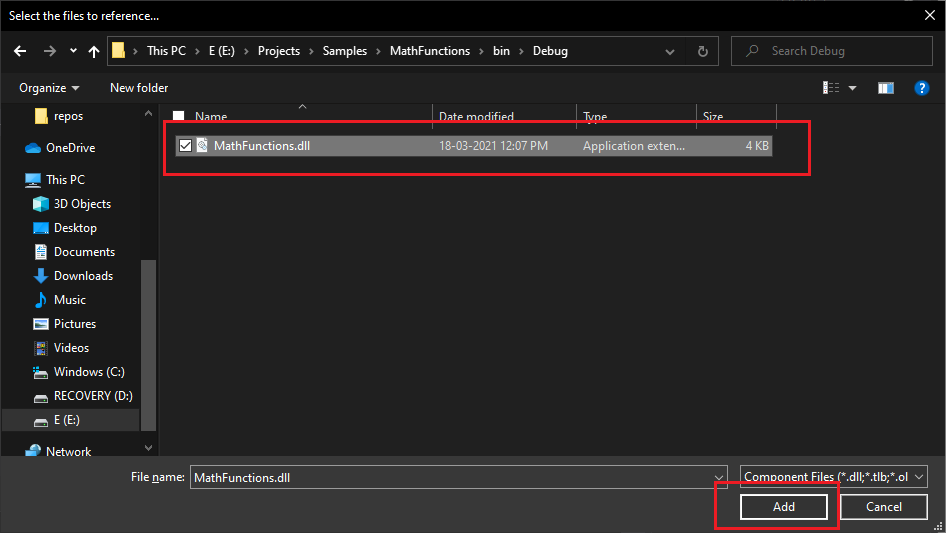
In the above dialog, Select the "MathFunctions.dll" and click the "Add" button to add the DLL as a reference in our project.
You can see the "MathFunctions" reference in the "References" tab in your project now.
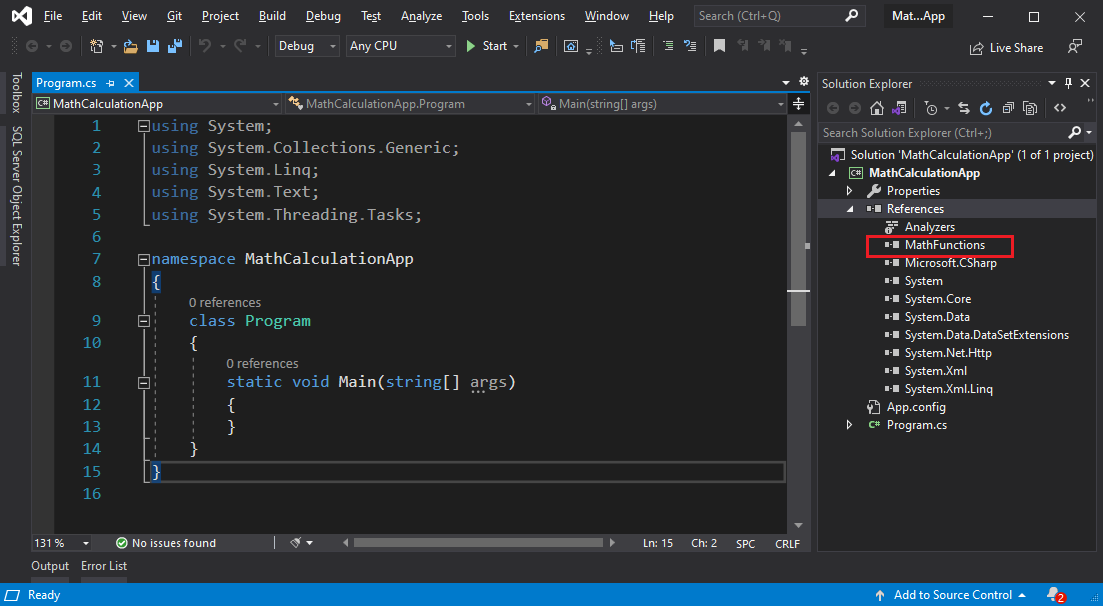
Step 4:
Next, we have to add the "MathFunctions" namespace ( using MathFunctions; ) as shown below,
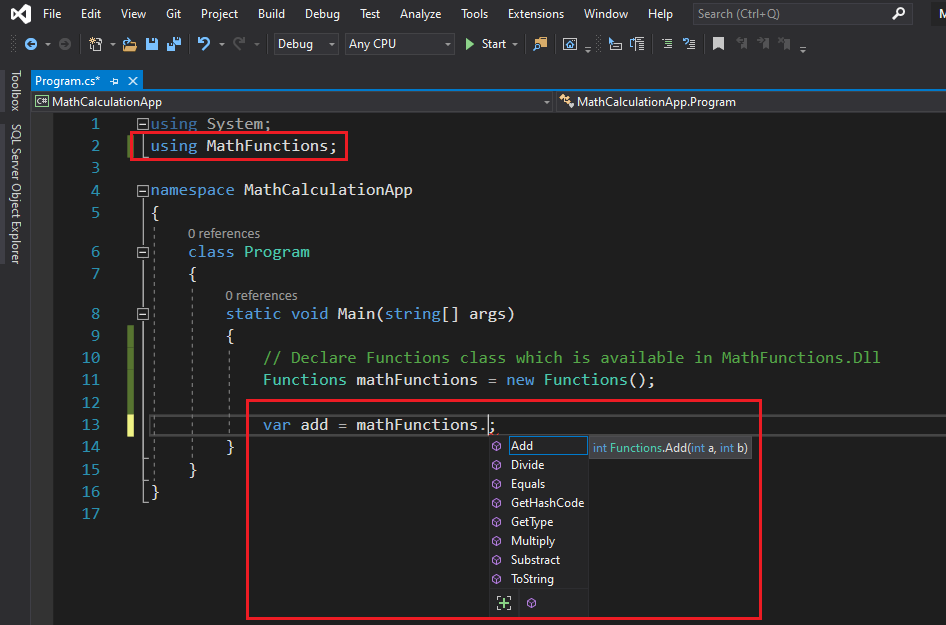
You can now access all the math function methods inside the "Functions" class after the declaration (see above).
Step 5:
Add the below code to access all the math functions from the class library (DLL).
Как создать библиотеку классов в c
Нередко различные классы и структуры оформляются в виде отдельных библиотек, которые компилируются в файлы dll и затем могут подключаться в другие проекты. Благодаря этому мы можем определить один и тот же функционал в виде библиотеки классов и подключать в различные проекты или передавать на использование другим разработчикам.
Создадим и подключим библиотеку классов.
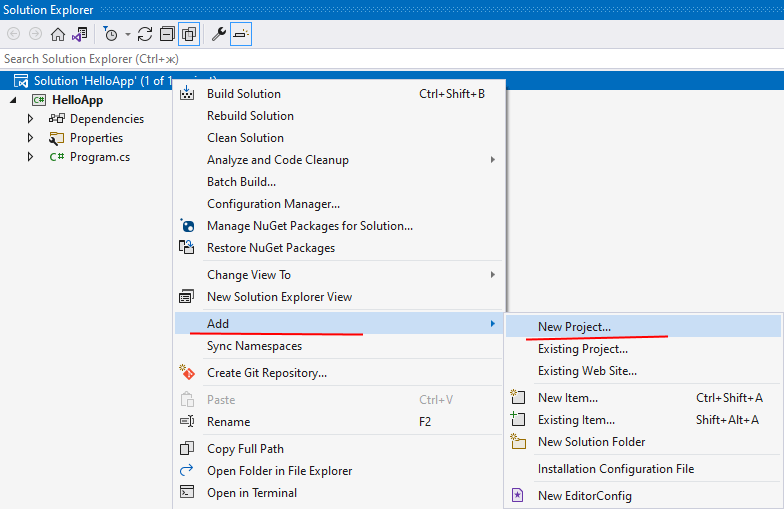
Возьмем имеющийся проект консольного приложения C#, например, созданный в прошлых темах. В структуре проекта нажмем правой кнопкой на название решения и далее в появившемся контекстном меню выберем Add -> New Project. (Добавить новый проект):
Далее в списке шаблонов проекта найдем пункт Class Library :
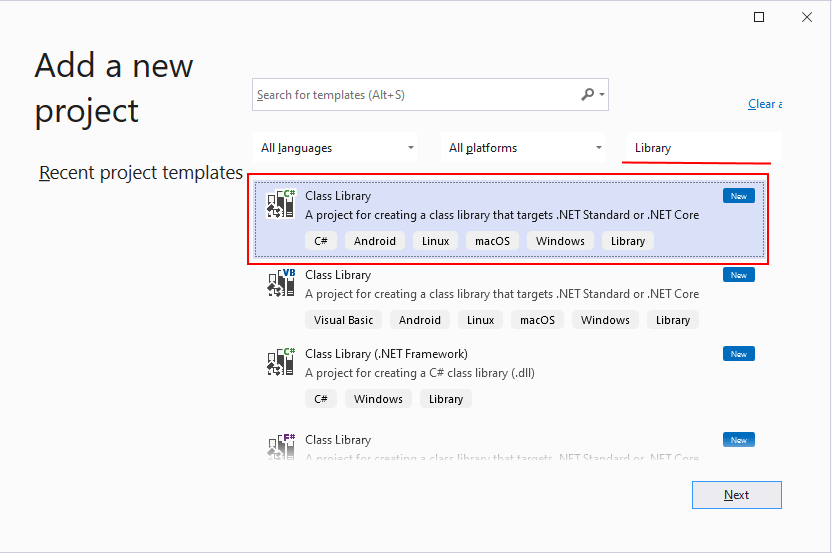
Затем дадим новому проекту какое-нибудь название, например, MyLib:
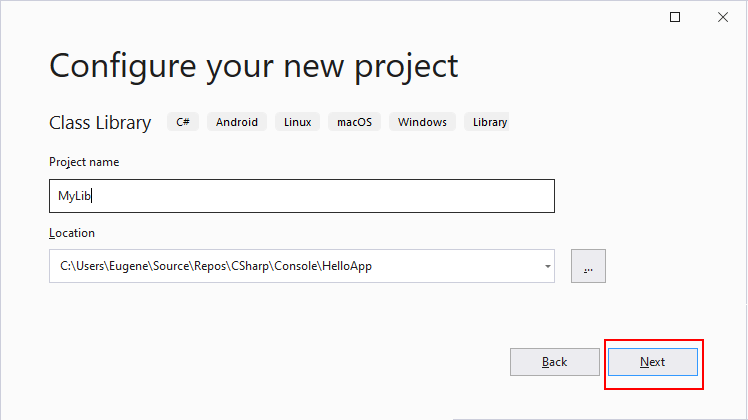
После создания этого проекта в решение будет добавлен новый проект, в моем случае с названием MyLib:
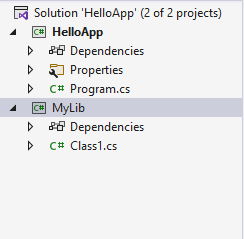
По умолчанию новый проект имеет один пустой класс Class1 в файле Class1.cs. Мы можем этот файл удалить или переименовать, как нам больше нравится.
Например, переименуем файл Class1.cs в Person.cs, а класс Class1 в Person. Определим в классе Person простейший код:
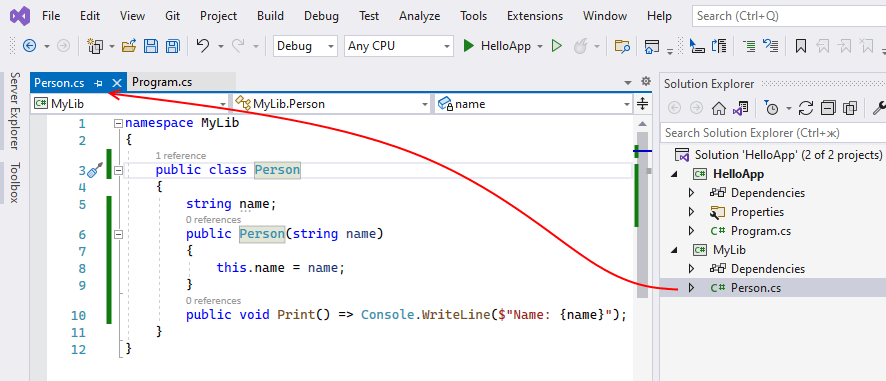
Теперь скомпилируем библиотеку классов. Для этого нажмем правой кнопкой на проект библиотеки классов и в контекстном меню выберем пункт Rebuild :
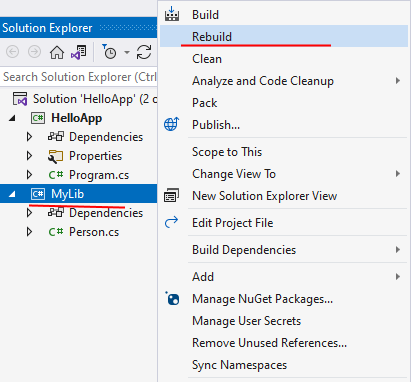
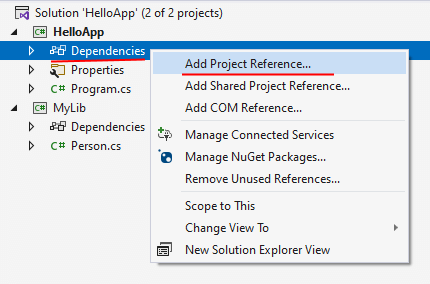
После компиляции библиотеки классов в папке проекта в каталоге bin/Debug/net6.0 мы сможем найти скомпилированный файл dll (MyLib.dll). Подключим его в основной проект. Для этого в основном проекте нажмем правой кнопкой на узел Dependencies и в контекстном меню выберем пункт Add Project Reference. :
Далее нам откроется окно для добавления библиотек. В этом окне выберем пункт Solution,который позволяет увидеть все библиотеки классов из проектов текущего решения, поставим отметку рядом с нашей библиотекой и нажмем на кнопку OK:
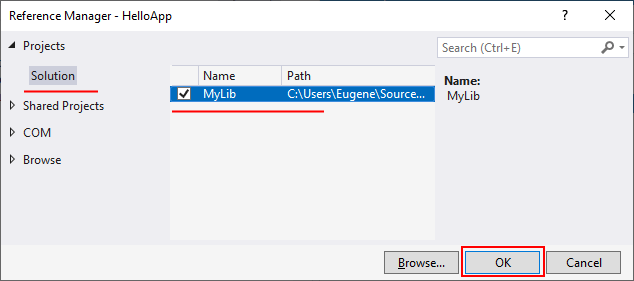
Если наша библиотека вдруг представляет файл dll, который не связан ни с каким проектом в нашем решении, то с помощью кнопки Browse мы можем найти местоположение файла dll и также его подключить.
Create a C# Class Library (DLL)
Do you find yourself writing code that you would like to reuse across multiple C# projects? In this tutorial, you will learn how to create a class library and add a reference to it in your projects.
What is a Class Library?
By creating a C# class library, you are creating a package that can be included in your projects. This package contains code, like classes and methods, that you find useful enough to use across multiple applications.
When you build a C# class library, a .dll file is created. By referencing this DLL file in your other projects, you will be able to use the classes and methods contained within. You can also distribute your class library through package management repositories or through open-source projects to allow other developers to use the functions you have created.
How to Create a Class Library
To create a C# class library project from the New Project dialog, ( File > New > Project… ), select the Class Library (.NET Core) project type.

In a previous tutorial, you wrote a method to read a specific line number from a text file. In this tutorial, you will build off that example by creating a class library, called FileIOLibrary.
The class library project layout looks similar to what you expect from a typical C# project. Add the following code to your library’s .cs file.
The namespace identifier on line 4 is the dependency name you will reference via a using directive in your client projects. Here, I have chosen the name FileIOLibrary.
The name of the public class on line 6 is the name you will reference when you are ready to instantiate an instance of the class object in your projects. Here, I have called it FileIO.
This class has one public method and a private helper method. Once you have initialized a class object, you will be able to call the public method from your other projects. The private method cannot be called from outside this class.
Remember, you can always overload method constructors in order to provide different ways to call the function. As an exercise, consider creating an overloaded version of the ReadLine() method that takes three input parameters ReadLine(string directoryName, string fileName, int lineNumber) .
You can add several other public methods to this library. For example, you may wish to add a ReadFile() method, a WriteFile() method, and a WriteFileAsync() method to the same class library. Then, any time you have a project that requires File I/O operations, you could import your library and have an easy way to access the methods needed by your project.
Using a Class Library DLL
When you build a typical C# project file, an executable .EXE file is generated. When you build a class library project, a .DLL file is created in the source directory. By simply adding a reference to this .DLL file, any of your projects will be able to take advantage of the custom classes and methods you have written.
For this tutorial, add a second project to your solution, of type Console App (.NET Core). Name the project FileIOClient. To import the .DLL, locate the client project in the Solution Explorer. Right click it and Add > Reference.

If the class library is in the same solution as your current project, you will find it in the Projects > Solution pane. Otherwise, you can Browse … for the .dll file directly.

Once you have successfully added a reference to the class library, simply include it via a using directive. You will declare the reference using the name of the library’s namespace. Refer to Line 4 in the example above.
Following is an example of a client-side application that uses the class library we previously wrote. Notice, we are able to reference the library’s custom classes and methods, even though they are outside of the namespace of our current project.
After you instantiate a new instance of the FileIO class (Line 18), you are free to use its methods in your new project. On Line 19, for example, I have called the ReadLine() method that we wrote in the class library project.
A Note About Error Handling
It is important to follow best practices when creating class libraries. For example, you may have noticed that our class library code includes minimal error checking. The class library should be left to throw exceptions, because it is the responsibility of the client to appropriately handle exceptions. Notice it is the client-side File I/O operations that are enclosed in the try / catch block, not those of the class library itself.