Create Login and Register System with C# Winforms
Many developers in recent years have been using C# to develop their applications. In this tutorial, we’ll go through a simple example of how to create a basic user authentication in C#.
Introduction
C# or C-sharp is an object-oriented programming language developed by Microsoft. C# or C-sharp runs on a framework called the .Net framework.
The language has created many applications like:
- Web applications
- Mobile applications
- Computer games
- Desktop applications
- Database applications
- Virtual reality applications
Prerequisites
To follow this article along it would be helpful to have the following:
- An editor, in my case, I’ll be using Visual Studio.
- Some basic C# and SQL knowledge.
- Knowledge on how to run relational database management in this case, we will use MySQL.
- Visual Studio knowledge and how to create projects.
Step I: Create a database and table with required columns

Create table command:

Step II: Create a project
Create a Visual Studio project by clicking on File -> New -> Project and then select Visual C#. From the window, choose Windows Forms App(.Net Framework). Give your application a name. Then click ok. The project will come with default form called Form 1.
Step III: Create a config class to execute MySQL queries
Since C# is object-oriented, we will create a class that will handle the execution of queries that we will use in our program.
From the Solution Explorer window right-click and select add -> New Item -> Class. Name the class Config.cs the click on the button add.
- Add MySQL.Data Library by right-clicking on solution explorer window, then Manage Nuget packages, then search for MySQL.Data Library and install.

- Add the following class to help in the execution of MySQL queries.
- Now that we have Config.cs, we can execute any MySQL statement.
Step IV: Create register windows form
In Microsoft Visual Studio, create a new project. Choose project -> Add Windows Form from File submenu in the left corner, give the form a name Register , and click Add.
We have two Windows form classes that is Form1.cs and Register.cs.
Step V: Design login and register interface
Login form
- Click on Form1.cs in Solution Explorer, and on the form that displays, add three buttons, two textboxes, and two labels.
The first button will be the register button, that launch the Register form. The second button will be the Login button. When the second button is clicked, it will query the database with the input entered. The second button will execute the login MySQL query. The third button will close the application.
The first textbox will allow the username input for login, while the second textbox will enable the password’s input. These two inputs will be passed to the SQL.
The labels will indicate the functionality of the two textboxes.

Register form
- Click on Register.cs in the Solution Explorer and on the form that displays add two buttons, three textboxes, and three labels.
The first button will be a register button to save data entered, and the second one will be an exit button that will close the Register form.
The first textbox will allow the input of the names for the user. The second textbox will allow input of the user’s username. The third textbox is for entering the password.
The labels will or show the functionality of the three textboxes.

Step VI: Login logic
- Initialize the Config file in Form1.cs to allow us to access the database with ease.
On click of the register button, add the following code.
On click of the login button, add the following code.
On click of the exit button, add the following code.
Step VII: Register logic
- Initialize the Config file in Register.cs to allow us to access the database with ease.
On click of the exit button, add the following code.
On click of the register button, add the following code to save the information.
Find the above application in GitHub Login and Register application.
Conclusion
From the example above, we have seen how we can use C# to create a Desktop system with a login functionality. The object-oriented functionality helps in code re-use without doing much coding from scratch.
Создание формы авторизации и подключение к базе данных в Visual Studio (C#)
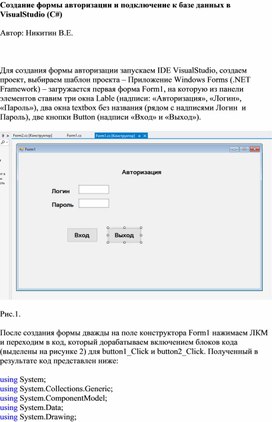
Для создания формы авторизации запускаем IDE VisualStudio , создаем проект, выбираем шаблон проекта – Приложение Windows Forms (. NET Framework ) – загружается первая форма Form 1, на которую из панели элементов ставим три окна Lable (надписи: «Авторизация», «Логин», «Пароль»), два окна textbox без названия (рядом с надписями Логин и Пароль), две кнопки Button (надписи «Вход» и «Выход»).
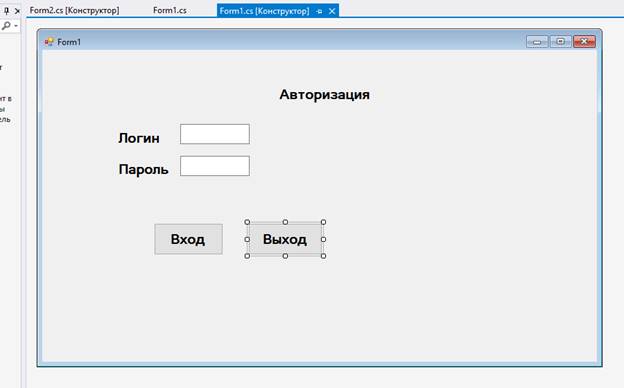
После создания формы дважды на поле конструктора Form 1 нажимаем ЛКМ и переходим в код, который дорабатываем включением блоков кода (выделены на рисунке 2) для button 1_ Click и button 2_ Click . Полученный в результате код представлен ниже:
Create Login(Sign In) and Registration (Sign Up) Form in C# Windows Form With Database
Hello guys, in this article we will create a login and registration form with database in c# windows form application .In this article we create a windows form app with login page, registration page for create new account and home page which show message that you login successfully .I hope you will like this article .So let’s start step by step.
Step: 1:- Open your visual studio, here I will use visual studio 2019.
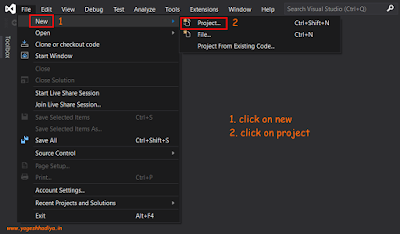
Step: 2:- Clock on file menu on top of the visual studio, hover mouse on new and click on project.
Step: 3:- Search for windows form App.(.Net framework) and click on next.
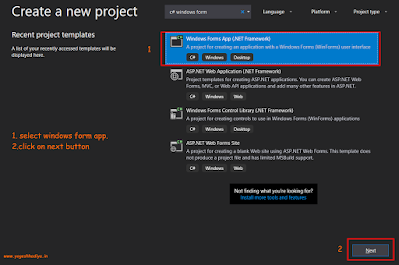
Step: 4:- In this step you have to enter some details of your application and then click on Create button. Following details you have to enter.
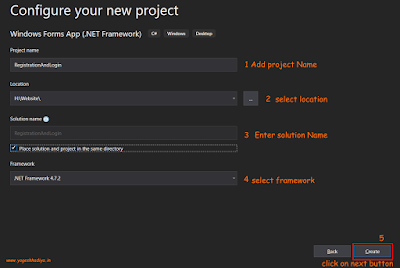
1. Project Name: Name of your project
2. Location: Location where you want to store your app in your local computer.
3. Solution Name: This name is display in solution explore in visual studio.
4. Framework: Select appropriate framework as your application require.
Step: 5:- Now your project is created. Open Solution Explorer .If you don’t see solution explore you can open from View menu on top or you can try short cut key “Ctrl+W,S”. We need to create some pages for our application. Right click on solution name then Hover mouse on Add and click on Add New Item or you can user short cut key “Ctrl+Shift+A”.
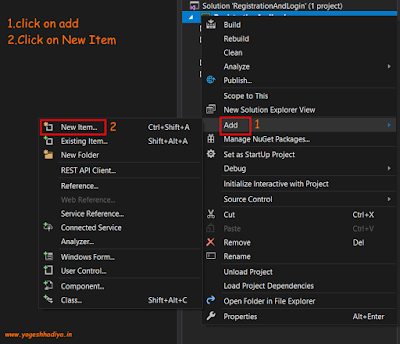
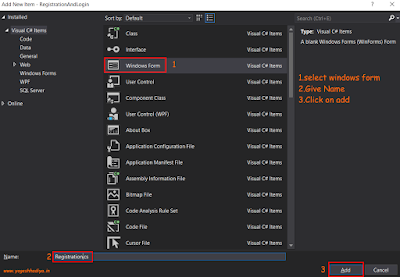
Step: 6:- Now you see a dialog where we add our forms. Select Windows Form, give proper name and click on Add. Add Login, Registration and Home page in same way.
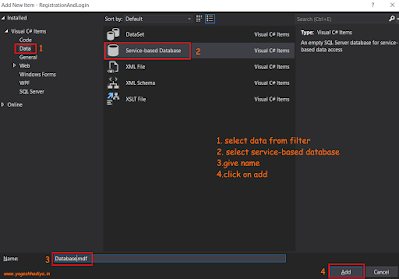
Step: 7:- Now we need to add database in our project. Right click on solution name then Hover mouse on Add and click on Add New Item or you can user short cut key “Ctrl+Shift+A”. Select data filter from left side bar for see item which associate with database. Select service based database, give name and click on add.
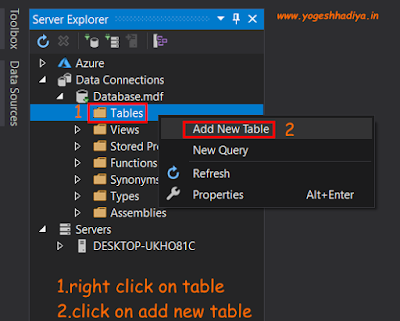
Step: 8:- Now we create a table which we user in login and registration. Double click on database file from solution explorer. It will open database file in server explore. Expand your database and right click on table then click on Add New Table.
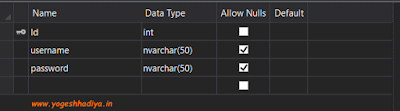
Step: 9:- Create table field which you want, here I added only three field Id, UserName and password where id is auto increment by 1. You can set it by right click on field name , click on property and find Id Identity Specification expand it make true (Is Identity) field and give increment number which increment id by adding this number in last id.
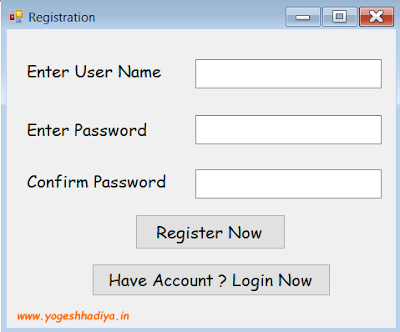
Step:-10:- Now first of all we create Registration form. So create design of your form as you need. In below image you see how I design form.
Step: 11:- Now click anywhere on form it will generate Form_Load event where enter following code. This code create database connection and open it. In next step you will learn how you get that connection string which added in SQLConnection Constructor.
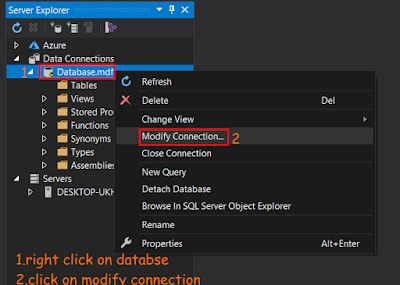
Step: 12:- Go to server Explorer right click on database, click on Modify Connection.
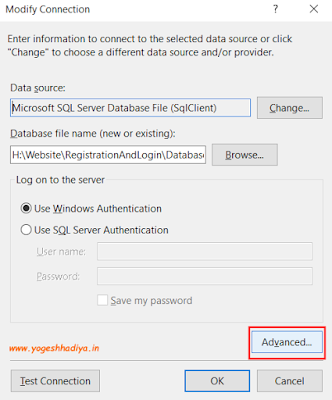
Step: 13:- Now you see a windows dialog popup click on advance button. This will open another dialog. But Before that click on test button and check you database working properly.
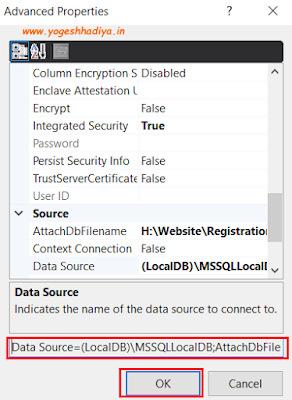
Step: 14:- Copy path which show below on this dialog and close both dialog. Then past this path in form load event. Add @ sign before this path so you no need to change slash.
Step: 15:- We need to open login page when user click on login button so enter following code in Login Button click event.
Code Explanation:
1. Here first we hide the current form which is registration .
2. Then we create an object of login page and show login form using that object.
Step: 16:- Now add following code in registration button click event
Code Explanation:
1. First of all we check that user enter value in all field if yes that continue otherwise show message using message box.
2. Then we check if password and confirm password both are same.
3. Then we check if any record/user is already register with that username if not then continue further otherwise show error message.
4. In last we insert data in table using SQLCommand object.
Step: 17:- Now we create a login page here I add two textbox for username and password and two button for login and open registration form.
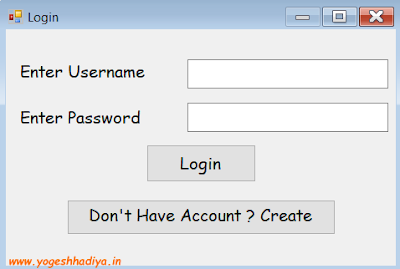
Step: 18:- Click on anywhere in form which generate Form_Load event add connection code that as show below.
Step: 19:- On Registration button click add following code which open registration form.
Step: 20:- Add below code in login button click for redirect user to home page form if user exist.
Code Explanation
1. Here first of all we check if user enter value in both field if yes then continue otherwise show error message.
2. Then we check if user exist in our database with that username and password. If user exist then open home page which we generate in start.
5 шагов для создания простой формы входа на C#
Инструкция из пяти шагов о том, как создать в Visual Studio форму авторизации для Windows-приложений на языке C# с хранением логинов и паролей в MySQL.

Многие приложения требуют авторизации для полноценного использования. Сегодня мы напишем простую форму авторизации Windows-приложений на языке C#.
Шаг 1. Создание базы
Первым делом создадим новую базу данных test для хранения тестовой информации. Добавьте таблицу user со следующими полями:
- id (INT) c атрибутом AUTO_INCREMENT ;
- name (VARCHAR(100));
- title (VARCHAR(100));
- address (VARCHAR(100)).
Шаг 2. Создание проекта
Создайте проект для нового приложения. В Visual Studio для этого нужно зайти в меню File > New > Project .
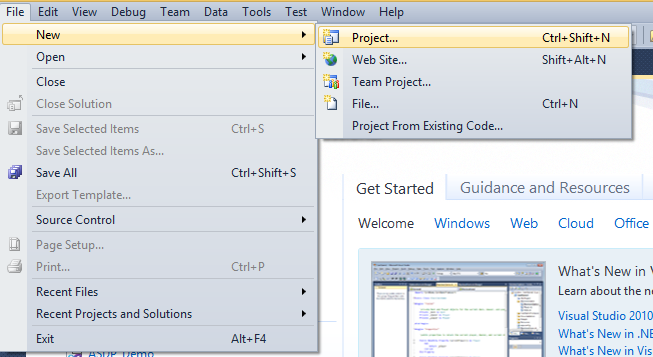
Создание нового проекта в Visual Studio
После этого появится окно New Project:
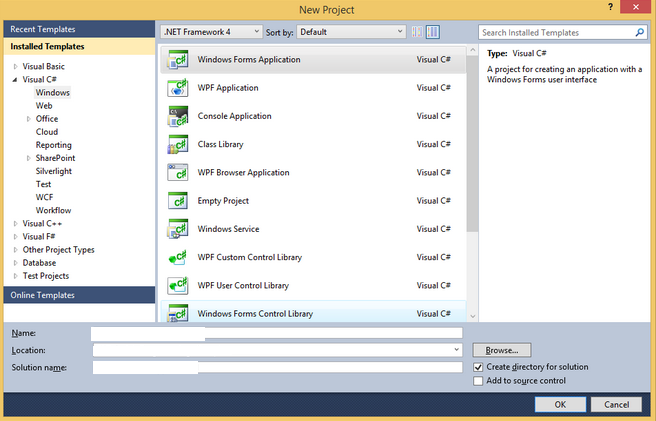
Окно New Project в интерфейсе Visual Studio
В поле Name нужно вписать название вашего проекта, в поле Location – указать нужную директорию, в Solution name – ввести название решения. Заполнили данные – нажимаем OK .
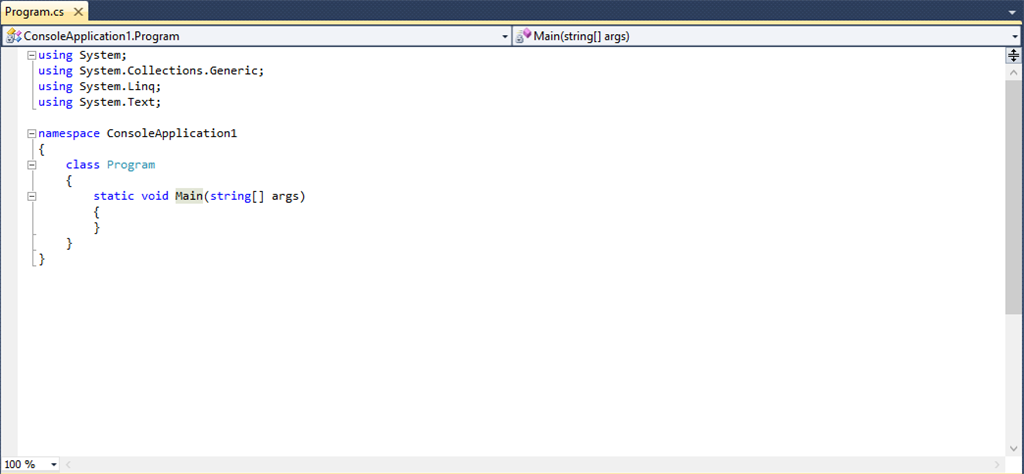
Главный класс нового проекта в Visual Studio
Шаг 3. Создание интерфейса
Создайте представление будущей формы авторизации, как показано на рисунке ниже. Добавьте два поля ( username и password ) и кнопку для входа.
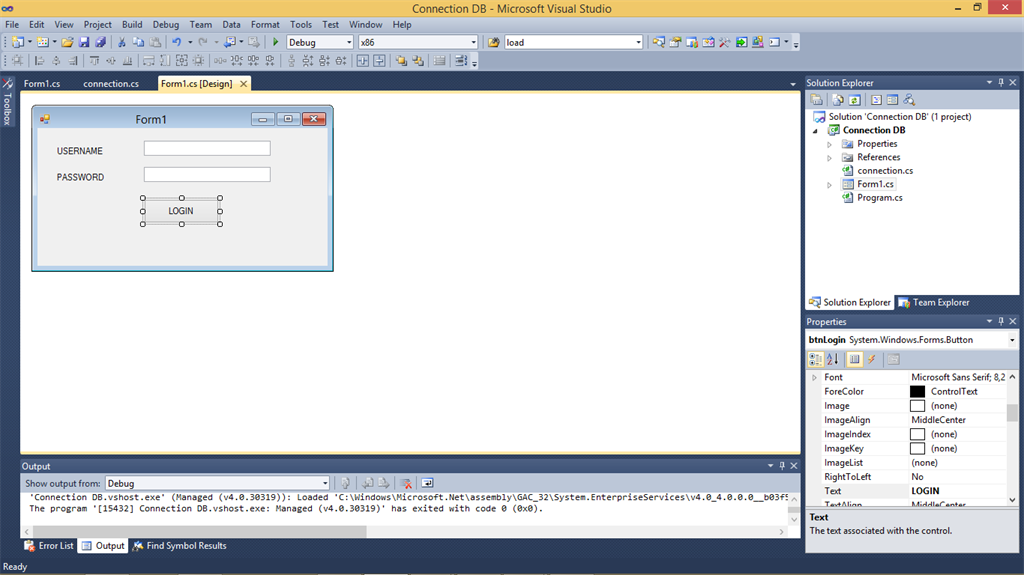
Шаг 4. Настройка соединения с базой
Создайте класс connection для настройки соединения с базой. Пример реализации представлен в листинге ниже:
Шаг 5. Код авторизации
Наконец, вернитесь к форме и добавьте следующий код:
Результат
Нажмите F5 , чтобы запустить программу. Если соединение с базой данных успешно установится, вы увидите только что созданную форму.
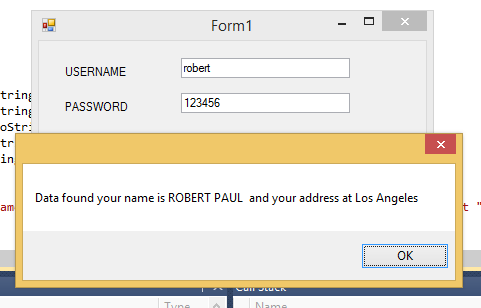
Интерфейс работающей программы