Как подключить к VS code?
Таков вопрос.
Мне надо сделать программу с простейшей графикой в с++. Я выбрал такую графическую библиотеку SFML, которую уже полдня пытаюсь установить. В интернетах не могу найти подходящего способа установки на VS code, и танцы с бубном, увы, тоже не помогли.
main.cpp(1): fatal error C1083: Не удается открыть файл включение: SFML/Graphics.hpp: No such file or directory
выводится такая ошибка.
Использую VS code с компилятором cl.exe и это все на винде
Как подключить lib к Code::Blocks
Всем привет. Я не могу подключить к Code::Blocks библиотеку .lib Я делаю вот так: Project -> Build.
Как подключить OpenSSL в Code::Blocks?
Не могу никак подключить OpenSSL в Code::Blocks Библиотеки я подключил, dll кинул в папку с.
Как подключить GDI+ в Code::Blocks?
Здравствуйте. Пытаюсь работать с графикой в Code::Blocks, но, найти GDI+ не удалось: т.е. ни.
EntityFramework: code-first как подключить файл mdf
Собственно вот, создал такое вот чудо public class Company < public Guid ID .
Сообщение от S_el
Сообщение от S_el
Вложения
| qwfpgj.rar (9.45 Мб, 74 просмотров) |
 Сообщение было отмечено ElliotAn как решение
Решение
Сообщение от ElliotAn
1) открываем папку с исходниками через VSCode.
Он тебе сразу предложит выбрать тулчейн и сконфигурироваь проект, если потеряешься:
2) на панели нажми пресет и выбери свою систему сборки (у тебя MSBuild должна быть установлена, выберешь нужный компилятор под разрядность и платформу в выпадающем сверху списке)
3) выбери конфигурацию сборки (у меня релиз)
4) нажми Ctrl+Shift+P набери CMake: Edit CMake Cahe (UI) и сними галочку с BUILD_SHARED_LIBS (это что бы статические библиотеки собрать) и сконфигурируй заново (CMake: Configure)
5) нажми на сборку
6) после удачной сборки выбери цель install и сноваа нажми на сборку
Библиотеки будут инсталлированы в папку, которую мы указали на втором скрине.
Настройка includePath
Данное руководство актуально для проектов на языках C/C++. Вам также нужно установить расширение C/C++ от Microsoft.
Если в файлах проекта C/C++ вы подключаете заголовочные файлы, которых нет внутри открытой в Visual Studio Code папки (например, файлы используемых в проекте сторонних библиотек), то вы увидите ошибку Не удается открыть источник файла. Для того чтобы исправить это и заставить Code корректно обрабатывать символы из этого файла, нужно указать путь к папке с этим файлом в параметре includePath.
Для этого нажмите на «лампочку», которая появится рядом с подчеркнутой строкой, указывающей на ошибку, и выберите Изменить параметр «includePath».

В этот раздел можно попасть и другим способом. Откройте палитру команд, введите config и выберите пункт C/C++: Изменить конфигурацию (пользовательский интерфейс).
После чего в открывшемся окне настроек C/C++ Configurations найдите раздел Включить путь (Include Path) и на новой строке укажите полный путь к нужной папке. В нашем примере заголовочные файлы библиотеки MPI установлены по адресу A:/libraries/MPI/Include, его и нужно указать в поле.
Configure VS Code for Microsoft C++
In this tutorial, you configure Visual Studio Code to use the Microsoft Visual C++ compiler and debugger on Windows.
After configuring VS Code, you will compile and debug a simple Hello World program in VS Code. This tutorial does not teach you details about the Microsoft C++ toolset or the C++ language. For those subjects, there are many good resources available on the Web.
If you have any problems, feel free to file an issue for this tutorial in the VS Code documentation repository.
Prerequisites
To successfully complete this tutorial, you must do the following:
Install the C/C++ extension for VS Code. You can install the C/C++ extension by searching for ‘c++’ in the Extensions view ( ⇧⌘X (Windows, Linux Ctrl+Shift+X ) ).

Install the Microsoft Visual C++ (MSVC) compiler toolset.
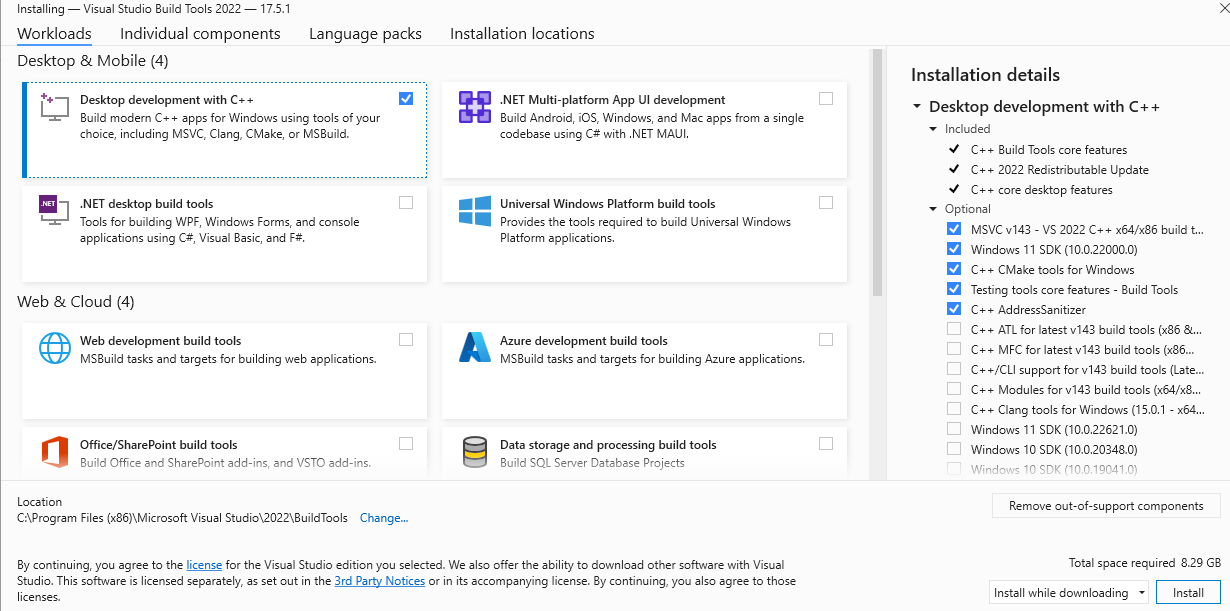
If you have a recent version of Visual Studio, open the Visual Studio Installer from the Windows Start menu and verify that the C++ workload is checked. If it’s not installed, then check the box and select the Modify button in the installer.
You can also install the Desktop development with C++ workload without a full Visual Studio IDE installation. From the Visual Studio Downloads page, scroll down until you see Tools for Visual Studio under the All Downloads section and select the download for Build Tools for Visual Studio 2022.

This will launch the Visual Studio Installer, which will bring up a dialog showing the available Visual Studio Build Tools workloads. Check the Desktop development with C++ workload and select Install.
Note: You can use the C++ toolset from Visual Studio Build Tools along with Visual Studio Code to compile, build, and verify any C++ codebase as long as you also have a valid Visual Studio license (either Community, Pro, or Enterprise) that you are actively using to develop that C++ codebase.
Check your Microsoft Visual C++ installation
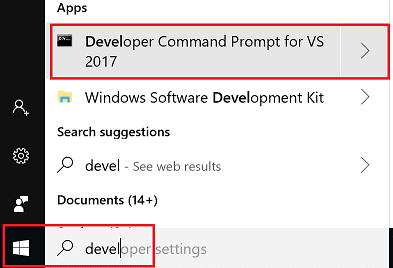
To use MSVC from a command line or VS Code, you must run from a Developer Command Prompt for Visual Studio. An ordinary shell such as PowerShell, Bash, or the Windows command prompt does not have the necessary path environment variables set.
To open the Developer Command Prompt for VS, start typing ‘developer’ in the Windows Start menu, and you should see it appear in the list of suggestions. The exact name depends on which version of Visual Studio or the Visual Studio Build Tools you have installed. Select the item to open the prompt.
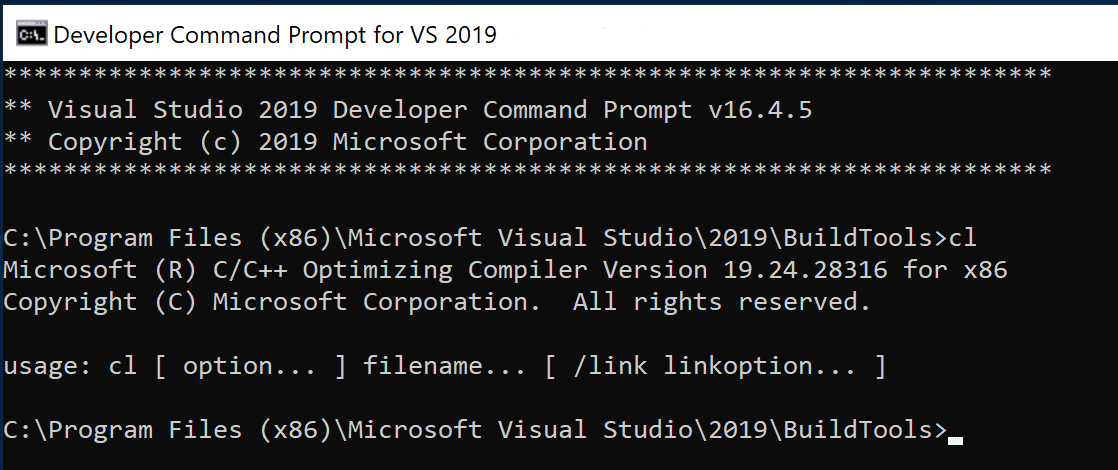
You can test that you have the C++ compiler, cl.exe , installed correctly by typing ‘cl’ and you should see a copyright message with the version and basic usage description.
If the Developer Command Prompt is using the BuildTools location as the starting directory (you wouldn’t want to put projects there), navigate to your user folder ( C:\users\
Note: If for some reason you can’t run VS Code from a Developer Command Prompt, you can find a workaround for building C++ projects with VS Code in Run VS Code outside a Developer Command Prompt.
Create Hello World
From the Developer Command Prompt, create an empty folder called "projects" where you can store all your VS Code projects, then create a subfolder called "helloworld", navigate into it, and open VS Code ( code ) in that folder ( . ) by entering the following commands:
The "code ." command opens VS Code in the current working folder, which becomes your "workspace". As you go through the tutorial, you will see three files created in a .vscode folder in the workspace:
- tasks.json (build instructions)
- launch.json (debugger settings)
- c_cpp_properties.json (compiler path and IntelliSense settings)
Add a source code file
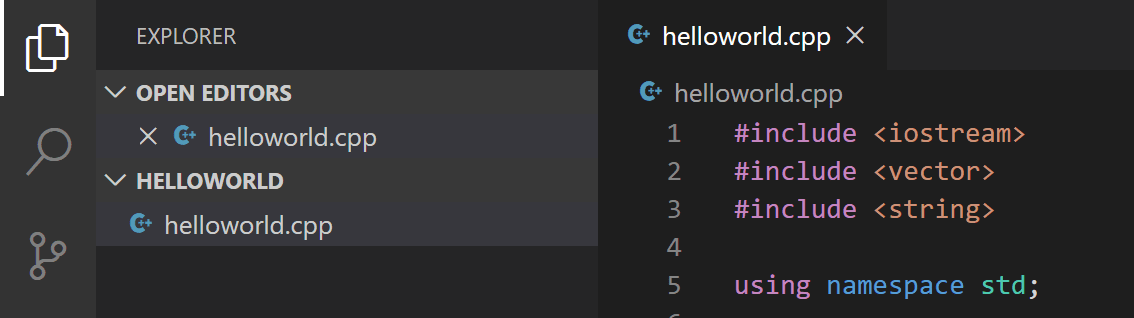
In the File Explorer title bar, select the New File button and name the file helloworld.cpp .
Add hello world source code
Now paste in this source code:
Now press ⌘S (Windows, Linux Ctrl+S ) to save the file. Notice how the file you just added appears in the File Explorer view ( ⇧⌘E (Windows, Linux Ctrl+Shift+E ) ) in the side bar of VS Code:
You can also enable Auto Save to automatically save your file changes, by checking Auto Save in the main File menu.
The Activity Bar on the far left lets you open different views such as Search, Source Control, and Run. You’ll look at the Run view later in this tutorial. You can find out more about the other views in the VS Code User Interface documentation.
Note: When you save or open a C++ file, you may see a notification from the C/C++ extension about the availability of an Insiders version, which lets you test new features and fixes. You can ignore this notification by selecting the X (Clear Notification).
Explore IntelliSense
In your new helloworld.cpp file, hover over vector or string to see type information. After the declaration of the msg variable, start typing msg. as you would when calling a member function. You should immediately see a completion list that shows all the member functions, and a window that shows the type information for the msg object:
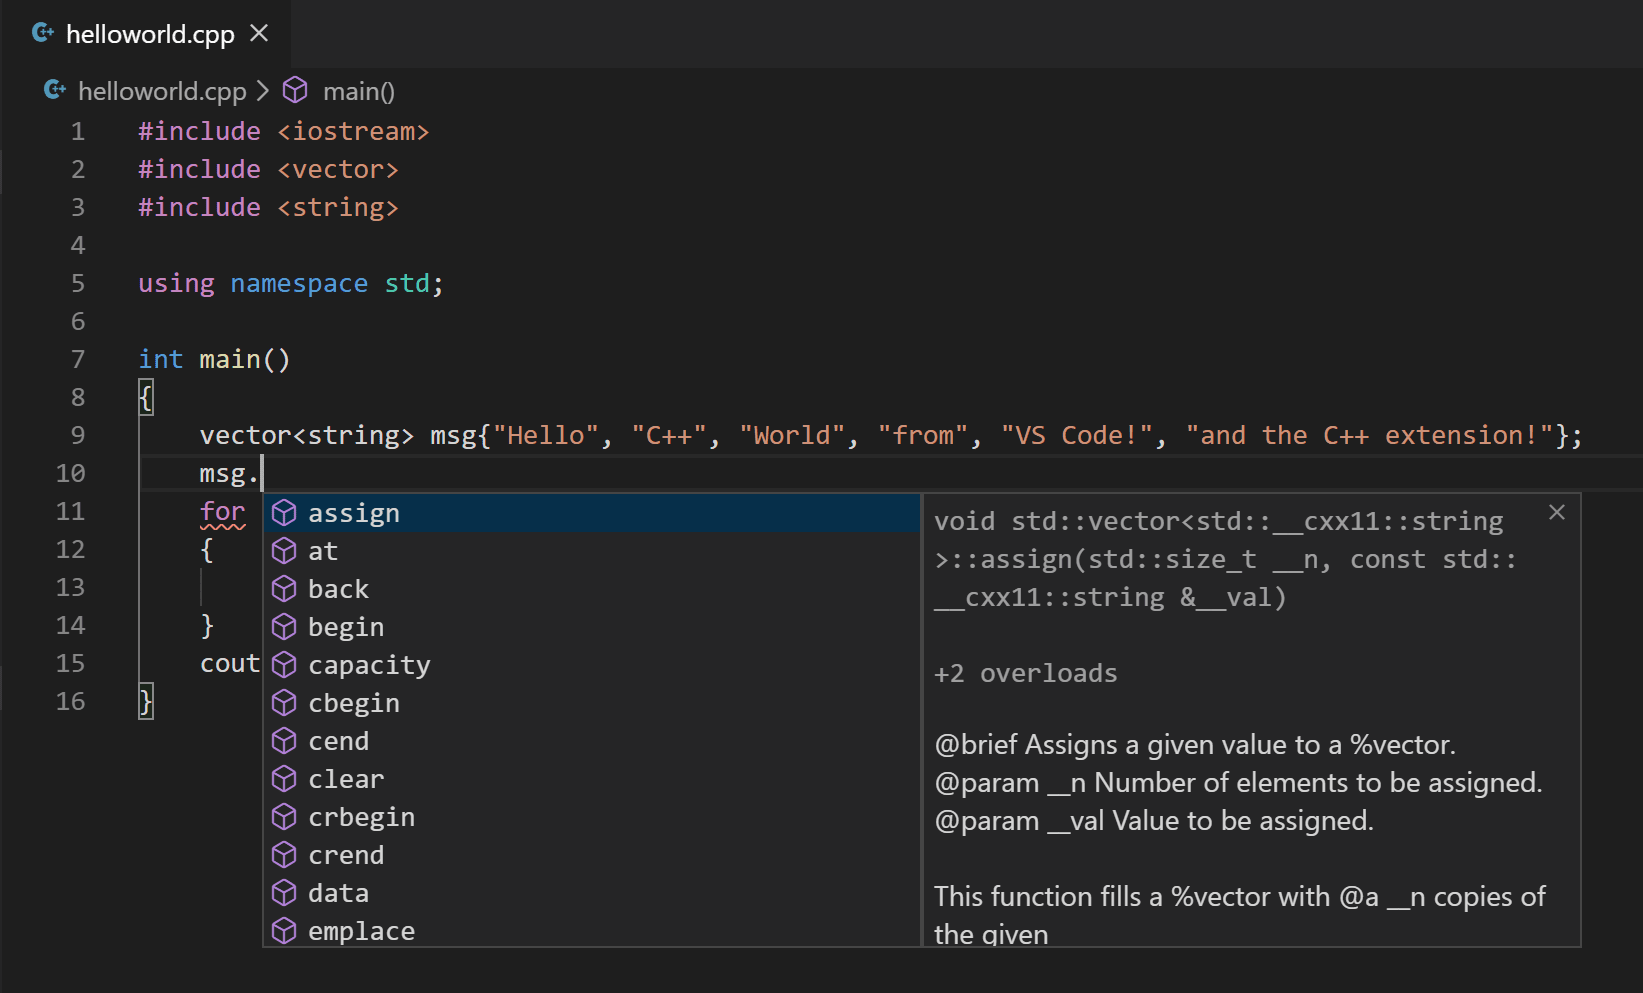
You can press the Tab key to insert the selected member; then, when you add the opening parenthesis, you will see information about any arguments that the function requires.
Run helloworld.cpp
Remember, the C++ extension uses the C++ compiler you have installed on your machine to build your program. Make sure you have a C++ compiler installed before attempting to run and debug helloworld.cpp in VS Code.
Open helloworld.cpp so that it is the active file.
Press the play button in the top right corner of the editor.
Choose C/C++: cl.exe build and debug active file from the list of detected compilers on your system.
You’ll only be asked to choose a compiler the first time you run helloworld.cpp . This compiler will be set as the "default" compiler in tasks.json file.
After the build succeeds, your program’s output will appear in the integrated Terminal.
If you get an error trying to build and debug with cl.exe, make sure you have started VS Code from the Developer Command Prompt for Visual Studio using the code . shortcut.
The first time you run your program, the C++ extension creates tasks.json , which you’ll find in your project’s .vscode folder. tasks.json stores build configurations.
Your new tasks.json file should look similar to the JSON below:
Note: You can learn more about tasks.json variables in the variables reference.
The command setting specifies the program to run; in this case that is "cl.exe". The args array specifies the command-line arguments that will be passed to cl.exe. These arguments must be specified in the order expected by the compiler.
This task tells the C++ compiler to take the active file ( $
The label value is what you will see in the tasks list; you can name this whatever you like.
The detail value is what you will as the description of the task in the tasks list. It’s highly recommended to rename this value to differentiate it from similar tasks.
The problemMatcher value selects the output parser to use for finding errors and warnings in the compiler output. For cl.exe, you’ll get the best results if you use the $msCompile problem matcher.
From now on, the play button will read from tasks.json to figure out how to build and run your program. You can define multiple build tasks in tasks.json , and whichever task is marked as the default will be used by the play button. In case you need to change the default compiler, you can run Tasks: Configure default build task. Alternatively you can modify the tasks.json file and remove the default by replacing this segment:
Modifying tasks.json
You can modify your tasks.json to build multiple C++ files by using an argument like "$
Debug helloworld.cpp
To debug your code,
- Go back to helloworld.cpp so that it is the active file.
- Set a breakpoint by clicking on the editor margin or using F9 on the current line.
- From the drop-down next to the play button, select Debug C/C++ File.
- Choose C/C++: cl.exe build and debug active file from the list of detected compilers on your system (you’ll only be asked to choose a compiler the first time you run or debug helloworld.cpp ).
The play button has two modes: Run C/C++ File and Debug C/C++ File. It will default to the last-used mode. If you see the debug icon in the play button, you can select the play button to debug, instead of selecting the drop-down menu item.
If you get an error trying to build and debug with cl.exe, make sure you have started VS Code from the Developer Command Prompt for Visual Studio using the code . shortcut.
Explore the debugger
Before you start stepping through the code, let’s take a moment to notice several changes in the user interface:
The Integrated Terminal appears at the bottom of the source code editor. In the Debug Output tab, you see output that indicates the debugger is up and running.
The editor highlights the line where you set a breakpoint before starting the debugger:
The Run and Debug view on the left shows debugging information. You’ll see an example later in the tutorial.
At the top of the code editor, a debugging control panel appears. You can move this around the screen by grabbing the dots on the left side.

Step through the code
Now you’re ready to start stepping through the code.
Click or press the Step over icon in the debugging control panel.
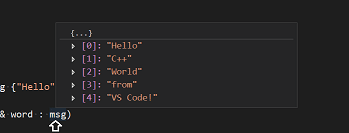
This will advance program execution to the first line of the for loop, and skip over all the internal function calls within the vector and string classes that are invoked when the msg variable is created and initialized. Notice the change in the Variables window on the left.
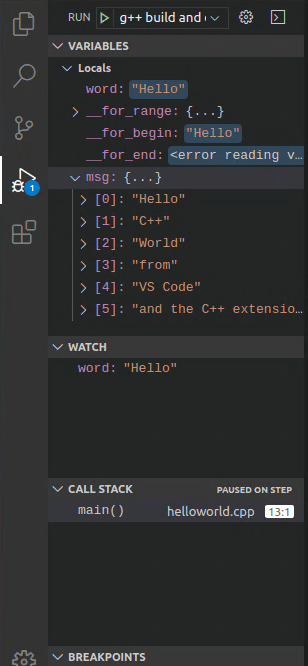
In this case, the errors are expected because, although the variable names for the loop are now visible to the debugger, the statement has not executed yet, so there is nothing to read at this point. The contents of msg are visible, however, because that statement has completed.
Press Step over again to advance to the next statement in this program (skipping over all the internal code that is executed to initialize the loop). Now, the Variables window shows information about the loop variables.
Press Step over again to execute the cout statement. (Note that as of the March 2019 release, the C++ extension does not print any output to the Debug Console until the loop exits.)
If you like, you can keep pressing Step over until all the words in the vector have been printed to the console. But if you are curious, try pressing the Step Into button to step through source code in the C++ standard library!
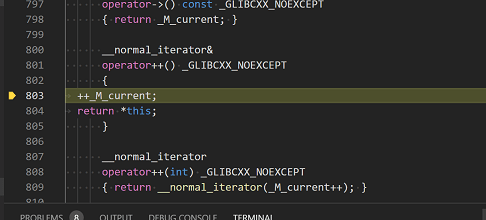
To return to your own code, one way is to keep pressing Step over. Another way is to set a breakpoint in your code by switching to the helloworld.cpp tab in the code editor, putting the insertion point somewhere on the cout statement inside the loop, and pressing F9 . A red dot appears in the gutter on the left to indicate that a breakpoint has been set on this line.
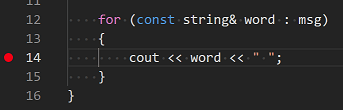
Then press F5 to start execution from the current line in the standard library header. Execution will break on cout . If you like, you can press F9 again to toggle off the breakpoint.
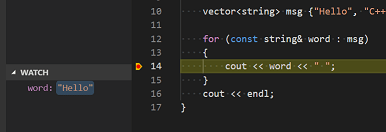
Set a watch
Sometimes you might want to keep track of the value of a variable as your program executes. You can do this by setting a watch on the variable.
Place the insertion point inside the loop. In the Watch window, select the plus sign and in the text box, type word , which is the name of the loop variable. Now view the Watch window as you step through the loop.
Add another watch by adding this statement before the loop: int i = 0; . Then, inside the loop, add this statement: ++i; . Now add a watch for i as you did in the previous step.
To quickly view the value of any variable while execution is paused on a breakpoint, you can hover over it with the mouse pointer.
Customize debugging with launch.json
When you debug with the play button or F5 , the C++ extension creates a dynamic debug configuration on the fly.
There are cases where you’d want to customize your debug configuration, such as specifying arguments to pass to the program at runtime. You can define custom debug configurations in a launch.json file.
To create launch.json , choose Add Debug Configuration from the play button drop-down menu.
You’ll then see a dropdown for various predefined debugging configurations. Choose C/C++: cl.exe build and debug active file.
VS Code creates a launch.json file, which looks something like this:
In the JSON above, program specifies the program you want to debug. Here it is set to the active file folder ( $
By default, the C++ extension won’t add any breakpoints to your source code and the stopAtEntry value is set to false .
Change the stopAtEntry value to true to cause the debugger to stop on the main method when you start debugging.
From now on, the play button and F5 will read from your launch.json file when launching your program for debugging.
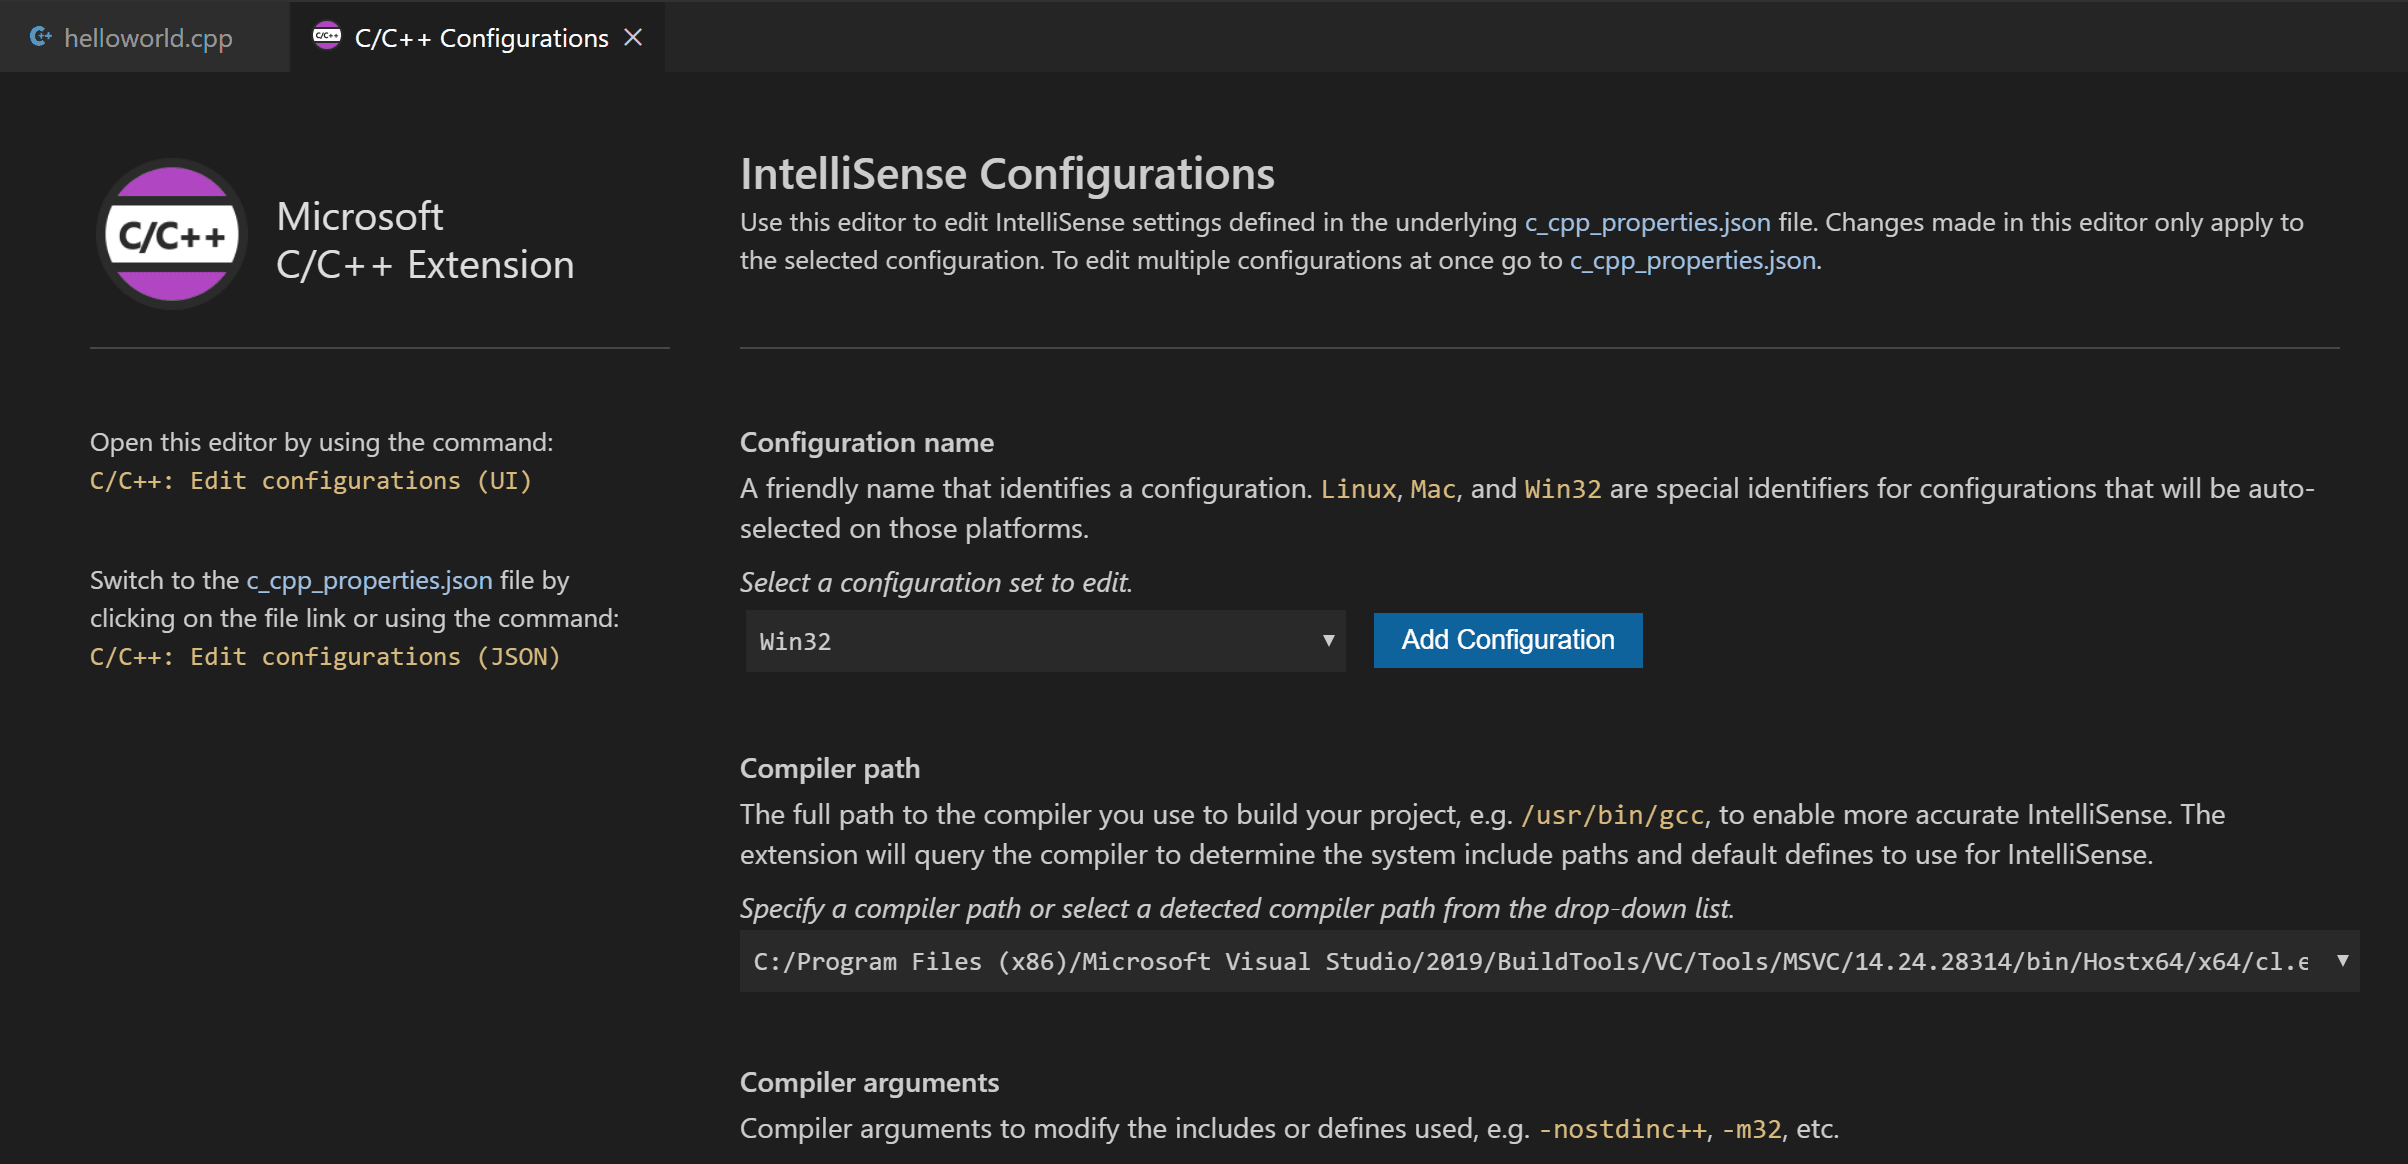
C/C++ configurations
If you want more control over the C/C++ extension, you can create a c_cpp_properties.json file, which will allow you to change settings such as the path to the compiler, include paths, C++ standard (default is C++17), and more.
You can view the C/C++ configuration UI by running the command C/C++: Edit Configurations (UI) from the Command Palette ( ⇧⌘P (Windows, Linux Ctrl+Shift+P ) ).

This opens the C/C++ Configurations page. When you make changes here, VS Code writes them to a file called c_cpp_properties.json in the .vscode folder.
Visual Studio Code places these settings in .vscode\c_cpp_properties.json . If you open that file directly, it should look something like this:
You only need to add to the Include path array setting if your program includes header files that are not in your workspace or in the standard library path.
Compiler path
The compilerPath setting is an important setting in your configuration. The extension uses it to infer the path to the C++ standard library header files. When the extension knows where to find those files, it can provide useful features like smart completions and Go to Definition navigation.
The C/C++ extension attempts to populate compilerPath with the default compiler location based on what it finds on your system. The extension looks in several common compiler locations.
The compilerPath search order is:
- First check for the Microsoft Visual C++ compilerOpe
- Then look for g++ on Windows Subsystem for Linux (WSL)
- Then g++ for Mingw-w64.
If you have g++ or WSL installed, you might need to change compilerPath to match the preferred compiler for your project. For Microsoft C++, the path should look something like this, depending on which specific version you have installed: "C:/Program Files (x86)/Microsoft Visual Studio/2017/BuildTools/VC/Tools/MSVC/14.16.27023/bin/Hostx64/x64/cl.exe".
Reusing your C++ configuration
VS Code is now configured to use the Microsoft C++ compiler. The configuration applies to the current workspace. To reuse the configuration, just copy the JSON files to a .vscode folder in a new project folder (workspace) and change the names of the source file(s) and executable as needed.
Run VS Code outside the Developer Command Prompt
In certain circumstances, it isn’t possible to run VS Code from Developer Command Prompt for Visual Studio (for example, in Remote Development through SSH scenarios). In that case, you can automate initialization of Developer Command Prompt for Visual Studio during the build using the following tasks.json configuration:
Note: The path to VsDevCmd.bat might be different depending on the Visual Studio version or installation path. You can find the path to VsDevCmd.bat by opening a Command Prompt and running dir "\VsDevCmd*" /s .
Troubleshooting
The term ‘cl.exe’ is not recognized
If you see the error "The term ‘cl.exe’ is not recognized as the name of a cmdlet, function, script file, or operable program.", this usually means you are running VS Code outside of a Developer Command Prompt for Visual Studio and VS Code doesn’t know the path to the cl.exe compiler.
VS Code must either be started from the Developer Command Prompt for Visual Studio, or the task must be configured to run outside a Developer Command Prompt.
Как подключать сторонние библиотеки C/C++ в VS Code?
Один из главных преимуществ разработки на языке C/C++, это богатое сообщество разработчиков, которые создают библиотеки для достижения различных целей. Эти библиотеки могут быть использованы в качестве скелета для наших приложений, чтобы избавиться от необходимости писать всю работу с нуля. Чтобы использовать эти библиотеки в вашем проекте, необходимо знать, как их подключить.
В этой статье мы рассмотрим, как подключить сторонние библиотеки C/C++ в Visual Studio Code (VS Code). Это будут глобальные инструкции для подключения любой библиотеки, но мы также обсудим специфические инструкции для Boost, Qt и SFML.
Перед тем, как мы начнем, давайте определимся с терминологией. Библиотека — это набор функций, классов и методов, которые могут быть использованы в вашем коде без необходимости писать весь код заново. Есть два типа библиотек: статические и динамические. Статическая библиотека — это файл, который содержит функции и знания, которые могут быть вызваны другим программным кодом. Динамическая библиотека — это файл, который может быть загружен и выгружен из памяти по запросу, что в свою очередь экономит ресурсы системы.
# Подключение статической библиотеки
Чтобы подключить статическую библиотеку в VS Code, должно быть выполнено несколько шагов:
## 1. Скачивание библиотеки и размещение ее в проектной директории
Ниже приведен пример для скачивания и распаковки библиотеки OpenCV:
## 2. Конфигурация проекта
Так как мы используем CMake для нашего проекта, мы можем создать файл `CMakeLists.txt`, в котором опишем, какой код файлов проекта должен быть использован, каким образом мы хотим, чтобы код был скомпилирован и какие заголовочные файлы мы хотим использовать.
Как мы видим, мы используем функции `find_package()` для подключения библиотеки. Это запустит поиск пакета OpenCV в системах, которые установлены на вашей машине, и найдет необходимые библиотеки и заголовочный файлы.
## 3. Компиляция проекта в терминале
Используя CMakeLists.txt, мы можем компилировать наш проект с библиотекой OpenCV, выполнив следующее в терминале:
Однако, если вы используете расширение C++ для VS Code, то вы можете скомпилировать код через интерфейс VS Code.
# Подключение динамической библиотеки
Как уже упоминалось, динамическая библиотека — это файл, который может быть загружен и выгружен из памяти на запрос. Как мы узнаем, какую динамическую библиотеку можно подключить? В принципе, вы можете заглянуть в документацию, посмотреть на ресурсы, которые можно использовать, или вы можете найти динамическую библиотеку, которую вы хотели бы использовать, через веб-сайты и репозитории.
## 1. Скачивание и установка динамической библиотеки и размещение ее в проектной директории
Ниже приведен пример для скачивания и установки динамической библиотеки Qt:
После того как пакет необходимой динамической библиотеки установлен, нам нужно разместить заголовочные файлы и библиотеки в нашей проектной директории.
## 2. Конфигурация проекта
Мы используем CMake для конфигурации нашего проекта, чтобы привязать искомые библиотеки и заголовочные файлы к проекту.
## 3. Компиляция проекта в терминале
Используя CMakeLists.txt, мы можем компилировать наш проект с библиотекой Qt, выполнив следующее в терминале:
Однако, если вы используете расширение C++ для VS Code, то вы можете скомпилировать код через интерфейс VS Code.
# Специфические инструкции для Boost, Qt и SFML
Библиотека Boost имеет большой выбор классов и шаблонов, которые позволяют решать многие задачи, такие как работа с файлами, ввод/вывод, криптография, параллельное программирование и многое другое.
После скачивания и установки библиотеки Boost, нужно добавить путь к заголовочным файлам и исполняемую библиотеку в наш файл CMakeLists.txt.
Имейте ввиду, что для использования файла библиотеки Boost в проекте, отличном от Boost, вы должны использовать флаги `-DBOOST_*_DYN_LINK` при компиляции вашего проекта. Например, когда вы запускаете `cmake`, вы можете добавить флаги вот так:
Qt — работает на обычных компьютерах с различными операционными системами, а также на мобильных устройствах, таких как Android и iOS.
Как и в предыдущих случаях, мы должны начать с установки необходимой библиотеки. Для использования библиотеки Qt в нашем проекте мы можем использовать следующие инструкции в CMakeLists.txt:
Обратите внимание, что мы используем 'AUTOMOC' для генерации других файлов с исходным кодом, которые могут быть нужны для выполнения Qt.
SFML — кроссплатформенная библиотека для разработки игр и мультимедиа-приложений.
Чтобы добавить библиотеку SFML в наш проект C++, мы можем использовать следующие инструкции в CMakeLists.txt:
Обратите внимание, что мы используем флаг `»cmake_modules»`, чтобы указать, где находятся наши модули для CMake.
В этой статье мы рассмотрели, как подключить сторонние библиотеки C/C++ в Visual Studio Code. Мы рассмотрели различные типы библиотек и процесс их подключения. В частности, мы обсудили подключение библиотеки Boost, Qt и SFML.
Для получения более детальной информации об общих приемах и конкретных деталях работы CMake с библиотеками, рекомендуется ознакомиться со стандартной документацией на сайтах CMake, Boost, Qt и SFML. И, конечно же, не забывайте пробовать что-то новое и экспериментировать, ведь так вы сможете усовершенствовать свои навыки и улучшить свои проекты.