Как восстановить удаленную ячейку ноутбука Jupyter?
Я использую ноутбук Jupyter через Anaconda. Я случайно удалил ячейку, и я не могу отступить.
Как я могу восстановить ячейку ноутбука?
5 ответов
Если вы идете в «Редактировать», есть опция «Отменить удаление ячеек».
Если вы знакомы с ярлыками, вы можете сделать cmd + shift + p , а затем ввести undo для восстановления. Нет необходимости перемещать мышь.
Сначала переключитесь в командный режим, нажав ESC, затем вы можете нажать z чтобы восстановить удаленные ячейки, работает даже в Jupyter Lab, у которой нет опции «Отменить удаление ячеек» на вкладке «Редактировать».
Если ядро ноутбука все еще запущено, и вы выполнили эту ячейку, вы можете найти содержимое всех ячеек, включая удаленные в _ih . Например, последние пять ячеек:
если вы уже перезапустили свое ядро, тогда %history или _ih[:n] будет пустым. Вы можете надеяться, что недавняя контрольная точка вернется. Вы можете сделать это с помощью File> Revert to Checkpoint.
How To Recover Deleted Jupyter Notebook Cell?

As a data scientist or software engineer, Jupyter Notebook is an essential tool in your arsenal. It allows you to write, test, and share code in an interactive environment. However, one of the most frustrating experiences is accidentally deleting a Jupyter Notebook cell. Don’t worry, in this article, we will guide you on how to recover deleted Jupyter Notebook cells.
Overview
Before we dive into the recovery process, let’s take a step back and understand what a Jupyter Notebook is. A Jupyter Notebook is an open-source web application that allows you to create and share documents that contain live code, equations, visualizations, and narrative text. It is a powerful tool for data analysis, data visualization, and machine learning.
A Jupyter Notebook consists of cells, which can contain code, markdown text, or raw text. You can add, delete, move, and edit cells in a Jupyter Notebook. However, sometimes you may accidentally delete a cell, and it can be frustrating to lose your work. But don’t panic; there are ways to recover deleted Jupyter Notebook cells.
Recovery Process
When you delete a Jupyter Notebook cell, it is not permanently deleted. Instead, it is moved to the Notebook’s recycle bin. The recycle bin is a hidden folder in the Notebook directory that contains deleted cells. To recover a deleted cell, you need to follow these simple steps:
- Open the Jupyter Notebook directory
- Look for the folder named “.ipynb_checkpoints”
- Open the folder and look for the Notebook file you want to recover
- Right-click on the Notebook file and select “Restore to previous version”
- Select the version you want to restore and click “Restore”
Once you have restored the Notebook file, you can open it and see the recovered cell. However, if you have made changes to the Notebook after deleting the cell, you may lose these changes. Therefore, it is essential to save your work regularly to avoid losing data.
Prevention Tips
Prevention is always better than cure. Here are some tips to prevent accidentally deleting Jupyter Notebook cells:
- Use Git or any other version control system to track changes in your Notebook. This way, you can roll back to a previous version if you accidentally delete a cell.
- Use the “Undo” command (Ctrl+Z) to undo any accidental cell deletion.
- Use the Notebook extensions like “Hinterland” or “Collapsible headings” to avoid accidental cell deletion.
Conclusion
In conclusion, accidentally deleting a Jupyter Notebook cell can be frustrating, but it is not the end of the world. You can recover deleted cells by following the steps outlined in this article. However, prevention is always better than cure, and it is essential to follow the prevention tips to avoid accidentally deleting cells in the first place.
Jupyter Notebook is a powerful tool for data scientists and software engineers, and it is essential to use it effectively. By following the tips outlined in this article, you can make the most of Jupyter Notebook and avoid the frustration of losing your work due to accidental cell deletion.
6 ways to Recover deleted Jupyter Notebook (including JupyterLab)
In this tutorial, we’ll see how to recover deleted cells and restore previous sessions of Jupyter Notebook. We’ll also see how to restore an accidentally deleted notebook.
Step 1: Jupyter Notebook restore deleted cell
There are several ways to recover deleted cells. Let’s start with the easiest one using the menu:
- Go to Notebook menu
- Edit
- Undo Delete Cells
Note: For JupyterLab this option is missing. In this case you need to use: Undo Cell Operation. The short cut is Z — you need to press escape before applying it.
Step 2: Jupyter Notebook restore cells with active Kernel
If the Notebook Kernel is still active then you can use commands which are reading the last executed cells from the Kernel. For example reading the last 5 commands can be done by:
Note: it shows even deleted cells
Step 3: Jupyter Notebook view current or full execution history
This step will help even if the Kernel is not active. Jupyter Notebook history is available by command(it can be executed in the notebook):
If you like to save the recovered execution history to a given file like: notebook_file.ipynb then you can use:
%history -g -f notebook_file.ipynb
Parameter -g defines the history scope:
- without -g — current session
- with -g — all sessions
This is the last resort in some cases.
Step 4: Jupyter Notebook restore checkpoint/session
Jupyter Notebook Checkpoints are simple version control systems which save sessions. You can find them from the UI:
- File
- Save and Checkpoint — save the current session
- Revert to Checkpoint — restore previous session
- Select Checkpoint
Another way to access them and recover your work is from the file system. Open the Notebook folder and search for:
Then search for the file name of your Notebook. The file pattern is:
Note: How to find your folder: .ipynb_checkpoints/ . You can check the current folder by command like:
executed in the cell.
Step 5: JupyterLab restore deleted Notebook
If you delete a Notebook in JupyterLab or in the browser then they can be found in folder like (Linux; for Windows it goes to Recycle Bin):
Now the file can be restored by move or copy.
On Linux and Mac a command like:
might help to search for the deleted file.
Step 6: Restore Notebook from the browser cache
One more way to recover deleted Notebook is by next algorithm:
-
Find the cache for your browser
- grep -a ‘import pandas as pd’
- since the command is really slow you can search for the cache from the last hour by — grep "^$(date -d ‘-1 hour’ +’%H’)" | grep -a ‘pandas’
- for the current folder only — grep -r "^$(date -d ‘-1 hour’ +’%H’)" . | grep -r -a ‘pandas’ .
- sudo nano
- start with < "cells":
- ends with "nbformat": 4, "nbformat_minor": 2>
- use advanced version control when it’s possible
- activate multiple checkpoints
- Получить ссылку
- Электронная почта
- Другие приложения
Good luck with the Notebook recovery and restore!
By using SoftHints — Python, Linux, Pandas , you agree to our Cookie Policy.
Lets Analyse it!
Блог Владимира Степанова об аналитике. Публикую свои подходы и кейсы по анализу данных, визуализации и работе с дата-инструментами.
Jupyter-фишки, которые облегчат жизнь аналитику
Если ты работаешь аналитиком или пока еще изучаешь предмет, наверняка, твой основной рабочий инструмент — Jupyter Notebook. И все дело в том, что аналитики используют Python немного по-другому, в отличие от Python-программистов. Конечно, можно делать исследования и в какой-нибудь навороченной IDE, но работа в Jupyter уже давно стала стандартом для аналитиков. А сегодня посмотрим на фишки Jupyter, которые помогут сделать твою работу еще более продуктивной и интересной.

Pandas profiling
Установка

и пишем в терминале такую команду:
Далее, подключаем библиотеку и наш датасет:
Запускаем одной командой:
А сохранить результаты в виде HTML-странички можно такой командой:
Интерактив в чартах
Установка
А теперь сделаем тоже самое. с помощью cufflinks:
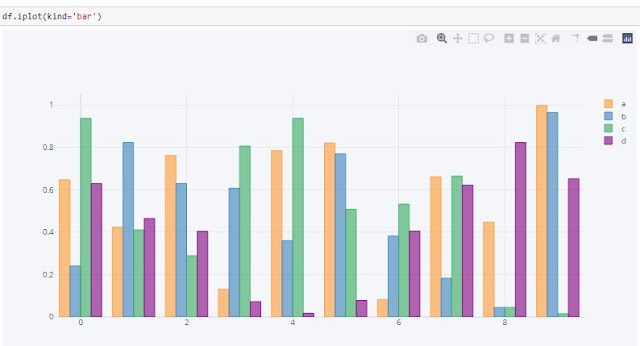
Подробнее. я рассказывал про библиотеку Plotly в этом посте. А посмотреть на чарты сделанные с помощью cufflinks — здесь
Выше мы рассмотрели сторонние библиотеки, которые устанавливаются в окружение Python. А сейчас перейдем уже непосредственно к самому JupyterМагия
В Jupyter есть набор так называемых магических команд, которые делают работу с оболочкой более удобной. Полный список команд можно вывести так:

%history — команда, которая выводит список введенных ранее команд.
Бывает полезно, если вы удалили ячейки с кодом, но не знаете, как их вернуть (расскажу об этом в конце). Можно задать, чтобы была выведена конкретная ячейка или диапазон ячеек.
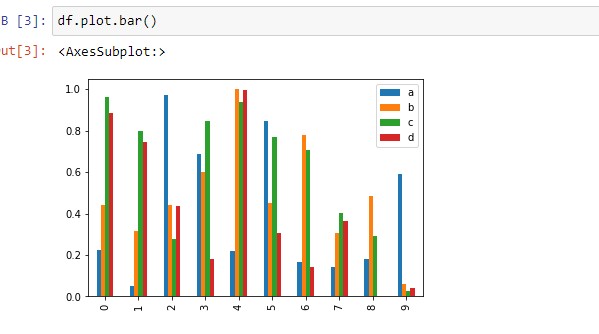
Выше мы уже говорили про интерактивность в чартах. Наверняка. многие из вас знают такую команду, как %matplotlib inline, позволяющую выводить чарты прямо в ячейки Jupyter. Но у этой команды есть еще и брат-близнец:

Но я по сравнению с plotly выглядит все-равно бедновато.
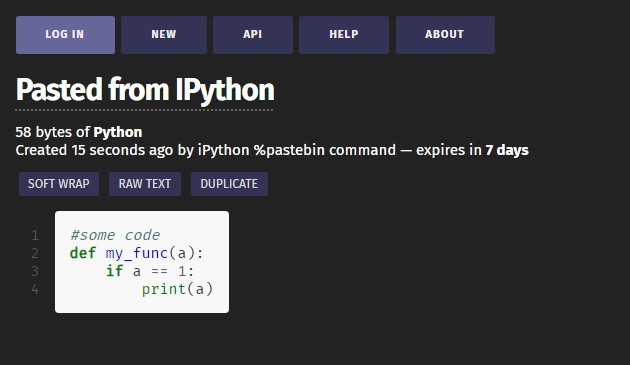
%%writefile — удобная команда, которая позволяет записывать код в файл. Пишем саму команду, затем имя файла, строчками ниже наш код.


Оптимизируем вывод


Добавим цвета
Если вы часто делитесь ноутбуками и хотите обозначить какую-то часть кода с помощью алерта или заметки, то в Jupyter есть возможность создавать ячейки с цветовыми схемами. Цвет ячейки зависит от типа указанного предупреждения. Просто добавьте любой или все следующие коды в ячейку, которую нужно выделить:


Заставляем Jupyter показывать полный вывод результатов.
По умолчанию Jupyter выводит только последний результат группы вычислений. А если хотим видеть все? Можно конечно использовать и команду display. Но есть и другой вариант.
Перед блоком с вычислениями пишем:И теперь нам выдаст все результаты:

Чтобы вернуть в исходный режим меняем параметр «all» на «last_expr»
Hotkeys

Второй важный hotkey — если вы часто используете функции в коде. Написание функции требует задавать табуляцию. Но, что делать, если код был написан plain и теперь вы хотите обернуть его в виде функции? Я раньше ставил tab перед каждой строчкой, пока не узнал волшебный hotkey:
CTRL ] — добавить отступ. CTRL [ — убрать отступ
И, наверное, два самых частых хоткея, который я использую CTRL Z и Z. Позволяют откатить обратно изменения в коде. Случайно удалили часть кода в ячейке?Используйте CTRL Z и он вернет все обратно. А если удалили всю ячейку? Для такого случая используйте хоткей просто Z
А полный список горячих клавиш можно посмотреть, зайдя в меню Help, или просто вынести курсор из ячейки и нажать H