How to Make Gradient Text in Illustrator
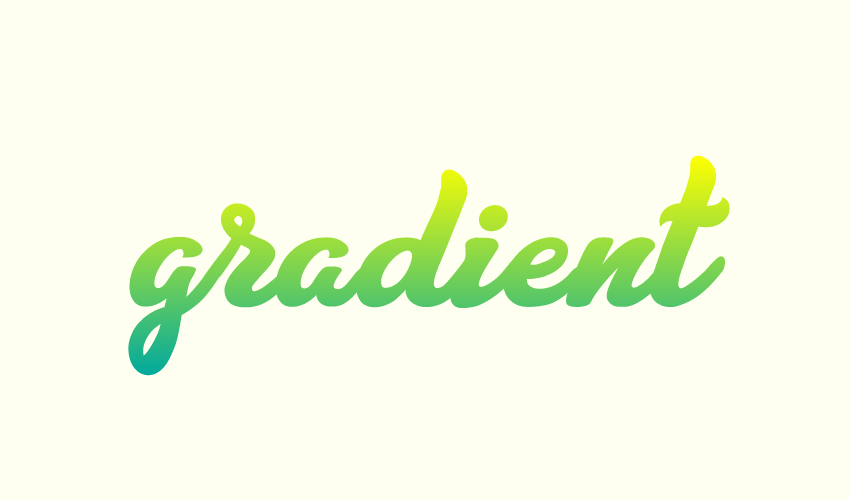
 What You’ll Be Creating
In the following steps, you will learn how to add a gradient to text in Illustrator using two different methods.
What You’ll Learn in This Gradient Text Tutorial
- How to add a gradient to text in Illustrator via a non-destructive fill
- How to add a gradient to text in Illustrator via a destructive fill
- How to apply a gradient to a text outline in Illustrator
For more inspiration on how to adjust or improve your final Illustrator gradient text, you can find plenty of resources at GraphicRiver.
Follow along with us over on our Envato Tuts+ YouTube channel:
What You Will Need
You will need the following resource in order to learn how to apply a gradient to text in Illustrator:
- Letter Craft font
1. How to Add a Gradient to Text in Illustrator (Non-Destructive Fill)
Step 1
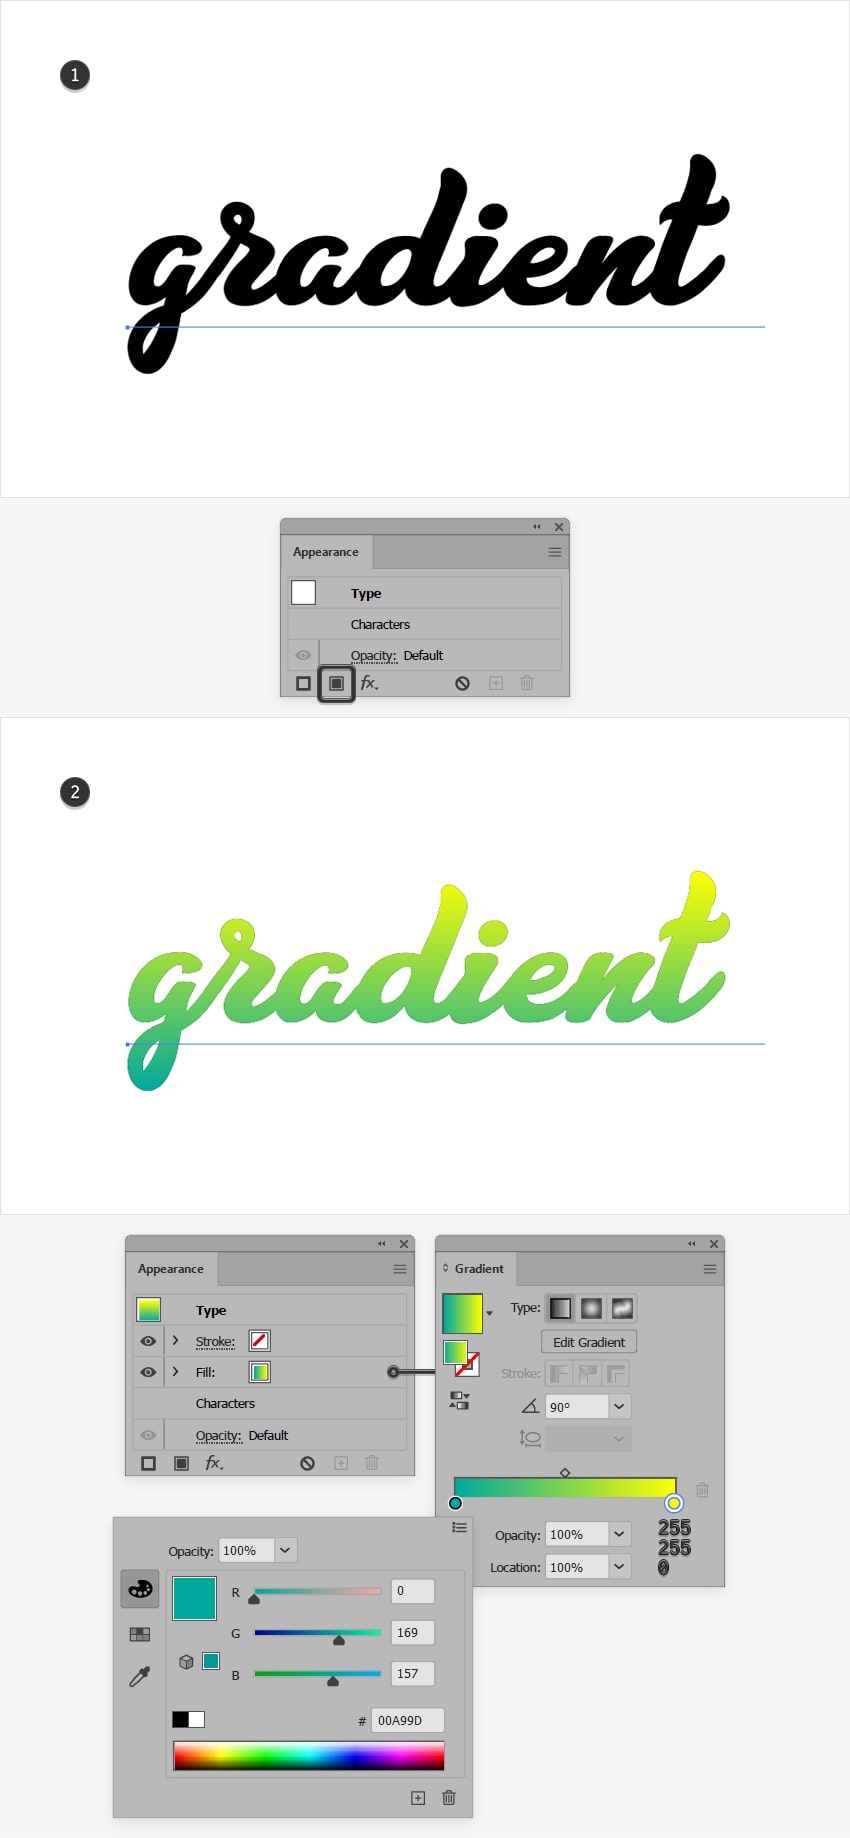
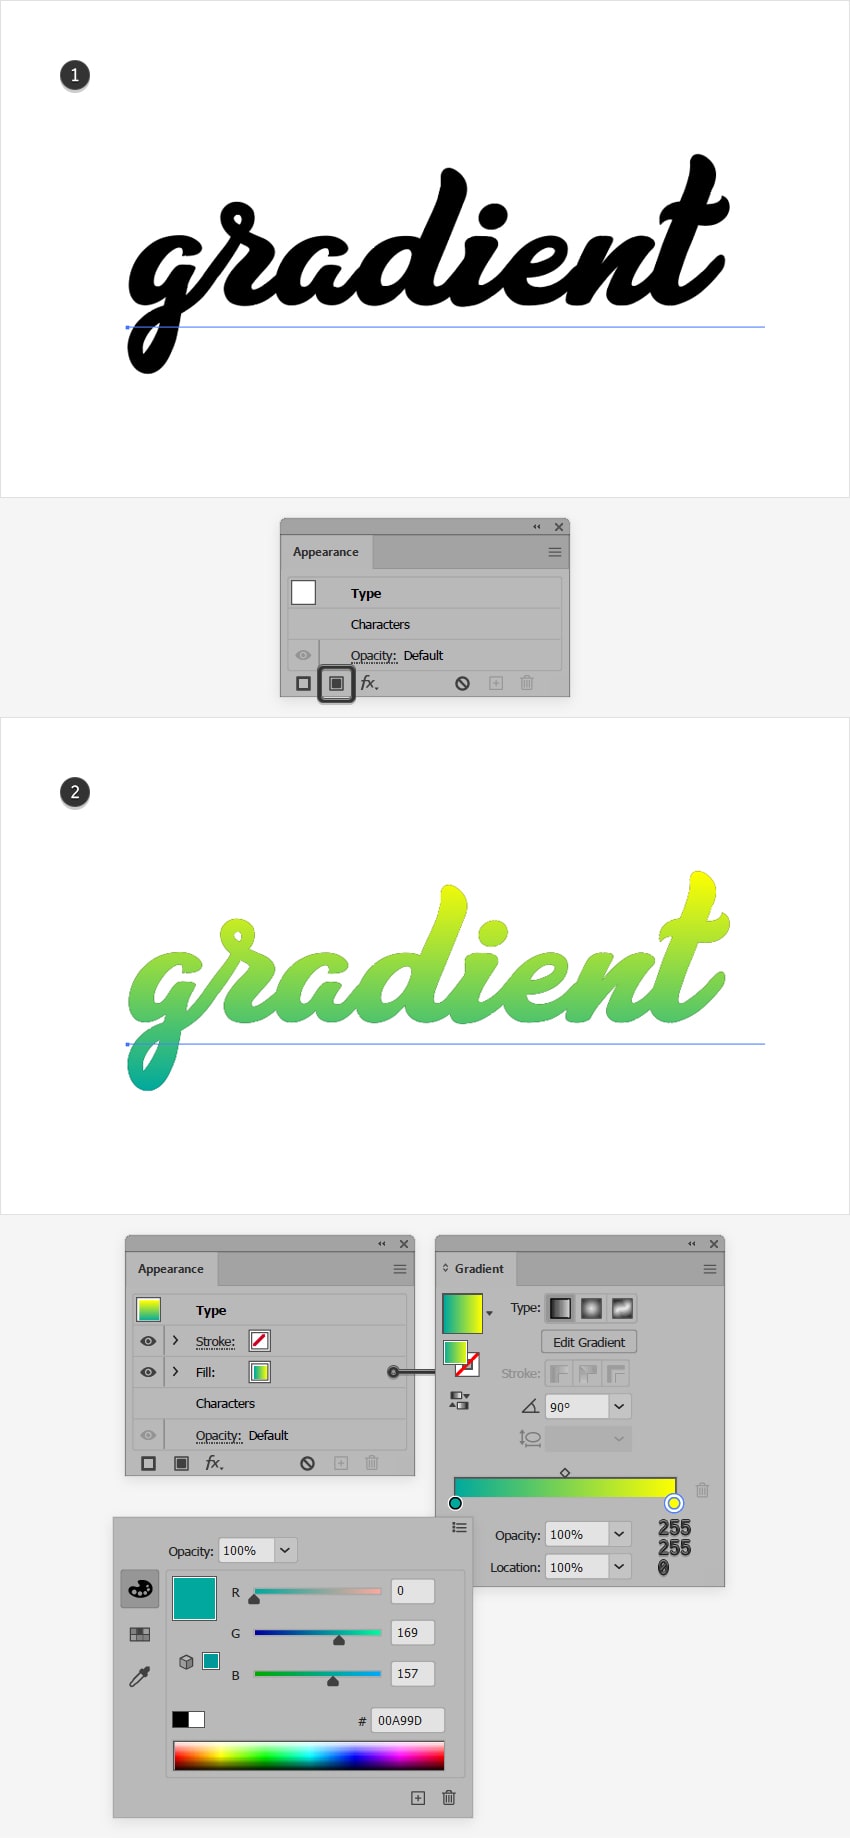
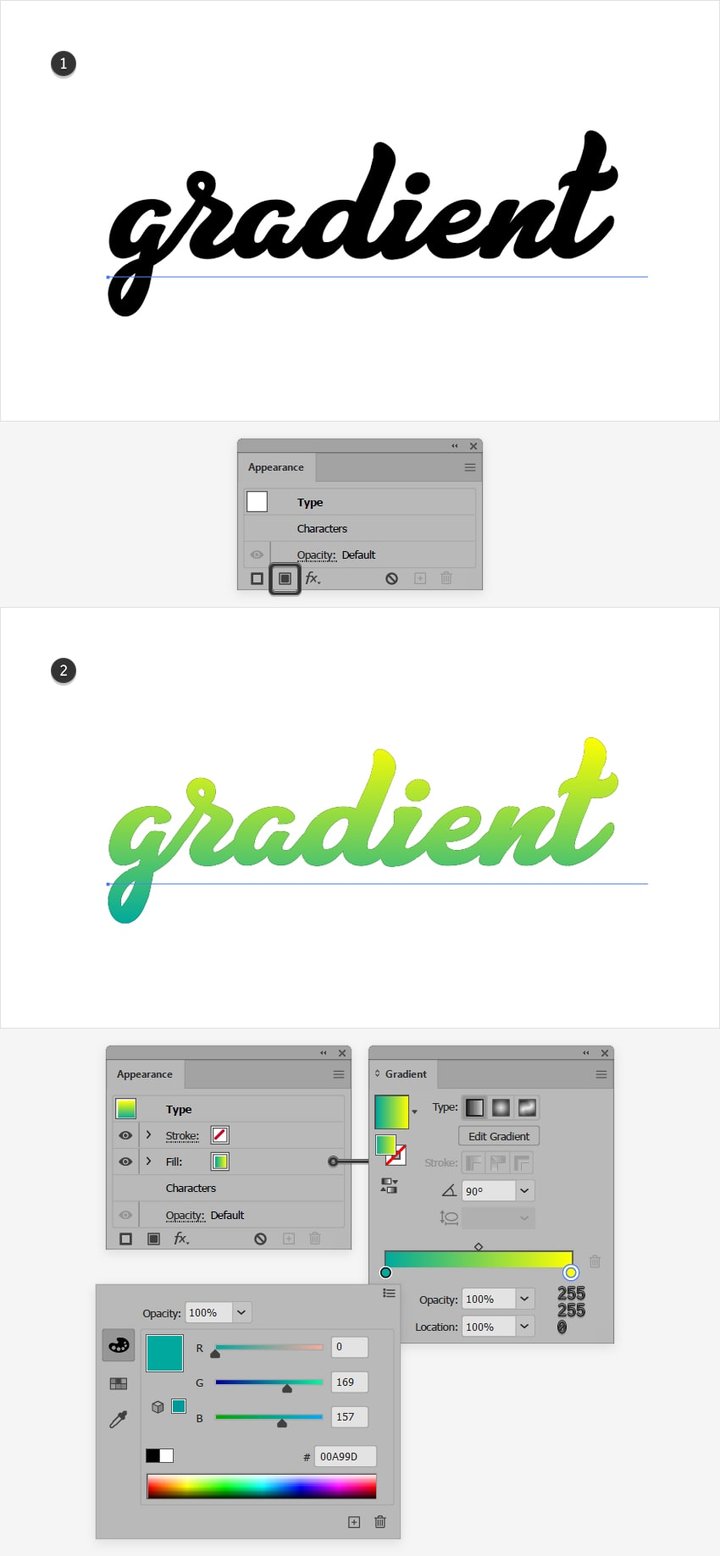
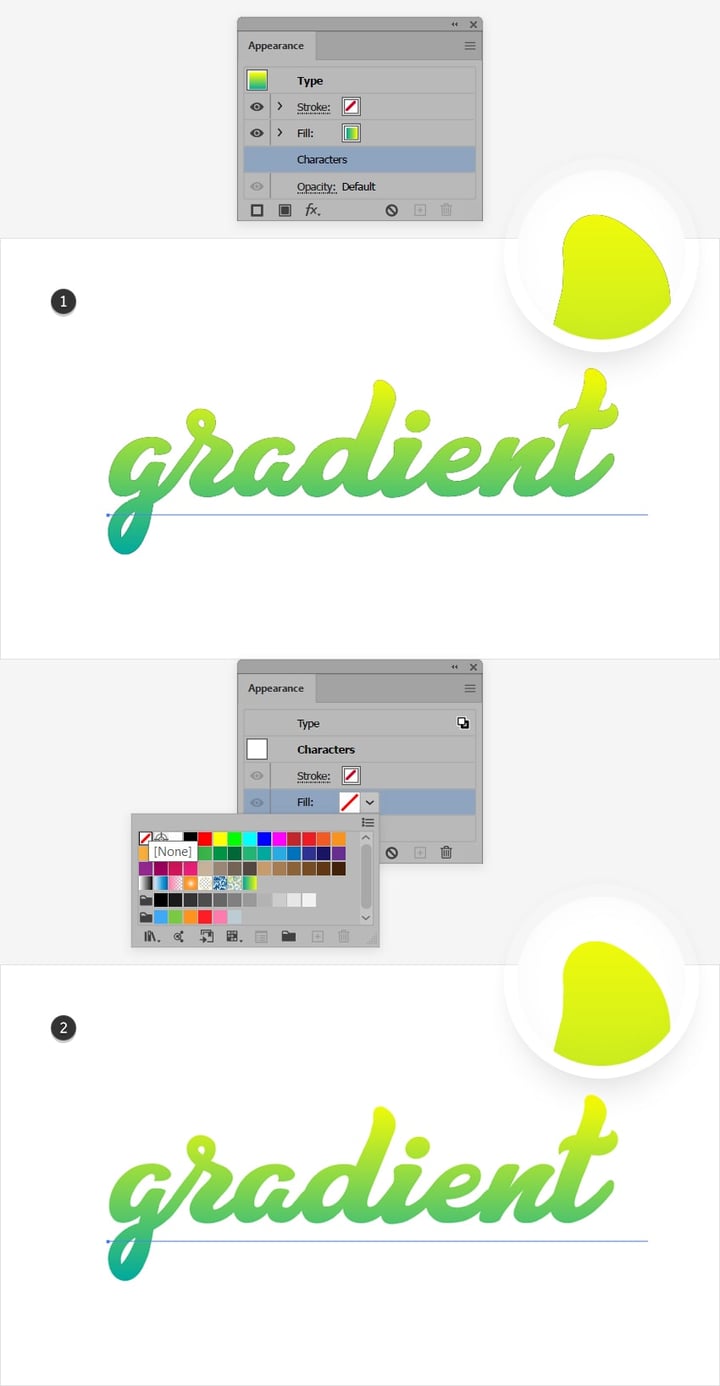
There are two methods that you can use to apply a gradient to text in Illustrator. For the first method, select your text and go to the Appearance panel (Window > Appearance). Click the Add New Fill button and make sure that the newly added fill stays selected.
Move to the Gradient panel (Window > Gradient) and click the gradient thumbnail or the gradient slider to apply a gradient across all text in Illustrator. Once you’ve applied it, you can edit the gradient or the text as you wish.
Step 2
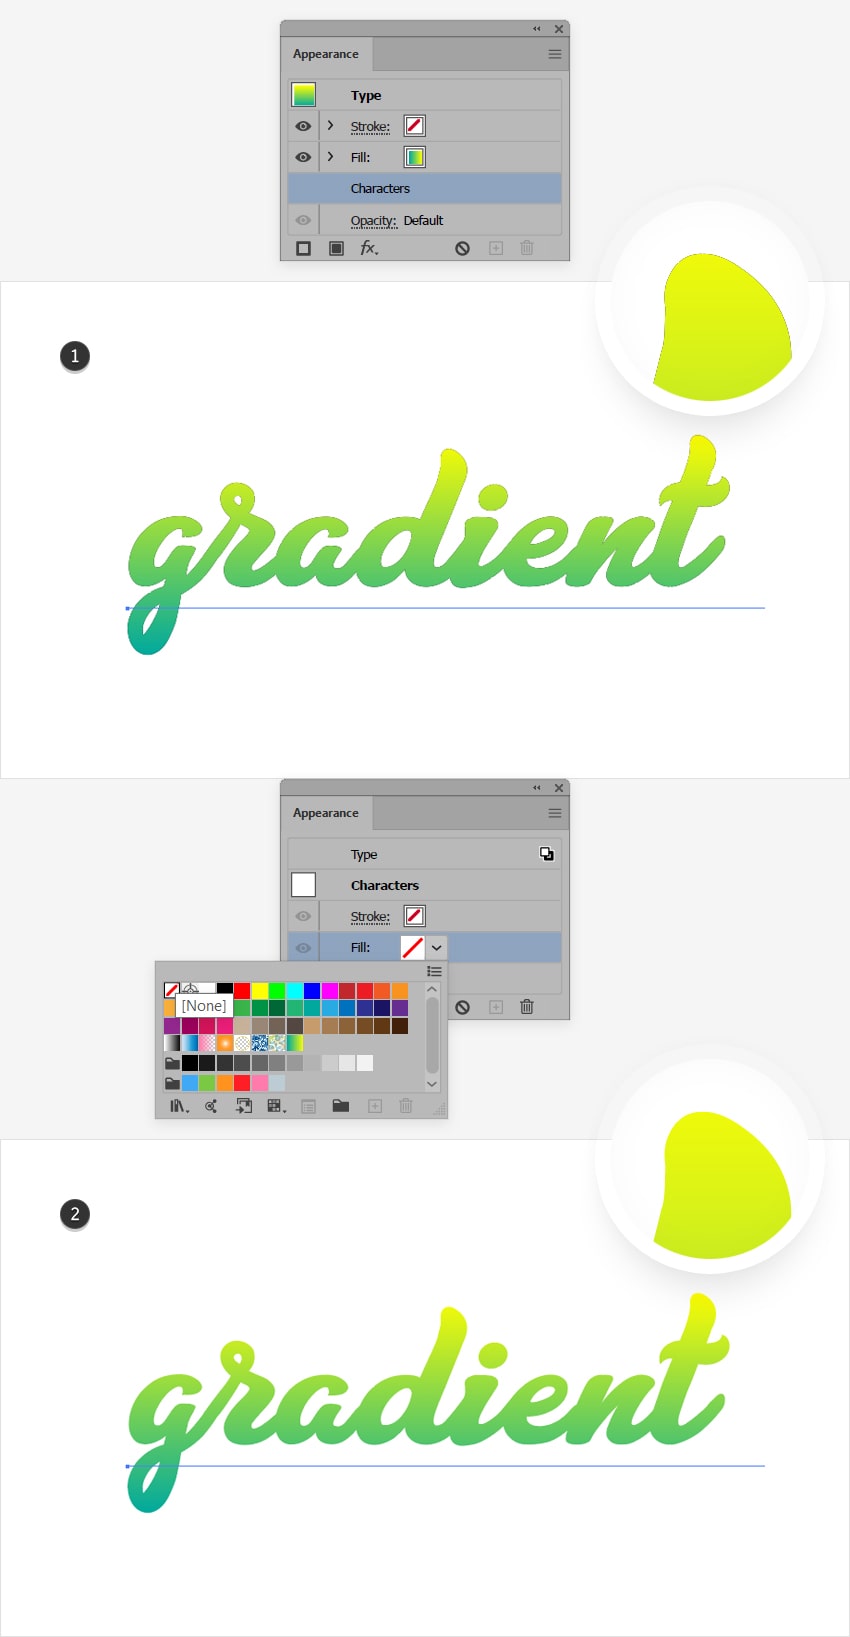
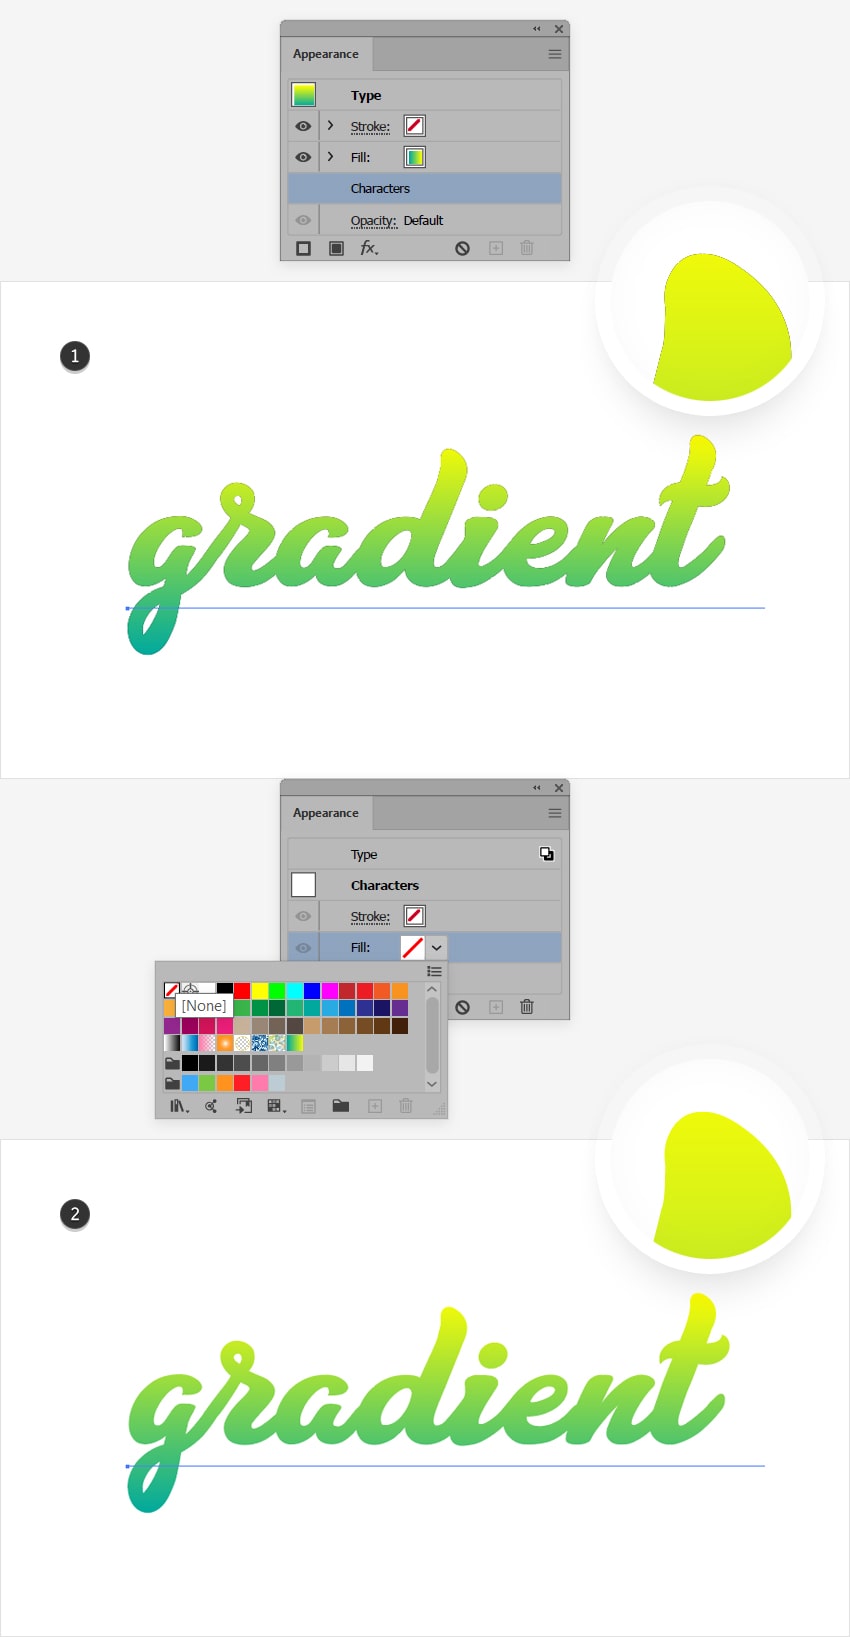
Take a closer look at the text, and you’ll notice a subtle pixelated outline. This happens because of that original text color which still lies underneath your gradient.
To fix this issue, all you have to do is remove that color. Go to the Appearance panel and double-click the Character button to access the text settings. Click the Fill color wheel and remove the color using that [None] swatch. To return to the Appearance settings, click the Type button.
2. How to Add a Gradient to Text in Illustrator (Destructive Fill)
Step 1
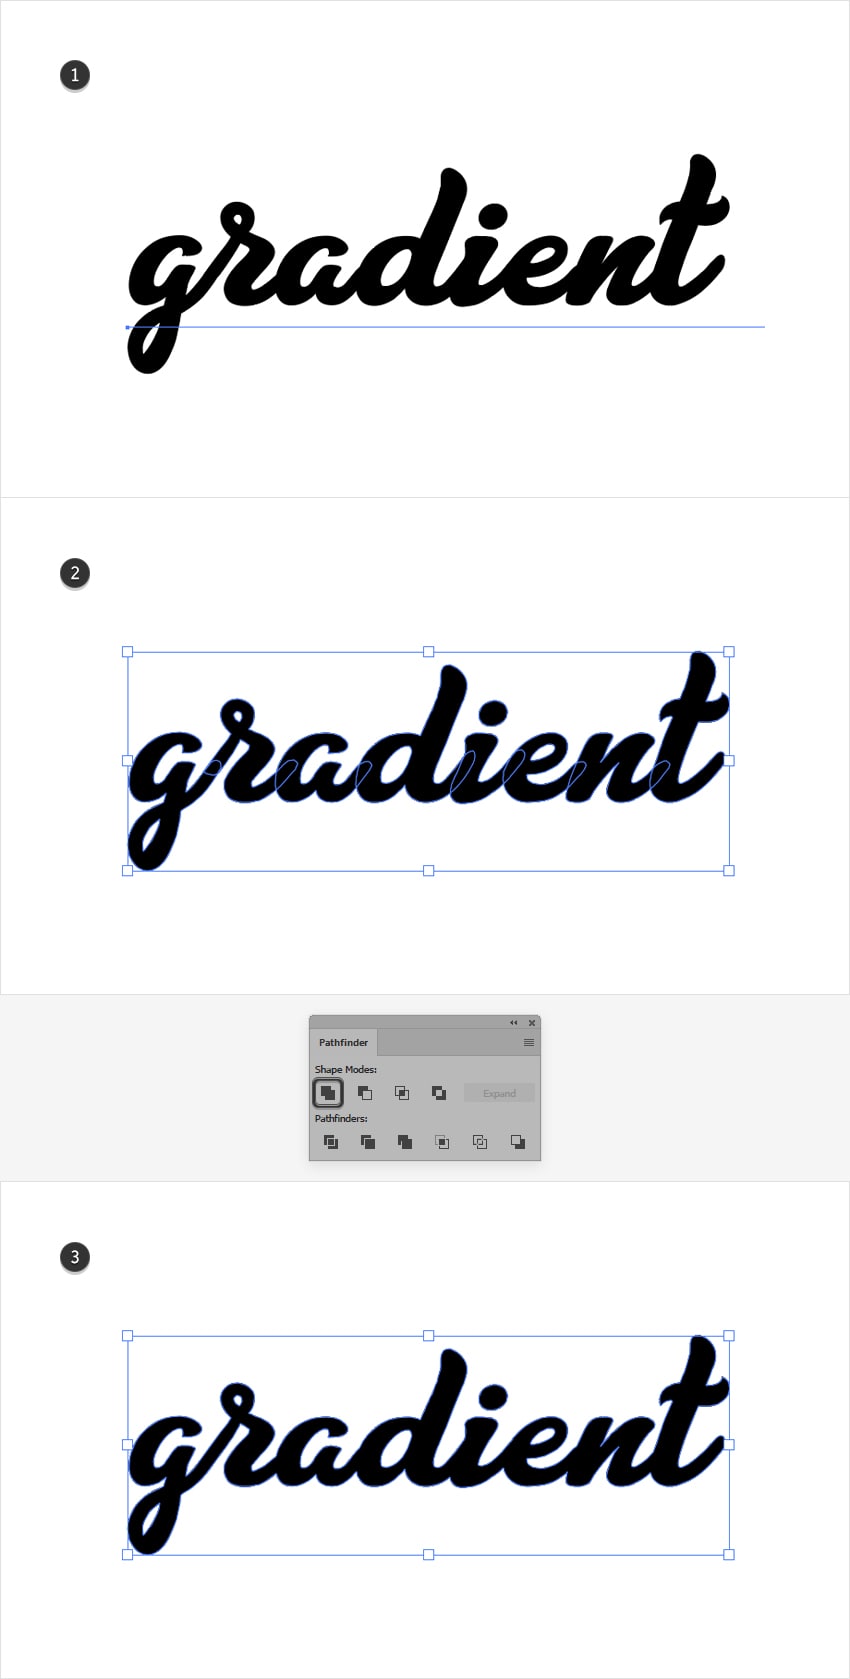
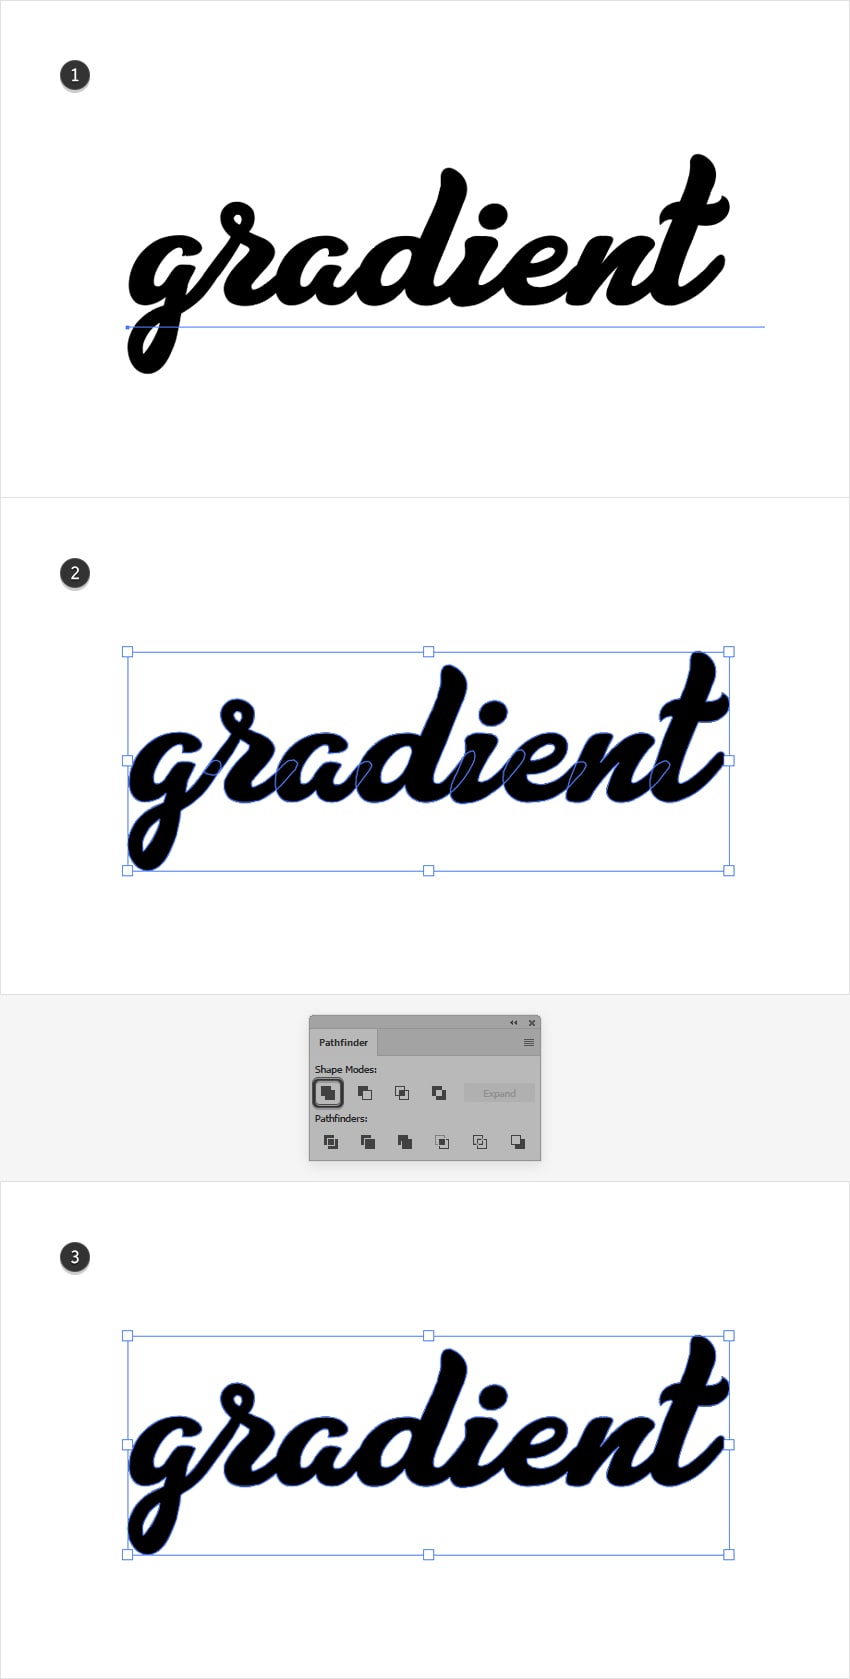
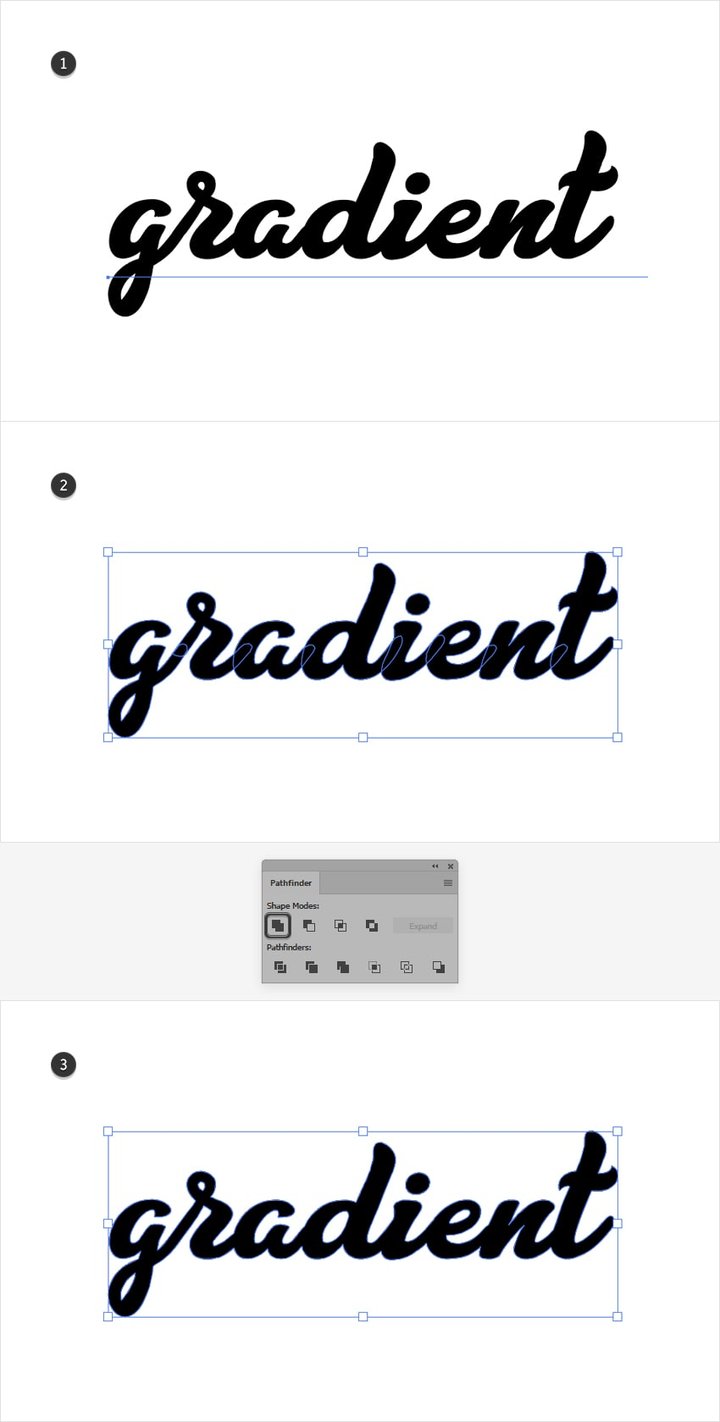
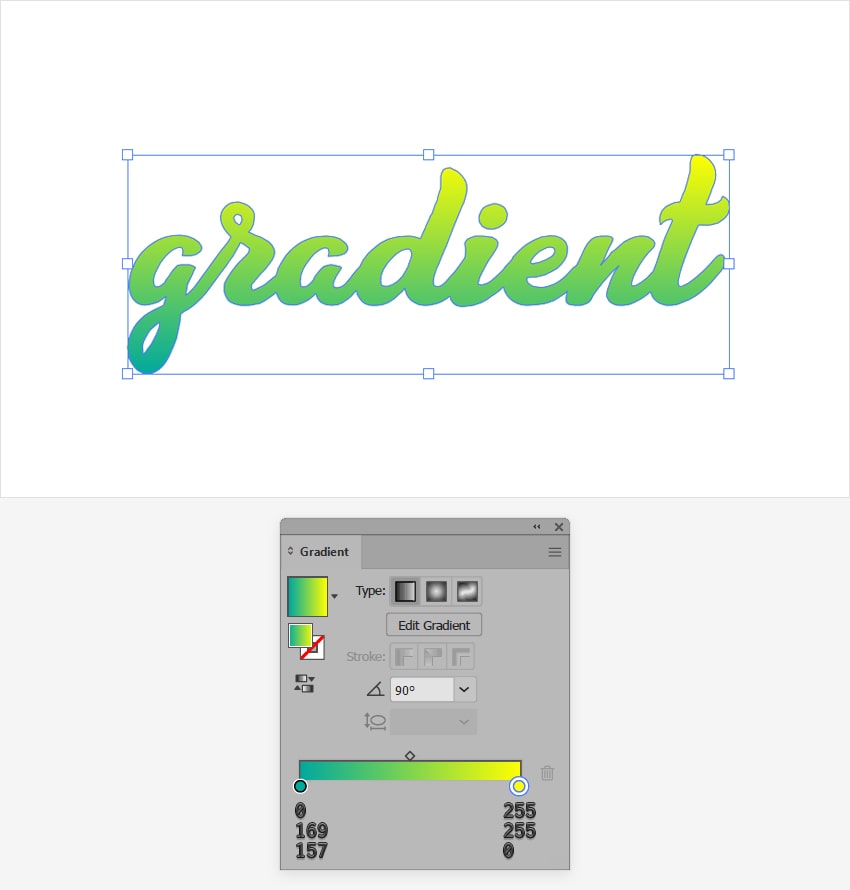
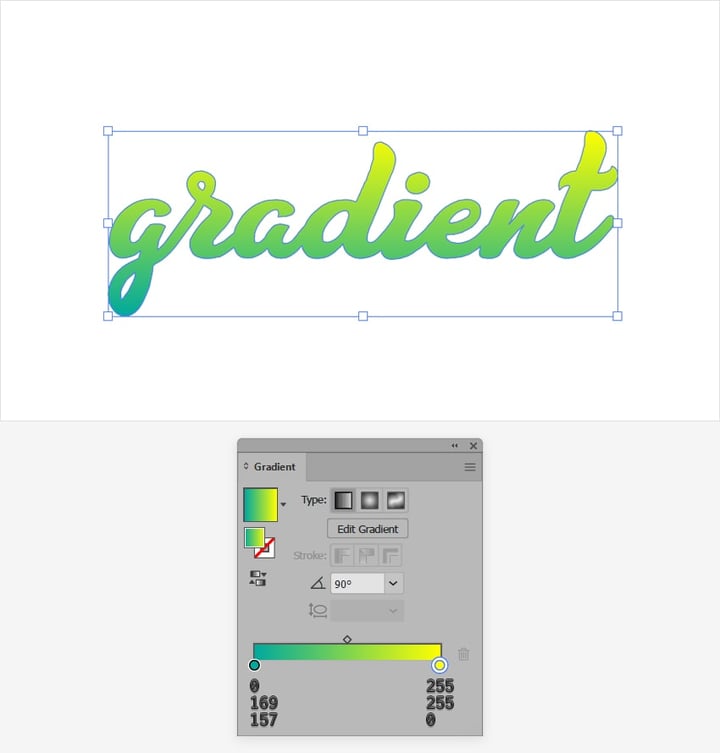
For the second method, select your text and go to Type > Create Outlines to turn the text into editable vector shapes. Now, you can apply a gradient to the resulting shapes, but the gradient will be applied separately, on each letter shape.
To apply a uniform gradient on the entire text, you need to turn your group into one vector shape. Open the Pathfinder panel and click the Unite button, and then turn the resulting shapes into a compound path (Object > Compound Path > Make or Control-8).
Step 2
With your compound path selected, move to the Gradient panel (Window > Gradient) and apply a gradient across all the text in Illustrator. Once you’ve applied it, you can edit the gradient as you wish, but not the text.

3. How to Apply a Gradient Outline to Text in Illustrator
Step 1
You can also apply a gradient outline to your text in Illustrator.
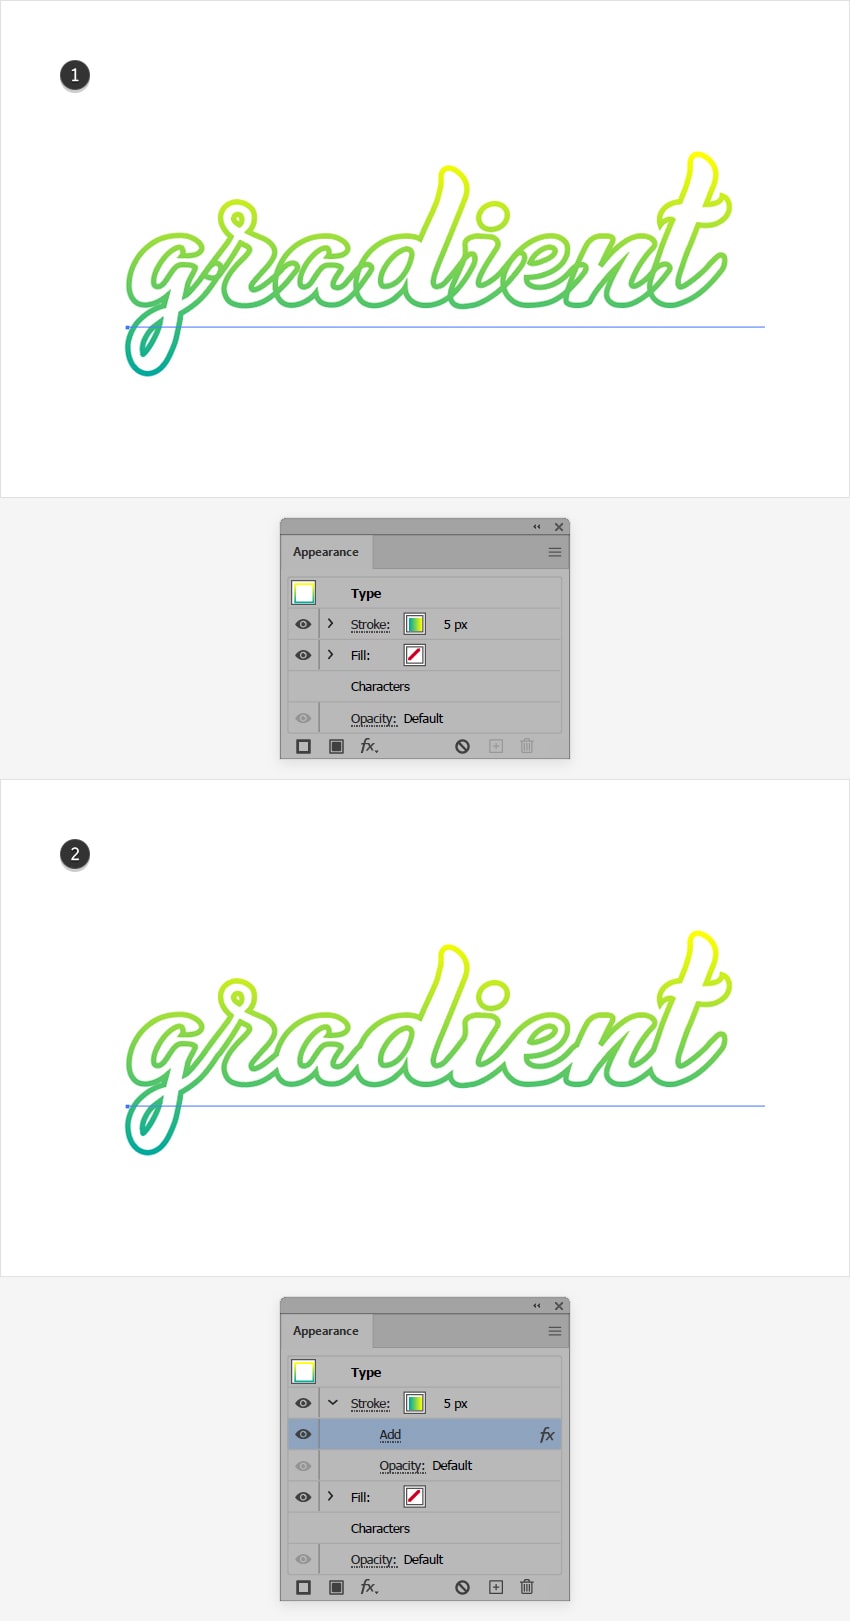
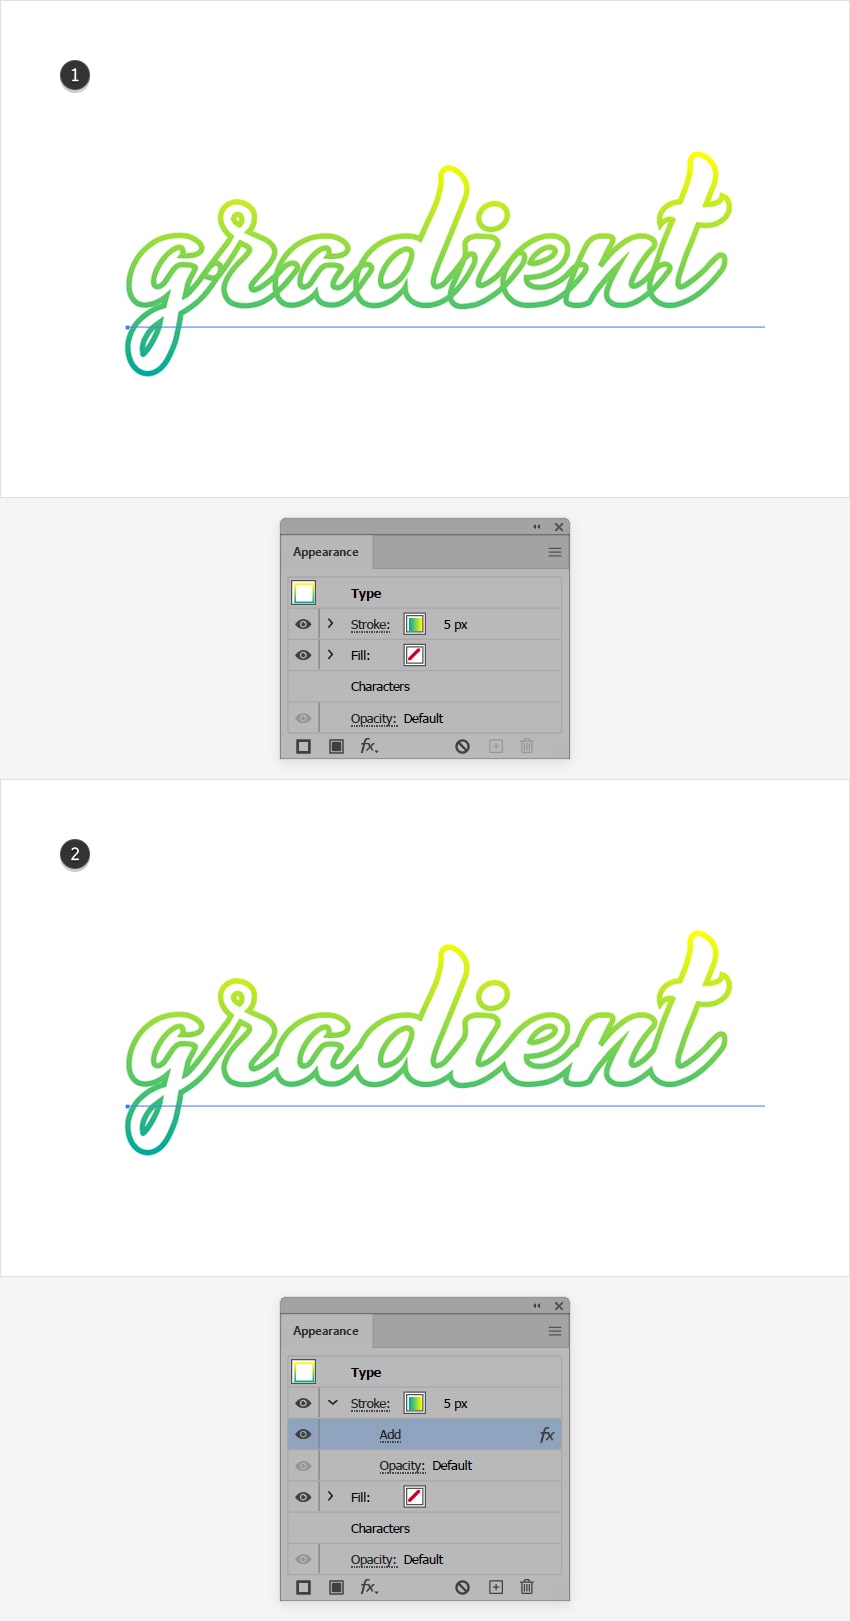
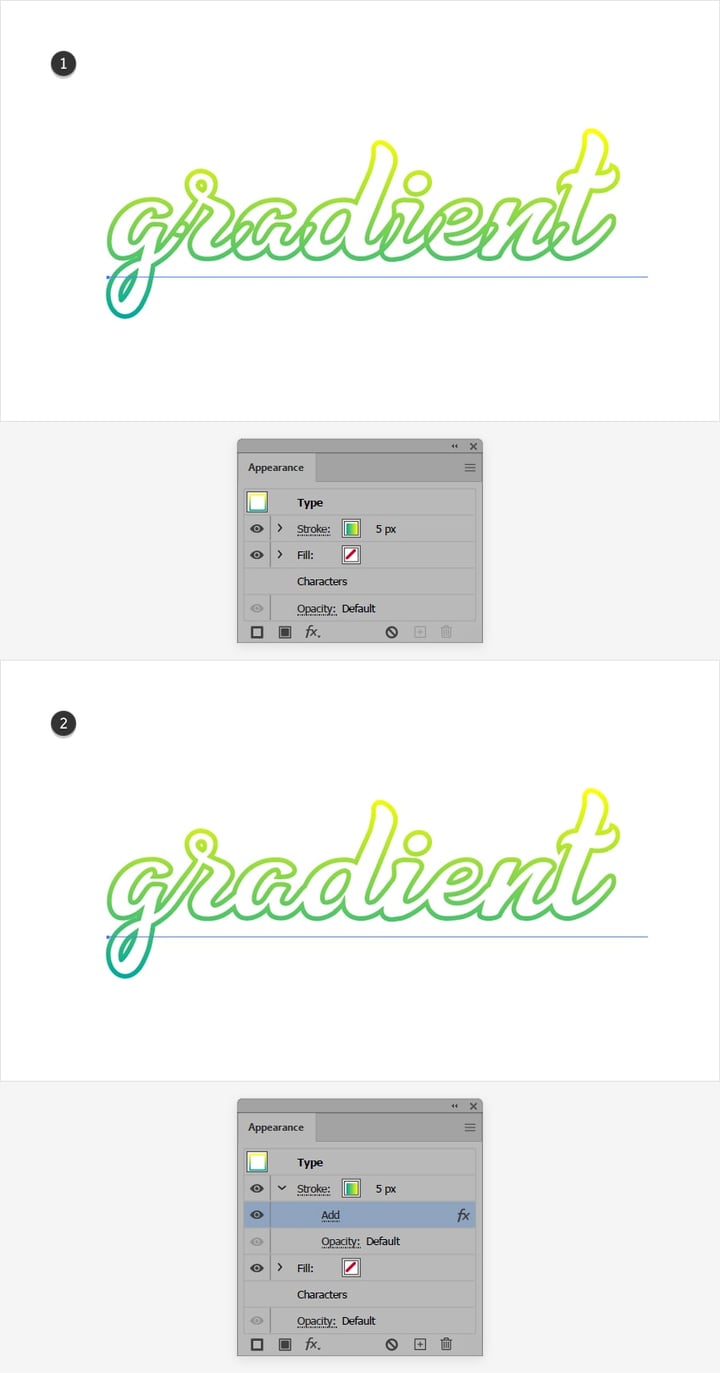
If you used the first technique to apply a gradient to text in Illustrator, select that text and simply hit the Shift-X keyboard shortcut to switch the Fill and Stroke attributes in the Appearance panel. Increase the stroke weight to make the outline thicker.
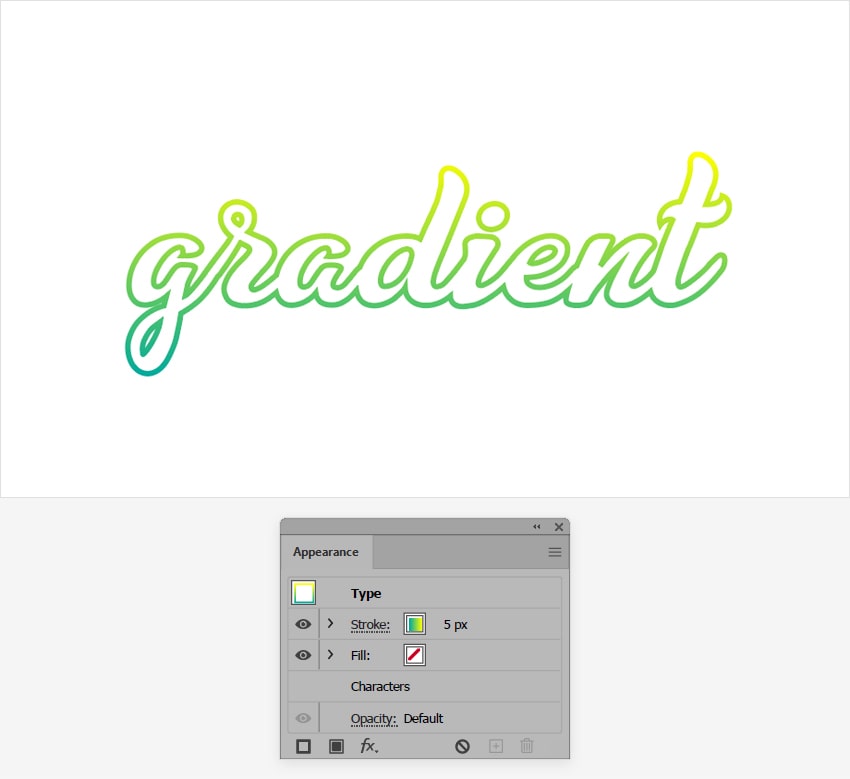
You might have noticed that the outline is overlapping at some points. This simply happens because Illustrator applies a stroke to each character. To fix this issue and apply the outline to the entire text, select the Stroke from the Appearance panel and go to Effect > Pathfinder > Add.
Step 2
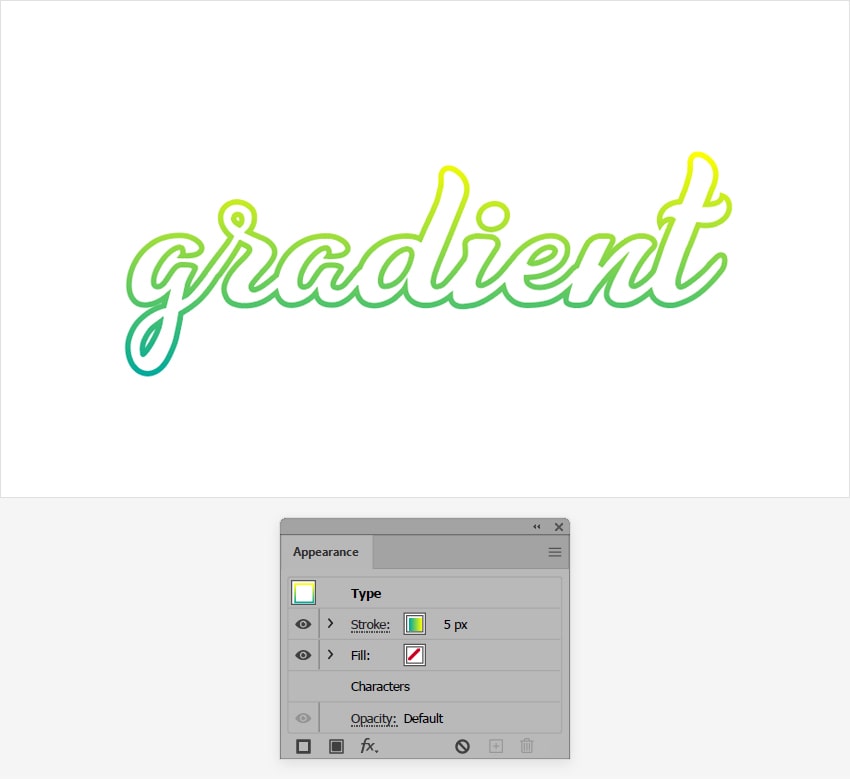
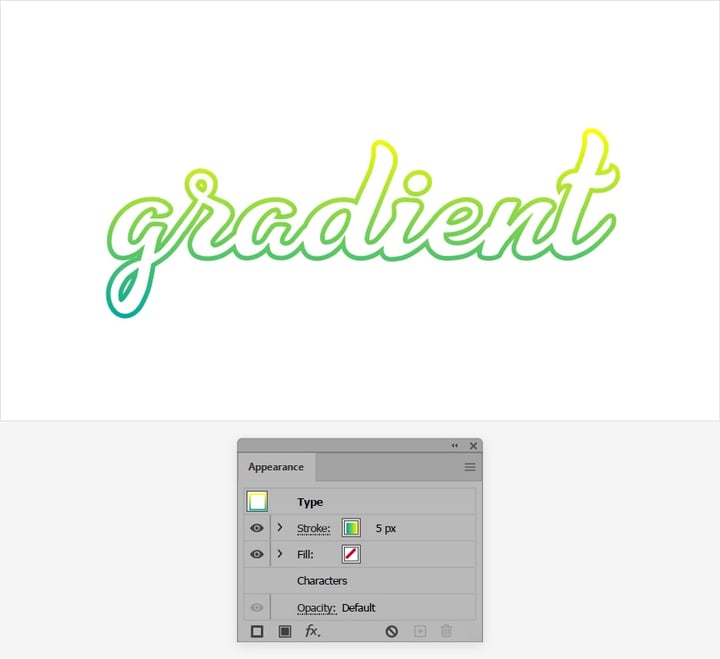
If you used the second technique to apply a gradient to text in Illustrator, select that compound path and use that same Shift-X keyboard shortcut to switch the Fill and Stroke attributes in the Appearance panel.
Congratulations! You’re Done!
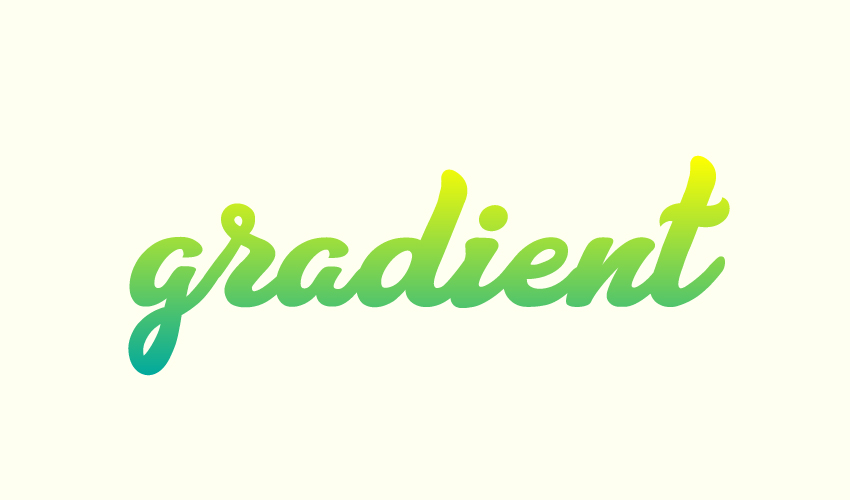
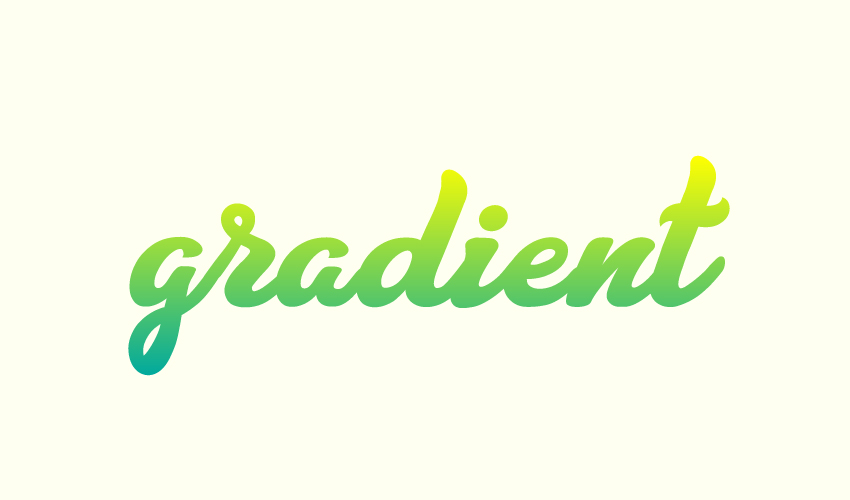
Here’s how it should look. Now that you know how to add a gradient to a font in Illustrator, you can use these techniques in your future projects. Don’t hesitate to share your final result in the comments section.
You can find some great sources of inspiration at GraphicRiver, with interesting solutions to improve any Illustrator gradient text.

Want to Learn More?
We have loads of tutorials on Envato Tuts+, from beginner to intermediate level. Take a look!
How to Add Gradient to Text in Adobe Illustrator
My name is Elianna. I have a Bachelor of Fine Arts in Illustration and have been using Adobe Illustrator for over six years. I use Illustrator to create posters, illustrators, business cards, and more.
In this post, I will show you how to add gradients to text in Adobe Illustrator using outlines and with the Gradient tool and Appearance > Fill.
Let’s get into it!
Table of Contents
Key Takeaways
- Right-click your text and select Create Outlines, or use the keyboard shortcut Shift + Ctrl + O to create text outlines.
- While adding gradients to outlines in Illustrator is faster, you will lose the ability to edit your text.
- To add gradients to text in Adobe Illustrator, use the Swatches, Appearance, and Gradient panels
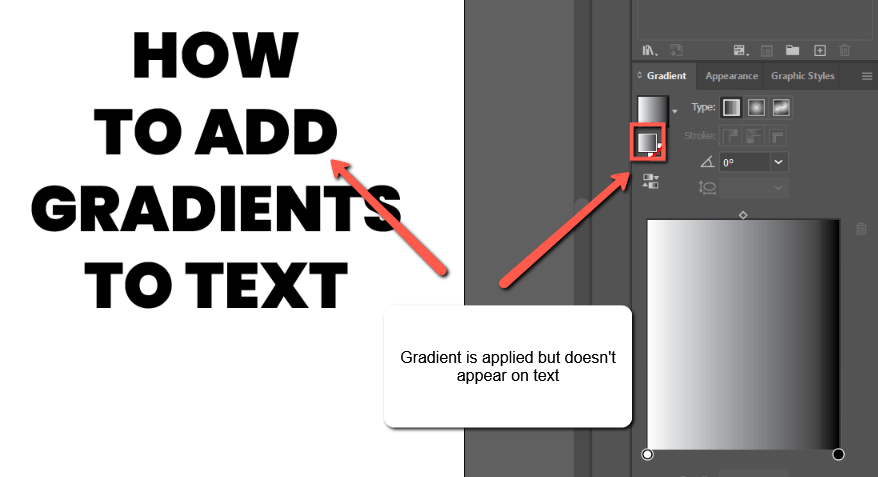
- When you first apply a gradient to text in Illustrator, it will not show on your text but will show in the swatches menu. While this may be confusing, you can make your gradient appear with a few additional steps.
Where is the Gradient Tool in Adobe Illustrator
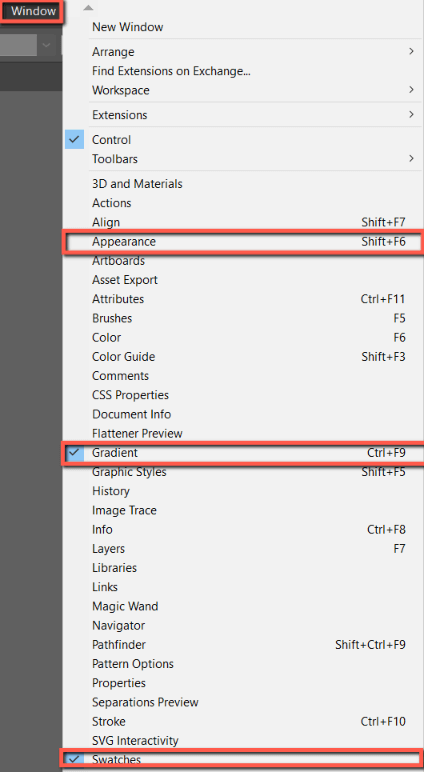
You can find and apply gradient colors using different panels including the Gradient, Swatches, and Appearance panels. While you can access all of these panels and tools while following the tutorial, it will be much easier if these panels are opened before starting.
You can open the Gradient, Swatches, and Appearance panels in the Window dropdown menu.
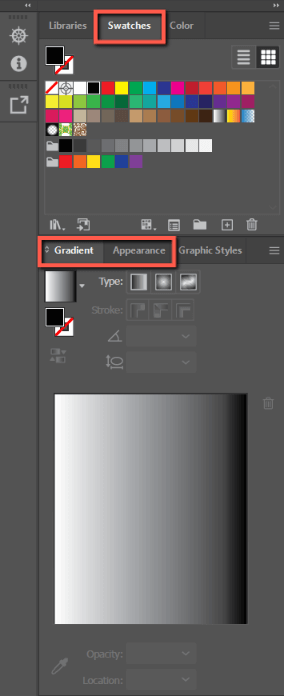
Here is how I have set up my workspace for this tutorial:
Method 1: Adding Gradients to Outlined Text in Adobe Illustrator
The fastest way to add a gradient to text in Adobe Illustrator is by creating outlines of your text, and then applying a gradient. Here’s how:
Important Note: Before you try this method note that you will lose the ability to edit your text. If you would like to add a gradient to the text so that it stays editable, skip to Method 2.
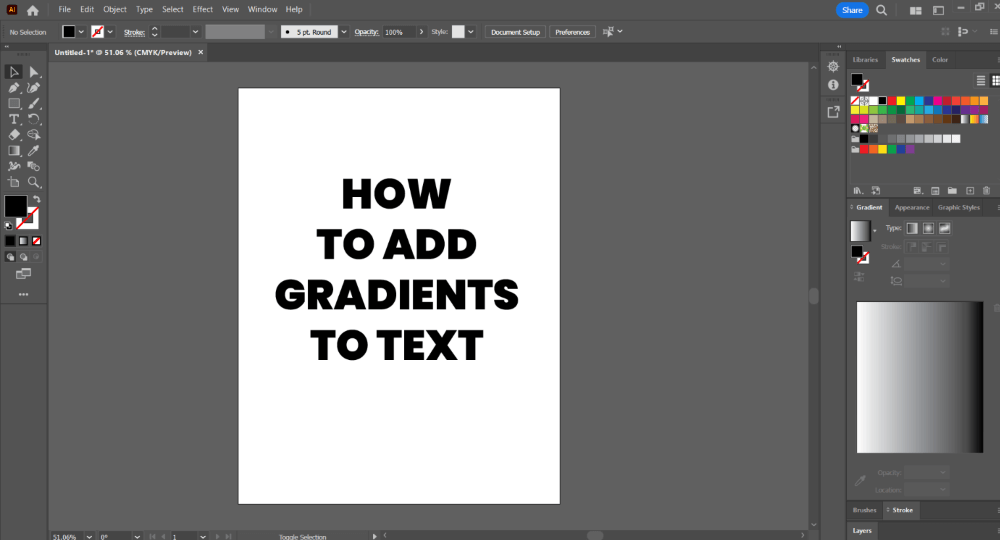
Step 1: Open your Adobe Illustrator document with the text you want to add a gradient to.
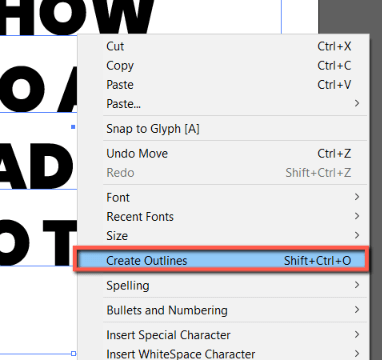
Step 2: Click to select your text, right-click, and select Create Outlines, or use the keyboard shortcut Shift + Ctrl/Command + O.
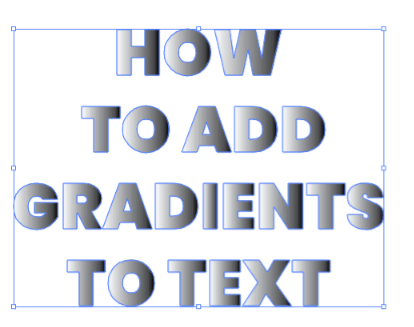
Step 3: With the outlined text selected, click anywhere on the Gradient Slider to add the gradient to text.
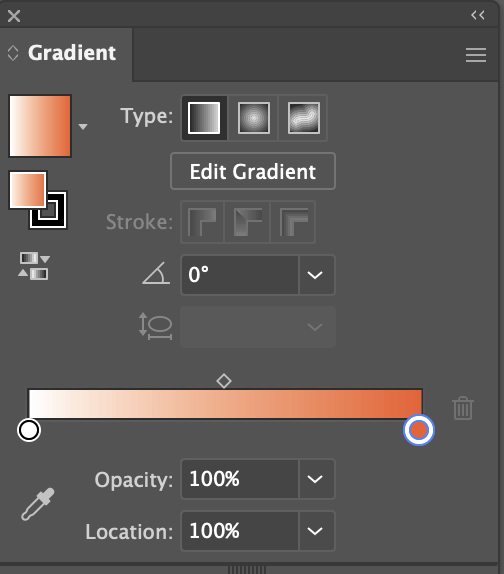
If you don’t want the default black-and-white gradient, you can double-click on the gradient slider to change the color.
Method 2: Adding Gradients to Live Text in Adobe Illustrator
While adding gradients to text outlines can appear easier and save time, adding gradients to text that is editable can simplify your design process in the case of edits. While it takes a few more steps and can be initially confusing, it is worth the effort. Here’s how to do it:
Step 1: Select your live text.
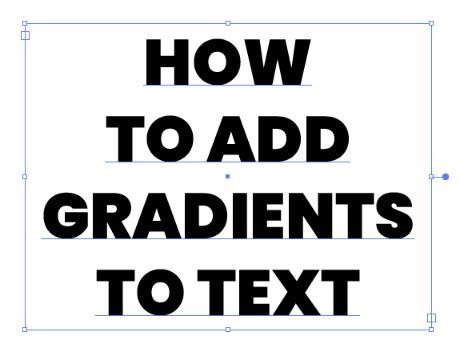
Step 2: Click anywhere in the Gradient Slider.
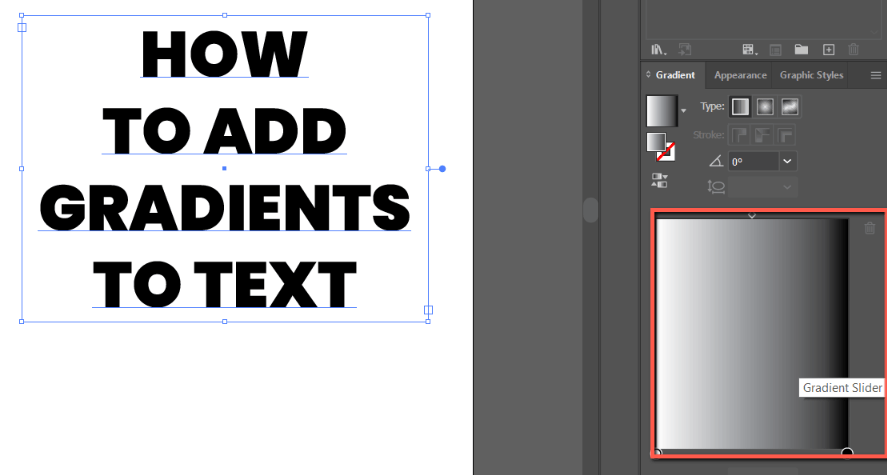
Step 3: You will now notice that a gradient has been applied to your text in the Gradient panel, but you are not able to see it on your text. Here’s how to fix it.
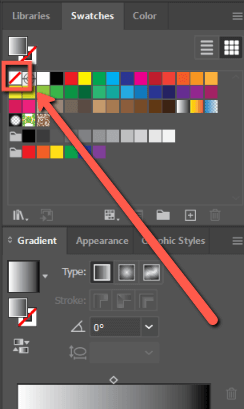
Step 4: Select your text and hide the gradient on your text by clicking on the None (/) swatch in the Swatches panel.
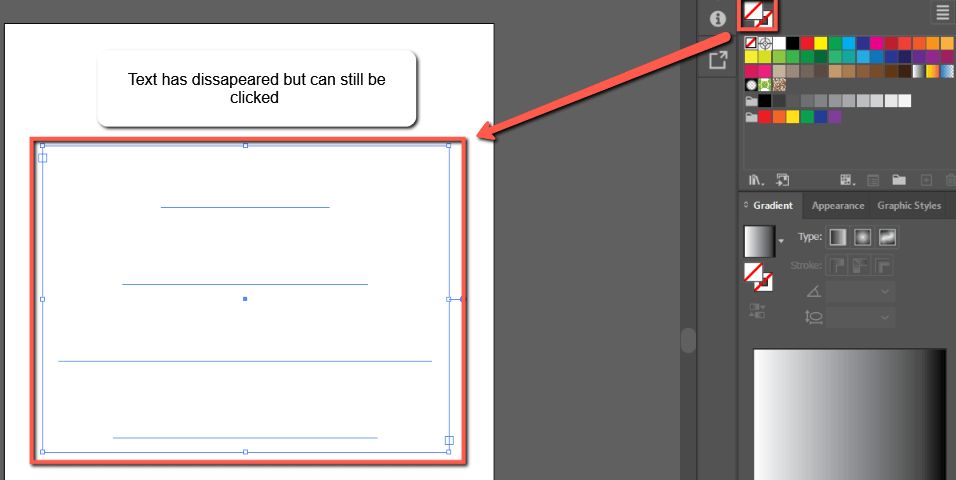
Step 5: Your text will now disappear from sight, but if you hover over it, it will still be there. Click on it.
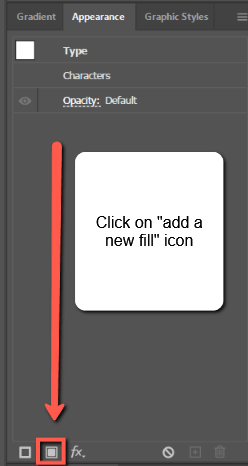
Step 6: Go to the Appearance panel and click Add a New Fill.
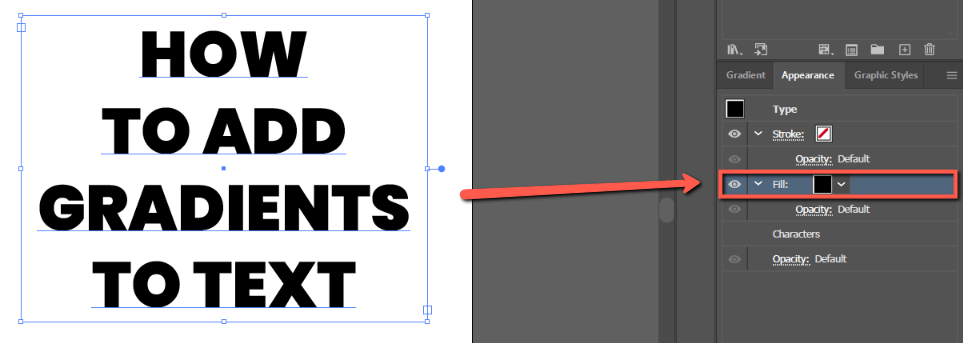
Change the fill color to Black.
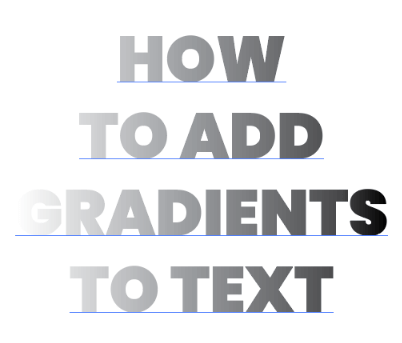
Step 7: Go to the Gradient panel, click on the gradient slider, and choose gradient colors for your text.
For a more in-depth look at how to create this effect, watch this video:
Text gradient won’t show in Adobe Illustrator?
When you first apply a gradient to text it will now show, which can be confusing. To fix this, go to the Appearance panel and add a new fill. Then click anywhere on the gradient slider. Your text gradient will now appear.
Final Thoughts
Adding gradients to text is easy in Adobe Illustrator using Create Outlines (Shift + Ctrl/Command + O) and a combination of the Gradient, Swatches, and Appearance panels.
Knowing the differences between the two methods and how they work with your design process is essential. Remember, if you create outlines of your text, you will not be able to edit it later.
What Method did you use to add gradients to your text in Adobe Illustrator? Tell me in the comments below!
Как создать градиентную обводку текста в иллюстраторе
Share this.
В этом уроке мы покажем как легко и быстро создать градиентную обводку для текста.
Используя инструмент «Текст» (Т) пишем любой текст с которым будем работать.

Удаляем обводку и заливку в нашем тексте.

В панели оформления создаем новую заливку два раза.

Выбираем нижнюю заливку и переходим в панель эффектов. Эффекты > Контур > Создать параллельный контур. Устанавливаем настройки на свое усмотрение.
Градиенты
Узнайте, как создавать градиенты различных типов в Illustrator.
Градиент — это градуированный переход между двумя или более цветами или двумя оттенками одного цвета. Градиенты можно использовать для создания наложения цветов, добавления объема к векторным объектам, а также для добавления света и тени к иллюстрациям.

В Illustrator можно создавать, применять и изменять градиент с помощью панели «Градиент», инструмента «Градиент» или панели управления.
Типы градиентов
В Illustrator можно использовать следующие три типа градиентов:
- Линейный
Этот градиент можно использовать для перехода цветов от одной точки до другой по прямой линии.
- Радиальный
Этот градиент можно использовать для перехода цветов от одной точки до другой в виде кругового узора.
- Произвольный
Этот градиент можно использовать для создания градуированного перехода между точками цвета на форме в упорядоченной или произвольной последовательности, чтобы переход выглядел ровно и естественно. Произвольный градиент может применяться в двух режимах:- Точки. Этот режим используется для затенения области вокруг точки цвета.
- Линии. Этот режим используется для затенения области вокруг линии.
Точка цвета — это точка на аннотаторе градиента (для линейных или радиальных градиентов) или на объекте (для произвольного градиента), которая управляет цветом градиента. Можно изменить цвет точки цвета для настройки градиента

A. Линейный градиент B. Радиальный градиент C. Произвольный градиент (точки)
Линейные и радиальные градиенты можно применять на заливке и обводке объекта. Произвольный градиент можно применять только для заливки объекта.
Инструмент «Градиент» и панель «Градиент»
Для создания и изменения градиента используется инструмент «Градиент» или панель «Градиент». Используйте инструмент «Градиент», если необходимо создать или изменить градиенты непосредственно на иллюстрации и просмотреть изменения в реальном времени.
Чтобы открыть инструмент «Градиент», нажмите инструмент «Градиент» на панели инструментов.
Попробуйте в приложении
Создавайте наложения цветов за несколько простых шагов.Для открытия панели «Градиент» выполните одно из следующих действий:
- Выберите «Окно > Градиент».
- На панели управления дважды щелкните инструмент «Градиент».
Панель «Градиент» откроется на холсте.

A. Активный или ранее использованный градиент B. Раскрывающийся список существующих градиентов C. Цвет заливки D. Цвет обводки E. Обратный градиент F. Аннотатор градиента G. Точка цвета H. Средняя точка I. Палитра цветов J. Отображение и скрытие параметров K. Типы градиентов L. Типы обводок M. Угол N. Пропорции O. Удалить точку P. Непрозрачность Q. Положение R. Заливка или обводка (цветом) S. Точка цвета T. Распределение U. Произвольный градиент V. Режимы произвольного градиента
Инструмент «Градиент» и панель «Градиент» имеют множество одинаковых параметров. Однако некоторые задачи можно выполнить только с помощью инструмента или панели. С помощью инструмента «Градиент» и панели можно задать несколько точек цвета, их расположение и распределение. Можно также указать угол, под которым отображаются цвета, пропорции эллиптического градиента и непрозрачность каждого цвета.
Можно включить функцию рисования и редактирования в реальном времени, чтобы улучшить внешний вид объектов при работе с ними. Чтобы включить эту функцию, выполните следующие действия:
[Windows] Выберите Редактирование > Установки > Производительность > Рисование и редактирование в реальном времени.
[macOS] Выберите Illustrator > Установки > Производительность > Рисование и редактирование в реальном времени.
Аннотатор градиента
Для линейных и радиальных градиентов при нажатии инструмента «Градиент» на панели инструментов на объекте отображается аннотатор градиента. Аннотатор градиента — это шкала, на который отображаются начальная точка, конечная точка, средняя точка, а также две точки цвета для начальной и конечной точек.

A. Аннотатор градиента B. Кольцо из точек C. Наведите курсор, чтобы изменить пропорции D. Курсор поворота E. Точка для изменения размера радиального градиента F. Конечная точка (точка со стрелкой) G. Точка цвета H. Средняя точка I. Выбранная точка цвета J. Центральная точка
Аннотатор градиента можно использовать для изменения угла, положения и области линейного градиента, а также фокусной точки, центральной точки и распределения радиального градиента. После того как в объекте появится аннотатор градиента, можно использовать панель «Градиент» или аннотатор градиента, чтобы добавить новые точки цвета, задать новые цвета для отдельных точек цвета, изменить настройки непрозрачности и перетащить точки цвета в новое расположение.
Чтобы скрыть или отобразить аннотатор градиента, выберите Просмотр > Спрятать градиентный аннотатор или Просмотр > Показать градиентный аннотатор.
Для линейных и радиальных градиентов перетаскивание круглого конца ползунка (начальной точки) приводит к изменению положения центральной точки градиента, а конца со стрелкой (конечной точки) — увеличению или уменьшению диапазона. Если навести курсор на конечную точку, появится курсор поворота, с помощью которого можно изменить угол градиента.
Примечание. Произвольный градиент позволяет размещать точки цвета в любом месте объекта. Поэтому произвольный градиент не требует использования аннотатора градиента.
Применение предварительно заданного градиента
При первом применении инструмента «Градиент» по умолчанию используется Черно-белый градиент. Если градиент применялся ранее, по умолчанию применяется последний использованный градиент.
Кроме того, Illustrator содержит предварительно заданный набор градиентов, которые можно применить с помощью панели «Градиент» или «Образцы». Можно также создать градиент и сохранить его на панели «Образцы» для дальнейшего использования. Чтобы применить предварительно заданный или сохраненный градиент с панели «Градиент», выполните следующие действия:
- Выберите объект на холсте и нажмите раскрывающийся список Градиент на панели «Градиент».
Чтобы применить предварительно заданный градиент из библиотеки образцов, выполните следующие действия: