Как включить Secure Boot в BIOS на Gigabyte и AORUS
Одним из системных требований Windows 11 является наличие безопасной загрузки Secure Boot. Эта функция является частью UEFI и предназначена для проверки запускаемых операционных систем. Secure Boot проверяет цифровую подпись и в случае ошибки блокирует загрузку ОС. Это позволяет защититься от некоторых видов вредоносных программ и контролировать список ОС, которые могут загружаться на компьютере.
После анонса Windows 11 начали интересоваться включением данной опции, чтобы подготовить компьютер к обновлению до новой операционной системы. В этой статье мы расскажем, как включить Secure Boot в BIOS на материнских платах Gigabyte и Gigabyte AORUS.
Для работы Secure Boot диск должен быть в формате GPT. Поэтому, перед включением Secure Boot нужно проверить формат диска и если диск в MBR, то его нужно сконвертировать в GPT. Подробнее:
Процесс включения Secure Boot может сильно отличаться от одной материнской платы к другой. Точную информацию для вашей конкретной материнской платы можно получить в инструкции. Ниже мы рассмотрим несколько типичных вариантов для BIOS на платах Gigabyte и Gigabyte AORUS.
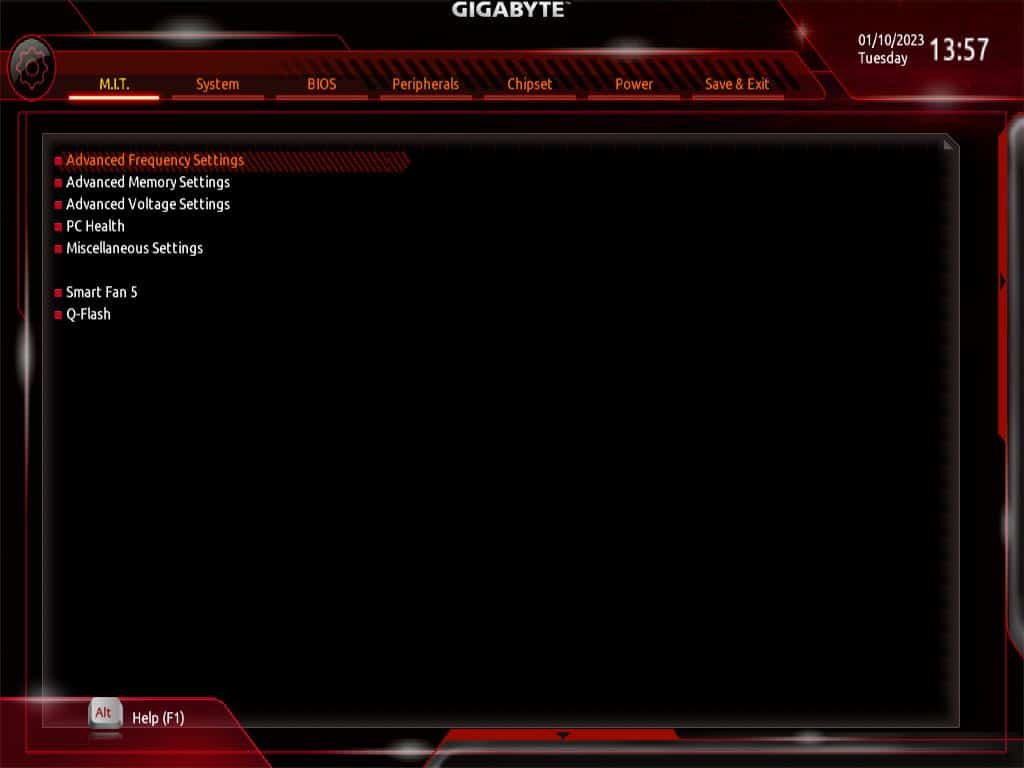
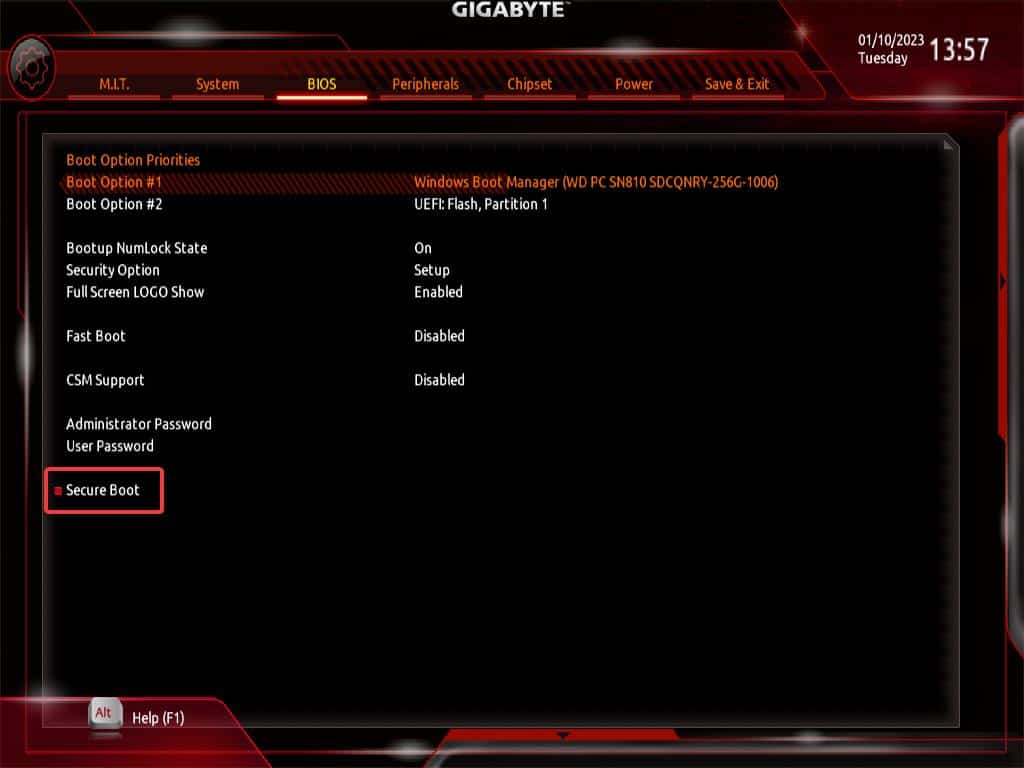
Для того чтобы включить Secure Boot на материнских платах Gigabyte или Gigabyte AORUS нужно зайти в настройки BIOS и открыть раздел « BOOT » или « BIOS ». Содержимое этих разделов похожее, но в зависимости от модели платы, название может отличаться.
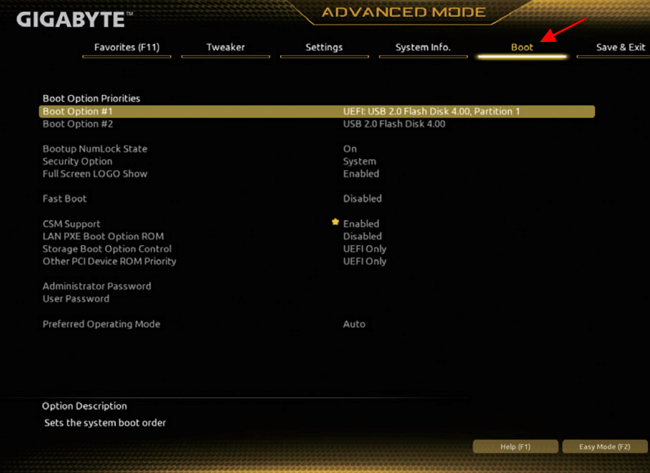
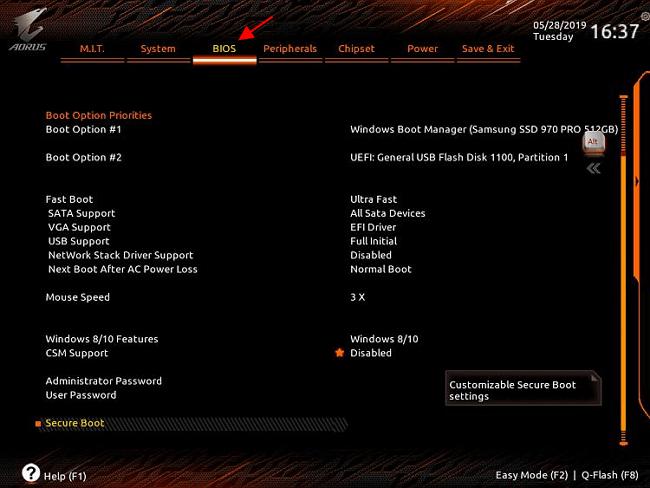
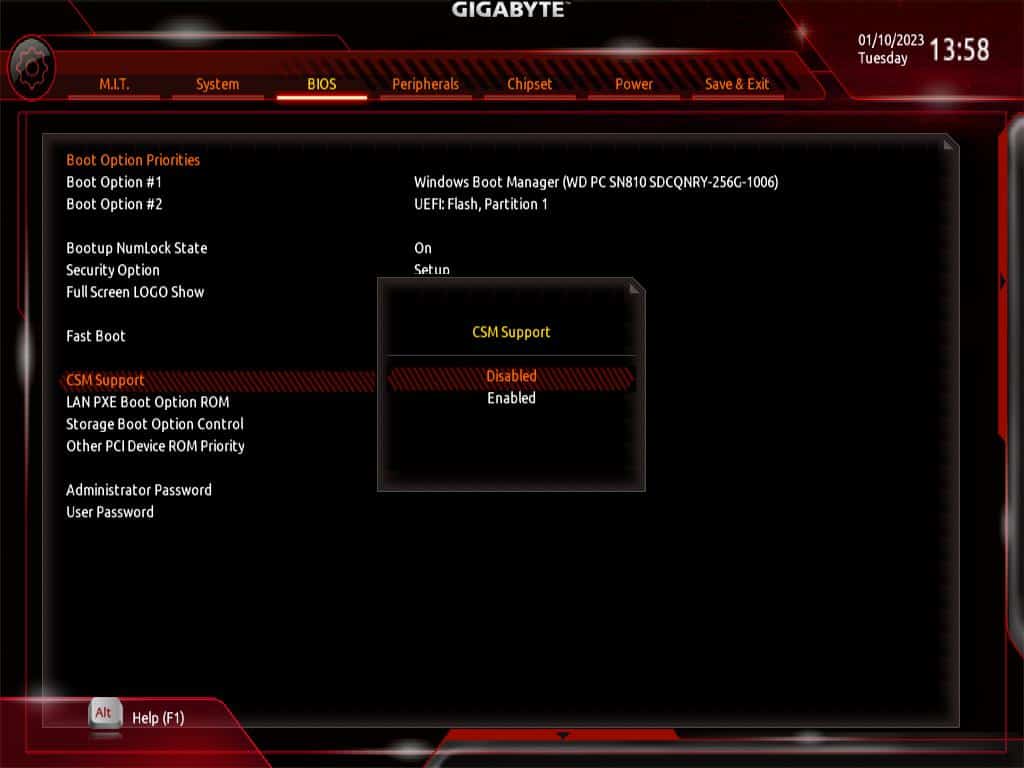
Дальше нужно отключить функцию « CSM Support » если она включена. CSM или Compatibility Support Module – это функция эмуляции старого BIOS, позволяющая загружать операционную систему с жестких дисков с разметкой MBR. Без отключения CSM вы не сможете включить Secure Boot.
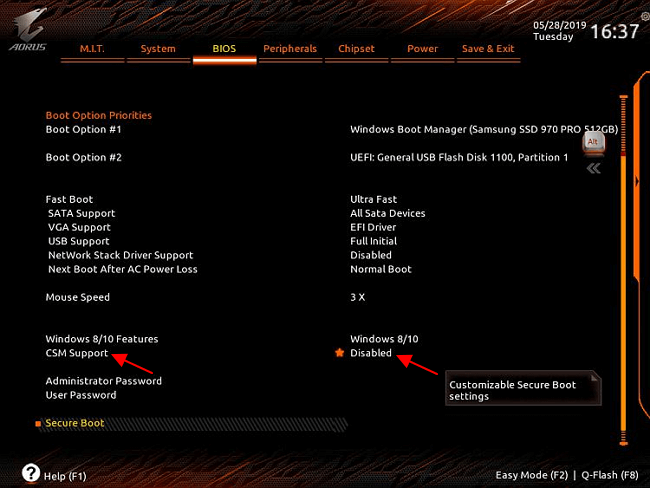
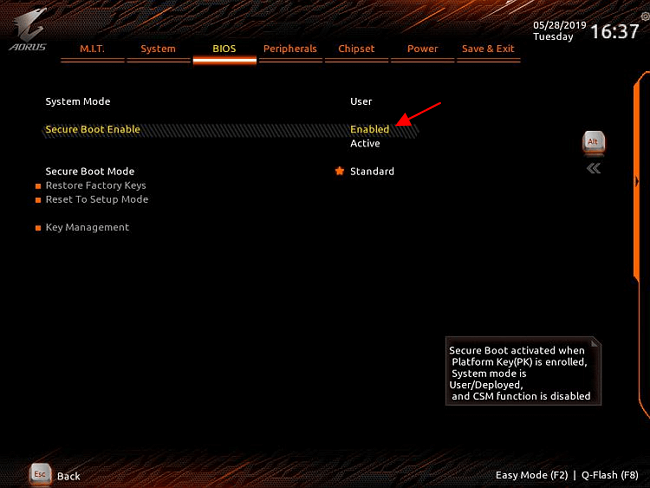
После этого нужно открыть раздел « Secure Boot ». Обратите внимание, если функция « CSM Support » включена, то раздел « Secure Boot » может не отображаться в меню.
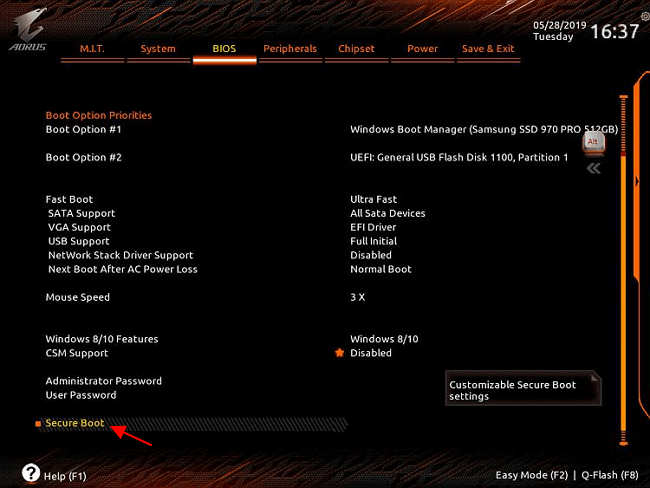
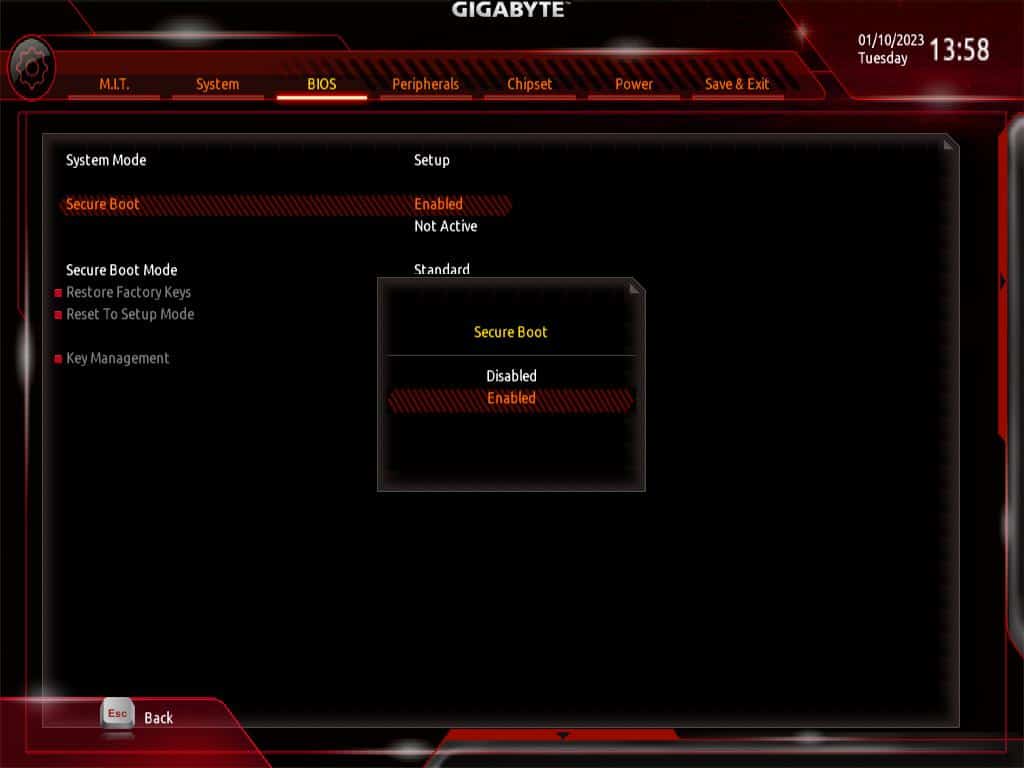
И включить опцию « Secure Boot Enable ». После этого необходимо сохранить настройки BIOS и перезагрузить компьютер.
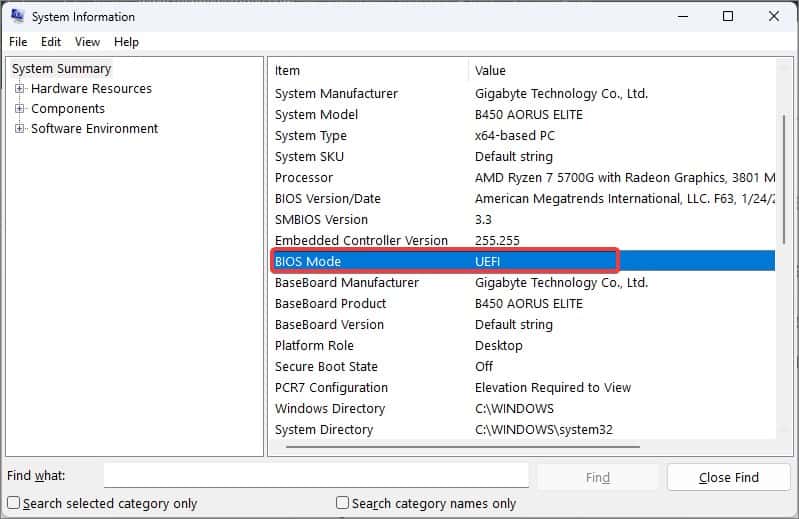
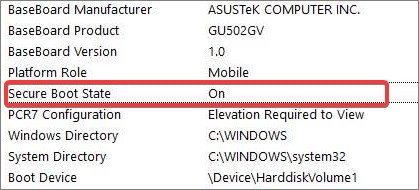
После включение Secure Boot можно проверить ее состояние с помощью программы « Сведения о системе », которая доступна в Windows 10. Для этого нажмите комбинацию клавиш Win-R и выполните команду « msinfo32 ».
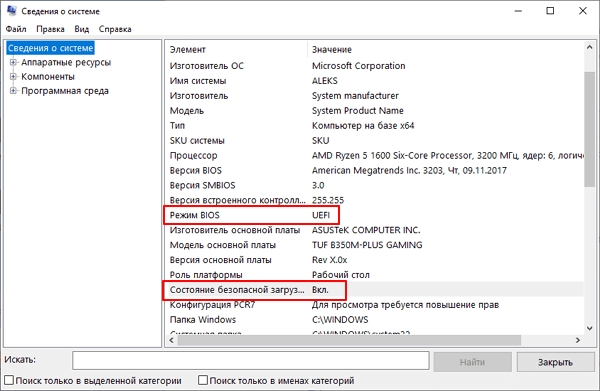
В открывшемся окне нужно найти строки « Режим BIOS » и « Состояние безопасной загрузки ». Если все было сделано правильно, то здесь должно быть указано « UEFI » и « Включено », как на скриншоте вверху.
Возможно вам будет интересно:
- Как проверить совместимость компьютера с Windows 11
- Что такое Secure Boot для Windows 11
- Программа для проверки совместимости с Windows 11
- Запуск Windows 11 на этом компьютере невозможен
- Как включить Secure Boot в BIOS на MSI
Создатель сайта comp-security.net, автор более 2000 статей о ремонте компьютеров, работе с программами, настройке операционных систем.
Задайте вопрос в комментариях под статьей или на странице «Задать вопрос» и вы обязательно получите ответ.
Не выключается csm. материнка gigabyte h110m-s2.
Если компьютер не загружается после выключения, то скорее всего у вас диск в MBR и его нужно конвертировать в GPT.
Я выключаю csm а она включается обратно. А Secure Boot ругается на то что СSM включен
Диск в MBR или GPT? Если в MBR, то конвертируйте в GPT и снова попробуйте отключить CSM.
Как подсказали внизу в комментариях, вероятно, что-то из вашего оборудование не поддерживает UEFI, скорее всего видеокарта. Поэтому BIOS автоматически включает CSM, чтобы компьютер запустился.
После всех манипуляций система после сохранения настроек все время перезаходит в Биос, ТК перестает видеть все загрузочные диски с системой и без нее. Как это лечить. Gigabyte b550 aorus ac pro
How To Enable Secure Boot on Gigabyte
Secure Boot is a security standard that oversees that the computer does not boot using unreliable software. This can restrict and prevent different attacks on the system from malicious software and rootkits.
If you want to make an upgrade to Windows 11, you must first make sure that the device is Secure boot capable, although you do not need to enable it. But enabling it will add an extra layer of security to your device.
On Gigabyte devices that use UEFI firmware, you can enable the secure boot easily from the BIOS. However, you may need to disable the Compatibility Support Mode (CSM) as the Secure Boot cannot operate along with the Legacy BIOS.
Table of Contents
Before You Begin
Check the Secure Boot Status
The secure boot might have been disabled to install some operating systems like Linux or older versions of Windows on some UEFI-enabled devices. On Windows, you can check if the secure boot is enabled/disabled from the System information.
- Press Windows Key + R, type msinfo32 , and hit enter. This will open the System Information window.
- Under the System Summary, find Secure Boot State. If it is labeled as off, Secure Boot is disabled on the device.
Check for GPT partition
Secure boot is one of the features of the United Extensible Firmware Interface (UEFI) firmware. Unlike the traditional BIOS, UEFI does not boot from the disks with Master Boot Record (MBR) partition. The UEFI is only compatible with the disks using GUID Partition Table (GPT) partition style.
Therefore, you need to check if the disk on your device is a GPT disk before we go on to enable the secure boot.
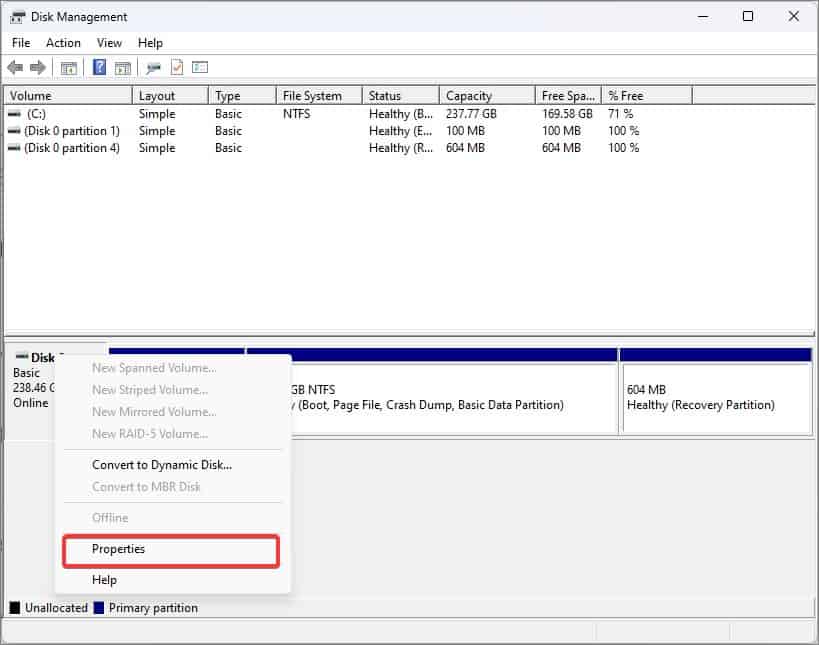
- Press Windows Key + X and open Disk Management.
- Right-click on the Disk and select Properties.
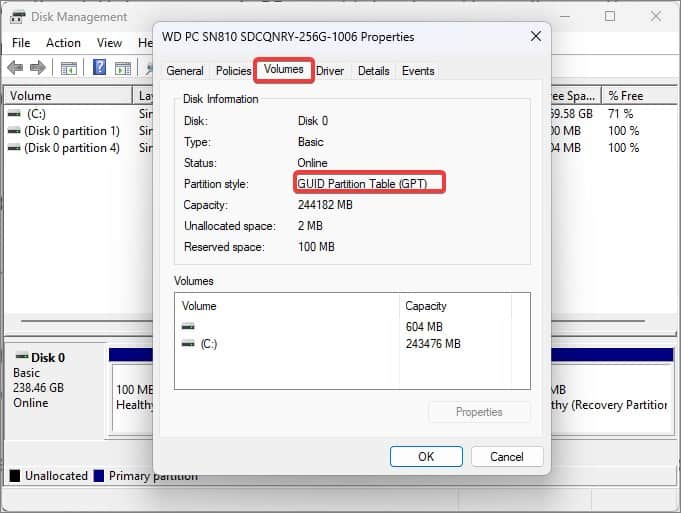
If the partition style is Master Boot Record (MBR), here’s how to change it into GPT.
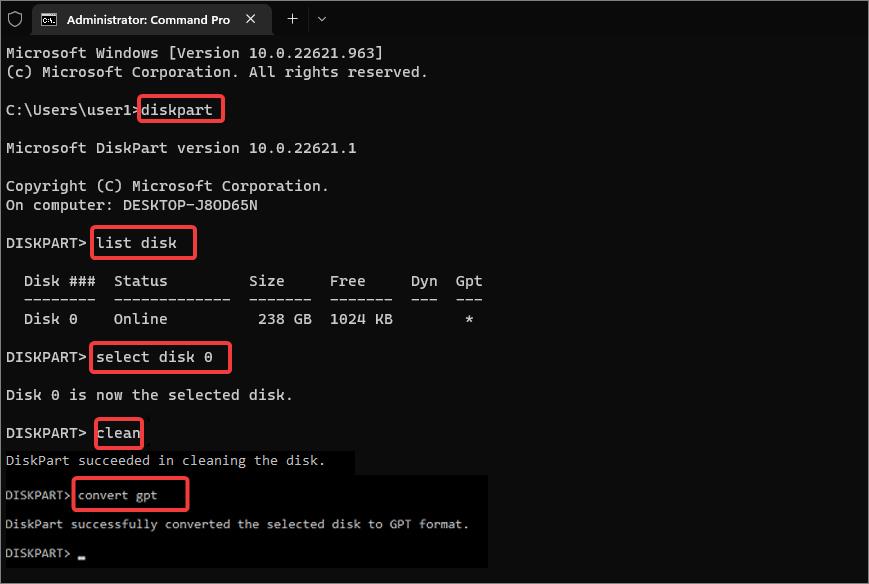
Note: Back up all the data that is in the MBR disk before you proceed with the conversion. All the contents of the disk including the partition or volumes in the disk will get deleted in the process.
- Open Command Prompt with elevated privileges.
- Enter diskpart and hit enter.
- Now enter List disk . This command will give you the list of disk partitions on your computer. Note the volume which you are willing to convert.
- Then, type select disk 0 . The disk we are trying to convert here is disk 0. Replace it with the disk name you noted earlier.
- Now, enter clean . This will delete all the partitions on the disk.
Check for UEFI Support
The Secure boot is a security feature for the UEFI firmware which you won’t find on the older legacy BIOS firmware. Therefore, the next thing you should do is check if the BIOS mode on your Windows device is set to UEFI.
- Open Run, type msinfo32 , and hit enter to launch the System Information.
- In the System summary, check the BIOS mode field. If UEFI is mentioned there, you can proceed with enabling the secure boot.
Enabling the Secure Boot
Once you have assured that the BIOS mode is set to UEFI, you can then boot into the BIOS and enable the Secure Boot.
-
Restart the computer and press the Del Key continuously during the initial boot-up. The system will then boot into the BIOS.
On some Gigabyte devices, the section for the secure boot is hidden in the BIOS. To make the option available, you have to disable the Compatibility Support Mode (CSM). The CSM provides Legacy BIOS backward compatibility for the UEFI. Unless this mode is disabled, the UEFI won’t operate fully, and thus the secure boot cant is enabled.
To disable the CSM on Gigabyte devices,
- Boot into BIOS for your device.
- Go into the BIOS tab.
- Navigate to the CSM support and press enter.
Nishant is an enthusiast who loves writing about technology. He also is heavily invested in keeping himself updated about the latest happenings in the tech world. At Tech News Today, he covers Operating Systems, how-to-topics, and Fixes.
Как активировать режим Secure Boot на материнской плате Gigabyte через BIOS: пошаговая инструкция
Secure Boot — это механизм защиты, который обеспечивает дополнительную безопасность загрузки операционной системы на компьютере. Он является жизненно важным для защиты от злонамеренных программ и вирусов, поэтому его активация на материнской плате Gigabyte — это очень важный шаг для обеспечения безопасности вашего компьютера.
Шаг 1: Запуск BIOS
Первым делом, необходимо запустить BIOS на материнской плате Gigabyte. Для этого, надо нажать клавишу "Delete" (или "F2") во время запуска компьютера. Это откроет меню BIOS, и вы сможете продолжить настройку.
Шаг 2: Переход к разделу "Boot"
Следующий шаг — перейти к разделу "Boot" с помощью клавиш на клавиатуре. В этом разделе вы найдете настройки, которые позволяют вам изменять порядок загрузки операционной системы и активировать Secure Boot.
Шаг 3: Активация режима Secure Boot
Настройка режима Secure Boot нестандартная в зависимости от конкретной материнской платы, поэтому производитель может использовать различные названия и настройки:
- "Secure Boot"
- "Boot Mode"
- "UEFI Boot"
- "Windows 8/10 Features"
Если вы читаете это из-за того, что хотите конкретную инструкцию для Gigabyte, то переходите к следующему шагу:
- Выберите соответствующий пункт настройки. Делается это с помощью стрелок на клавиатуре и клавиши Enter, но иногда надо нажимать Tab.
- Включите режим Secure Boot в соответствующей настройке.
- Сохраните настройки и выйдите из BIOS, нажав F10 и Enter.
Шаг 4: Проверка установки
После выхода из BIOS надо перезагрузить компьютер, чтобы убедиться, что установка была осуществлена успешно. Убедитесь, что загрузка проходит без ошибок, и панель загрузки сообщает, что Secure Boot включен.
Заключение
Активация Secure Boot на материнской плате Gigabyte — это простая процедура, которая требуется для обеспечения безопасности вашего компьютера. Вы можете пройти эту процедуру самостоятельно, если вы следуете этой пошаговой инструкции.
How to Enable Secure Boot on Gigabyte Motherboard
Learn how to enable Secure Boot on a Gigabyte motherboard in Windows 11 so you can improve system security.

Secure Boot is a security feature that prevents certain types of malware from gaining access to the Windows operating system. Some malware can bypass antivirus and antimalware software to gain control of the system, and Secure Boot improves overall system security by verifying the bootloader. Some games, like Valorant, require Secure Boot to be enabled, so you may be struggling with enabling it on your PC. Follow the guide below if you need to know how to enable Secure Boot on a Gigabyte Motherboard.
In this guide, we’ll show you how to enable Secure Boot on a Gigabyte motherboard specifically. The steps are similar for most motherboards, but it’s possible to get confused by how different manufacturers label things in the BIOS.
How to Enable Secure Boot on Gigabyte Motherboard
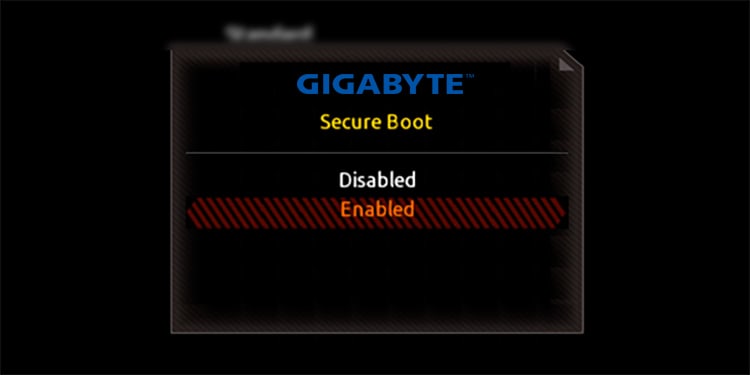
To enable Secure Boot on a Gigabyte motherboard:
- Restart your computer
- Press the DEL key on startup to enter BIOS
- Navigate to the Boot tab
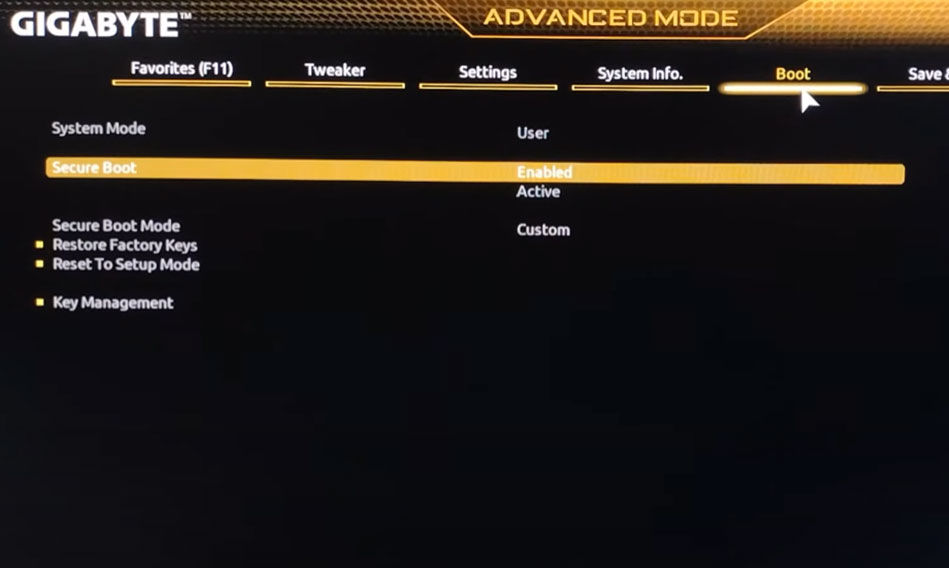
- Click on Secure Boot
- Change Secure boot to Active
When attempting to enable Secure Boot in the BIOS, you may see an error that says:
“Secure Boot can be enabled when System in User Mode. Repeat operation after enrolling Platform Key(PK).”
Follow these steps to resolve this issue:
- Navigate to the Boot tab
- Click on Secure Boot
- Change Secure Boot Mode to Custom
- Select Restore Factory Keys
After that’s done, you can follow the steps outlined above to enable Secure Boot.
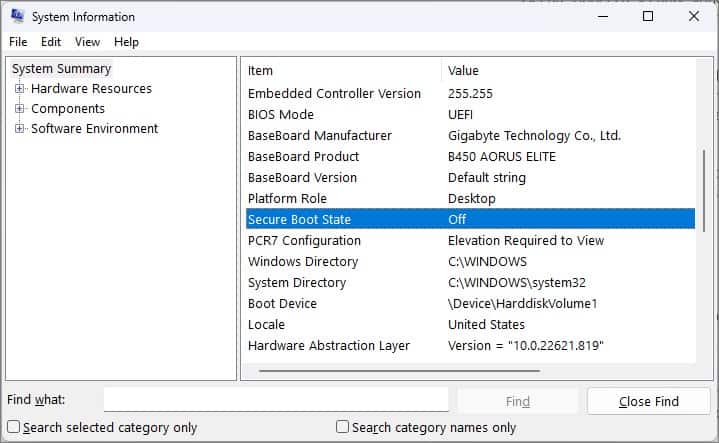
How to Check if Secure Boot is enabled on Windows
To check if Secure Boot is enabled:
- Press the Windows key
- Type in System Information and hit enter
- Go to the System Summary Tab
- Find and check the Secure Boot State
- If it says On, Secure Boot is enabled
That’s how to enable Secure Boot for a Windows PC running on a Gigabyte motherboard and how to check if Secure Boot is currently enabled in Windows 11!