Blender: рендер с прозрачным фоном. Подробное руководство
Blender — это программное обеспечение для моделирования и анимации 3D-графики. С его помощью вы можете создавать комплексные 3D-модели и анимации для использования в играх, фильмах, рекламных роликах и других проектах.
Одним из важных аспектов для создания реалистичных и красивых 3D-изображений является возможность рендера с прозрачным фоном. В этой статье мы расскажем, как создать рендер с прозрачным фоном в Blender.
Шаг 1: создание объекта
Прежде чем мы начнем рассматривать процесс создания рендера с прозрачным фоном, нам нужно создать объект, который мы будем рендерить. Для этого мы добавим куб на сцену.
Для добавления куба:
- Выберите панель "Add" в верхнем левом углу окна Blender.
- Нажмите на кнопку "Mesh" и выберите "Cube" из выпадающего меню.
- Куб будет добавлен на сцену.
Шаг 2: настройка материала
Теперь, когда у нас есть объект, который мы будем рендерить, нам нужно настроить материал таким образом, чтобы он имел прозрачность.
- Выберите куб на сцене, нажав на него левой кнопкой мыши.
- Перейдите на панель "Materials" в правой части интерфейса Blender.
- Нажмите на кнопку "New" для создания нового материала.
- Измените значение "Alpha" на 0, чтобы сделать материал прозрачным.
Шаг 3: настройка настроек рендеринга
Теперь нам нужно настроить настройки рендеринга для того, чтобы наш рендер содержал прозрачный фон.
- Перейдите на панель "Render" в верхней части интерфейса Blender.
- Выберите "PNG" в качестве формата файла для сохранения рендера.
- Выберите "RGBA" в качестве цветового режима.
- Установите флажок "Transparent" рядом с значком флажка "Film".
- Убедитесь, что цвет фона установлен на черный, чтобы фон был прозрачным.
Шаг 4: рендеринг сцены с прозрачным фоном
Теперь мы готовы сделать рендер нашей сцены с прозрачным фоном.
- Нажмите кнопку "Render" на панели "Render" в верхней части интерфейса Blender.
- Дождитесь окончания рендеринга.
- Сохраните изображение в формате PNG с прозрачным фоном.
Заключение
Теперь вы знаете, как создать рендер с прозрачным фоном в Blender. Следуйте этому простому руководству, и вы сможете создавать красивые и реалистичные 3D-изображения с прозрачными фонами для использования в своих проектах.
Альфа-канал и слои в Blender
В данном уроке Вы узнаете, как выполнять рендер Ваших объектов без фона (с прозрачным фоном). Также я покажу как разделить сцену на отдельные слои, а затем заново ее собрать.
Рендеринг с альфа-каналом (прозрачностью)

Чтобы выполнить рендер с прозрачным фоном, достаточно отметить всего один пункт Transparent в меню Film и убедится, что формат сохраняемого изображения поддерживает прозрачность .PNG (RGBA):
При работе со встроенным рендером, параметр Transparent находится в меню Shading. Вот и вся наука! 🙂
Разделение сцены на слои
Часто выполняется рендеринг с альфа-каналом для последующего редактирования данного слоя в каком-либо графическом редакторе. Создайте любые три объекта и переместите каждый на отдельный слой (M): 
Перейдите на вкладку Render Layers. Создайте еще два слоя и назовите их Layer1, Layer2, Layer3. Выделите первый слой (Layer1), в меню Layer для параметра Scene отметьте первые 3 квадратика. Это те слои, которые будут участвовать в рендере. А для параметра Layer отметьте только первый квадратик. Таким образом мы укажем, что на первом слое будет находится лишь тот объект, который находится на первом слое. Для второго и третьего слоев измените лишь параметр Layer на 2-й и 3-й квадратики: 
Выполните рендер и Вы увидите лишь объект расположенный на первом слое. В окне UV/Image Editor можно переключаться между каждым из слоев.

Откройте окно Node Editor и продублируйте нод Render Layers два раза. Для каждого нода выберите свой слой рендера:
Теперь добавьте нод File Output и откройте панель свойств (N). В меню Properies добавьте еще два входа, назовите их, выставите выходной формат и путь сохранения изображений. Данный нод позволит нам создать 3 различных изображения нажатием одной кнопки. Подключите все три нода Render Layers к соответствуюшим входам и нажмите F12. По завершению рендера, в папке, которую Вы указали будет лежать 3 изображения: Cube001, Cone001 и Culinder001. Цифры приписываются в конце для удобства при анимации. С помощью данного нода Вы сможете отрендерить длинную анимацию разбитую на слои.

Собираем слои вместе
С данными изображениями можно произвести любые необходимые изменения и затем собрать все в единый файл с помощью нодов Image и Alpha Over. Я изменил цвет каждого изображения, загрузил каждое в свой нод и смешал все вместе: 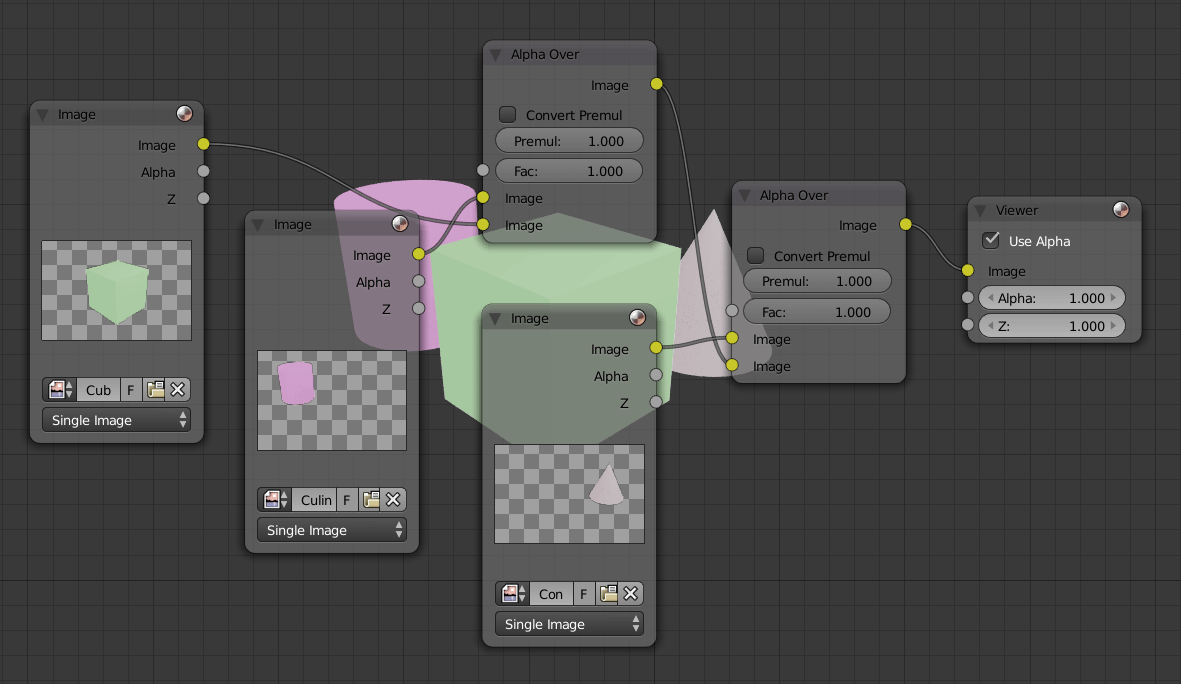
Так как у нас присутствует альфа-канал, мы легко можем добавить фон для наших объектов: 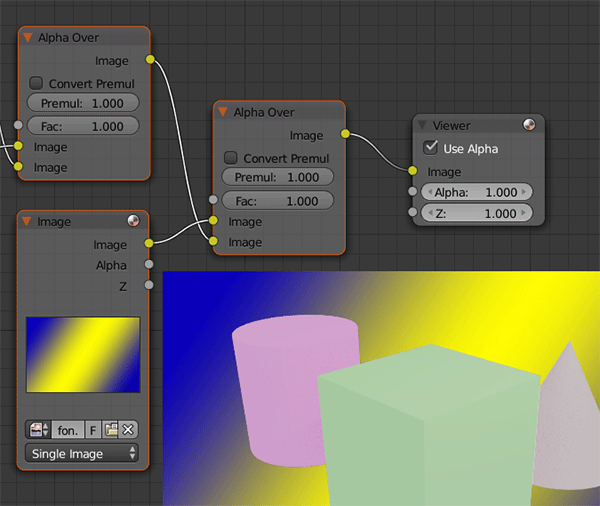
Это что касалось разделения на слои изображений. Открыв меню Passes на вкладке Render Layers и отметив нужные пункты Вы сможете вынести туман, тени, глубину и т.д., на отдельные слои и затем производить изменения с ними в любом редакторе или же в самом Blender.
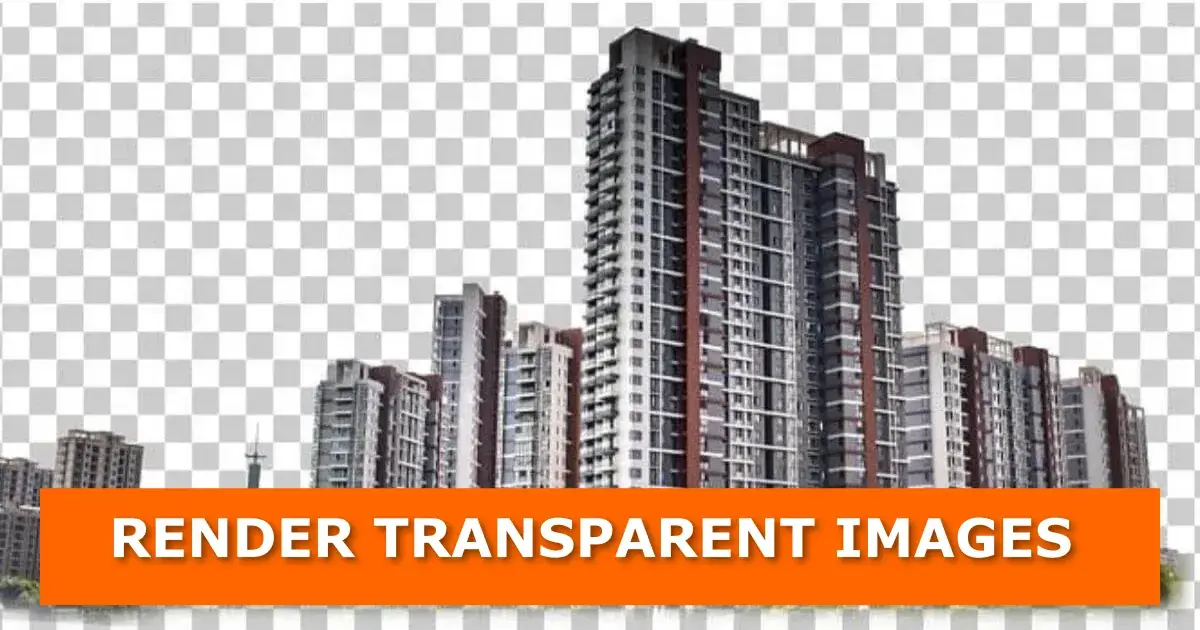
Render Transparent Backgrounds in Blender 3D
Transparent backgrounds in a render are often desirable to overlay the still render or animation on top of something else. Blender allows us to render with a transparent background.
If you are interested in learning transparent materials instead, here’s everything you need to know about transparent materials.


This page may contain affiliate links which pay me a commission if used to make a purchase. As an Amazon Associate, I earn from qualifying purchases.
Enabling Transparent Film (Invisible Background)
The first step in making a transparent background is to tell Blender to render the film as transparent. By default, film is not rendered as transparent and our background (also called the “world”) will display wherever we don’t have objects blocking it out.
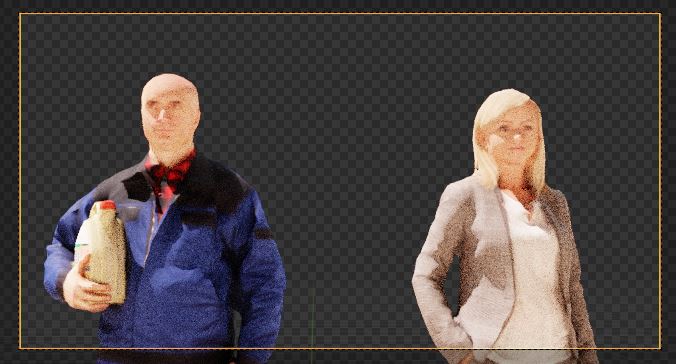
For example the people in the following image are rendered and where they are not blocking the camera’s view, the background (world) is visible. This means an invisible background will be rendered.
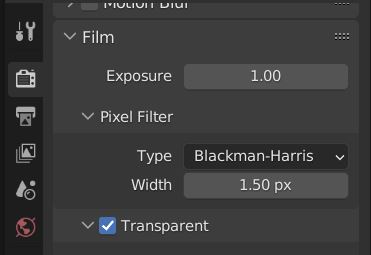
To make the film/background/world transparent, we go to the Render Properties Panel. Scroll down and find the tab for “Film.” Expand this and there is a box labeled “Transparent.” Checking this box will render the film as transparent.
Whatever light is put off by our world background will still affect the Blender scene. The world will still shine light, cast shadows and appear in reflections. But, the world will not be directly visible in the render.
Instead, there will be areas designated as transparent in the background. The checkered display is a universal indicator of transparency.
Transparency with HDRIs
A quick note about using transparency with an HDRI (High Dynamic Range Image). We may still wish to use an HDRI to light our scene and we can. Making the film transparent in Blender will still allow the world to give off light as if it was there. Here’s more about using HDRIs in Blender.
Render with Alpha Channel
The second thing we have to do for a transparent background on an image or animation is to render to a format with an Alpha Channel. An alpha channel is data which tells a computer (or other device) that certain areas of an image are supposed to be invisible (or translucent).
JPEG files do not support transparency. Other files, such as PNG formats do.
Go into the Render Output Properties tab (the printer icon). Under “Output” we find a box to choose our “File Format” (I believe it defaults to PNG still). Below this are the “Color” options.
If a file format does NOT support an alpha channel, we will see options for BW (Black and White) and RGB (Red/Green/Blue). If the chosen file format DOES support an alpha channel, we’ll see a third option for RGBA (Red/Green/Blue/Alpha).
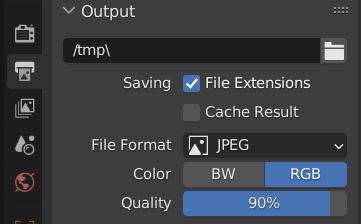

We will need to both select a file format that supports an alpha channel and select “RGBA” in the color option for the output settings.
Now, rendering an image will output an image with a transparent background. Congratulations!
How to Save Renders with Transparent Backgrounds
Rendering a transparent background doesn’t do us any good if we don’t save the render in a format which recognizes transparency.
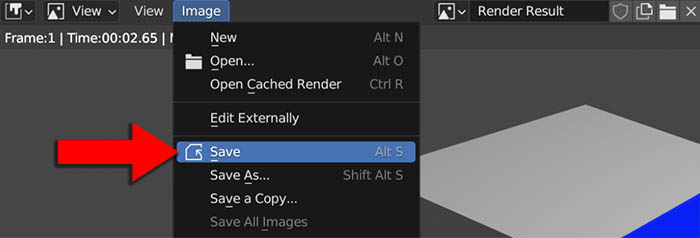
After our image is rendered, it will be displayed in an image editor. To save a rendered image from the image editor, find “Image” in the top menu and select “Save.”
A file browser window will open where we can instruct Blender on where to save the rendered image. On the right of the file browser editor are settings to choose the file type.
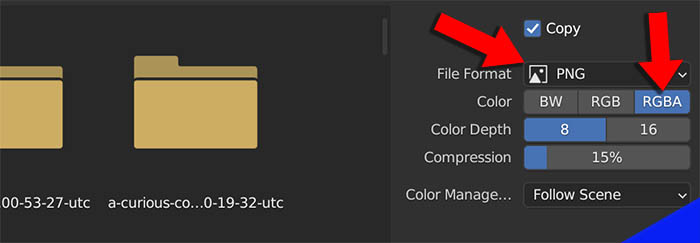
In order for the rendered image to be saved with a transparent background, it must be saved in a file type that supports RGBA (alpha) transparency.
File types that support transparency will display an option for “RGBA” which must be selected when saved. These file types include PNG and TIFF. Other file types (including JPEG) do not support transparency and won’t have an option for RGBA.


Transparent Background Animations
But what if we want our entire animation to have a transparent background? This part gets a little trickier but yes we can do it.
We will still need to have our film set to transparent and my advice on rendering animations is to individually render out each frame first and compile them. They can be compiled in Blender’s video sequence editor or in another program such as Adobe Premiere.
I have a full video on How to Export Animations the Right Way that covers this all in depth.

The short version is this: Whether we’ve compiled individual frames into the video sequencer or we re rendering straight to a video format, we again need a format that supports an alpha channel.
For file format, we want to choose FFMPEG Video. With this chosen, we expand the “Encoding” tab a little lower in the output properties. Here’s where some decisions have to be made.
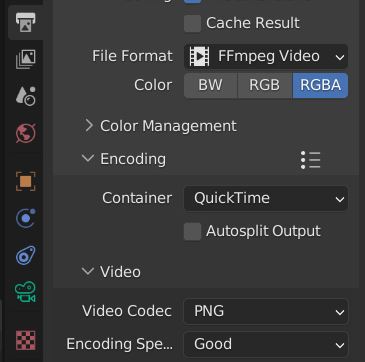
The default is Matroska which doesn’t seem to work in most applications. I usually use MPEG-4 but this doesn’t support an alpha channel. One I’ve found to work for some applications (but not all) is Quicktime.
After choosing Quicktime, we still have to go down a little further and expand the Video tab and look for the “Codec” setting.
The H.264 Codec is what I use for most things but it does not give us an RGBA (alpha channel) option. If we select PNG from the drop-down menu, it does give us an alpha channel.
Now we can render the animation and a .MOV file will be created with an alpha channel. But there’s a problem.
I’ve had this method work in some applications and not in others. So, depending on how universally available you want this animation to be this may not be the option for you.
To be honest, I import all of my image sequences into Adobe Premiere now and am not using Blender for video editing any longer. But for a while, I used Blender exclusively and have made several transparent animations with this method.
Have a look around the site for more Blender tutorials or check out my YouTube Channel. Stay Creative!
Get Brandon’s Newsletter
By submitting, you agree to receive periodic e-mails from me. You can unsubscribe at any time.
Render Transparent PNGs in Blender Cycles and EEVEE Render Engines: How-To
How to render transparent PNG images in Blender Cycles and EEVEE render engines
Table of contents
The settings for the “Cycles” and “EEVEE” rendering engines are as follows for saving rendered images with transparent backgrounds (PNG format, for example).
How to render transparent PNG images in Blender version 2.9 and 3 Cycles render engine

Blender version 2.9 and 3 cycles render output settings
- Go to Properties Editor > Render Properties > Film tab
- Check Transparent so that the World background is transparent. Product Rendering Tools add-on has this and many other features that make your work easier.
- Go to Output Properties, then down to the Output Tab. Copy the settings in the image below to your Blender project render settings.

Blender version 2.9 and 3 render output settings
How to render transparent PNG images in Blender version 2.9 and 3 EEVEE render engine

Blender version 2.9 and 3 EEVEE render output settings
- Go to Properties Editor > Render Properties > Film Panel
- Check Film > Transparent so that the World background is transparent
- Go to Output Properties, then down to the Output Tab. Copy the settings in the image below to your Blender project render settings.
Blender version 2.9 and 3 render output settings
How to render transparent PNG images in Blender 2.79 Cycles

Blender 2.79 cycles render output settings
- Go to Properties Editor > Render Context > Output Panel
- Choose RGBA so that the alpha from the renderer is saved in the png
- Go to Properties Editor > Render Context > Film Panel
- Check Film > Transparent so that the World background is transparent
NB: If you are looking for a way to render transparent videos in Blender, check out ‘How to render transparent animation videos in Blender’s Cycles and Eevee render engines’