Установка DEB-пакетов в Ubuntu

Файлы формата DEB представляют собой специальный пакет, предназначенный для установки программ в Linux. Использование такого метода инсталляции софта будет полезно тогда, когда невозможно получить доступ к официальному репозиторию (хранилищу) или оно просто отсутствует. Методов выполнения поставленной задачи существует несколько, каждый из них будет максимально полезен определенным пользователям. Давайте разберем все способы для операционной системы Ubuntu, а вы, исходя из своей ситуации, выберите наиболее оптимальный вариант.
Устанавливаем DEB-пакеты в Ubuntu
Сразу хочется отметить, что такой метод инсталляции имеет один существенный недостаток — приложение не будет автоматически обновляться и вы не получите уведомлений о вышедшей новой версии, поэтому придется регулярно просматривать эту информацию на официальном сайте разработчика. Каждый рассмотренный ниже метод достаточно простой и не требует от пользователей дополнительных знаний или навыков, просто следуйте приведенным инструкциям и все обязательно получится.
Способ 1: Использование браузера
Если у вас на компьютере еще не имеется скачанного пакета, но присутствует активное подключение к интернету, загрузить его и сразу же запустить будет очень легко. В Ubuntu по умолчанию присутствует веб-обозреватель Mozilla Firefox, давайте же рассмотрим весь процесс на этом примере.

-
Запустите браузер из меню или панели задач и перейдите на необходимый сайт, где следует отыскать рекомендованный пакет формата DEB. Кликните на соответствующую кнопку для начала скачивания.
Преимущество этого способа в том, что после инсталляции на компьютере не остается лишних файлов — DEB-пакет сразу же удаляется. Однако не всегда у пользователя имеется доступ к интернету, поэтому советуем ознакомиться со следующими способами.
Способ 2: Стандартный установщик приложений
Оболочка Ubuntu имеет встроенный компонент, позволяющий устанавливать приложения, запакованные в DEB-пакеты. Он может пригодиться в том случае, когда сама программа находится на съемном накопителе или в локальном хранилище.
- Запустите «Менеджер пакетов» и воспользуйтесь панелью навигации слева, чтобы перейти в папку хранения софта.

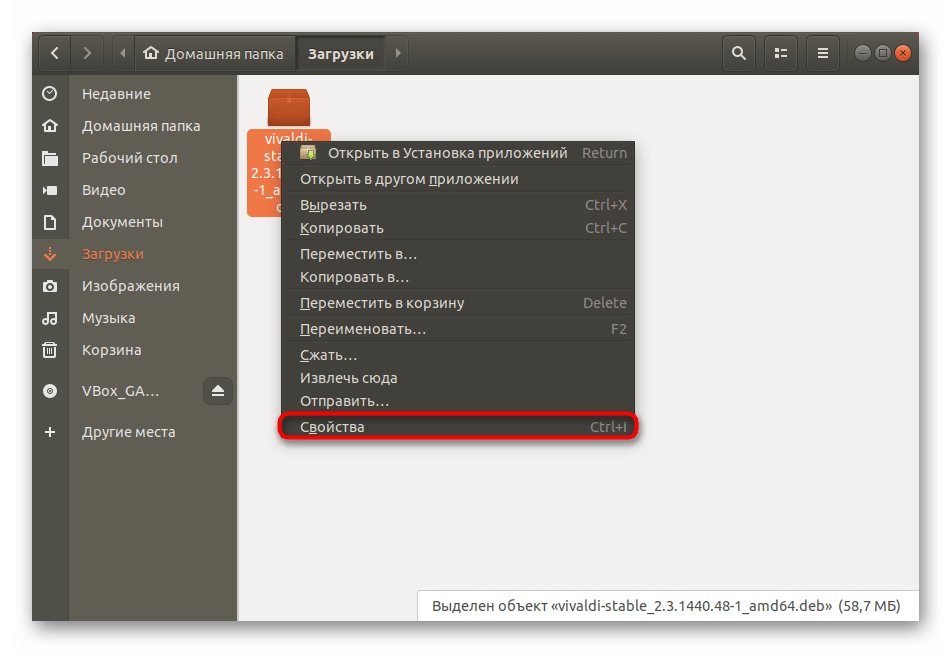
- Нажмите правой кнопкой мыши по программе и выберите пункт «Открыть в Установка приложений».

- Проведите процедуру инсталляции аналогичную той, которую мы рассмотрели в предыдущем способе.
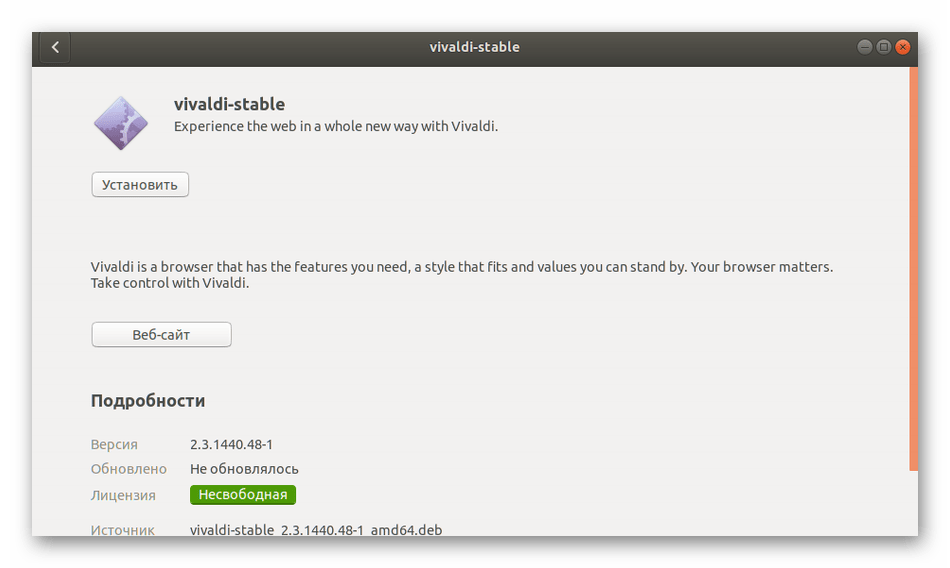
Если во время установки возникли какие-либо ошибки, придется задать параметр выполнения для необходимого пакета, а делается это буквально в несколько кликов:
- Щелкните на файле ПКМ и кликните на «Свойства».
- Переместитесь во вкладку «Права» и отметьте галочкой пункт «Разрешить выполнение файла как программы».

- Повторите установку.
Возможности рассмотренного стандартного средства достаточно урезаны, что не устраивает определенную категорию пользователей. Поэтому специально им мы советуем обратиться к следующим методам.
Способ 3: Утилита GDebi
Если так случилось, что стандартная программа-установщик не функционирует или она вам попросту не подходит, придется устанавливать дополнительное обеспечение, чтобы провести аналогичную процедуру распаковки пакетов DEB. Наиболее оптимальным решением будет добавление утилиты GDebi в Убунту, а делается это двумя методами.
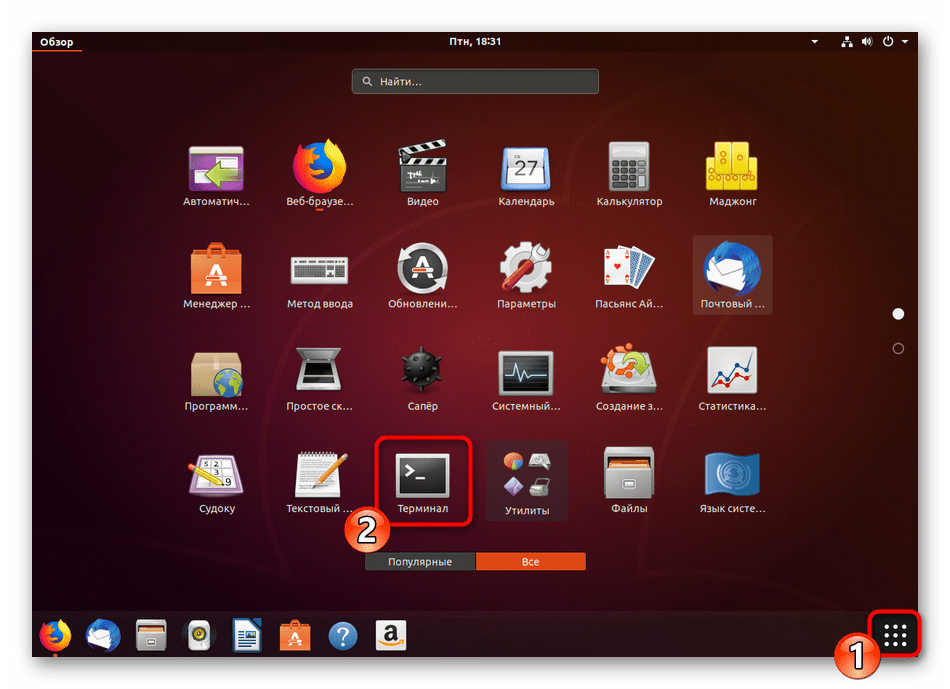
- Сначала разберемся, как сделать это черед «Терминал». Откройте меню и запустите консоль либо щелкните ПКМ по рабочему столу и выберите соответствующий пункт.
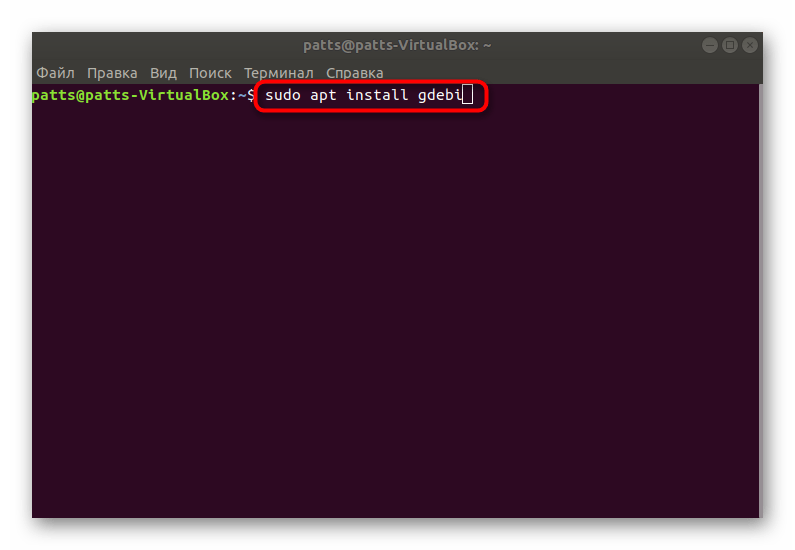
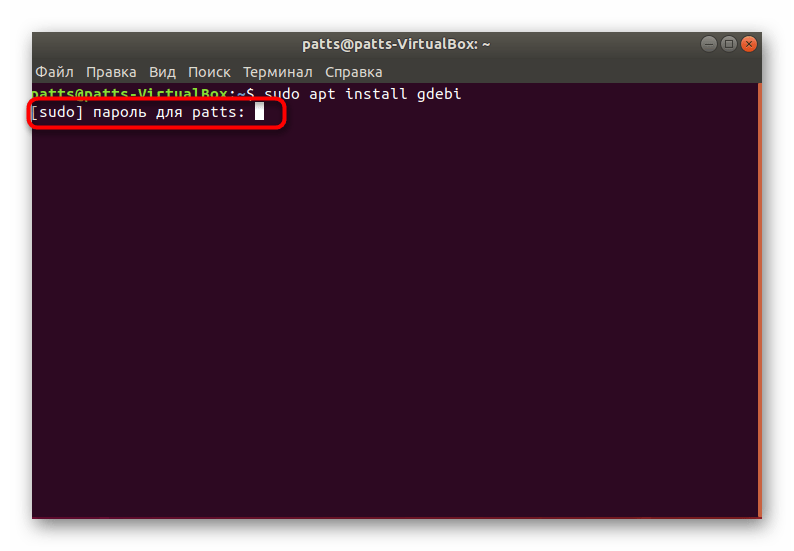
- Введите команду sudo apt install gdebi и нажмите на Enter.
- Впишите пароль для учетной записи (символы при вводе отображаться не будут).
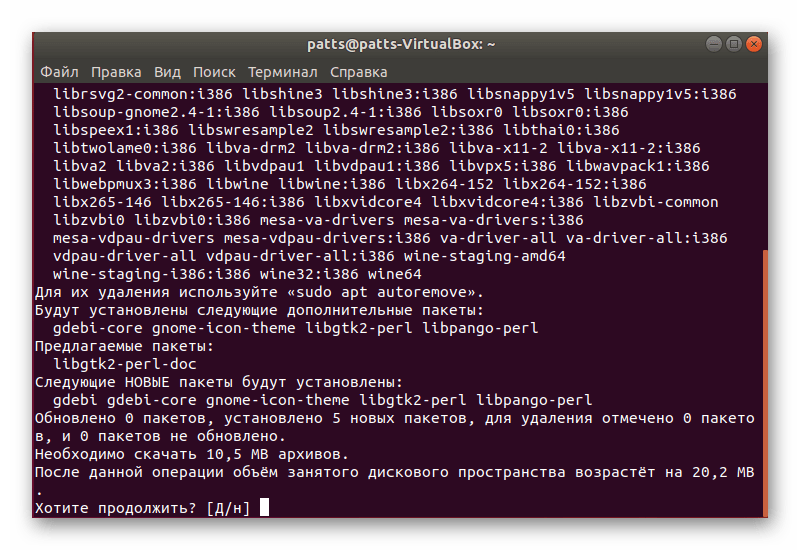
- Подтвердите операцию по изменению дискового пространства из-за добавления новой программы, выбрав вариант Д.
- Когда GDebi будет добавлен, появится строка для ввода, можно закрыть консоль.

Добавление GDebi доступно и через Менеджер приложений, что выполняется следующим образом:
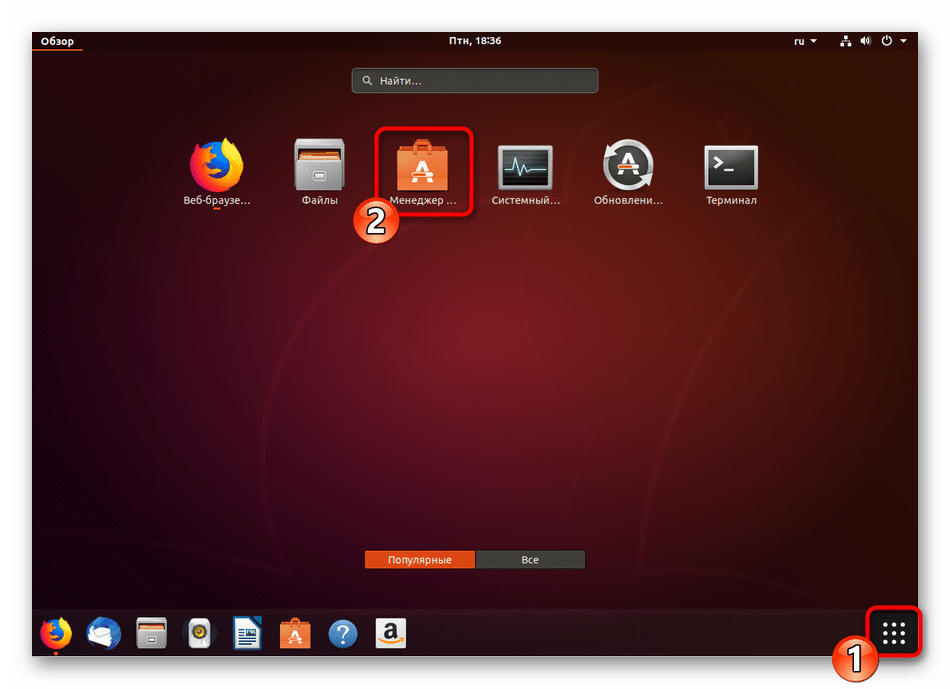
- Откройте меню и запустите «Менеджер приложений».
- Нажмите на кнопку поиска, введите нужное название и откройте страницу утилиты.

- Щелкните на кнопку «Установить».

На этом добавление дополнений закончено, осталось только выбрать необходимую утилиту для распаковки DEB-пакета:
- Перейдите в папку с файлом, щелкните по нему ПКМ и во всплывающем меню найдите «Открыть в другом приложении».

- Из списка рекомендованных приложений выберите GDebi, дважды кликнув по строке ЛКМ.

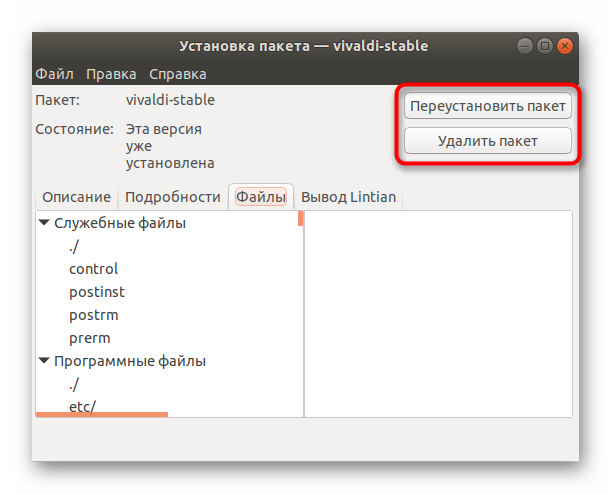
- Нажмите на кнопку для начала установки, по окончании которой вы увидите новые функции — «Переустановить пакет» и «Удалить пакет».
Способ 4: «Терминал»
Иногда бывает проще задействовать привычную консоль, введя всего одну команду для запуска инсталляции, нежели бродить по папкам и использовать дополнительные программы. Вы можете сами убедиться, что в этом методе нет ничего сложного, ознакомившись с инструкцией ниже.
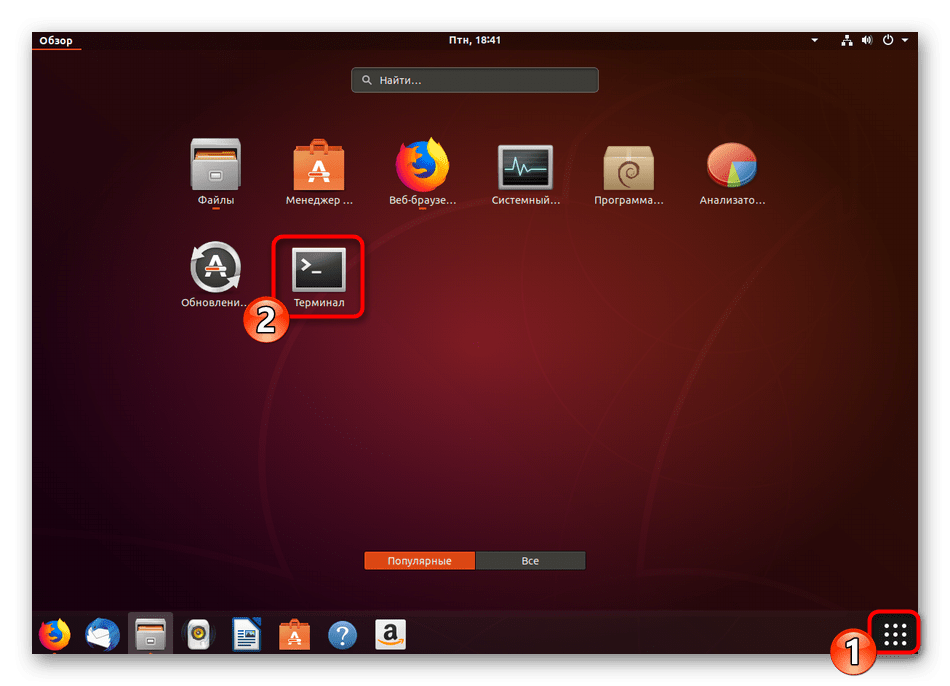
- Перейдите в меню и откройте «Терминал».
- Если вы не знаете наизусть путь к требуемому файлу, откройте его через менеджер и перейдите в «Свойства».
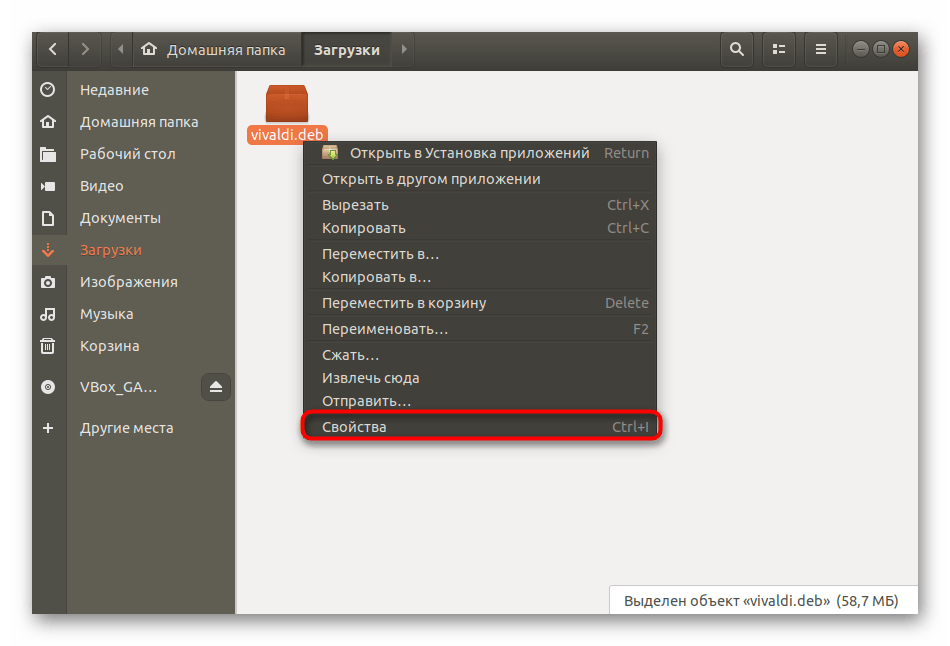
- Здесь вас интересует пункт «Родительская папка». Запомните или скопируйте путь и возвращайтесь к консоли.

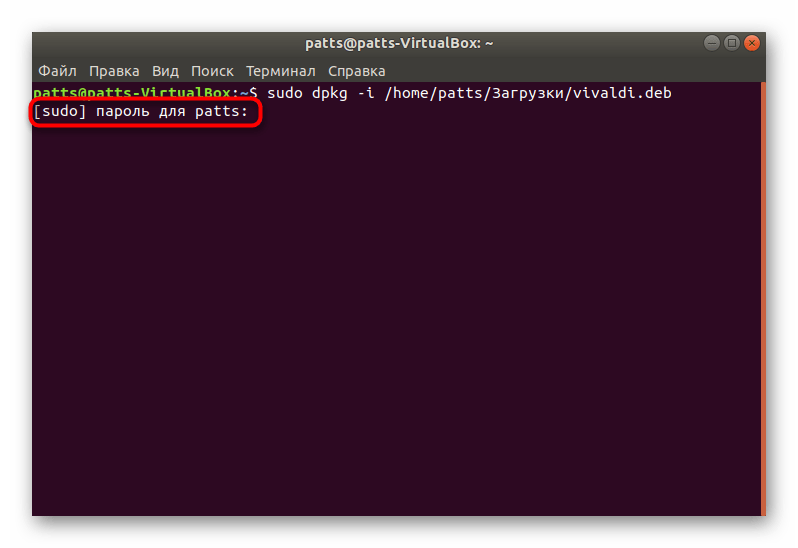
- Использоваться будет консольная утилита DPKG, поэтому нужно ввести только одну команду sudo dpkg -i /home/user/Программы/name.deb , где home — домашняя директория, user — имя пользователя, программы — папка с сохраненным файлом, а name.deb — полное название файла, включая .deb.

- Укажите свой пароль и нажмите на Enter.
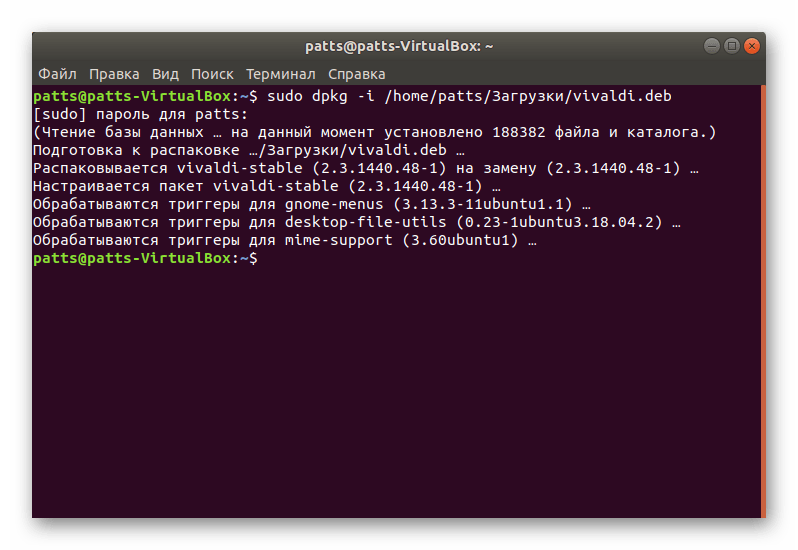
- Ожидайте завершения инсталляции, после чего можете переходить к использованию необходимого приложения.
Если во время установки одним из представленных методов у вас возникают ошибки, попробуйте задействовать другой вариант, а также внимательно изучайте коды ошибок, уведомления и различные предупреждения, появляющиеся на экране. Такой подход позволит сразу же найти и исправить возможные неполадки.
How to Install .deb File in Ubuntu — 4 Ways Described with Example

How will you install packages which are not available in the software center?
Basically there are are many software’s are available on Ubuntu software center, and you can install those very easily by using an apt and apt-get command as well as by graphical Interface.
If the software does not exist on the software center and you want to install on your ubuntu operating system then you must download first from the official website of that particular software.
if you want to install external you must download the executable file in .deb format for Debian and Ubuntu-based operating system.
This tutorial will cover how to install Deb file in Ubuntu operating system using different methods. I will cover command-line methods as well as the graphical interface for installing deb files on ubuntu.
What is the .deb file?
deb files are executable file for the Debian-based Linux distribution. In general word, you can install software by using a .deb package.
When you install any software on the windows then you download .exe file first. and you can install software by using this executable file.
Similar to Windows you can install the software by using the .deb executable file. So keep in mind if you are going to download an executable file from the vendor’s official website it would be in .deb format.
Why install a deb file manually
Most of the time you use a package manager such as the Ubuntu Software Center to install the new software on Debian-based distribution. You use apt and apt-get command for downloading and installing new software from the repository.
Some application does not exist on the software center/repository then you must download from the vendor’s website first. Be careful before downloading and installing such type of files which are not available on the repository.
Some of the biggest applications are delivered in this format, including Google’s Chrome web browser. For this reason, it is important to know how to install the packages manually.
How to download deb Package
You must go to the vendor’s website and download the executable file in .deb format. Don’t forget system architecture before downloading the .deb file. If you are running 32 bit then download deb file for 32 bit otherwise for 64 bit.
For the demonstration purpose, I am going to install TeamViewer on my Ubuntu operating system, then first I will have to go on the vendor’s website teamviewer.com then I will search for Teamviewer executable file in .deb format.
I found there are two types of the .deb packages, one is 32 bit another 64 bit. I have the installed Ubuntu operating system 64 bit. So I download 64 bit .deb file. The file name is teamviewer_14.5.1691_amd64.deb
Install deb files in Ubuntu by using dpkg tool
You can install and uninstall Debian (.deb) packages by using the tool “dpkg”. This is a command-line tool. You can do many things by using this tool, for Now, I am going to teach you how to install deb file in Linux by using dpkg command.
So run the following command in terminal.
$sudo dpkg -i /path_to_package/packagename
For example, to install Teamviewer, My downloaded .deb file in Download folder, the path is /home/vijay/Download and the file name is teamviewer_14.5.1691_amd64.deb.
So the command will be as following:
You can use -install switch instead of -i and command will be as following:
Install deb file in Ubuntu using apt Package Manager
If you come to installing .deb packages on you Debian based distribution then you have another option for it. you can use the apt package manager to install .deb package. Yes, you install the package locally on your system instead of the web.
Before go running the apt command for installing the new package use the apt update command to update the database.
$sudo apt update
As I have told you previously, apt has the advantage to resolve dependency error automatically. So you would not worry about the dependencies when using apt command.
If you have faced any problem-related dependency error then Please use apt command to install .deb file in ubuntu. See in the command below to install the same package as the previous example.
In the above example, you can see there are multiple dependencies required for TeamViewer software. the apt tool didn’t install Teamviewer in the previous example and asked for installing dependency first.
You can use apt command followed by -fix-broken install for installing package and dependencies as well.
Command will be the following:
Choose Y and hit enter, After some, you will that Teamviewer has been installed on your system.
Install deb file in Ubuntu using apt-get command
apt-get command is working similar as an apt command. You don’t need to change anything in apt command. You will use apt-get instead of apt.
Commands will look like following
Install Deb file in Ubuntu by using GUI
The graphical interface is loved by everyone. One more thing about the graphical interface it’s very comfortable.
If you are one of the graphical interface lovers then you can use GUI to install deb file in ubuntu.
You can use the following steps:
Step 1: double click on downloaded .deb file it will open automatic in ubuntu software center.
Step 2: Click on the “Install” button
Step 3: It will ask for authentication, give the current user password and click on the authenticate. If you don’t know you can’t install the package.
The installation process will start and after some time Teamviewer will be installed on your ubuntu system.
How to remove .deb package
You can use the following command to remove/uninstall the package
If you want to remove a package along with configuration file then run the following command
When you uninstall the package it will remove the only package and dependency will remain in your computer so run the following command to remove unused dependency packages in your system.
If you want to remove package as well as its dependency then use the apt command followed by remove option and package name.
See the example below:
You can use GUI to uninstall the package follow the steps:
Step 1: Open software center in ubuntu
Step 2: Click on an Installed tab inside the ubuntu software center application
Step 3: Find the package name and Click on “Remove”.
Conclusion
By now you are able to understand about deb files. and how to install, uninstall deb file in ubuntu. How you can install .deb package with its dependency. and remove a package with its dependency as well.
Package management
Ubuntu features a comprehensive package management system for installing, upgrading, configuring, and removing software. In addition to providing access to an organized base of over 60,000 software packages for your Ubuntu computer, the package management facilities also feature dependency resolution capabilities and software update checking.
Several tools are available for interacting with Ubuntu’s package management system, from simple command-line utilities that can be easily automated by system administrators, to an easy-to-use graphical interface for those new to Ubuntu.
Introduction
Ubuntu’s package management system is derived from the same system used by the Debian GNU/Linux distribution. The package files contain all of the necessary files, metadata, and instructions to implement a particular functionality or software application on your Ubuntu computer.
Debian package files typically have the extension .deb , and usually exist in repositories which are collections of packages found online or on physical media, such as CD-ROM discs. Packages are normally in a pre-compiled binary format; thus installation is quick and requires no compiling of software.
Many packages use dependencies. Dependencies are additional packages required by the principal package in order to function properly. For example, the speech synthesis package festival depends upon the package alsa-utils , which is a package supplying the Advanced Linux Sound Architecture (ALSA) sound library tools needed for audio playback. In order for festival to function, it – and all of its dependencies – must be installed. The software management tools in Ubuntu will do this automatically.
Advanced Packaging Tool – APT
The apt command is a powerful command-line tool, which works with Ubuntu’s Advanced Packaging Tool (APT). The commands contained within apt provide the means for installing new software packages, upgrading existing software packages, updating the package list index, and even upgrading the entire Ubuntu system.
Some examples of popular uses for the apt utility include:
Install a Package
Installation of packages using apt is quite simple. For example, to install the nmap network scanner, type the following:
Tip
You can specify multiple packages to be installed or removed, by separating them with spaces.
Remove a Package
Removal of a package (or packages) is also straightforward. To remove the package installed in the previous example, simply type:
Adding the —purge option to apt remove will remove the package configuration files as well. This may or may not be the desired effect, so use with caution.
Note:
While apt is a command-line tool, it is intended to be used interactively, and not to be called from non-interactive scripts. The apt-get command should be used in scripts (perhaps with the —quiet flag). For basic commands the syntax of the two tools is identical.
Update the package index
The APT package index is essentially a database of available packages from the repositories defined in the /etc/apt/sources.list file and in the /etc/apt/sources.list.d directory. To update the local package index with the latest changes made in the repositories, type the following:
Upgrade packages
Installed packages on your computer may periodically have upgrades available from the package repositories (e.g., security updates). To upgrade your system, first, update your package index with sudo apt update , and then type:
For details on how to upgrade to a new Ubuntu release, see our guide on upgrading.
Actions of the apt command, such as installation and removal of packages, are logged in the /var/log/dpkg.log log file.
For further information about the use of APT, read the comprehensive APT User’s Guide, or type apt help .
Aptitude
Launching Aptitude with no command-line options will give you a menu-driven, text-based frontend to the APT system. Many of the common package management functions, such as installation, removal, and upgrade, can be performed in Aptitude with single-key commands, which are typically lowercase letters.
Aptitude is best suited for use in a non-graphical terminal environment to ensure proper functioning of the command keys. You can start the menu-driven interface of Aptitude as a normal user by typing the following command at a terminal prompt:
When Aptitude starts, you will see a menu bar at the top of the screen and two panes below the menu bar. The top pane contains package categories, such as New Packages and Not Installed Packages. The bottom pane contains information related to the packages and package categories.
Using Aptitude for package management is relatively straightforward, and the user interface makes common tasks simple to perform. The following are examples of common package management functions as performed in Aptitude:
Install Packages
To install a package, locate it via the Not Installed Packages package category by using the keyboard arrow keys and the Enter key. Highlight the desired package, then press the + key. The package entry should turn green, indicating it has been marked for installation. Now press g to be presented with a summary of package actions. Press g again, and the package will be downloaded and installed. When finished, press Enter to return to the menu.
Remove Packages
To remove a package, locate it in the Installed Packages package category by using the keyboard arrow keys and the Enter key. Highlight the package you want to remove, then press the — key. The package entry should turn pink, indicating it has been marked for removal. Now press g to be presented with a summary of package actions. Press g again, and the package will be removed. When finished, press Enter to return to the menu.
Update Package Index
To update the package index, simply press the u key.
Upgrade Packages
To upgrade packages, first update the package index as detailed above, and then press the U key to mark all packages with updates. Now press g , which will present you with a summary of package actions. Press g again to begin the download and installation. When finished, press Enter to return to the menu.
The first column of information displayed in the package list (in the top pane) lists the current state of the package (when viewing packages). It uses the following key to describe the package state:
i: Installed package
c: Package not installed, but package configuration remains on the system
p: Purged from system
v: Virtual package
B: Broken package
u: Unpacked files, but package not yet configured
C: Half-configured — configuration failed and requires fix
H: Half-installed — removal failed and requires a fix
To exit Aptitude, simply press the q key and confirm you wish to exit. Many other functions are available from the Aptitude menu by pressing the F10 key.
Command Line Aptitude
You can also use Aptitude as a command-line tool, similar to apt . To install the nmap package with all necessary dependencies (as in the apt example), you would use the following command:
To remove the same package, you would use the command:
Consult the Aptitude manpages for full details of Aptitude’s command-line options.
dpkg is a package manager for Debian-based systems. It can install, remove, and build packages, but unlike other package management systems, it cannot automatically download and install packages – or their dependencies. APT and Aptitude are newer, and layer additional features on top of dpkg . This section covers using dpkg to manage locally installed packages:
To list all packages in the system’s package database, installed and uninstalled, from a terminal prompt type:
Depending on the number of packages on your system, this can generate a large amount of output. Pipe the output through grep to see if a specific package is installed:
Replace apache2 with any package name, part of a package name, or a regular expression.
To list the files installed by a package, in this case the ufw package, enter:
If you are unsure which package installed a file, dpkg -S may be able to tell you. For example:
The output shows that the /etc/host.conf belongs to the base-files package.
Note:
Many files are automatically generated during the package install process, and even though they are on the filesystem, dpkg -S may not know which package they belong to.
You can install a local .deb file by entering:
Change zip_3.0-4_amd64.deb to the actual file name of the local .deb file you wish to install.
You can uninstall a package by:
Caution:
Uninstalling packages using dpkg , is NOT recommended in most cases. It is better to use a package manager that handles dependencies to ensure that the system is in a consistent state. For example, using dpkg -r zip will remove the zip package, but any packages that depend on it will still be installed and may no longer function correctly.
For more dpkg options see the manpage: man dpkg .
APT configuration
Configuration of the APT system repositories is stored in the /etc/apt/sources.list file and the /etc/apt/sources.list.d directory. An example of this file is referenced here, along with information on adding or removing repository references from the file.
You can edit the file to enable and disable repositories. For example, to disable the requirement of inserting the Ubuntu CD-ROM whenever package operations occur, simply comment out the appropriate line for the CD-ROM, which appears at the top of the file:
Extra repositories
In addition to the officially-supported package repositories available for Ubuntu, there are also community-maintained repositories which add thousands more packages for potential installation. Two of the most popular are the universe and multiverse repositories. These repositories are not officially supported by Ubuntu, but because they are maintained by the community they generally provide packages which are safe for use with your Ubuntu computer.
Note:
Packages in the multiverse repository often have licensing issues that prevent them from being distributed with a free operating system, and they may be illegal in your locality.
Warning:
Be advised that neither universe nor multiverse contain officially-supported packages. In particular, there may not be security updates for these packages.
Many other package sources are available – sometimes even offering only one package, as in the case of packages provided by the developer of a single application. You should always be very careful and cautious when using non-standard package sources/repos, however. Research the packages and their origins carefully before performing any installation, as some packages could render your system unstable or non-functional in some respects.
By default, the universe and multiverse repositories are enabled. If you would like to disable them, edit /etc/apt/sources.list and comment out the following lines:
Automatic updates
The unattended-upgrades package can be used to automatically install updated packages and can be configured to update all packages or just install security updates. First, install the package by entering the following in a terminal:
To configure unattended-upgrades , edit /etc/apt/apt.conf.d/50unattended-upgrades and adjust the following to fit your needs:
Certain packages can also be excluded and therefore will not be automatically updated. To block a package, add it to the list:
Note:
The double “//” serve as comments, so whatever follows “//” will not be evaluated.
To enable automatic updates, edit /etc/apt/apt.conf.d/20auto-upgrades and set the appropriate APT configuration options:
The above configuration updates the package list, downloads, and installs available upgrades every day. These actions are triggered by timer units at a set time but with a random delay: apt-daily.timer and apt-daily-upgrade.timer . These timers activate the correspondent services that run the /usr/lib/apt/apt.systemd.daily script.
However, it may happen that if the server is off at the time the timer unit elapses, the timer will be triggered immediately at the next startup. As a result, they will often run on system startup
and thereby cause immediate activity and hold the apt-lock.
In many cases this is beneficial, but in some cases it might be counter-productive; examples are administrators with many shut-down machines or VM images that are only started for some quick action, which is delayed or even blocked by the unattended upgrades. To adapt this behaviour, we can change/override the configuration of both APT’s timer units [ apt-daily-upgrade.timer, apt-daily.timer ]. To do so, use systemctl edit <timer_unit> and override the Persistent attribute, for example with Persistent=delay :
The local download archive is cleaned every week. On servers upgraded to newer versions of Ubuntu, depending on your responses, the file listed above may not be there. In this case, creating a new file of the same name should also work.
Note:
You can read more about apt Periodic configuration options in the apt.conf(5) manpage and in the /usr/lib/apt/apt.systemd.daily script header.
The results of unattended-upgrades will be logged to /var/log/unattended-upgrades .
Notifications
Configuring Unattended-Upgrade::Mail in /etc/apt/apt.conf.d/50unattended-upgrades will enable unattended-upgrades to email an administrator detailing any packages that need upgrading or have problems.
Another useful package is apticron . apticron will configure a cron job to email an administrator information about any packages on the system that have updates available, as well as a summary of changes in each package.
To install the apticron package, enter the following command in a terminal:
Once the package is installed, edit /etc/apticron/apticron.conf , to set the email address and other options:
References
Most of the material covered in this chapter is available in man pages, many of which are available online.
The Installing Software Ubuntu wiki page has more information.
For more dpkg details see the dpkg man page.
The APT User’s Guide and apt man page contain useful information regarding APT usage.
For more info about systemd timer units (and systemd in general), visit the systemd man page and systemd.timer man page.
See the Aptitude user’s manual for more Aptitude options.
The Adding Repositories HOWTO (Ubuntu Wiki) page contains more details on adding repositories.
How to Install DEB Packages on Ubuntu 22.04
In Linux based system, such as Ubuntu, installing a package or software from the DEB (Debian software package file) is extremely important since not all packages are there in the system repositories. Thus, having a deb file of a package makes it easy for the users to install any package or software on the system.
If you do not know how to install DEB files, follow this article’s guidelines.
How to Install DEB Packages on Ubuntu 22.04
There are four methods to install DEB files on Ubuntu, which are:
Method 1: By Using apt
apt is a package manager tool present in all Linux distributions and by using the apt command different packages can be installed from the official Linux repository. By using apt command, the .deb files of different packages can also be installed.
If you have a deb file downloaded on your system, you can install it using the below-written syntax:
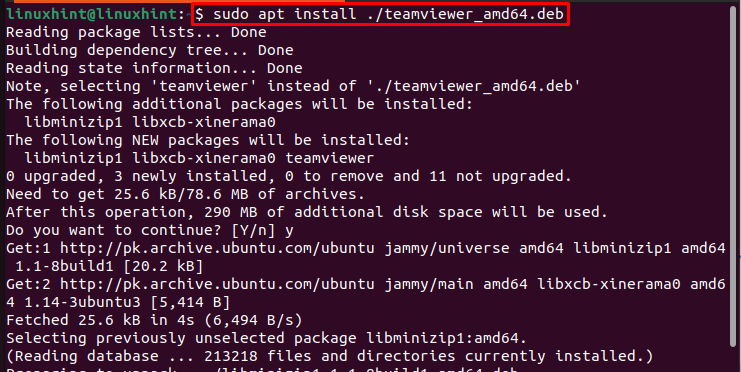
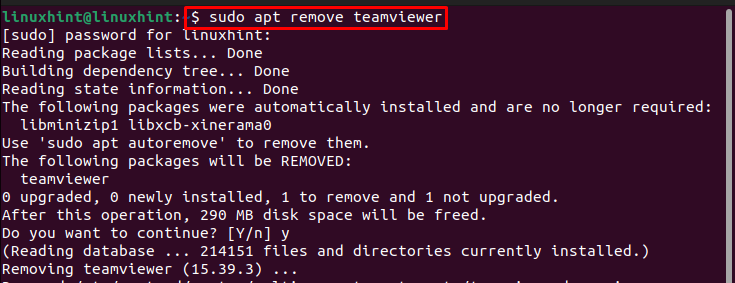
To remove the package from the Ubuntu system installed through apt command, use the below-mentioned command:
Method 2: By Using dpkg
dpkg is a pre-installed command line utility in Ubuntu and other Linux distributions and you can also use it to install deb packages in Linux. To install the .deb file using dpkg, follow the below-written syntax in which the -i identifier is for “install”:

To remove the package installed through dpkg, you can use the below-written remove command:
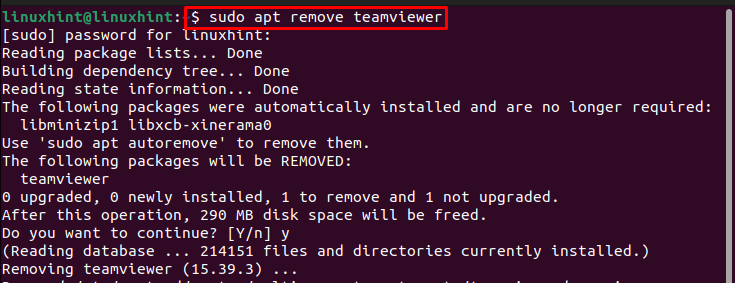
Method 3: By Using gdebi
In all Linux distributions such as Ubuntu the “gdebi” is a command line tool that aids the installation of local .deb packages and their dependencies. To install DEB files using gdebi, firstly install the gdebi package from the official Linux repository by using the below-mentioned command:
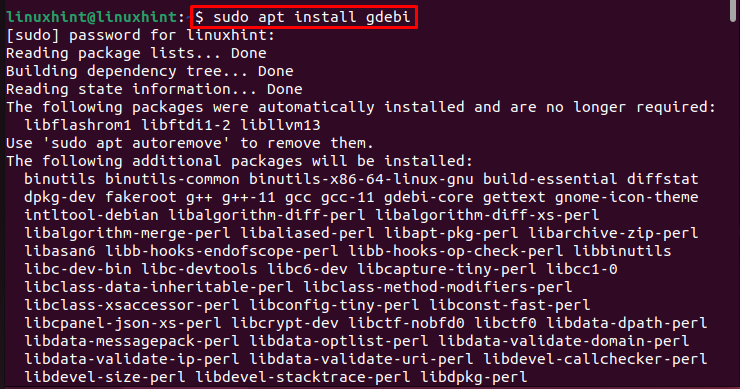
Once the gdebi is installed in your Ubuntu then you can use it to install any local .deb file by following the below-written syntax:
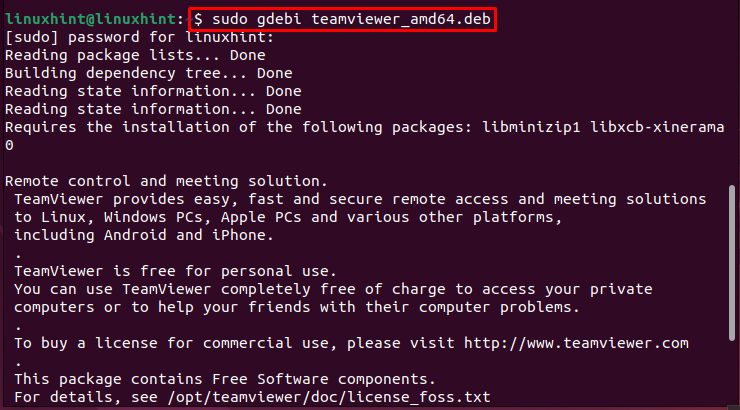
To remove the package installed through gdebi, you can follow the below-mentioned syntax:
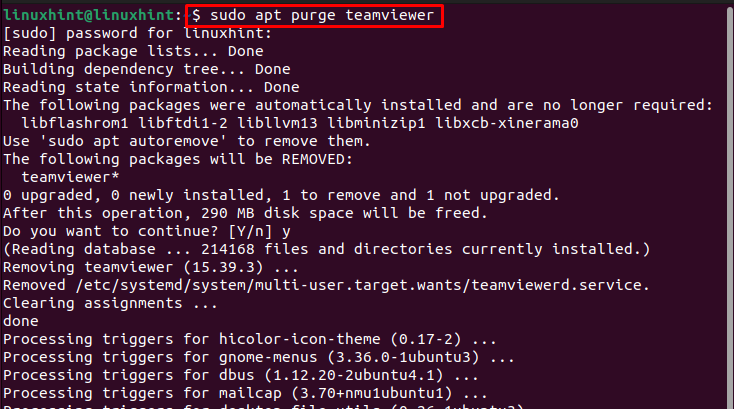
Method 4: By Using GUI
Last method on our list is the GUI method, this is an easy method for beginners who have switched from Windows to Linux.
To install the .deb file using GUI, go to the downloaded .deb file and after right-clicking on it, a drop-down list will appear, click “Open With Other Application” here:
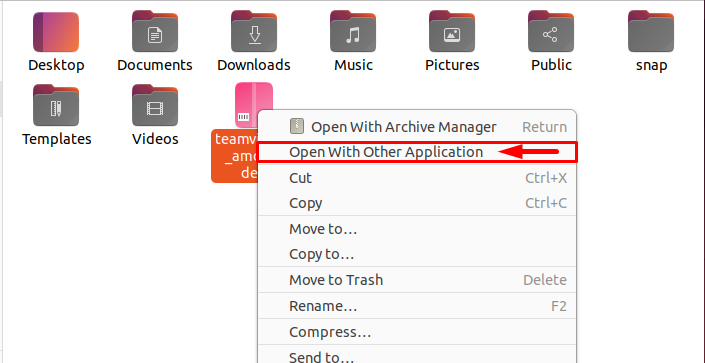
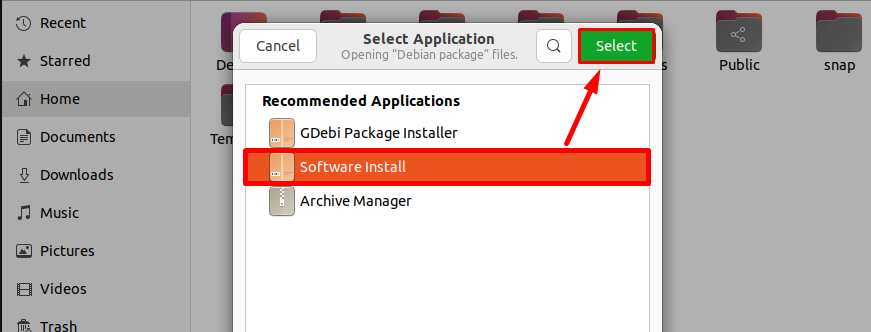
Then a list of multiple applications which are present in your system will appear, you can Select any of them by selecting and then hitting the green Select button:
Note: Here, I have chosen Software Install, as this is a default application but you can go for gdebi or other application if they are installed.
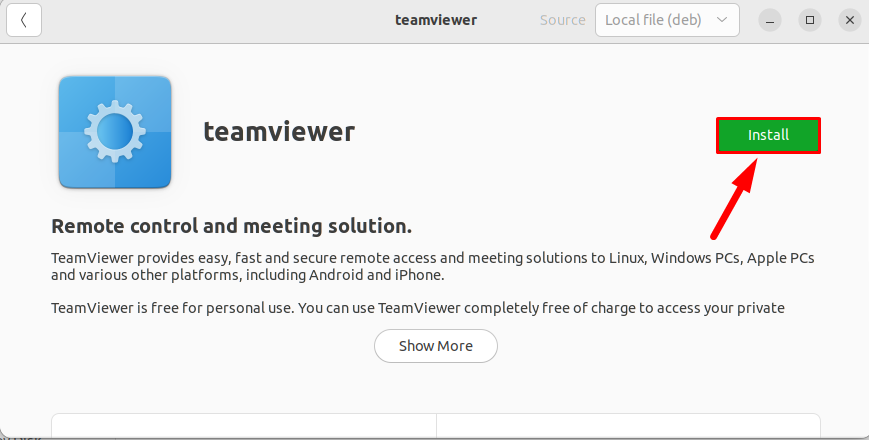
After loading the application details, the software install package will open the .deb package file and you can click on the “Install” button to install it:
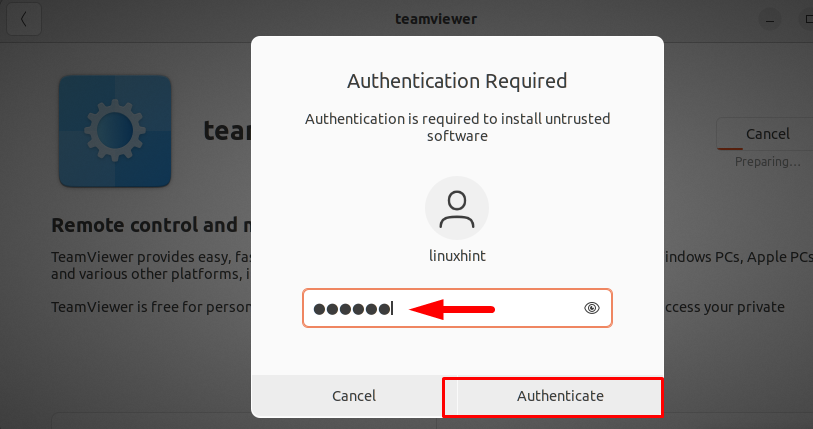
Verify Authentication by providing the password and clicking on the Authenticate button:
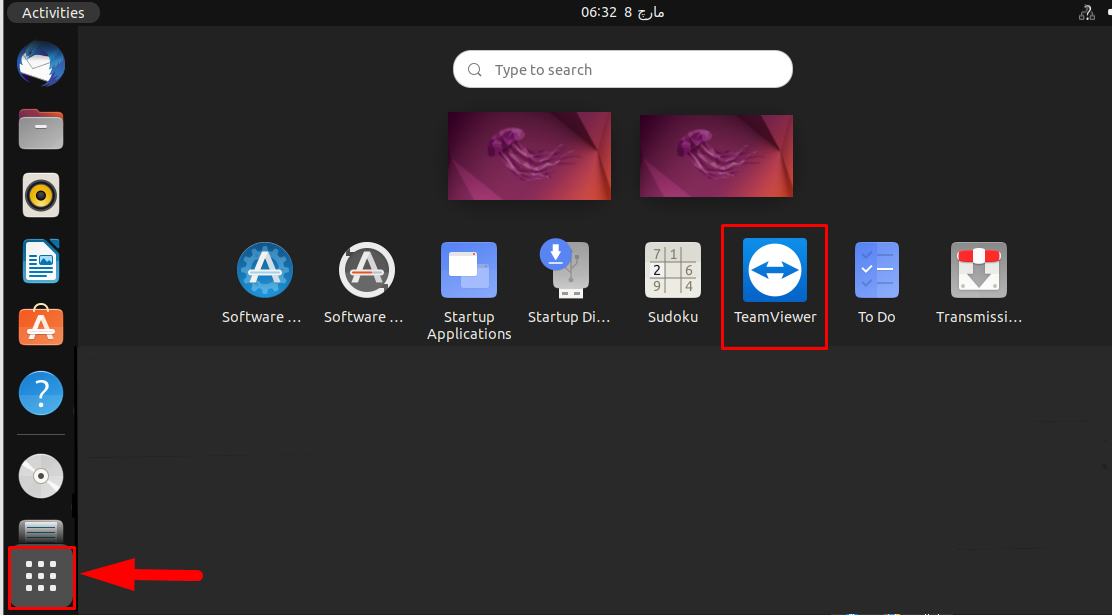
Once the authentication is completed, the package will start installing and you can find your installed application in the Application Menu:
Conclusion
There are four ways to install .deb files in Ubuntu/Linux; “apt”, “dpkg”, “gdebi” and GUI. All four ways are discussed in the above-given guidelines. The first three methods are command-line methods that install a deb package directly from the terminal. While the GUI method is easy for beginners who have switched from Windows to Linux.
About the author

Zahra Zamir
An Electronics graduate who loves to learn and share the knowledge, my passion for my field has helped me grasp complex electronics concepts and now I am here to share them with others.