1.3: Working with TextView Elements

A new version of this course is now available, updated to reflect best practices for more recent versions of the Android framework and Android Studio. The new course is available at Android Developer Fundamentals course (Version 2), or go directly to the new practical Codelabs.
This course is now deprecated and this content will be removed from this site soon. Please update your links.
1.3: Working with TextView Elements
Contents:
The TextView class is a subclass of the View class that displays text on the screen. You can control how the text appears with TextView attributes in the XML layout file. This practical shows how to work with multiple TextView elements, including one in which the user can scroll its contents vertically.
If you have more information than fits on the device's display, you can create a scrolling view so that the user can scroll vertically by swiping up or down, or horizontally by swiping right or left.
You would typically use a scrolling view for news stories, articles, or any lengthy text that doesn't completely fit on the device display. You can also use a scrolling view to enable users to enter multiple lines of text, or to combine UI elements (such as a text field and a button) within a scrolling view.
The ScrollView class provides the layout for the scrolling view. ScrollView is a subclass of FrameLayout, and developers should place only one view as a child within it, where the child view contains the entire contents to scroll. This child view may itself be a view group (such as a layout manager like LinearLayout) with a complex hierarchy of objects. Note that complex layouts may suffer performance issues with child views such as images. A good choice for a view within a ScrollView is a LinearLayout that is arranged in a vertical orientation, presenting top-level items that the user can scroll through.
With a ScrollView, all of the views are in memory and in the view hierarchy even if they aren't displayed on screen. This makes ScrollView ideal for scrolling pages of free-form text smoothly, because the text is already in memory. However, ScrollView can use up a lot of memory, which can affect the performance of the rest of your app. To display long lists of items that users can add to, delete from, or edit, consider using a RecyclerView, which is described in a separate practical.
What you should already KNOW
From previous practicals, you should be able to:
- Create a Hello World app with Android Studio.
- Run an app on an emulator or a device.
- Implement a TextView in a layout for an app.
- Create and use string resources.
- Convert layout dimensions to resources.
What you will LEARN
You will learn to:
- Use XML code to add multiple TextView elements.
- Use XML code to define a scrolling view.
- Display free-form text with some HTML formatting tags.
- Style the TextView background color and text color.
- Include a web link in the text.
What you will DO
In this practical, you will:
- Create the Scrolling Text app.
- Add two TextView elements for the article heading and subheading.
- Use TextAppearance styles and colors for the article heading and subheading.
- Use HTML tags in the text string to control formatting.
- Use the lineSpacingExtra attribute to add line spacing for readability.
- Add a ScrollView to the layout to enable scrolling a TextView element.
- Add the autoLink attribute to enable URLs in the text to be active and clickable.
App overview
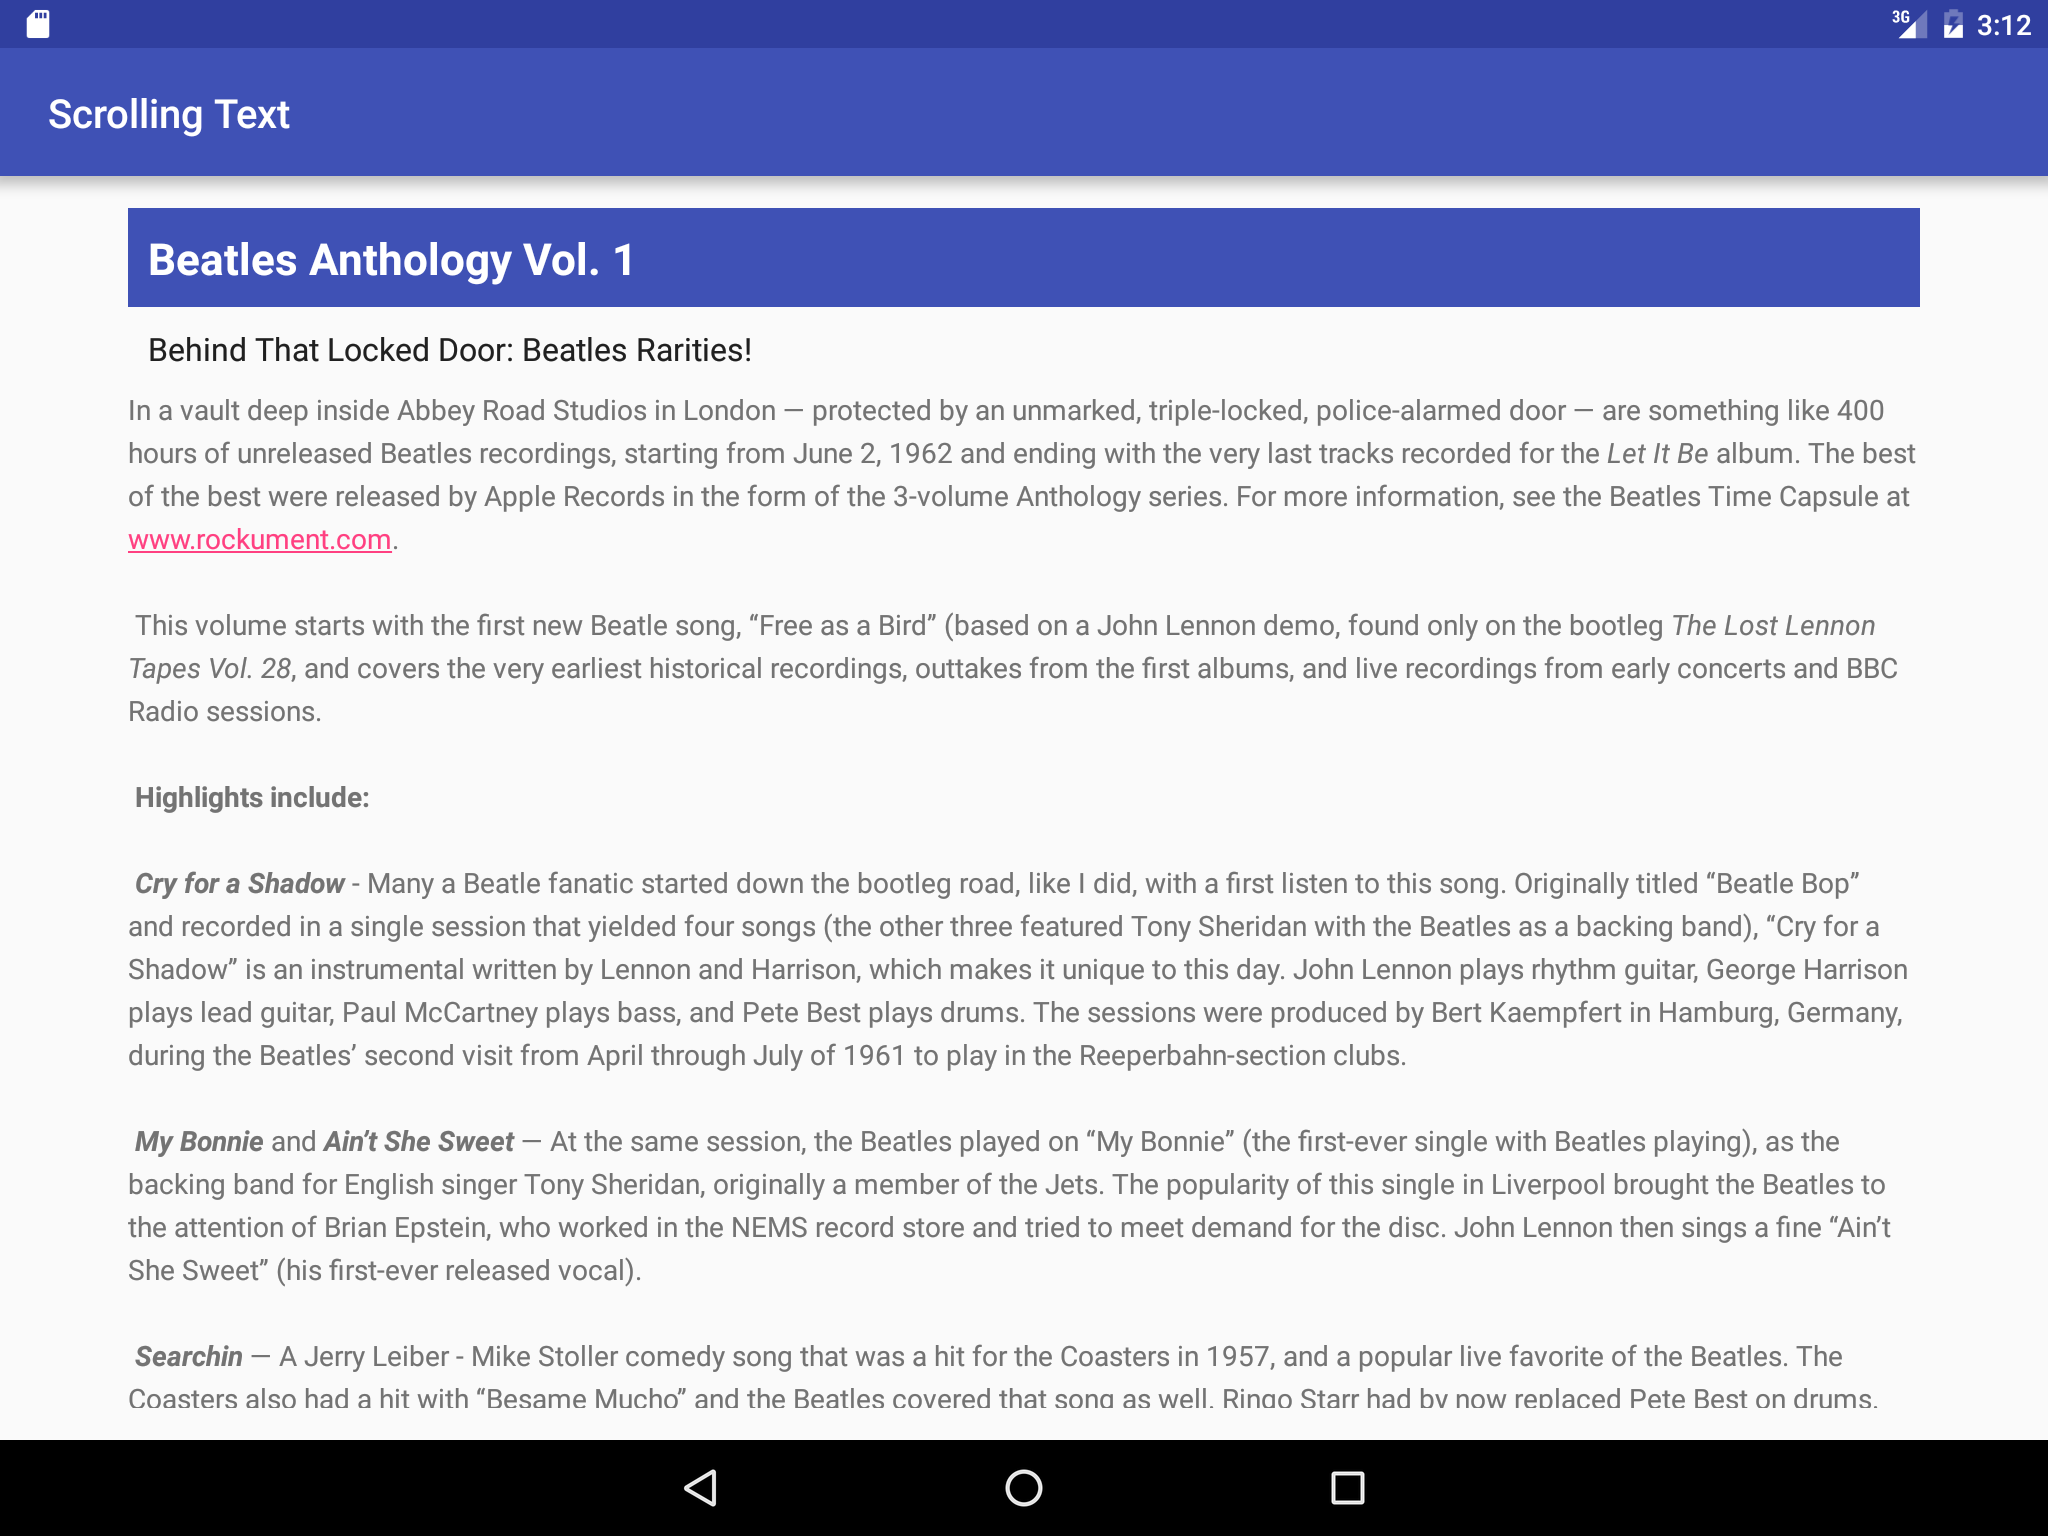
The Scrolling Text app demonstrates the ScrollView UI component. ScrollView is a view group that in this example contains a TextView. It shows a lengthy page of text—in this case, a music album review—that the user can scroll vertically to read by swiping up and down. A scroll bar appears in the right margin. The app shows how you can use text formatted with minimal HTML tags for setting text to bold or italic, and with new-line characters to separate paragraphs. You can also include active web links in the text.
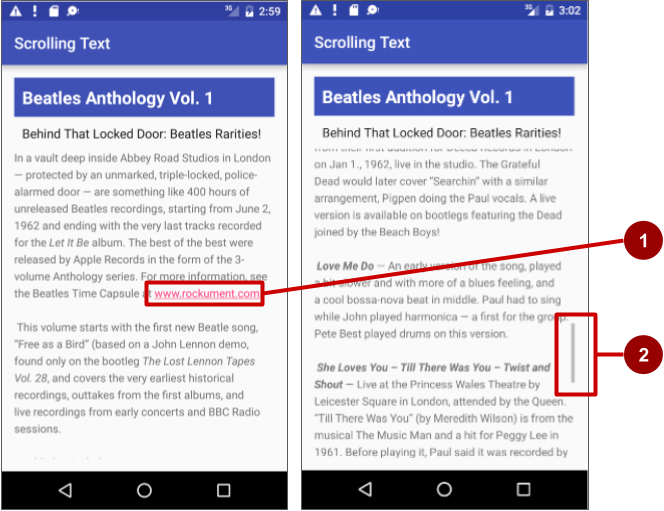
In the above figure, the following appear:
- An active web link embedded in free-form text
- The scroll bar that appears when scrolling the text
Task 1: Add several text views
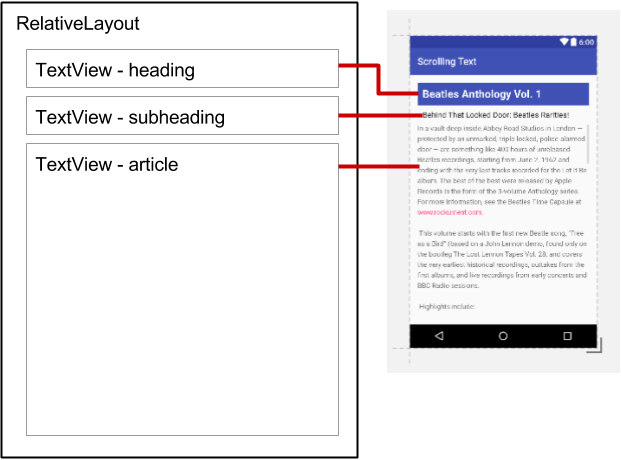
In this practical, you will create an Android project for the Scrolling Text app, add TextViews to the layout for an article title and subtitle, and change the existing "Hello World" TextView element to show a lengthy article. The figure below is a diagram of the layout.
You will make all these changes in the XML code and in the strings.xml file. You will edit the XML code for the layout in the Text pane, which you show by clicking the Text tab, rather than clicking the Design tab for the Design pane. Some changes to UI elements and attributes are easier to make directly in the Text pane using XML source code.
1.1 Create the project and TextView elements
In Android Studio create a new project with the following parameters:
In the app > res > layout folder, open the activity_main.xml file, and click the Text tab to see the XML code if it is not already selected.
At the top, or root, of the view hierarchy is a view group such as ConstraintLayout. Change this view group to RelativeLayout. The second line of code now looks something like this:
RelativeLayout allows you to position its child Views relative to each other or relative to the parent RelativeLayout itself. The default "Hello World" TextView element that is created by the Empty Layout template is a child View within the RelativeLayout view group. For more information about using a RelativeLayout, see the Relative Layout API Guide.
Add a TextView element above the "Hello World" TextView . Add the following attributes to the TextView:
| TextView #1 attribute | Value |
| android:id | "@+id/article_heading" |
| layout_width | "match_parent" |
| layout_height | "wrap_content" |
| android:background | "@color/colorPrimary" |
| android:textColor | "@android:color/white" |
| android:padding | "10dp" |
| android:textAppearance | "@android:style/TextAppearance.Large" |
| android:textStyle | "bold" |
| android:text | "Article Title" |
Tip: The attributes for styling the text and background are summarized in the TextView class documentation.
Extract the string resource for the android:text attribute's hard-coded string "Article Title" in the TextView to create an entry for it in strings.xml.
Place the cursor on the hard-coded string, press Alt-Enter (Option-Enter on the Mac), and select Extract string resource. Then edit the resource name for the string value to article_title.
Tip: String resources are described in detail in the String Resources documentation.
Extract the dimension resource for the android:padding attribute's hard-coded string "10dp" in the TextView to create an entry in dimens.xml.
Place the cursor on the hard-coded string, press Alt-Enter (Option-Enter on the Mac), and select Extract dimension resource. Then edit the Resource name to padding_regular.
Add another TextView element above the "Hello World" TextView and below the TextView you created in the previous steps. Add the following attributes to the TextView :
| TextView #2 Attribute | Value |
| android:id | "@+id/article_subheading" |
| layout_width | "match_parent" |
| layout_height | "wrap_content" |
| android:layout_below | "@id/article_heading" |
| android:padding | "@dimen/padding_regular" |
| android:textAppearance | "@android:style/TextAppearance" |
| android:text | "Article Subtitle" |
Note that since you extracted the dimension resource for the "10dp" string to padding_regular in the previously created TextView , you can use "@dimen/padding_regular" for the android:padding attribute in this TextView .
Add the following TextView attributes to the "Hello World" TextView element, and change the android:text attribute:
1.2 Add the text of the article
In a real app that accesses magazine or newspaper articles, the articles that appear would probably come from an online source through a content provider, or might be saved in advance in a database on the device.
For this practical, you will create the article as a single long string in the strings.xml resource.
- In the app > res > values folder, open strings.xml.
- Enter the values for the strings article_title and article_subtitle with a made-up title and a subtitle for the article you are adding. The string values for each should be single-line text without HTML tags or multiple lines.
Enter or copy and paste text for the article_text string.
Use the text provided for the article_text string in the strings.xml file of the finished ScrollingText app, or use your own generic text. You can copy and then paste the same sentence over and over, as long as the result is a long section of text that will not fit entirely on the screen. Keep in mind the following (refer to the figure below for an example):
As you enter or paste text in the strings.xml file, the text lines don't wrap around to the next line—they extend beyond the right margin. This is the correct behavior—each new line of text starting at the left margin represents an entire paragraph.
Enter \n to represent the end of a line, and another \n to represent a blank line.
Why? You need to add end-of-line characters to keep paragraphs from running into each other.
Tip: If you want to see the text wrapped in strings.xml, you can press Return to enter hard line endings, or format the text first in a text editor with hard line endings.
If you have an apostrophe (') in your text, you must escape it by preceding it with a backslash (\'). If you have a double-quote in your text, you must also escape it (\"). You must also escape any other non-ASCII characters.See the "Formatting and Styling" section of String Resources for more details.
Enter the HTML and </b> tags around words that should be in bold.
Enter the HTML and </i> tags around words that should be in italics. Note, however, that if you use curled apostrophes within an italic phrase, you should replace them with straight apostrophes.
You can combine bold and italics by combining the tags, as in . words. </i></b>. Other HTML tags are ignored.
Enclose The entire text within <string name="article_text"> </string> in the strings.xml file.
Include a web link to test, such as www.google.com (the example below uses www.rockument.com ). Don't use an HTML tag—any HTML tags except the bold and italic tags will be ignored and presented as text, which is not what you want. 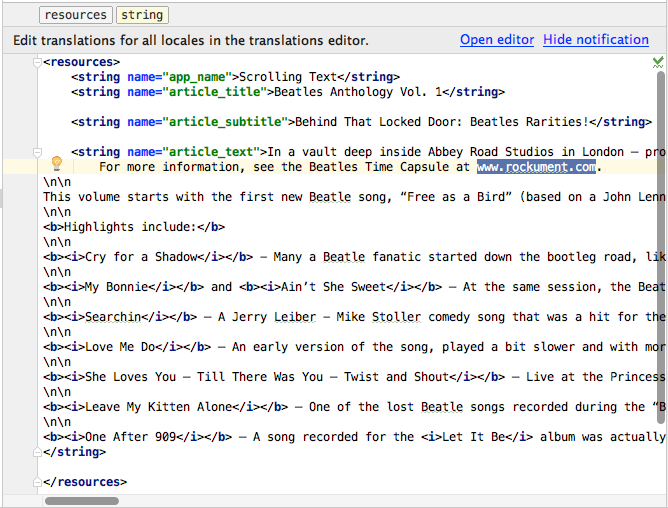
The article appears, and you can even scroll it, but the scrolling is not smooth and there is no scroll bar because you haven't yet included a ScrollView (which you will do in the next task). Note also that tapping a web link does not currently do anything. You will also fix that in the next task.
Solution code
Depending on your version of Android Studio, the activity_main.xml layout file will look something like the following:
Task 2: Add active Web links and a ScrollView
In the previous task you created the Scrolling Text app with TextViews for an article title, subtitle, and lengthy article text. You also included a web link, but the link is not yet active. You will add the code to make it active.
Also, the TextView by itself can't enable users to scroll the article text to see all of it. You will add a new view group called ScrollView to the XML layout that will make the TextView scrollable.
2.1 Add the autoLink attribute for active web links
Add the android:autoLink="web" attribute to the article TextView. The XML code for this TextView should now look like this:
2.2 Add a ScrollView to the layout
To make a view (such as a TextView) scrollable, embed the view inside a ScrollView.
Add a ScrollView between the article_subheading TextView and the article TextView. As you enter <ScrollView, Android Studio automatically adds </ScrollView> at the end, and presents the android:layout_width and android:layout_height attributes with suggestions. Choose wrap_content from the suggestions for both attributes. The code should now look like this:
Move the ending </ScrollView> code after the article TextView so that the article TextView attributes are inside the ScrollView XML element.
Remove the following attribute from the article TextView, because the ScrollView itself will be placed below the article_subheading element, and this attribute for TextView would conflict with the ScrollView:
The layout should now look like this: 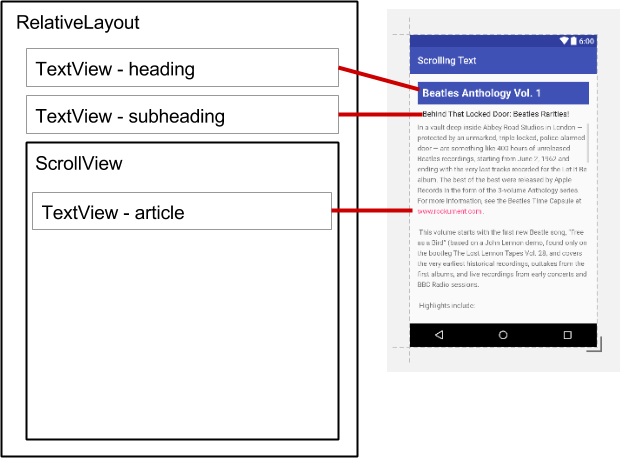
Swipe up and down to scroll the article. The scroll bar appears in the right margin as you scroll.
Tap the web link to go to the web page. The android:autoLink attribute turns any recognizable URL in the TextView (such as www.rockument.com) into a web link.
In the above figure, the following appear:
- An active web link embedded in free-form text
- The scroll bar that appears when scrolling the text
Depending on your version of Android Studio, the activity_main.xml layout file will now look something like the following:
Solution code
Android Studio project: ScrollingText
Task 3: Scroll multiple elements
As noted before, the ScrollView view group can contain only one child view (such as the article TextView you created); however, that View can be another view group that contains Views, such as LinearLayout. You can nest a view group such as LinearLayout within the ScrollView view group, thereby scrolling everything that is inside the LinearLayout.
For example, if you want the subheading of the article to scroll along with the article, add a LinearLayout within the ScrollView, and move the subheading, along with the article, into the LinearLayout. The LinearLayout view group becomes the single child View in the ScrollView as shown in the figure below, and the user can scroll the entire view group: the subheading and the article. 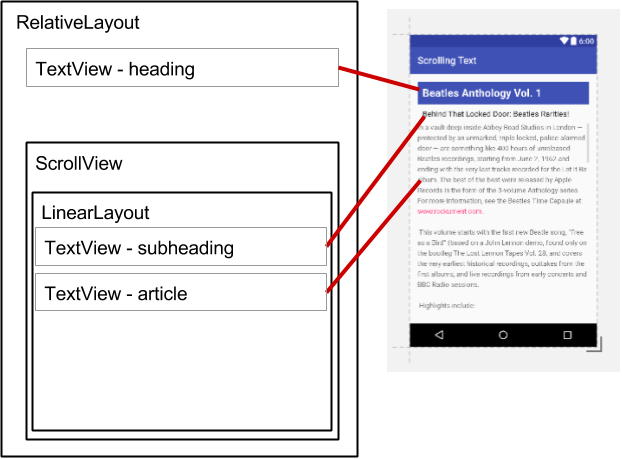
3.1 Add a LinearLayout to the ScrollView
- On your computer, make a copy of Android Studio's project folder for ScrollingText, and rename the project to be ScrollingText2. To copy and rename a project, follow the "Copy and rename a project" instructions in the Appendix.
- Open ScrollingText2 in Android Studio, and open the activity_main.xml file to change the XML layout code.
Add a LinearLayout above the article TextView in the ScrollView. As you enter <LinearLayout, Android Studio automatically adds </LinearLayout> to the end, and presents the android:layout_width and android:layout_height attributes with suggestions. Choose match_parent and wrap_content from the suggestions for its width and height, respectively. The code should now look like this:
You use match_parent to match the width of the parent view group, and wrap_content to make the view group only big enough to enclose its contents and padding.
Add the android:orientation="vertical" attribute to the LinearLayout in order to set the orientation of the LinearLayout to vertical. The LinearLayout within the ScrollView should now look like this (choose Code > Reformat Code to indent the view groups correctly):
Swipe up and down to scroll the article, and notice that the subheading now scrolls along with the article while the heading stays in place.
Solution code
Android Studio project: ScrollingText2
Coding challenge
Note: All coding challenges are optional and are not a prerequisite for later lessons.
Challenge: Add another UI element—a Button—to the LinearLayout view group that is contained within the ScrollView. Make the Button appear below the article. The user would have to scroll to the end of the article to see the button. Use the text "Add Comment" for the Button, for users to click to add a comment to the article. For this challenge, there is no need to create a button-handling method to actually add a comment; it is sufficient to just place the Button element in the proper place in the layout.
TextView
Компонент TextView предназначен для отображения текста без возможности редактирования его пользователем, что видно из его названия (Text — текст, view — просмотр).
Находится в разделе Texts.
TextView — один из самых используемых компонентов. С его помощью пользователю удобнее ориентироваться в программе. По сути, это как таблички: Руками не трогать, По газону не ходить, Вход с собаками воспрещен, Часы работы с 9.00 до 18.00 и т.д., и служит для представления пользователю описательного текста.
Для отображения текста в TextView в файле разметки используется атрибут android:text, например:
Такой подход является нежелательным. Рекомендуется всегда использовать текстовые ресурсы. В будущем эта привычка позволит вам обеспечить многоязыковую поддержку:
Программная установка текста
Программно текст можно задать методом setText():
Атрибуты
Для всех вышеперечисленных атрибутов в классе TextView есть соответствующие методы для чтения или задания соответствующих свойств.
Программно установим размеры текста при помощи setTextSize() с различными единицами измерения.

По умолчанию у компонентов TextView отсутствует фоновый цвет. Чтобы задать цвет, укажите значение Drawable для атрибута android:background. В качестве значения Drawable может использоваться изображение или XML-представление фигуры, включающий ресурс Drawable (поместить в папку res/drawable).
Программная установка фона
В некоторых случаях программисты из-за невнимательности неправильно меняют фон элемента программным способом и удивляются, почему ничего не работает.
Предположим, у вас определён в ресурсах зелёный цвет:
Следующий код будет ошибочным:
Нужно так (два варианта):
Реагируем на событие onClick
Если вы хотите, чтобы TextView обрабатывал нажатия (атрибут android:onClick), то не забывайте также использовать в связке атрибут android:clickable=»true». Иначе работать не будет!
Многострочный текст
Если вы хотите создать многострочный текст в TextView, то используйте символы \n для переноса строк.
Например, в ресурсах:
Обратите внимание, что в тексте также применяется простое форматирование.
Также перенос на новую строку можно задать в коде:
Увеличиваем интервалы между строками
Вы можете управлять интервалом между соседними строчками текста через атрибут android:lineSpacingMultiplier, который является множителем. Установите дробное значение меньше единицы, чтобы сократить интервал или больше единицы, чтобы увеличить интервал между строками.
Бой с тенью
Чтобы оживить текст, можно дополнительно задействовать атрибуты для создания эффектов тени: shadowColor, shadowDx, shadowDy и shadowRadius. С их помощью вы можете установить цвет тени и ее смещение. Во время установки значений вы не увидите изменений, необходимо запустить пример в эмуляторе или на устройстве. В следующем примере я создал тень красного цвета со смещением в 2 пикселя по вертикали и горизонтали. Учтите, что для смещения используются единицы px (пиксели), единицы dp не поддерживаются.

Программный эквивалент — метод public void setShadowLayer (float radius, float dx, float dy, int color):
Создание ссылок автоматом
У TextView есть ещё два интересных свойства Auto link (атрибут autoLink) и Links clickable (атрибут linksClickable), которые позволяют автоматически создавать ссылки из текста.
Выглядит это следующим образом. Предположим, мы присвоим элементу TextView текст Мой сайт: developer.alexanderklimov.ru и применим к нему указанные свойства.
При этом уже на этапе разработки вы увидите, что строка адреса сайта после слов Мой адрес: стала ссылкой. Если вы запустите приложение и нажмете на ссылку, то откроется браузер с указанным адресом. Вам даже не придется писать дополнительный код. Аналогично, если указать номер телефона (параметр phone), то запустится звонилка.
У ссылки есть интересная особенность — при длительном нажатии на ссылку появляется диалоговое окно, позволяющее скопировать ссылку в буфер обмена.
Атрибут autoLink позволяет комбинировать различные виды ссылок для автоматического распознавания: веб-адрес, email, номер телефона.

Цвет ссылки можно поменять через свойство Text color link (XML-атрибут textColorLink), а программно через метод setTextLinkColor().
Программно можно установить ссылки на текст через класс Linkify:

Кроме константы ALL, можно также использовать Linkify.EMAIL_ADDRESSES, Linkify.MAP_ADDRESSES, Linkify.PHONE_NUMBERS. К сожалению, русские адреса не распознаются. В моём случае индекс был распознан как телефонный номер, а город и улица не стали ссылкой.
В таких случаях придётся самостоятельно добавить ссылки в текстах. Например, определим ссылку в ресурсе:
Присвоим созданный ресурс тексту в TextView и запустим пример. Сам текст будет выглядеть как ссылка, но реагировать не будет. Чтобы исправить данную проблему, добавим код:
Ссылки в тексте выглядят не совсем удобными. Есть отдельная библиотека, которая улучшает функциональность. Описание проблем и ссылка на библиотеку есть в статье A better way to handle links in TextView — Saket Narayan.
Совет: Используйте полупрозрачность с умом
Если вам нужно установить текст полупрозрачным, то не используйте атрибут android:alpha:
Дело в том, что такой подход затрачивает много ресурсов при перерисовке.
Атрибут textColor позволяет установить полупрозрачность без потери производительности:
Выделить текст для копирования
По умолчанию, текст в TextView нельзя выделить для копирования. Но в API 11 появилась такая возможность, которая может пригодиться. Делается либо при помощи XML-атрибута android:textIsSelectable, либо через метод setTextIsSelectable().
Добавьте в разметку два компонента TextView и одно текстовое поле EditText для вставки скопированного текста. У первой текстовой метки установим возможность выделения текста декларативно.
Для второго компонента возможность выделения создадим программно.
Сделайте долгий тап на тексте в любом TextView. Увидите стандартные ползунки для выбора длины текста. Скопируйте текст, сделайте длинный тап в EditText и вставьте текст.
Working With the TextView in Android
TextView in Android is one of the basic and important UI elements. This plays a very important role in the UI experience and depends on how the information is displayed to the user. This TextView widget in android can be dynamized in various contexts. For example, if the important part of the information is to be highlighted then the substring that contains, it is to be italicized or it has to be made bold, one more scenario is where if the information in TextView contains a hyperlink that directs to a particular web URL then it has to be spanned with hyperlink and has to be underlined. Have a look at the following list and image to get an idea of the overall discussion.
How to use replace () in Android textview?
This example demonstrate about How to use replace () in Android textview.
Step 1 − Create a new project in Android Studio, go to File ⇒ New Project and fill all required details to create a new project.
Step 2 − Add the following code to res/layout/activity_main.xml.
In the above code, we have taken name as Edit text, when user click on button it will take data and replace all a values with
Step 3 − Add the following code to src/MainActivity.java
Let's try to run your application. I assume you have connected your actual Android Mobile device with your computer. To run the app from android studio, open one of your project's activity files and click Run  icon from the toolbar. Select your mobile device as an option and then check your mobile device which will display your default screen −
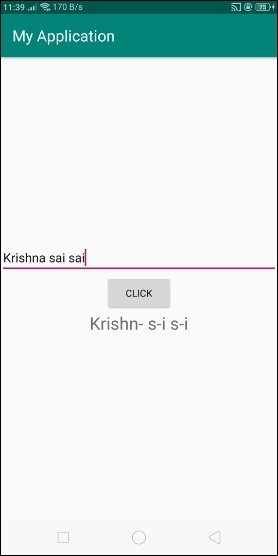
In the above result, enter the string as “Krishna sai sai” . It replaced all a values with −