Amd Radeon Software Settings What Do They All Mean
Use it wisely, however, and this tool can take your gaming up a few notches. So to help you, here’s a list of all the main features you’ll find in Radeon Software Settings, with a particular focus on the “Gaming” and “Display” sections.
Graphics#
Radeon Anti-Lag#
This feature is designed to reduce input lag by making sure the CPU and GPU speeds are in sync with each other. Sounds great, especially with its promise of up to 32% input lag reduction, but in reality a given game has to support the feature, which may limit its benefits. There’s a lot of discussion about what kind of games this feature benefits most, and it seems that you should turn it off for games that are CPU-bound lest you incur a performance penalty. Beyond that, it seems to work best for games that run in the 60-90fps range.
Radeon Chill#
If excessive heat (and the performance throttling that comes off the back of it) is a concern for you, then there’s no harm in switching on Radeon Chill. This feature regulates the framerate depending on your in-game movement, so it sneakily reduces the framerate when it’s not going to affect your enjoyment of the game (such as when there’s no on-screen motion). Once you turn it on, you can set the minimum and maximum framerates you want your games running between, making it double as a handy framerate limiter.
Radeon Boost#
When you turn very quickly in a first-person shooter, or carry out other actions where for even just a single frame the action is barely legible, then Radeon Boost lowers the resolution in those moments to help boost your framerate and lower input lag. It’s a nifty feature, with the main downside being that it’s compatible with only a limited number of games. But there’s no reason not to leave it on.
Radeon Image Sharpening#
A lot of gamers swear by this one. Radeon Image Sharpening has been around for a while now but can be applied to any 3D game to help combat the blur that sometimes results from poorly implemented antialiasing. To give you an idea of how well it works, we direct you to Reddit, where Redditor Guerbest recently did a post showing the before/after difference it can make to an image. Impressive stuff. It works based on a percentage slider, so we recommend starting it off at 50% then increasing or decreasing it depending on the quality/performance you get out of it.
Wait for Vertical Refresh#
This is a slightly roundabout way of saying “VSync” (Vertical Synchronization), which you may have heard of. If you have a game that’s running at a higher frame-rate (fps) than the refresh rate (Hz) of your monitor, then you may see jarring horizontal lines on your screen known as screen tearing. VSync combats this by limiting your GPU’s frame-rate to your monitor’s refresh rate. Click the “Advanced” button just below all the features we mentioned above, and a whole load more graphics settings will appear for you. Starting with…
Anti-Aliasing#
Particularly on screens with lower resolutions, diagonal lines in video games (which are made of individual square pixels) may look jaggy and “staircased” rather than smooth. Anti-aliasing (AA) resolves this by effectively filling the gaps in these staircased lines to smooth them out. If you choose the “Enhance application settings” option, it will utilize something called “Enhanced Quality Anti-Aliasing,” which layers over your AA in-game settings to further smooth edges. If you choose “Override application settings,” it will use the settings outlined below.
Anti-Aliasing Method#
There are three types of anti-aliasing you can use in Radeon Settings:
Multisampling (MSAA) – The easiest on your GPU, MSAA reduces aliasing only on parts of the screen that really need it, usually along edges of objects.Adaptive multisampling (Adaptive MSAA) – The middle ground. Reduces jaggies on edges of objects with transparent elements (barbed wire fences and so on).Supersampling (SSAA) – The most powerful (and graphically demanding) AA method, which reduces aliasing on the entire screen.
Morphological Filtering (MLAA)#
An AMD-specific type of anti-aliasing that claims to have a similar effect to SSAA but with less of a performance hit. In reality, its effectiveness varies from game to game, so it’s worth experimenting with it to see where and when it works best.
Anisotropic Filtering Mode#
Much like anti-aliasing reduces jaggies on edges, this improves them within textures (making wooden crates look more like wooden crates, for example, rather than boxes with a “wooden crate” sticker slapped onto them). It also keeps textures looking good in the distance rather than letting them get blurry and prevents textures from getting jaggy when viewed from tight angles. If you turn this on, you get options for 2x, 4x, 8x and 16x anisotropic filtering, with even the highest level running fairly well on modern graphics cards.
Texture Filtering Quality#
This changes texture quality on the fly to improve game smoothness and performance. Its effects are fairly negligible compared to other texture options, and the popular opinion in the gaming community currently is to set it to “Performance.”
Surface Format Optimization#
Another somewhat outdated setting, this was used some years back on games to decrease graphical quality and improve performance but is unlikely to have much effect on modern games and modern GPUs. You certainly won’t miss it if you leave it off.
Tessellation Mode#
Increases in-game graphics by breaking larger polygons up into smaller pieces, making graphics smoother (a bit like crushing peppercorns into powdered pepper – if you’re into your foody analogies). “AMD Optimized” uses x64 tessellation, but if you select “Override application settings,” you can set a lower rate if you think the performance impact is too high.
OpenGL Triple Buffering#
Not a huge number of games use the OpenGL API these days (here’s a list of ones that do), but for those that do, having this turned on together with VSync will allow your frame-rate to fluctuate more smoothly. So where double buffering would drop the fps to 30 even though it could technically be running at 55 to make up for the delay caused by synchronization, Triple buffering removes this issue, allowing frame-rates to run at whatever fps your GPU can handle.
Reset Shader Cache#
Stores shaders for games locally on your hard drive, greatly increasing load times (particularly if you don’t have an SSD). Be warned that this takes up quite a lot of hard drive space (3oGB or so).
Radeon Display Settings#
In the Radeon Software Settings menu, clicking “Display” will take you to the settings relating to your monitor. Here’s everything you need to know about them.
AMD FreeSync#
AMD’s answer to Nvidia G-Sync, this “adaptive sync” technology is built into certain GPUs and monitors and all but removes screen tearing. It synchronizes the refresh rates of your monitor and graphics card, adapting the monitor’s refresh rate to the graphics card’s. Think of it as a very powerful version of V-Sync which you can read about further down.
Virtual Super Resolution#
AMD’s fancy word for “downsampling.” This sort of unlocks resolutions higher than your monitor is capable of (4k for a 1080p monitor, for example), then squishes the resolution down to your monitor size, resulting in a crisper image with less jaggies.
GPU Scaling#
This uses your graphics card (instead of your monitor) to fit the resolution of whatever you’re running to your screen. For most decent gaming graphics cards, this is a better option than leaving your monitor to do the work and should lead to a clearer image.
Scaling Mode#
In most cases you’ll be using the full size of your screen, but if you’re playing games at a 4:3 aspect ratio, then forcing it to fit the whole screen will stretch the image in an ugly way. Maybe that doesn’t bother you, in which case go for “Full panel,” but we recommend the “Preserve aspect ratio” option here. Plenty to take in, but these will hopefully give you the confidence to play around with your AMD settings a little bit more. Remember that all of these settings can also be applied to individual games (To add game profiles to Radeon Settings, go to “Gaming -> Add -> Scan.”), and what works for some games might not work for others. Happy tinkering!
Vari-Bright#
This feature – mainly for laptops – dynamically adjusts the screen brightness depending on whether you’re plugged into the power, gaming and other variables. This feature can be a little frustrating, as Windows already has its own in-built screen dimmer when you unplug from the mains, and this has been found to interfere with it. Unless you really want auto screen-dimming, we recommend keeping this one off. If you have an Android phone, you should also check out the AMD Link app, which syncs up with your Radeon Settings so you can monitor such things as your GPU fan speed, temperature and frame rate. You can even use your phone to record your gaming! If you want to delve deeper into the world of AMD, then see our reviews of the latest AMD Ryzen CPUs. We have also compared the latest batch of AMD and CPUs for 2021, to help you decide which to go for this year.
Vari-Bright Amd — что это?
 Vari-Bright Amd — фирменная технология, позволяющая снизить уровень подсветки, одновременно повышая яркость компенсировав снижение подсветки.
Эффективность функции можно настроить.
Разбираемся
- Данная технология необходима для экономии энергии за счет уменьшения подсветки и одновременном повышении яркости. Суть в том, что уровень подсветки снижается, а чтобы немного улучшить при этом качество картинки — повышается яркость.
- Опция активная только если ноутбук работает от батареи. Если от сети — автоматически отключается.
- Vari-Bright работает автоматически, анализируя содержимое экрана, производя определенные настройки. Работу технологии можно настроить используя фирменное приложение AMD Radeon Software.
 Кстати Virtual Super Resolution позволяет получить высокое качество картинки, не уступающее разрешению 4K, когда экран формата 1080p. Работает просто — рендеринг игры происходит в высоком разрешении, после изображение масштабируется до разрешения используемого экрана. Однозначно стоит попробовать включить.
[Игровой ноутбук] Обзор AMD Vari-Bright
Отсканируйте QR-код, чтобы открыть эту страницу на вашем смартфоне.
[Игровой ноутбук] Обзор AMD Vari-Bright
Целью технологии AMD Vari-Bright является экономия энергии за счет уменьшения подсветки при одновременном повышении яркости изображения, чтобы компенсировать пониженный уровень подсветки и повысить удобочитаемость содержимого экрана. Эта функция активируется только тогда, когда система работает от батареи (режим постоянного тока) и отключается при подключении к адаптеру питания (режим переменного тока). Поскольку технология Vari-Bright постоянно определяет используемые страницы и сама регулирует режим подсветки, вы можете отключить или изменить уровень Vari-Bright с помощью следующих настроек, если вы чувствуете дискомфорт из-за частого изменения подсветки.
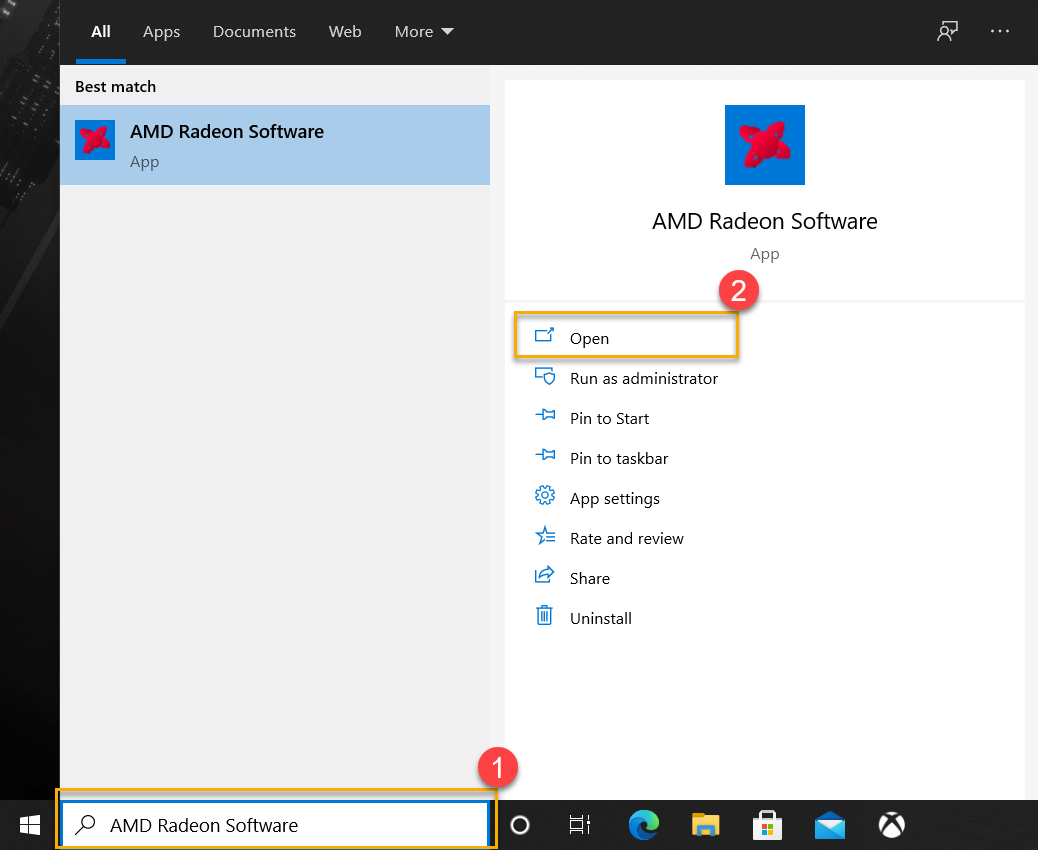
2-1 Пожалуйста, укажите в поисковой строке Windows [AMD Radeon Software] ① , нажмите [Открыть] ②
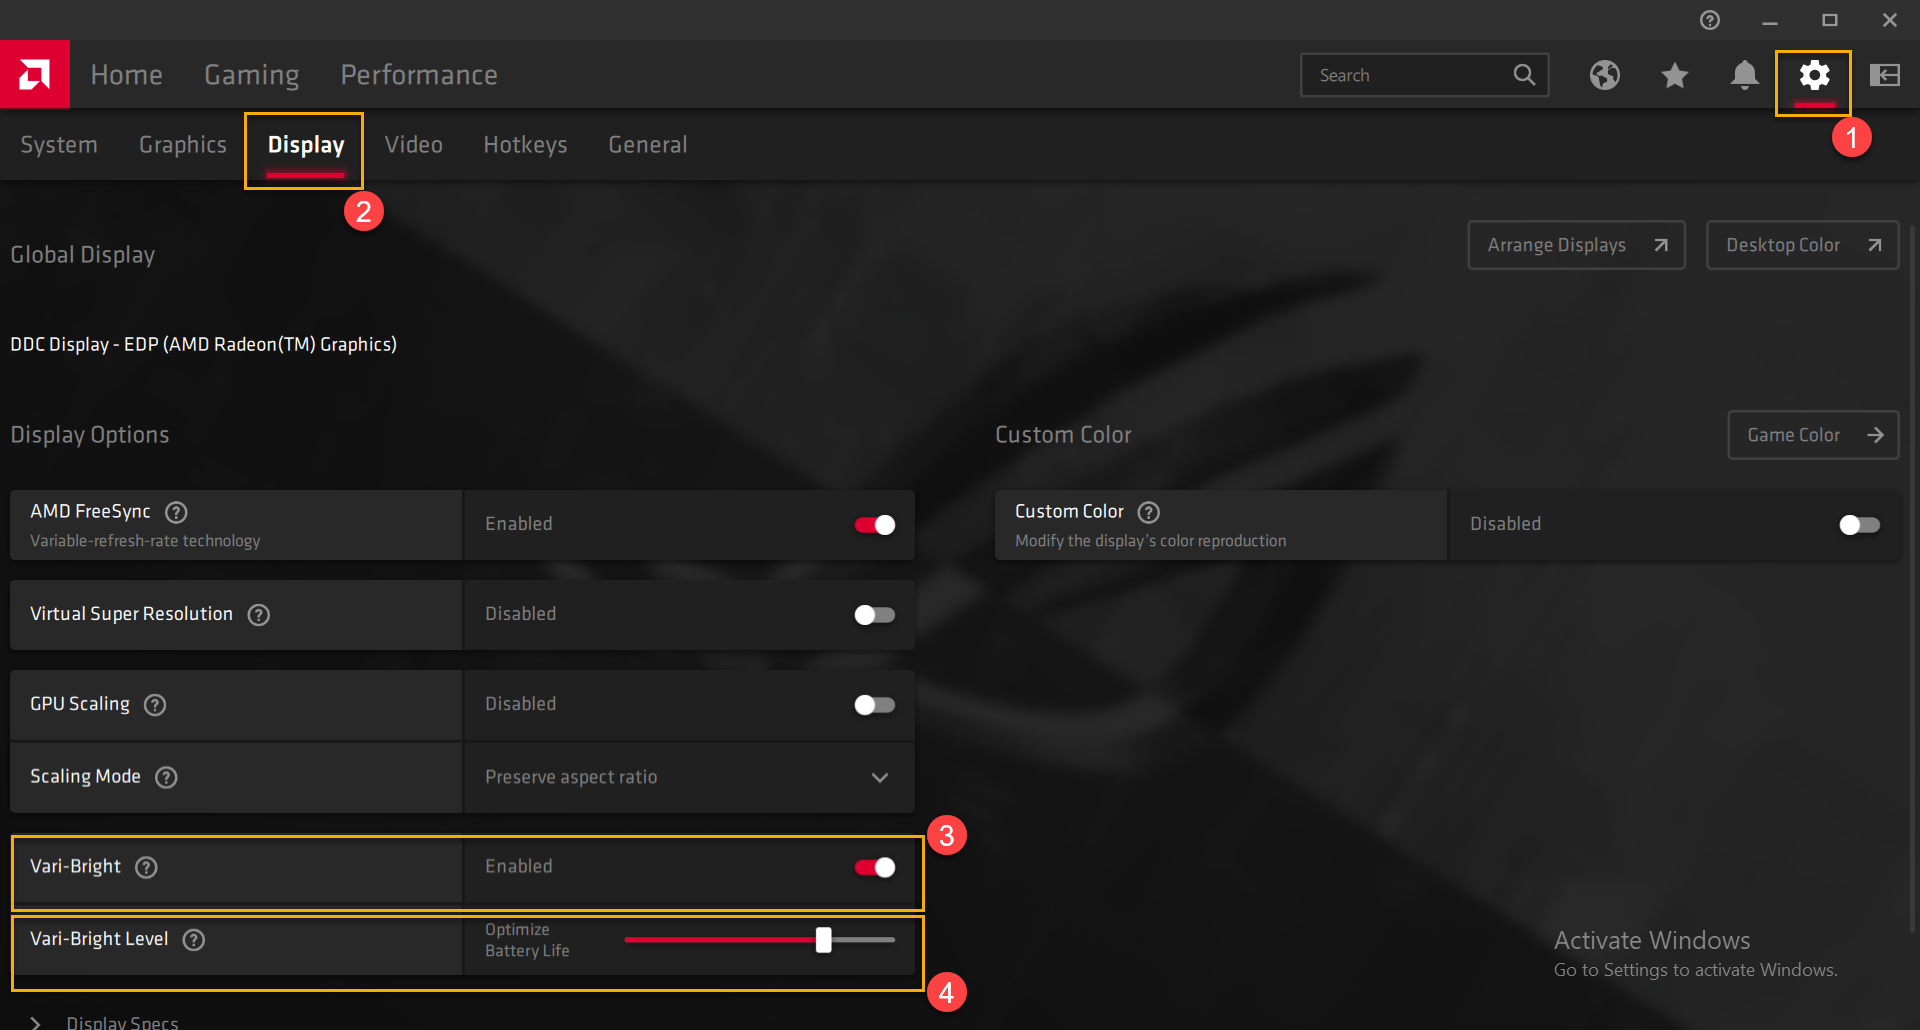
2-2 На главной странице в [Настройках] ① , найдите опции дисплея в пункте [Дисплей] ② . Вы можете включить [Vari-Bright] ③ или отключить, а [уровень Vari-Bright] ④ можно оптимизировать в соответствии с вашими предпочтениями в отношении энергопотребления.
FA506/FA706/GA401/GA502 серии (ASUS TUF Gaming A15& A17, ROG Zephyrus G14&G15)
* Больше информации о поддерживаемых моделях можно найти на сайте ASUS
※Больше информации о ПО AMD Radeon можно получить по ссылке:
Настройки и интерфейс новых драйверов AMD Radeon Software Crimson ReLive
 Доброго дня!
Вообще, обычно, я никогда не пишу «новости» и обзоры каких-то обновлений, выхода новых версий драйверов и пр. Но сейчас отдельный случай.
Дело в том, что с привычным пакетом драйверов Catalyst мы (похоже) прощаемся, т.к. на смену ему приходит новая версия Crimson Edition (или Crimson ReLive (Crimson — в переводе с англ. значит «малиновый») ).
Главные нововведения : полностью переработанный интерфейс (его не узнать!); улучшен установщик; параметры и настройки разнесены так, что их гораздо быстрее и легче менять. Называется панель управления теперь просто «Radeon Settings» (а не как раньше «Центр управления Catalyst settings. «) .
Также не могу не отметить, что панель управления стала гораздо быстрее открываться (да и вообще стала более отзывчива), есть пресеты для быстрой оптимизации видеокарты под производительность (либо под качество), появились более расширенные настройки вывода «картинки» на дисплей, не обошли стороной и возможность разгона GPU.
В общем и целом, получилось всё весьма интересно (по крайней мере, хуже точно не стало). Собственно, в этой заметке приведу десяток скринов нового интерфейса с небольшими комментариями и описанием ряда ключевых параметров.
Заметка!
Прежде чем настраивать видеодрайвер, не забудьте его обновить. О том, как это сделать можете узнать в этой заметке — https://ocomp.info/kak-obnovit-drayver-na-videokartu.html
AMD Radeon Settings (Crimson. ): обзор настроек и нового интерфейса
И так, если у вас установлены (и обновлены) видеодрайвера — в трее (рядом с часами) у вас должен быть значок от AMD ![]() (напоминающий чем-то малину) . Для входа в настройки (панель управления AMD) — достаточно кликнуть по нему двойным щелчком мышки.
(напоминающий чем-то малину) . Для входа в настройки (панель управления AMD) — достаточно кликнуть по нему двойным щелчком мышки.
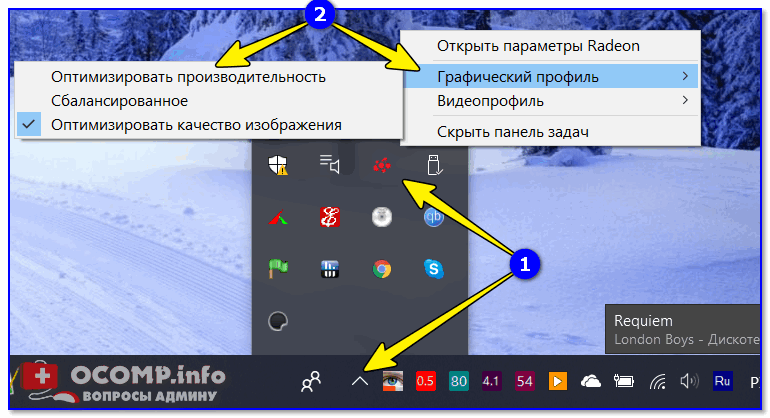
Кстати, если говорить «об этом значке» — не могу сразу же не отметить, что разработчики добавили мега-полезную фишку: можно в 2 клика мыши оптимизировать работу видеокарты на производительность или качество . Например, во время обычной работы можно «сидеть» на качестве, как только запустили игру и увидели притормаживания (или просто захотели увеличить FPS) — нажали клавишу WIN, поменяли пресет (см. скрин ниже) и вновь вошли игру. Удобно?!
AMD Radeon — оптимизировать качество или производительность
Отмечу, что качество картинки при оптимизации под производительность значительно падает (в качестве примера привожу скрин одного и того же окна игры, заметно при увеличении) . При работе на производительность резкость изображения падает, некоторые грани и элементы недостаточно хорошо прорисовываются — но благодаря этому поднимается FPS (т.е. опция сделана явно не для простой «показухи») .
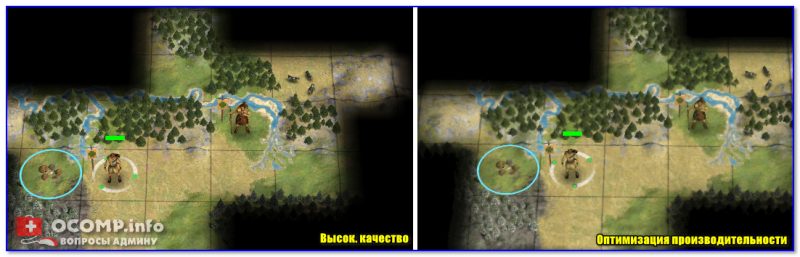
Разница между оптимизации на производительность и качество / Кликабельно (разница заметна при увеличении картинки)
Теперь что касается самой панели управления.
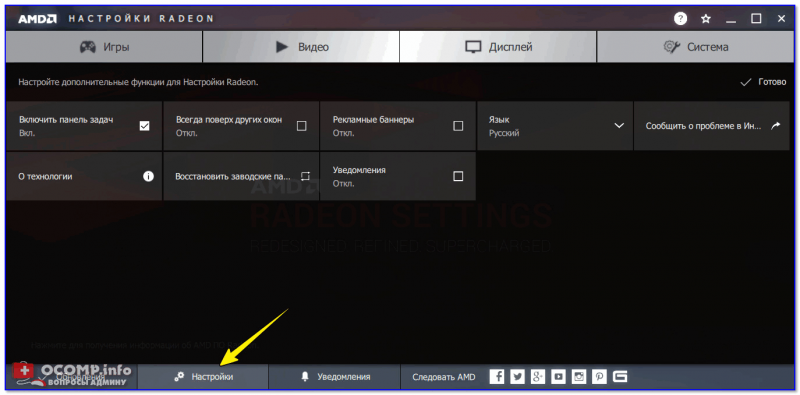
При первом входе рекомендовал бы сразу открыть вкладку «Настройки» («Settings») . В ней можно поменять язык ( прим. : у некоторых по умолчанию активируется английская версия) , отключить уведомления, рекламные баннеры, восстановить заводские настройки. В общем, все самое базовое.
Настройки (общие) / AMD Radeon
Кстати, обратите внимание, что все настройки видеокарты разбиты на 4 больших раздела: «Игры», «Видео», «Дисплей» и «Система».
Наибольший интерес представляет раздел «Игры» . Здесь можно задать как глобальные настройки для всех запускаемых 3D-приложений, так и для каждой игры в отдельности.
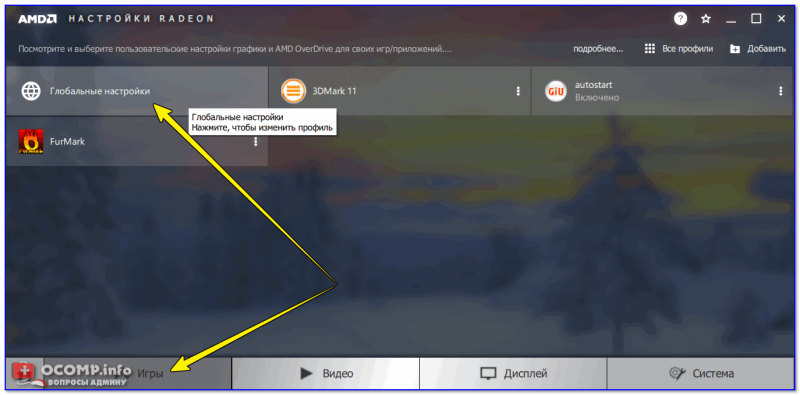
Глобальные настройки (AMD Radeon Settings)
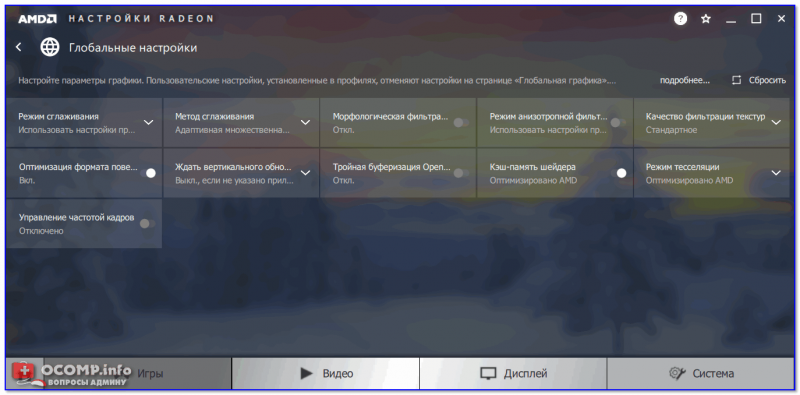
Возможности вкладки «глобальные настройки графики» представлены на скрине ниже. Те параметры и настройки, которые раньше были представлены в разных разделах («Сглаживание», «Текстурная фильтрация», «Управление частотой кадров», «Тесселяция») , теперь объединили в один.
Примечание!
О том, что значат эти параметры (режим сглаживания, метод сглаживания, режим анизотропной фильтрации и пр.) , и как их выставить для макс. производительности — можете узнать из этой заметки: https://ocomp.info/kak-uskorit-videokartu-amd-radeon.html
AMD Radeon — раздел настроек игр
Вкладка «Видео» представлена достаточно «скупо» (на мой взгляд): можно выбрать 1 из 8 режимов (по умолчанию, классическое кино, расширенный, домашнее видео, на улице, спорт, интенсивный, пользовательское значение) .
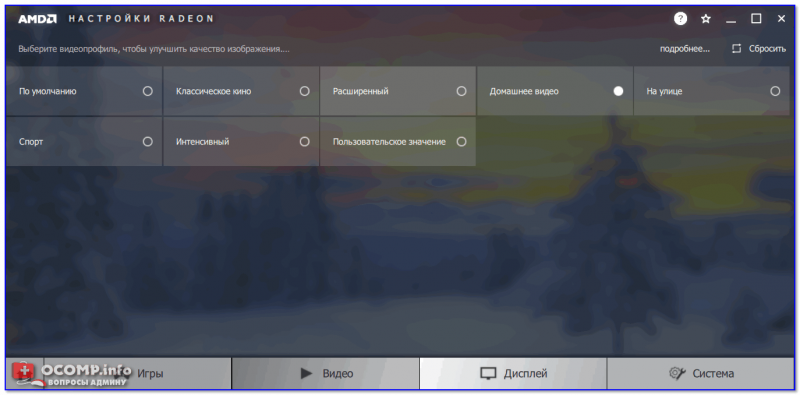
AMD Radeon — видео
Кстати, менять видеопрофиль можно также двумя щелчками мышки при помощи значка в трее.
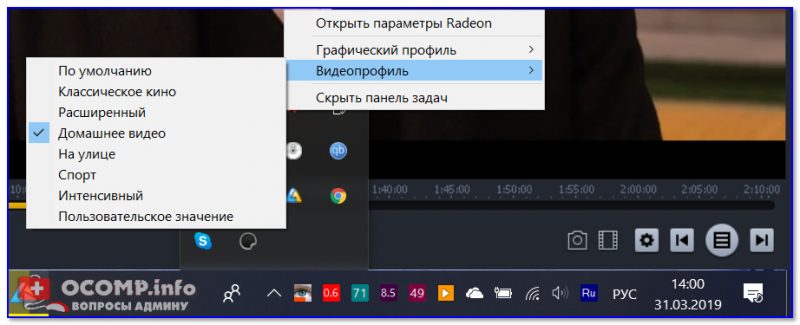
Видеопрофиль тоже можно менять 2-мя щелчками мышки
Не могу не отметить, что как я не менял видеопрофили — существенного изменения изображения не заметил (кроме яркости и контрастности, по-моему, эти профили ничего не меняют).

Пример смены видеопрофиля: разница на скринах почти незаметна (кадры из фильма «Oz the Great and Powerful»).
В разделе «Дисплей» есть несколько интересных опций:
-
AMD FreeSync — опция, которая позволяет сделать картинку в игре более плавной (прим.: ваш монитор также должен поддерживать эту возможность). Чтобы было легче понять о чем идет речь — взгляните на фото ниже;
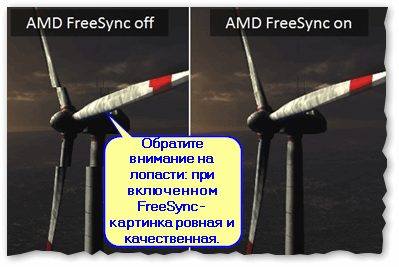
Сравнение картинки на мониторе — при включенной динамической регулировке частоты, и при выключенной
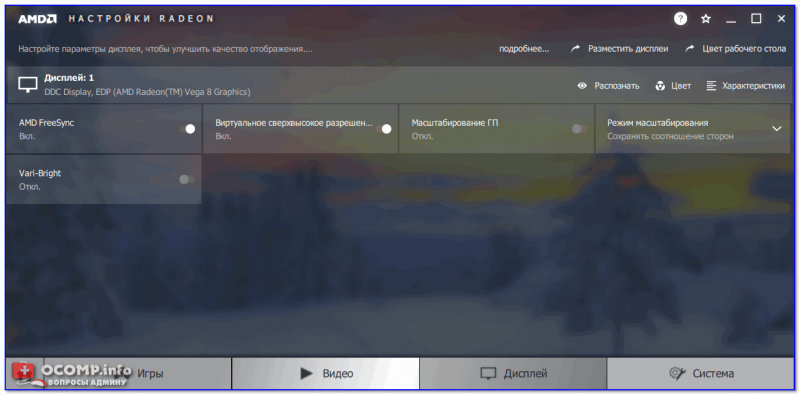
AMD Radeon — дисплей
В разделе «Система» можно ознакомиться с характеристиками вашего железа: модель видеокарты, количество ОЗУ, версия ПО, тип памяти и пр. Кстати, в этом разделе есть три вкладки «Обзор», «Программное обеспечение», и «Аппаратура» (данных о системе и железе предоставлено достаточно много) .
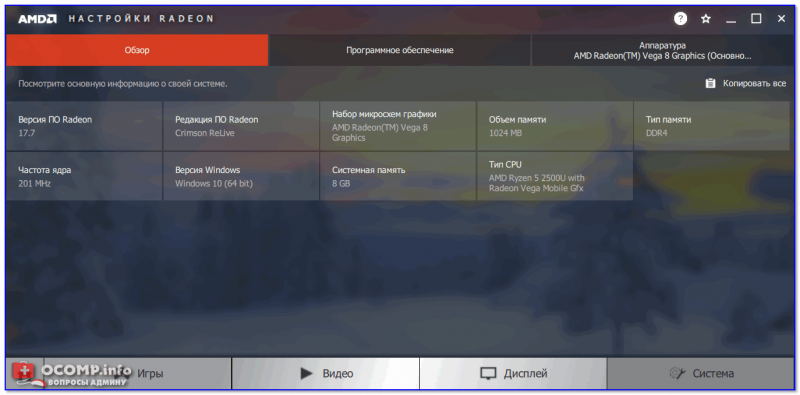
AMD Radeon — система
Тем не менее, без AIDA64 пока еще обойтись нельзя (😒). Например, в AMD Settings явно не хватает мониторинга температуры, количество FPS, частот, величины загрузки ядер ЦП и пр. Причем это должно быть сделано так, чтобы эти данные легко выводились в углу экрана любой из игр (3D-приложения).