Как создать бота в Discord
В статье мы расскажем о том, как создается приложение для бота, выполняется первая авторизация на сервере и пишется общий код для нормализации работы. Имея «каркас», вы уже можете добавлять пользовательские команды и сразу проверять, как они работают.
Создание приложения и авторизация бота
Далее речь пойдет о двух разных методах создания бота — при помощи JavaScript и Python. Каждый из них имеет свои особенности и нюансы, но вот метод создания приложения и авторизации бота на сервере остается одинаков, поскольку не зависит от выбранного языка программирования. После этого вы сможете перейти к подбору библиотеки и работе с кодом.
- Перейдите по ссылке выше, чтобы оказаться на главной странице портала для разработчиков в Discord. Используйте личные авторизационные данные для входа в аккаунт.

- Создайте новое приложение, нажав кнопку «New Application».

Выбор среды разработки
Перед началом работы с кодом в упомянутых языках программирования уточним, что вам понадобится установить текстовый редактор или специальную среду разработки, поддерживающую синтаксис Python или JavaScript (в зависимости от выбранного). Конечно, можно использовать просто «Блокнот», но по удобству он уступает специализированным программам. Просмотрите их списки в обзорах по следующим ссылкам и выберите для себя подходящий софт.

Вариант 1: Python и библиотека discord
Если ранее вы не сталкивались с языками программирования или знакомы с ними только поверхностно, создание бота для Discord на Python — лучший выбор. Этот ЯП проще учится, компактный и имеет логически понятный синтаксис, поэтому идеально подходит новичкам. К тому же в сети есть огромное количество исходников с различными командами или уже готовыми ботами, которые ничего не мешает скопировать и использовать в своих целях. В следующих шагах вы узнаете, как создать «каркас» бота на Python и запустить его, чтобы проверить работу.
Шаг 1: Установка Python и библиотеки discord
По умолчанию в Windows нет встроенных функций и утилит, предназначенных для работы с Питоном, поэтому их придется установить отдельно, не забыв про подключаемую библиотеку discord, которая позволит взаимодействовать с полезными функциями и командами, связанными исключительно с Дискордом.
- Воспользуйтесь ссылкой выше, чтобы перейти на официальный сайт Python и нажмите кнопку для загрузки его последней версии.

- На новой странице отыщите инсталлятор для Windows и начните его загрузку.

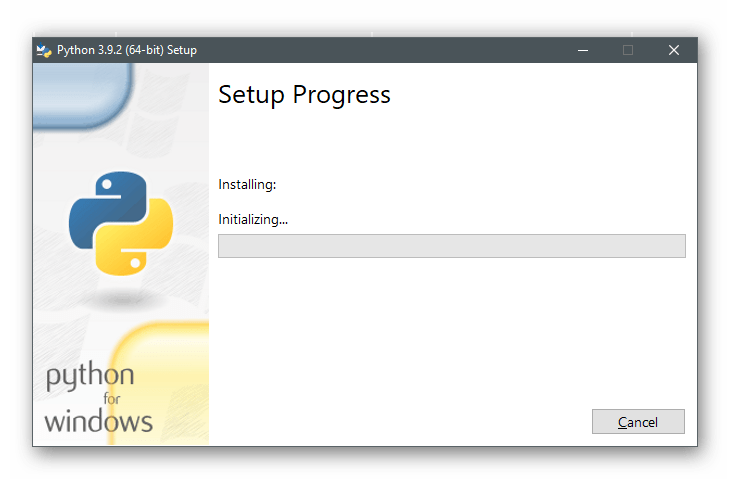
- Дождитесь завершения скачивания и запустите установщик.

- Можно запустить установку без изменений, но обязательно отметьте галочкой «Add Python X.X to PATH», чтобы все переменные среды добавились автоматически и не возникло проблем при дальнейшем вводе команд.

- Ожидайте завершения установки и на всякий случай перезагрузите компьютер, чтобы все изменения вступили в силу.
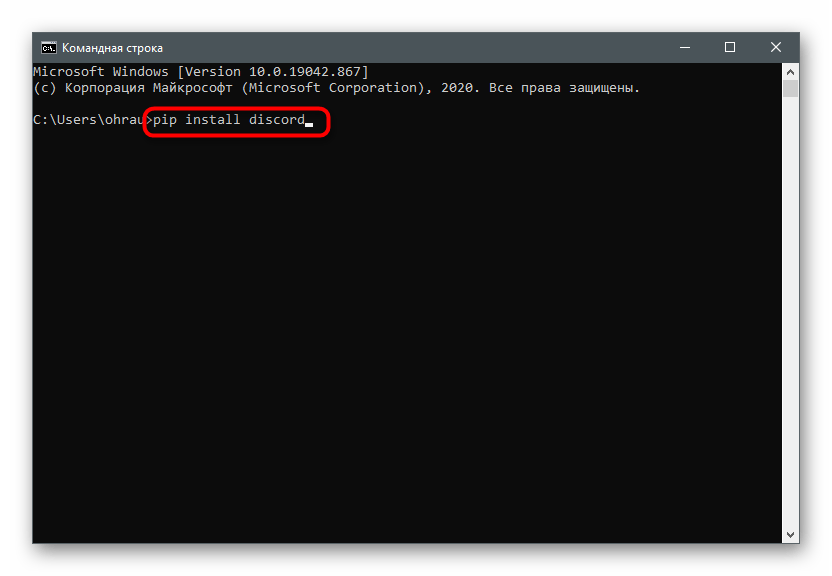
- Откройте «Командную строку» удобным для вас способом, например, отыскав приложение в меню «Пуск».

- Напишите команду pip install discord и подтвердите ее нажатием клавиши Enter.
- Начнется загрузка файлов и в консоли «побегут» строки. Не закрывайте данное окно до завершения скачивания.
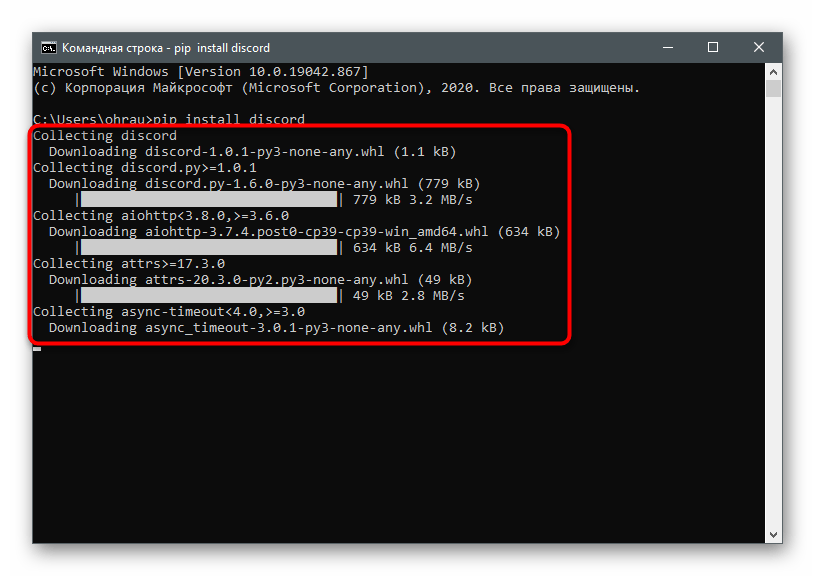
- Как только появилась информация «Successfully installed», закрывайте «Командную строку» и переходите далее.
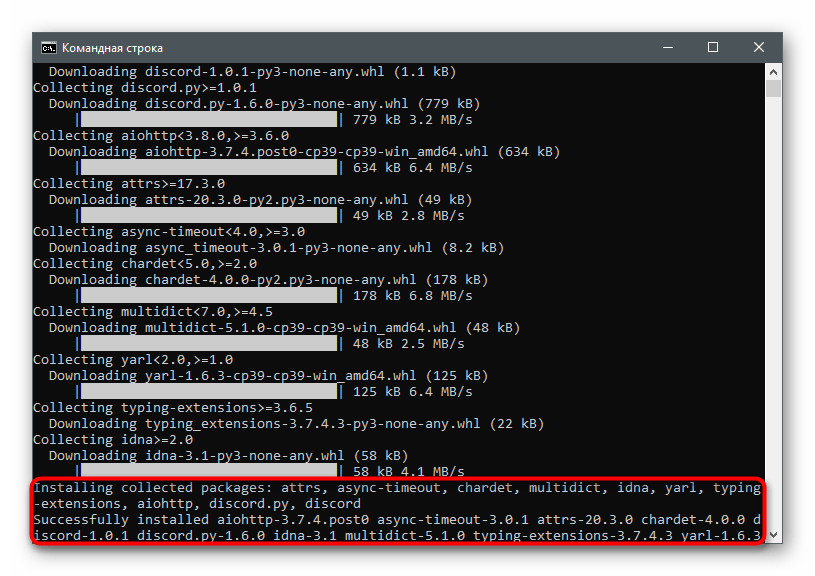
Если Python у вас установлен, но команда для добавления подключаемой библиотеки не работает, выполните обновление компонента PIP, о чем рассказывается в другой статье на нашем сайте. Там же вы найдете инструкцию и по изменению переменных среды, если этого не произошло во время установки.
Шаг 2: Создание словаря бота
В этом варианте мы будем использовать словарь для бота, то есть конфигурационный файл, хранящий в разных именах значения токена, префикса и имени бота. Это существенно упрощает весь процесс написания кода и не заставляет каждый раз вспоминать данные приложения, чтобы ввести их в одной строке.
- Начните с запуска IDLE, отыскав добавленное приложение через меню «Пуск». Если вы скачали другую среду разработки, откройте ее и создайте новый проект на базе Python.

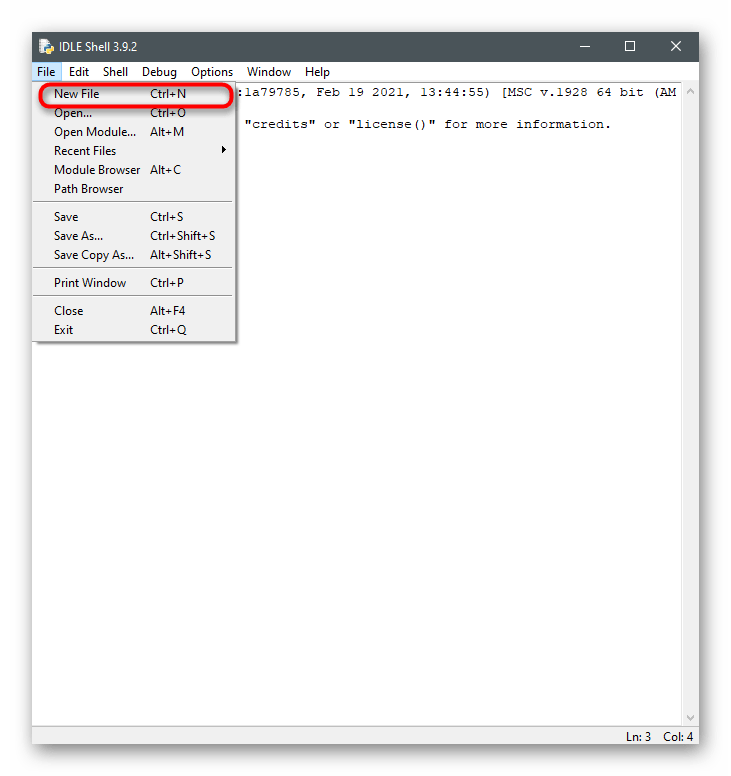
- После открытия нового окна вызовите меню «File» и выберите пункт «New File». Сделать это можно и при помощи комбинации клавиш Ctrl + N.
- В новом окне, которое и предназначено для написания кода, вставьте блок
Шаг 3: Создание тела бота
Для обеспечения базового функционирования бота ему нужно создать «тело» — основной код для запуска и работы на сервере. Понадобится отдельный файл, который можно назвать как угодно, но обязательно сохранить его в том же месте, где находится созданный ранее словарь.

- В среде разработки откройте меню «File» и создайте новый файл.
- Вставьте туда три команды, которые предназначены для импорта установленных библиотек и созданного ранее файла:
@bot.command() # Не передаём аргумент pass_context, так как он был нужен в старых версиях.
async def hello(ctx): # Создаём функцию и передаём аргумент ctx.
author = ctx.message.author # Объявляем переменную author и записываем туда информацию об авторе.
Далее вы видите полный код, о котором шла речь выше, поэтому при надобности просто можете скопировать его.

import discord
from discord.ext import commands
from config import settings
bot = commands.Bot(command_prefix = settings[‘prefix’])
@bot.command() # Не передаём аргумент pass_context, так как он был нужен в старых версиях.
async def hello(ctx): # Создаём функцию и передаём аргумент ctx.
author = ctx.message.author # Объявляем переменную author и записываем туда информацию об авторе.
await ctx.send(f’Hello,
bot.run(settings[‘token’]) # Обращаемся к словарю settings с ключом token, для получения токена
Дополнительно уточним, что вы можете использовать альтернативную схему, избавившись от файла со словарем и получив немного другое «тело» для бота. Решите, подходит ли вам этот код больше. Указанные строки с токеном нужно будет отредактировать под себя.
import discord
from discord.ext import commands
TOKEN = ‘Ваш токен’
bot = commands.Bot(command_prefix=’!’)
@bot.command(pass_context=True) # разрешаем передавать аргументы
async def test(ctx, arg): # создаем асинхронную функцию бота
await ctx.send(arg) # отправляем обратно аргумент
Шаг 4: Запуск бота
Теперь можно запустить бота для проверки, для чего понадобится созданный в Шаге 3 основной файл. Скомпилируйте его прямо через среду разработки или вызовите «Командную строку» и введите там python bot.py , где bot.py — название созданного файла. Если файл найти не удалось, укажите его полный путь, например python C:\Users\USER_NAME\bot.py .
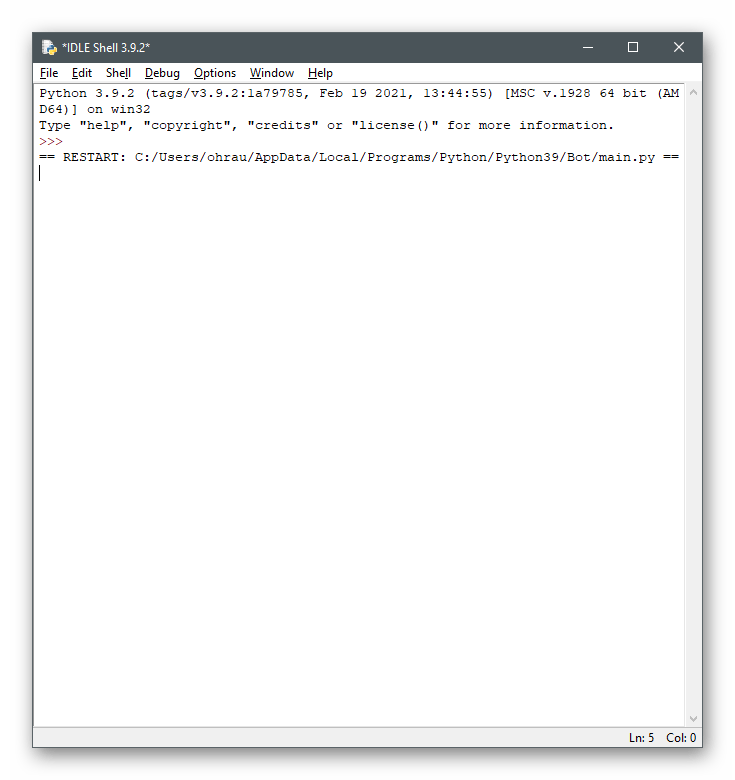
Перейдите в Дискорд и проверьте текущее состояние бота. Он должен отображаться в списке участников в разделе «В сети» вместе с зеленой точкой.

Воспользуйтесь открытыми источниками или собственными знаниями, чтобы написать команды для бота или реализовать другие задачи, которые он должен выполнять. Для этого редактируйте его основной файл или создавайте другие, связывая все в единый проект.
Вариант 2: JavaScript и discord.js
Следующий вариант создания бота для Discord — использование JS и подключаемой библиотеки discord.js, которая добавляет все необходимые компоненты для работы с ботами. Принцип действий отличается от предыдущего варианта лишь инструментами и разницей в синтаксисах языков программирования, но остается примерно таким же.
Шаг 1: Установка Node.js и discord.js
Расширить функциональность JS и превратить его в язык программирования общего назначения поможет платформа Node.js, установкой которой и рекомендуем заняться в первую очередь. Для этого выполните простейший алгоритм действий:
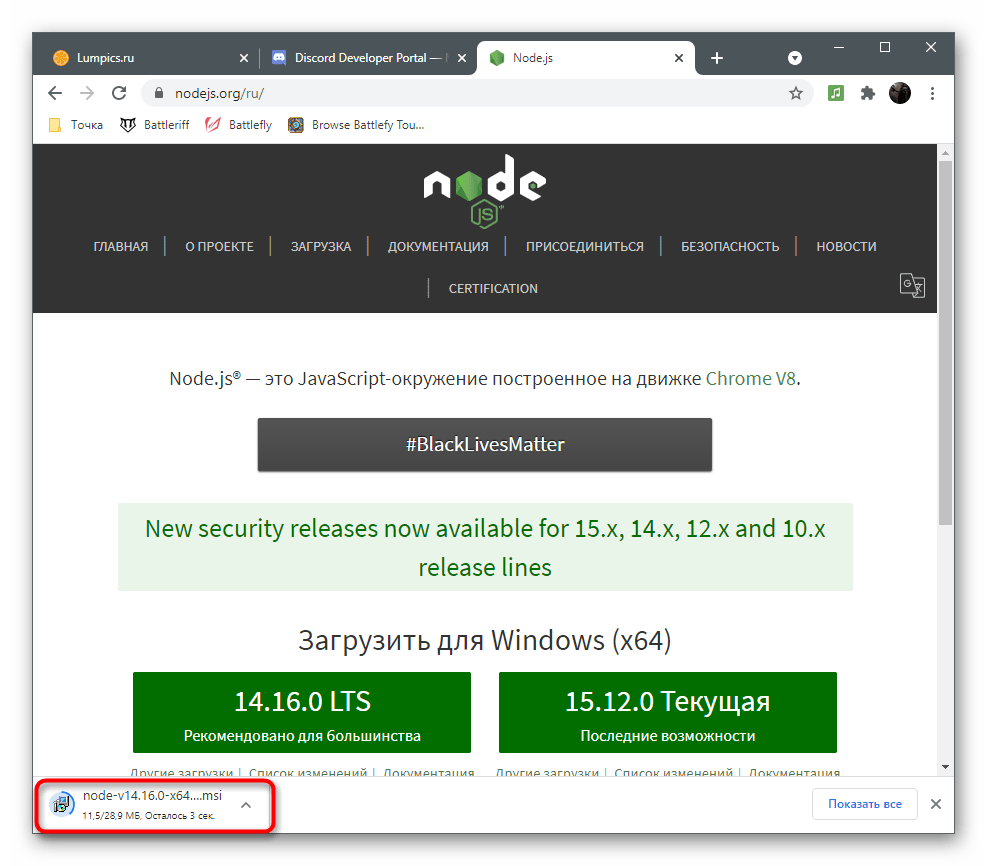
- Откройте страницу Node.js в интернете и выберите последнюю рекомендованную версию для скачивания.
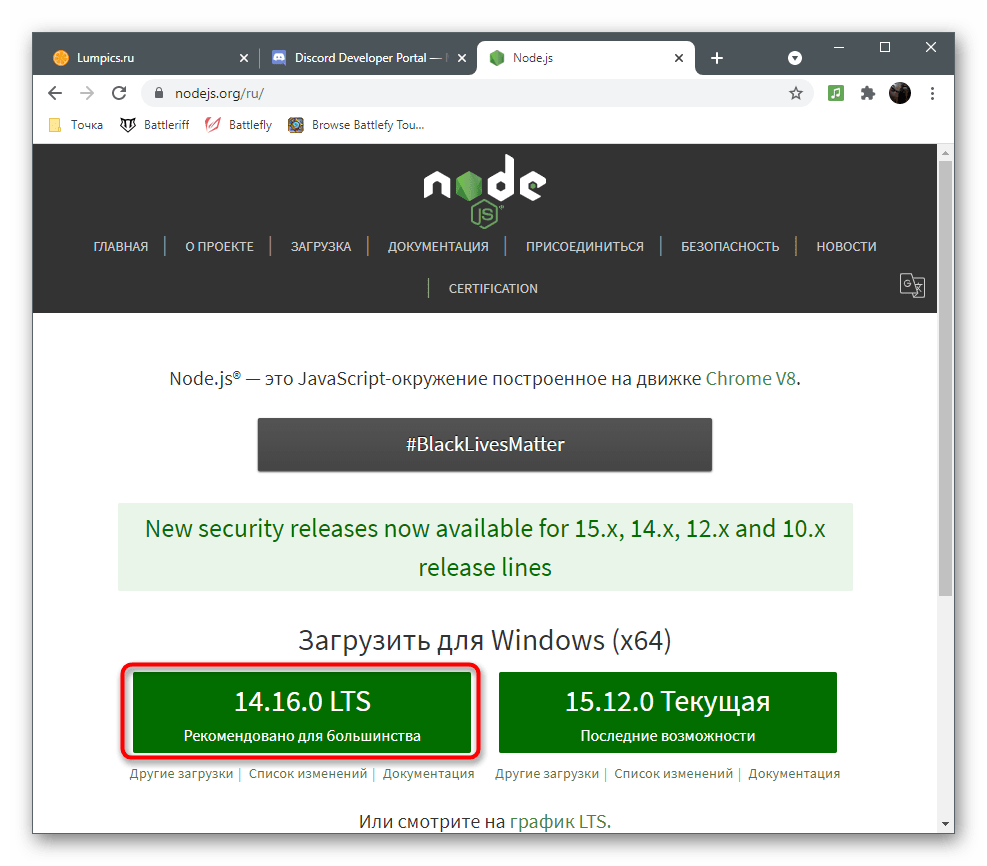
- Дождитесь получения исполняемого файла и запустите его.
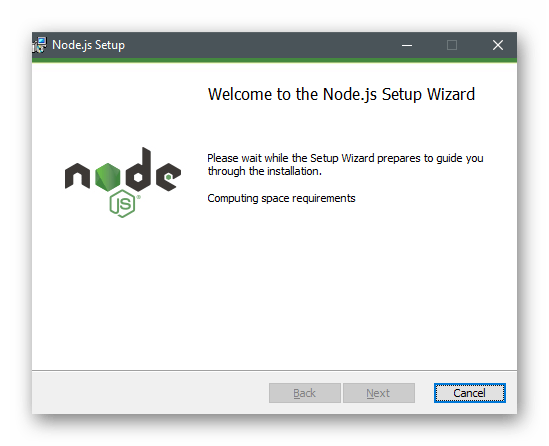
- Следуйте появившимся на экране инструкциям, завершите установку и перезагрузите компьютер.
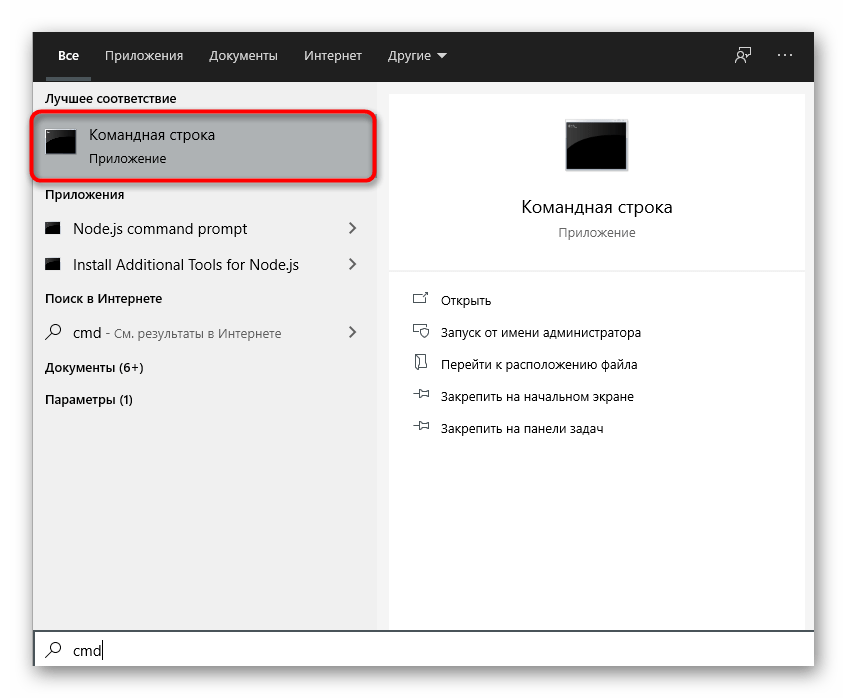
- Раскройте «Пуск» и через поиск отыщите классическое приложение «Командная строка».
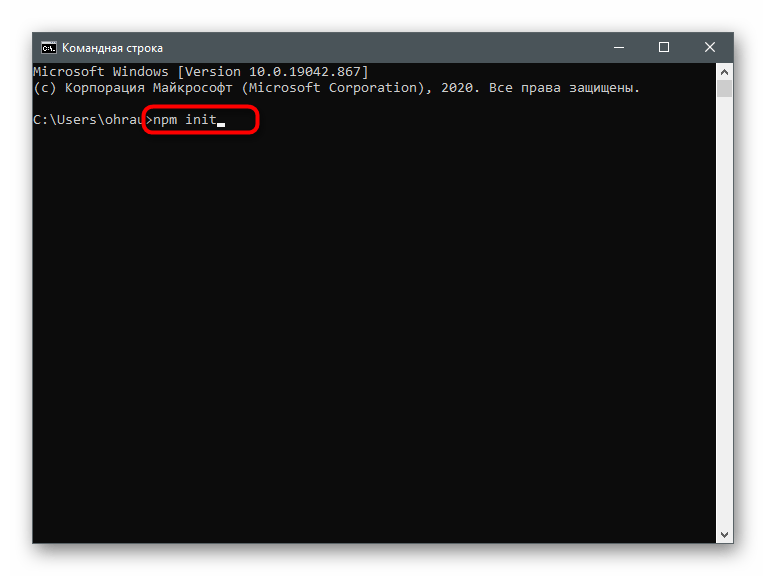
- В ней напишите команду npm init и активируйте ее нажатием Enter.
- Создайте стандартный пакет с пользовательской информацией, нажимая Enter после ввода каждого параметра, или оставьте все по умолчанию.

- Когда все параметры пакета окажутся заданы, вы получите предупреждение, которое нужно подтвердить, снова нажав Enter.

- Введите команду npm install для установки недостающих стандартных компонентов.
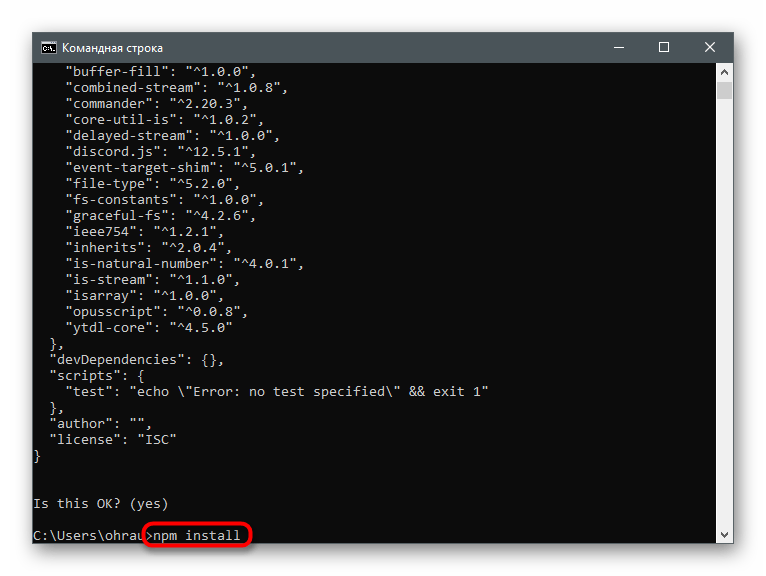
- Дождитесь завершения их загрузки и появления строки ввода.
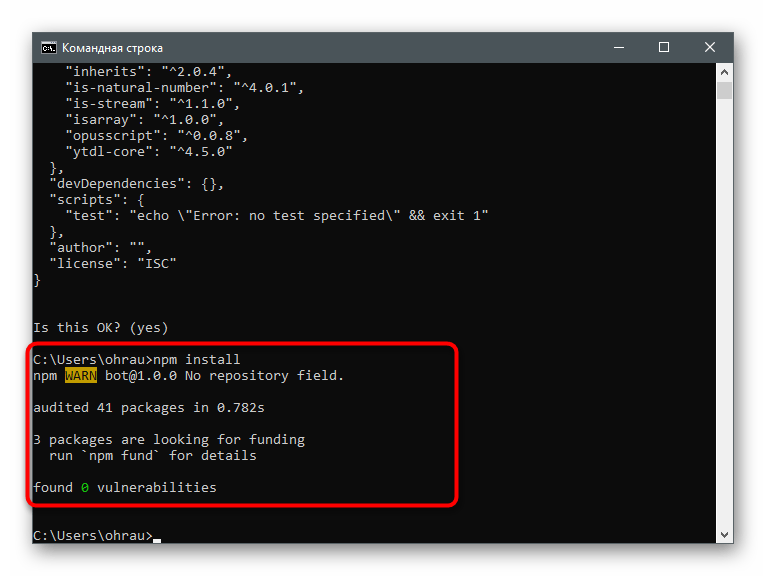
- Напишите npm install discord.js .
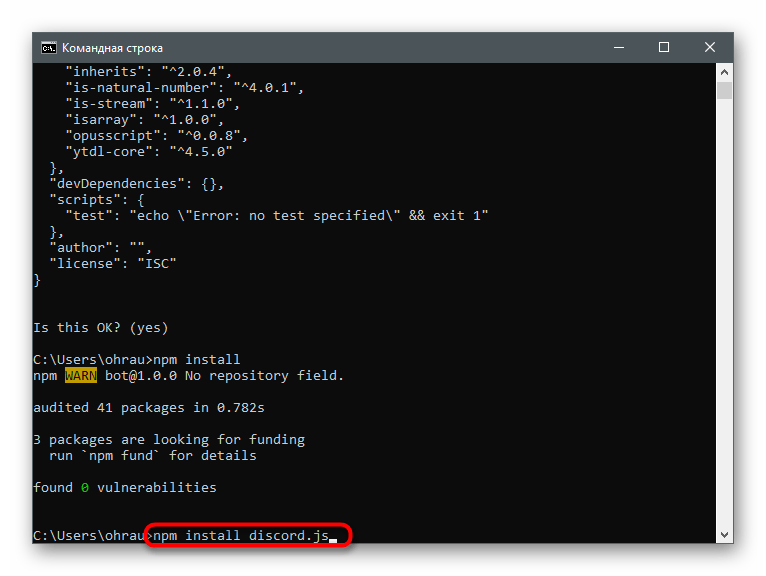
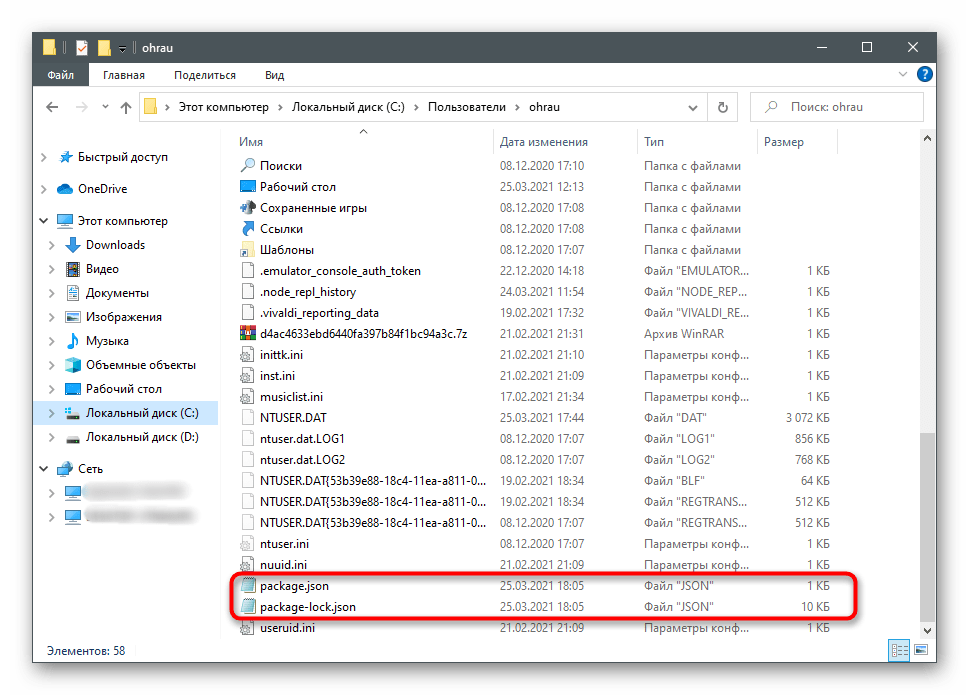
- Как только и эта команда выполнена, откройте папку своего пользователя и убедитесь в наличии созданных файлов пакета формата JSON.
Шаг 2: Работа с файлами бота
Все действия, связанные с файлами бота и программным кодом, рассмотрим в рамках одного этапа, поскольку делить их на несколько просто не имеет смысла. Вам понадобятся три основных файла, куда и вписываются все необходимые функции: один отвечает за конфигурацию бота, второй — за «тело», а третий хранит список добавленных команд.
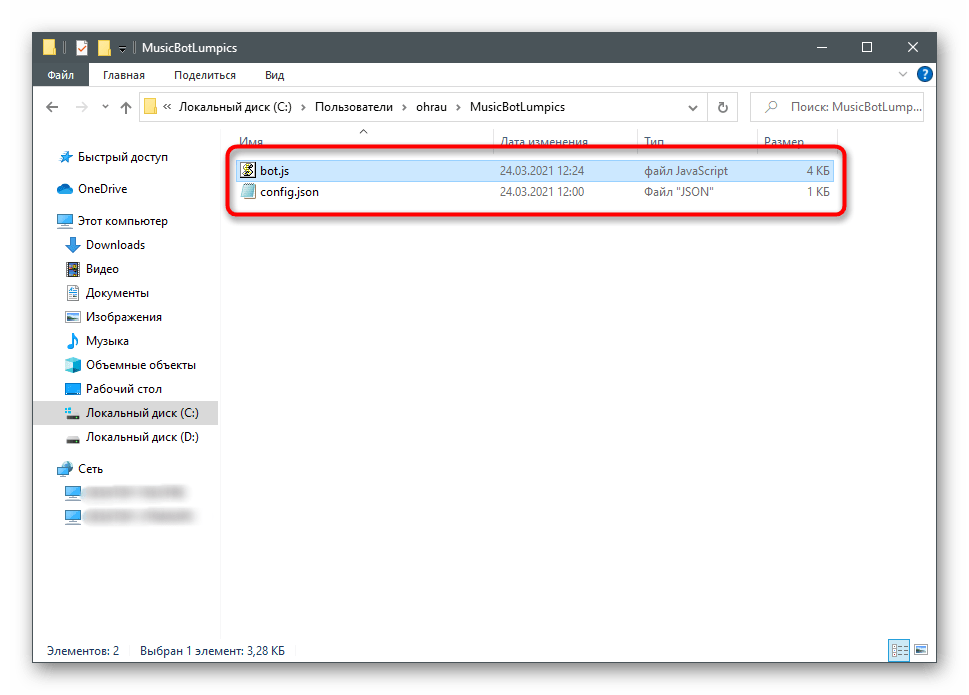
- Для начала создайте файлы «bot.js» и «config.json» в одном каталоге.
- Откройте через текстовый редактор или среду разработки «config.json» и добавьте туда такие строки:
<
«token» : «Ваш_токен»,
«prefix» : «Ваш_префикс»
>
const Discord = require(‘discord.js’); // Подключаем библиотеку discord.js
const robot = new Discord.Client(); // Объявляем, что robot — бот
const comms = require(«./comms.js»); // Подключаем файл с командами для бота
const fs = require(‘fs’); // Подключаем родной модуль файловой системы node.js
let config = require(‘./config.json’); // Подключаем файл с параметрами и информацией
let token = config.token; // «Вытаскиваем» из него токен
let prefix = config.prefix; // «Вытаскиваем» из него префикс
robot.on(«ready», function() <
/* При успешном запуске, в консоли появится сообщение «[Имя бота] запустился!» */
console.log(robot.user.username + » запустился!»);
>);
robot.on(‘message’, (msg) => < // Реагирование на сообщения
if (msg.author.username != robot.user.username && msg.author.discriminator != robot.user.discriminator) <
var comm = msg.content.trim() + » «;
var comm_name = comm.slice(0, comm.indexOf(» «));
var messArr = comm.split(» «);
for (comm_count in comms.comms) <
var comm2 = prefix + comms.comms[comm_count].name;
if (comm2 == comm_name) <
comms.comms[comm_count].out(robot, msg, messArr);
>
>
>
>);
robot.login(token); // Авторизация бота
const config = require(‘./config.json’); // Подключаем файл с параметрами и информацией
const Discord = require(‘discord.js’); // Подключаем библиотеку discord.js
const prefix = config.prefix; // «Вытаскиваем» префикс
function test(robot, mess, args) <
mess.channel.send(‘Test!’)
>
var comms_list = [ <
name: «test»,
out: test,
about: «Тестовая команда»
>];
// Name — название команды, на которую будет реагировать бот
// Out — название функции с командой
// About — описание команды
Для дальнейшей работы с командами достаточно будет объявить их функции и пополнить список соответствующими блоками кода. На примере готовый файл «comms.js» выглядит так:
const config = require(‘./config.json’);
const Discord = require(‘discord.js’);
const prefix = config.prefix;
const versions = config.versions;
function test(robot, mess, args) <
mess.channel.send(«Тест!»)
>
function hello(robot, mess, args) <
mess.reply(«Привет!»)
>
var comms_list = [ <
name: «test»,
out: test,
about: «Тестовая команда»
>,
<
name: «hello»,
out: hello,
about: «Команда для приветствия!»
>
>
Шаг 3: Запуск бота
Первые действия с ботом на JavaScript завершены, а значит, можно запустить его и проверить работу. Для этого вам понадобится выполнить следующее:
- Откройте меню «Пуск» через поиск отыщите «Командную строку» и запустите ее.

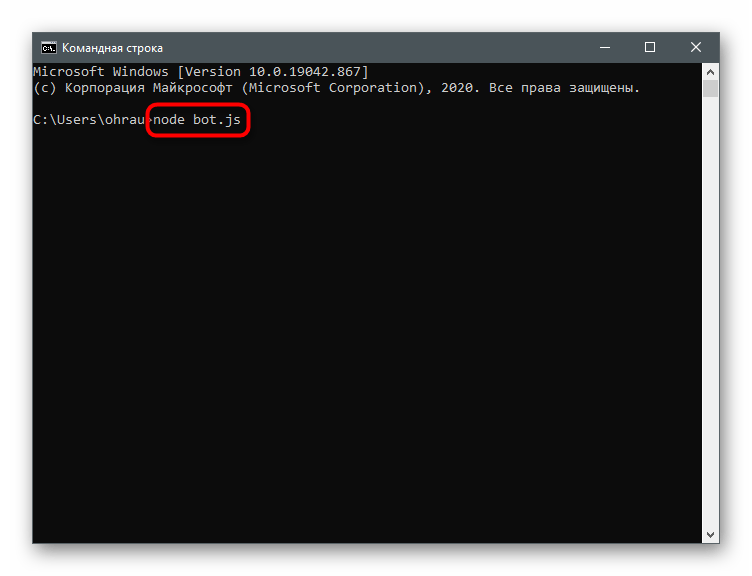
- Введите node bot.js , где bot.js — название основного файла с кодом для бота. Если он находится не в вашей домашней папке, указывайте полный путь к файлу или сначала перейдите к расположению, используя команду cd .
Примеры полезных команд
В завершение этого варианта вкратце расскажем о двух полезных командах, которые могут пригодиться при настройке бота. Их можно использовать в качестве тестовых, когда работа над проектом еще находится на стадии развития. Первая команда — !clear — удаляет указанное количество сообщений в чате. Ее код выглядит следующим образом:
const arggs = mess.content.split(‘ ‘).slice(1); // Все аргументы за именем команды с префиксом
const amount = arggs.join(‘ ‘); // Количество сообщений, которые должны быть удалены
if (!amount) return mess.channel.send(‘Вы не указали, сколько сообщений нужно удалить!’); // Проверка, задан ли параметр количества
if (isNaN(amount)) return mess.channel.send(‘Это не число!’); // Проверка, является ли числом ввод пользователя
if (amount > 100) return mess.channel.send(‘Вы не можете удалить 100 сообщений за раз’); // Проверка, является ли ввод пользователя числом больше 100
if (amount <
mess.channel.bulkDelete(messages)
mess.channel.send(`Удалено $
>)
>;
delete_messages(); // Вызов асинхронной функции
Вторая команда предназначена для подбрасывания монетки и запускается путем ввода !heads_or_tails в чате. Здесь код не такой сложный, поскольку действий мало и бот должен откликнуться всего на один запрос без огромного количества переменных.
var random = Math.floor(Math.random() * 4) + 1; // Объявление переменной random — она вычисляет случайное число от 1 до 3
В интернете вы можете найти другие полезные команды, которые хотите включить в своего бота, однако для работы с ними все же понадобятся продвинутые знания в JavaScript или Python, чтобы самостоятельно исправлять ошибки или редактировать код под себя.
Discord role assignment bot with Python
Discord is a free-to-use chat server application that was initially developed for gamers but is becoming increasingly widely used by many different communities. Anyone can use it to create a chat server for discussion over text as well as voice and video. In addition to hosting human members, these servers can also host special automated users, called bots, which are capable of a variety of fun and useful tasks: everything from playing music to helping human moderators.
In this tutorial, we’ll create a welcome bot for our programming discussion Discord server. This bot will welcome users as they join and assign them roles and private channels based on their stated interests. By the end of this tutorial, you will:
- Have familiarity with the process of creating a Discord bot application.
- Be able to use discord.py to develop useful bot logic.
- Know how to host Discord bots on Replit!
Getting started
Sign in to Replit or create an account if you haven’t already. Once logged in, create a Python repl.

Creating a Discord application
Open another browser tab and visit the Discord Developer Portal. Log in with your Discord account, or create one if you haven’t already. Keep your repl open – we’ll return to it soon.
Once you’re logged in, create a new application. Give it a name, like «Welcomer».

Discord applications can interact with Discord in several different ways, not all of which require bots, so creating one is optional. That said, we’ll need one for this project. Let’s create a bot.
- Click on Bot in the menu on the left-hand side of the page.
- Click Add Bot.
- Give your bot a username (such as «WelcomeBot»).
- Click Reset Token and then Yes, do it!
- Copy the token that appears just under your bot’s username.

The token you just copied is required for the code in our repl to interface with Discord’s API. Return to your repl and open the Secrets tab in the left sidebar. Create a new secret with DISCORD_TOKEN as its key and the token you copied as its value.
src=»https://replit-docs-images.bardia.repl.co/images/tutorials/46-discord-role-bot/secret-token.png»
alt=»Secret token»
/>
Once, you’ve done that, return to the Discord developer panel. We need to finish setting up our bot.
First, disable the Public Bot option – the functionality we’re building for this bot will be highly specific to our server, so we don’t want anyone else to try to add it to their server. What’s more, bots on 100 or more servers have to go through a special verification and approval process, and we don’t want to worry about that.
Second, we need to configure access to privileged Gateway Intents. Depending on a bot’s functionality, it will require access to different events and sources of data. Events involving users’ actions and the content of their messages are considered more sensitive and need to be explicitly enabled.
For this bot to work, we’ll need to be able to see when users join our server, and we’ll need to see the contents of their messages. For the former, we’ll need the Server Members Intent and for the latter, we’ll need the Message Content Intent. Toggle both of these to the «on» position. Save changes when prompted.

Now that we’ve created our application and its bot, we need to add it to a server. We’ll walk you through creating a test server for this tutorial, but you can also use any server you’ve created in the past, as long as the other members won’t get too annoyed about it becoming a bot testing ground. You can’t use a server that you’re just a normal user on, as adding bots requires special privileges.
Open Discord.com in your browser. You should already be logged in. Then click on the + icon in the leftmost panel to create a new server. Alternatively, open an existing server you own.

In a separate tab, return to the Discord Dev Portal and open your application. Follow these steps to add your bot to your server:
- Click on OAuth2 in the left sidebar.
- In the menu that appears under OAuth2, select URL Generator.
- Under Scopes, mark the checkbox labelled bot.

Under Bot Permissions, mark the checkbox labelled Administrator.

Scroll down and copy the URL under Generated URL.
Paste the URL in your browser’s navigation bar and hit Enter.
On the page that appears, select your server from the drop-down box and click Continue.

When prompted about permissions, click Authorize, and complete the CAPTCHA.
Return to your Discord server. You should see that your bot has just joined.
Now that we’ve done the preparatory work, it’s time to write some code. Return to your repl for the next section.
Writing the Discord bot code
We’ll be using discord.py to interface with Discord’s API using Python. Add the following code scaffold to main.py in your repl:
Exit fullscreen mode
First, we import the Python libraries we’ll need, including discord.py and its commands extension. Next we retrieve the value of the DISCORD_TOKEN environment variable, which we set in our repl’s secrets tab above. Then we instantiate a Bot object. We’ll use this object to listen for Discord events and respond to them.
The first event we’re interested in is on_ready() , which will trigger when our bot logs onto Discord (the @bot.event decorator ensures this). All this event will do is print a message to our repl’s console, telling us that the bot has connected.
Note that we’ve prepended async to the function definition – this makes our on_ready() function into a coroutine. Coroutines are largely similar to functions, but may not execute immediately, and must be invoked with the await keyword. Using coroutines makes our program asynchronous, which means it can continue executing code while waiting for the results of a long-running function, usually one that depends on input or output. If you’ve used JavaScript before, you’ll recognize this style of programming.
The final line in our file starts the bot, providing DISCORD_TOKEN to authenticate it. Run your repl now to see it in action. Once it’s started, return to your Discord server. You should see that your bot user is now online.

Creating server roles
Before we write our bot’s main logic, we need to create some roles for it to assign. Our Discord server is for programming discussion, so we’ll create roles for a few different programming languages: Python, JavaScript, Rust, Go, and C++. For the sake of simplicity, we’ll use all-lowercase for our role names. Feel free to add other languages.
You can add roles by doing the following:
- Right-click on your server’s icon in the leftmost panel.
- From the menu that appears, select Server Settings, and then Roles.

Click Create Role.
Enter a role name (for example, «python») and choose a color.
Click Back.
Repeat steps 3–5 until all the roles are created.
Your role list should now look something like this:

The order in which roles are listed is the role hierarchy. Users who have permission to manage roles will only be able to manage roles lower than their highest role on this list. Ensure that the WelcomeBot role is at the top, or it won’t be able to assign users to any of the other roles, even with Administrator privileges.
At present, all these roles will do is change the color of users’ names and the list they appear in on the right sidebar. To make them a bit more meaningful, we can create some private channels. Only users with a given role will be able to use these channels.
To add private channels for your server’s roles, do the following:
- Click on the + next to Text Channels.
- Type a channel name (e.g. «python») under Channel Name.
- Enable the Private Channel toggle.
- Click Create Channel.
- Select the role that matches your channel’s name.
- Repeat for all roles.
As the server owner, you’ll be able to see these channels regardless of your assigned roles, but normal members will not.
Messaging users
Now that our roles are configured, let’s write some bot logic. We’ll start with a function to DM users with a welcome message. Return to your repl and enter the following code just below the line where you defined bot :
Exit fullscreen mode
This simple function takes a member object and sends it a private message. Note the use of await when running the coroutine member.send() .
We need to run this function when one of two things happens: a new member joins the server, or an existing member types the command !roles in a channel. The second one will allow us to test the bot without constantly leaving and rejoining the server, and let users change their minds about what programming languages they want to discuss.
To handle the first event, add this code below the definition of on_ready :
Exit fullscreen mode
The on_member_join() callback supplies a member object we can use to call dm_about_roles() .
For the second event, we’ll need a bit more code. While we could use discord.py’s bot commands framework to handle our !roles command, we will also need to deal with general message content later on, and doing both in different functions doesn’t work well. So instead, we’ll put everything to do with message contents in a single on_message() event. If our bot were just responding to commands, using @bot.command handlers would be preferable.
Add the following code below the definition of on_member_join() :
Exit fullscreen mode
First, we print a message to the repl console to note that we’ve seen a message. We then check if the message’s author is the bot itself. If it is, we terminate the function, to avoid infinite loops. Following that, we check if the message’s content starts with !roles , and if so we invoke dm_amount_roles() , passing in the message’s author.
Stop and rerun your repl now. If you receive a CloudFlare error, type kill 1 in your repl’s shell and try again. Once your repl’s running, return to your Discord server and type «!roles» into the general chat. You should receive a DM from your bot.

Assigning roles from replies
Our bot can DM users, but it won’t do anything when users reply to it. Before we can add that logic, we need to implement a small hack to allow our bot to take actions on our server based on the contents of direct messages.
The Discord bot framework is designed with the assumption that bots are generic and will be added to many different servers. Bots do not have a home server, and there’s no easy way for them to trace a process flow that moves from a server to private messages like the one we’re building here. Therefore, our bot won’t automatically know which server to use for role assignment when that user replies to its DM.
We could work out which server to use through the user’s mutual_guilds property, but it is not always reliable due to caching. Note that Discord servers were previously known as «guilds» and this terminology persists in areas of the API.
As we don’t plan to add this bot to more than one server at a time, we’ll solve the problem by hardcoding the server ID in our bot logic. But first, we need to retrieve our server’s ID. The easiest way to do this is to add another command to our bot’s vocabulary. Expand the if statement at the bottom of on_message() to include the following elif :
Exit fullscreen mode
Rerun your repl and return to your Discord server. Type «!serverid» into the chat, and you should get a reply from your bot containing a long string of digits. Copy that string to your clipboard.
Go to the top of main.py . Underneath DISCORD_TOKEN , add the following line:
Exit fullscreen mode
Paste the contents of your clipboard after the equals sign. Now we can retrieve our server’s ID from this variable.
Once that’s done, return to the definition of on_message() . We’re going to add another if statement to deal with the contents of user replies in DMs. Edit the function body so that it matches the below:
Exit fullscreen mode
This new if statement will check whether the message that triggered the event was in a DM channel, and if so, will run assign_roles() and then exit. Now we need to define assign_roles() . Add the following code above the definition of on_message() :
Exit fullscreen mode
We can find the languages mentioned in the user replies using regular expressions: re.findall() will return a list of strings that match our expression. This way, whether the user replies with «Please add me to the Python and Go groups» or just «python go», we’ll be able to assign them the right role.
We convert the list into a set in order to remove duplicates.
The next thing we need to do is deal with emoji responses. Add the following code to the bottom of the assign_roles() function:
Exit fullscreen mode
In the first line, we do the same regex matching we did with the language names, but using emoji Unicode values instead of standard text. You can find a list of emojis with their codes on Unicode.org. Note that the + in this list’s code should be replaced with 000 in your Python code: for example, U+1F40D becomes U0001F40D .
Once we’ve got our set of emoji matches in language_emojis , we loop through it and use a dictionary to add the correct name to our languages set. This dictionary has strings as values and lambda functions as keys. Finally, [emoji]() will select the lambda function for the provided key and execute it, adding a value to languages . This is similar to the switch-case syntax you may have seen in other programming languages.
We now have a full list of languages our users may wish to discuss. Add the following code below the for loop:
Exit fullscreen mode
This code first checks that the languages set contains values. If so, we use get_guild() to retrieve a Guild object corresponding to our server’s ID (remember, guild means server).
We then use a list comprehension and discord.py’s get() function to construct a list of all the roles corresponding to languages in our list. Note that we’ve used the lower() to ensure all of our strings are in lowercase.
Finally, we retrieve the member object corresponding to the user who sent us the message and our server.
We now have everything we need to assign roles. Add the following code to the bottom of the if statement, within the body of the if statement:
Exit fullscreen mode
The member object’s add_roles() method takes an arbitrary number of role objects as positional arguments. We unpack our languages set into separate arguments using the * operator, and provide a string for the named argument reason .
Our operation is wrapped in a try-except-else block. If adding roles fails, we’ll print the resulting error to our repl’s console and send a generic error message to the user. If it succeeds, we’ll send a message to the user informing them of their new roles, making extensive use of string interpolation.
Finally, we need to deal with the case where no languages were found in the user’s message. Add an else: block onto the bottom of the if languages: block as below:
Exit fullscreen mode
Rerun your repl and return to your Discord server. Open the DM channel with your bot and try sending it one or more language names or emojis. You should receive the expected roles. You can check this by clicking on your name in the right-hand panel on your Discord server – your roles will be listed in the box that appears.

Removing roles
Our code currently does not allow users to remove roles from themselves. While we could do this manually as the server owner, we’ve built this bot to avoid having to do that sort of thing, so let’s expand our code to allow for role removal.
To keep things simple, we’ll remove any roles mentioned by the user which they already have. So if a user with the «python» role writes «c++ python», we’ll add the «c++» role and remove the «python» role.
Let’s make some changes. Find the if languages: block in your assign_roles() function and change the code above try: to match the below:
Exit fullscreen mode
We replace the list of roles with a set of new roles. We also create a set of roles the user current holds. Given these two sets, we can figure out which roles to add and which to remove using set operations. Add the following code below the definition of current_roles :
Exit fullscreen mode
The roles to add will be roles that are in new_roles but not in current_roles , i.e. the difference of the sets. The roles to remove will be roles that are in both sets, i.e. their intersection.
Now we need to replace the try-except-else block with the code below:
Exit fullscreen mode
This code follows the same general logic as our original block, but can remove roles as well as add them.
Finally, we need to update the bot’s original DM to reflect this new functionality. Find the dm_about_roles() function and amend it as follows:
Exit fullscreen mode
Rerun your repl and test it out. You should be able to add and remove roles from yourself. Try inviting some of your friends to your Discord server, and have them use the bot as well. They should receive DMs as soon as they join.


Where next?
We’ve created a simple Discord server welcome bot. There’s a lot of scope for additional functionality. Here are some ideas for expansion:
- Include more complex logic for role assignment. For example, you could have some roles that require users to have been members of the server for a certain amount of time.
- Have your bot automatically assign additional user roles based on behavior. For example, you could give a role to users who react to messages with the most emojis.
- Add additional commands. For example, you might want to have a command that searches Stack Overflow, allowing members to ask programming questions from the chat.
Discord bot code can be hosted on Replit permanently, but you’ll need to use an Always-on repl to keep it running 24/7.
Выдача роли на сервере по реакциям в Discord

Самый распространенный метод выдачи ролей на сервере в Discord – ручное редактирование каждой из них и дальнейшее присвоение каждому юзеру. Иногда используются специальные боты, которые автоматически выдают нужную роль участнику после достижения определенного уровня. Есть еще и третий вариант – получение роли по реакции-эмодзи. Это очень удобно в тех случаях, когда юзер сам должен выбрать подходящую для себя роль или пройти верификацию, чтобы получить доступ к нужным каналам. В этой статье я разберу пример такой настройки с помощью бота Carl.gg – популярного инструмента расширенного администрирования проектов.
Шаг 1: Подготовка списка ролей
В первую очередь, если этот этап еще не выполнен, нужно заняться подготовкой списка ролей, которые далее будут участвовать при распределении по реакциям. Если вы уже знакомы с этим процессом, пропустите данный шаг и сразу переходите ко взаимодействию с ботом. Всем остальным рекомендую ознакомиться со инструкцией далее:
Перейдите на свой сервер, нажмите по его названию сверху слева и из появившегося меню выберите пункт «Настройки сервера».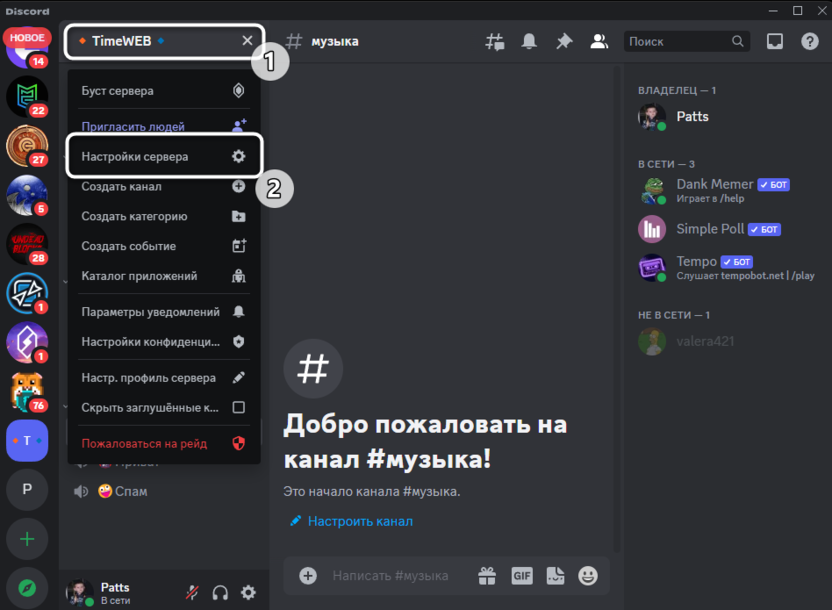
На панели слева вас интересует раздел «Роли», в котором нужно щелкнуть по кнопке «Создание роли», чтобы перейти к форме администрирования.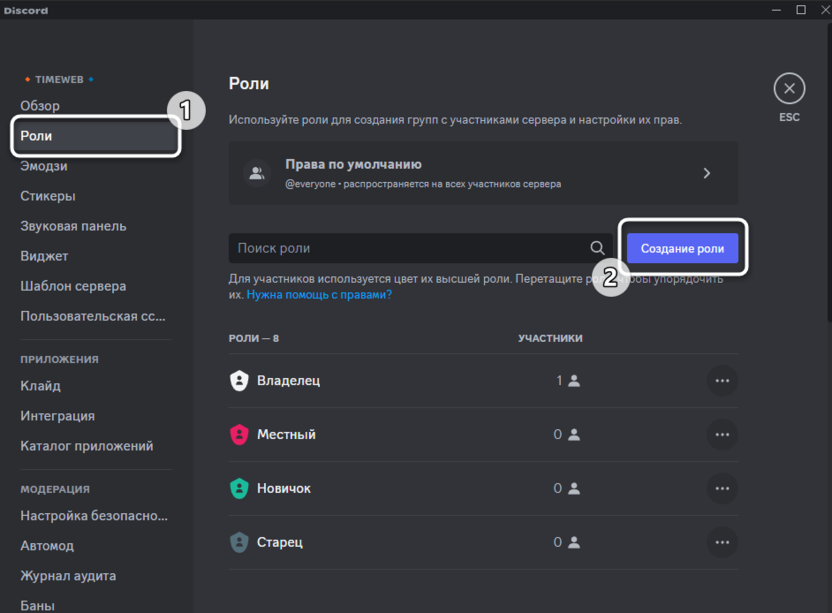
В первую очередь укажите название для роли, задайте цвет ников и добавьте значок, если у вашего сервера есть буст нужного уровня.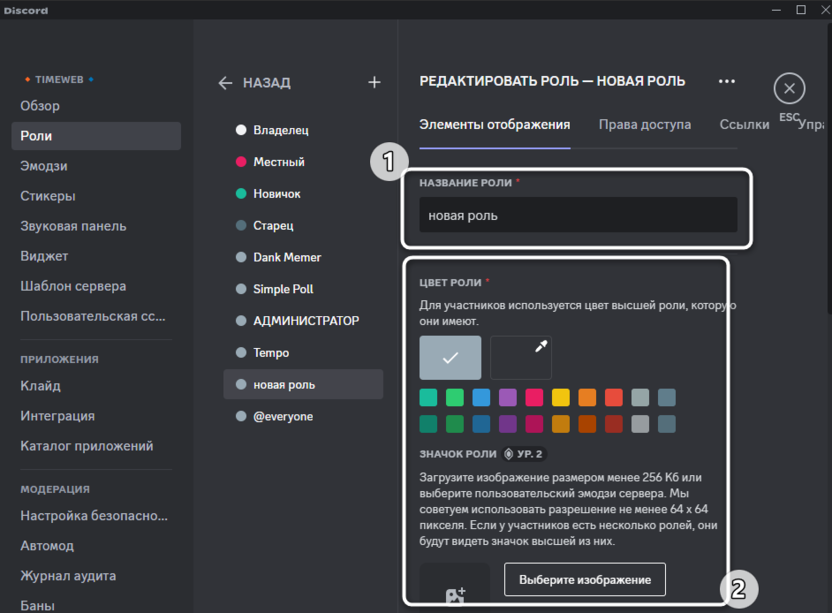
После этого перейдите на вкладку «Права доступа» и внимательно изучите список всех привилегий для данной роли. Активируйте и отключите нужное, сделайте доступными конкретные скрытые каналы, чтобы после получения этой роли пользователь сразу мог перейти к общению по нужной ему теме на вашем сервере.
Повторите те же самые действия для всех ролей, которые вы планируете создать, меняя привилегии каждой на свое усмотрение. Перед выходом из данного меню не забудьте сохранить изменения.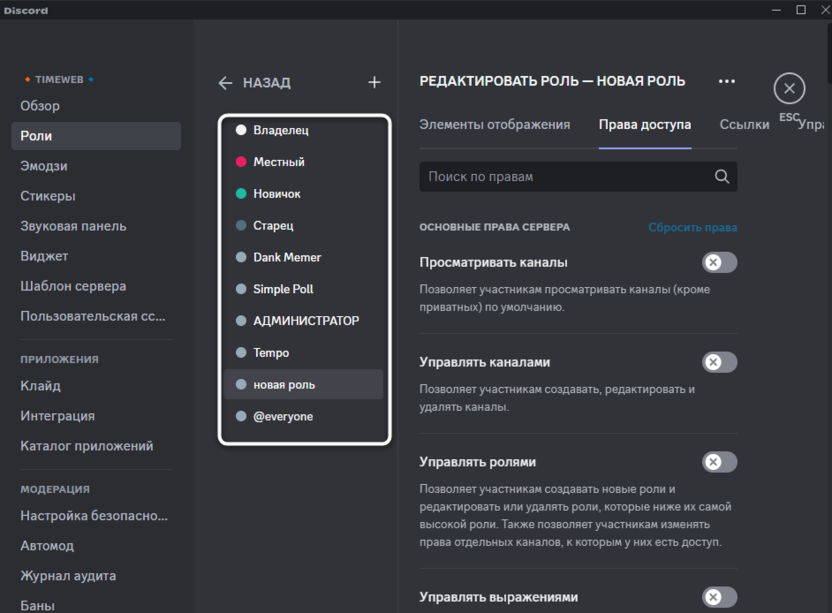
Шаг 2: Добавление Carl.gg на сервер
Далее предстоит выполнить один простой шаг, заключающийся в авторизации на сайте бота через свою учетную запись и в выборе сервера для подключения. Это нужно для того, чтобы далее через этот же сайт осуществлять удобное управление сервером, включая и создание сообщений с реакциями для получения нужных ролей.
Откройте официальный сайт Carl.gg и нажмите по кнопке «Log in with Discord».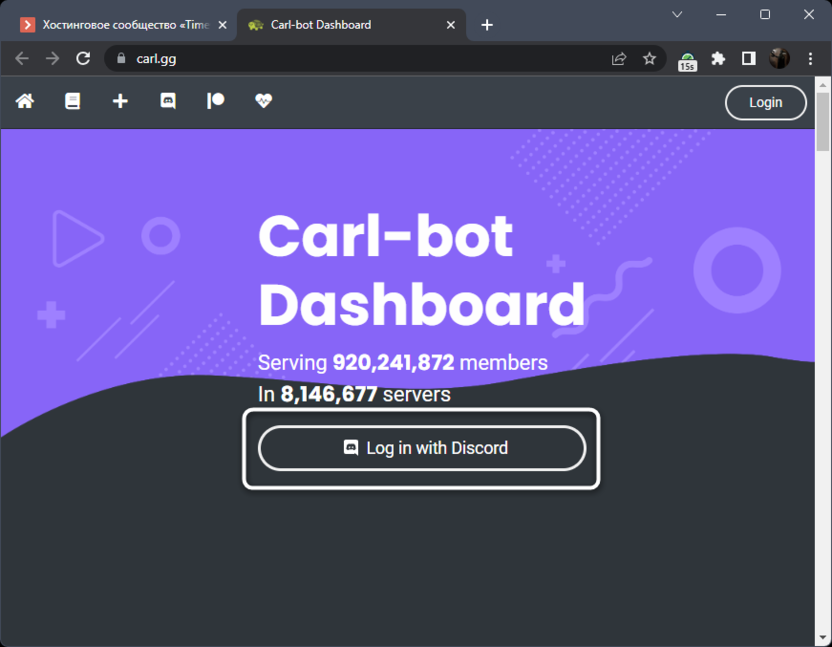
После загрузки Дискорда в вашем браузере подтвердите авторизацию профиля на сайте, чтобы предоставить основные сведения о своем аккаунте (пароли и личные данные при этом не открываются).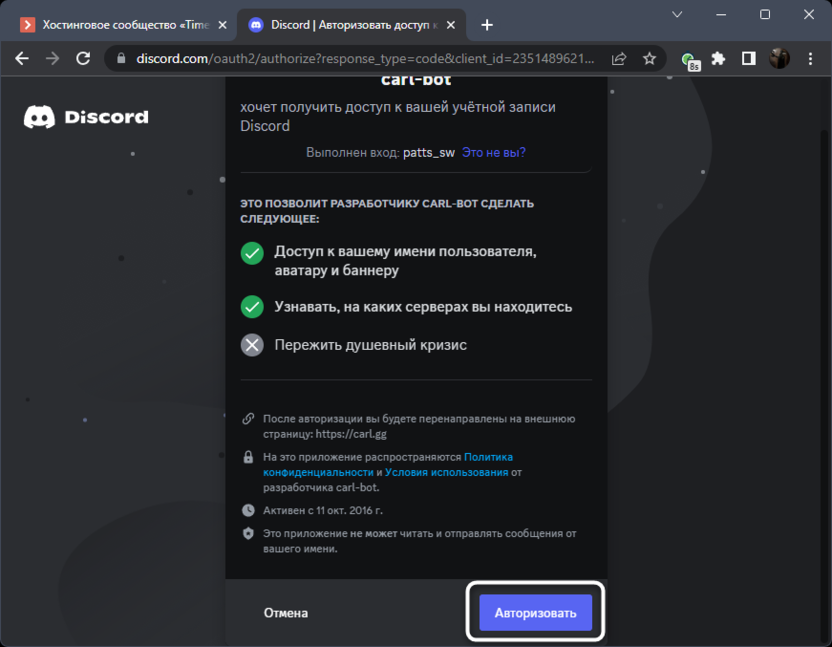
После возвращения на сайт бота он обнаружит, создателями каких серверов вы являетесь, если их несколько, позволит выбрать нужный для авторизации.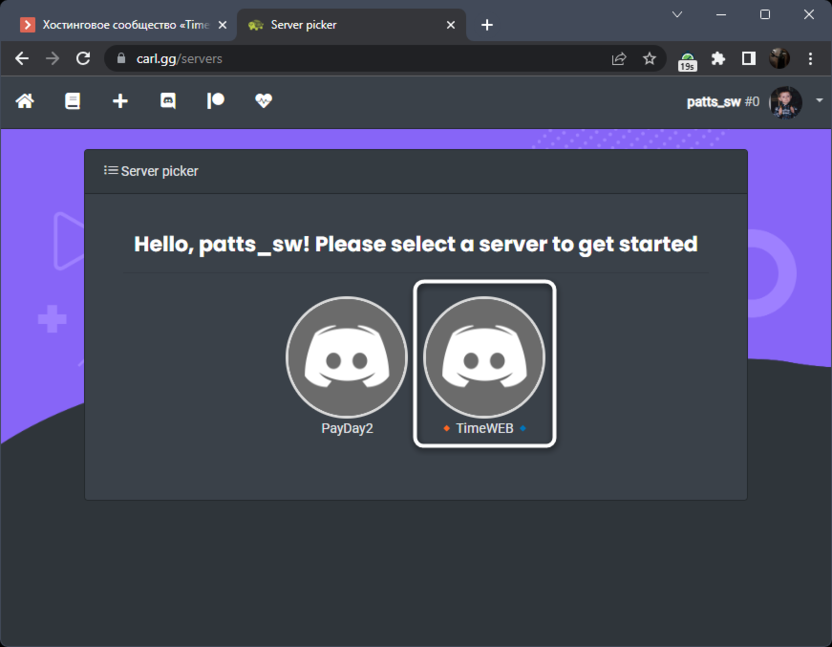
Далее снова произойдет переход к Дискорду, где нужно убедиться в правильности выбранного сервера и нажать «Продолжить», чтобы перейти к подтверждению авторизации бота.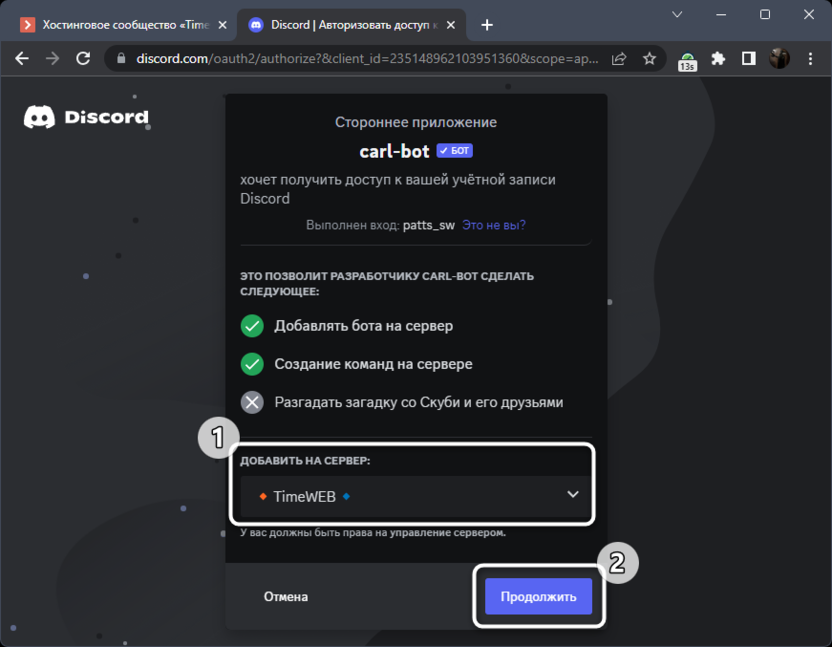
В следующей форме вы будете уведомлены о том, какие разрешения на сервере получает бот. Нажмите «Авторизовать», чтобы подтвердить это и добавить его в своей проект.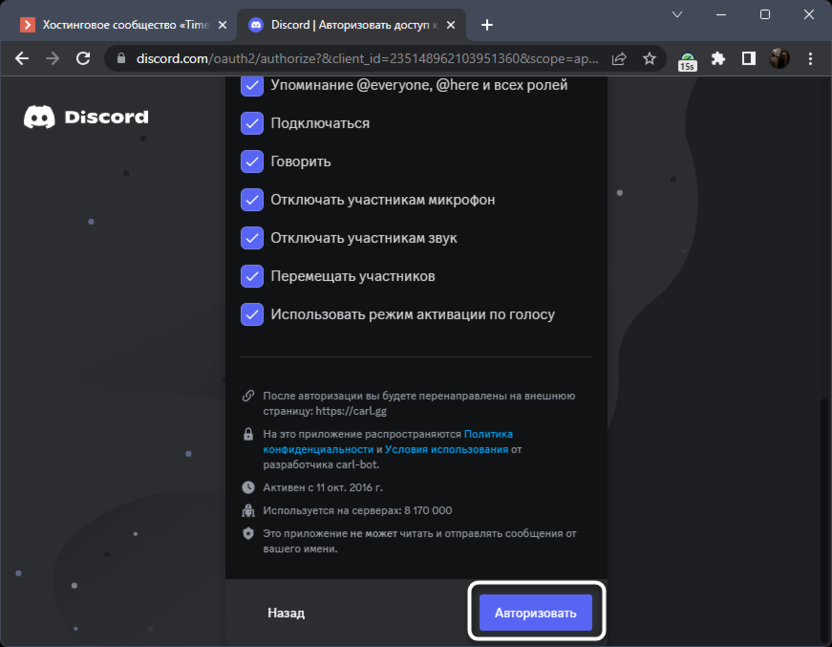
Теперь Carl.gg есть на вашем сервере и вы можете управлять им в соответствии с выданными разрешениями. На сайте нажмите «Get started», чтобы ознакомиться с основными настройками и возможностями бота.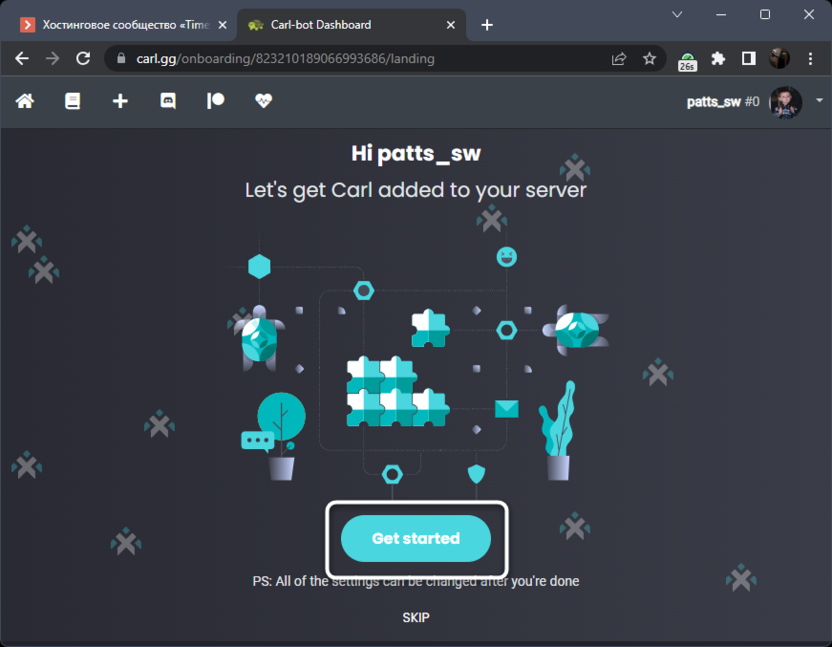
В одном из приветственных шагов уже будет предложено создать сообщение с ролями по реакциям. Основное внимание здесь сосредоточено на применении шаблонов из существующего списка и отправке тестового сообщения в выбранный канал.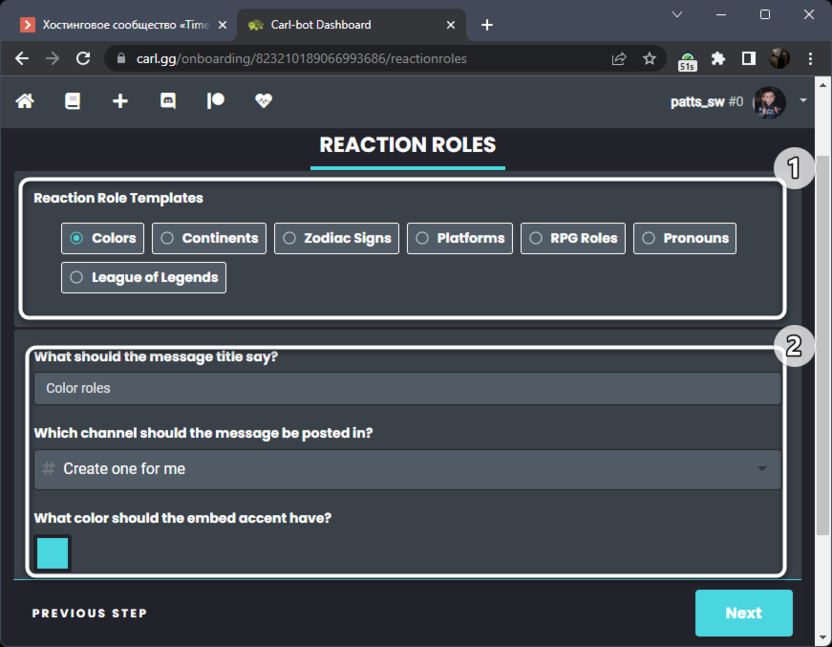
Если хотите попробовать выполнить это действие, укажите роль для отправки сообщения и нажмите «Create Reaction Role». Однако в этой форме не очень удобно создавать подобное сообщение, поэтому для наглядности лучше ознакомиться со следующим этапом.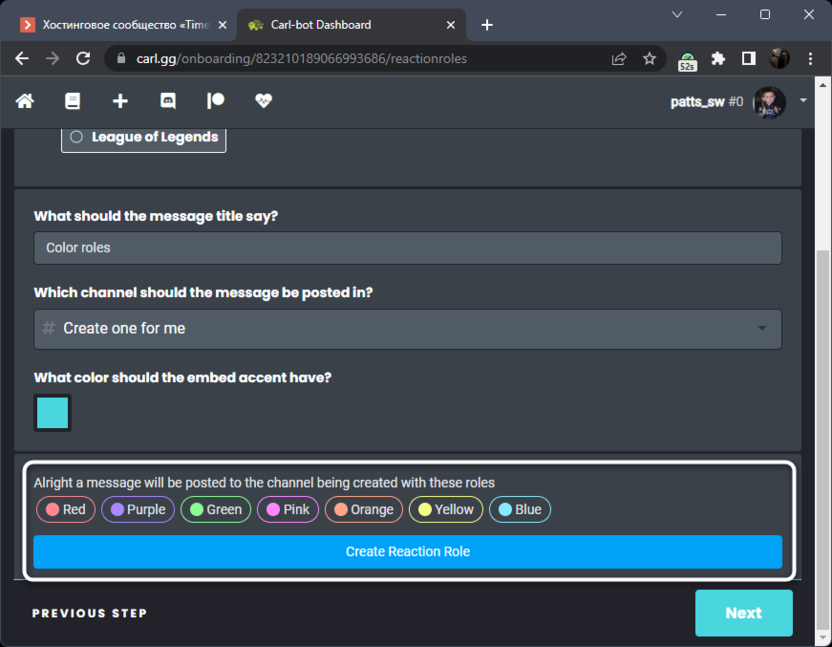
Шаг 3: Создание сообщения с выдачей роли по реакции
Приступим к основному этапу настройки, который и подразумевает создание того самого сообщения, которое будут видеть пользователи и смогут по реакции получить себе нужную роль. Отмечу, что таких сообщений можно создавать практически неограниченное количество в любое время и рассылать их по разным каналам. Все зависит исключительно от тематики вашего сервера и вашего подхода к администрированию. Я покажу только создание одного сообщения, поскольку принцип действий всегда остается практически неизменным.
После перехода к дашборду на сайте разверните меню и выберите инструмент «Reaction roles».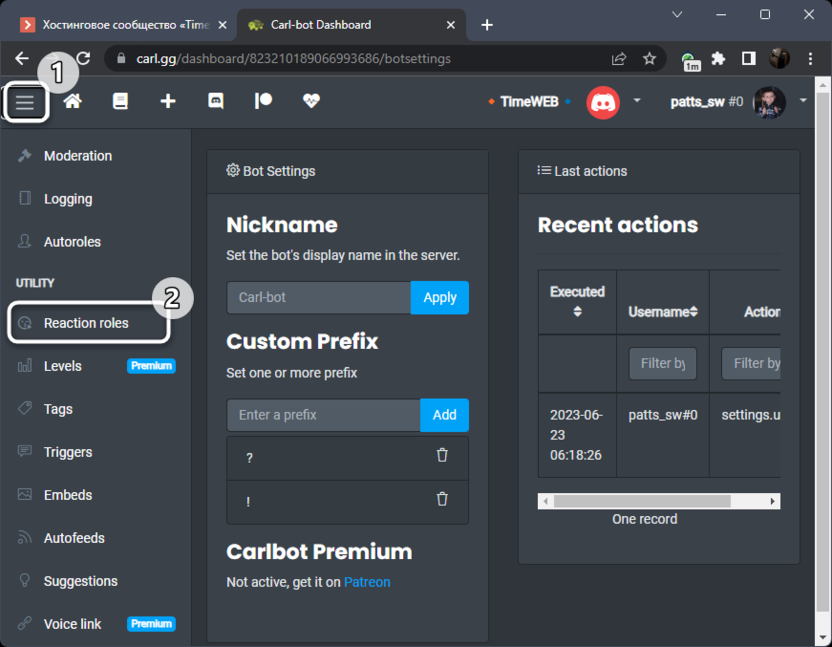
В нем вас интересует зеленая кнопка «Create new reaction role».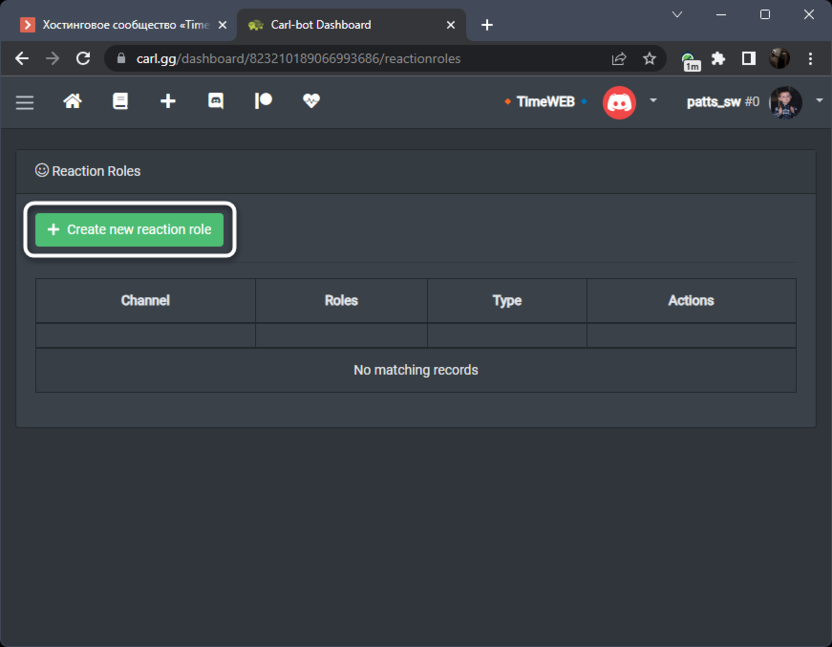
В первую очередь разверните список каналов и выберите тот, куда будет отправлено сообщение. Обычно таковым является приветственный или специально отведенный под выдачу ролей.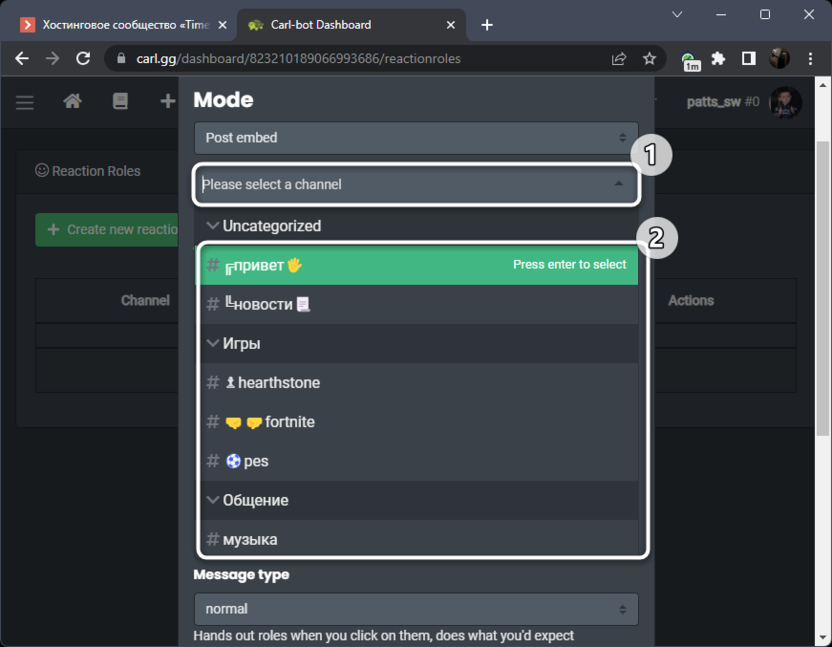
Введите сообщение, которое будет сопровождаться реакциями. Напишите в нем всю необходимую информацию о том, какую реакцию нужно выбрать, чтобы получить конкретную роль или пройти верификацию. После этого нажмите «Add emoji» для добавления первой реакции.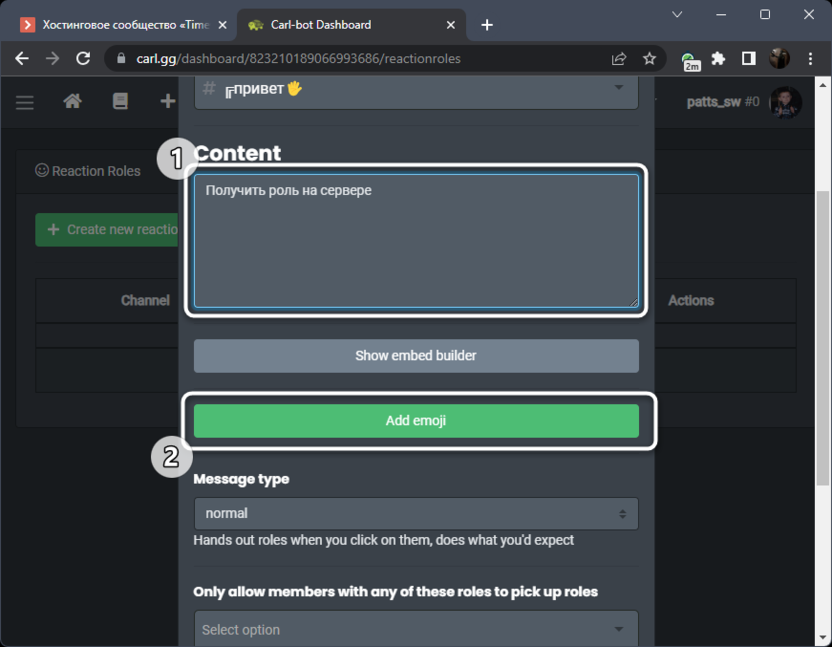
Выберите смайлик из списка, разверните список существующих ролей и присвойте ему одну из них.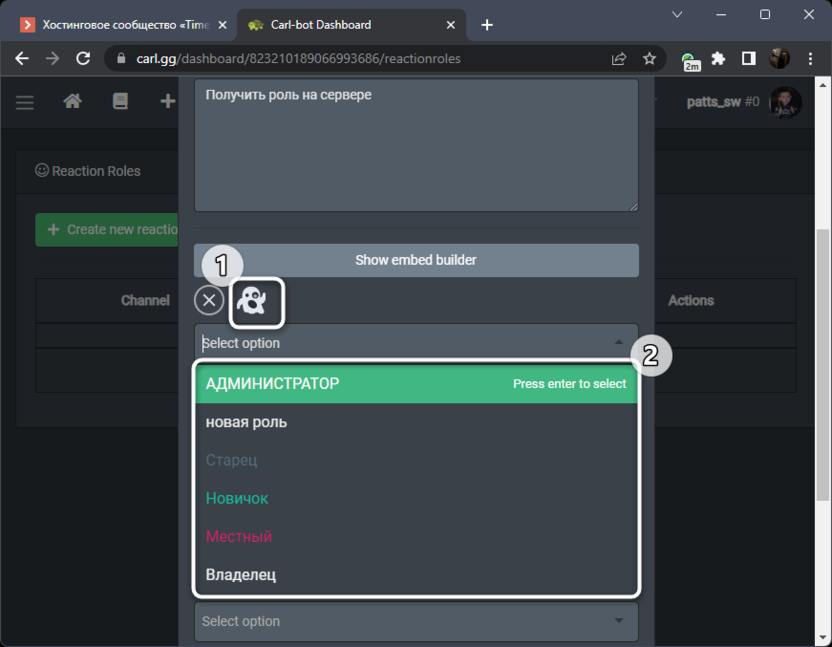
Делайте то же самое со всеми необходимыми реакциями, создавая тем самым список из них.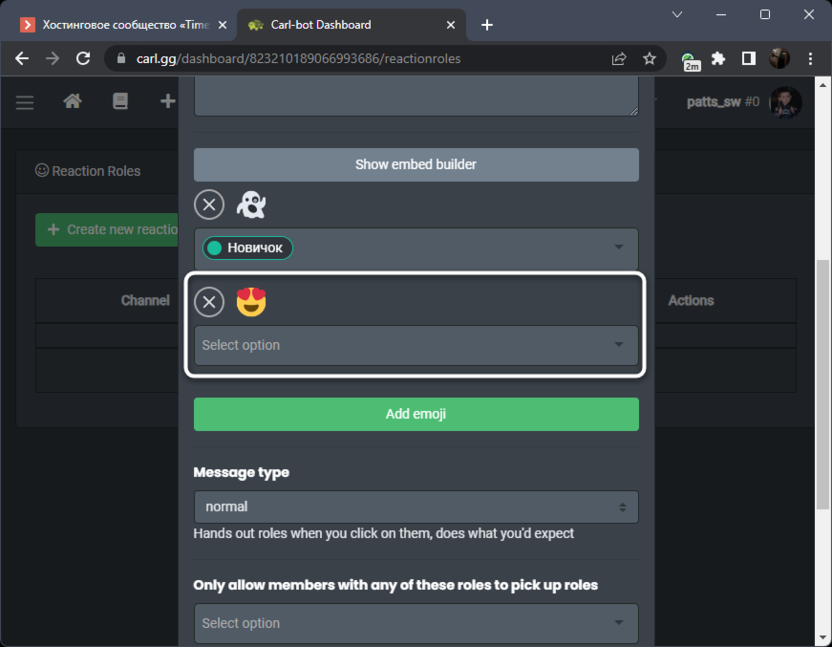
Как только все реакции будут соотнесены с ролями, выберите тип сообщения и настройте дополнительные параметры, если нужно сделать так, чтобы только конкретные пользователи могли выбрать себе роль или можно ли это будет делать участникам из черного списка. На этом подготовка завершена, поэтому нажмите кнопку «Create».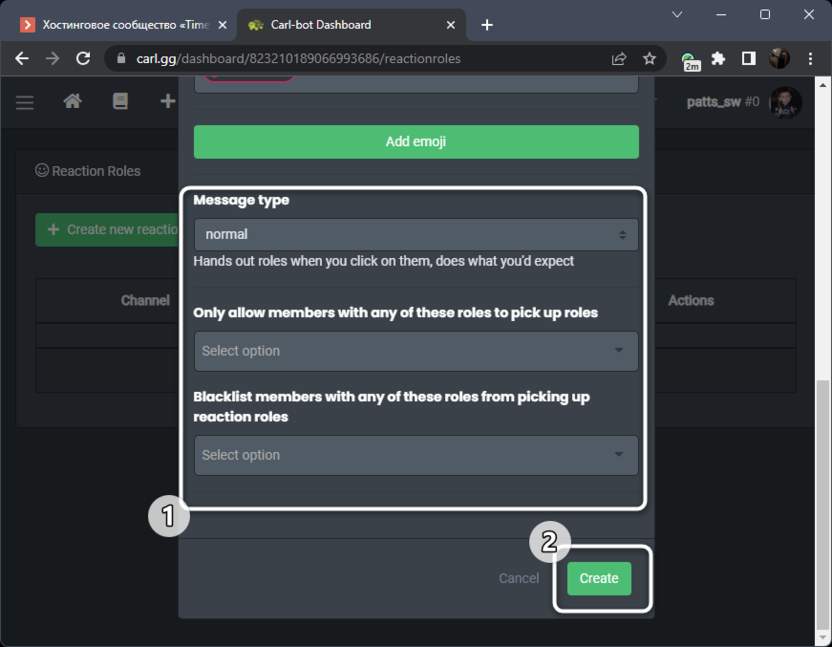
Шаг 4: Завершающая настройка бота
Пока что действия с сайтом Carl.gg завершены, поэтому можно перейти непосредственно к Дискорду. Перед проверкой сообщений рекомендую изменить настройку самой роли бота, сделав ее приоритетной. Это позволит избежать дальнейших проблем при выдаче им ролей по реакциям.
Откройте меню своего сервера и перейдите в настройки.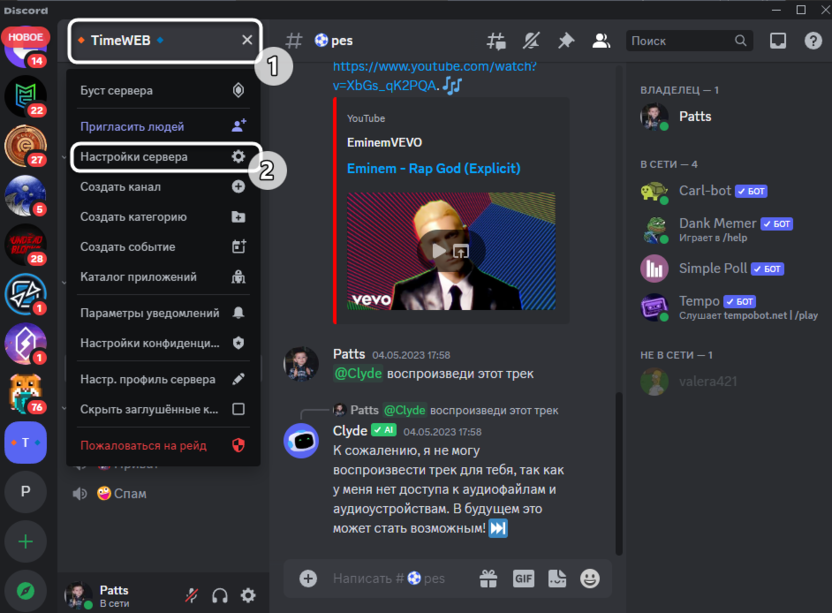
Выберите раздел «Роли», найдите в списке роль рассматриваемого бота и щелкните по ней левой кнопкой мыши.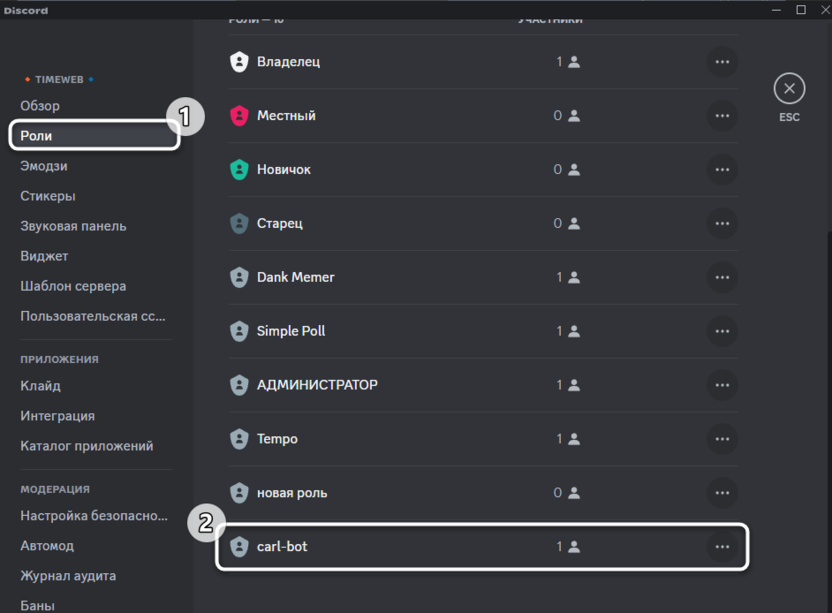
Зажмите ее ЛКМ в списке и перетащите на самый верх. Перед выходом не забудьте нажать кнопку «Сохранить изменения».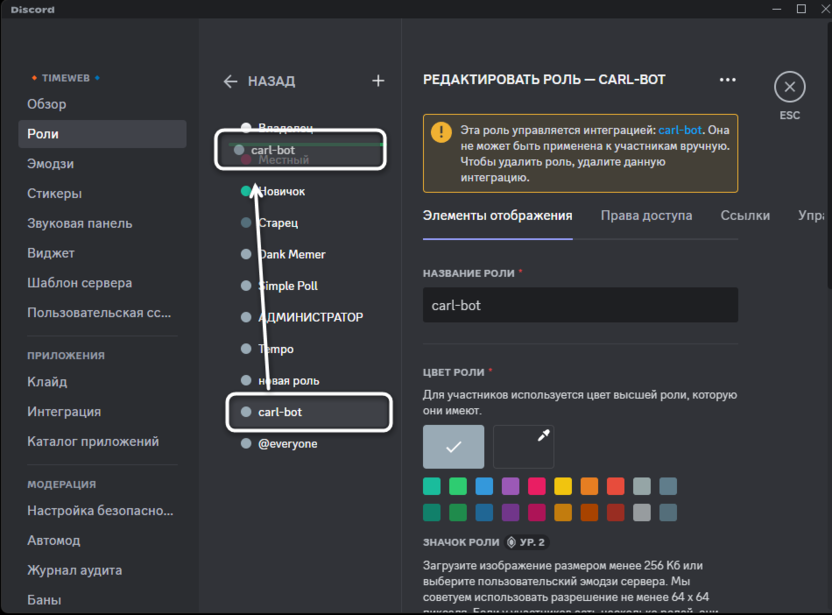
Шаг 5: Получение роли по реакции
Основные этапы позади, значит, самое сложное уже выполнено и сообщение с выдачей ролей по реакциям должно работать корректно. Вам же остается только проверить его и узнать информацию о том, как создавать такие сообщения дальше или редактировать уже существующие.
В первую очередь перейдите к каналу, где было создано сообщение от бота. Посмотрите на реакции и можете даже понажимать на некоторые из них, чтобы проверить отклик. Лучше это делать не с аккаунта создателя, поскольку у вас и так уже есть все необходимые права. Если второго профиля нет, попросите друга протестировать функцию.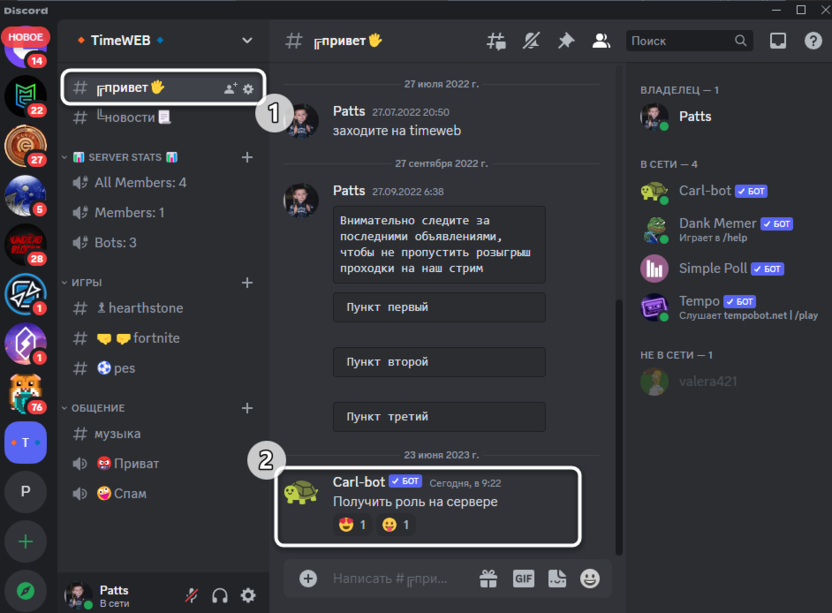
Как только реакция будет засчитана (список нажавших на эмодзи участников отображается при наведении на него курсора), можете посмотреть, обновились ли права для вас или «подопытного» пользователя, кто нажал на реакцию для получения роли.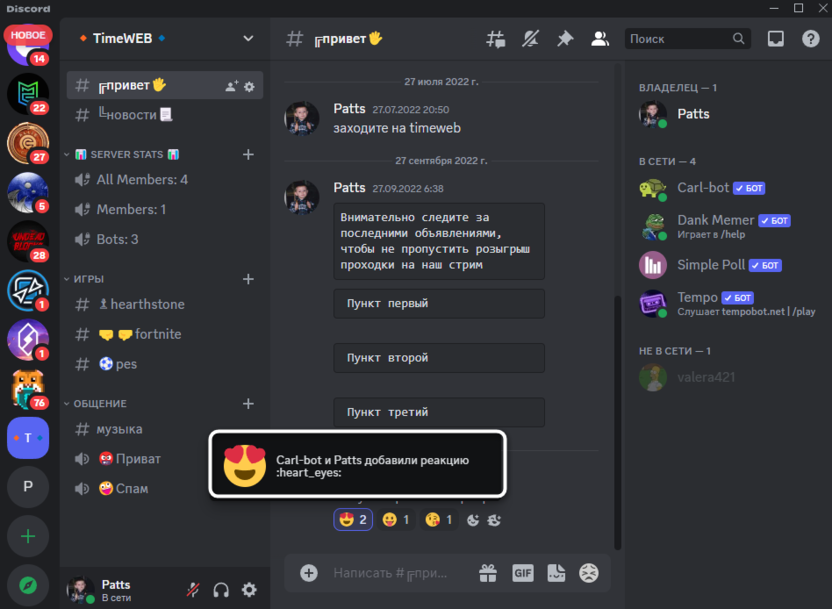
Вы в любой момент можете вернуться на сайт в тот же раздел «Reaction Roles», чтобы отредактировать существующее сообщение или создать новое для другого или того же самого текстового канала.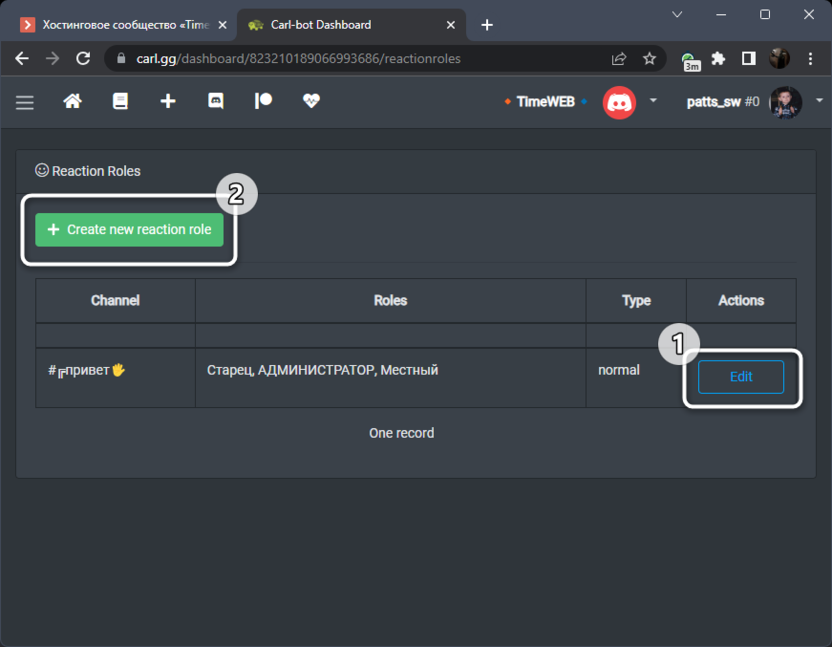
В этой статье я показал только один пример использования бота, который без сложностей для пользователя создает сообщение с получением ролей по реакциям. Есть и другие боты, которые могут так же или предлагают дополнительные инструменты для администрирования. Подобным помощникам посвящен другой материал на нашем сайте по следующей ссылке:
Creating a Discord role assignment bot with Python
Discord is a free-to-use chat server application that was initially developed for gamers but is becoming increasingly widely used by many different communities. Anyone can use it to create a chat server for discussion over text as well as voice and video. In addition to hosting human members, these servers can also host special automated users, called bots, which are capable of a variety of fun and useful tasks: everything from playing music to helping human moderators.
In this tutorial, we'll create a welcome bot for our programming discussion Discord server. This bot will welcome users as they join and assign them roles and private channels based on their stated interests. By the end of this tutorial, you will:
- Have familiarity with the process of creating a Discord bot application.
- Be able to use discord.py to develop useful bot logic.
- Know how to host Discord bots on Replit!
Getting started
Sign in to Replit or create an account if you haven't already. Once logged in, create a Python repl.
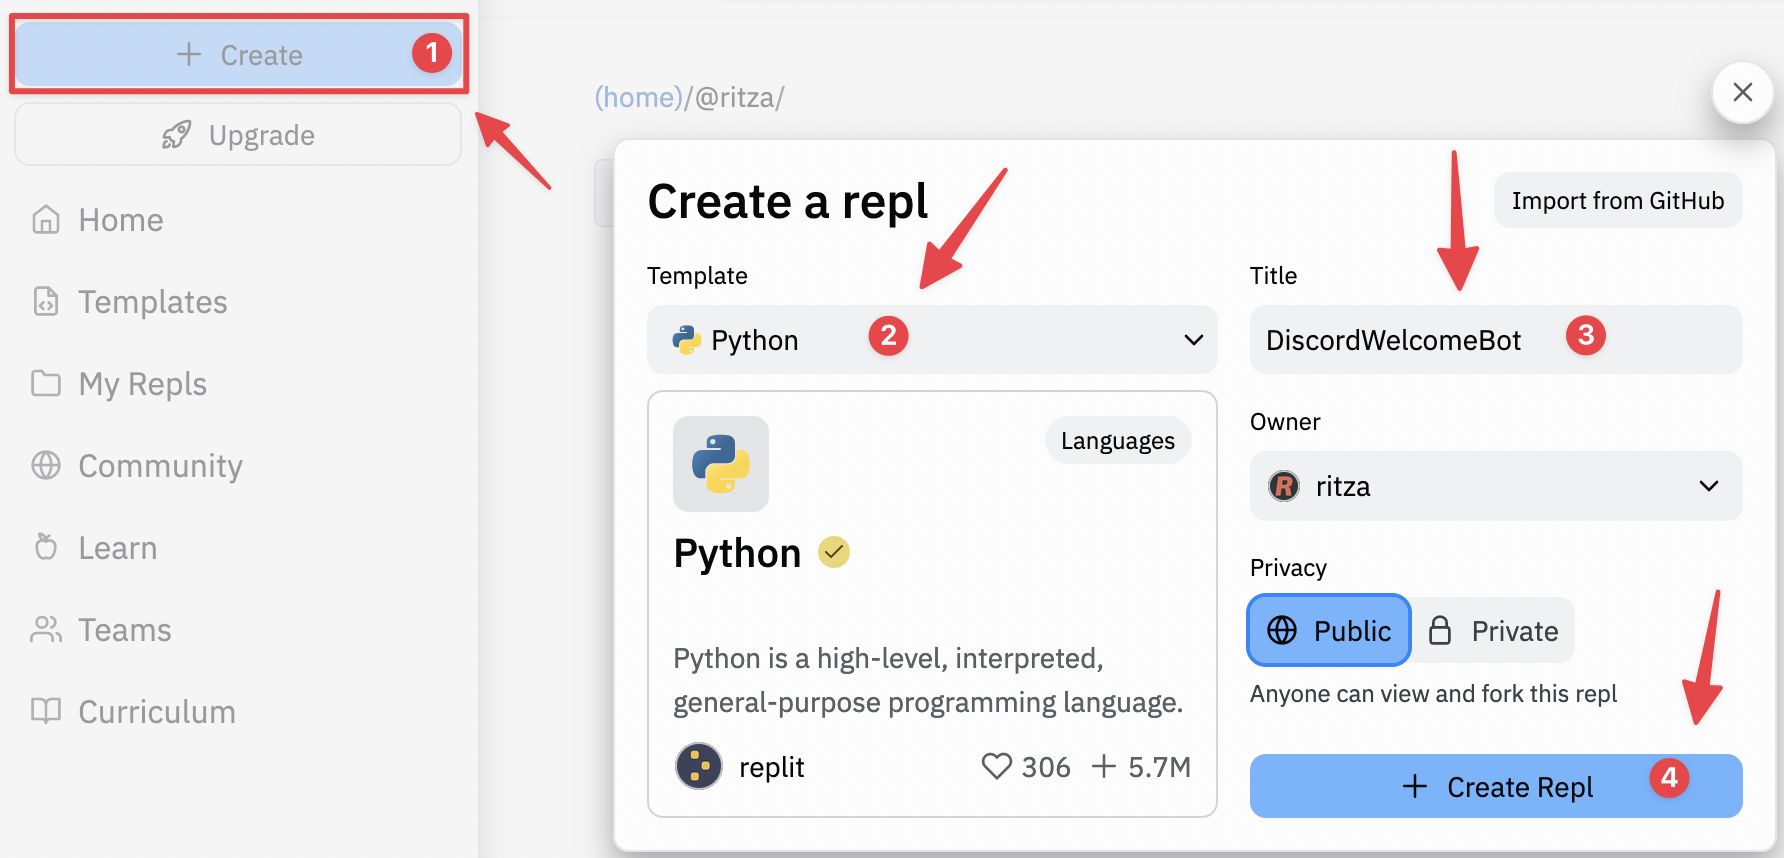
Creating a Discord application
Open another browser tab and visit the Discord Developer Portal. Log in with your Discord account, or create one if you haven't already. Keep your repl open – we'll return to it soon.
Once you're logged in, create a new application. Give it a name, like "Welcomer".
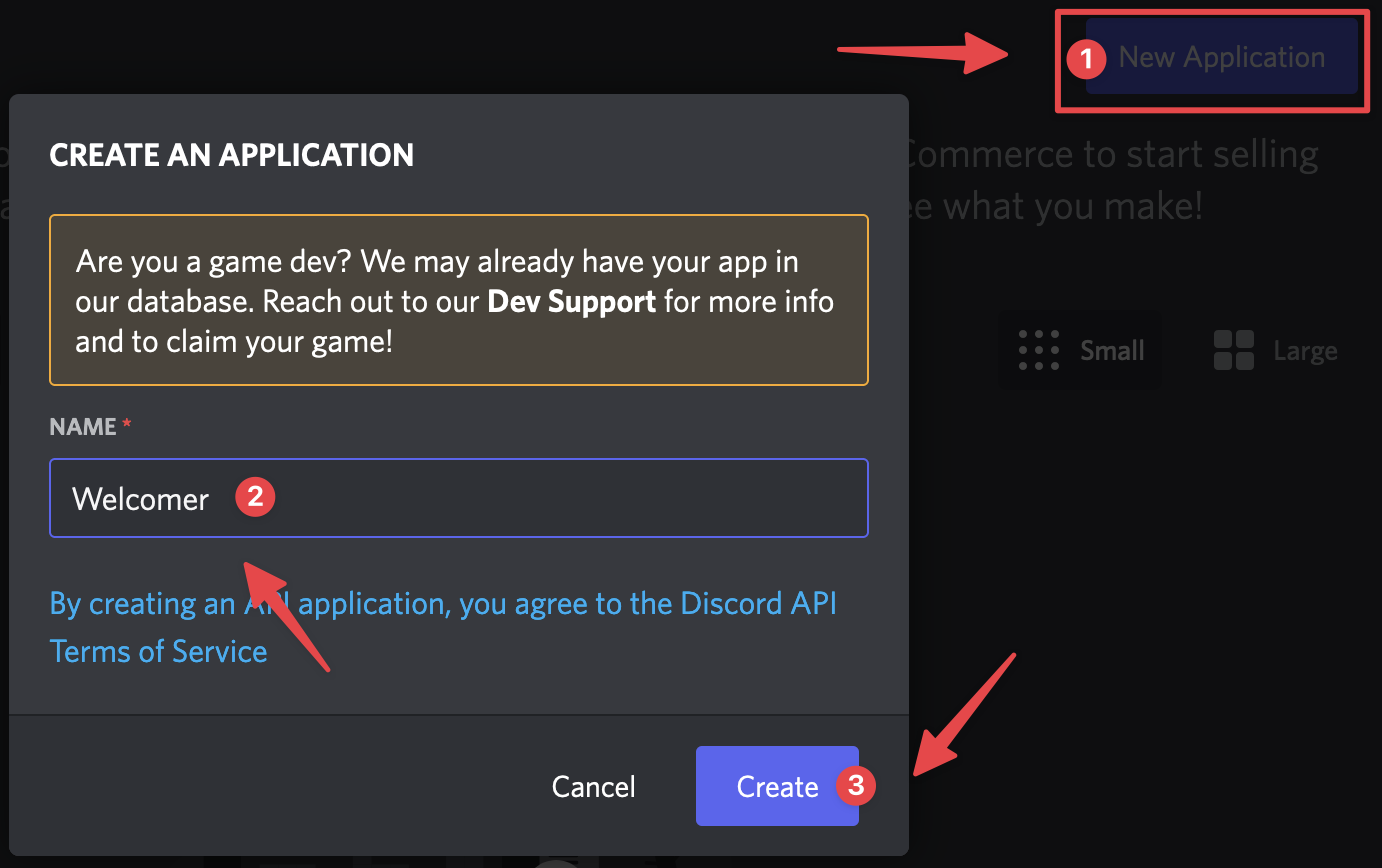
Discord applications can interact with Discord in several different ways, not all of which require bots, so creating one is optional. That said, we'll need one for this project. Let's create a bot.
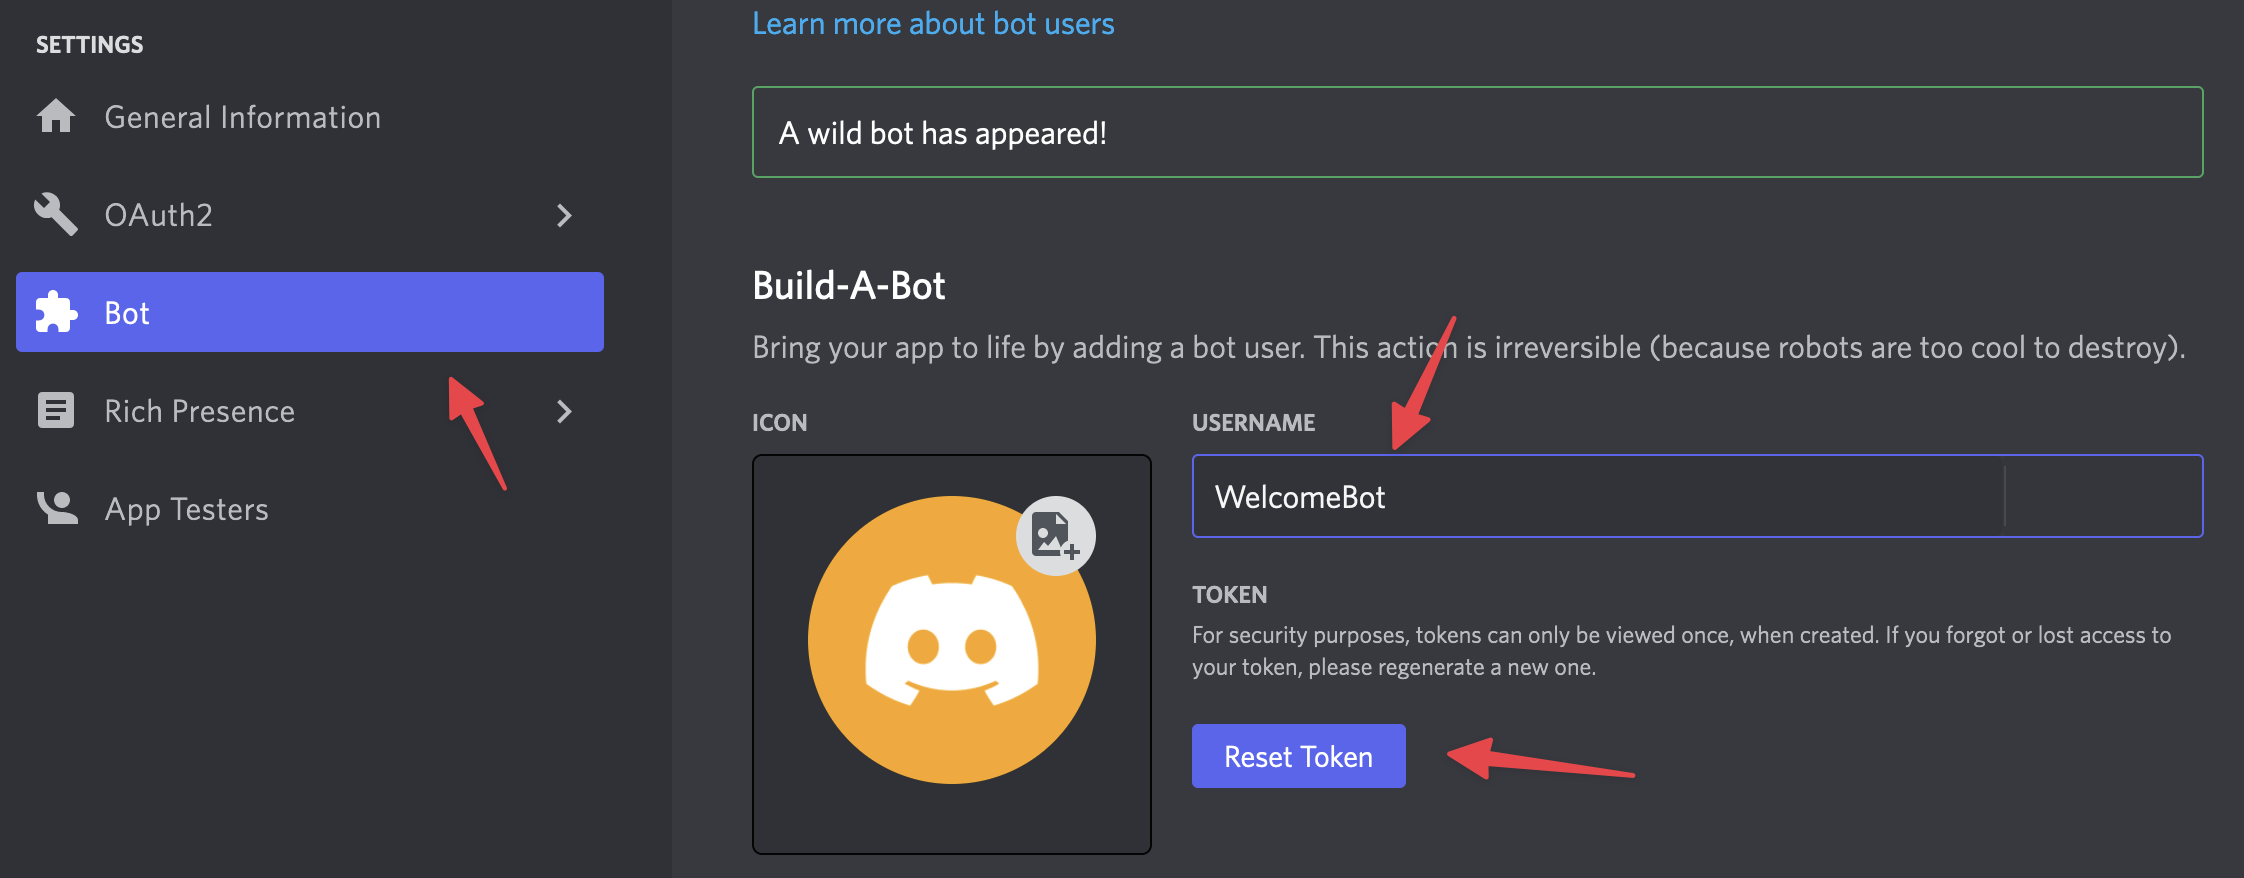
- Click on Bot in the menu on the left-hand side of the page.
- Click Add Bot.
- Give your bot a username (such as "WelcomeBot").
- Click Reset Token and then Yes, do it!
- Copy the token that appears just under your bot's username.
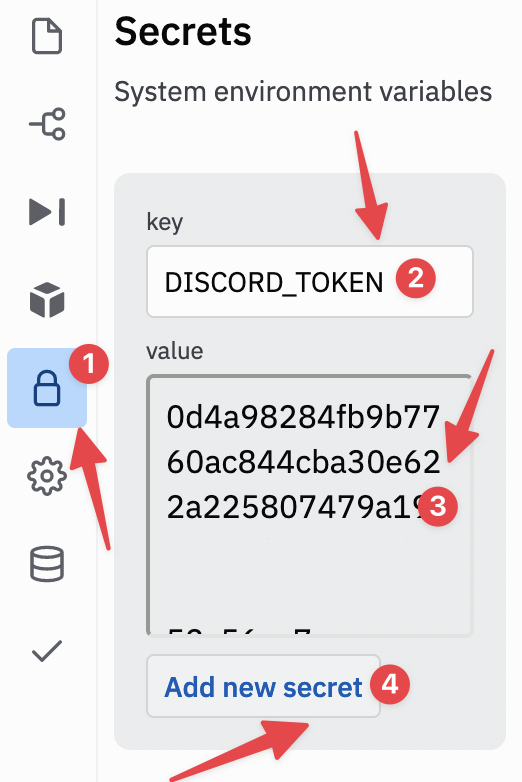
The token you just copied is required for the code in our repl to interface with Discord's API. Return to your repl and open the Secrets tab in the left sidebar. Create a new secret with DISCORD_TOKEN as its key and the token you copied as its value.
Once, you've done that, return to the Discord developer panel. We need to finish setting up our bot.
First, disable the Public Bot option – the functionality we're building for this bot will be highly specific to our server, so we don't want anyone else to try to add it to their server. What's more, bots on 100 or more servers have to go through a special verification and approval process, and we don't want to worry about that.
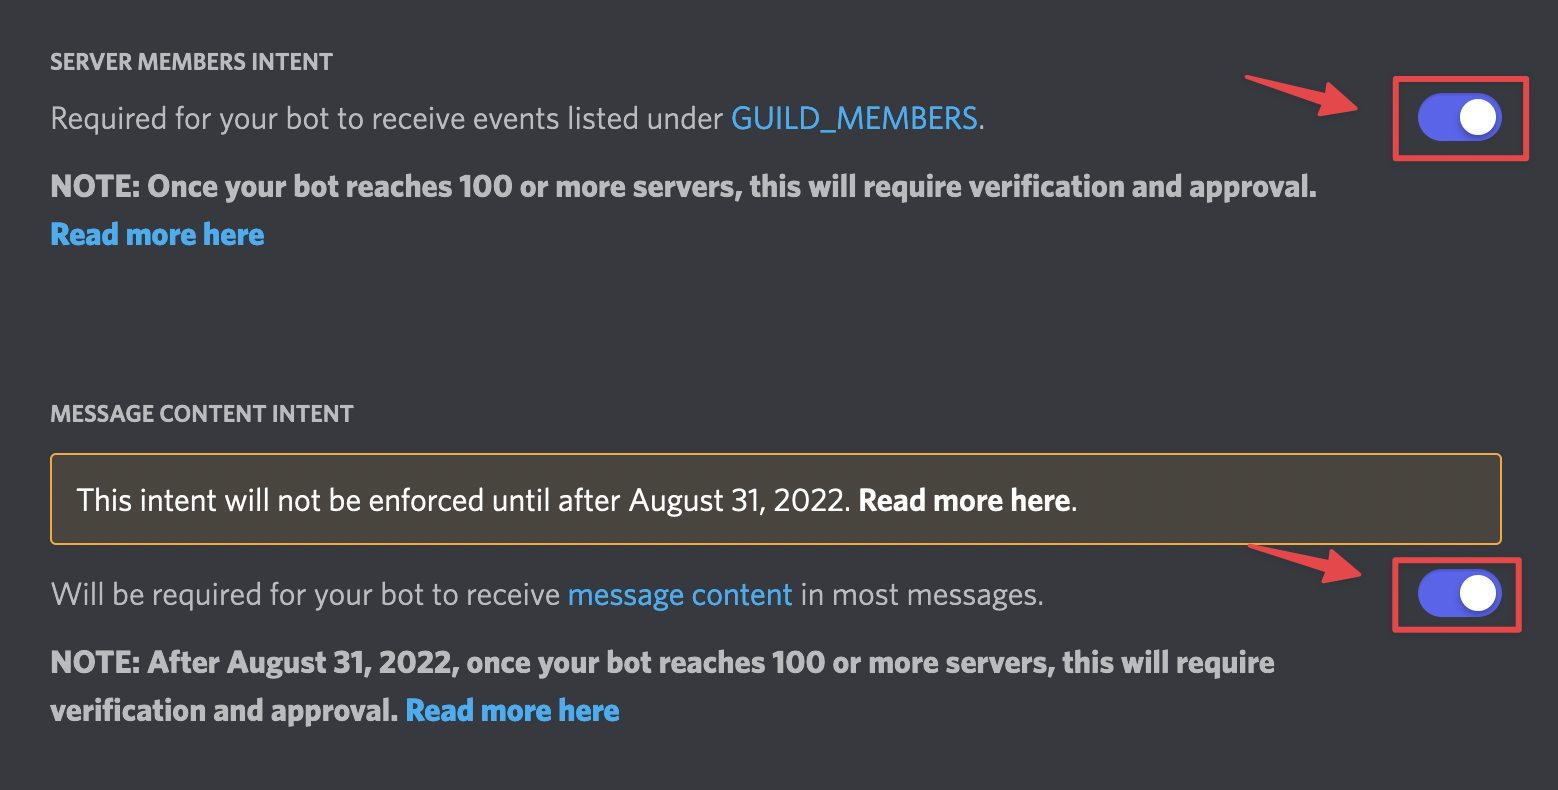
Second, we need to configure access to privileged Gateway Intents. Depending on a bot's functionality, it will require access to different events and sources of data. Events involving users' actions and the content of their messages are considered more sensitive and need to be explicitly enabled.
For this bot to work, we'll need to be able to see when users join our server, and we'll need to see the contents of their messages. For the former, we'll need the Server Members Intent and for the latter, we'll need the Message Content Intent. Toggle both of these to the "on" position. Save changes when prompted.
Now that we've created our application and its bot, we need to add it to a server. We'll walk you through creating a test server for this tutorial, but you can also use any server you've created in the past, as long as the other members won't get too annoyed about it becoming a bot testing ground. You can't use a server that you're just a normal user on, as adding bots requires special privileges.
Open Discord.com in your browser. You should already be logged in. Then click on the + icon in the leftmost panel to create a new server. Alternatively, open an existing server you own.
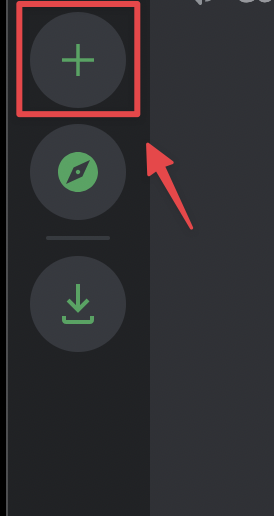
In a separate tab, return to the Discord Dev Portal and open your application. Follow these steps to add your bot to your server:
Click on OAuth2 in the left sidebar.
In the menu that appears under OAuth2, select URL Generator.
Under Scopes, mark the checkbox labelled bot.
Under Bot Permissions, mark the checkbox labelled Administrator. 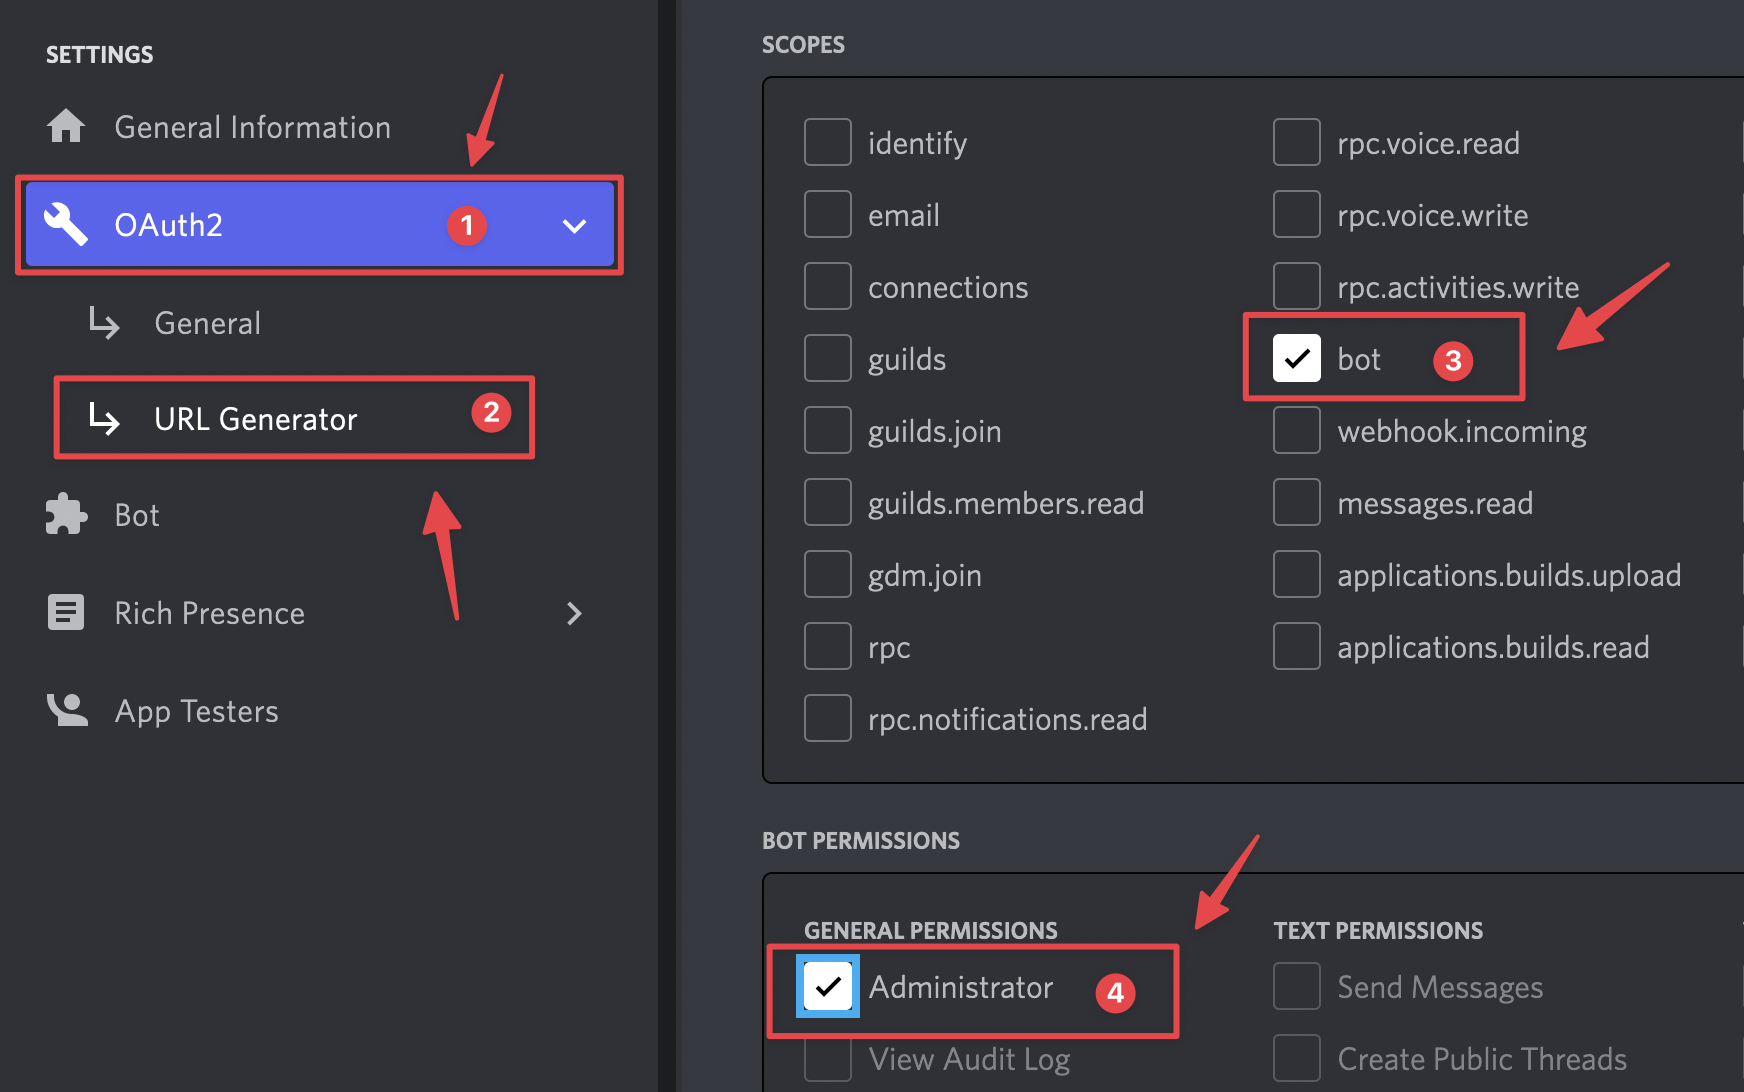
Scroll down and copy the URL under Generated URL. 
Paste the URL in your browser's navigation bar and hit Enter.
On the page that appears, select your server from the drop-down box and click Continue.
When prompted about permissions, click Authorize, and complete the CAPTCHA. 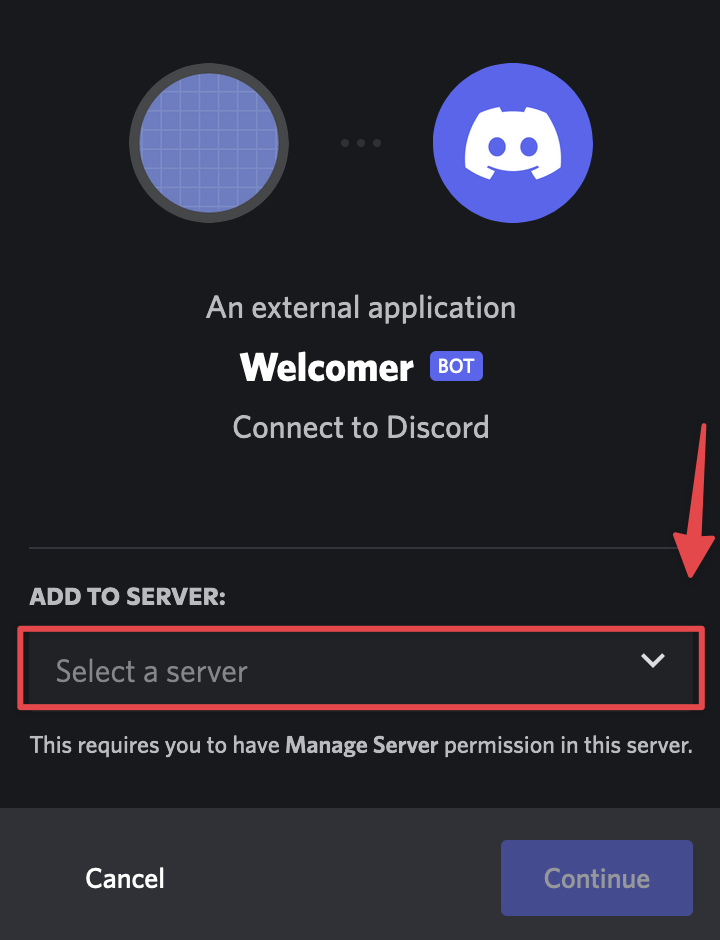
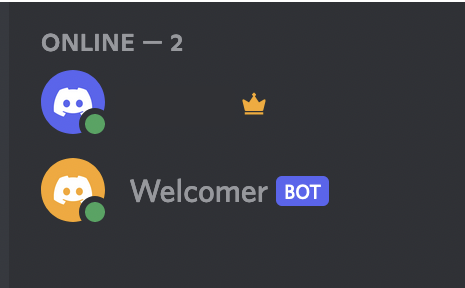
Return to your Discord server. You should see that your bot has just joined.
Now that we've done the preparatory work, it's time to write some code. Return to your repl for the next section.
Writing the Discord bot code
We'll be using discord.py to interface with Discord's API using Python. Add the following code scaffold to main.py in your repl:
First, we import the Python libraries we'll need, including discord.py and its commands extension. Next we retrieve the value of the DISCORD_TOKEN environment variable, which we set in our repl's secrets tab above. Then we instantiate a Bot object. We'll use this object to listen for Discord events and respond to them.
The first event we're interested in is on_ready() , which will trigger when our bot logs onto Discord (the @bot.event decorator ensures this). All this event will do is print a message to our repl's console, telling us that the bot has connected.
Note that we've prepended async to the function definition – this makes our on_ready() function into a coroutine. Coroutines are largely similar to functions, but may not execute immediately, and must be invoked with the await keyword. Using coroutines makes our program asynchronous, which means it can continue executing code while waiting for the results of a long-running function, usually one that depends on input or output. If you've used JavaScript before, you'll recognize this style of programming.
The final line in our file starts the bot, providing DISCORD_TOKEN to authenticate it. Run your repl now to see it in action. Once it's started, return to your Discord server. You should see that your bot user is now online.
Creating server roles
Before we write our bot's main logic, we need to create some roles for it to assign. Our Discord server is for programming discussion, so we'll create roles for a few different programming languages: Python, JavaScript, Rust, Go, and C++. For the sake of simplicity, we'll use all-lowercase for our role names. Feel free to add other languages.
You can add roles by doing the following:
Right-click on your server's icon in the leftmost panel.
From the menu that appears, select Server Settings, and then Roles.
Click Create Role. 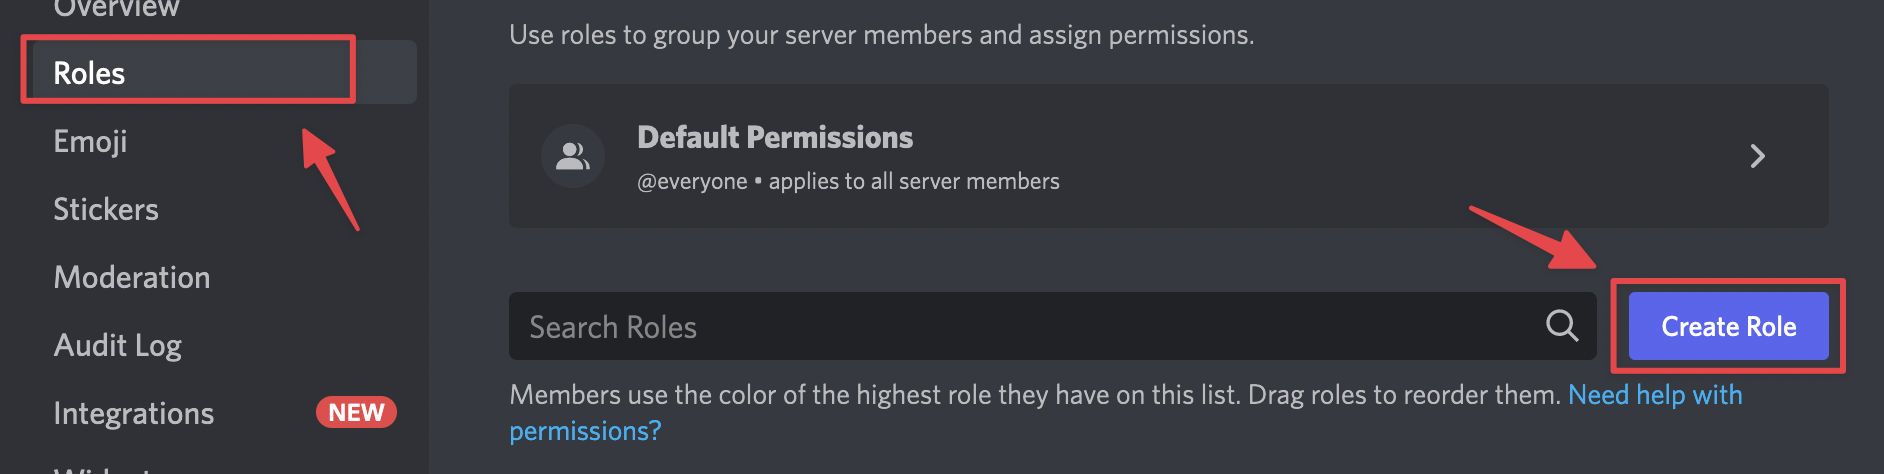
Enter a role name (for example, "python") and choose a color.
Click Back.
Repeat steps 3–5 until all the roles are created.
Your role list should now look something like this:
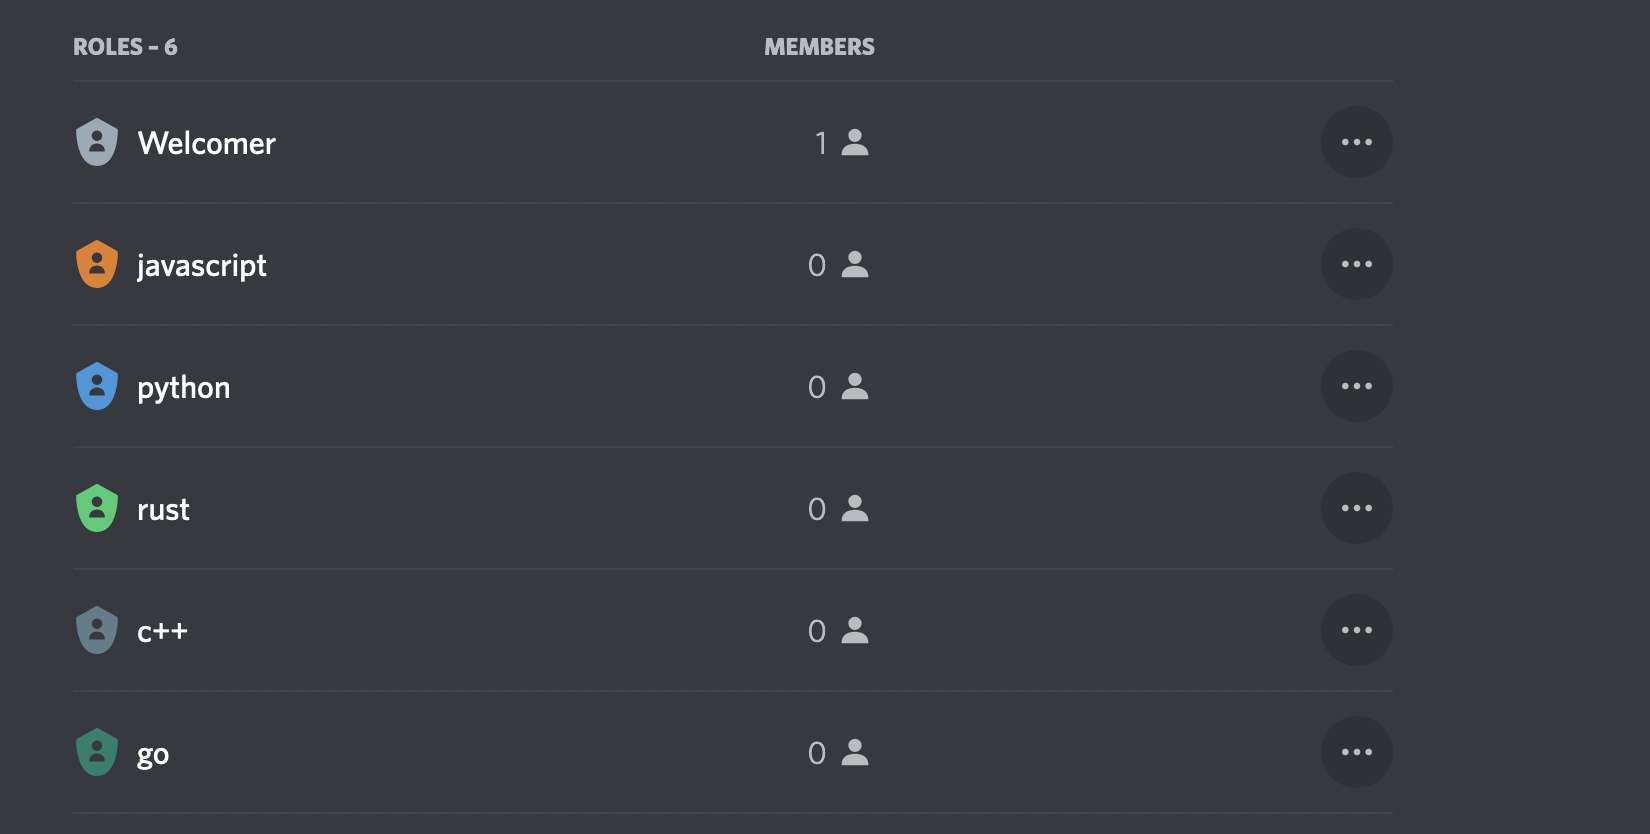
The order in which roles are listed is the role hierarchy. Users who have permission to manage roles will only be able to manage roles lower than their highest role on this list. Ensure that the WelcomeBot role is at the top, or it won't be able to assign users to any of the other roles, even with Administrator privileges.
At present, all these roles will do is change the color of users' names and the list they appear in on the right sidebar. To make them a bit more meaningful, we can create some private channels. Only users with a given role will be able to use these channels.
To add private channels for your server's roles, do the following:
- Click on the + next to Text Channels.
- Type a channel name (e.g. "python") under Channel Name.
- Enable the Private Channel toggle.
- Click Create Channel.
- Select the role that matches your channel's name.
- Repeat for all roles.
As the server owner, you'll be able to see these channels regardless of your assigned roles, but normal members will not.
Messaging users
Now that our roles are configured, let's write some bot logic. We'll start with a function to DM users with a welcome message. Return to your repl and enter the following code just below the line where you defined bot :
This simple function takes a member object and sends it a private message. Note the use of await when running the coroutine member.send() .
We need to run this function when one of two things happens: a new member joins the server, or an existing member types the command !roles in a channel. The second one will allow us to test the bot without constantly leaving and rejoining the server, and let users change their minds about what programming languages they want to discuss.
To handle the first event, add this code below the definition of on_ready :
The on_member_join() callback supplies a member object we can use to call dm_about_roles() .
For the second event, we'll need a bit more code. While we could use discord.py's bot commands framework to handle our !roles command, we will also need to deal with general message content later on, and doing both in different functions doesn't work well. So instead, we'll put everything to do with message contents in a single on_message() event. If our bot were just responding to commands, using @bot.command handlers would be preferable.
Add the following code below the definition of on_member_join() :
First, we print a message to the repl console to note that we've seen a message. We then check if the message's author is the bot itself. If it is, we terminate the function, to avoid infinite loops. Following that, we check if the message's content starts with !roles , and if so we invoke dm_amount_roles() , passing in the message's author.
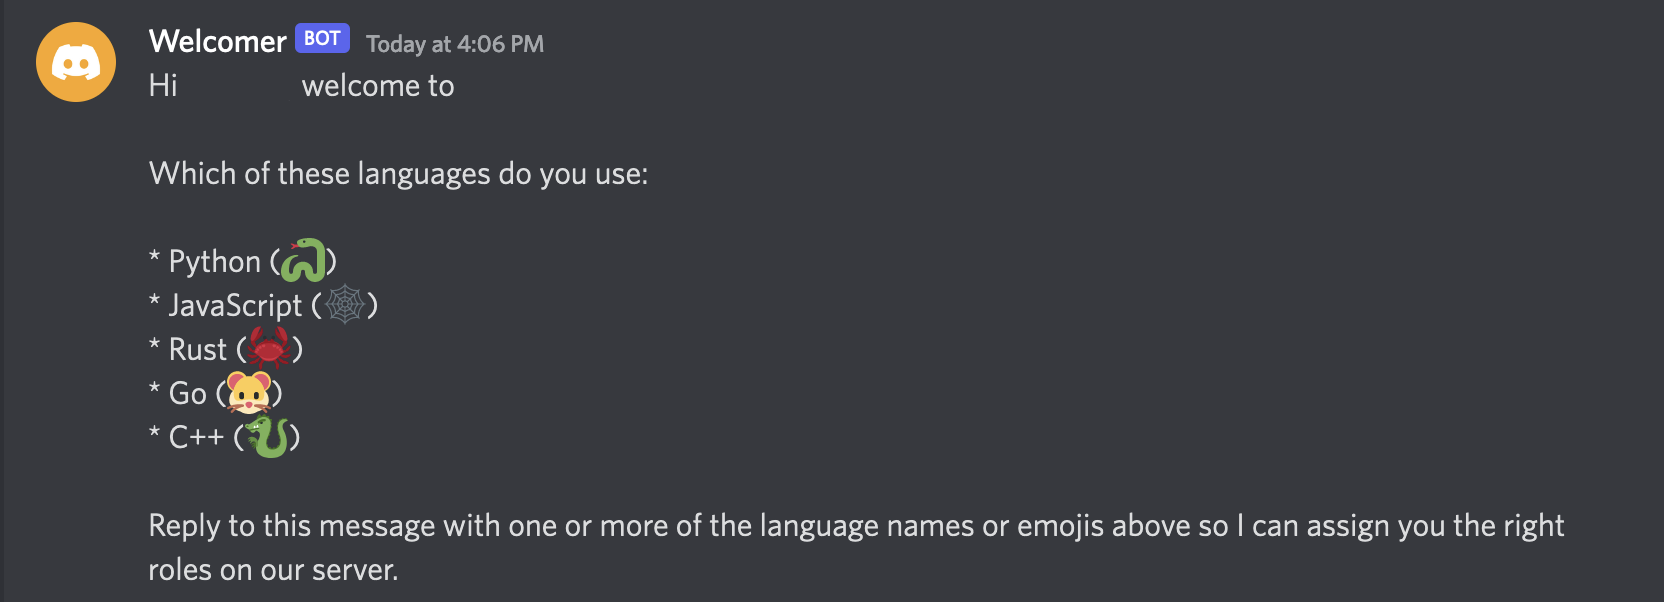
Stop and rerun your repl now. If you receive a CloudFlare error, type kill 1 in your repl's shell and try again. Once your repl's running, return to your Discord server and type "!roles" into the general chat. You should receive a DM from your bot.
Assigning roles from replies
Our bot can DM users, but it won't do anything when users reply to it. Before we can add that logic, we need to implement a small hack to allow our bot to take actions on our server based on the contents of direct messages.
The Discord bot framework is designed with the assumption that bots are generic and will be added to many different servers. Bots do not have a home server, and there's no easy way for them to trace a process flow that moves from a server to private messages like the one we're building here. Therefore, our bot won't automatically know which server to use for role assignment when that user replies to its DM.
We could work out which server to use through the user's mutual_guilds property, but it is not always reliable due to caching. Note that Discord servers were previously known as "guilds" and this terminology persists in areas of the API.
As we don't plan to add this bot to more than one server at a time, we'll solve the problem by hardcoding the server ID in our bot logic. But first, we need to retrieve our server's ID. The easiest way to do this is to add another command to our bot's vocabulary. Expand the if statement at the bottom of on_message() to include the following elif :
Rerun your repl and return to your Discord server. Type "!serverid" into the chat, and you should get a reply from your bot containing a long string of digits. Copy that string to your clipboard.
Go to the top of main.py . Underneath DISCORD_TOKEN , add the following line:
Paste the contents of your clipboard after the equals sign. Now we can retrieve our server's ID from this variable.
Once that's done, return to the definition of on_message() . We're going to add another if statement to deal with the contents of user replies in DMs. Edit the function body so that it matches the below:
This new if statement will check whether the message that triggered the event was in a DM channel, and if so, will run assign_roles() and then exit. Now we need to define assign_roles() . Add the following code above the definition of on_message() :
We can find the languages mentioned in the user replies using regular expressions: re.findall() will return a list of strings that match our expression. This way, whether the user replies with "Please add me to the Python and Go groups" or just "python go", we'll be able to assign them the right role.
We convert the list into a set in order to remove duplicates.
The next thing we need to do is deal with emoji responses. Add the following code to the bottom of the assign_roles() function:
In the first line, we do the same regex matching we did with the language names, but using emoji Unicode values instead of standard text. You can find a list of emojis with their codes on Unicode.org. Note that the + in this list's code should be replaced with 000 in your Python code: for example, U+1F40D becomes U0001F40D .
Once we've got our set of emoji matches in language_emojis , we loop through it and use a dictionary to add the correct name to our languages set. This dictionary has strings as values and lambda functions as keys. Finally, [emoji]() will select the lambda function for the provided key and execute it, adding a value to languages . This is similar to the switch-case syntax you may have seen in other programming languages.
We now have a full list of languages our users may wish to discuss. Add the following code below the for loop:
This code first checks that the languages set contains values. If so, we use get_guild() to retrieve a Guild object corresponding to our server's ID (remember, guild means server).
We then use a list comprehension and discord.py's get() function to construct a list of all the roles corresponding to languages in our list. Note that we've used the lower() to ensure all of our strings are in lowercase.
Finally, we retrieve the member object corresponding to the user who sent us the message and our server.
We now have everything we need to assign roles. Add the following code to the bottom of the if statement, within the body of the if statement:
The member object's add_roles() method takes an arbitrary number of role objects as positional arguments. We unpack our languages set into separate arguments using the * operator, and provide a string for the named argument reason .
Our operation is wrapped in a try-except-else block. If adding roles fails, we'll print the resulting error to our repl's console and send a generic error message to the user. If it succeeds, we'll send a message to the user informing them of their new roles, making extensive use of string interpolation.
Finally, we need to deal with the case where no languages were found in the user's message. Add an else: block onto the bottom of the if languages: block as below:
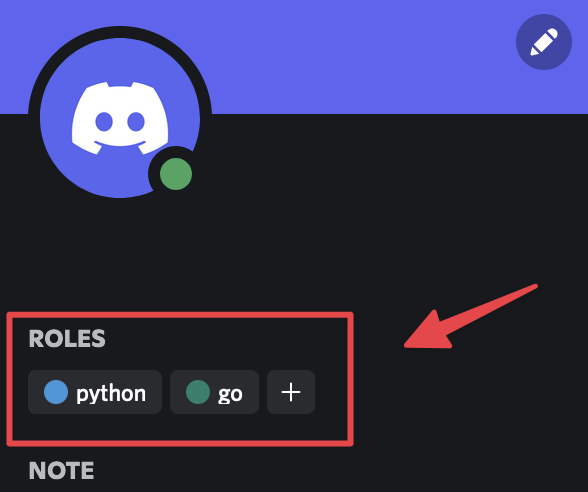
Rerun your repl and return to your Discord server. Open the DM channel with your bot and try sending it one or more language names or emojis. You should receive the expected roles. You can check this by clicking on your name in the right-hand panel on your Discord server – your roles will be listed in the box that appears.
Removing roles
Our code currently does not allow users to remove roles from themselves. While we could do this manually as the server owner, we've built this bot to avoid having to do that sort of thing, so let's expand our code to allow for role removal.
To keep things simple, we'll remove any roles mentioned by the user which they already have. So if a user with the "python" role writes "c++ python", we'll add the "c++" role and remove the "python" role.
Let's make some changes. Find the if languages: block in your assign_roles() function and change the code above try: to match the below:
We replace the list of roles with a set of new roles. We also create a set of roles the user current holds. Given these two sets, we can figure out which roles to add and which to remove using set operations. Add the following code below the definition of current_roles :
The roles to add will be roles that are in new_roles but not in current_roles , i.e. the difference of the sets. The roles to remove will be roles that are in both sets, i.e. their intersection.
Now we need to replace the try-except-else block with the code below:
This code follows the same general logic as our original block, but can remove roles as well as add them.
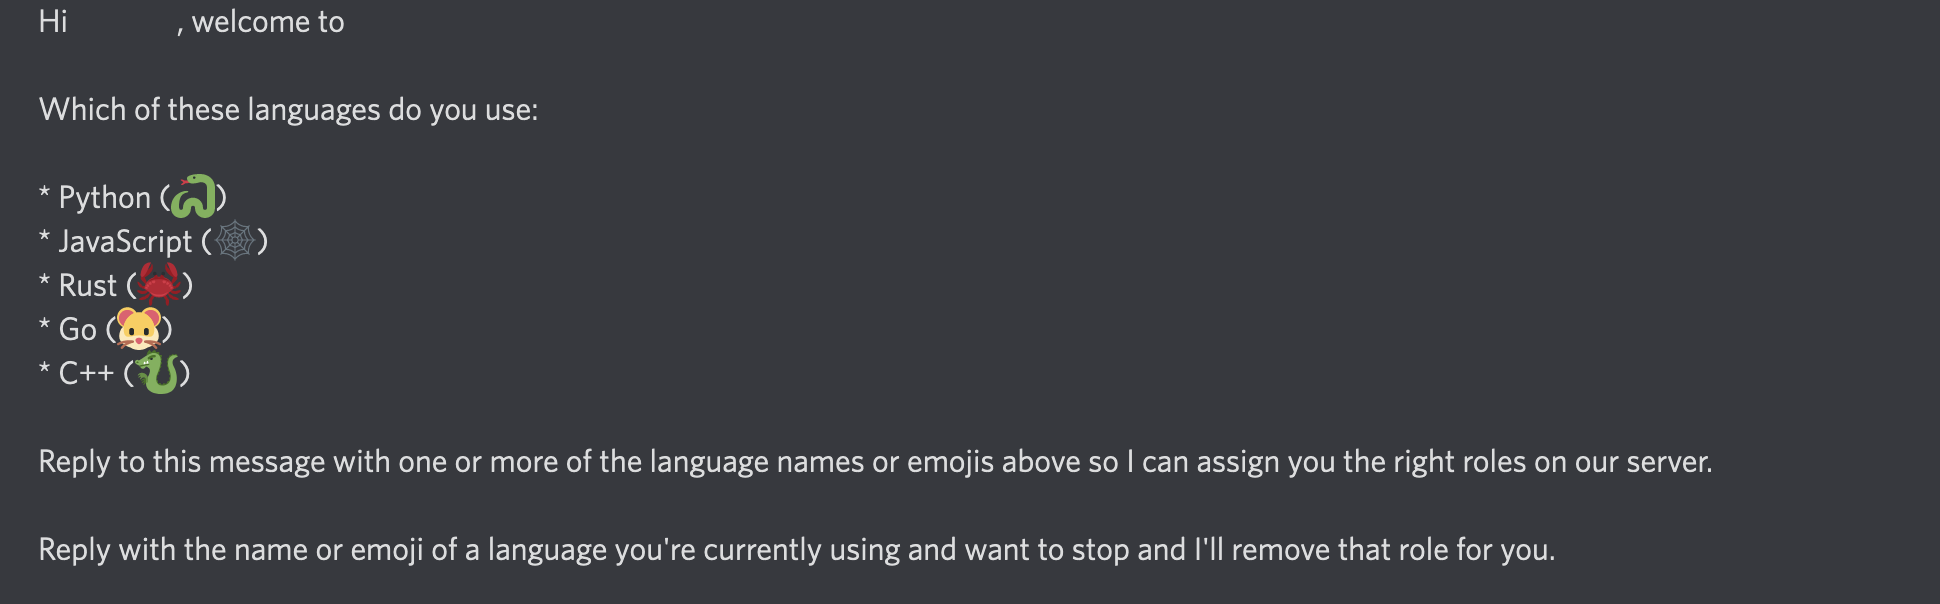
Finally, we need to update the bot's original DM to reflect this new functionality. Find the dm_about_roles() function and amend it as follows:
Rerun your repl and test it out. You should be able to add and remove roles from yourself. Try inviting some of your friends to your Discord server, and have them use the bot as well. They should receive DMs as soon as they join.

Where next?
We've created a simple Discord server welcome bot. There's a lot of scope for additional functionality. Here are some ideas for expansion:
- Include more complex logic for role assignment. For example, you could have some roles that require users to have been members of the server for a certain amount of time.
- Have your bot automatically assign additional user roles based on behavior. For example, you could give a role to users who react to messages with the most emojis.
- Add additional commands. For example, you might want to have a command that searches Stack Overflow, allowing members to ask programming questions from the chat.
Discord bot code can be hosted on Replit permanently, but you'll need to use an Always-on repl to keep it running 24/7.