Как слелать Sidechain в FLstudio через Fruity Limiter

Наверное у многих людей возникает проблема с тем, что бочку не слышно на фоне басса.
Этот урок о том, как это исправить с помощью Sidechain
Сайдчейн в FL Studio делают в основном, чтобы убрать конфликт баса и бочки. Если в момент удара бочки звучит бас (что чаще всего бывает), он «заслоняет» собой бочку и ее просто не слышно.
- Для начала, ставим наш басс на микшер (в нашем случае на №34), и добавляем на него Fruity Limiter

2. Переходим на вкладку «COMP»

3. Под «LOUDNESS» крутим THRES на -12.0dB.

4. И подкручиваем Ratio на 4.0:1.

5. Выводим нашу бочку на микшер ( в нашем случае №33 ), и выставляем точно те же значение как и на наш басс ( THRES на -12.0dB. Ratio на 4.0:1 ).

6. Выбрав наш канал №33, перенаправляем его на канал №34, как на картинке.

7. Переходим на канал №34 и во вкладке «SIDECHAIN» меняем значение на 1.

8. Немного опустим линию Thres (уменьшим порог срабатывания) и увеличим Ratio (степень сжатия). Все параметры необходимо выставить на слух, тут точных значений дать не могу. Ручкой Gain можно изменять громкость баса.
Также для улучшения советую поиграться с эквалайзером.
Теперь, после проведенной работы, можно наслаждаться чистым звучанием бочки.
Как сделать sidechain (Сайдчейн) в Фл Студио 20-21
Пошаговая инструкция: как сделать sidechain в fl studio
Создание эффекта sidechain позволяет создавать затухание звука определенных элементов музыкального трека при игре других элементов. В FL Studio для создания эффекта sidechain можно использовать встроенный плагин Gross Beat.
Давайте рассмотрим пошаговую инструкцию, как создать sidechain в FL Studio с помощью Gross Beat.
Шаг 1: Установите плагин Gross Beat
Убедитесь, что у вас установлена последняя версия FL Studio и что плагин Gross Beat уже установлен на вашем компьютере. Если вы не уверены, можете проверить наличие плагина в меню «Channels -> Add one -> More…» и выбрать пункт «Image-Line -> Gross Beat».
Шаг 2: Добавьте инструменты в каналы
Добавьте инструменты, для которых вы хотите создать эффект sidechain, в разные каналы микшера в FL Studio.
Шаг 3: Добавьте Gross Beat в канал синтезатора
Добавьте плагин Gross Beat в канал микшера, где находится синтезатор, который вы хотите использовать в качестве «источника» для эффекта sidechain. Щелкните правой кнопкой мыши по каналу синтезатора и выберите пункт «Insert -> Gross Beat».
Шаг 4: Выберите эффект sidechain в Gross Beat
В окне плагина Gross Beat выберите паттерн, который отвечает за создание эффекта sidechain. Например, паттерн «Volume Gate» или «Ducking». Убедитесь, что вы выбрали правильный паттерн, чтобы создать желаемый эффект.
Шаг 5: Настройте параметры sidechain
Настройте параметры sidechain в плагине Gross Beat. Например, вы можете задать частоту sidechain, уровень сигнала, скорость и глубину эффекта. Эти параметры могут быть настроены в соответствии с вашими потребностями и желаемым звуковым эффектом.
Шаг 6: Настройте тайминги
Настройте тайминги в плагине Gross Beat в соответствии с желаемым звуковым эффектом. Например, вы можете задать тайминг для «источника» sidechain, чтобы определить, какой звук должен быть затушеван при игре другого звука.
Шаг 7: Настройте параметры смешивания
Настройте параметры смешивания в каналах микшера, чтобы достичь желаемого эффекта. Например, вы можете настроить уровень громкости синтезатора и других элементов трека, чтобы достичь правильного баланса между ними.
Как сделать сайдчейн в fl studio 20
If you’re just getting started with music production in FL Studio, chances are you’ve heard the term sidechain or sidechain compression thrown around. Compression is one of the most popular tools used in professional audio recording, producing, and performances. So no matter what genre of music you listen to, your favourite songs are sure to use some sort of compression.
Generally speaking, most compressors work on their own and focus on controlling the output of a single channel in your mix. Sidechaining works a little bit differently, by making sure a particular sound is compressed, relative to other sounds or channels in your mix. In laymen terms, sidechain helps your leading elements stand out while ducking the volume of other sounds that get played at the same time.
If you’re still a bit confused, think of your favourite dance music tracks. You’ll notice that even though they have hard-hitting and catchy bassline synths, the kick drums always shine through and punch on every beat. This is because the producer has utilized sidechain compression in order to “duck” the clashing low-end frequencies on the bassline whenever the kick
In this article, we explain everything you need to know in terms of compression and sidechain. As well as a step by step guide on how to sidechain within FL Studio!

AVE PK-Fusion5 Studio Monitor Pair 5 Inch

FL Studio Producer Edition 20.6 Music Production Software

FL Studio 20.6 Fruity Music Production Software

Akai FIRE NS (No Software) MIDI Controller Workstation

Compression
To understand Sidechaining and Sidechain Compression in FL Studio, we must first cover the basics of Compression, and how to use a compressor. Compression originated in the early days of recording with the goal of maintaining a consistent output from vocalists. It’s a dynamic processing tool that’s used to keep your audio signal within a specific dynamic/volume range.
Essentially, compressors are useful for making your loud sounds softer. So you can boost the overall level of a track while narrowing the dynamic range. Resulting in a much cleaner, and more enjoyable mix.
Using a compressor on your FL Studio audio track starts by picking a volume level you always want your instrument to sound at (never louder, never softer). Then, you’ll set a compression level to determine how sensitive your effect will be. Resulting in every note played too quietly to be boosted into your volume range, and every note too loud to be softened to fit the range. So, your instrument will always be heard within the dynamic range you specified.
Even after reading this, you might still be a bit confused when you’re staring blankly at a compressor on your FL Studio project. So, we’ve outlined some of the most common terms to help you out!
Parameters on your compressor
Threshold
Perhaps the most important parameter on your compressor. Setting the threshold means that any sounds on the track louder than this will be reduced according to the ratio. While leaving sounds sitting lower than this level alone.
Ratio
The ratio determines the intensity of compression for sounds sitting above the threshold. Therefore, at a ratio of 2:1, any sound 2dB above the threshold will be reduced by 1dB. While at a ratio of 10:1, the sound will be reduced by 1.8dB. Therefore, the higher the ratio, the harder the compressor will work. It’s worth experimenting to find the ratio that works best for your sound.
Adjusting the peak parameter determines how your compressor perceives the loudness of the sound.
Attack/Release
Using the attack parameter on your compression allows you to determine how quickly the compressor engages. While the Release parameter will determine how quickly it shuts off.
The Knee determines the onset of your compression. Using a low knee on instruments like drums and guitar generally sounds better. While a higher knee placed on vocals can make your voice sound smoother and more natural.
Furthermore, using a multiband compressor can isolate multiple frequencies and compress them, while leaving other frequencies alone. 
Sidechain Compression
Sidechain compression differs slightly from compression. It works to control the level of a particular sound, relative to other sounds within your mix. For example, the compression level of your bass track may be controlled by the volume of your kick drum. So, when your kick drum sounds, your bass becomes more compressed. Therefore, both sounds can keep cutting through the mix. Allowing the kicks to dominate the mix without clashing with the sound of the bass and creating a muddy signal. Therefore, providing a pulsating, and rhythmic dynamic to the sound.
Sidechaining has a number of different uses, so today we’ll explore just a few of its most common applications.
Dialogue Ducking
Since the introduction of sidechaining, Dialogue Ducking has been one of the most common uses of the technique. Automatically reducing the volume of music to make way for vocals. There are numerous examples showing dialogue ducking in action such as; when you’re at the supermarket and the music softens in order for somebody to make an announcement; and when the music drops in volume on the radio while the host speaks.
Vocal Mixing
Vocals are consistently the main focus of every song. You want your vocals to stand out, be loud enough, and be heard clearly. If your vocals are getting a little bit lost in the mix, you may be tempted just to turn them up. However, by sidechaining other tracks to your vocals, you can make sure that your other tracks quieten down to make room for your vocals. Letting your vocals shine while minimizing unwanted distortion or clipping.
Letting The Kick Punch
You’ll notice most Pop and Dance songs feature super punchy kicks and bass. Using these elements together without proper separation can be a recipe for disaster. Resulting in clashing frequencies and in turn, a muddy, unpleasant mix. Like the example above, in order to avoid this, you’d simply add a compressor to your bass track, while sending your kick’s signal to the sidechain input. Helping you to clear up the clashing frequencies and really make your kick drum pop!
To achieve a different and more stylistic effect; you can even sidechain other sounds like synths, leads, and even vocals to center your rhythm around the kick drum. 
How To Use Sidechain in FL Studio
So, now to the nitty-gritty! How do you use sidechain in FL Studio? There are a few easy ways to sidechain in FL Studio, and we’ll go through 3 different methods you can use to get this done! We’ve even put together a handy infographic below that gives you a quick rundown on how to sidechain.
How to Sidechain with FL Studio’s Fruity Limiter
For the first and most typical sidechain setup, we’ll be using the Fruity Limiter inside FL Studio to sidechain your kick drum to a bass synth. In this technique, we’ll work to compress the bass signal whenever the kick drum plays.
Without any sidechain, your kick drum and bass synth are likely to clash with each other within certain frequencies. As a result, your kicks are probably getting lost in the mix and end up sounding much weaker than ideal. So once you’ve added the side chain, things are going to sound a lot cleaner.
Step 1. Add a Fruity Limiter
First up, you’ll want to open up and add a Fruity Limiter to the track you want to ‘duck’ under your kick. For instance, in this case, we’ll be ducking the kick under the Bass Synth track.

Step 2. Link the kick to the bass signal
We’ve added the initial Fruity Limiter, now we have to link the kick track to the bass synth track. To do this, simply select the Kick track, then right-click on the small arrow on your bass synth track.
That will then open up a menu window, where you can select the “Sidechain to this track” option.

Step 3. Basic Settings
Ok, everything has been added and linked together. It’s now time to tweak your settings and make sure everything is sounding as good as it can. Depending on how you’re using Sidechain, the settings are always going to be different. But we’ve given you a basic run down to get started before you fine tweak it to suit your sound!
So open up your Fruity Limiter, and start by changing it from LIMIT to COMP mode.
Next, you’ll want to change the number in the SIDECHAIN box to 1. Then, drop the THRESHOLD amount, and increase the RATIO until its starting to sound the way you’d like it to.
You’ll notice the kick and bass signals are now working together, and your sound is going to sound so much cleaner. But what else can you do to make your sidechain in FL Studio sound even better? There are a number of settings in your Fruity Limiter that are going to affect the way your compression sounds, so it’s worth playing around and tweaking it until it sounds perfect.
If you’re not sure what you’re doing, take another look at our explanation of the compressor parameters above!

Alternative Method – How to Sidechain in FL Studio using Automation
Alternatively, you can use the method of volume automation to perform a similar effect. Technically, this isn’t sidechaining, since the automation will control the volume of the signal you want to duck (in this case the bass) independent of the kick signal. Rather than being linked together using the Fruity Limiter.
This method is easy, but it can get a bit more tedious. However, it does allow for a lot more flexibility and control over your sound. In saying that, you’d only really use it over the Fruity Limiter technique if you were trying to create a specific sound effect that you couldn’t achieve otherwise.
For instance, you can choose between letting your effects such as your reverb and delay tail off while ducking the sound for an interesting effect. Or, apply the automation to your mixer track volume and completely silence the effects if you’d rather.
Step 1. Create a Fruity Balance Volume Automation Clip
First things first, you’ll want to head over to the mixer track you want to duck (In this case we’re ducking the Bass) and add an instance of Fruity Balance.
From there, we’ll want to link the volume knob to a separate automation clip. So right-click on the Fruity Balance volume knob, then select “Create Automation Clip” from the drop-down menu. You should now see a new automation clip appear in your playlist.
Step 2. Adjust the Automation Clip
Now what you’re going to want to do is shape the automation clip so we can achieve a similar ducking effect as the previous method. Essentially, we’ll be creating a hole in the frequency spectrum where the kick can fill in. So it’s important to take note where your kick drum starts, peaks, and ends. That will give you a good idea as to when to drop the volume of your bass synth and when to bring it back up again. 
Step 3. Copy the automation
That’s basically it! Our automation has been created and you should be seeing (and hearing) a similar effect as you would using the Fruity Limiter. Now the only thing left to do is copy the automation pattern across your entire track where you want the effect to come into play. That’s unless you want to spend unnecessary amounts of time creating automation curves throughout your song.
Method Three – Gross Beat
Finally, the last and possibly the easiest option for side-chaining a specific pattern in FL Studio is done by using the Gross Beat plugin.
Step 1. Add an instance of Gross Beat to the mixer track you have your bass/lead synth/or other sound you want to duck
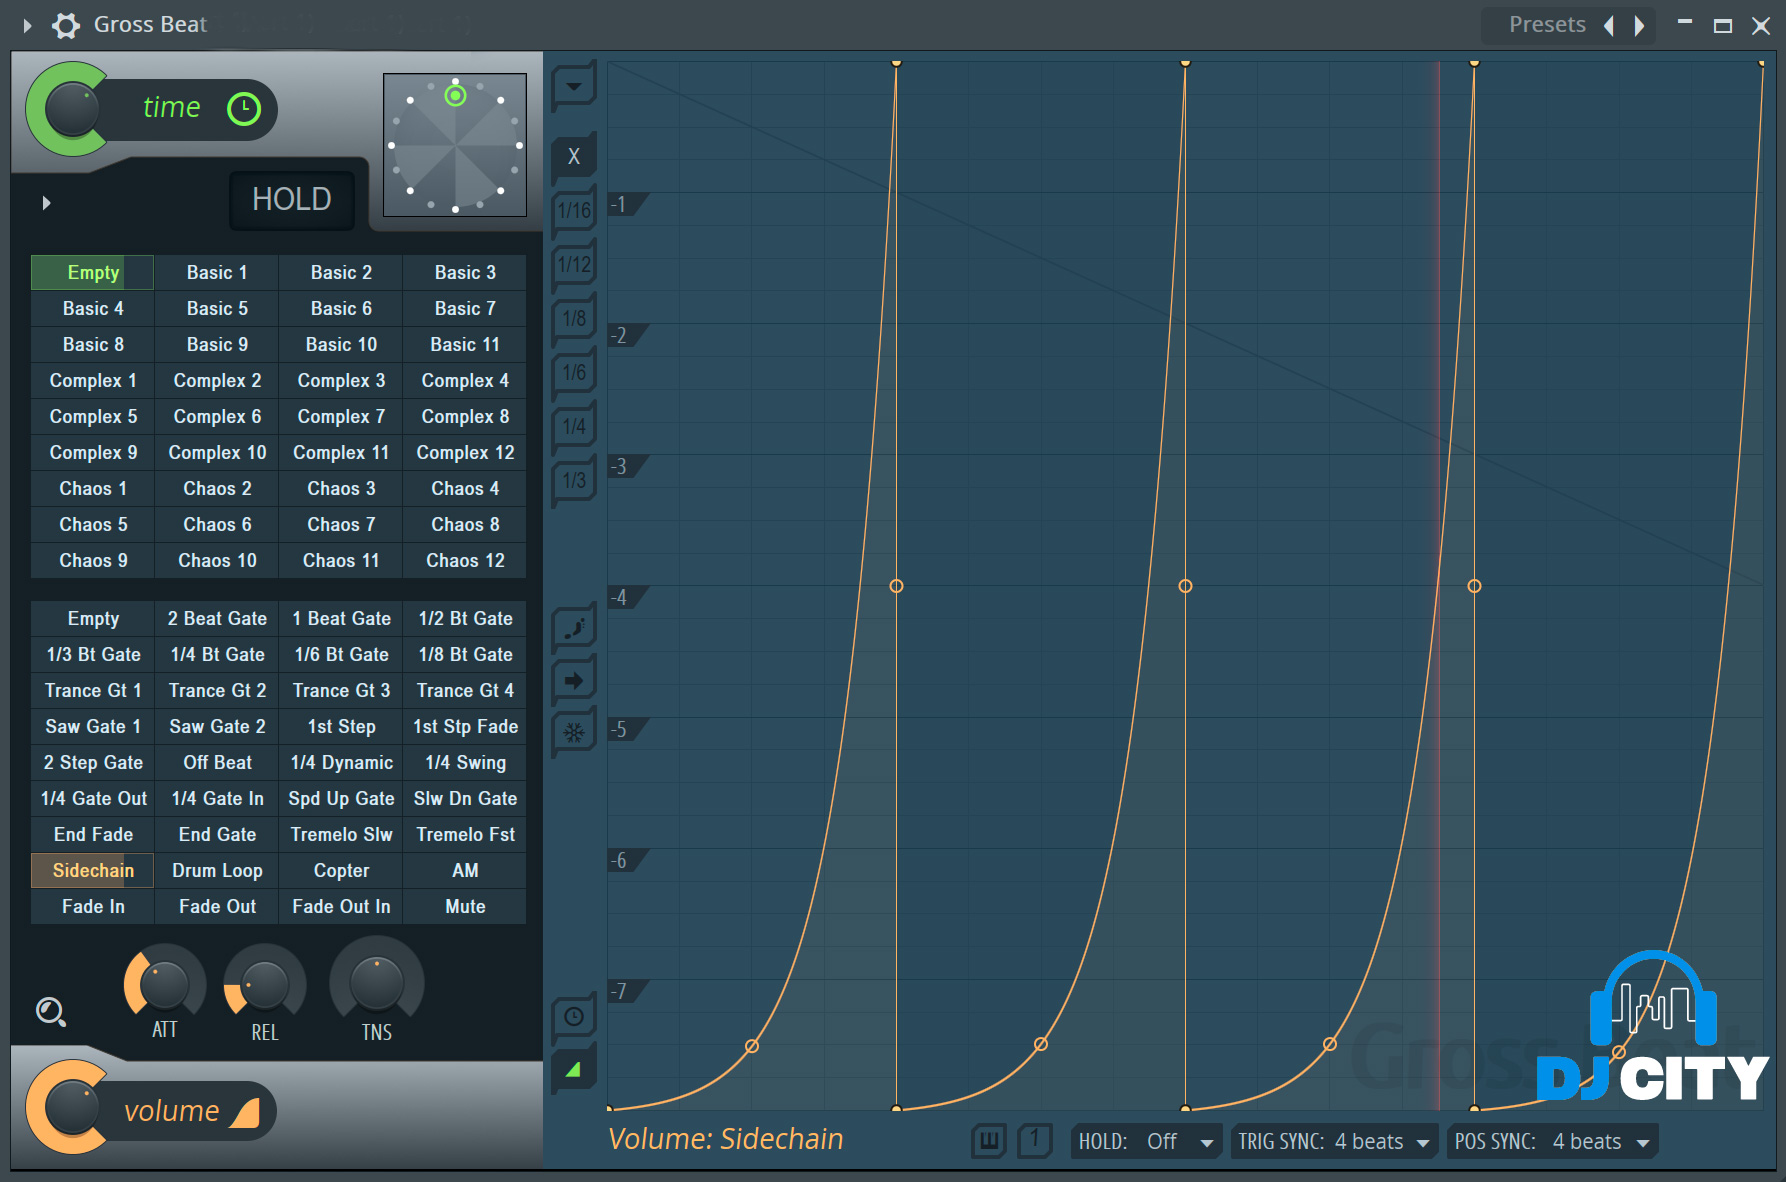
Step 2. Head into the Gross Beat plugin and select the sidechain option from the left hand side (See below)
This will automatically add a subtle sidechain effect to your track. From there, you can adjust the automation clip to your liking if you wanted to make a different pattern or change the intensity of the sidechain.
The Final Say
That’s it, three simple methods on how to Sidechain in FL Studio. Gross Beat is the easiest method for a simple sidechain pattern, while the Fruity Limiter gives you more control over your compression. Then you have the automation method that although not technically sidechaining and can get a little tedious, gives you even more flexibility over your sound. Hopefully you learned a thing or two and can use these techniques to make your tracks sound even better!
How to Sidechain in FL Studio [Complete Guide]
Sidechaining is common when you are mixing and mastering electronic music such as trance, house and techno. It is an essential technique if you are looking to achieve a clean and modern mix. When implemented correctly, sidechaining can add dynamic and rhythm to your mix. It works by using the volume of one signal to control a parameter on another signal. However, it is not one solution that fits all. If you try to apply it everywhere, it may do more harm than good.
Understanding Compression in FL Studio
To understand sidechaining, we must first understand compression. Compression is a processing tool that keeps your signal in the same dynamic range. It typically reduces the difference between the loudest and softest parts of your signal. A compressor has parameters that you can adjust to precisely regulate its behavior:
Threshold – the compressor works by reducing the volume of a signal once it passes a specified level. This level is called the threshold. You set it using a gain knob.
Ratio – this determines how much a compressor reduces a signal once it’s past the threshold. A compressor set with a ratio of 4:1 means that the amplitude of the signal will be reduced by 4db for every 1db that passes the threshold.
Attack – this determines how quickly the compression acts once the threshold is passed. A fast attack is great for handling sharp transients. A slow track will let some transients through; this especially works great with drums.
Release – this defines how quickly the compression lets go after it acts on the signal
Knee – the knee determines how fast the compressor acts on a signal. A soft knee applies the compression gradually until the compression ratio is reached. A hard knee applies the compression only when the signal passes the threshold.
Scenarios for Applying Sidechain Compression in FL Studio
I use sidechain compression in a few scenarios
To separate the Kick and bass
Often, the kick and bass clash in the same frequencies. To make sure they don’t fight and cancel each other out, I use sidechain compression to make the kick cut through the mix.
To balance lead vocal and synths
I always want my vocals to pop in the mix. I use a little sidechain compression to make sure that the lead vocal gets a little more presence in the mix.
To create special FX
I use sidechain compression to add dynamics and movement to delays and reverbs by only activating the effects when the lead signal is not playing.
How to Sidechain in FL Studio (4 Different Ways)
In FL studio there are four ways to implement sidechaining
- Sidechaining using Fruity Limiter.
- Sidechaining using Fruity Peak Controller.
- Sidechaining using automation.
- Sidechaining using Gross beat.
Sidechain using Fruity Limiter
It is important to remember that sidechaining works by reducing the volume of one signal relative to another, in this case we will sidechain a kick to the bassline. When you’re doing sidechain compression using the limiter, add the fruity limiter plugin to the signal you want to duck.
- Start by adding Fruity Limiter to an effect slot in the Bass insert.
- Now I link the kick insert to the bass insert. I do this by selecting the kick insert, and right clicking on the small arrow on the bass insert. Select ‘Sidechain to this track’ from the menu.
- If you don’t want your kick to be heard you can select “Sidechain to this track only”. This is usually known as using a ‘Ghost Kick’. The kick insert will not output to the master track.
- Open Fruity Limiter and change from Limit to Comp mode.
- In the sidechain box , drag up or down until it changes to 1. You can also right click on the sidechain box and select an input.
- Lower the threshold to the level you want the compression to take effect. Adjust the knee to adjust the compression curve.
- Increase the ratio until it sounds the way you want it to.
Other settings you should ideally play with, are the attack and release.
Adjusting the curve will allow you to determine the tension of the attack and release. A short curve means that the attack and release will be immediate. In contrast to longer curve times that allow the attack and release to be achieved gradually.
Sidechain using Fruity Peak Controller
We’re still going to use a kick and bass to demonstrate this technique. When using sidechain compression, the whole bass signal ducks as the kick plays. What if you want to preserve the high end frequencies of the bass? You can use a combination of Fruity peak controller and Fruity parametric EQ2 to sidechain a specific frequency range. You can control the automation signal using the Peak and LFO controllers.

- Base – sets the base value of the control output.
- Volume – this knob controls how the peak controller is affected by volume peaks. It is bipolar and goes from -200% to 200%.
- Tension – adjusting this parameter changes the shape of the attack and release curve.
- Decay – this defines the time it takes for the signal to get back to the base level.
- Base – sets the lowest value output by the LFO
- Volume – determines the highest value of the LFO output. It ranges from -100% to 100%
- Tension – this alters the shape of the curve mapping the LFO values to the LFO controller.
- Shape – Use this to select the shape of the LFO waveform (Triangle, Square, Sine, Saw or Random).
- Speed – this determines the speed of the LFO
- Phase – this defines the start position of the LFO.
In our case, we’re going to use the kick to trigger the sidechain effect on the bass. To start, load the fruity peak controller on an effect slot in the kick track.
- Add the Fruity parametric eq to an effect slot on the bass track.
- On the parametric eq, set the frequency range you want to sidechain. You can do this by selecting the first frequency band and dragging it to your preferred frequency. If you’re looking to sidechain the low end frequencies, you should set it to around 100-150Hz.
- The next thing to do is to right click on the first frequency band and from the menu that appears, select ‘link to controller’
- In the internal controller menu that appears, select ‘Peak ctrl – Peak’ to complete the link to the Fruity peak controller on the kick track.
- Select ‘inverted’ under the mapping control menu. This means that every time the kick plays the low frequency band will duck.
- In the peak controller, set the ‘Peak base level’ to 50%. This puts the volume of the low frequency band in the eq at 0db.
- Set the ‘Volume’’ to 200% or lower. This will lower the volume of the low frequency band by about -18db everytime the Kick hits. Adjust this to taste. Your peak amount may vary depending on how much you want to lower the volume of the bass when the kick plays.
Another way to achieve this effect is to link the fruity peak controller with the fruity balance plugin.
- Add the Fruity balance to an effect slot on the bass track.
- Right click on the volume knob and select ‘Link to controller’
- From here, just follow the same procedure from step 4 above.
Sidechain using Automation
This method is more of a workaround because the volume of the bass is determined by the automation curve and not affected by the kick output. It is relatively easy and allows you to have complete control over your bass. It is especially useful when you are trying to create a specific sound effect that will not run continuously through the whole song.
- To sidechain your bass track, add Fruity balance to an empty effect slot.
- Right click on the volume knob and select ‘Create Automation Clip. this will create an automation clip that appears in the playlist.
- The next thing is to shape the automation such that the bass ducks when the kick hits. It is important that you know where your kick starts and ends so that you can shape the automation clip to fit.
- To shape your automation clip, right click any part of the clip area to create a control point. To delete a control point, right click on it and select ‘delete’.
- When you create more than one control point, there’ll be a tension control point that is automatically added between 2 points. Left clicking and dragging up or down on the tension control will change the steepness of the curve. To undo all your changes, Right click on the tension handle.
- You can change the curve type by right clicking the control point and selecting an option from the menu.
- You can change the length of your automation clip by dragging the right-most control point.
- When you are done shaping the automation clip, you can copy paste it across the track or wherever you deem fit.
Sidechaining using Gross Beat
Gross beat allows you to duck your signal without setting up complex sidechains. It is arguably the easiest way to do sidechaining in FL. It has a 2-bar buffer that allows you to manipulate the volume and pitch of the buffered audio using the time and volume presets. You can also draw your own waveform in the graph for a more custom sound.
- Add Gross beat to your bass insert.
- Select ‘sidechain’ from the volume presets on the bottom left and let the magic work.
- You can manually edit the waveform to fit your track or choose from the myriad of presets available. Editing the waveform follows a similar workflow to editing an automation clip.
The only drawback to using Gross beat is that it may add some latency to the signal. An easy way to fix this is to export the sidechained signal once you’ve finished setting up your gross beat and re-importing it back into the project.
- You can also add Edison in an effect slot after the Gross beat and record the output, then use it to replace the signal in the playlist.
Conclusion
And just like that, you’ve successfully done sidechaining in FL. There’s more than one way to do it. Just make sure to choose what works best for your track. Sidechaining, like most production techniques, is most effective when used subtly. Too much salt is bad for your food, so don’t do it too much. You can always try gain-staging, panning and subtractive eq to clear out clashing frequencies before pulling sidechain from your hat of tricks. Sidechaining lets crucial elements in your mix shine without affecting the volume of something else.
Using Gross Beat is the easiest and fastest way to sidechain. You can also use the Fruity limiter set to comp mode, create custom automation clips and even use Fruity Peak controller linked to a parametric eq or fruity balance. Depending on what you’re looking for, one or all of these methods may help you achieve the sidechaining technique.