Compile and build applications with IntelliJ IDEA
The IntelliJ IDEA compilation and building process compiles source files and brings together external libraries, properties files, and configurations to produce a living application. IntelliJ IDEA uses a compiler that works according to the Java specification.
You can compile a single file, use the incremental build for a module or a project, and rebuild a project from scratch.
If you have a pure Java or a Kotlin project we recommend that you use IntelliJ IDEA to build your project since IntelliJ IDEA supports the incremental build which significantly speeds up the building process.
However, IntelliJ IDEA native builder might not correctly build the Gradle or Maven project if its build script file uses custom plugins or tasks. In this case, the build delegation to Gradle or Maven can help you build your project correctly.
Compile a single file or class
Open the needed file in the editor and from the main menu, select Build | Recompile ‘class name’ ( Control+Shift+F9 ).
Alternatively, in the Project tool window, right-click the class you need and from the context menu, select Recompile ‘class name’ .
If errors occur during the compilation process, IntelliJ IDEA will display them in the Review compilation and build output along with warning messages.
Change the compilation output locations
When you compile your source code, IntelliJ IDEA automatically creates an output directory that contains compiled .class files.
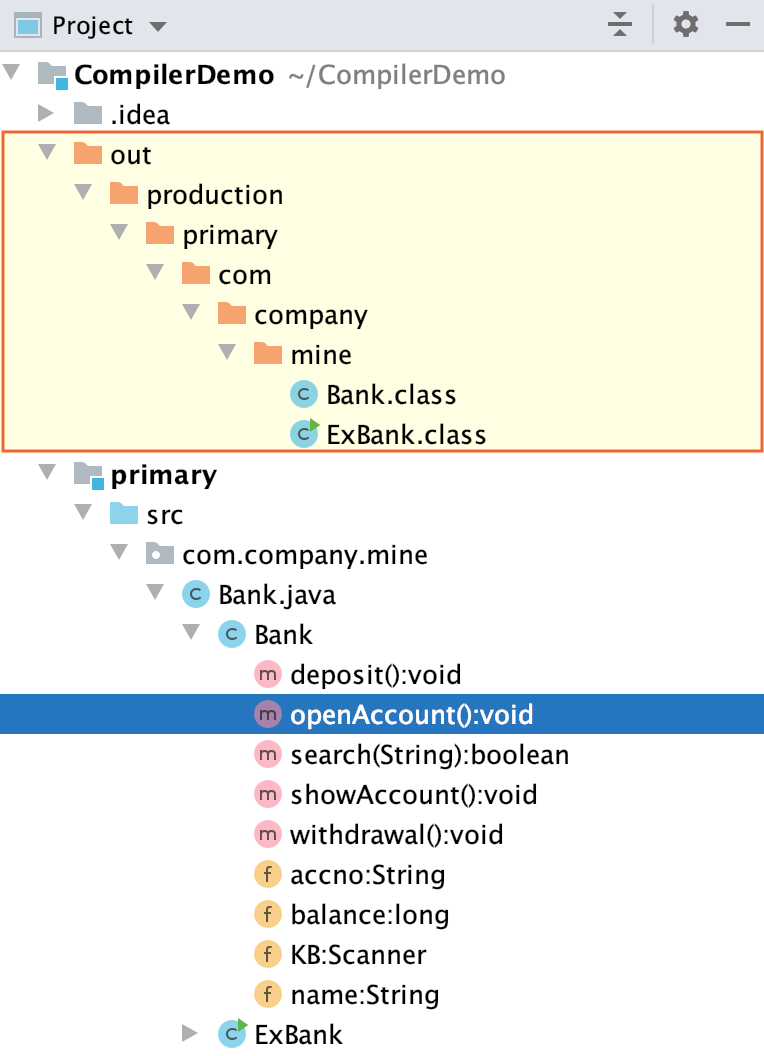
Inside the output directory, IntelliJ IDEA also creates subdirectories for each of your modules.
The default paths for subdirectories are as follows:
At the project level, you can change the <ProjectFolder>/out part of the output path. If you do so (say, specify some <OutputFolder> instead of <ProjectFolder>/out ) but don’t redefine the paths at the module level, the compilation results will go to <OutputFolder>/production/<ModuleName> and <OutputFolder>/test/<ModuleName> .
At the module level, you can specify any desirable compilation output location for the module sources and tests individually.
Specify compilation output folders
Open the Project Structure dialog ( File | Project Structure Control+Alt+Shift+S ).
In Project Settings , select Project and in the Project compiler output field, specify the corresponding path.
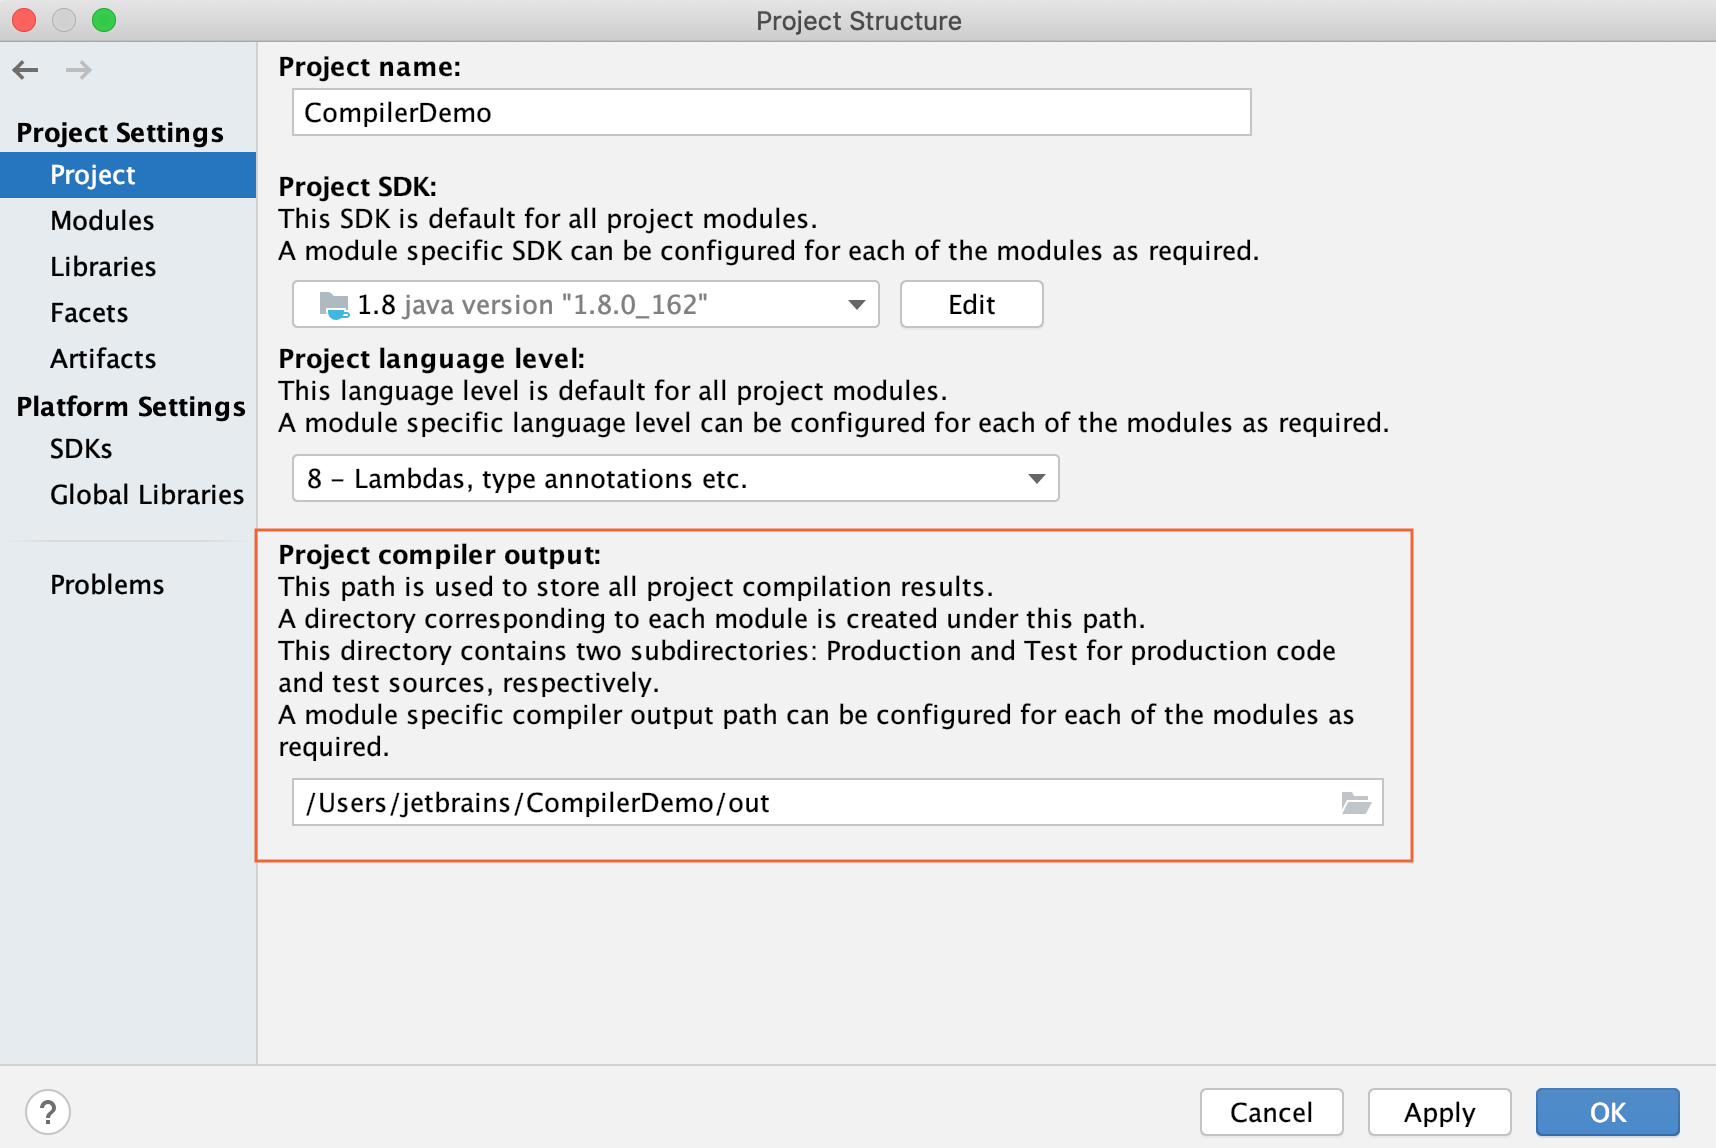
For modules, select Modules , the module you need and the Paths tab. Change the location of the output folder under the Compiler output section.
Build
When you execute the Build command, IntelliJ IDEA compiles all the classes inside your build target and places them inside the output directory.
When you change any class inside the build target and then execute the build action, IntelliJ IDEA performs the incremental build that compiles only the changed classes. IntelliJ IDEA also recursively builds the classes’ dependencies.
Build a module, or a project
Select a module or a project you want to compile and from the main menu, select Build | Build Project ( Control+F9 ).
IntelliJ IDEA displays the compilation results in the Review compilation and build output.
If you add a module dependency to your primary module and build the module, IntelliJ IDEA builds the dependent module as well and displays it in the output directory alongside the primary one. If the dependent module has its own module dependencies, then IntelliJ IDEA compiles all of them recursively starting with the least dependent module.
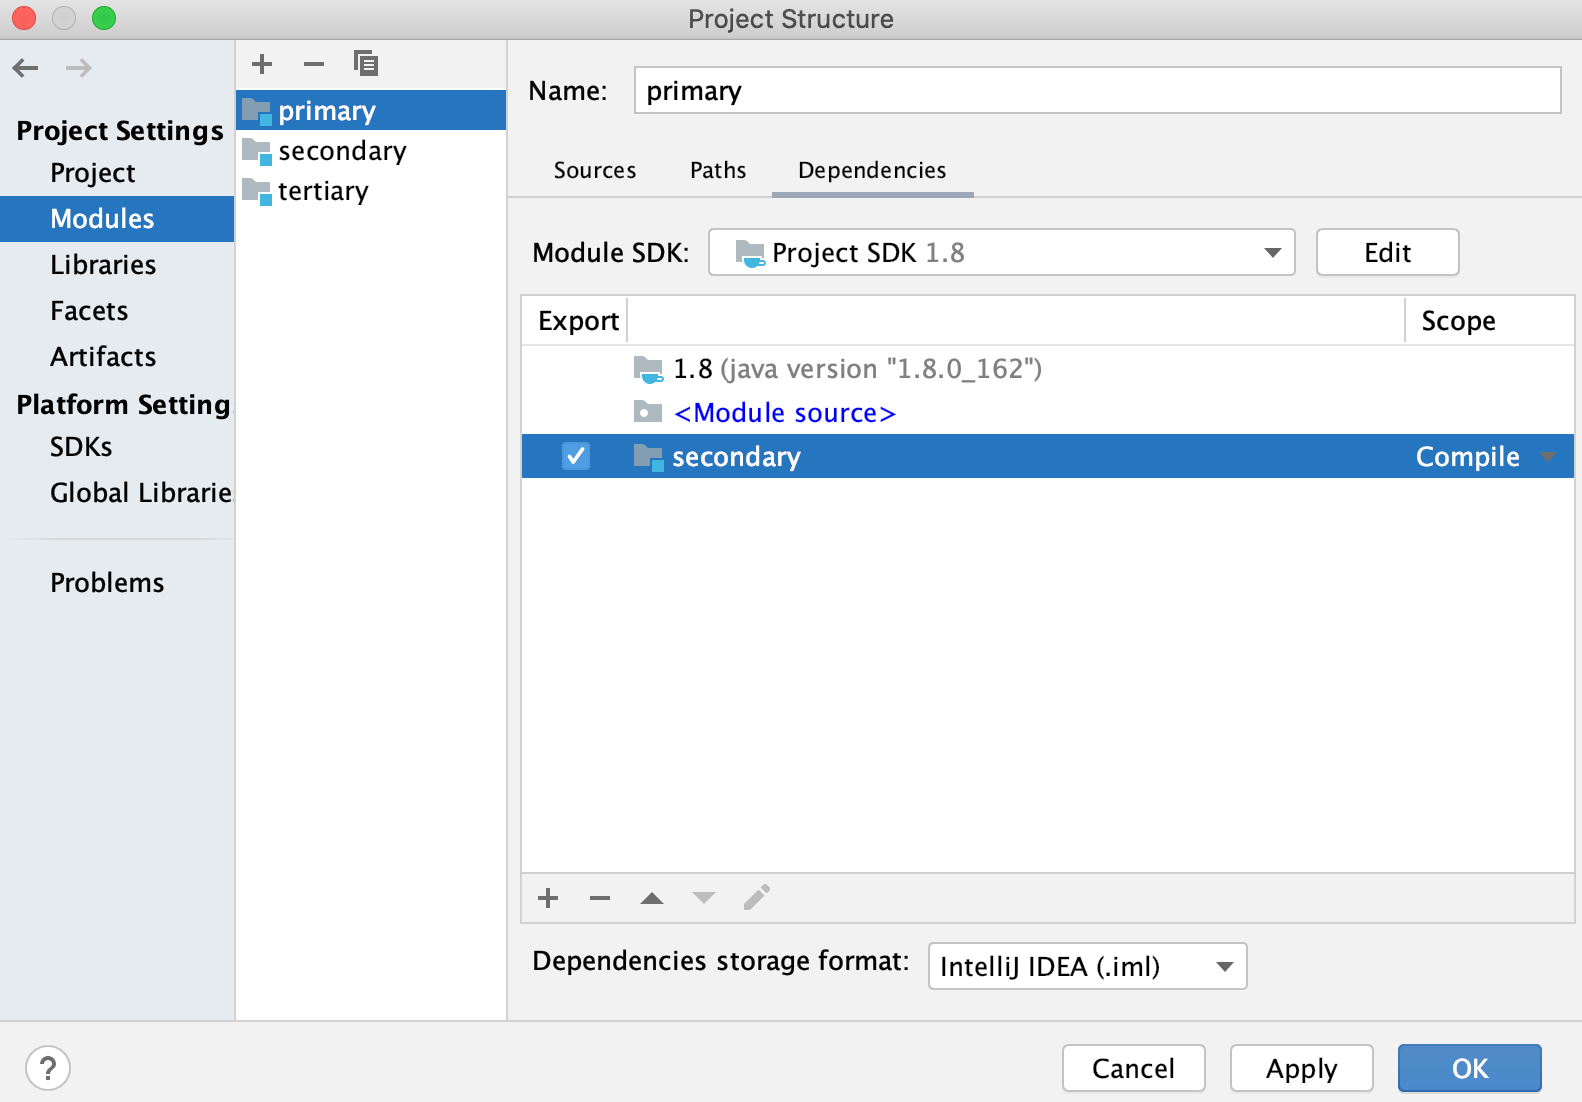
The way the module dependencies are ordered may be very important for the compilation to succeed. If any two JAR files contain classes with the same name, the IntelliJ IDEA compiler will use the classes from the first JAR file it locates in the classpath.
For more information, see Module dependencies.
Rebuild
When you execute a rebuild command, IntelliJ IDEA cleans out the entire output directory, deletes the build caches and builds a project, or a module from scratch. It might be helpful when the classpath entries have changed. For example, SDKs or libraries that the project uses are added, removed or altered.
Rebuild a module, or a project
From the main menu, select Build | Rebuild Project for the entire project or Build | Rebuild ‘module name’ for the module rebuild.
IntelliJ IDEA displays the build results in the Review compilation and build output.
When the Rebuild Project action is delegated to Gradle or Maven, IntelliJ IDEA doesn’t include the clean task/goal when rebuilding a project. If you need, you can execute the clean command before the rebuild using the Execute Before Rebuild option in the Gradle or Maven tool window.
Background compilation (auto-build)
You can configure IntelliJ IDEA to build your project automatically, every time you make changes to it. The results of the background compilation are displayed in the Problems tool window.
Configure the background compilation
Press Control+Alt+S to open the IDE settings and then select Build, Execution, Deployment | Compiler .
On the Compiler page, select Build project automatically .
Now when you make changes in the class files, IntelliJ IDEA automatically performs the incremental build of the project.
The automatic build also gets triggered when you save the file ( Control+S ) or when you have the Save files automatically if application is idle for N sec. option selected in the System settings dialog.
Enabling the Build project automatically option also enables Build project in Settings | Tools | Actions on Save
When you have the Power Save Mode option ( File | Power Save Mode ) enabled in your project, the auto-build action is disabled, and you need to manually run the build ( Control+F9 ).
Compile before running
By default, when you run an application, IntelliJ IDEA compiles the module in which the classes you are trying to run are located.
If you want to change that behavior, you can do so in the Run/Debug Configurations dialog.
Configure a run/debug configuration
From the main menu, select Run | Edit Configurations .
In the dialog that opens, create a new or open an existing run configuration.
Click the Modify options link.
In the Add Run Options list, under the Before Launch section, select Add before launch task . The list of tasks becomes available and the Build will be selected. Click to disable it.
If you need to add a new configuration action, click and from the list that opens, select the desired option.
For example, if you select Build Project then IntelliJ IDEA will build the whole project before the run. In this case, the dependencies that were not included in the build with the Build action, will be accounted for. If you select the Build, no error check option, IntelliJ IDEA will run the application even if there are errors in the compilation results.
Review compilation and build output
IntelliJ IDEA reports compilation and building results in the Build tool window, which displays messages about errors and warnings as well as successful steps of compilation.

If you configured an auto-build, then IntelliJ IDEA uses the Problems tool window for messages. The window is available even if the build was executed successfully. To open it, click Auto-build on the status bar.

Double-click a message to jump to the problem in the source code. If you need to adjust the compiler settings, click .
Package an application into a JAR
When the code is compiled and ready, you can package your application in a Java archive (JAR) to share it with other developers. A built Java archive is called an artifact .
Create an artifact configuration for the JAR
From the main menu, select File | Project Structure Control+Alt+Shift+S and click Artifacts .
Click , point to JAR , and select From modules with dependencies .
To the right of the Main Class field, click and select the main class in the dialog that opens (for example, HelloWorld (com.example.helloworld) ).
IntelliJ IDEA creates the artifact configuration and shows its settings in the right-hand part of the Project Structure dialog.
Apply the changes and close the dialog.
Build the JAR artifact
From the main menu, select Build | Build Artifacts .
Point to the created .jar ( HelloWorld:jar ) and select Build .
If you now look at the out/artifacts folder, you’ll find your .jar file there.
When you’re building a project, resources stored in the Resources root are copied into the compilation output folder by default. If necessary, you can specify another directory within the output folder to place resources.
Run a packaged JAR
To run a Java application packaged in a JAR, IntelliJ IDEA allows you to create a dedicated run configuration.
If you have a Gradle project, use Gradle to create and run the JAR file.
For Maven projects, you can use IntelliJ IDEA to run the JAR file. If you have a Spring Boot Maven project, refer to the Spring section.
Create a run configuration
Press Control+Shift+A , find and run the Edit Configurations action.
In the Run/Debug Configurations dialog, click and select JAR Application .
Add a name for the new configuration.
In the Path to JAR field, click and specify the path to the JAR file on your computer.
Under Before launch , click , select Build Artifacts in the dialog that opens.
Doing this means that the JAR is built automatically every time you execute the run configuration.
Run configurations allow you to define how you want to run your application, with which arguments and options. You can have multiple run configurations for the same application, each with its own settings.
Execute the run configuration
On the toolbar, select the created configuration and click to the right of the run configuration selector. Alternatively, press Shift+F10 if you prefer shortcuts.
As before, the Run tool window opens and shows you the application output.
If the process has exited successfully, then the application is packaged correctly.
Как создать jar-архив используя (в) Intellij idea?
Не могу создать создать исполняемый архив JAR .Как я понял данная проблема должна решаться с помощью Terminal ,НО ОН У МЕНЯ И НЕ РАБОТАЕТ(не могу туда заносить текст,как и печатать там ,так и вставлять туда скопированный текст).Также как использовать при компиляции флаги.Также где набирать команду для создания jar-архива?

В идее сначала идете в File | Project Structure | Artifacts, там создаете новый artifact, jar —> From modules with dependencies
Потом Build | Build artifacts
По-хорошему у вас должна быть система сборки, которая сама этим занимается. Самые известные — это Maven, Gradle и Ant. Кроме простой компиляции в war/jar эти системы умеют еще много полезных штук, в том числе подчищать директории от промежуточных файлов, подправлять файлы в момент компиляции, прогонять тесты и многое другое. После этого достаточно добавить задачи в Run Configurations, и IDEA сама озаботится вызовом консольных команд, останется только запускать нужные конфигурации.
Дизайн сайта / логотип © 2023 Stack Exchange Inc; пользовательские материалы лицензированы в соответствии с CC BY-SA . rev 2023.8.29.43607
Нажимая «Принять все файлы cookie» вы соглашаетесь, что Stack Exchange может хранить файлы cookie на вашем устройстве и раскрывать информацию в соответствии с нашей Политикой в отношении файлов cookie.
Как в IntelliJ IDEA написать и собрать в исполняемый .exe файл приложение на JavaFX

Как я уже писала в своей предыдущей статье, недавно, после двухлетнего обучения (обещали 12 месяцев, но жизненные и геополитические обстоятельства внесли свои коррективы в сроки получения дополнительного образования), я стала java-разработчиком.
Завершение обучения требовало написания выпускного проекта, которым я, изрядно поразмыслив, решила «убить сразу несколько зайцев»:
проект должен быть написан мной самостоятельно (без команды),
быть законченным и полноценным с точки зрения «бэка и фронта»,
функционал проекта должен нести какую-то информативную пользу,
проект станет подарком на день рождения.
Вспомнив все, чему меня «пытались научить», я решила, что за 1,5 месяца, отведенных на выпускную работу (с учетом загруженности по основному месту своей занятости), я вполне самостоятельно справлюсь с написанием оконного приложения для рабочего стола по предоставлению пользователю текущих и прогнозных значений погоды. Оболочку приложения решила выполнить на JavaFX, а для получения данных о погоде использовать JSON.
Когда я выслала преподавателю техническое задание с характеристиками проекта, он, восседая на удобном кресле где-то в пригороде германского города Мюнхен, меня, великовозрастную студентку из Санкт-Петербурга, «обрадовал и окрылил» тем, что знания по JavaFX в реальной жизни мне не пригодятся, и я рискую впустую потратить время…
Ну что же, такая откровенность на завершающей стадии обучения, конечно, похвальна. Осознав, что целый курс, посвященный разработке приложения на JavaFX, получается, еще год назад был пустой тратой времени, я решила не отступаться и попробовать реализовать задуманное.
Процесс и трудности, с которыми пришлось столкнуться
Не особо вдумываясь в тонкости платформы JavaFX и ее представлении в выпусках Java-8, я решила писать приложение на JDK-1.8 в среде разработки IntelliJ IDEA Community Edition, используя maven.
Начиная создавать проект стандартным путем и пытаясь упростить себе жизнь, я выбрала настройки, как показаны на скриншоте:

и, нажав на кнопку «Next», получила неожиданное для себя сообщение:

Да-да, я не знала той тонкости, что JavaFX, представленный как часть выпуска Java-8, был удален из JDK и перенесен в отдельный модуль в Java-11.
Ну что же, начав все сначала, я выбрала JDK-11.0.2, и у меня чудесным образом создался проект с необходимыми классами и ресурсными файлами, со всеми нужными зависимостями и способами сборки, автоматически прописанными в pom.xml файле:

Чтобы проверить, действительно ли работает минимальный функционал будущего приложения, я запустила класс HelloApplication.java и получила результат, свидетельствующий, что все в порядке:

Далее была длительная полуторамесячная работа над проектом, в процессе которой:
я внесла изменения в базовый код, сформированный IntelliJ IDEA автоматически,
создала сцены с помощью JavaFX Scene Builder 2.0,
установила получение информации по JSON,
и прочее, прочее, прочее… пока в среде разработки все не начало запускаться, открываться и отображаться так, как мне бы хотелось.
С финальной версией проекта и демонстрацией его возможностей можно ознакомиться на GitHub.
Теоретически, проект готов, образовательная цель достигнута, его можно сдать как выпускную работу и выдохнуть.
Но, не забываем, программа должна была стать подарком на день рождения. У именинника не установлена Java, чтобы запустить jar-файл проекта и наслаждаться результатом работы приложения. Значит, нужно собрать проект в исполняемый .exe файл, который будет запускаться на любом устройстве с установленной системой Windows.
«Ерунда какая!» — подумала я, — «У меня же IntelliJ IDEA, она все сама соберет и подскажет, в случае чего».
Захожу в File -> Project Settings -> Artifacts -> JavaFx application -> From Module ‘имя модуля’

Добавляю к артефакту всю библиотеку зависимостей, что у меня есть в проекте (краем глаза вижу красные символы, которые должны бы вызвать тревогу и заставить меня призадуматься, но я так увлечена процессом, что не придаю им значения):

Заполняю сведения об основном классе, который запускает приложение (поле Application class):

В той же вкладке указываю значение «all» в поле Native bundle и применяю настройки:

После вхожу в режим Build -> Build Artifacts, выбираю только что созданный артефакт и… получаю сообщение, что используемая версия JDK не способна собрать мой проект в необходимый пакет:

Начитавшись всего, чего только возможно, во всемирной паутине, я решаюсь на эксперимент:
1. Заменила в pom.xml файле версию Java 11 на 8, обновилась:

2. В File -> Project Structure -> Project указала корректную версию используемой SDK:

3. Закомментировала (можно удалить) файл module-info.java, сформированный Java-11 автоматически при создании проекта:

4. Проверила, запускается ли приложение до сборки:

5. Описанными выше способами снова создала и собрала артефакт. Но! – опять получила ошибку:

6. После непродолжительных поисков причины я поняла, что на ноутбуке, на котором написана моя программа, собрать ее в исполняемый .exe файл у меня пока не получится, т.к. в наименовании пути к директории не должно быть ни кириллицы, ни специальных символов:

И изменение имени учетной записи Windows вручную не приведет к изменению имени пользовательской папки.
7. Не рискнув «копаться в мозгах» установленной на ноутбуке операционной системы, я воспользовалась стационарным компьютером, не имеющим в наименовании директорий кириллицу, и спокойно собрала проект.
Запускаемый .exe файл располагается в папке out\artifacts\название артефакта\bundles\название проекта:

Вместо заключения
При кажущейся простоте создания приложения на JavaFX (особенно с помощью JavaFX Scene Builder 2.0 и бесплатных видео-уроков на различных ресурсах), написание функционала программы – это только половина пути. Программа должна работать, жить своей жизнью самостоятельно, без привязки к среде разработки. И, как показывает мой личный опыт, при сборке проекта и выпуске его в «большой мир» приходится преодолевать немало терний.
How to build an artifact from simple java application project in IntelliJ?

Continuing from the previous article about how to start a simple java application project in IntelliJ, I would like to talk about how to build an artifact(Java Archive File) from the project in IntelliJ.
Option1. Compile a single file or class.
Before we actually begin to compile the whole files or classes, I would like to show you how to compile a single file or class and what comes out of it as a result.
Step1. Press the button Recompile ‘ClassName.java’.
You can find the button in right-click menu or Build menu at the top.
What the Recompile does is to compile the java file into class file into the output directory.
as you can see the compiled Main.class file resides in out/production/SimpleApplication folder. That is because IntelliJ basically follows the output directory rules as followings:
- Sources: <ProjectFolder>/out/production/<ModuleName>
- Tests: <ProjectFolder>/out/test/<ModuleName>
Here what <ModuleName> indicate is the SimpleApplication module itself.
The SimpleApplication module has been created alongside the project creation. You can see the list of modules in Project Structure window ( Shortcut : Command + ; ) as in the picture below.
Step2. Execute the compiled class file for test.
You can actually execute the class file using ‘java’ command.
of course, to use java command, you need it installed somewhere else like this. using “which java” lets you know where it is installed or symbolically linked.
Option2. Build a module or project.
The reason why I gave the option1 which is unrealistic in real world is because I am sure that every single problem that looks bigger than what it is is because we mostly tend to ignore the smallest unit of problem like option1.
In reality, we are supposed to be building entire project so that we can build an artifact from the hundreds, thousands of java files.
To test building entire classes in the target directory, I have added another class name Util and referenced it in the Main class’s method like this.