PUABundler Win32 как удалить
Наверняка вы сталкивались с появлением у вас приложений, которые вы не собирались устанавливать. То есть, скачав и установив какую-то нужную вам программу с ней установилось сразу несколько. Чаще всего это браузер «Амиго», «Яндекс бар», «MediaGet», «360 Total» и т.д. При этом также может измениться стартовая страница в браузере, появятся тормоза в работе системы, станет сильно нагружен процессор и т.д. Защитник Windows в новейших версиях системы может такие программы отследить и сообщить вам о том, что обнаружено нежелательное ПО PUABundler:Win32. Через слэш также указывается название нежелательной программы, например, PUABundler:Win32/UBar.

В этой статье разберемся как удалить такую программу.
PUABundler Win32 как удалить
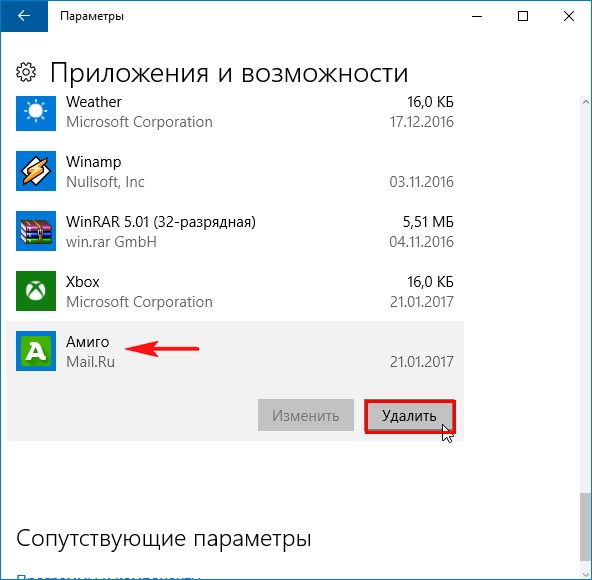
Во-первых, необходимо удалить приложение, которое установило еще какие-то программы. То есть, то что у вас указано после слэша, скорее всего и будет тем самым менеджером загрузок.
1. Жмем «Win+R», пишем «appwiz.cpl» и щелкаем Ввод.
2. Выбираем приложение и нажимаем «Удалить».
Во-вторых, желательно избавиться от временных файлов. Там уже может быть засел вирус.
1. Нажимаем «Win+I».
2. Переходим в «Память» — «Временные файлы».
3. Ставим отметку возле каждого пункта и щелкаем «Удалить файлы».
В-третьих, необходимо почистить браузер.
1. В вашем браузере заходим в историю и удаляем данные за все время.
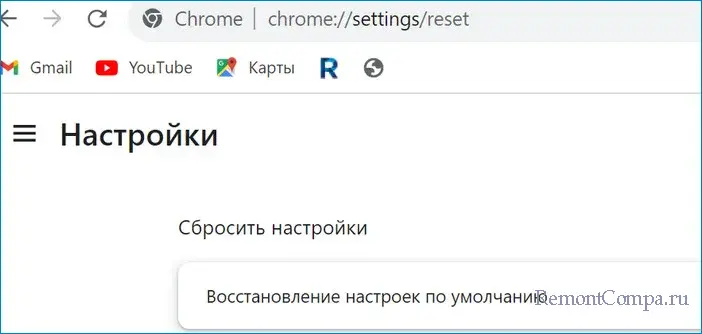
2. Также можно прибегнуть к восстановлению браузера до заводских настроек. Вводим в адресной строке:
Нажимаем «Восстановление настроек по умолчанию».
В-четвертых, рекомендуется подстраховаться и проверить ПК сторонним антивирусом. Для этого можно воспользоваться, например, «Dr Web CureIt».
Чтобы убедиться в отсутствии нежелательного ПО, необходимо воспользоваться стандартными функциями Windows.
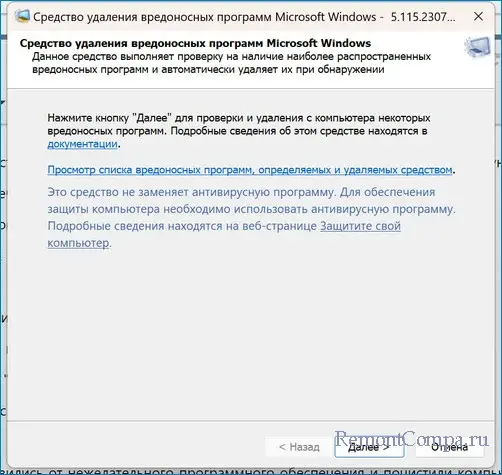
1. Нажимаем «Win+R», печатаем «mrt.exe» и жмем Enter.
2. Смотрим список вредоносных программ.
Напоследок прибегаем к проверке компьютера Защитником Windows.
1. Жмем «Win+I» и заходим в «Безопасность Windows».
2. Нажимаем «Защита от вирусов и угроз» — «Параметры сканирования».
3. Ставим отметку возле «Полного режима».
4. Щелкаем «Выполнить сканирование сейчас».
Таким образом мы избавились от нежелательного программного обеспечения и почистили компьютер от его остатков.
Антивирус Windows 10 распознает CCleaner как PUA:Win32/PiriformBundler
CCleaner является популярным инструментом Windows для удаления временных файлов с целью освобождения дискового пространства. Программа предлагает несколько расширенных функций, например обновление установленных приложений, «Проверку здоровья» компьютера и очистку реестра.
Потенциально нежелательные программы не обязательно являются вредоносными, но могут раздражать пользователей. Обычно под определение ПНП подпадают приложения, инсталляционные файлы которых дополнительно устанавливают стороннее ПО. Таким способом разработчики продвигают свои продукты и получают дополнительную прибыль. Обычно опция установки вспомогательного ПО установлена по умолчанию, или установочный файл пытается запутать пользователя.
Некоторые установщики CCleaner действительно предлагают установить стороннее ПО. Microsoft перечисляет четыре приложения, два из которых являются собственными продуктами Avast: Avast Free Antivirus и AVG Antivirus Free. Установщик может также предлагать браузер Google Chrome или браузерную панель Google Toolbar, которая больше подходит для установщика CCleaner Browser.

Microsoft приводит следующее описание PUA:Win32/PiriformBundler:
Некоторые установщики бесплатной и пробной 14-дневной версии CCleaner поставляются с пакетным ПО, включая приложения, которые не требуются для работы CCleaner и не разрабатываются той же компанией Piriform.
Хотя дополнительно предлагаемое ПО является легитимным, сами бандлы, особенно продукты других разработчиков, могут привести к нежелательной активности и негативно повлиять на опыт использования. Для защиты пользователей Windows, Microsoft Defender Antivirus расценивает установщики CCleaner, которые демонстрируют подобное поведение, как нежелательное ПО.

Защитник Microsoft выведет предупреждение, если включена защита от потенциально нежелательного ПО. Компания подчеркивает, что ПО в составе бандла CCleaner не представляет опасности, но может быть не интересно пользователю, который запускает установщик.
Это второй по счету случай блокировки CCleaner со стороны Microsoft. Ранее некоторое время оставался заблокированным домен CCleaner на сайте сообщества Microsoft. Позже Microsoft призналась, что блокировка была ошибочной.
Пользователям, которые используют приложения для удаления временных файлов рекомендуем обратить внимание на альтернативу CCleaner — приложение BleachBit с открытым исходным кодом, которое предлагает аналогичную функциональность.
PuaBundler Win32
The PUABundler is a harmful detection by Windows Defender, possibly indicating a Trojan Horse infection. This infection can be triggered by a variety of sources, such as unverified downloads or compromised software, and can be linked to other similar detections, including puabundler:win32/rostpay, puabundler:win32/yandexbundled, and puabundler:win32/utorrent_bundleinstaller. Users have reported difficulty in removing it, as it cleverly hides in the system and can even resist standard remediation efforts. Even deleting associated files or programs may not entirely eradicate the threat. It’s crucial not to ignore any alerts related to PUAbundler, as neglecting it can cause significant damage. If manual removal proves unsuccessful, deploying a robust anti-malware tool, like the one liked on this page, can be effective in thoroughly purging the system of this persistent threat.
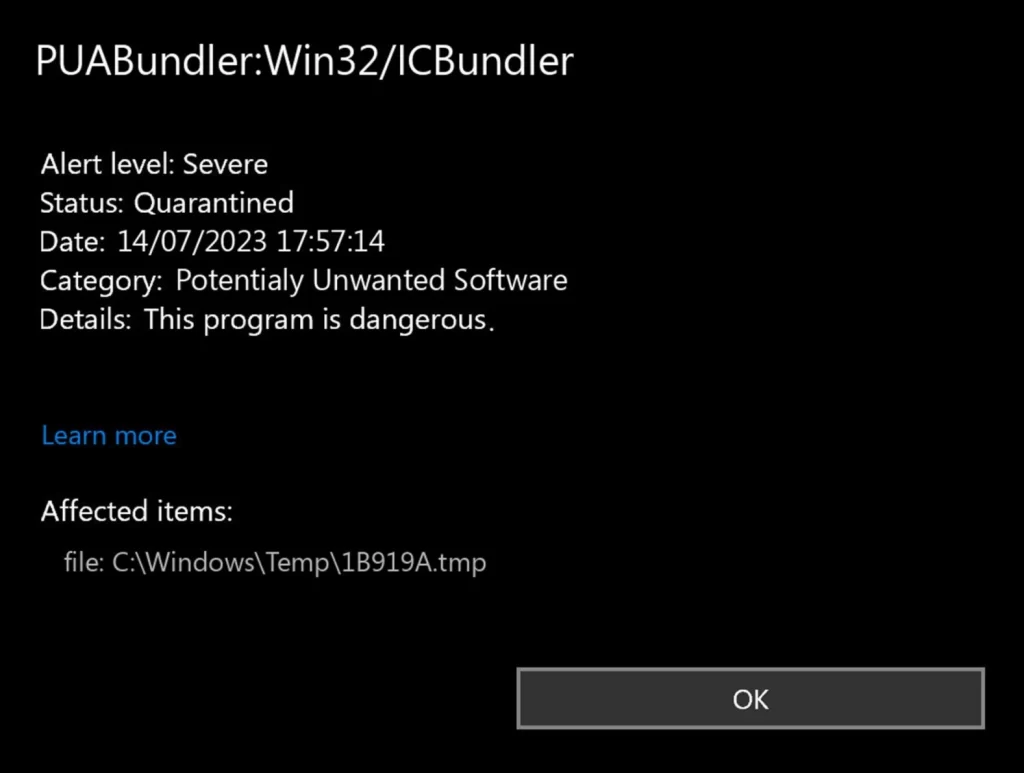
PUAbundler detected by Windows Firewall
PUAbundler win32 is a Windows Defender detection alert that warns you about the presence of a potential threat, such as a Trojan Horse virus, on your computer. It’s crucial that you do not ignore any such threats and do everything you can to identify their source and eliminate it. Oftentimes, PUAbundler Win32 is delivered via installation bundles, questionable downloads, and pirate sites, so be sure to avoid those in the future to keep your system safe.
The PUAbundler Win32 Virus
The PUAbundler Win32 virus detection is often indicative of a Trojan Horse infection, a form of malware known for stealthy infiltration. Trojan Horses typically hitch a ride with other software, often disguising themselves as legitimate programs or hiding within complex software bundles. In this case, the PUAbundler Win32 virus has been observed within downloads such as ‘uTorrent.exe’. This suggests it’s often distributed through downloads from unverified sources or packaged within pirated software. Furthermore, this threat is linked to other similar detections, such as puabundler:win32/mediaget, puabundler:win32/msetup, puabundler win32/ytdvideodownload, puabundler, and win32/photoscapebundler. Therefore, to stay safe, it’s critical to download software only from trusted sources and regularly scan your system with a reliable antivirus. Exercising caution with downloads can greatly decrease the risk of unintentionally installing such harmful threats.
The PuaBundler Win32 virus steal sensitive information from your computer
PUAbundler:Win32
The PUABundler:Win32 detection is associated with a Trojan Horse virus, a type of malware notorious for their harmful potential. Such threats (PUADIManager Win32 OfferCore, PUADIManager Win32/InstallCore) may perform a variety of destructive actions like data theft, file corruption, and even total system compromise. Moreover, they may open backdoors for other malware like ransomware, amplifying the damage inflicted. One user noted a significant system slowdown, with the CPU overrun and the cooling fan in overdrive. Despite the inconspicuous nature of PUAbundler:Win32, it’s crucial to act promptly. Delaying removal may lead to irreversible system damage, data loss, or privacy breaches. Therefore, it’s essential to regularly scan your system with a trusted antivirus and remove detected threats immediately to ensure your digital safety.
SUMMARY:
How to Remove PUAbundler
To try and remove PUAbundler Win32 quickly you can try this:
- Go to your browser’s settings and select More Tools (or Add-ons, depending on your browser).
- Then click on the Extensions tab.
- Look for the PUAbundler Win32 extension (as well as any other unfamiliar ones).
- Remove PUAbundler Win32 by clicking on the Trash Bin icon next to its name.
- Confirm and get rid of PUAbundler Win32 and any other suspicious items.
If this does not work as described please follow our more detailed PUAbundler Win32 removal guide below.
If you have a Windows virus, continue with the guide below.
If you have a Mac virus, please use our How to remove Ads on Mac guide.
If you have an Android virus, please use our Android Malware Removal guide.
If you have an iPhone virus, please use our iPhone Virus Removal guide .
Some of the steps may require you to exit the page. Bookmark it for later reference.
Next, Reboot in Safe Mode (use this guide if you don’t know how to do it).
 Uninstall the PUAbundler Win32 app and kill its processes
The first thing you must try to do is look for any sketchy installs on your computer and uninstall anything you think may come from PUAbundler Win32. After that, you’ll also need to get rid of any processes that may be related to the unwanted app by searching for them in the Task Manager.
Note that sometimes an app, especially a rogue one like PUAbundler Win32, may ask you to install something else or keep some of its data (such as settings files) on your PC – never agree to that when trying to delete a potentially rogue software. You need to make sure that everything related to PUAbundler Win32 is removed from your PC to get rid of the malware. Also, if you aren’t allowed to go through with the uninstallation, proceed with the guide, and try again after you’ve completed everything else.
What is “PUABundler:Win32” Virus? How to remove it?
 Reviewed by Muhammad Zubyan
Windows Defender might have alerted you about a virus threat found on your computer, indicating the presence of specific malware starting with the name “PUABundler:Win32.” These alerts serve as warnings from Windows, notifying you about the potentially harmful content it has detected. If Windows Defender notifies you of a malicious virus on your system, it is crucial not to ignore it, as it can cause serious damage to your system.
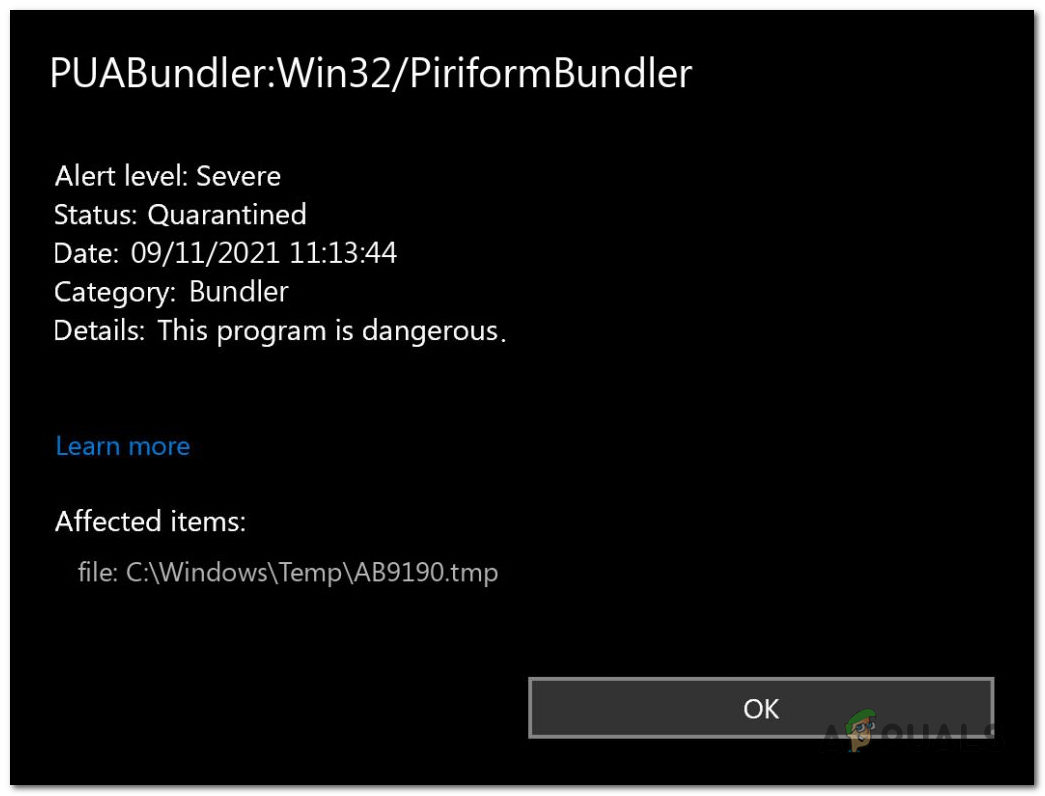
The Virus “PUABundler:Win32/PiriformBundler” detected by Windows Security.
These threats often enter your system through spam emails, infected websites, or by clicking on malicious links. Once this virus is installed on your computer, it begins to spread via Windows System files. This allows the malware to access all the information on your computer and even gain control over it. The virus can cause various issues, including:
- Unexpected issues with internet connectivity and applications.
- Freezing or slowdowns in computer performance.
- Difficulties in opening documents or accessing files.
- Unusual pop-up ads appearing while browsing online.
- Overheating and high CPU usage.
Detections like these are particularly dangerous because these can be used to attack users by stealing their private credentials, financial information, and more. If you suspect that your device has been affected by this specific virus, it is crucial to remove it as soon as possible.
1. Launch Windows in Safe Mode with Networking
Launching in Safe Mode is crucial since it allows you to start your computer with minimal programs and drivers. This helps because it stops the virus from running when the computer starts, making it easier to remove. To enter Safe Mode with Networking, follow these steps:
- Open the run dialog box by pressing the Windows button + R key on your keyboard simultaneously.
- Once the run box opens, type “msconfig.exe” and press enter to open the Microsoft system configuration window.
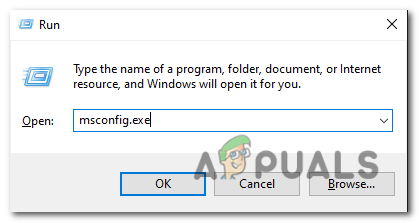 Open the run box and type “msconfig.exe”.
 - After the system configuration window opens, click on the “Boot” tab. Check the “Safe boot” option and select the option below that specifies “Network.” Click “Apply”.
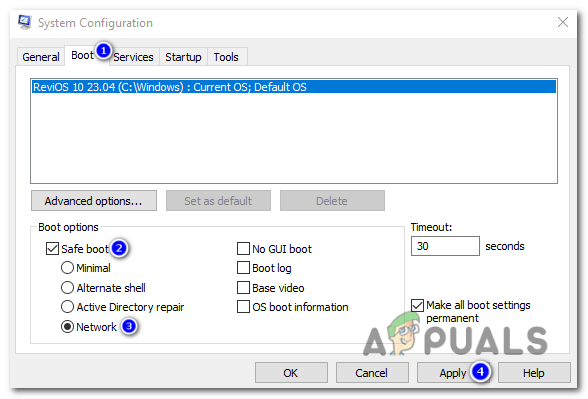 Once the system configuration window opens, click on the “Boot” tab. Check the “Safe boot” option and select the option below that specifies “Network.” Click “Apply”.
 - Restart your computer to enter Safe mode.
- Once you are in safe mode, you can proceed to the next step, which is removing the malware from your computer system.
2. Using Rkill to Terminate the Virus
RKill is a program developed by BleepingComputer.com that aims to terminate all known malware processes. Its purpose is to allow your regular security software to run and effectively clean your computer from infections. When RKill is executed, it terminates malware processes, corrects incorrect executable associations, and fixes policies that may hinder the use of certain tools. To download and use Rkill follow these steps:
- Open your web browser and go to the official RKill download page.
- On the download page, look for a specific download link labeled “iExplore.exe” and click on it. This is a renamed version of RKill that can bypass certain malware restrictions.
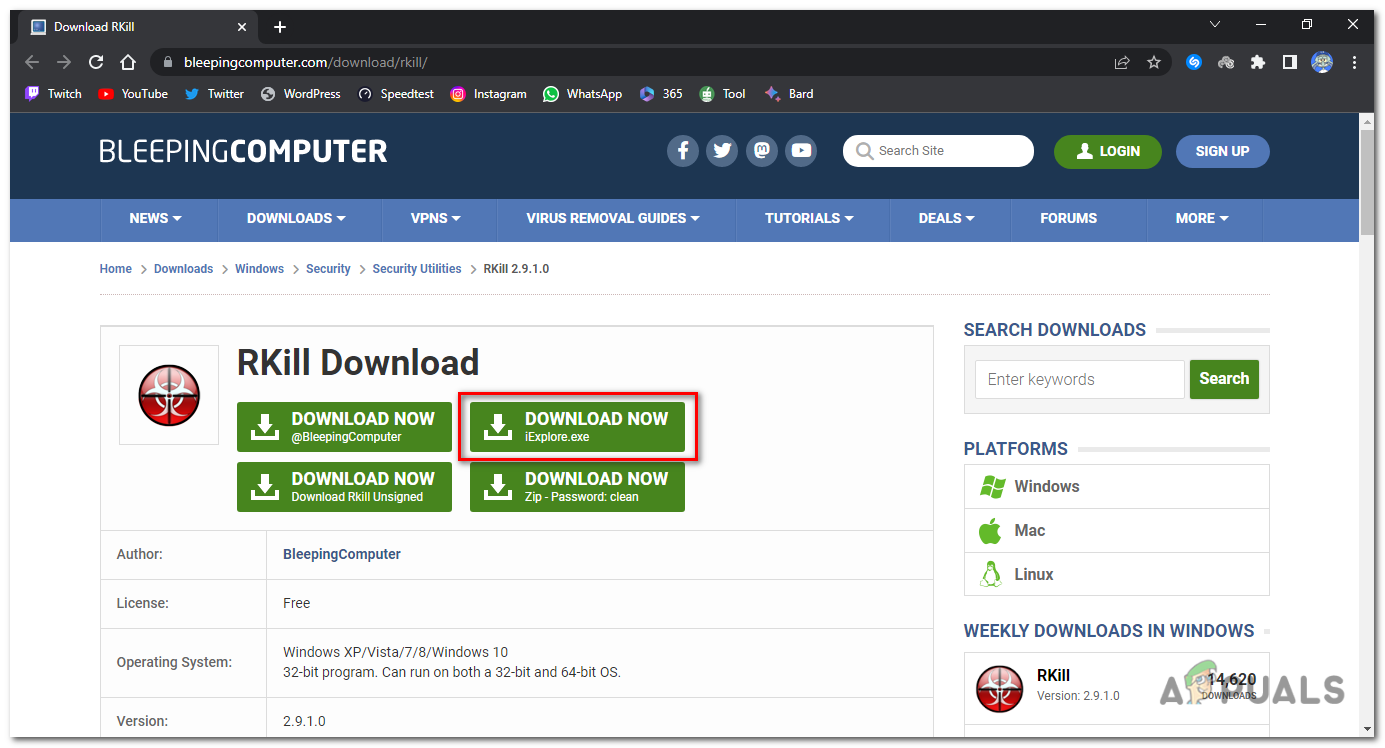 Press the download link labeled “iExplore.exe”.
 - Once the download is complete, navigate to the folder where the browser downloaded the RKill executable file.
- Double-click on the RKill executable file (iExplore.exe) to run it. A warning prompt will appear, click “Yes” or “Run” to proceed.
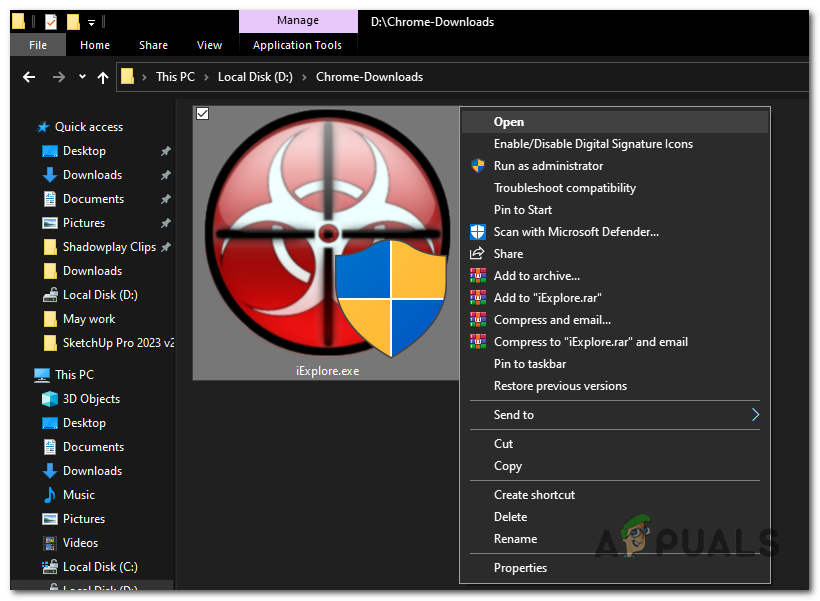 Double-click on the RKill executable file (iExplore.exe) to run it.
 - RKill will now start scanning and terminating known malware processes on your computer. It may take some time to complete the process, and you may see a black command prompt window displaying the progress.
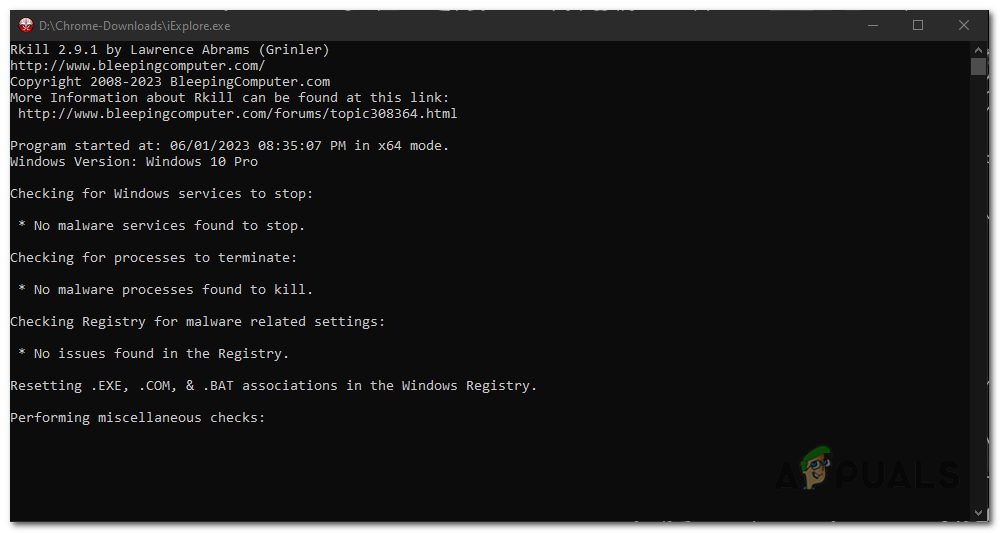 RKill will now start scanning and terminating known malware processes on your computer.
 - Once RKill has finished running, the black window will close automatically, and a log file will be generated.
- It is important not to restart your computer at this point. Instead, proceed to the next step of running a full system scan.
3. Run a Full System Scan
Performing a full system scan using Windows Security will detect the location of the virus file and eliminate it using its built-in antivirus capabilities. This process is straightforward, especially if you do not have any external antivirus software installed, as Windows Security is integrated within the Windows operating system. To run a full system scan, follow these steps:
- Press the Windows key to open the Start menu, type “Windows Security” in the search bar, and select the Windows Security app from the search results.
- In the Windows Security app, click on the “Virus & threat protection” tab located on the left-hand side of the window.
- Inside “Virus & threat protection” tab, under the “Quick scan” option, press “Scan options”. Inside “Virus & threat protection” tab, under the “Quick scan” option, press “Scan options”.
- A menu will appear with different scanning options. Choose “Full scan” from the list.
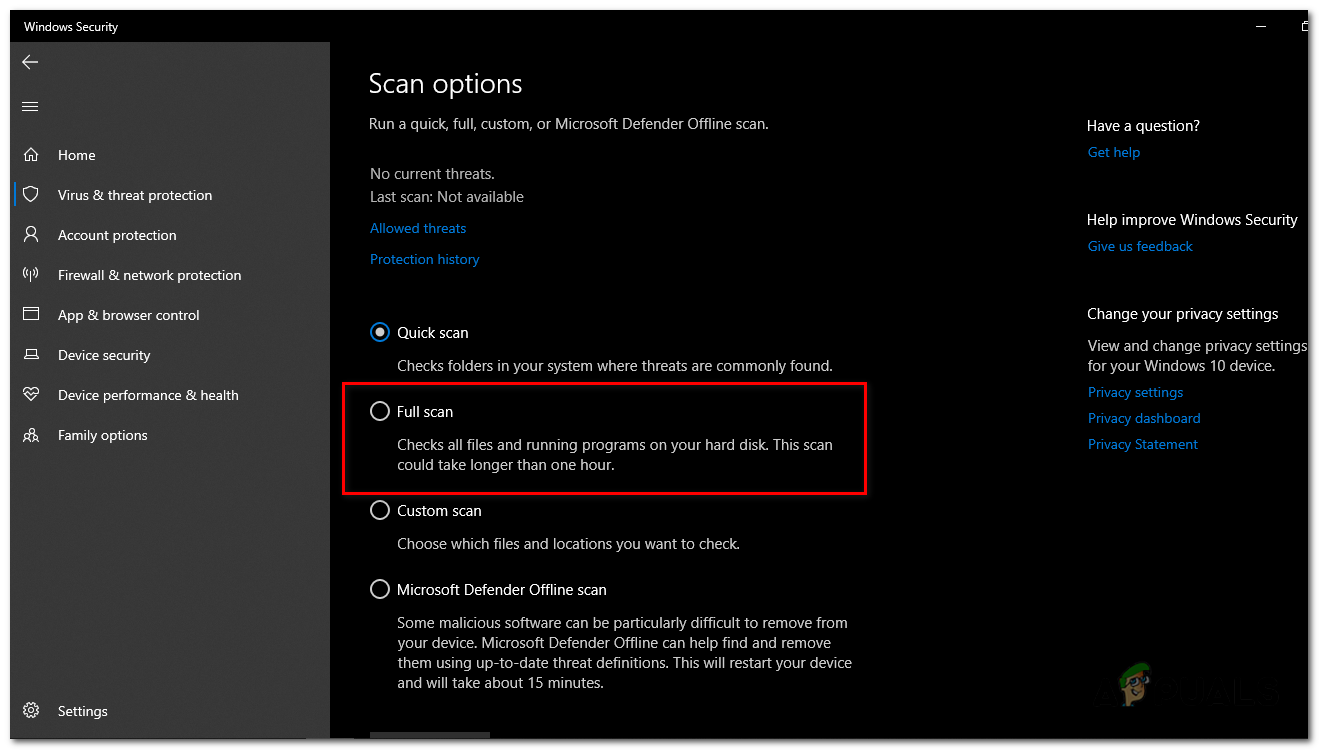 A menu will appear with different scanning options. Choose “Full scan” from the list.
 - Click on the “Scan now” button to begin the full scan. Windows Security will now scan your entire system for malware, including the “PUABundler:Win32” virus.
- The scanning process may take some time, depending on the size and speed of your storage drive and the number of files on your system. You can monitor the progress of the scan on the screen.
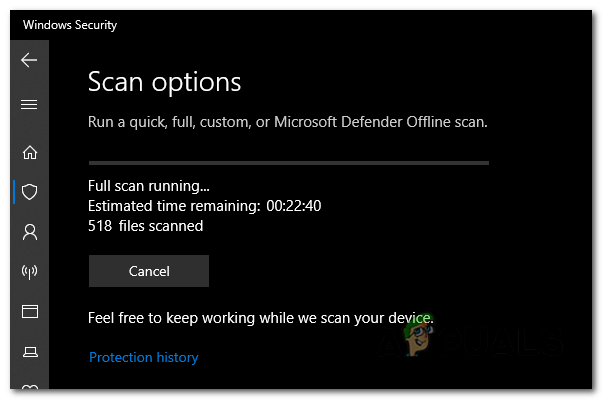 You can monitor the progress of the scan on the screen.
 - Once the scan is complete, Windows Security will display the results. It will list any detected threats.
- Windows Security will provide options to take action against the detected threats. If the PUABundler:Win32 virus is found, follow the prompts to remove or quarantine it. If the PUABundler:Win32 virus is found, follow the prompts to remove or quarantine it.
- In some cases, Windows Security will prompt you to restart your computer to complete the removal process. If prompted, save your work and restart your computer.
4. Using Malwarebytes anti-virus
Malwarebytes is widely recognized as one of the most popular and effective anti-malware software for Windows. Its reputation stems from its ability to successfully eliminate various types of malware that other programs might overlook. The best part is that Malwarebytes offers its powerful features at no cost. When it comes to dealing with an infected device and ensuring its cleanliness, Malwarebytes has consistently been available as a free and indispensable tool in the ongoing battle against malware. To download and use Malwarebytes, follow these steps:
- Open your browser and openMalwarebytes download page.
- Click on the “Free Dowload” button, the program will start downloading.
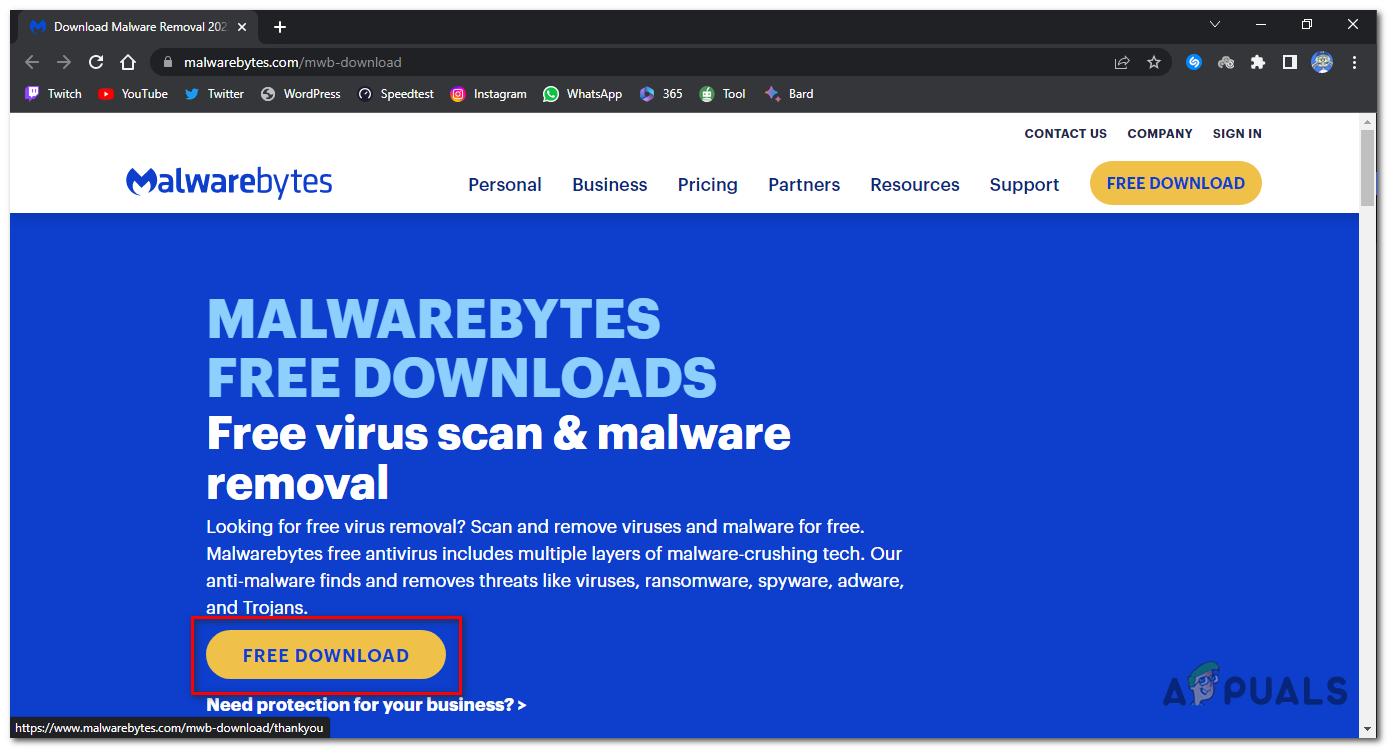 Click on the “Free Dowload” button, the program will start downloading.
 - Once the download is complete, locate the downloaded file (usually in the Downloads folder) and double-click on the “MBSetup” file to begin the installation of Malwarebytes.
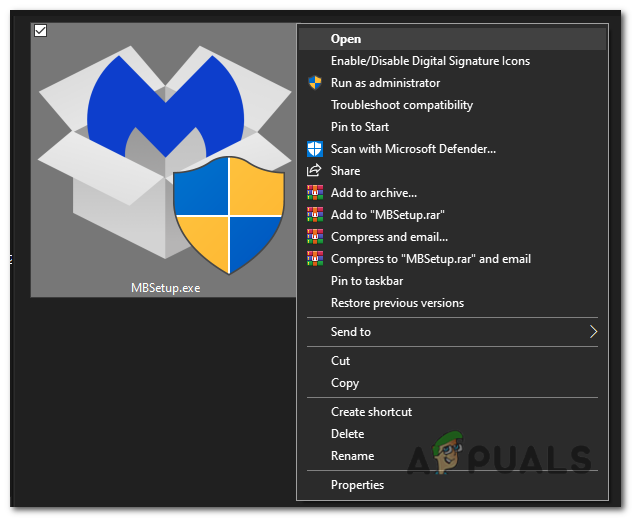 double-click on the “MBSetup” file to begin the installation of Malwarebytes.
 - Follow the on-screen prompts presented by the Malwarebytes setup wizard to complete the installation. When asked to select the type of computer, choose either “Personal Computer” or “Work Computer.” Then, click “Next” to proceed.
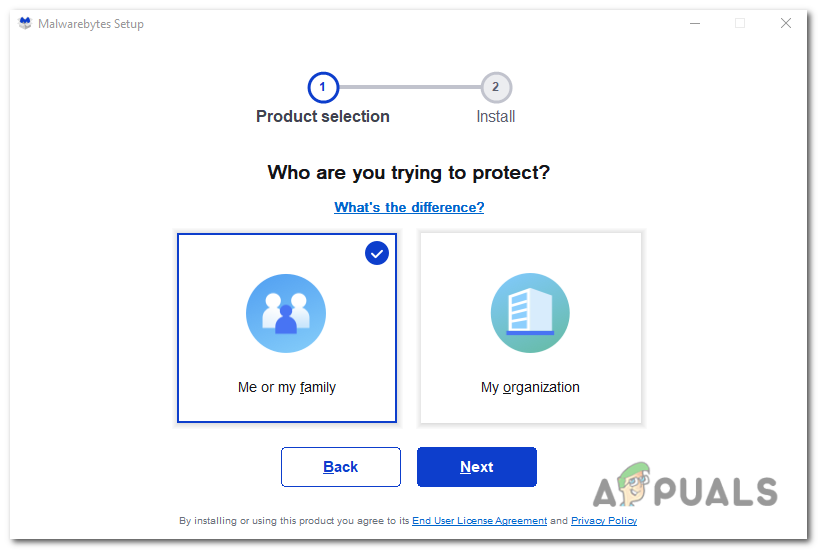 choose either “Personal Computer” or “Work Computer.” Then, click “Install” to proceed.
 - Click on the “Scan” button to start a scan of your computer. The program will automatically update its antivirus database before scanning for malicious programs.
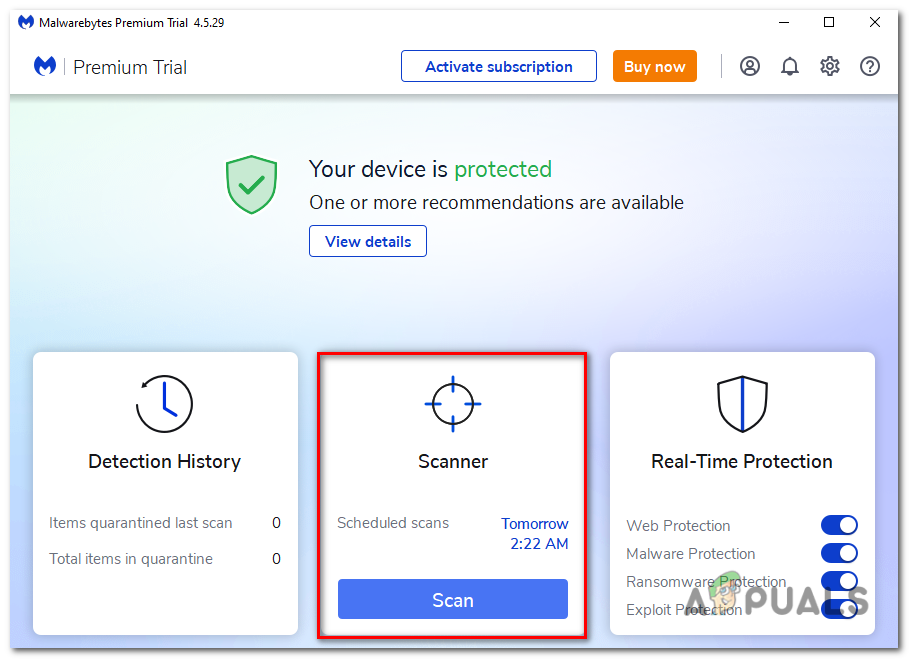 Click on the “Scan” button to start a scan of your computer.
 - Wait for the scan to complete. The program will scan your computer for browser hijackers, malware, and potentially unwanted programs. This process may take a few minutes, so you can do other tasks while periodically checking the scan’s progress.
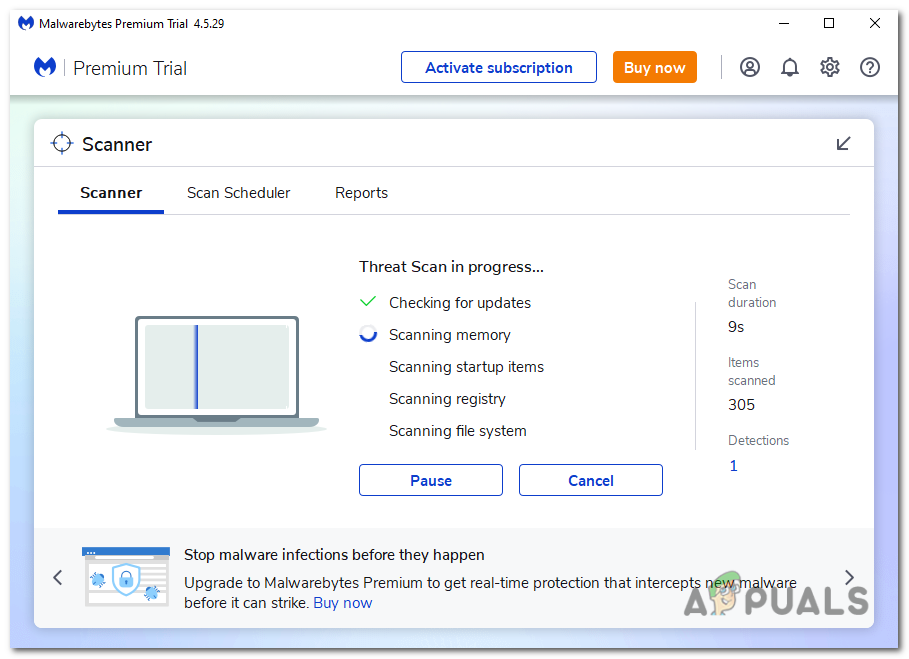 The program will scan your computer for browser hijackers, malware, and potentially unwanted programs.
 - Once the scan is complete, it will display a screen showing any detected malware, adware, or potentially unwanted programs. To remove these threats, click on the “Quarantine” button.
- Review the list of identified malicious programs and click “Quarantine” to remove them from your system.
- To complete the removal process, Malwarebytes will prompt you to restart your computer.
5. Resetting Browsers to Default Settings
If this Virus is effecting your browsing experience, it has infected your browser with spam notifications, malicious extensions, and rogue settings. To bring back your browser to its default state you will have to reset it, resetting it will remove all extensions, toolbars, and other customizations but will leave your bookmarks and favorites intact.
5.1 Resetting Google Chrome for Windows to default settings:
- Open Chrome and click on the menu button (represented by three vertical dots) in the top-right corner of the window.
- From the dropdown menu, select “Settings”.
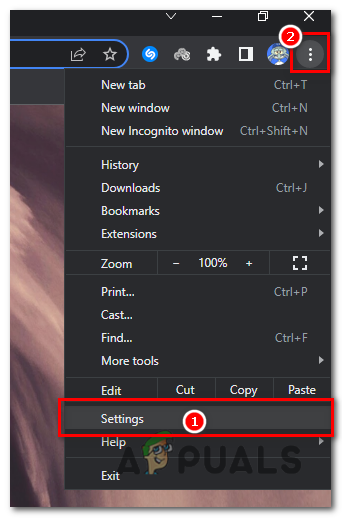 From the dropdown menu, select “Settings”.
 - In the Settings page, click on the “Reset settings” tab in the left sidebar.
- Then, click on “Reset settings to their original defaults”.
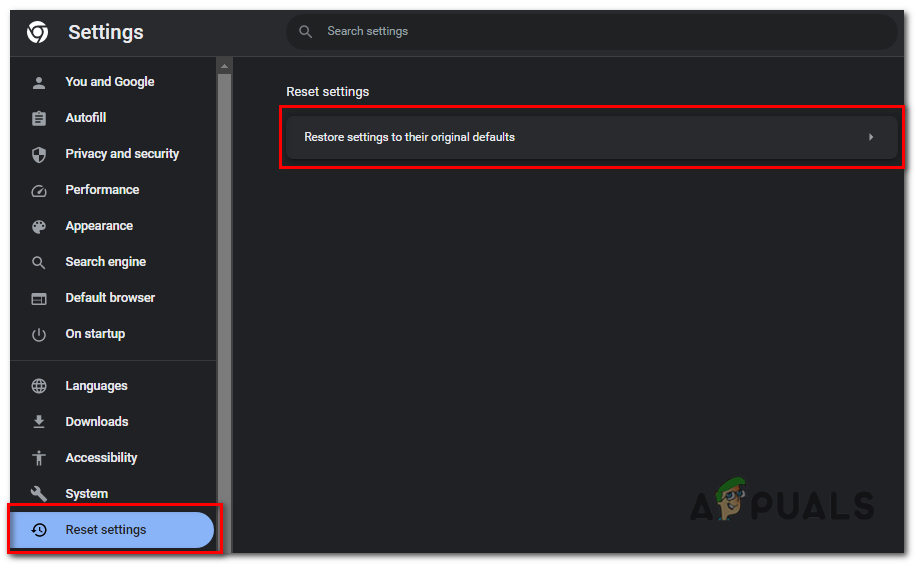 click on “Reset settings to their original defaults”.
 - A confirmation dialog will appear, detailing the components that will be restored to default. To proceed, click on the “Reset settings” button.
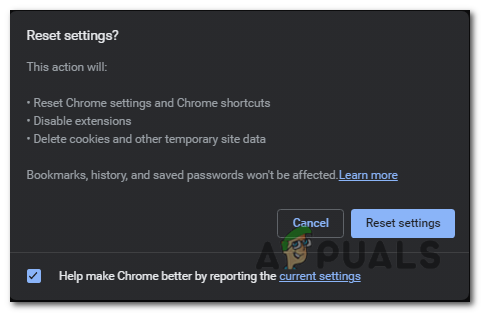 click on the “Reset settings” button.
 - Optional: If a malicious extension keeps reinstalling itself, you can also reset the data sync for your browser by visiting chrome.google.com/sync and clicking on the “Clear Data” button.
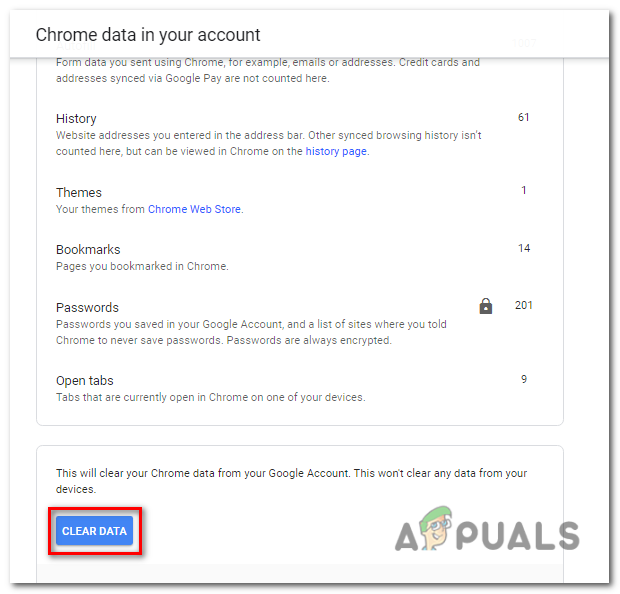 If a malicious extension keeps reinstalling itself, you can also reset the data sync for your browser by visiting chrome.google.com/sync and clicking on the “Clear Data” button.
5.2 Resetting Microsoft Edge to default settings:
- Open Microsoft Edge and click on the menu button (represented by three horizontal dots) in the top-right corner of the window.
- From the dropdown menu, select “Settings”.
- In the Settings page, scroll down and click on the “Reset settings” button.
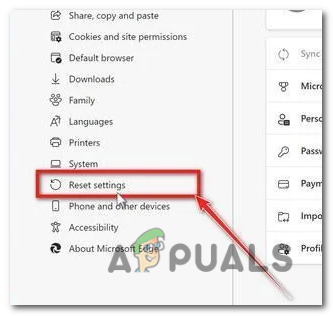 In the Settings page, scroll down and click on the “Reset settings” button.
 - Then, click on “Reset settings to their original defaults“.
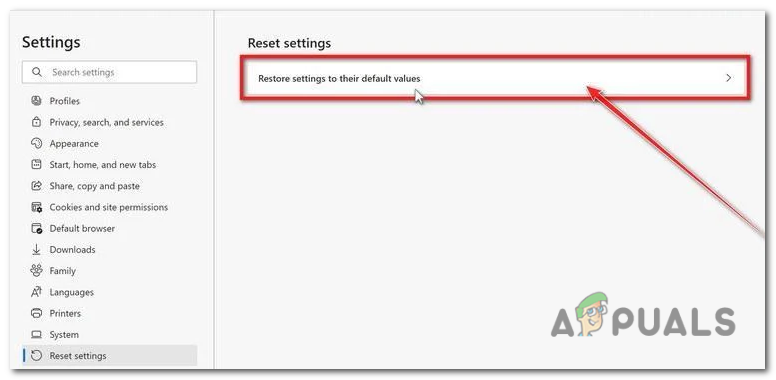 click on “Reset settings to their original defaults”.
 - A confirmation dialog will appear, asking if you want to reset Microsoft Edge. To proceed, click on the “Reset” button.
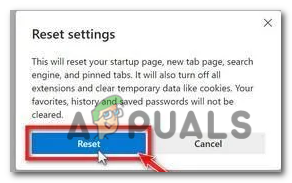 A confirmation dialog will appear, asking if you want to reset Microsoft Edge. To proceed, click on the “Reset” button.