Create a Fullscreen Background Image in Unity2D with a SpriteRenderer
A common requirement for 2D games is to have some sort of fullscreen background, be it a color, sprite, particle system, or anything else, to provide mood and aesthetic to the contents of your game. While a static color can be used to great effect, this post will go over the technique that I use for fullscreen background images in Unity using a standard SpriteRenderer and just a little touch of code to retain the original image’s aspect ratio. Maintaining the image’s aspect ratio prevents it from being stretched or squished, and it’s important due to the wide array of screen sizes available to mobile and desktop users alike.
When I originally set about to write the code for this, it took longer than I’d care to admit because I wasn’t thinking properly about how Unity handles scale. I had originally intended to maintain the aspect ratio on the scale itself using the same logic you would use to resize or crop an image, yet after writing the logic to do this I just couldn’t get the image to maintain it’s proper aspect ratio. I stared at and tweaked the math time and time again, yet the image would still be stretched. This was especially frustrating considering I was certain the math was correct, which it was, however Unity scale is not related to the actual resolution of the Sprite! Finally I realized, as I’ll show below, that Unity makes this much simpler than I had originally envisioned.
Setup
The first thing we’ll need is an actual background image. I’ll be using this image, but feel free to use whatever image you like.
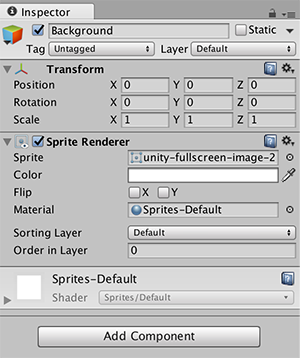
Next we’ll need a GameObject, I’ll be calling mine Background, with a SpriteRenderer component. Go ahead and attach your preferred background image to the SpriteRenderer in the Sprite property, and you should have a setup like so:
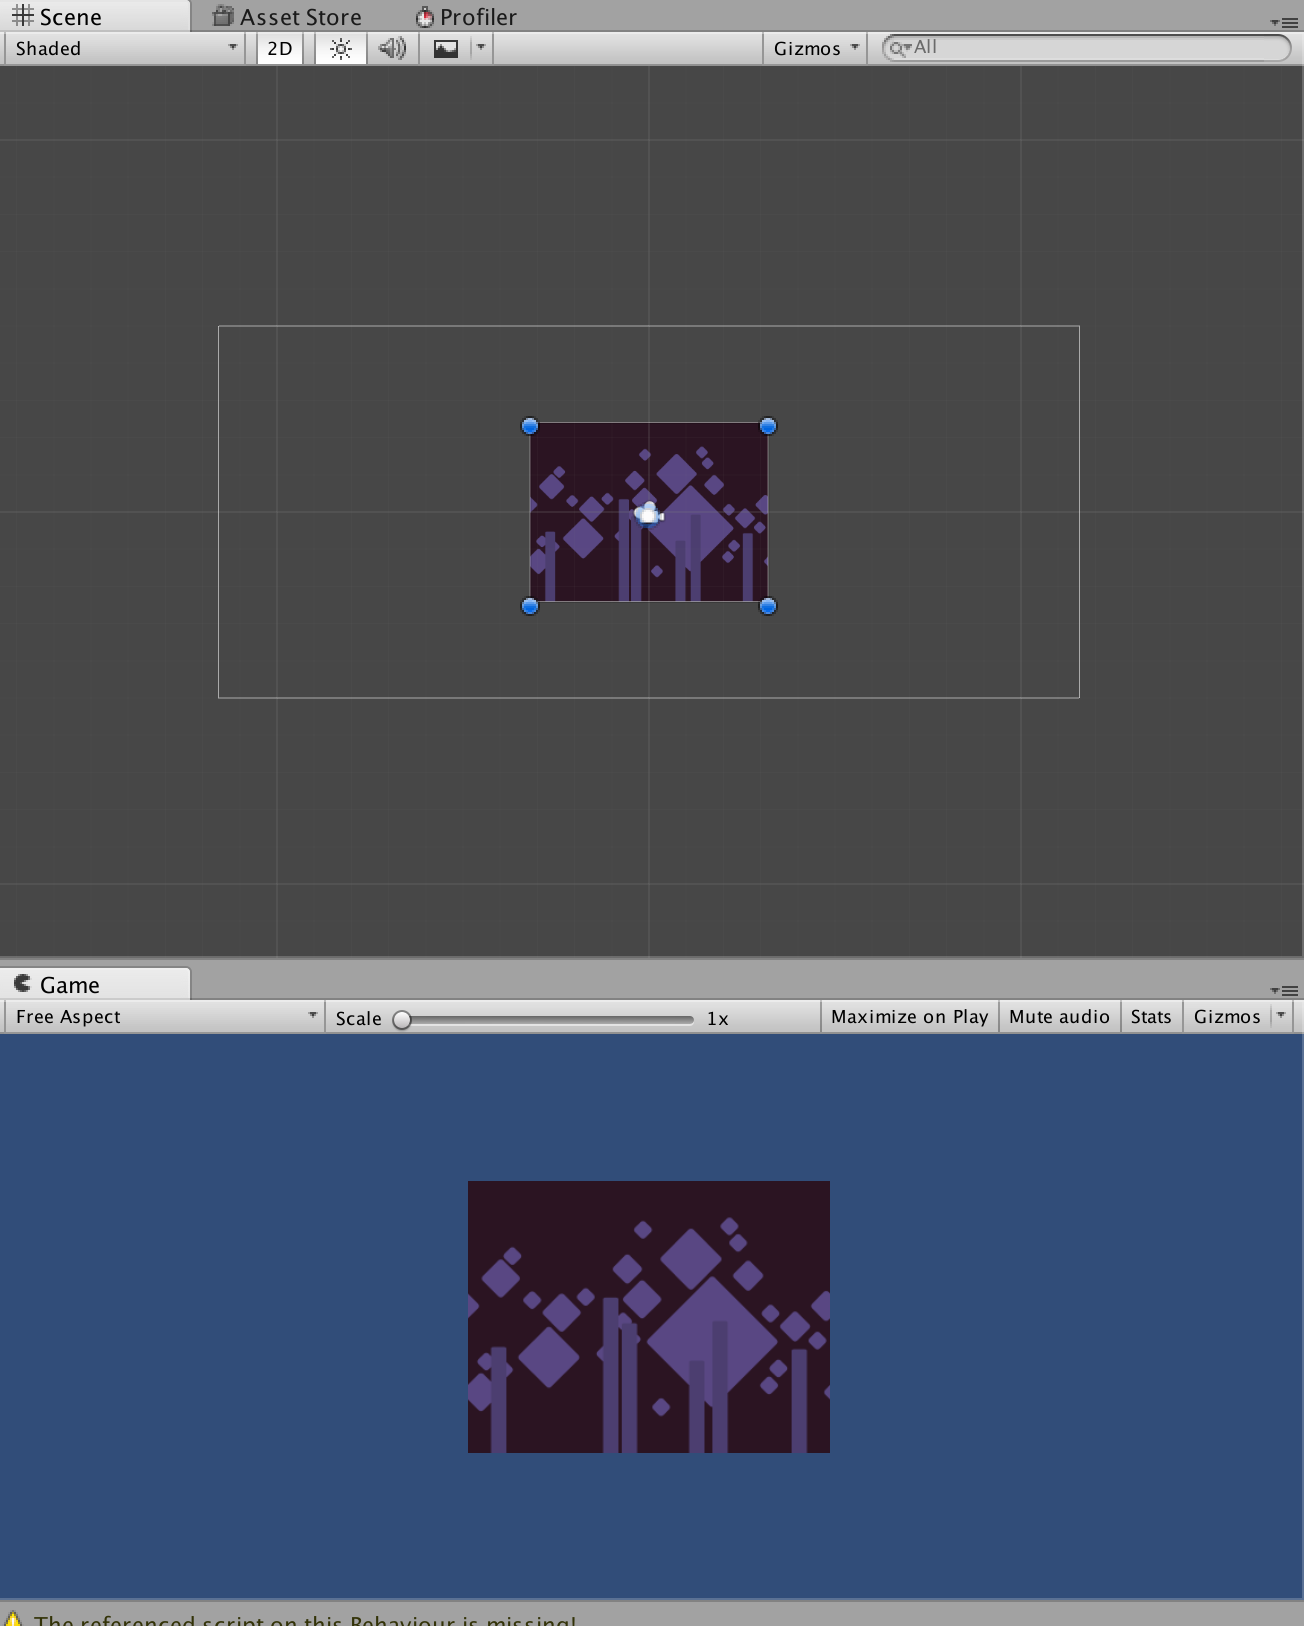
The only problem is, depending on the size of your image and the target device resolution, your image likely won’t fit perfectly and you’ll end up with something like the image to the right.
What we could do is set the scale of the Background to match the camera size in the editor, but you won’t have much luck running on actual devices considering the width of the Unity camera is dynamic (while the height always remains constant), and scales based on the resolution of the device you’re running on. A better solution would be to write a little code to dynamically scale the Background as needed.
All we’ll need to do is set the scale of the Background based on it’s Sprite’s size compared to the size of the Camera at runtime, and maintain the aspect ratio of the original image. As we’ll see in the code below, Unity actually makes maintaining the aspect ratio really easy for us.
The Script
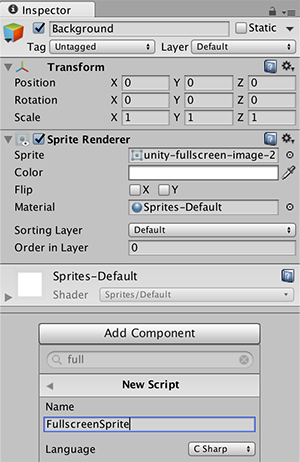
What we’ll do is create a new script called FullscreenSprite, and attach it to the Background GameObject like so:
As for the actual contents of the code, we’ll start off by simply grabbing a reference to the attached SpriteRenderer to determine the size of the sprite, as well as the size of and camera we’re working with:
As you can see, we start off by grabbing the SpriteRenderer component. Next we determine the height of the camera using the orthographicSize property, which is essentially half the camera’s height in Unity units (not pixels). By default this is 5. We determine the full cameraSize using the height we already calculated, and multiplying it by the camera’s aspect ratio to determine the width (aspect ratio = width / height). Finally, the spriteSize is simply grabbed from the SpriteRenderer’s sprite.
The next thing we’ll need to do is to determine what scale we need in order to fill the camera:
We determine if the camera is in a landscape (or equal) orientation, or portrait using the cameraSize we calculated in the previous step, and comparing it’s x (width) to it’s y (height). Based on the orientation, we multiply the current scale with either the width or height of the camera, divided by the corresponding width or height of the sprite.
For instance, if your cameraSize is 9, 5 and your spriteSize is 4, 3, we’ll be multiplying the scale by cameraSize.x / spriteSize.x = 9 / 4 = 2.25. Likewise if your camera were 5, 9 we’d multiply the scale by cameraSize.y / spriteSize.y = 9 / 3 == 3. The purpose is to scale the sprite to match the larger dimension of the camera’s size.
The resulting scale maintains the aspect ratio of the image, because Unity assigns the GameObject with a scale of 1, 1 by default, even if the image is 1000×500 pixels, for example. If an image is 1000×500 and you set the scale to 2, 2, the rendered image would be 2000×1000 — the exact same aspect ratio. We use this to our advantage because as long as we keep the X and Y scale as the same value, we don’t have to do any extra aspect ratio calculation, it’s all handled internally by Unity anyways!
The last thing we need to do is simply apply the new scale:
You’ll see I’m also setting the position to 0, 0 here. This is entirely optional, I just like to add this when appropriate to ensure that even if the Background is accidentally moved in the Unity editor, it’s set to the appropriate position at runtime.
The only thing left to do now is to run the game and see the background image in all it’s fullscreen glory:
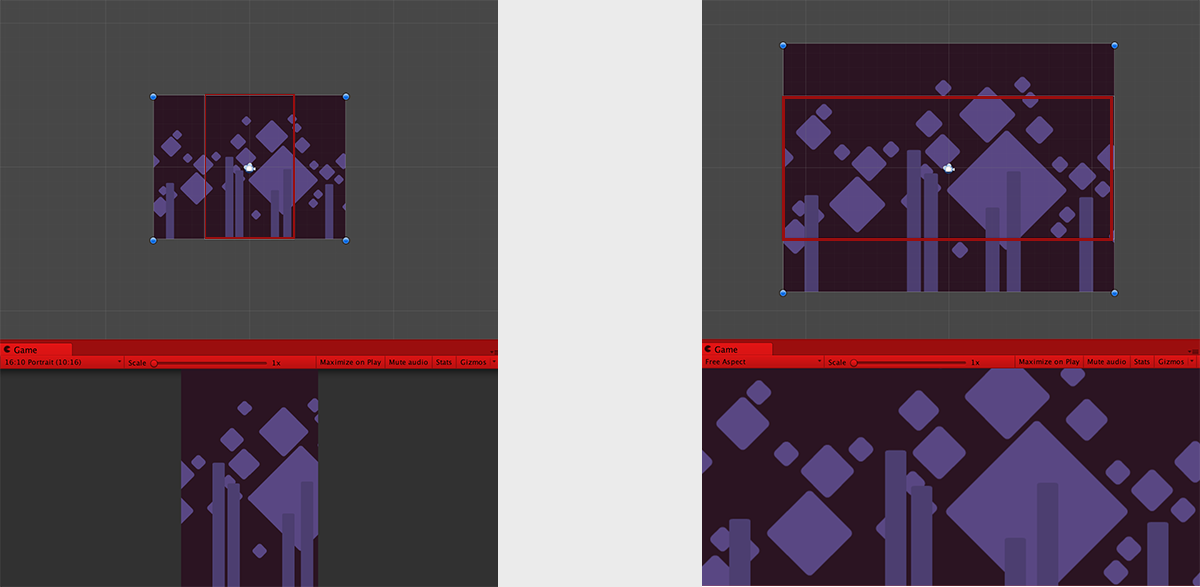
The red lines within the scene editor indicate the bounds of the camera, and as you can see, whether the game is run in landscape or portrait orientation, the image is scaled accordingly and maintains it’s aspect ratio!
And just in case anything wasn’t clear while following along, here’s the full script:
And that’s all there is to it! As I said in the intro, I wanted to write this post because as I was initially developing the logic, I wasn’t taking into account the way Unity scales sprites. I was thinking more in terms of image resizing where you need to actually calculate and use the aspect ratio when determining the width and height to scale to. Hopefully this post will be helpful to anyone making the same mistakes I was!
How to Add a background image in Unity
There are different ways in which you can set the background in Unity. The simplest way is using the UI Canvas to render an image as the camera background. There are other ways like using the skybox or multiple cameras but why bother when you can get it done in a few simple steps.
Unless you are planning to create a parallax background, this method will work regardless of the game being 2D or 3D. In case of scrolling or parallax background, you need to set the image as game objects. We have created a separate tutorial on parallax background for that.
Steps to add a background Image in Unity
1. Import and set properties of your background Image
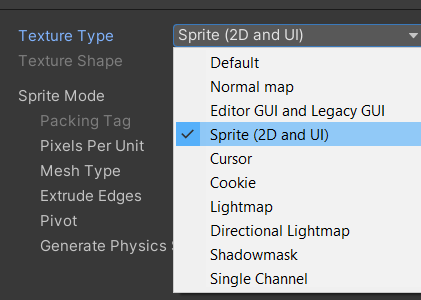
Drag and drop your background image inside the assets folder. Select the image and set the texture type to 2D and UI.
2. Adding a UI image to scene
Go to the Scene Hierarchy and add a UI image to it by clicking on the + sign and going to UI>Image.
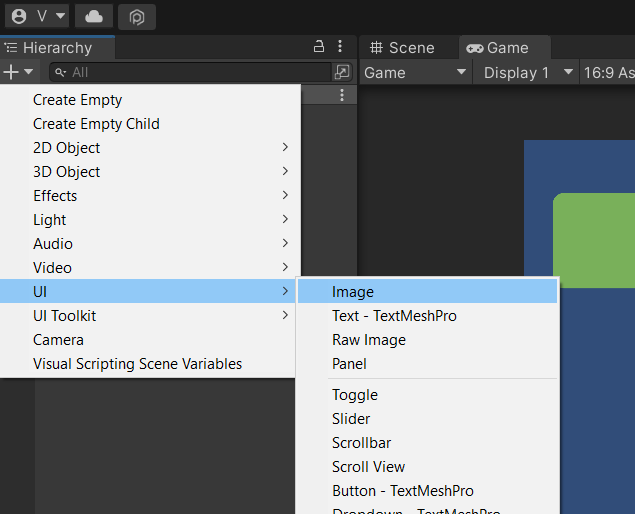
Rename the image to background and the canvas to background Canvas.
Select the background image element in the hierarchy and set the anchor preset under Rect transform to stretch-stretch as shown in the image below.
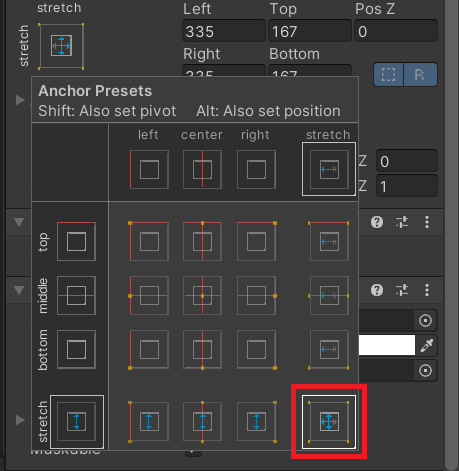
Set the Rect transform’s Left, Right, Top, Bottom, Pos Z to 0. This will stretch the image object to the size of the canvas.
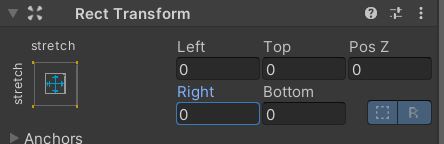
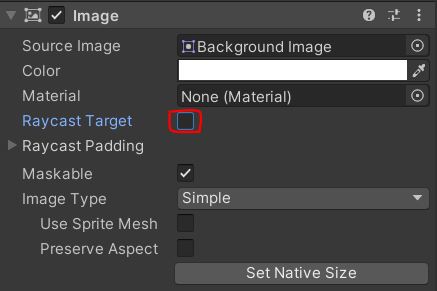
Drag and drop your background image to the source image parameter of the Image component. Uncheck the raycast target in the image component. If you don’t have a background image, then you can use stable diffusion AI to create free background image.
3. Canvas Settings
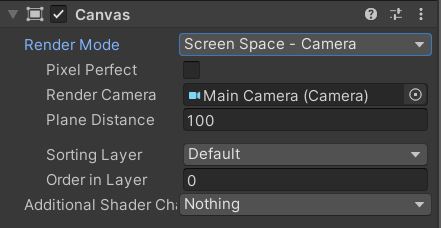
Select the background Canvas and go to the Canvas properties in the inspector window. Select the Render mode as Screen Space Camera.

Drag and drop your main camera to the Render Camera property and set the Plane distance. Increase the plane distance value if your foreground objects are not visible.
That’s it, you have successfully added a background image to your scene. Even if you resize the screen, the background will resize with it.
You can play around with the color property of the background image to add color tint and transparency to the background.
You cannot add any UI elements to this canvas. If you need UI in your scene then add a new canvas and set it as screen space overlay.
Adding and displaying a background
 Pixelnest 18 nov. 2013
Using the empty project we created in the previous part, we will now learn how to add a background and some fancy clouds.
Adding a background
Your first background will be static. We will use the following image:
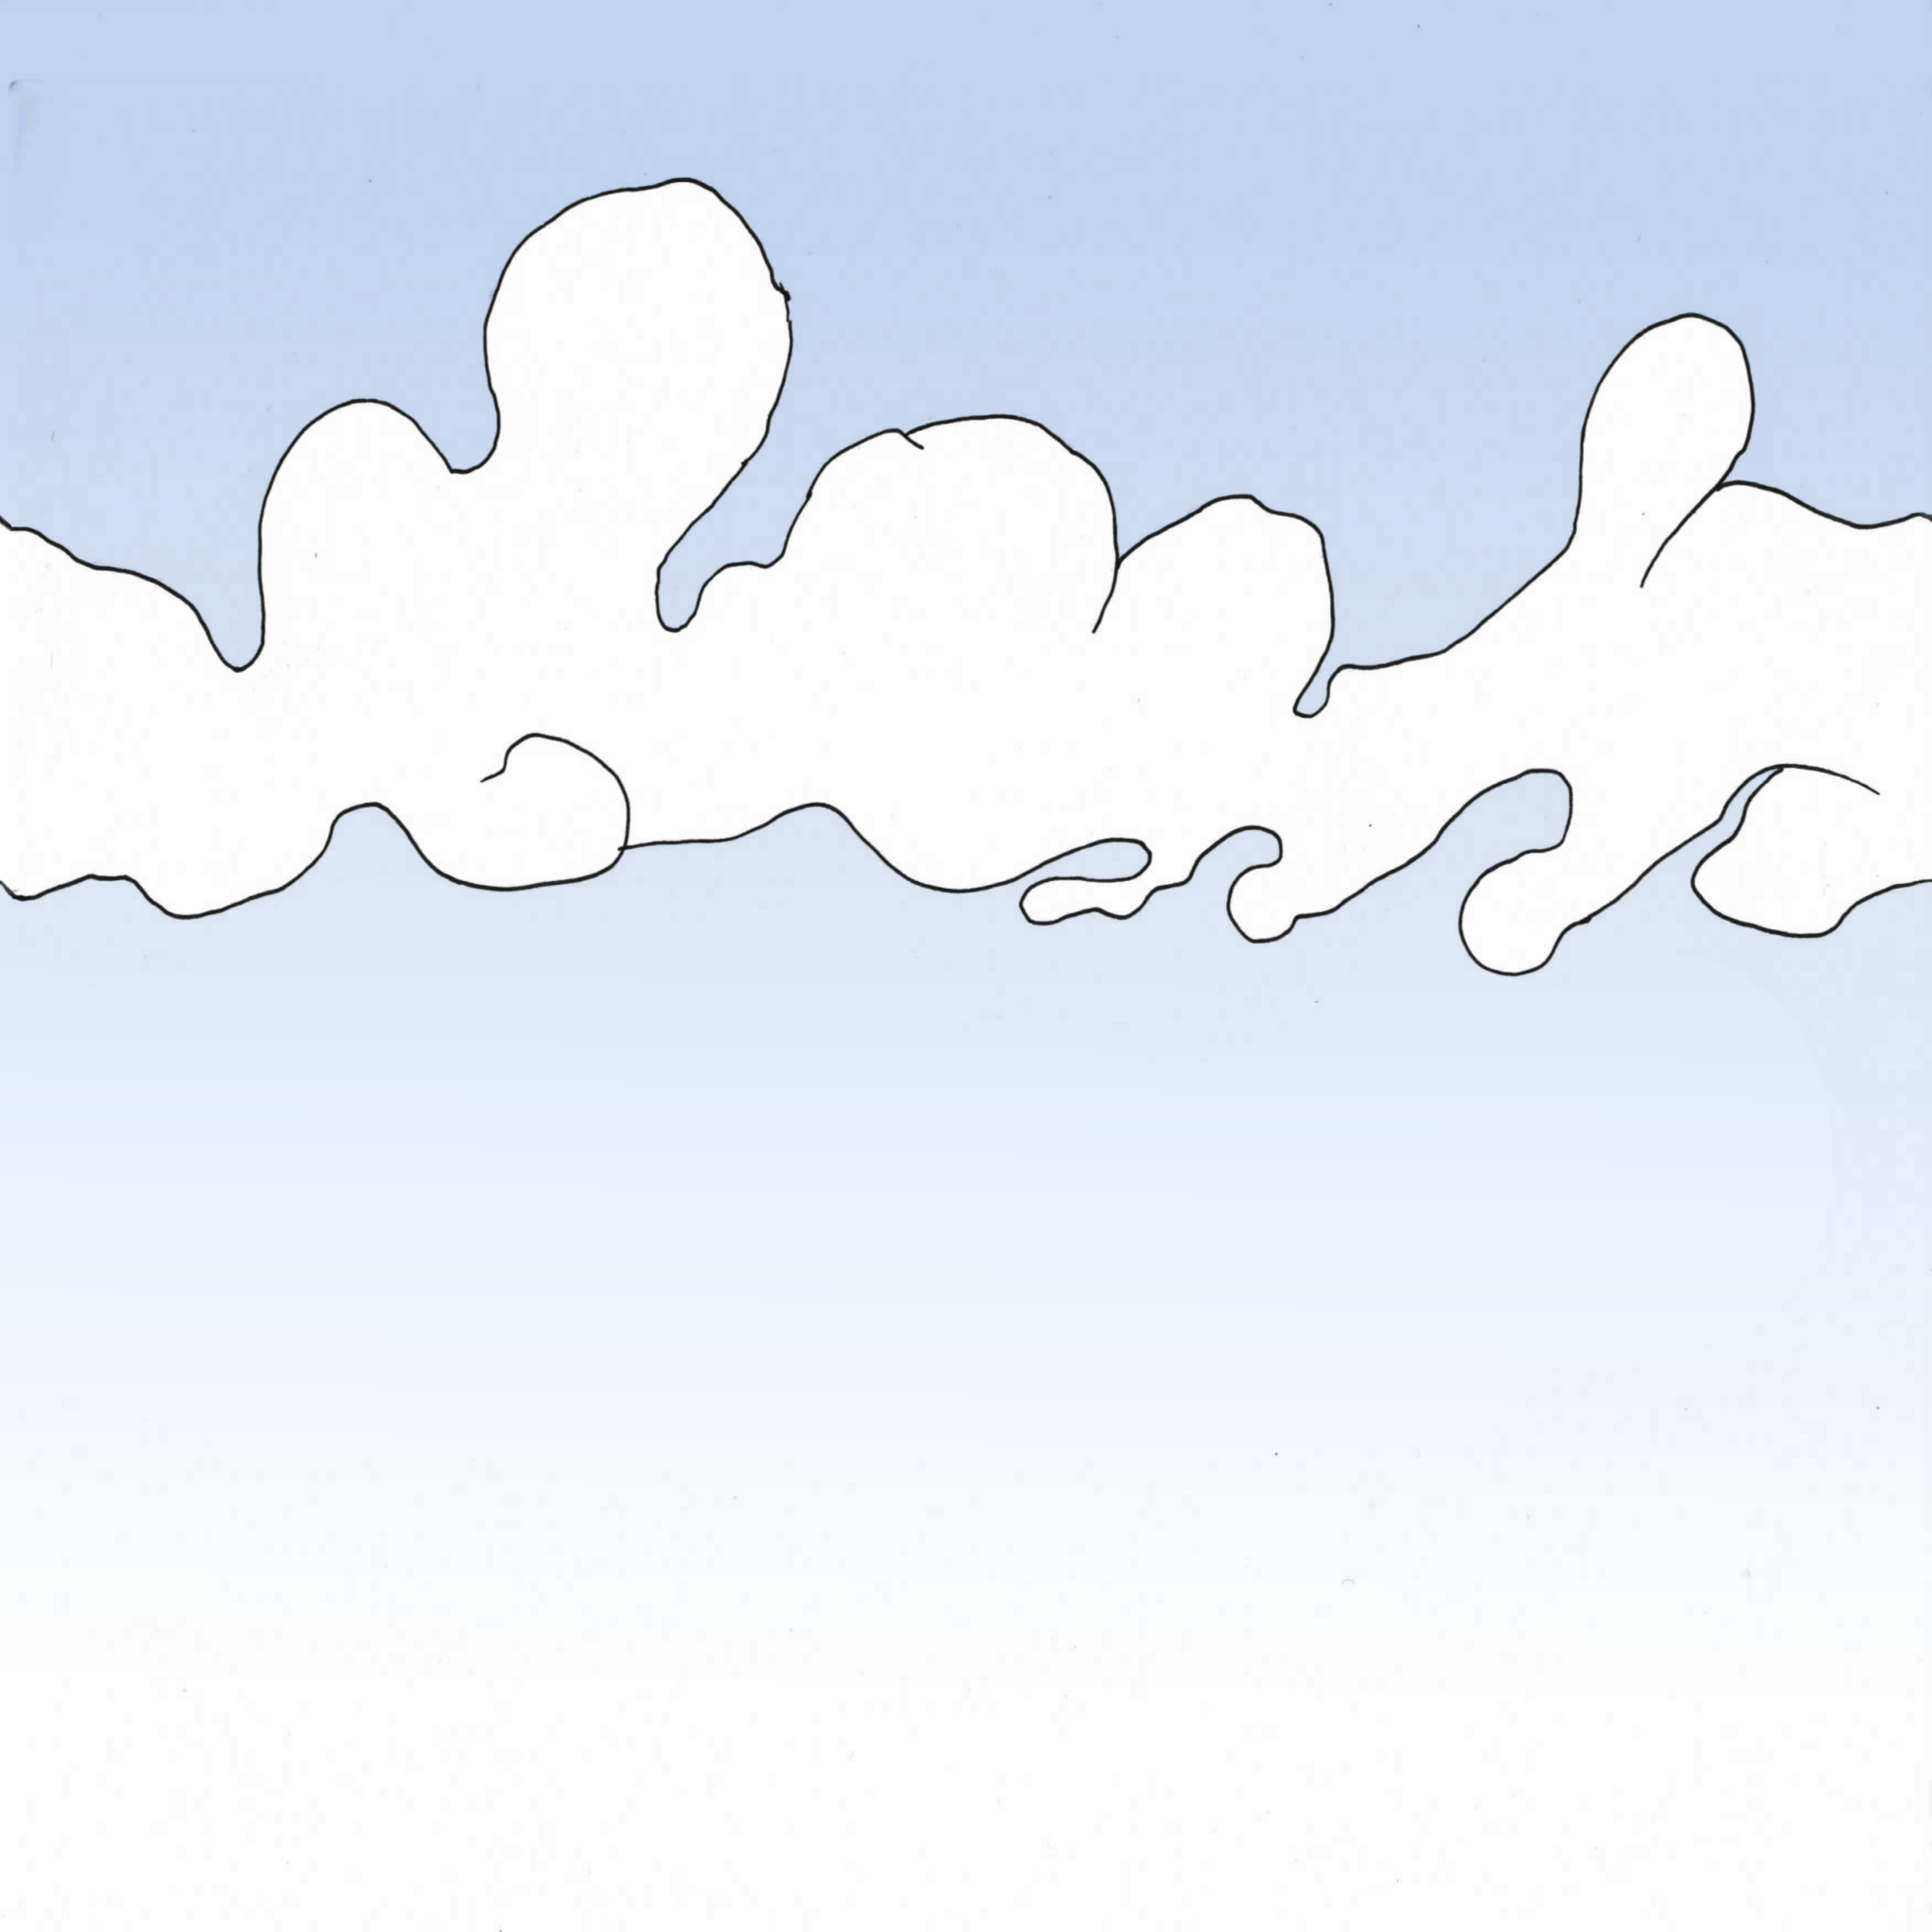
(Right click to save the image)
Import the image in the “sprites” folder. Simply copy the file in it, or drag and drop it from the explorer.
Do not worry about the import settings for now.
In Unity, create a new Sprite game object in the scene.
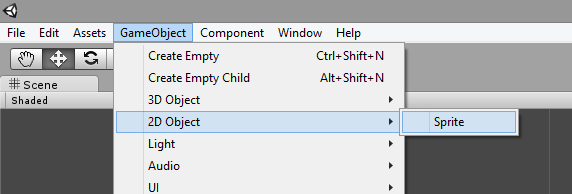
What is a sprite?
In general, we call “sprite” a 2D image displayed in a video game. Here, it’s a Unity specific object made for 2D games.
Add the texture to the sprite
We will now select the actual sprite to display. Make sure that “New Sprite” is selected and look at the inspector. Set the Sprite property to the “background” image:
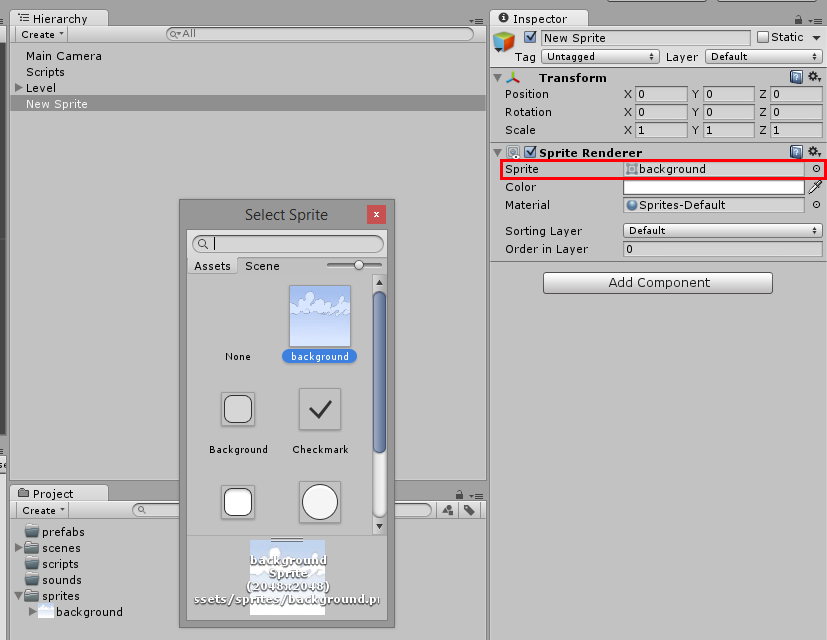
(You have to click on the small round icon at the right of the input box to show the “Select Sprite” inspector)
You can see that some other sprites are there. Those are the default images used by uGUI (the Unity UI system).
“My sprite doesn’t show up in the dialog?”: first, make sure you are in the “Assets” tab of the “Select Sprite” dialog.
Some readers have reported that, in their project, this dialog was empty. The reason is that for some Unity installations, even with a fresh new 2D project, images are imported as “Texture” and not “Sprite”.
To fix this, you need to select the image in the “Project” pane, and in the “Inspector”, change the “Texture Type” property to “Sprite”:
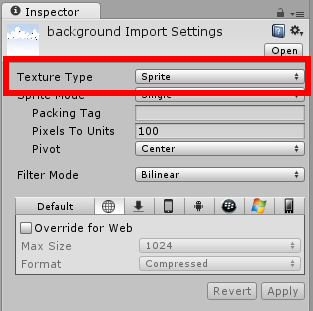
We don’t know why everybody doesn’t seem to have the same behavior.
Well, we have set a simple sprite displaying a cloudy sky background. You can think it was a bit complicated just for that. In fact, we could have dragged the sprite from the “Project” tab directly right into the “Scene”.
Let’s reorganize the scene.
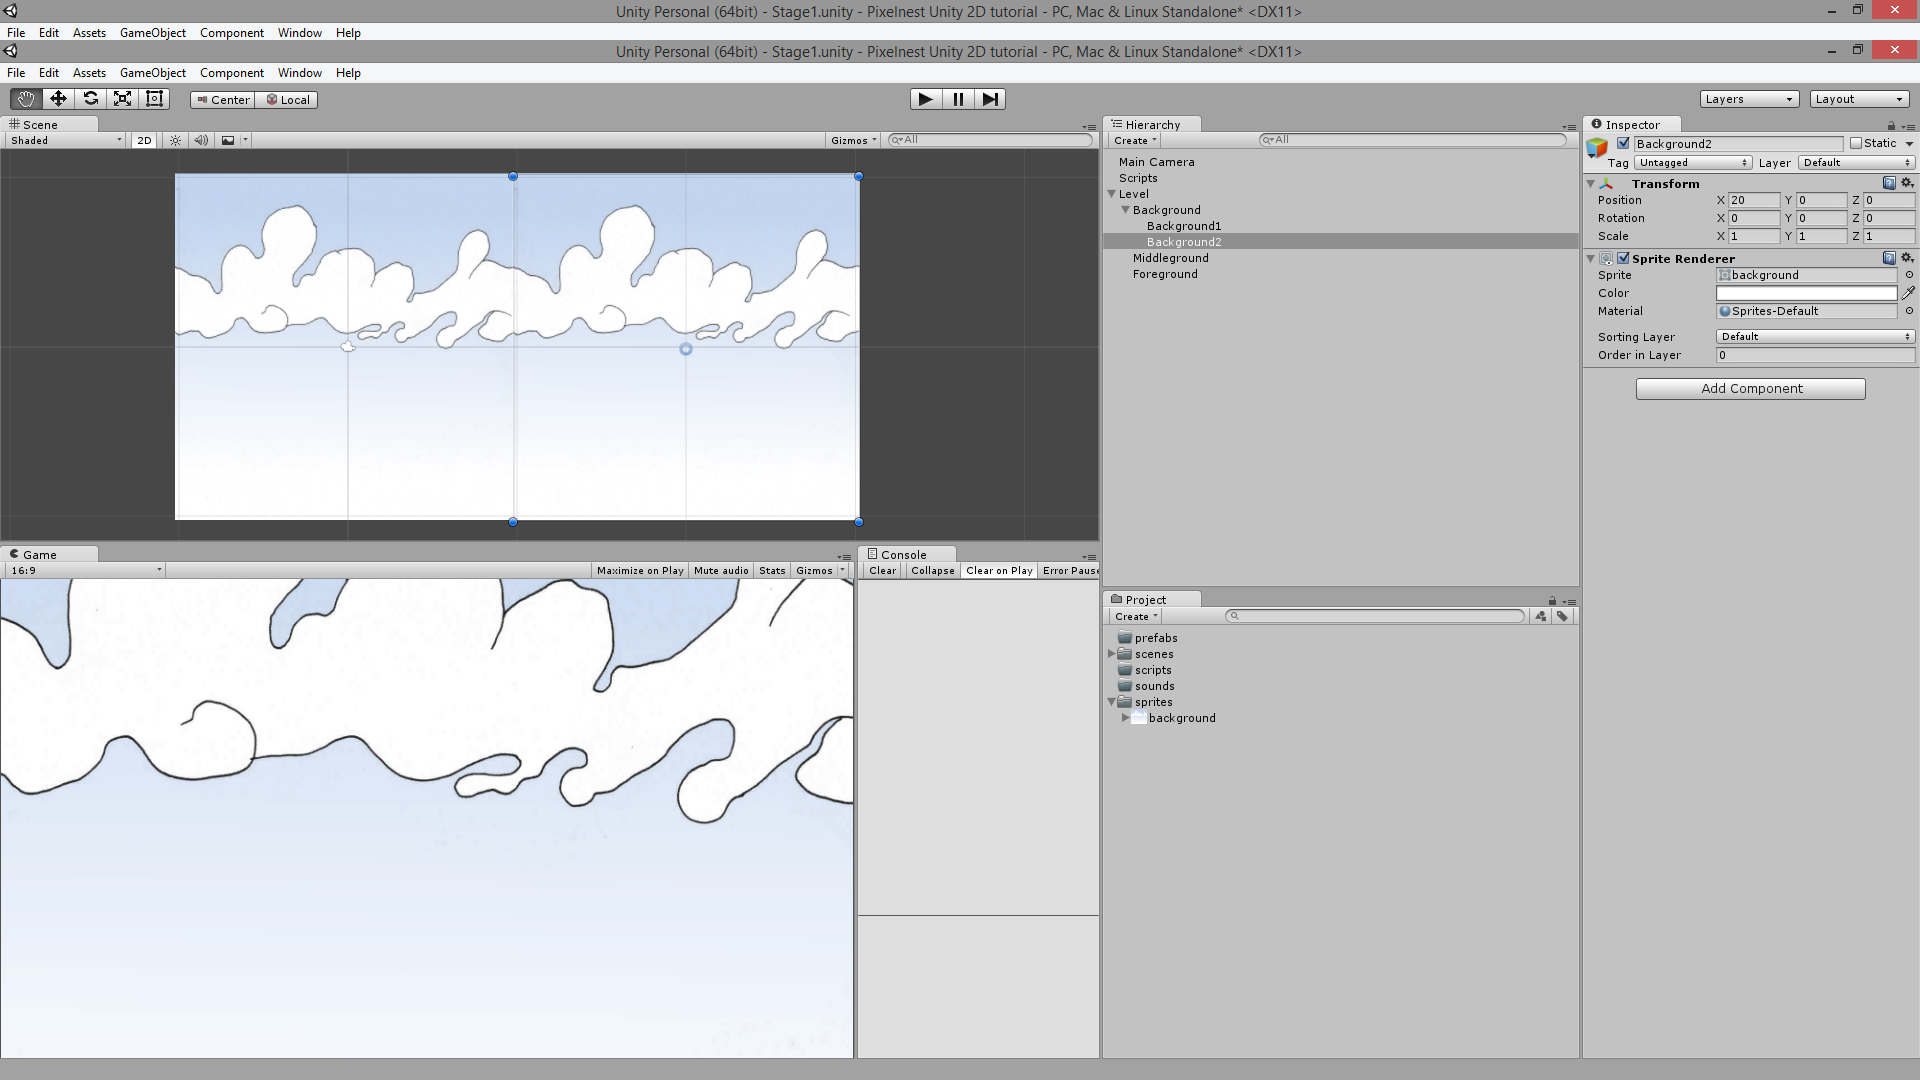
In the “Hierarchy” pane, select the New Sprite . Rename it in Background1 or something you will easily remember.
Then move the object to where it belongs: Level -> Background . Change its position to (0, 0, 0) .
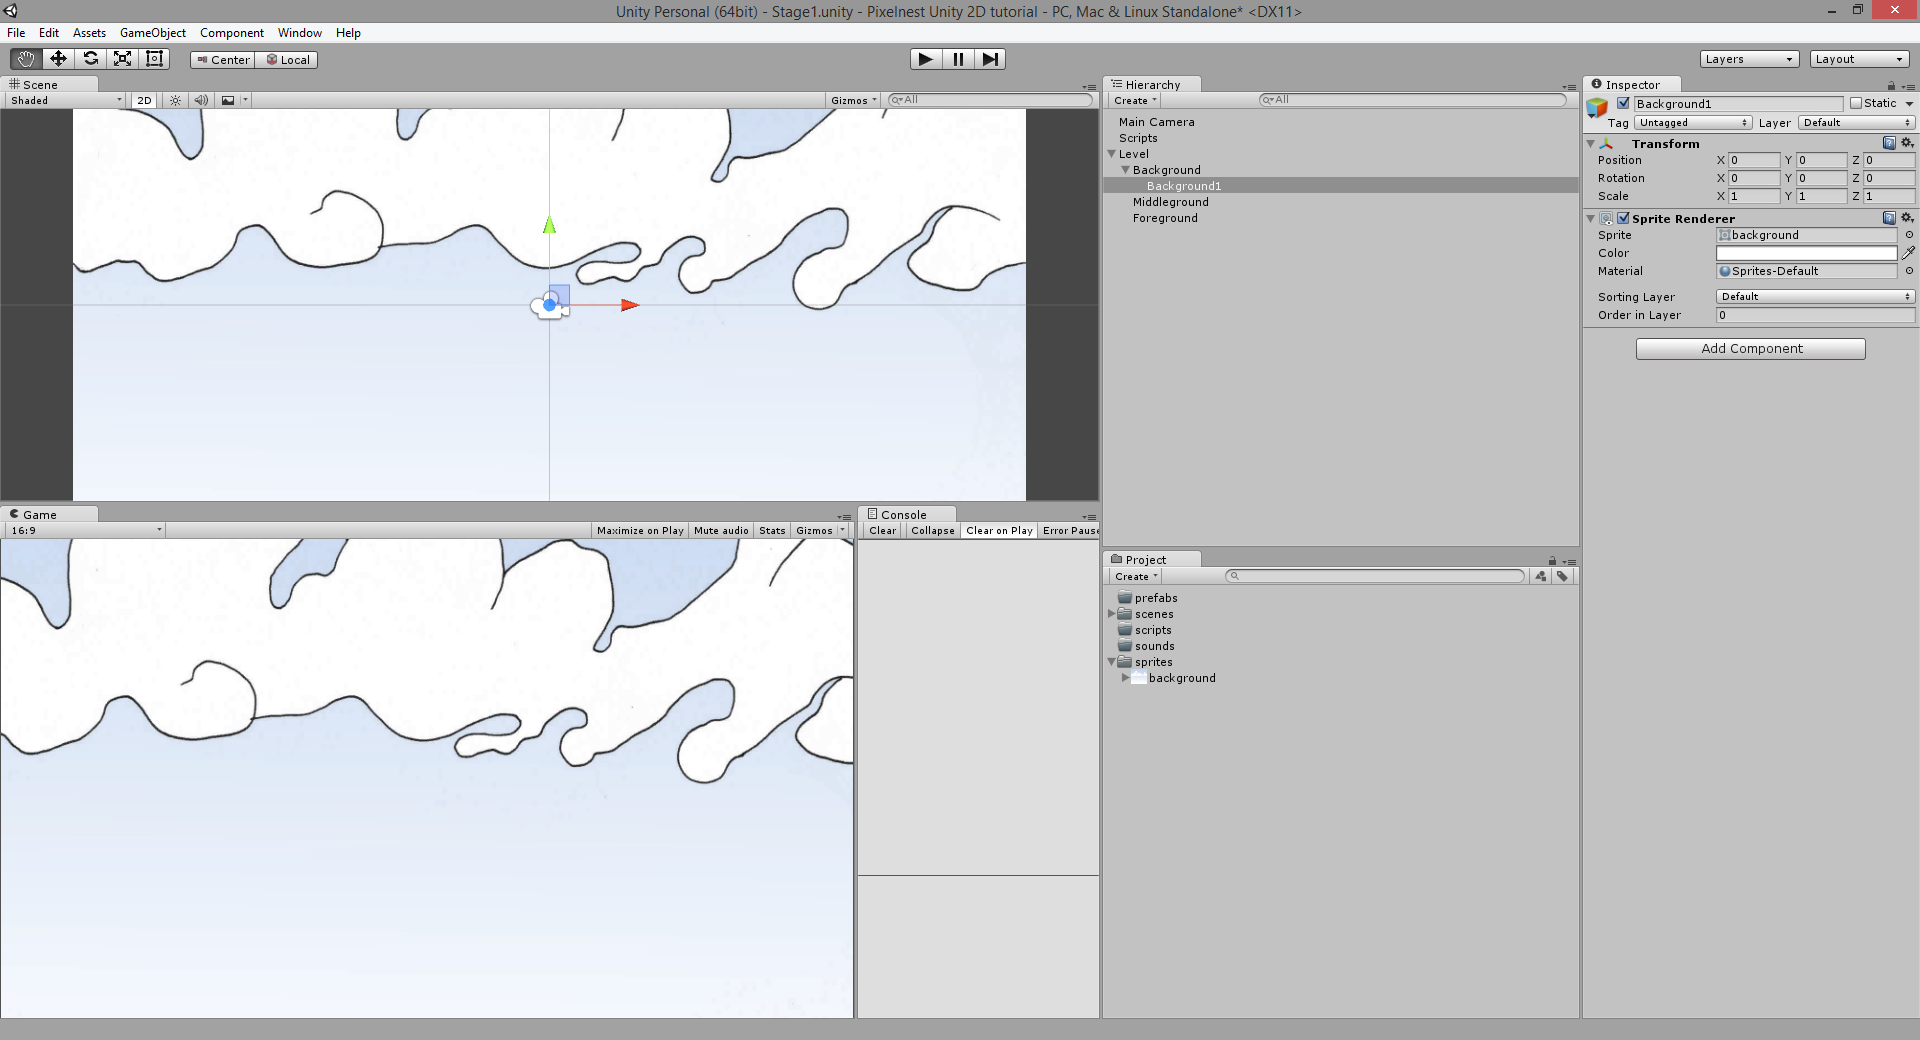
A quick exercise: duplicate the background and place it at (20, 0, 0) . It should fit perfectly with the first part.
Tip: you can duplicate an objet with the cmd + D (OS X) or ctrl + D (Windows) shortcuts.
Sprite layers
The next statement will seem pretty obvious, but it has some consequences: we are displaying a 2D world.
This means that all images are at the same depth, ie. 0 . And you (as well as the graphics engine) don’t really know who’s going to be displayed first.
Sprite layers allow us to tell Unity what is in the front and what is in the back.
In Unity, we can change the “Z” of our elements, and this will allow us to have layers. This is actually what we were doing in this tutorial before the Unity 5 update.
But we thought that it was a good idea to use Sprite Layers.
On your “Sprite Renderer” component, you have a field named… “Sprite Layer”, currently set to Default .
If you click on it, a short list will show:
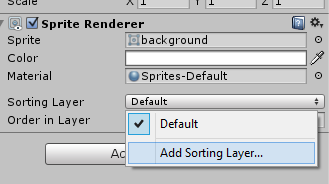
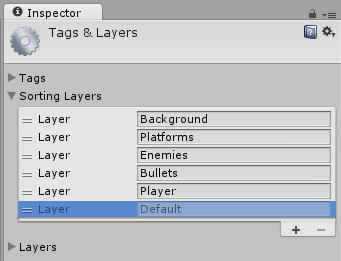
Let’s add some layers to fit our needs (use the “+” button):
Apply the Background layer to our background sprite:
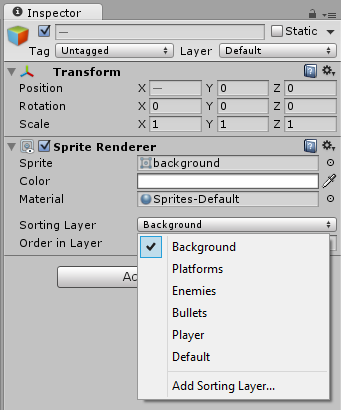
Tip: the settings “Order in Layer” is a way to limit sub-layers. Sprites with lower numbers are rendered before sprites with greater numbers.
Note: the “Default” layer cannot be removed, because this is the layer used by 3D elements. You can have 3D objects in your 2D game. Particles are considered as 3D objects by Unity, so they will be rendered on this layer.
Adding background elements
Also known as props. These elements aren’t used to improve the gameplay but to visually enhance the scene.
Here are some simple flying platform sprites:
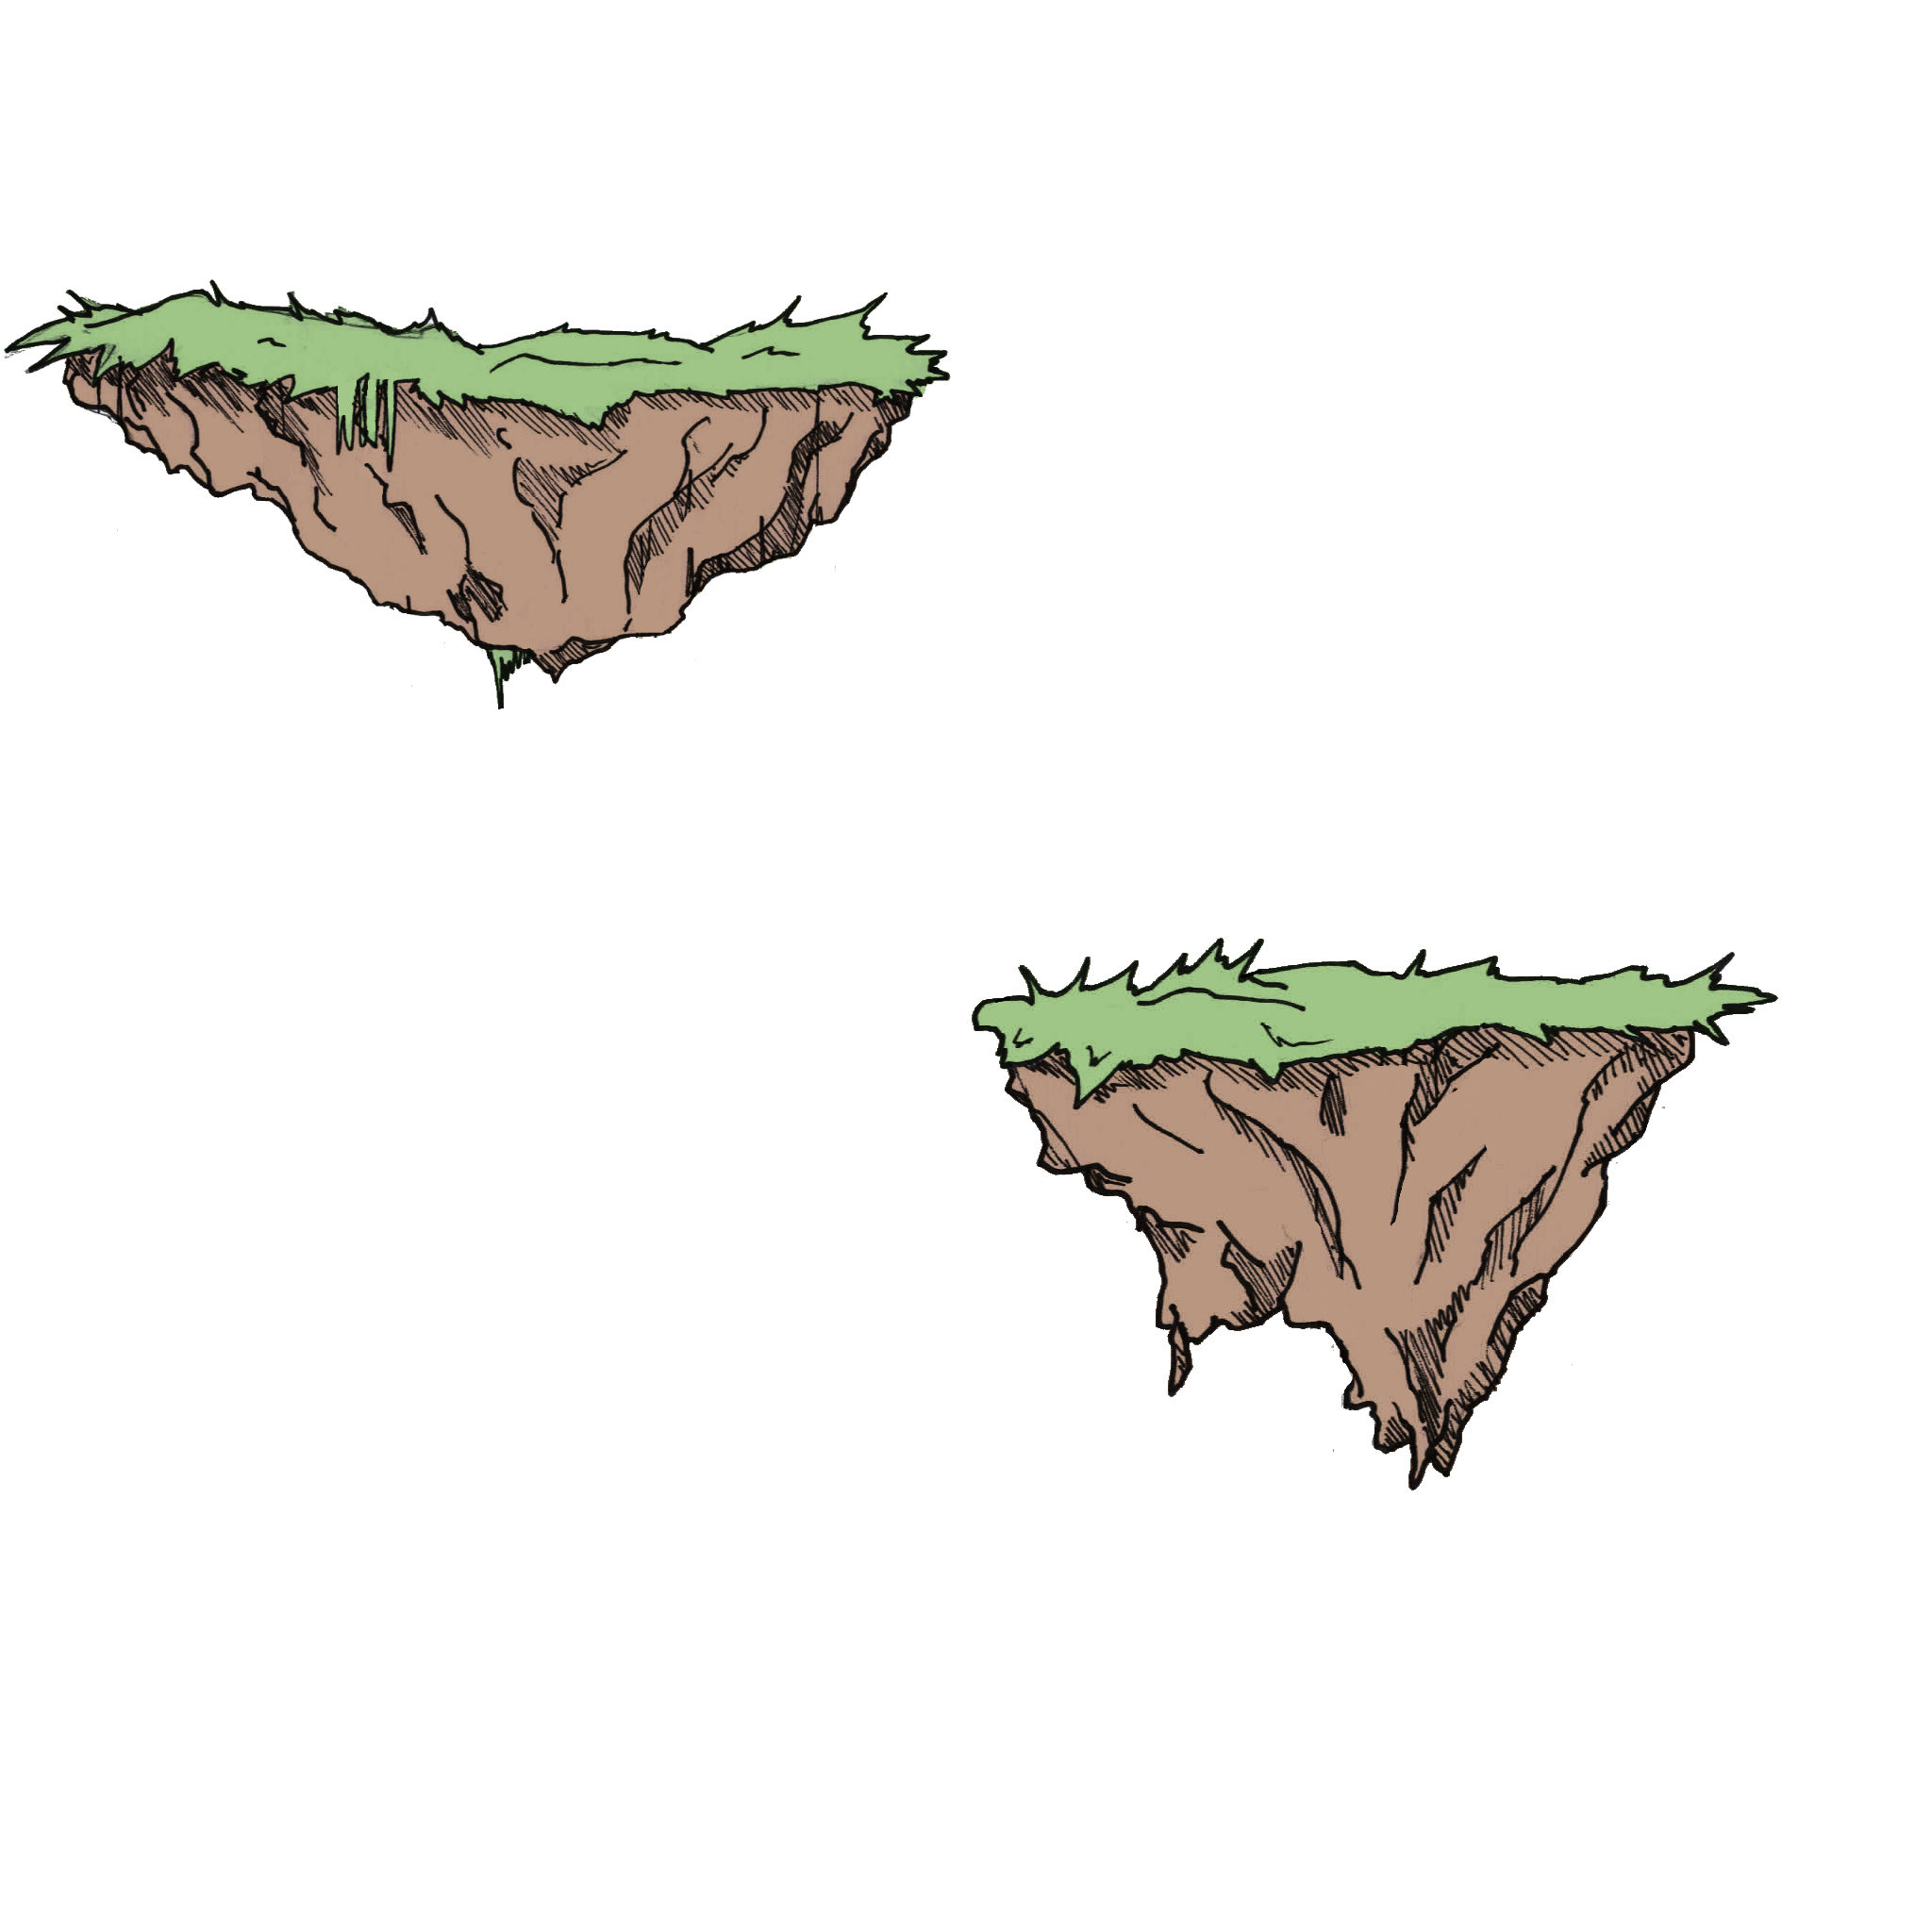
(Right click to save the image)
As you can see, we got two platforms in one file. This is a good way to learn how to crop sprites with the Unity tools.
Getting two sprites from one image
- Import the image in your “sprites” folder
- Select the “platforms” sprite and go to the inspector
- Change “Sprite Mode” to “Multiple”
- Click on “Sprite Editor”
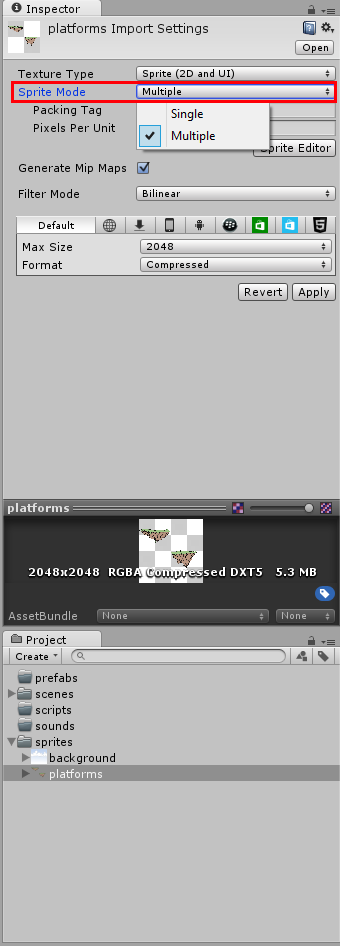
In the new window (“Sprite Editor”), you can draw rectangles around each platform to slice the texture into smaller parts:
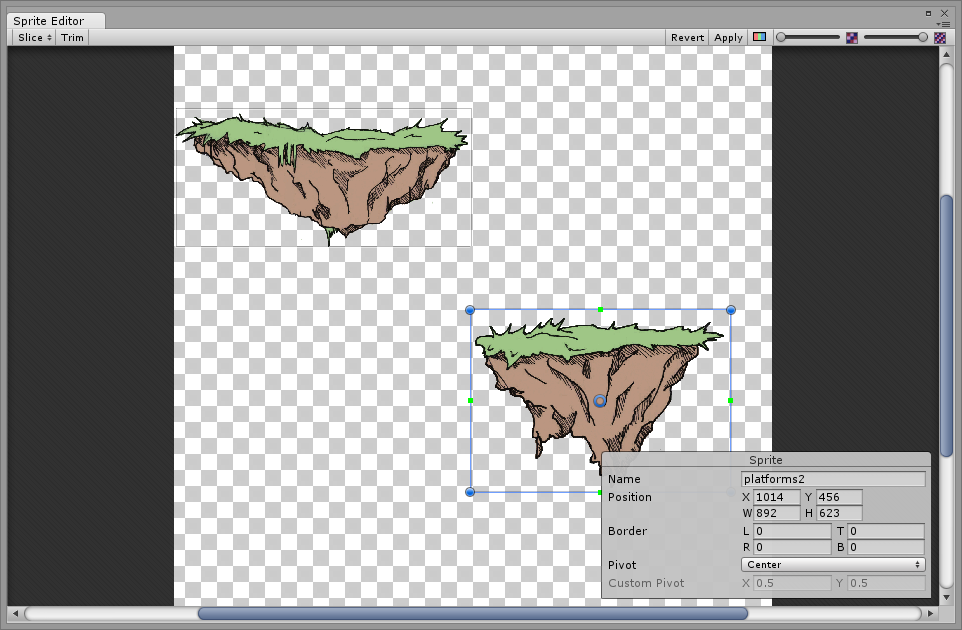
Call the platforms “platform1” and “platform2”.
Tip: the top-left button “Slice” allows you to quickly and automatically make this tedious task.
Unity will find the objects inside the image and will slice them automatically. You can specify the default pivot point, or set a minimum size for a slice. For a simple image without artifacts, it’s really efficient. However, if you use this tool, be careful and check the result to be sure to get what you want.
Now, under the image file, you should see the two sprites separately:
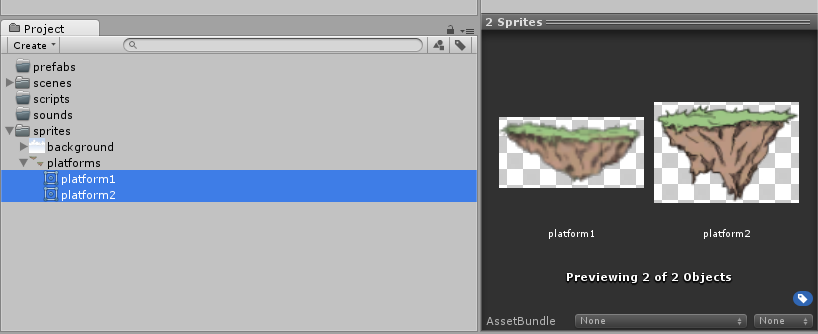
Adding them to the scene
We will proceed like for the background sprite: create a new Sprite and select the “platform1” sprite (or drag them one by one from the “Project” to the “Scene” tab). Repeat for “platform2”.
Set their “Sprite Layer” to “Platforms”.
Place them in the Middleground object.
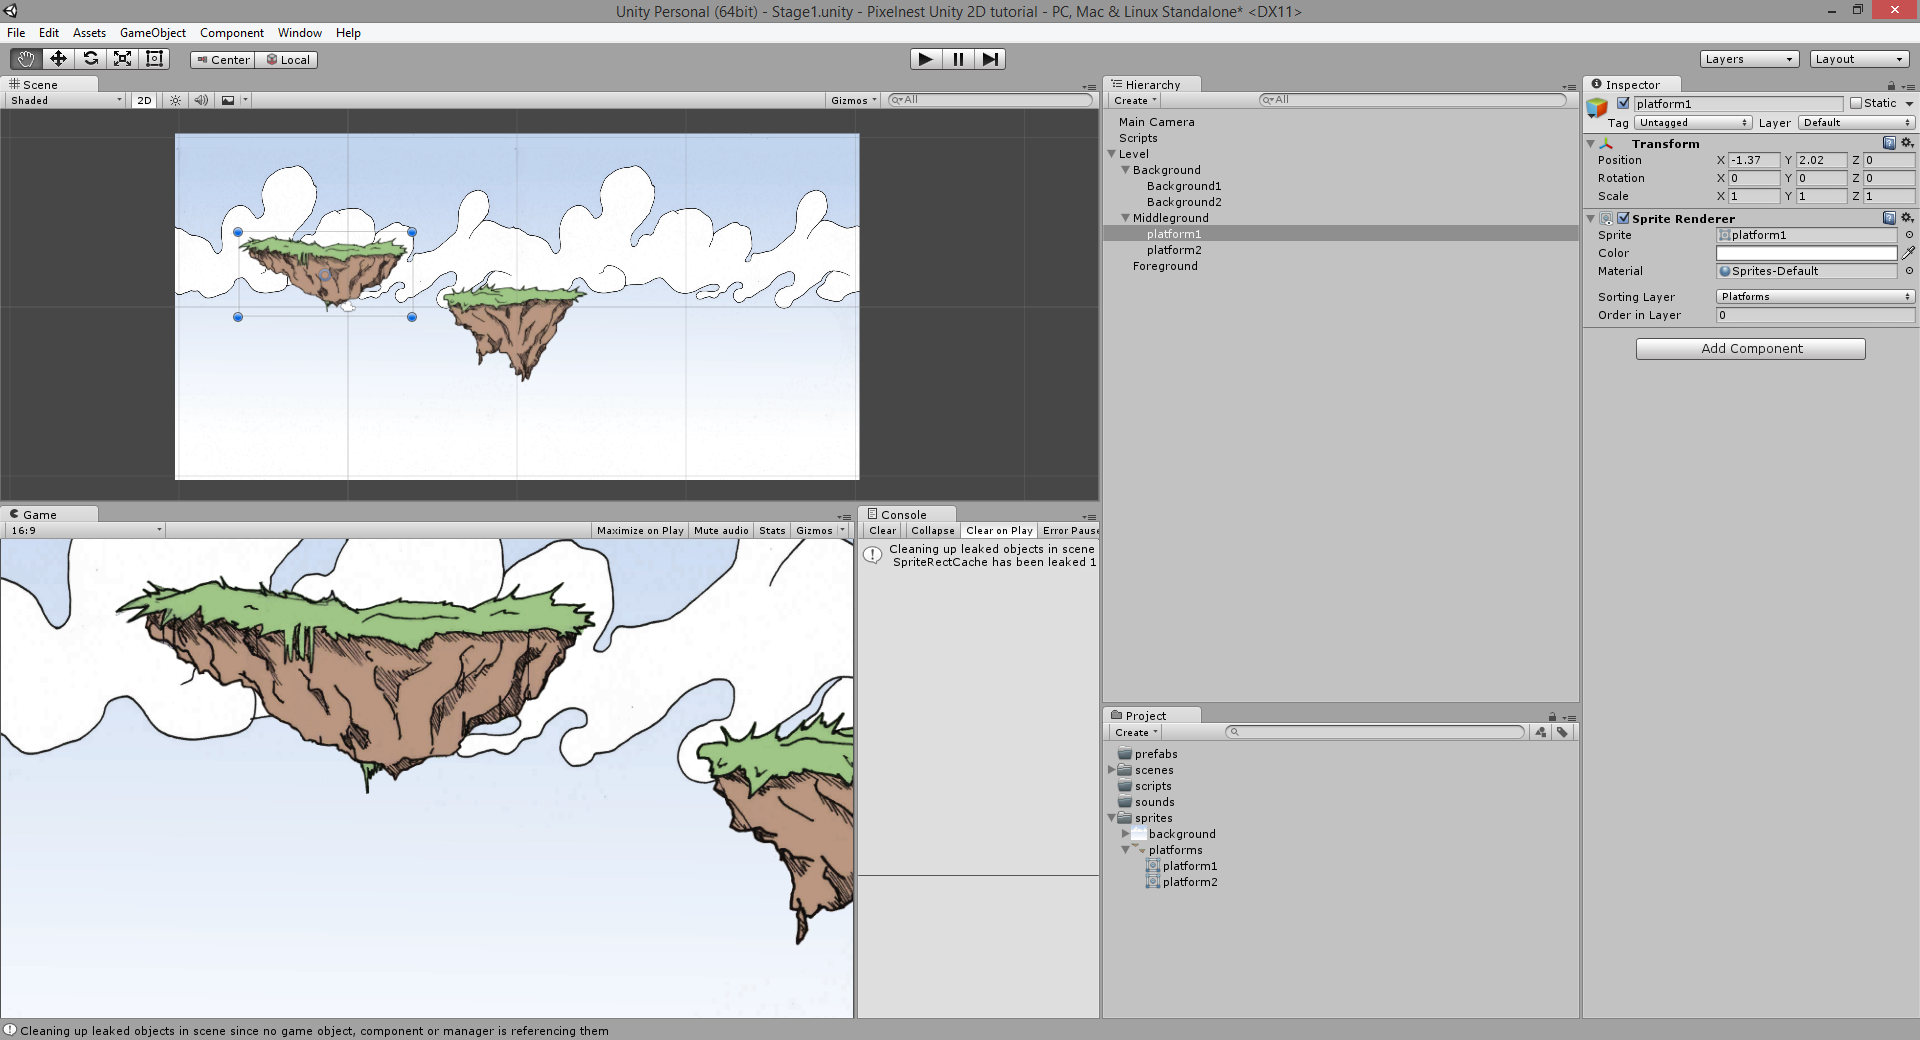
And… it’s working! I’m still amazed how simple it is now (to be honest, it was a bit tricky without the 2D tools, involving quad and image tiling).
Prefabs
Save those platforms as prefabs. Just drag’n’drop them inside the “Prefabs” folder of the “Project” pane from the “Hierarchy”:
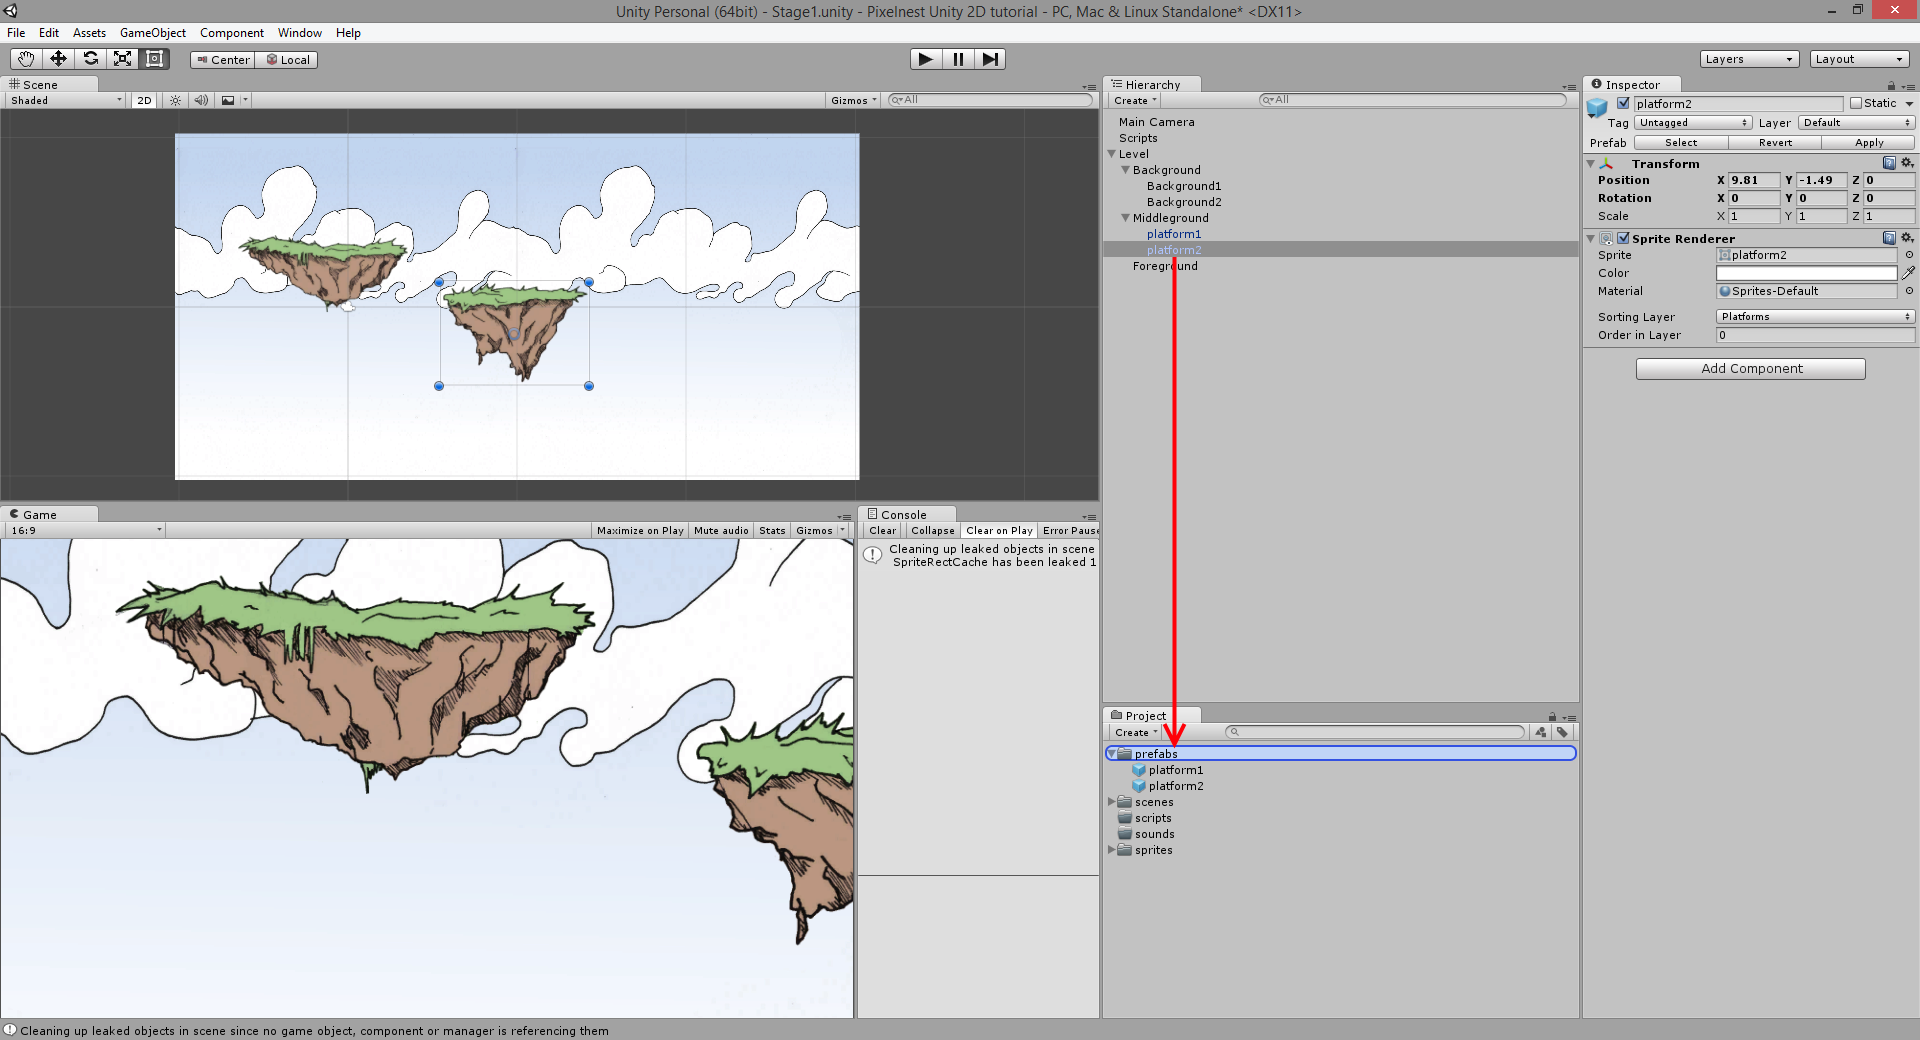
By doing so, you will create a Prefab based exactly on the original game object. You can notice that the game object that you have converted to a Prefab presents a new row of buttons just under its name:
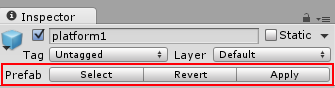
Note on the “Prefab” buttons: if you modify the game object later, you can “Apply” its changes to the Prefab or “Revert” it to the Prefab properties (canceling any change you’ve made on the game object). The “Select” button move your selection directly to the Prefab asset in the “Project” view (it will be highlighted).
Creating prefabs with the platform objects will make them easier to reuse later. Simply drag the Prefab into the scene to add a copy. Try to add another platform that way.
You are now able to add more platforms, change their positions, scales and planes.
You can put some in background or foreground too. Remember that the “Background”, “Middleground” and “Foreground” objects are just folders. So you need to set the right “Sprite Layer” (Platforms) and change the “Order in Layer”.
Use -10 for far platforms, and increase this number as you reach the foreground. An example:
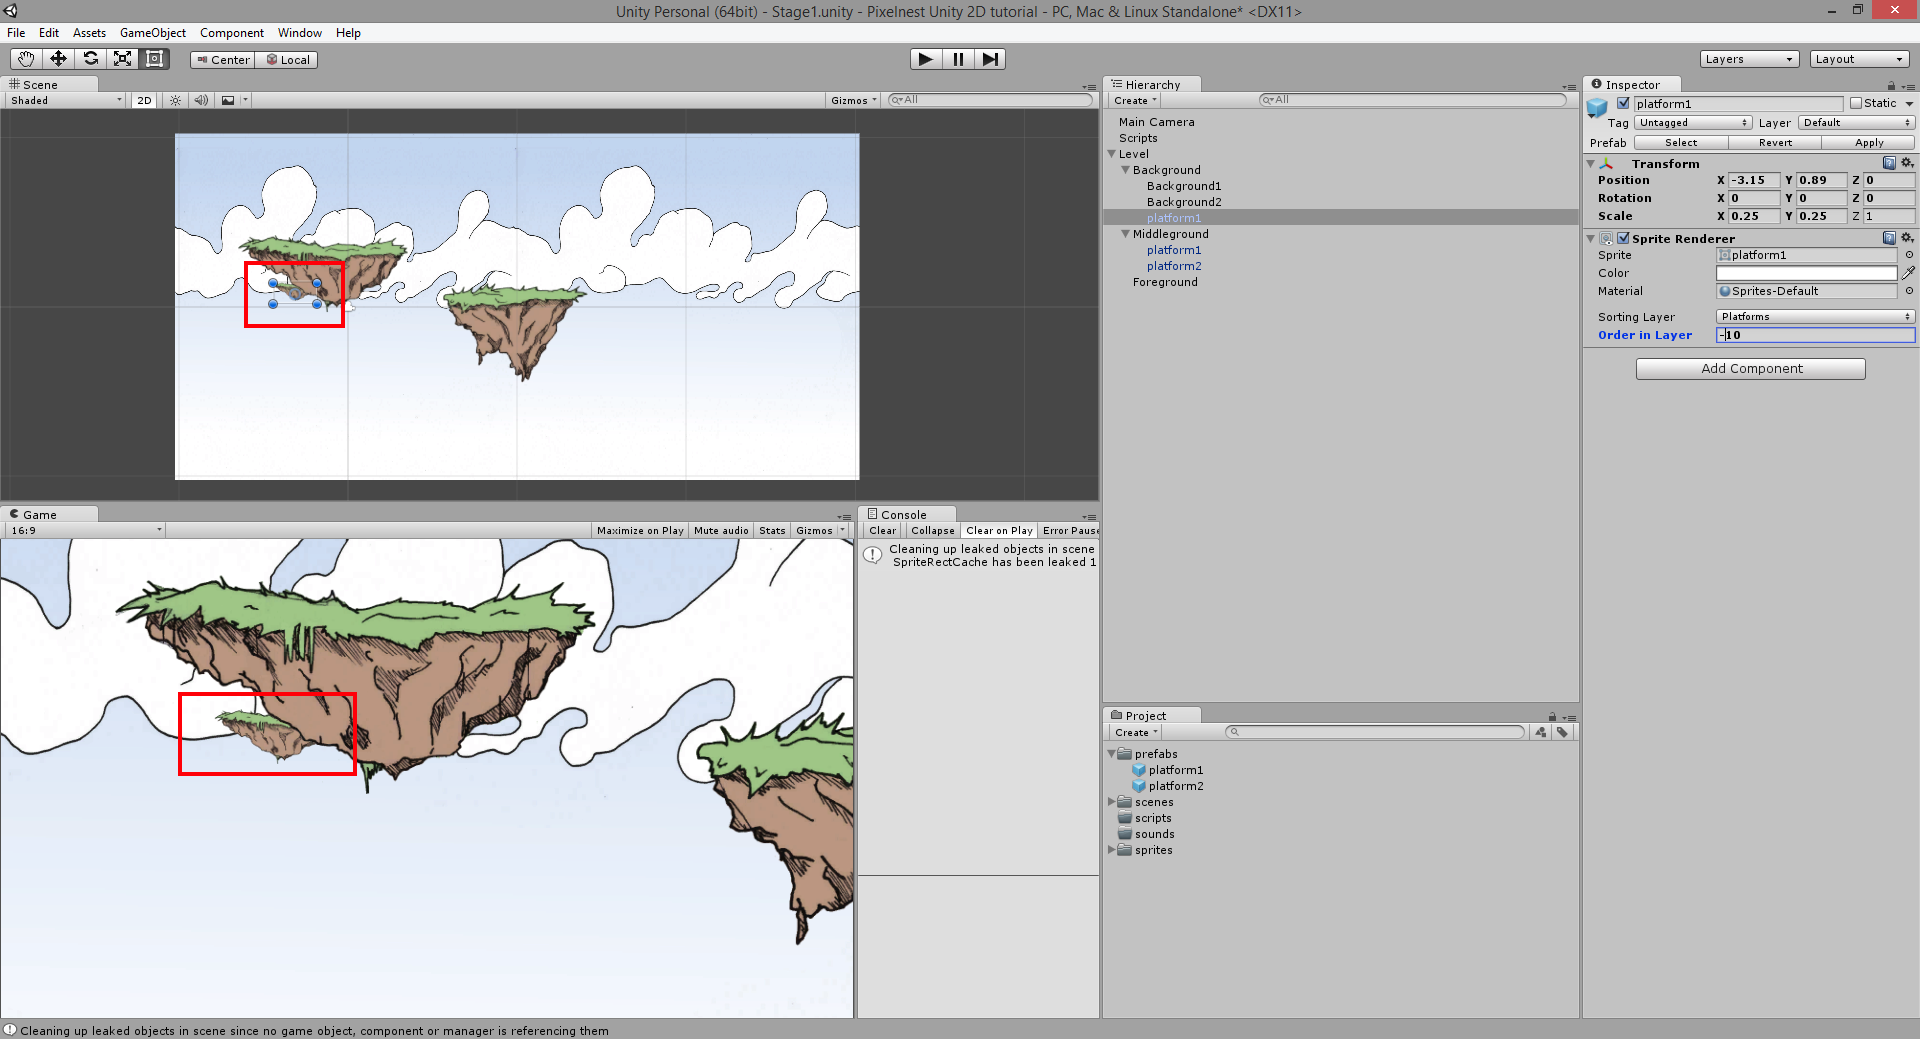
It’s not very fancy but in two chapters we will add a parallax scrolling and it will suddenly bring the scene to life.
Camera and lights
Well. In the previous version of this tutorial (for Unity 4.2), we had a long and detailed explanation on how to set the camera and the lights for a 2D game.
The good news is that it’s completely useless now. You have nothing to do. It just works™.
Aside: if you click on the Main Camera game object, you can see that it has a “Projection” flag set to “Orthographic”. This is the setting that allows the camera to render a 2D game without taking the 3D into account. Keep in mind that even if you are working with 2D objects, Unity is still using its 3D engine to render the scene. The gif above shows this well.
Next step
You have just learned how to create a simple static background and how to display it properly. Then, we have taught you how to make simple sprites from an image.
In the next chapter, we will learn how to add a player and its enemies.
© 2016 Pixelnest Studio — we craft games and apps
How to Add a Background Image to the UI Canvas of Your Unity Game
Lucy's been with GameDev.tv since the beginning & like Batman she's remained in the shadows — until now. If you have a problem, if no one else can help & if you can find her, wait — that's not Batman!
Lucy Becker

In my last article, I promised that I would cover inserting a background image. Start your game engines! Let’s go!
In the Complete Unity Developer course lecture “Adding 2D User Interface Text”, our instructor, Ben Tristem, shows us how to add a background image to the UI (User Interface). Let’s learn how to do this, step by step.
Create the Background Image Element
1). Click on the Game Object Menu, which is located at the top of Unity’s interface.
2). Scroll over UI.
3). Click on the Image option, in the side menu that slides out. (Please refer to picture below).

Linking Your Image to Source Image & Re-sizing the Image
A thumbnail (small picture of your image) will appear in the Assets section of the Project Tab, at the bottom of your Unity interface. A white blank box will also appear in the canvas, which is in the middle of your screen. We want the image to take the place of that white blank box, and for that to happen we must do the following steps:
1). Go to the Project Tab, which is located on the Bottom-Left. Make sure you have selected Assets, which is located on the Left-Hand side in the Project Tab’s directory. Click on the thumbnail of your image, in the Assets area, and drag it to the blank box next to the word Source Image, which is located on the Bottom-Right of your screen in the Inspector Tab. Please refer to picture below.

Some of these steps will spoil an instructor challenge! Don’t read on, unless you really want to.
2). We need to resize the image, so that it fits inside of the borders of the Canvas. In order to do this, we need to see the border of the Canvas. To make the border visible, click on the Layers Drop-Down Box, which is located at the Top-Right of the screen. Next, select the Everything option. This will highlight the Canvas and give it a solid white border. Please see picture below.

3). Select Image, which is located in the list in the Hierarchy Tab, on the Left. Please see picture below.
4). Click on the Move Tool, which is located on the Top-Left. Please see picture below.
5). Click on the center of the Image box, and drag it till it snaps to the center of the Canvas. When it snaps you will see a thin white line appear in the center of the Canvas.
6). You will see the Blue Re-Sizing Handles, which are on the four corners of the Image box (Please see picture below). Click on them, one at a time, and drag them to resize the image.You need the word Prison to fill the upper third of the canvas. My image is a little too big, so please don’t use it as an example.


In my next blog, I will show you how to add a background image file to the Assets area of the Project Tab. I have enjoyed showing you how to add a background image to your game, resize it, and make sure it is displaying properly. There is so much more to learn from theComplete Unity Developer! If you want to learn more, this course is a must have!
Until next time, happy programming to all! Have an awesome day!
A little about the author:
Subscribe to GameDev.tv Blog — Learning to Code through Video Game Development
Get the latest posts delivered right to your inbox

How to Call C++ Functions from Blueprint in Unreal
Blueprint is a wonderful tool, letting you visually assemble code. However there is a point at which its beauty turns into spaghetti, and you’re better-off coding the behaviour in
Resources for Learning Unity and Game Design
Learning how to learn something as complex as the Game Engine Unity can be quite overwhelming. I personally wanted to learn Unity for a year before I actually was able to. I’m still continuing to learn about it to this day. The following
Subscribe to GameDev.tv Blog — Learning to Code through Video Game Development
Stay up to date! Get all the latest & greatest posts delivered straight to your inbox