Adding Premade Components and Dynamic Components
SketchUp components enable you to reuse objects. For example, pretty much every building has at least one door and window. Instead of modeling these common objects, you can insert a component that someone else has already made.
Like all geometry in SketchUp, a component is still made of edges and faces. The edges and faces are simply part of a special component group. (You can also create components to reuse your own geometry, but that’s covered in Developing Components and Dynamic Components.)
Table of Contents
Getting started with components
Before you start inserting components, you need to know that every component has a definition and an instance:
- A component definition provides a blueprint for how all components of a specific type appear and behave in the drawing area.
- When you insert a component into a model, you create a component instance, which is based on its definition.
So, say you want to use a premade component called Framed Half Door with Double Panel. The component definition outlines what that door looks like, and you can insert as many instances of that component into your model as you like. In the following model, you see two instances of Framed Half Door with Double Panel. Inserting components, later in this article, explains how insert one or more component instances.
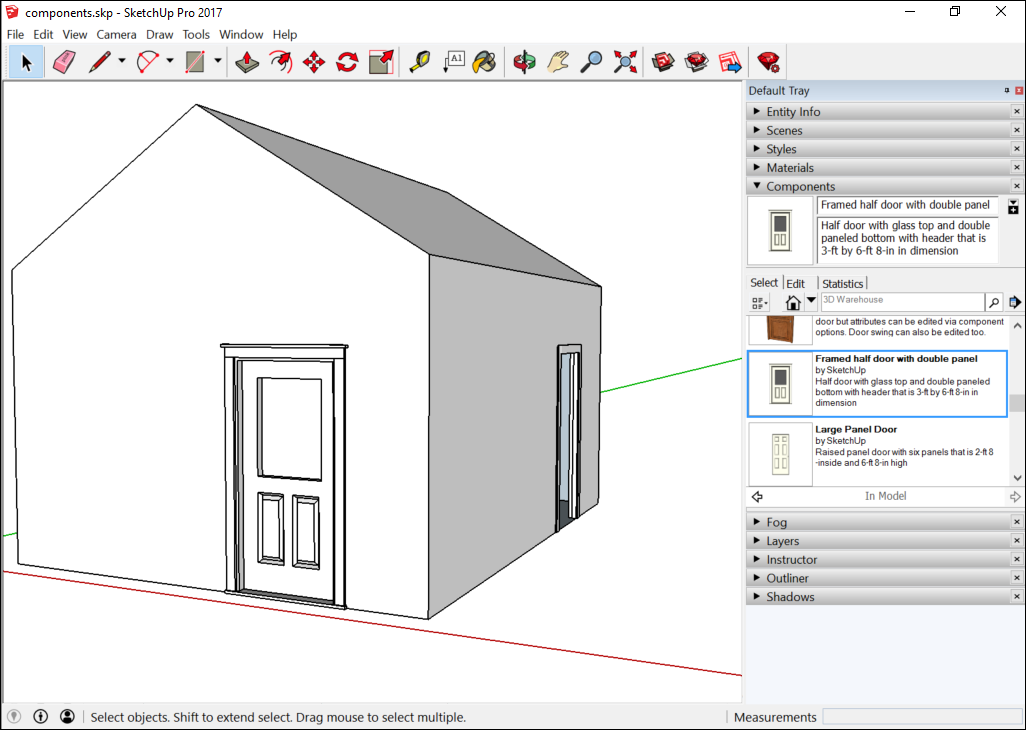
You can also replace all component instances with another component. If you (or a client) decide you don’t like the Framed Half Door with Double Panel, you can easily swap that component with a different one. See Replacing components, later in this article, for details.
Dynamic components have even more capabilities than regular components. If a component is dynamic, it has at least one of the following elements:
- Constrained values: For example, a dynamic cabinet door component might have a frame that’s constrained to 3 inches. Whether the panel inside the frame is 12 x 24 inches or 24 x 48 inches or some other dimension, the frame remains 3 inches wide all the way around the door, as shown in the following figure.
- Repetitive elements: A dynamic component can have subcomponents that repeat as you scale the component. For example, a repetitive dynamic component might add steps to a staircase, cushions to couch, pickets to a fence, studs to construction framing, and so on.
- Configurable values: A dynamic component can have a predefined set of values that you can configure, such as a couch’s length or the picket spacing in a fence component.
- Animated features: An animated dynamic component moves when you click it with the Interact tool (
 ). With animated dynamic components, your model can have doors and windows that open. Interacting with components, later in this article, explains how to open and close animated components.
You can find a few sample components in SketchUp’s Components panel, but components’ true home is the 3D Warehouse, an online tool for searching and downloading 3D models created in SketchUp. This article helps you navigate the Components panel and start searching for components in the 3D Warehouse via tools available in SketchUp.
After you become comfortable inserting and editing components, you might develop a special fondness for components that you find in the 3D Warehouse or create yourself. To keep your favorite components handy and organized, you can create collections in the Components panel.
In the following video, you see a brief introduction to components, how components are different from groups, and ways you can edit components. Although this video was created on an older version of SketchUp, the basic component behavior and features are the same in current SketchUp versions. In the sections that follow, you find detailed steps that walk you through the basics of inserting and working with components and dynamic components.
Inserting components
You can insert a component instance into your model in three ways:
- Select or download a component via the Components panel.
- Import a SketchUp file (with the .skp file extension).
- Drag a SketchUp file from File Explorer (Microsoft Windows) or the Finder (Mac OS X) into your model.
Premade components are most often inserted from the Components panel into a model. Follow these steps:
- By default, the Components panel opens to the Components Sampler collection, as shown in the figure.
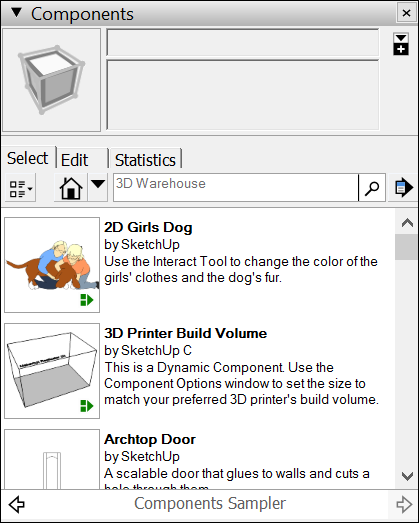
- You can select one of the sample components and proceed to the next step. However, the sampler’s selection is limited compared to the vast selection in the 3D Warehouse. To try the 3D Warehouse, type a search term in the 3D Warehouse search box. (Searching for components, later in this article, explains other ways to search the 3D Warehouse.) To browse collections, click the down arrow next to the In Model icon (
 ) and select a collection. (See Organizing component collections for details about the existing collections and how to create your own.) After you select or download a component, SketchUp loads the component onto the Move cursor.
 - Click in the drawing area to place the component in your model.
Tip: If you have trouble seeing the components in the Components panel, try changing your view options. Click the View Options button ( ) and choose from Small Thumbnails, Large Thumbnails, Details, or List.
If you have a SketchUp model saved to your hard drive, you can import that model as a component in another model. Follow these steps:
- Open the model into which you want to import a SketchUp file.
- Select File > Import.
- In the Open dialog box that appears, navigate to the SketchUp file. If you don’t see your file, in the Files of Type drop-down list, select SketchUp Files (.skp).
- Select the SketchUp file, and click Open. SketchUp loads the component onto the Move cursor.
- Click in the drawing area to place the component in your model.
Dragging a SketchUp file from the File Explorer (Microsoft Windows) or the Finder (Mac OS X) into an open model also loads the SketchUp file onto the Move cursor. Simply click to place the component in your model.
Replacing components
People like to see different options, and they change their minds all the time. When indecision strikes or your design just hasn’t become clear to you yet, know that you can easily replace one component with another component. Here’s how the process works:
- Add the new component to your model. If you don’t have anywhere to put it, just place it in an empty area in your model by following the steps in the preceding section. Placing the component somewhere in your model ensures that the component appears in your In Model collection. (Even if you then delete the component for now, the component remains in your In Model collection until you purge unused components.)
- In the Components panel, click the In Model icon () to see your In Model collection.
- Select the component or components that you want to replace.
PRO To swap out a series of dynamic components in SketchUp Pro, follow these steps:
- Select the dynamic components you want to replace. The components are highlighted in the drawing window.
- Context-click one component, and select Dynamic Components > Swap Component. The Select a SKP dialog box is displayed.
- Select the SketchUp file containing the dynamic component that will replace the currently selected components.
- Click the Open button. The new dynamic component replaces the previously selected dynamic components.
Interacting with dynamic components
Your ability to interact with a dynamic component depends on its variables. In the following figure, you see a basic building with two instances of a dynamic door component.
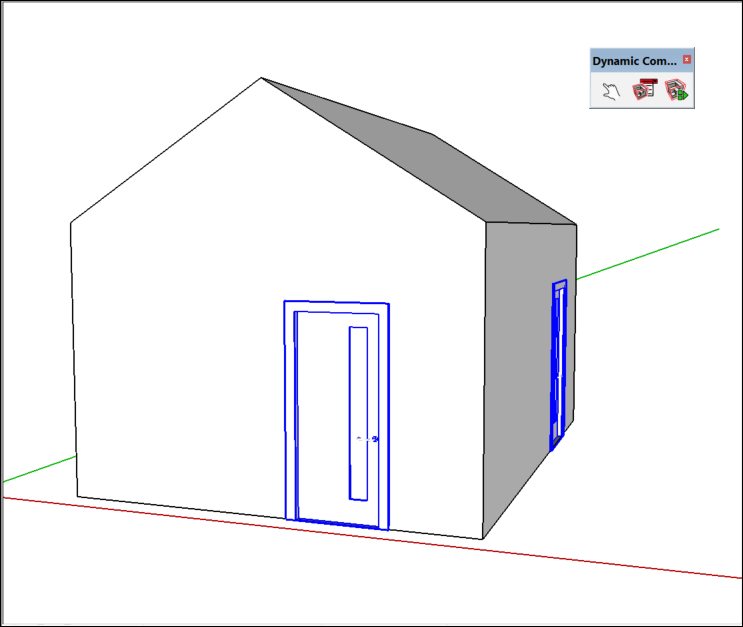
To activate the component’s animation, select the Interact tool () on the Dynamic Components toolbar or select Tools > Interact. When you click the door with the Interact tool cursor, the door opens, as shown in the following figure.

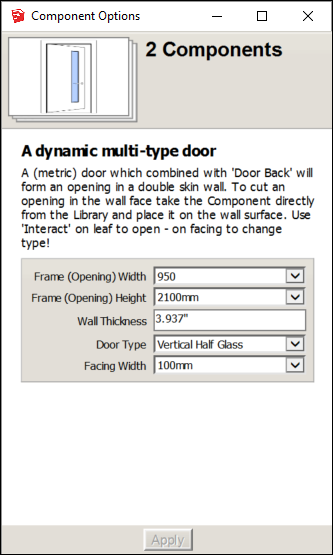
This dynamic component also has configurable values. To see these values, click the Component Options tool ( ) on the Dynamic Components toolbar or select Window > Component Options. In the Component Options window, shown in the following figure, you can choose from preset options for the frame width, frame height, door type, and more.
Searching for components
You can search for components in the Components panel or the 3D Warehouse.
In the Components panel, on the Select tab, you can use the following features to browse or search for components:
- In Model icon: Click the In Model icon (), and you see the In Model collection, which shows all the components currently saved with your model. Note that a component doesn’t have to actually appear in your model to be saved with it.
- In Model drown-down menu: Click the down arrow next to the In Model icon, and from the list that appears, you can select premade collections such as Architecture, Landscape, People, and Transportation. This menu may also show collections you’ve created, collections you’ve designated as a favorite, or collections you’ve visited recently. (Organizing component collections, later in this article, explains how to create and manage collections.)
To access the 3D Warehouse directly from SketchUp, click the Get Models tool ( ), which you find in the following parts of SketchUp’s interface:
- Getting Started toolbar
- Warehouse toolbar
You can also select File > 3D Warehouse > Get Models.
Whichever method you use, the 3D Warehouse opens, as shown in the following figure. From the opening screen, you can browse the featured models, featured manufacturer catalogs, featured collections, and recent models. However, you most likely want to use the Search box at the top. Type a search term and click the Search button.
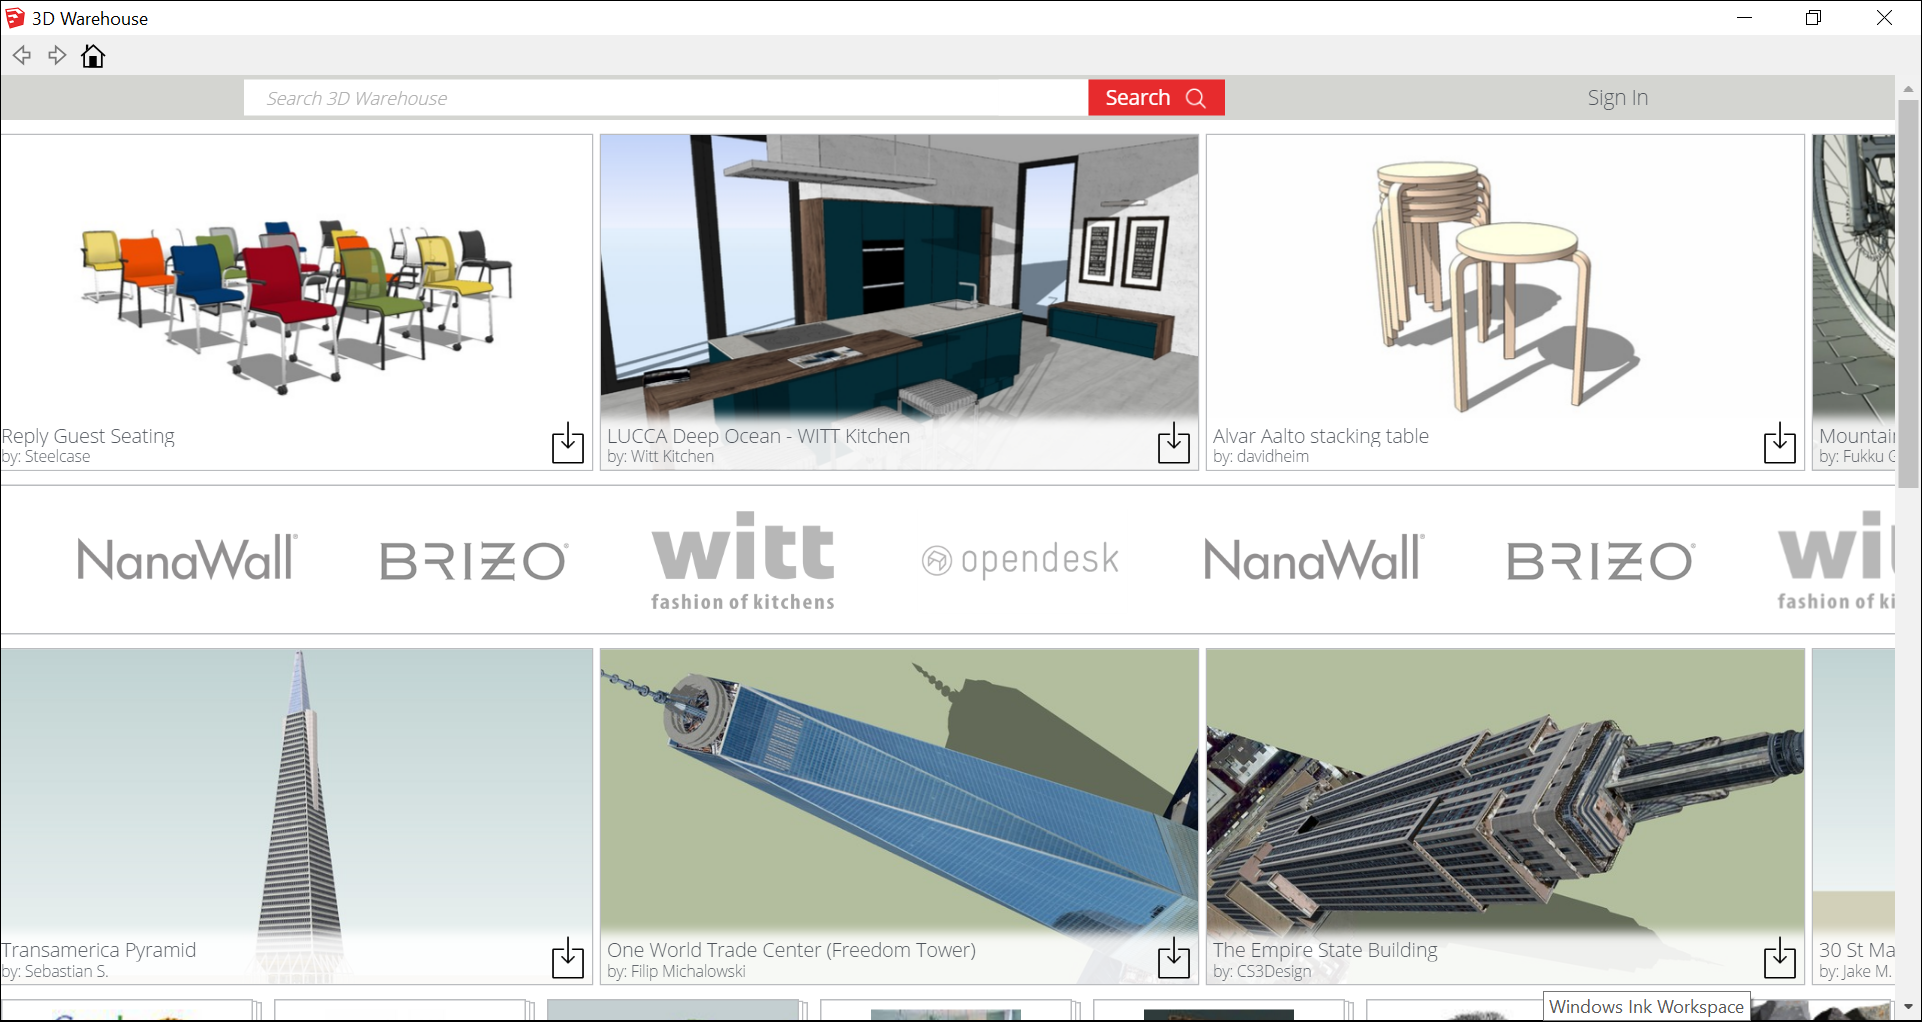
When you find a result that interests you, click it to open its details page. Click the Download button in the upper right to download the component into your model. You then return to SketchUp, where the Move cursor is loaded with the component. Click in the drawing area to place the component in your model.
Adjusting a component’s insertion point
A component has its own axis origin point, which determines the component’s insertion point, or the point that’s loaded onto the Move cursor when you place a component in your model.
If the component is box-shaped (such as a dresser, cabinet, or the Mesopotamian Tablet of Destinies), the insertion point is typically the front, lower-left corner, as shown in the figure. That placement works great — unless you need to place the component against other components or otherwise work around existing geometry.
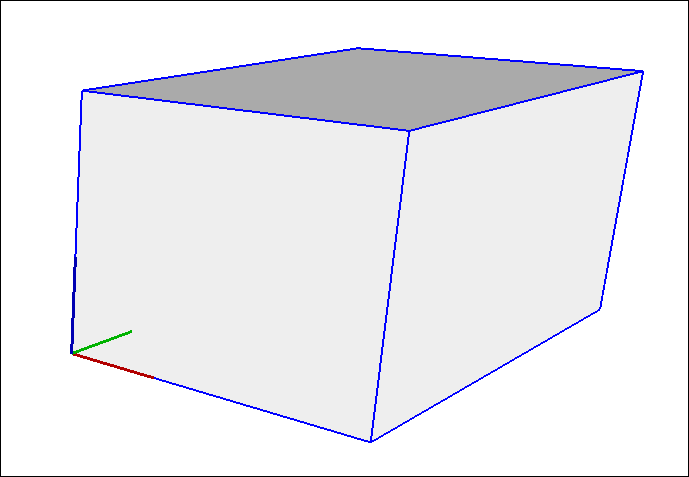
Whatever your reasons for moving the insertion point, here’s how to reset a component’s axis origin:
- Select the component in your model.
- Context-click the component and select Change Axes.
- With the Axes tool cursor that appears, reset the axis origin. See Adjusting the Drawing Axes for details about working with the Axes tool. The only difference is that you’re setting the axis origin for a component, not the whole model.
Tip: After you place a component in your model, you can move the component by any point you like. Simply select the Move tool ( ), click the point you want to use for moving the component, and click again to place the component. For example, after placing a cabinet component in your model, you might need to move the cabinet by its midpoint so you can slide the cabinet next to existing cabinets. See Moving Entities Around for more about moving entities with the Move tool.
Editing components
You can edit a component as a whole or edit individual entities within a component.
Editing or modifying a component instance as a whole affects only the component instance, not the component definition or other instances. Here are some of the edits you can make to a component as a whole:
- Scale: Scaling a component as a whole scales the individual component instance, not the component definition, allowing you to have differently scaled instances of the same component in your model. A component can become skewed when you scale the component in multiple directions. You can reset a component’s scale and skew by context-clicking the component and selecting Reset Scale or Reset Skew. To scale a component, use the Scale tool(
 ), as explained in the article, Scaling Your Model or Parts of Your Model.
 - Flip: You can flip (or mirror) a component along an axis. Context-click the component, select Flip Along, and select an axis (Component’s Red, Component’s Green, or Component’s Blue).
- Rotate: You can rotate a component with the Rotate tool (
 ) or the Move tool (). When you use the Rotate tool, you have more control over the rotate plane and center of rotation.
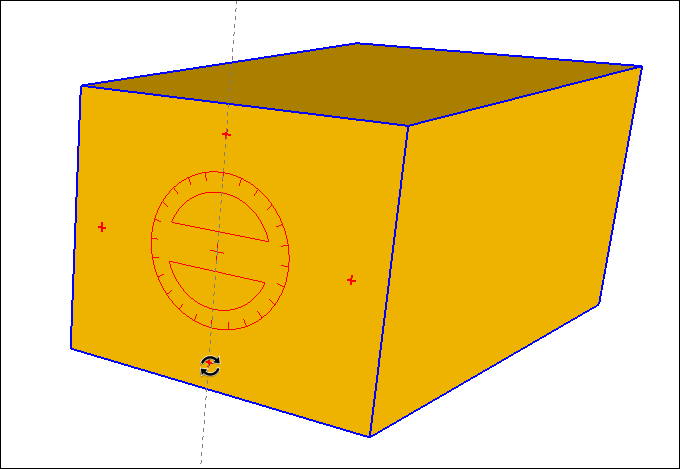
Flipping and Rotating explains how to flip and rotate geometry. To rotate a component with the Move tool, hover the Move tool over a face that’s perpendicular to the desired axis of rotation until four rotation handles and a protractor appear on the face, as shown in the following figure. Then click a rotation handle and rotate the component.
Editing entities within a component changes the component definition, and thus changes all other component instances in your model. To learn about the more advanced techniques involved in editing a component definition, see Editing a Component in the Developing Components and Dynamic Components section.
You can also save edits to your component, revert an edited component to the original file, or explode the component:
- To save an edited component as a separate file with a new name, select the component, context-click it, and select Save As from the menu that appears. Navigate to where you want to save the .skp file, type a new name, and click Save.
- To reload a component from its original file, which overrides any edits, context-click the component and select Reload.
- To break a component back into its entities, select your component and then select Edit > Component Instance > Explode from the menu bar. Or context-click the component and select Explode from the menu that appears. Your component is no longer a component with a special force field. It returns to plain old geometry, kind of like a captain returning to civilian life.
Organizing component collections
In SketchUp’s Components panel, collections help you organize components.
The In Model collection is a special collection that’s an important part of the Components panel. It holds all the components saved with your model, whether or not those components currently appear in your model. When you context-click a component in this collection, you see commands not available in other collections, such as Select Instances, Reload, and more. To see your In Model collection, click the In Model icon (). If you’ve inserted several components that you no longer need to save with your model, click the Details arrow ( ) and select Purge Unused.
SketchUp includes a few prebuilt collections, such as Architecture, Landscape, Construction, and so on. You find these collections by clicking the down arrow next to the In Model icon, as shown in the following figure.

The following steps explain how to create a component collection for your selected operating system (Microsoft Windows or Mac OS X):
Windows
- Open the Components panel in the Default Tray.
- Click the Details arrow () and select Open or Create a Local Collection.
- In the Select Folder dialog box that appears, navigate to the folder where you want to save your collection. To create a subfolder for the collection, click the New Folder button and create the folder.
- Select the folder where you want to save the components collection and click Select Folder. You see a blank collection on the Components panel’s Select tab. If the blank folder doesn’t appear, click the In Model drop-down arrow and select the collection that matches your folder from the menu.
- Click the Display Secondary Selection Pane icon (
 ).
). - In the secondary selection pane, navigate to a component that you want to add to your collection and drag it into the blank collection. In the following figure, the Galaxy Class Starship component in the In Model collection (bottom) was added to the newly created Components collection (top).
- Continue navigating to components in the secondary selection pane and adding them to your new collection until your collection is complete.
MacOS
- Open the Components dialog box in the Default Tray to open the Components panel.
- Click the Details arrow () and select Create a New Collection.
- In the Save dialog box that appears, navigate to the folder where you want to save your collection. To create a subfolder for the collection, click the New Folder button and create the folder.
- Select the folder where you want to save the components collection and click Save. You see a blank collection on the Components panel’s Select tab.
- For each component you want to add to your collection, save it as an .skp file in the folder that you selected in the preceding step. (If the component is in your model, context-click it and select Save As.) The following figure shows the Galaxy Class Starship component saved in a collection called Favorite Components.
Gathering intelligence about components
SketchUp provides a few tools that enable you to find important details about components:
Обучение работе в SketchUp
SketchUp – функциональный и удобный 3D-редактор для моделирования трехмерных объектов, зданий и интерьеров. В свое время его пользователи могли размещать созданные в нем работы в общедоступных онлайновых коллекциях Google.
Настройка программы
В SketchUp можно работать сразу после установки, но некоторые детали интерфейса стоит изменить для удобства
- Переместить панель инструментов на левый край экрана, перетащив ее туда мышкой – на широкоформатных мониторах это увеличит рабочую область. Иконки в SketchUp также можно уменьшить, кликнув на свободном месте панели и сняв галочку в Панели инструментов -> Параметры -> Большие значки.
- Выбрать шаблон по умолчанию: Файл -> Создать из шаблона, ставим сердечко под нужным (для начала – «Простой – метры»).
- Можно почистить «Лоток по умолчанию» в правом краю экрана от лишних элементов (Окно -> Лоток по умолчанию), чтобы они не мешали работе. Для начала достаточно оставить лотки «Данные объекта», «Материалы», «Компоненты» и «Метки». Остальные всегда можно вернуть на место с помощью Окно -> Управление лотками.
- В Окно -> Параметры -> Общие можно настроить интервал автосохранения.
Обзор интерфейса SketchUp
Интерфейс SketchUp создан для работы с помощью мыши и клавиатуры.
Классическим текстовым меню SketchUp можно не пользоваться вообще, поскольку все его пункты продублированы инструментами, лотками и контекстным меню, вызываемым правой кнопкой мыши.
Панель инструментов
Основная панель в программе SketchUp называется «Начало работы» и содержит достаточный набор иконок инструментов для старта. Чтобы открыть другие, достаточно кликнуть правой кнопкой мыши на свободном месте панели и поставить галочку напротив нужной.
Лоток по умолчанию
Лотки в SketchUp – собранные в небольшую панель выпадающие окна у правого края экрана. В них содержится информация об объектах и возможности для настройки инструментов. Например, в «Данных объекта» можно узнать его площадь, в «Материалах» – выбрать цвет или текстуру для заливки.
Область рисования
После старта проекта в SketchUp в центральном окне мы видим три разноцветных вектора (X, Y и Z) и фигуру человека (для масштаба). Чтобы выровнять линию или инструмент по вектору, можно использовать клавиши-стрелки «вверх», «вправо» и «влево».
Основные принципы SketchUp
Все объекты, создаваемые в программе в SketchUp, состоят из прямых линий, включая окружности. Когда линии соединяются, они образуют полигон. Несколько соединенных полигонов – 3D-модель. Таким образом, работая в SketchUp, мы рисуем трехмерные объекты из прямых линий, а затем модифицируем полученные полигоны, снова оперируя линиями. Например, чтобы что-то отрезать от 3D-объекта, надо буквально нарисовать на нем линии отреза, а затем «выдавить» лишнее.
Если нарисовать в SketchUp полигон, а потом поверх него – другой, они «слипнутся», и теперь, стерев второй, мы автоматически изменим и первый. Можно группировать нарисованное, тогда новые линии и полигоны не будут «прилипать» к группе, а для редактирования и добавления элементов группы достаточно выбрать ее двойным кликом. Тройной клик выберет все элементы внутри группы.
«Компоненты» в SketchUp предназначены для одновременного редактирования нескольких одинаковых объектов. Чтобы компонент перестал изменяться вместе со своими близнецами, его можно «Сделать уникальным» из контекстного меню.
Простой учебный проект в SketchUp
Нам потребуется чертеж помещения. В идеале он должен быть на бумаге или на втором мониторе. Если такой возможности нет, можно загрузить файл с чертежом с помощью Файл -> Импорт
Создание 2D-проекции помещения в SketchUp
Многие преподаватели рекомендуют начинать знакомство со SketchUp с 2D, используя для этого шаблон «Просмотр плана», но мы собираемся поднимать стены, поэтому лучше создать новый файл из шаблона «Простой», а дальше перевести его в «плоский» режим с помощью меню Камера -> Стандартные представления -> Сверху. Перетащите ось координат в удобное место инструментом «Панорама» (иконка руки), а затем обязательно поменяйте стандартные единицы измерения в меню Окно -> Данные модели -> Единицы на десятичный формат, сантиметры с точностью 0.0 (оптимально в нашем случае).
Таким образом в SketchUp можно быстро накидать внутренний план помещения. Мы уже в процессе рисования этого плана сделаем заготовки под окна и наружные двери. Если в стене они есть, то мы рисуем ее в несколько этапов: сперва отрезок до проема, затем продолжаем отрезок через весь проем и затем отрезок стены после. Результат пока будет выглядеть как одна прямая линия, но на следующем этапе эта разбивка пригодится. Внутренние двери, если они есть, достаточно обозначать только с одной стороны стены или оставить пока проемами.
Осталось сделать внешние стены, для этого пригодится инструмент «Рулетка» и направляющие. Подводим рулетку к одной из граней нашего плана (она должна оказаться «на ребре»), кликаем, тянем курсор наружу и вбиваем на клавиатуре ширину стены – например 50 см. Появилась пунктирная линия – направляющая. Повторим процесс со всеми стенами, изменяя ширину по необходимости, а затем обведем наружные стены «Линией» (игнорируя окна и двери). Если внешняя стена замкнулась, проекция стен окрасилась белым, если нет – надо замкнуть стены в проемах. Если внутри помещения у нас белый полигон – кликаем по нему инструментом «Выбрать» и удаляем клавишей Delete; сплошным белым цветом должны отображаться только стены.
Создание 3D-модели из чертежа в SketchUp
Камера -> Стандартные представления -> Изометрия переключит нас в 3D-проекцию, поскольку пришла пора работать с моделью. Кликаем инструментом «Вдавить-вытянуть» на проекцию стены и тянем ее вверх. Точную высоту задаем с клавиатуры. Масштаб отображения можно менять колесиком прокрутки или инструментом с изображением лупы, а крутить и рассматривать модель – инструментом «Вращение».
Поскольку мы строили геометрию из отрезков, сейчас на внутренних стенах уже есть линии, обозначающие горизонтальные границы проемов дверей и окон. Рисуем вертикальные линии с помощью рулетки «на ребре» (обратите внимание, что вектор рулетки должен быть синего цвета, чтобы отмерять точные расстояния по вертикали!), выбираем инструмент «Вдавить-вытянуть» и выдавливаем проемы. Если «выдавить» слишком далеко, вместо проема образуется нарост.
Если внутри планировки есть проемы без дверей, но с перегородкой сверху, пока отсутствующие на модели, или нам надо сделать антресоль, достаточно отобразить их проекцию на торце стены и затем «вытянуть» до другой стены одноименным инструментом. В случае антресоли «вытягивание» может упереться в вертикальные линии, оставшиеся над дверью – их надо удалить.
Теперь стоит удалить все ненужные линии, оставшиеся от окон и дверей, направляющие (Правка -> Удалить направляющие) и, если нас устраивает модель, сгруппировать ее. Выделяем все инструментом «Выбрать», правая кнопка мыши, «Создать группу». Включаем полезный лоток: Окно -> Лоток по умолчанию -> Иерархия, и в появившемся лотке переименовываем созданную группу, например, в «Стены». Теперь мы сможем скрывать стены, если они будут мешать работать с интерьером.
Также стоит расставить «Метки» (бывшие «Слои»), особенно если стен много. Открываем одноименный лоток и кнопкой «Плюс» добавляем необходимое количество, после чего выбираем стены и в лотке «Данные объекта» присваиваем им метки.
Создание интерьера в SketchUp
Для начала нам надо вставить окна и двери. Их можно смоделировать линиями, направляющими и «вытягиванием», но сейчас мы изучим новый инструмент – библиотеку готовых элементов 3D Warehouse. Кликаем на его иконку и забиваем в строке поиска Window и Door (искать лучше, используя английские слова). Сразу переходим из вкладки «Продукты» на вкладку «Модели», поскольку продукты часто поставляются с «вшитыми» размерами. Выбираем подходящий вариант и «Загружаем сразу в SketchUp». Зацепляем элемент за нужный угол проема. Поставить его в правильном положении поможет инструмент «Повернуть» (выбрать нужную проекцию для поворота можно клавишами курсора), после чего инструментом «Переместить» еще раз закрепляем объект в нужном месте, а дальше инструментом «Масштаб» подгоняем его под габариты проема.
Чтобы установить окна, внутри проема нужно разместить направляющую с помощью «Рулетки» и привязать объект к ней.
Прежде чем расставлять мебель, стоит обозначить на модели радиусы их открывания, чтобы не влезть в них каким-нибудь шкафом или креслом. Можно обойтись и простым инструментом «Дуга»: нарисуйте эту дугу на полу рядом с дверью.
Мебель для интерьера можно взять также в 3D Warehouse, во вкладке «Продукты».
Для оформления стен используется лоток «Материалы»: здесь есть готовые текстуры и цвета, и меню «Правка», где можно подобрать нужный тон или загрузить изображение. Поверхности окрашиваются инструментом «Заливка».
В результате мы получим эскизный проект интерьера в 3D. В этой модели не хватает пола: если он нужен, переворачиваем модель, рисуем линии по ее периметру и «вытягиваем» получившийся полигон на нужную высоту (точнее, глубину, учитывая, что это пол). Присваиваем объекту метку «Пол».
«Сектор», градусы также вбиваются на клавиатуре. Готовую лестницу помещаем в модель первого этажа.
Наконец, сделаем простую четырехскатную крышу. Обводим стены модели сверху по внешней грани линиями. Если наше помещение не прямоугольной формы, делаем прямоугольник, местами висящий в воздухе. Выбираем этот прямоугольник и инструментом «Смещение» увеличиваем его площадь на ширину карниза. У нас получилась рамка по периметру стен. Чтобы сделать перекрытие, стираем внутренние линии, после чего «вытягиваем» перекрытие вверх. Рулеткой рисуем диагональные направляющие крест-накрест, из центральной точки тянем направляющую вверх на высоту крыши – например, три метра – после чего рисуем линии по получившимся углам «пирамиды». Кладем на скаты выбранный материал из одноименного лотка, и крыша готова.
Чтобы узнать о работе с программой больше, изучите наши мастер-классы «Создаем дом в 3D: проект, архитектура, интерьер. Простые инструменты SketchUp», в которых мы рассказали об основных этапах проектирования и поделились лайфхаками от экспертов.
Ответы на многие вопросы по использованию программы SketchUp вы можете найти в разделе «Вопросы и ответы».