Blender 3D: How to Set Camera to Current View
The Blender camera is the point in space from which renders are created. The view we see in the 3D Viewport does not affect the view of the render. So, if you want to set the camera view to align with the current view in the 3D Viewport, here’s how.
This page may contain affiliate links which pay me a commission if used to make a purchase. As an Amazon Associate, I earn from qualifying purchases.
How to Align Camera to Viewport View in Blender
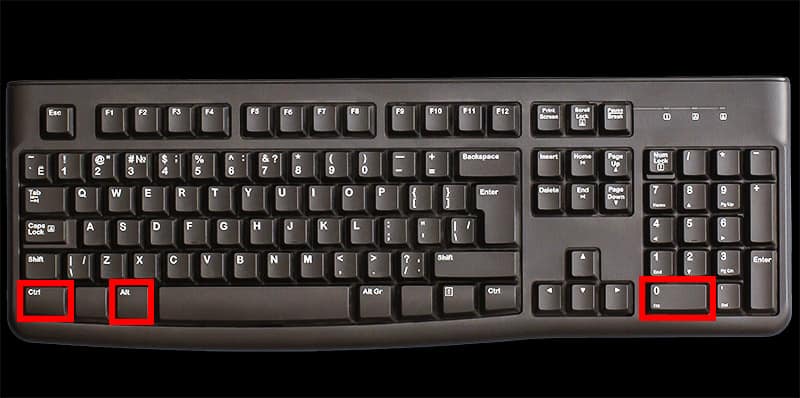
Ctrl + Alt + NumPad 0 to align camera to current view
To set the active camera to the current view in the 3D Viewport, press Ctrl + Alt + NumPad 0.
You specifically need to press the “zero” in the number pad to do this. By default, the zero on top of the keyboard will not set the camera to the current view.
How to Align Camera to View Without Number Pad
If you are working with a keyboard that doesn’t have a number pad, I highly recommend you invest in one. Many (like this keyboard on Amazon) are not very expensive.

In the meantime, there is a way in Blender to set the numbers at the top of the keyboard to emulate a keyboard number pad. Go into the user preferences and navigate to the “Input” tab. Check the box “Emulate NumPad” at the top.
With this enabled, pressing Ctrl + Alt + 0 will set the camera to current view.
How to Lock Camera to Current View
We can also lock the camera to the viewport view. When we do this, wherever we are viewing from in the 3D viewport will be our camera view.
This can be turned on to help place the camera and then turned off once the camera is set.
To lock the camera to view in Blender, press “N” to open the sidebar in the 3D viewport. Under the “View” tab, check the box labeled “Camera to View.”
Then press “0” (zero) on the numberpad to enter camera view. As you navigate the scene, the camera’s view will follow.
Camera View
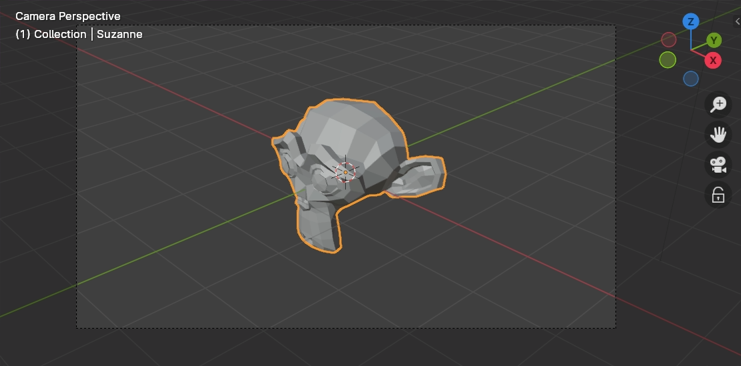
The Camera view shows the current scene from the active camera’s viewpoint.
The Camera view can be used to virtually compose shots and preview how the scene will look when rendered. The rendered image will contain everything within the dashed frame.
Camera Settings for details on how camera settings are used for display and rendering.
While in camera view, you can select the camera by clicking the dashed frame (assuming the camera object isn’t hidden).
Viewing the Active Camera
View ‣ Cameras ‣ Active Camera , View ‣ Viewpoint ‣ Camera
This switches the view to the active camera.
Setting the Active Camera
View ‣ Cameras ‣ Set Active Object as Camera
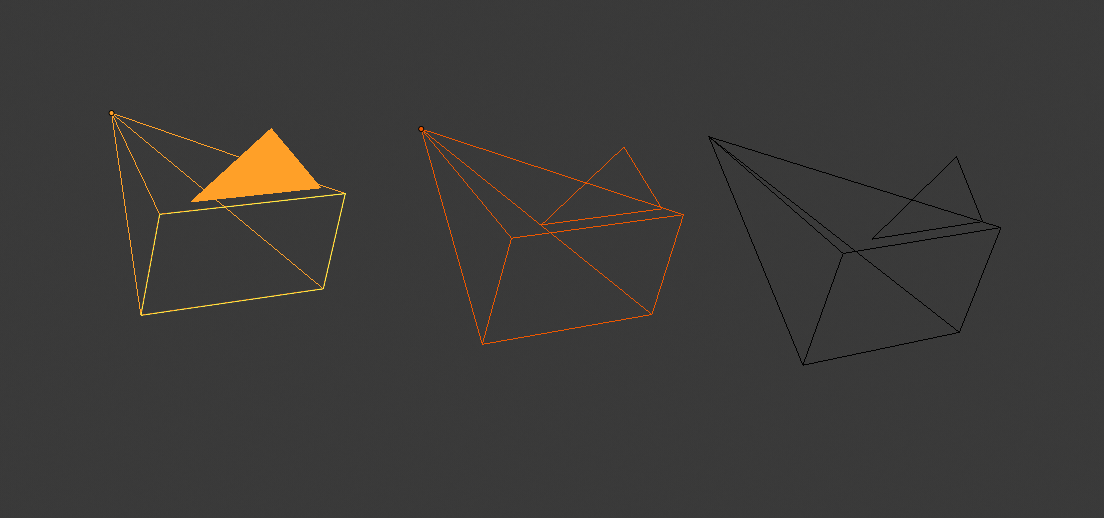
Active camera (left) displayed with a solid triangle above it.
This sets the current active object as the active camera and switches to the camera view.
The active camera is the one that will be used for rendering, and which you’ll look through when choosing camera view.
Another way of setting the active camera is through the Scene tab of the Properties .
The active camera is normally defined on the scene level, so that it’s the same across all 3D Viewports. However, it’s also possible to make a camera the active one within one Viewport only. See Local Camera .
Animated Camera Switching
While a scene contains only one camera by default, it’s possible to have multiple. You can then bind the cameras to specific time points in your animation to create jump cuts showing different viewpoints. See Animating Cameras .
Frame Camera Bounds
View ‣ Cameras ‣ Frame Camera Bounds
Centers the camera view inside the 3D Viewport’s screen area and resizes the view to fit within the area’s bounds.
Zoom Camera 1:1
View ‣ Navigation ‣ Zoom Camera 1:1
Zooms the view so that the camera frame has the exact same size as the output resolution. This allows you to preview exactly how large objects will be in the rendered image/animation.
Camera Positioning
There are several different ways to position the camera in your scene. Some of them are explained below.
The active “camera” might be any kind of object, meaning these actions can also be used to position and aim a light for example.
Align Active Camera to View
View ‣ Align View ‣ Align Active Camera to View
Ctrl — Alt — Numpad0
Moves and rotates the camera so it perfectly matches your current viewport view.
Camera Navigation
By enabling Lock Camera to View in Sidebar ‣ View and switching to camera view, the camera will become “glued” to the view and follow it around as you navigate.
Fly/Walk Navigation for first person navigation that moves the active camera too.
Roll, Pan, Dolly, and Track
To perform these camera moves, the camera must first be selected so transform operations apply to it. The following actions also assume that you are in camera view. Having done so, you can now manipulate the camera using the same tools that are used to transform any object:
Press R to enter object rotation mode. The default will be to rotate the camera along its local Z axis (the axis orthogonal to the camera view), which is the definition of a camera “roll”.
Vertical Pan or Pitch
This is just a rotation along the local X axis. Press R to enter object rotation mode, then X twice. (The first press selects the global axis, the second the local axis. This works with any axis; see Axis Locking ).
Horizontal Pan or Yaw
This corresponds to a rotation around the camera’s local Y axis. Press R , then Y twice.
To dolly the camera, press G then MMB (or Z twice).
Press G and move the mouse (you can use X or Y twice to get purely horizontal or vertical tracking).
© Copyright : This page is licensed under a CC-BY-SA 4.0 Int. License. Last updated on 09/04/2023.
Выровнять камеру по окну вида
Привет!
Подскажите, пожалуйста, как выровнять камеру по окну вида или создать камеру из окна вида.
Спасибо!
Нашел ответ по запросу на английском: «Blender camera to view».
Alt+Ctrl+0
А как быть если у тебя две и больше камер? Эта схема уже не работает так просто. Теперь уже нужно найти и выбрать камеру в аутлайнере и только после этого это сработает. Может есть дургой способ, кто знает?
- Форум «Моделирование и скульптинг» закрыт для новых тем и ответов.
Авторизация
Рубрики
О сайте
На данном сайте Вы сможете найти множество уроков и материалов по графическому
редактору Blender.
Контакты
Для связи с администрацией сайта Вы можете воспользоваться следующими контактами:
Следите за нами
Подписывайтесь на наши страницы в социальных сетях.
На сайте Blender3D собрано огромное количество уроков по программе трехмерного моделирования Blender. Обучающие материалы представлены как в формате видеоуроков, так и в текстовом виде. Здесь затронуты все аспекты, связанные с Blender, начиная от моделирования и заканчивая созданием игр с применением языка программирования Python.
Помимо уроков по Blender, Вы сможете найти готовые 3D-модели, материалы и архивы высококачественных текстур. Сайт регулярно пополняется новым контентом и следит за развитием Blender.
Как перемещать камеру в Blender
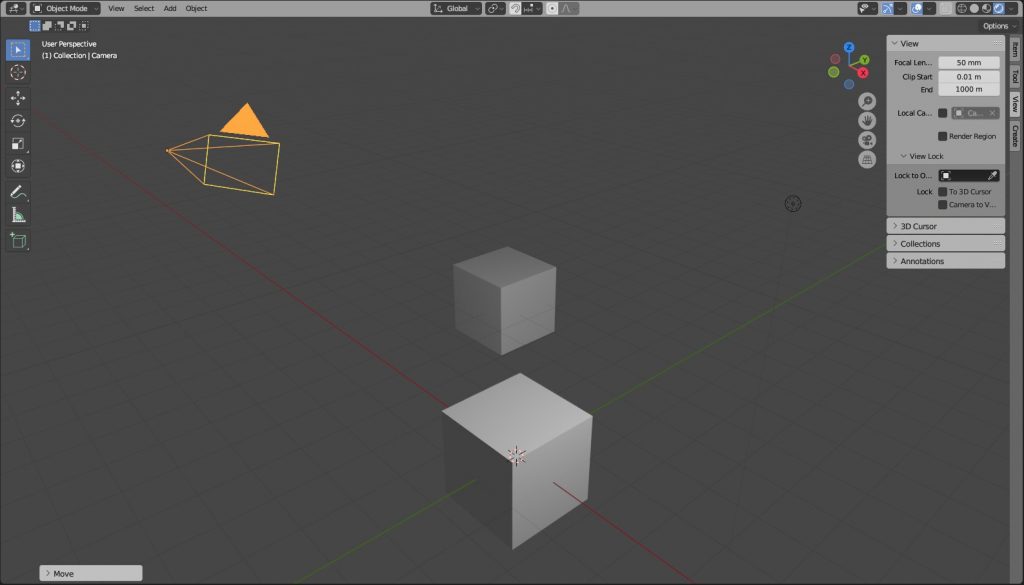
При работе с блендером или любой другой программой для 3д моделирования, необходимо работать с камерой. Особенно, при рендере, когда нужно выставить красивый кадр.
Камерой можно управлять как обычным объектом, однако, каждый раз переключаться на вид из камеры. Удовольствие малоприятное, да и затратное по времени.
Как добавить камеру в Blender?
Если вы удалили камеру, то ее можно вернуть обратно. Нажимаем Shift+A и выбираем в меню Camera.
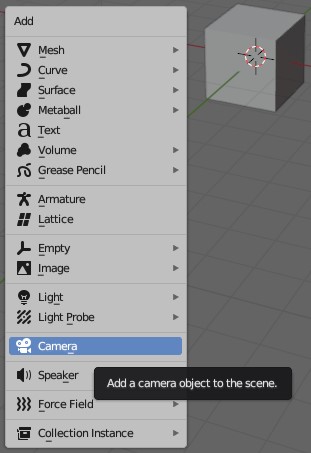
Теперь точно у всех на сцене есть камера, с которой мы продолжим работать.
Как переместить и повернуть камеру в текущий вид?
Для того чтобы камера встала ровно так, как вы сейчас видите сцену нужно выбрать камеру и нажать комбинацию кнопок ctrl+Alt+0. После чего, вы увидите, как камера переместилась прямо в нужное место.
При дальнейшем осмотре, камера останется на новом месте. Но, вдруг, вам нужно, чтобы камера перемещалась вместе с нашим вьюпортом?
Как управлять камерой в Blender?
Камерой можно управлять так-же, как и вьюпортом. Для этого нужно в меню View справа выбираем CameraToView. Этим мы привяжем
камеру к текущему виду окна просмотра.
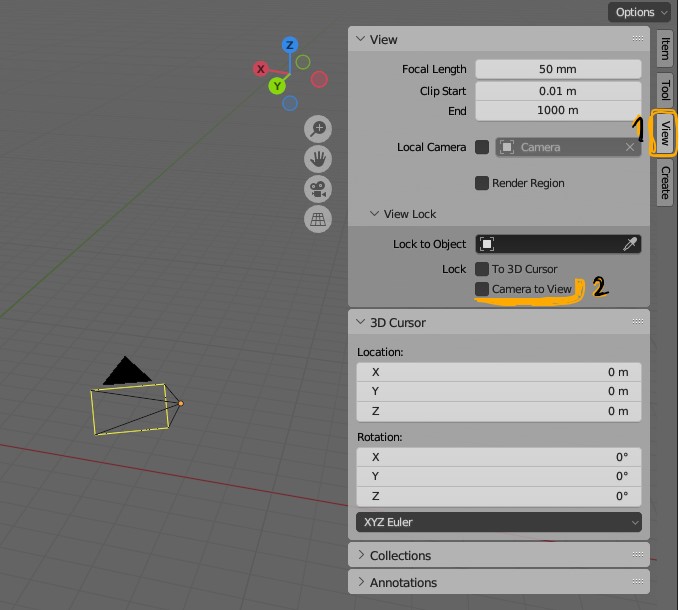
После этого, камера будет перемешаться за вьюпортом постоянно. Получается, свободная камера, которой вы будете управлять. Для прекращения слежения, нужно снять галочку.
Свободная камера, как в играх
Есть еще более свободный и удобный режим управления, похожий на управление в играх. Для включения, по настоящему свободного режима, нужно выбрать камеру (выбрать можно при помощи 0 на нумпаде) и нажать Shift+
или Shift+Ё на русской раскладке.
Теперь, можно перемещать камеру кнопками WASD, а мышкой осматриваться, так-же колесиком можно регулировать скорость перемещения, перемещение вверх-вниз E и Q.
Как настроить камеру в блендере?
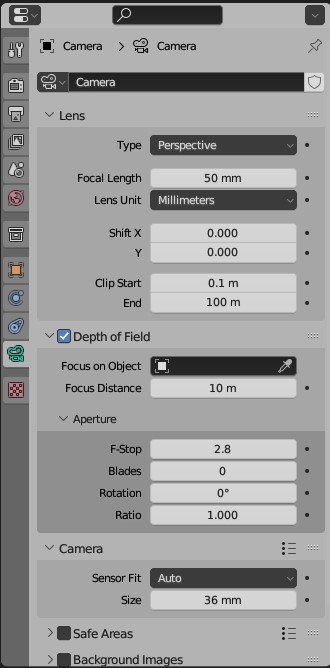
Выбрав камеру на сцене, справа появиться меню настройки. По умолчанию снимки получаются без глубины резкости, то-есть без размытия заднего плана. Для включения размытия, нужно поставить соответствующую галочку Depth of Field.
Камера в Blender настраивается, как и настоящая камера и даже лучше. Можно настроить:
- Фокусное расстояние объектива
- Сдвиг объектива
- Диафрагму
- Число лепестков
- Размер матрицы
Если вы имели дело с фотографией, то вам будут понятны эти настройки, если же нет, то желательно разобраться в этом вопросе, хотя методом тыка всегда можно добиться нужного эффекта.
Статья про диафрагму — ТЫК
Краткое описание параметров
Фокусное расстояние объектива — В блендере обозначается как Focal Length и по умолчанию стоит на 50 мм. Отвечает за угол обзора. Чем меньше значение, тем больше пространства попадает в объектив нашей виртуальной камеры и наоборот.
Сдвиг объектива — на фото Shift x и y. Можно использовать для интересных эффектов, в реальности с помощью сдвига можно создавать эффект миниатюры.
Диафрагма — Aperture -> F-stop. От данного параметра зависит степень размытия объектов вне фокуса. В фотографии это называется глубина резкости. Чем меньше значение тем больше размытие.
Число лепестков — Aperture -> Blades. Чем больше значение, тем менее угловатое размытие. Исключение 0, который стоит по умолчанию, с ним все будет максимально круглое.
Размер матрицы — Camera -> size. В настоящей камере размер матрицы не изменен, но в нашем случае мы можем поменять его в любой момент. Вообще от размера зависит светочувствительность, но так как у нас не настоящая камера, то параметр меняет угол обзора и степень размытия. Понять на словах сложно, нужно крутить и смотреть на результат.