What is OS X Base System?
This is a question that has been asked by many and if you go looking for the answer it can be a little unclear and confusing. You may have seen this on your Mac either in the disk utility or if you have been poking around the hard drive in a terminal session. What is it?
For the most part, it’s not something you need to worry about unless you are trying to restore, recover or repair your Mac back. Some have wondered if they can remove it to reclaim the disk space but in my opinion, it’s not a good idea and it’s not worth it.
My name is Eric and I have been an avid computer user since the late 1980s. While most of my past has been spent working on Windows PCs, I have recently been using, learning, and researching Mac systems, and as I learn new things I like to provide the information to others.
While, the OS X Base system on a Mac, is not something that everyday users work with or even need to worry about, many are curious as to what it is all about. If you would like to find out more, keep reading and we will discuss this a little further.
My Experience with OS X Base System
I have, of course, had some experience with Mac systems over the years, but it has only been the last couple of years that I have started working with and exploring the Mac world. As an engineer and being fairly new to the systems, I am always curious when I encounter new things.

I first saw a Base System directory when I was poking around the files and directories from a Terminal session on my Mac. I later saw this as well when looking at the disks and volumes in recovery mode and wondered what it was and what is for.

As it turns out, I was actually using it and didn’t even know it.
Investigating OS X Base System
Being curious as to what the Base System is, the first thing I did was a Google search on it. In doing that I found that there is not a lot of information out there as to what this is and what it does.
The only thing I could find was some very general statements indicating that it has something to do with Mac’s Recovery Mode. That makes sense, but I then wanted to know if it is related to the actual recovery mode itself or is an image that is used to reinstall or repair your mac.
I was first thinking that maybe this is the base operating system that your computer is shipped with, so if you do a factory reset, it will use this to create the new fresh macOS that your Mac originally had. That sounded good, but I was still unsure so I did some more digging.
I posted this question online in a Mac support forum but received only one response. While that response did not give me a whole lot of information it did point me in the right direction and spark something that made sense.
The size of the OS X Base System on the disk is much too small to be an entire OS such as Catalina, Big Sur, Monterey, or whatever your system was shipped with. I’m sure the designers would not want to take such a huge chunk of disk space just to keep the original OS intact.
Besides, recovery mode does allow you to connect to the internet where you can easily download an OS image and install it. It also lets you access a flash drive or a USB hard drive if you have a backup stored on one of those. There’s no need to store it on the actual computer.
OS X Base System Findings
My next thought was that if OS X Base System is not the original OS that the Mac was shipped with, maybe it is just a small simple operating system that is used to run the recovery mode. This would be a small image, so the size of the OS X Base System would make sense.
When thinking about it, recovery mode must have some type of small, slimmed-down OS that can boot the system up, perform a few maintenance functions, and has utilities needed for recovery of your Mac in the case it needs restoring.
After doing more research and getting input from others, it appears that this image is only around 2Gb and is located on the boot ROM. This ensures that it is always there since we can’t delete things from ROM and is available no matter what happens to our hard drive.

So, from what I have found, I do believe that OS X Base System is the small, slimmed-down operating system that is made available when you go into Recovery Mode. Recovery mode is what is running in the image above.
What is Recovery Mode?
If you have never used it, you may be wondering what Recovery Mode is. It is a mode that you can boot your Mac into at startup which allows you to have internet access, access to disks, and other utilities you can use to repair or restore your Mac.
It’s not only used for recovering from a disk failure, but one may also use this to restore their Mac to its original factory settings with a new clean version of your operating system. This might be done if you are experiencing issues with your Mac that you have been unable to fix.
It might also be done if you are going to sell your Mac or give it to someone. You might want to wipe the system clean so that they don’t have any of your data or information and also so they have a fresh clean system to start with.
You can find more information on Apple’s recovery mode and how to get your system into it from Apple Support.
Can I Remove OS X Base System?
Many who are looking to gain more disk space will often ask if they can remove or delete OS X Base System in order to gain more free disk space. This is a great question and my advice would be that you should not try this.
First of all, the space used by the OS X Base system is only around 2Gb, so you’re not gaining that much and you would be losing a critical function of your Mac that is needed if you ever need to repair or re-image your computer. Without it, things would be very difficult.
Also, I do not think it is possible to delete it because it is stored in ROM (short for Read-Only Memory) which is kind of like permanent storage that you can’t just write to or delete from like you do with your hard drive. It can only be modified with specific software.
The files stored in ROM are then mounted and shown as a volume on one of your disks. So if you do delete it, you would just be deleting the mount point and not the actual files. This would end up giving you little or no new disk space.
So I wouldn’t recommend doing this for any reason. You won’t gain any significant usable disk space and it will only make things more difficult if you need to restore or repair your Mac in the future.
Final Words
As we have seen above, the OS X Base System on your Mac is the operating system that is used to start up and repair, recover or reinstall your main operating system. There is not a lot of information available about this area of your computer but it is a critical part of it.
If you have more information on what OS X Base System is and how it works, I would love to hear from you! I am always looking to learn more about things like this.
Leave a Reply Cancel Reply
Edwin
Hi Eric, I just read your explanation about the OS base system. Very interesting. I am also a curious person who always wants to explore everything in depth. I was wondering if it’s actually in a ROM or if it’s installed on a hidden partition on the internal SSD, so on the same physical hardware as the operating system. If I choose the option “Erase all data and settings” in Ventura or Monterey, then I can just start all over again, but then I will not enter recovery mode. So I can’t also start my disk management before I start installing. (and therefore also not install another OS version from USB.
Hi Edwin,
I am glad that you had a chance to read the article and found it interesting. It is great to be curious and explore issues like this and I am grateful to get your feedback and questions as it helps me to learn about these topics in more depth also. I wrote this article quite a while ago and at the time my resources were explaining the idea of the OS base system existing on a ROM and that data from the ROM being mounted to your local drive. So deleting it from your local drive would only be deleting the mount point but the data would still exist on the ROM. I am trying to go back and find the original information that I used for this research but I am not finding it. It could be that this is the way it was done on older systems and is no longer the case. I am going to go back to see if I can find my original sources, but in any case, I believe that it is never a good idea to delete or remove the OS base system. It doesn’t take up enough space to really make a difference. At least not enough where it is worth it to cause issues with your system as you describe above. I appreciate your feedback and please do let me know if you find more information on this. I would love to hear and learn what you find.
macOS Base System Explained – All You Need to Know!
Written by  Kanika Modi Reviewed by Editorial Team
If you buy through affiliate links, we may earn a commission at no extra cost to you. Full Disclosure Here…
If you have been using your Mac for quite some time now, you might have heard about the “macOS Base system,” but you may not know it in detail. It is one of the most critical components of the operating system that carries and provides the core files necessary to operate. But that is not all; there is much more to know about it. This article guides you through what a macOS Base System is and when to use it.
Hey, I am Kanika, and there is so much we still don’t know about Mac, and one of the parts is the macOS base system. So, keep reading as we dissect every part we need to know about it.
What is the macOS Base System?
macOS Base System is the read-only partition on Mac’s hard drive. It is used to reinstall macOS, repair disk errors, and restore the system. You can access the base system while booting the Mac in Recovery Mode.
The system that you access in regular boot-up on your Mac is the Macintosh HD, while the macOS base system remains hidden. Overall, it is the system’s core component, and a separate partition meant for system recovery and maintenance. Let us learn more about it below.
When Do I Use the macOS Base System?
As mentioned above, the system is hidden from you for obvious reasons, so no one can accidentally erase it since it is needed to run the system. So, the real question is how you can use it.
Here are a few of the ways you can put the Base System to good use.
1. Repairing disk errors
If your Mac has been facing constant internal errors, you need to repair your disk before you can lose the data permanently. Such disk errors can also cause slow performance and data corruption that might be beyond repair if not treated properly. This is where you can use the macOS Base system to get access to Disk Utilities and then choose to repair the errors.
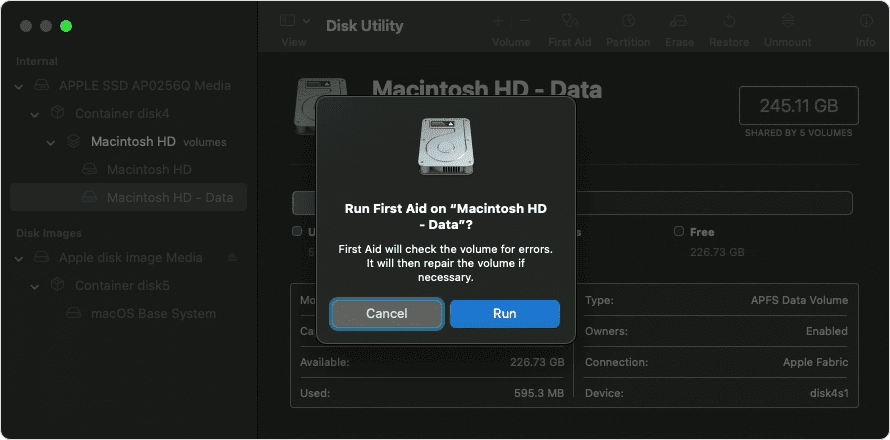
For this, you can boot your system in the macOS Base system mode and get access to the Disk utility. From here, you can run First Aid on the internal storage to detect and fix the error.
2. Repairing Startup Failure
Another issue that can be solved using the macOS Base System is when your Mac might face startup issues or errors. Whether your Mac is stuck on the Apple logo or not booting, you can use the base system to troubleshoot the problem.
You can restart your Mac in the recovery mode, i.e., in the base system, and then try diagnosing the issues through the utilities. Another way is to use the terminal and restart NVRAM and see if it works.
3. Operating System Issue
If your operating system is facing an issue or the current installation of your software is corrupted, you will need the help of the macOS Base System to identify the error and then fix it.
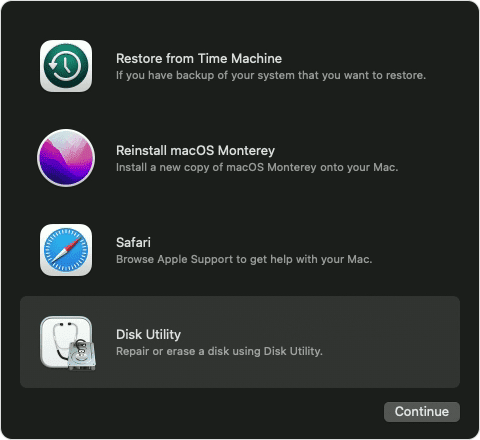
The only way to fix it is to reinstall the macOS, and for this, you can start by creating a bootable drive on a USB. You can boot your Mac in Recovery Mode using this USB and go to Disk Utility. From here, simply delete the internal storage and start fresh by installing a fresh copy of macOS.
What is the Difference Between macOS Base System and Macintosh HD?
macOS Base System and Macintosh HD are two different yet very important components of the system. While one is hidden, the other is readily available right in front of you on the system.
macOS Base system is the core part of your operating system that includes some of the most important files, such as the system library, to run the system efficiently. You can only access these files through the Terminal while in Recovery Mode.
While Macintosh HD is another important yet primary part of the internal storage that contains of your macOS installation, user data, and much more, you can find the Macintosh HD on the finder that is available to read and write or make any changes needed to it.
To sum it up, you will need the macOS Base System to boot your Mac, while with the help of Macintosh HD, you can store and even alter your file if and when needed.
Frequently Asked Questions
If you are getting the message that the macOS base system is almost full, your system might have malware or viruses creating or copying unnecessary files that are eating up the space, which needs to be taken care of.
No, you should never delete the macOS base system before or after selling. You can delete all your data from the system leaving this section out. It hardly takes up any space and is an important part of booting your system. If deleted, there is a high chance your system might never boot up.
You can enter Recovery Mode to restore your Mac from the base system. For this, you can shut down your Mac and then start it again by pressing Command + R. Then, you can click on Restore From Time Machine Backup and restore your system.
No, you should not delete the macOS base system since it consists of all the necessary files needed to operate this system or even boot up. If you delete the base system, you can end up with some significant issues, such as it may never start or even cause instability.
Conclusion
To sum up, the macOS Base System is one of the most important parts of your device that must not be deleted, which is why it is the read-only part of your Mac. However, as we know, it can play a great role in fixing errors and issues on your mac.
You simply have to access the Recovery Mode and then open Disk Utilities to fix those errors. You can even reinstall your macOS using the same method and fix the internet storage error through the base system.
If you have difficulties with any of the methods we’ve listed above, you can reach out to us, and we can guide you further. Simply leave a comment below. And if you liked this article, share it with your friends looking to know more about MacBooks.
Kanika is a Tech Enthusiast who is looking to add meaning to what people read. She has been writing on Apple devices and products for 7 years now and continues to share the solution to your everyday issues with everything technology.
Recent Posts
Mirroring your iPhone to a MacBook Pro is a handy task you might find essential for presentations, media sharing, or simply managing your content. Thankfully, this connection isn’t elusive; it can be.
We’ve all been there – a slip of the finger, an unintended deletion, and suddenly you need to revert a mistake on your Mac. Thankfully, using Command + Z to undo and Command + Shift + Z to redo is.
About the Author
 Kanika is a Tech Enthusiast who is looking to add meaning to what people read. She has been writing on Apple devices and products for 7 years now and continues to share the solution to your everyday issues with everything technology.
Как переустановить OS X. Восстановить Recovery с сохранением данных
 В закладки
Он отказался загружаться. CMD + R не помогает. Как быть?
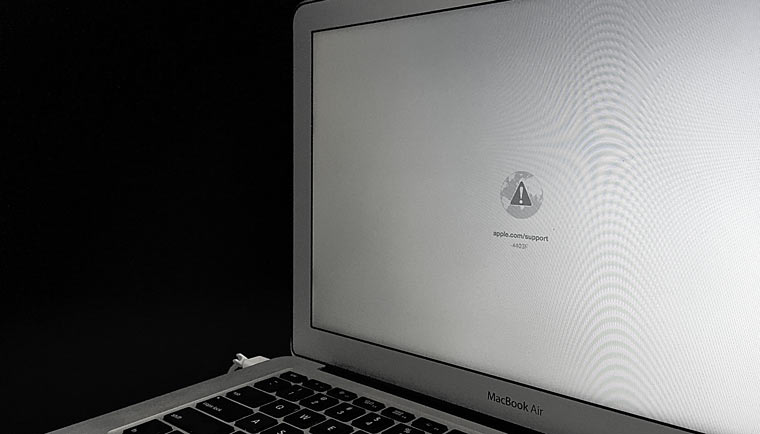
Начало рабочего дня не предвещало ничего плохого. Чашка кофе, хорошее настроение, клавиша Power и MacBook выводит следующую унылую картинку:
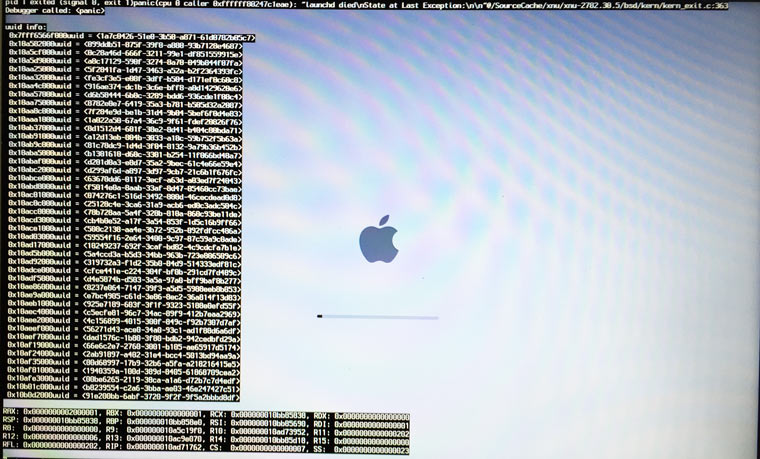
В голове тут же промелькнула беспокойная мысль о сохранности данных, актуальной версии резервной копии TimeMachine (которой не оказалось под рукой) и возможной утере информации.
Попытка №1. Загрузка в режиме восстановления
Будучи интересующимся пользователем и заядлым «маководом», я тут же попытался запустить MacBook в режиме восстановление путем удерживания клавиш CMD + R. Вместо привычной дисковой утилиты система встретила меня окном с попыткой сетевого восстановления.

Выбрав домашнюю сеть Wi-Fi, я стал дожидаться дальнейшего развития событий. Спустя несколько минут прогресс восстановления OS X прервала ошибка -4403F.

Попытки запустить процесс повторно приводили точно к такому же результату. Перезагрузка роутера подтвердила, что с сетевым подключением все в полном порядке.
О попытке провести диагностику Mac, пофиксить возможные ошибки винчестера или банально переустановить систему теперь не могло идти и речи. Раздел с Recovery HD, в котором хранится инструментарий для восстановления, приказал долго жить.
Попытка №2. Сброс PRAM и NVRAM
Компьютеры Mac создавались высококлассными инженерами, поэтому правильная организация всей системы и наличие «скрытых аппаратных резервов» позволяет избежать ряда перебоев в ее работе. Одним из таких резервов являются разделы памяти PRAM и NVRAM. В ней хранятся данные настроек, которые не сбрасываются даже после отключения компьютера от питания. Чтобы оживить упавшую систему было принято решение сбросить настройки PRAM и NVRAM.
1. Включаем Mac.
2. После появления белого экрана быстро зажимаем комбинацию клавиш CMD + Option + P + R.
3. Удерживаем до повторной перезагрузки и звука приветствия Mac.
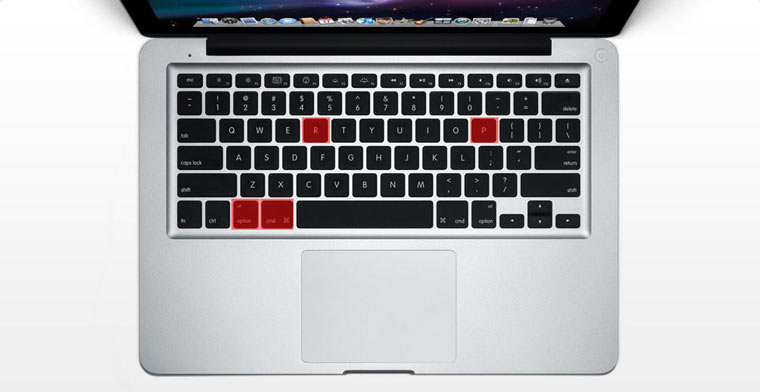
Сброс PRAM и NVRAM завершен.
Хотя говорят, что надежда умирает последней, она, бездыханная и еле живая продолжала таиться в моем сознании. Сброс PRAM и NVRAM на ошибку при загрузку системы не повлиял. MacBook продолжал испытывать мои нервы.
Попытка №3. Сброс SMС
Привыкнув хранить все необходимые данные «в облаке» или на съемном носителе, самым простым решением глобальных проблем всегда оставалась переустановка системы «с нуля». Этот случай был особенным. Мне нужны были хранящиеся в памяти данные, и мне нужен был работающий Mac сегодня.
В среде Mac есть так называемый контроллер управления системой SMC. От безотказности его работы зависит стабильность всей системы. Сброс настроек SMC может вылечить ряд проблем, вроде:
-
– постоянно высокой скорости вращения кулера даже при минимальной нагрузке;
– зависаний во время ухода системы в Режим cна;
– ошибками, связанными с работой дополнительной периферии или внешних мониторов, а также исправлении проблем загрузки системы.
Для сброса SMC следует выполнить следующие шаги:
-
Ноутбуки со встроенными аккумуляторами
1. Выключите MacBook и подключите адаптер питания.
2. Одновременно зажмите клавиши Shit + Control + Option + Power и удерживайте до изменения цвета индикатора адаптера MagSafe.
3. Отпустите все клавиши и повторно нажмите клавишу Power.
-
Ноутбуки со съемными аккумуляторами (старые модели)
1. Выключите MacBook и отключите адаптер питания.
2. Достаньте аккумулятор из ноутбука.
3. Зажмите клавишу Power и удерживайте не менее 5 секунд.
4. Отпустите Power, вставьте аккумулятор и подключите адаптер питания. Включите ноутбук.
-
Десктопы (iMac, Mac mini, Mac Pro)
1. Полностью отключите компьютер от сетевого питания.
2. Подождите не менее 30 секунд.
3. Подключите питание и выждите еще 5-10 секунд после чего включите компьютер.
Вышеперечисленные действия могут стать действительно результативными и система запустится. В моем случае чуда не произошло.
Попытка №4. Восстановление с помощью загрузочной флешки
Попытка оживить систему с помощью вышеперечисленных действий не увенчалась успехом. Оставался единственный вариант – переустановка OS X с помощью загрузочной флешки. Для этого шага потребуется:
- еще один компьютер, работающий под управлением операционной системы OS X;
- флешка, размером не менее 8 ГБ.
Подготовка флешки
1. В магазине приложений Mac App Store потребуется скачать дистрибутив системы OS X Yosemite.
2. Для создания загрузочной флешки скачайте утилиту DiskMaker X (распространяется бесплатно). Она понадобится для разворачивания дистрибутива.
3. Отформатируйте флеш-накопитель с помощью Дисковой Утилиты в Mac OS Extended (журнальный).
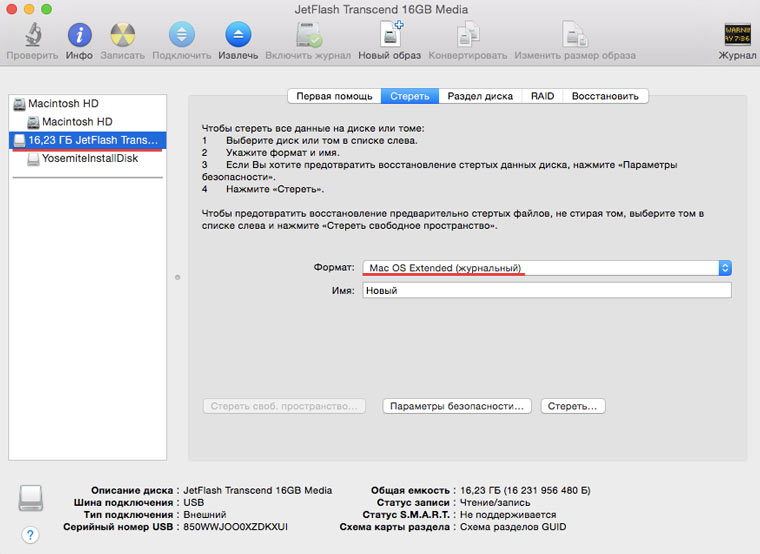
4. После окончания загрузки дистрибутива отмените предложенную установку и запустите утилиту DiskMaker X.
5. Выберите систему Yosemite (10.10). Утилита обнаружит дистрибутив в папке Приложений. Нажмите Use this copy (использовать эту копию).
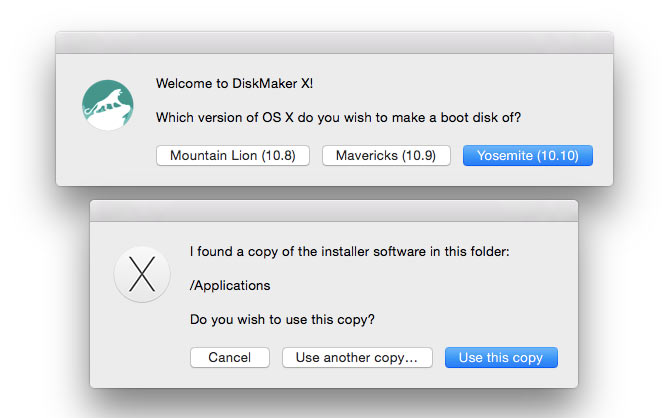
6. Выберите установленный в USB-порт накопитель и согласитесь с предупреждением о полном удаление всех данных, присутствующих на флешке.
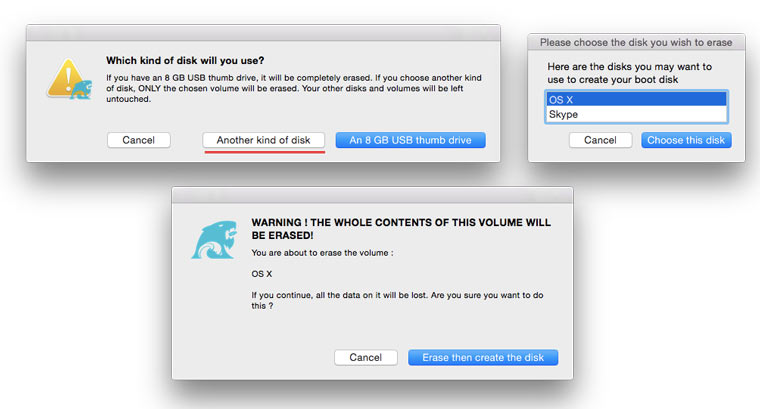
7. Начнется процесс монтирования дистрибутива с OS X Yosemite на накопитель.
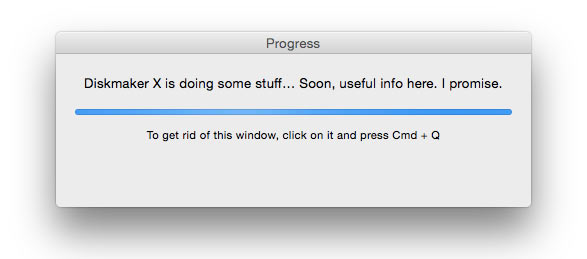
Процесс копирования занимает порядка 10-20 минут и зависит от скорости записи USB-флешки. Во время монтирования на экране периодически могут открываться диалоговые окна и папки. Не обращайте внимание.
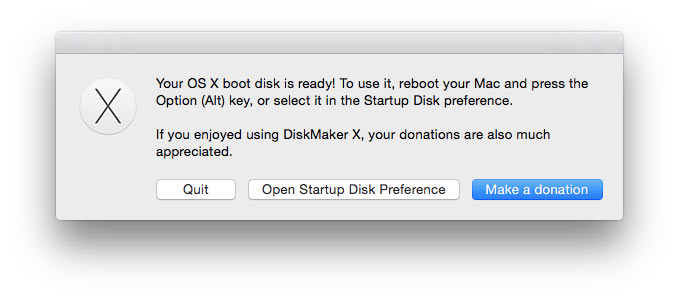
После успешного разворачивания образа OS X Yosemite извлеките накопитель.
Установка системы
1. Установите флешку в USB-порт «проблемного Mac», нажмите клавишу Power и зажмите клавишу Alt.
2. В списке доступных разделов для загрузки выберите OS X Base System. Обратите внимание на отсутствие раздела Recovery. .
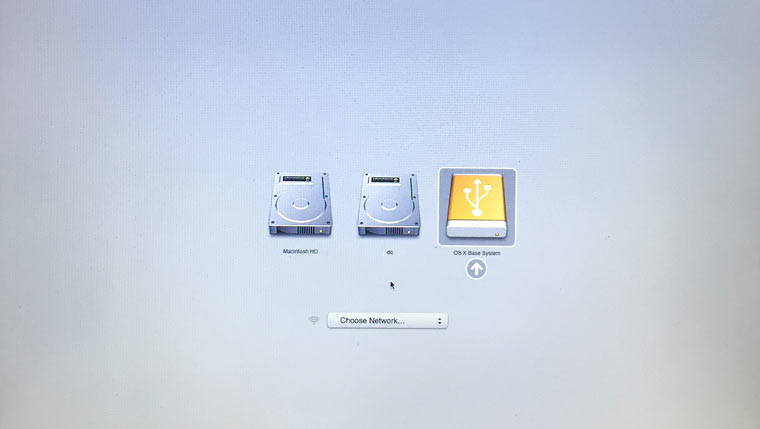
3. Mac загрузится в режиме восстановления. После выбора основного языка системы откроется меню установки. В верхнем меню вы найдете стандартный список утилит.
Воспользуйтесь дисковой утилитой и попробуйте сперва проверить права доступа к системному разделу и исправить возможные ошибки. Если после перезагрузки система по-прежнему отказывается загружаться, потребуется отделить раздел, размер которого будет не менее 20 ГБ с целью установки новой системы. Подробную инструкцию по разделению диска вы найдете здесь.
Из этого же меню есть возможность как начать процесс установки системы на вновь созданный раздел, так и восстановить систему с помощью резервной копии TimeMachine (см. Работа с TimeMachine).
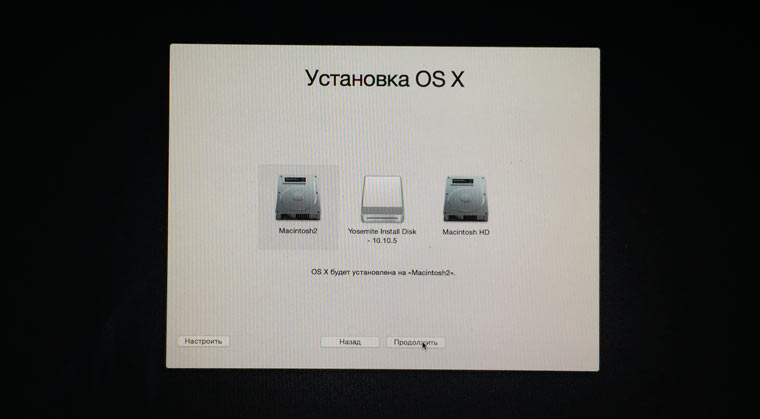
ОСТОРОЖНО! Будьте внимательны при выборе раздела установки. Установку требуется осуществлять не поверх старого раздела, а на вновь созданный.
После окончания установки вы получите доступ ко всем данным, размещенным на «испорченном» разделе со старой версией системы.
Если создать дополнительный раздел диска не удалось
Если по какой-либо причине вам не удалось создать дополнительный раздел диска для установки новой версии OS X, а сохранение оставшихся на битом разделе данных по-прежнему в приоритете, есть вариант установки OS X с помощью ранее созданной загрузочной флешки на внешний накопитель.
В дисковой утилите отформатируйте схему разделов в GUID Partition (Внимание! Все данные на внешнем винчестере будут стерты) и выберите тип форматирования Mac OS Extended (журнальный).
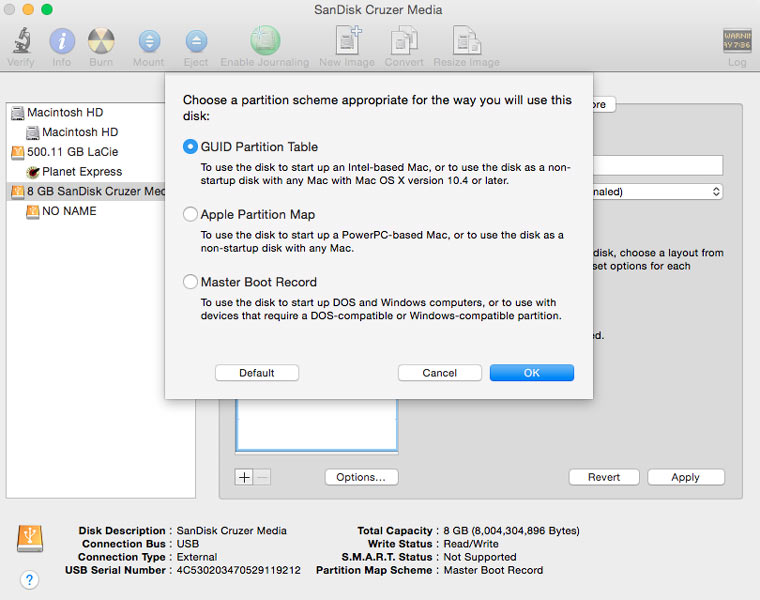
Установка системы на внешний накопитель в остальном полностью дублирует описанный выше способ. Загрузившись с внешнего винчестера вы получите доступ к оставшихся в старой системе данным.
В закладки
What is macOS Base System?
Summary: This post explains what macOS Base System is and how to solve the reinstallation failure when macOS Base System is the only disk available.
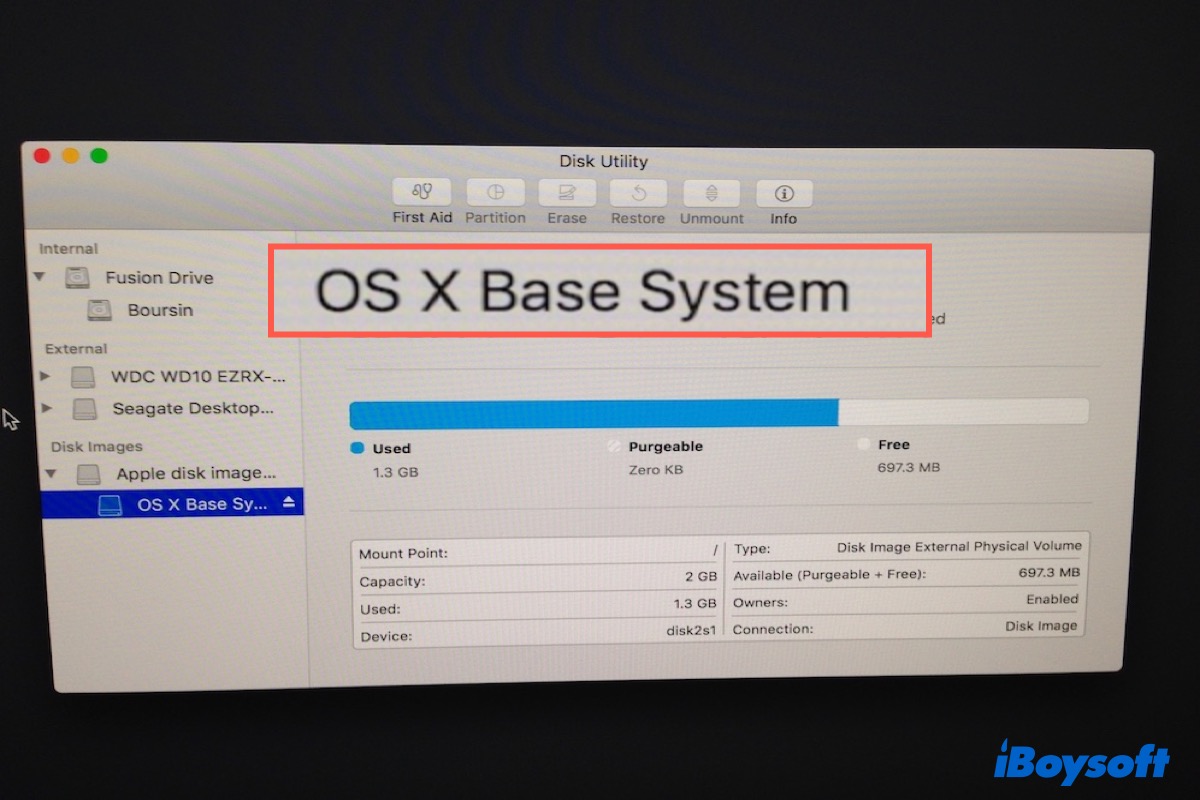
You may notice a volume called macOS Base System or Mac OS X Base System when accessing Disk Utility in Recovery mode, especially when you fail to install the Mac operating system. What is macOS Base System, and how to handle the problems with it? We will give you the answers in this post.
Table of Contents:
What is macOS Base System?
macOS Base System is the recovery partition on your Mac, which allows you to reinstall macOS when your system fails to operate, or a different macOS version needs to be installed. It also helps you troubleshoot and solve Mac problems with Disk Utility, go back to a previous state by restoring from Time Machine.
You can’t see the macOS Base System in a regular boot. It is a read-only disk image around 2 GB in size, which appears when you boot into Recovery Mode with Command + R on Intel-based Macs. It resides all the essential information needed for your Mac to work properly.
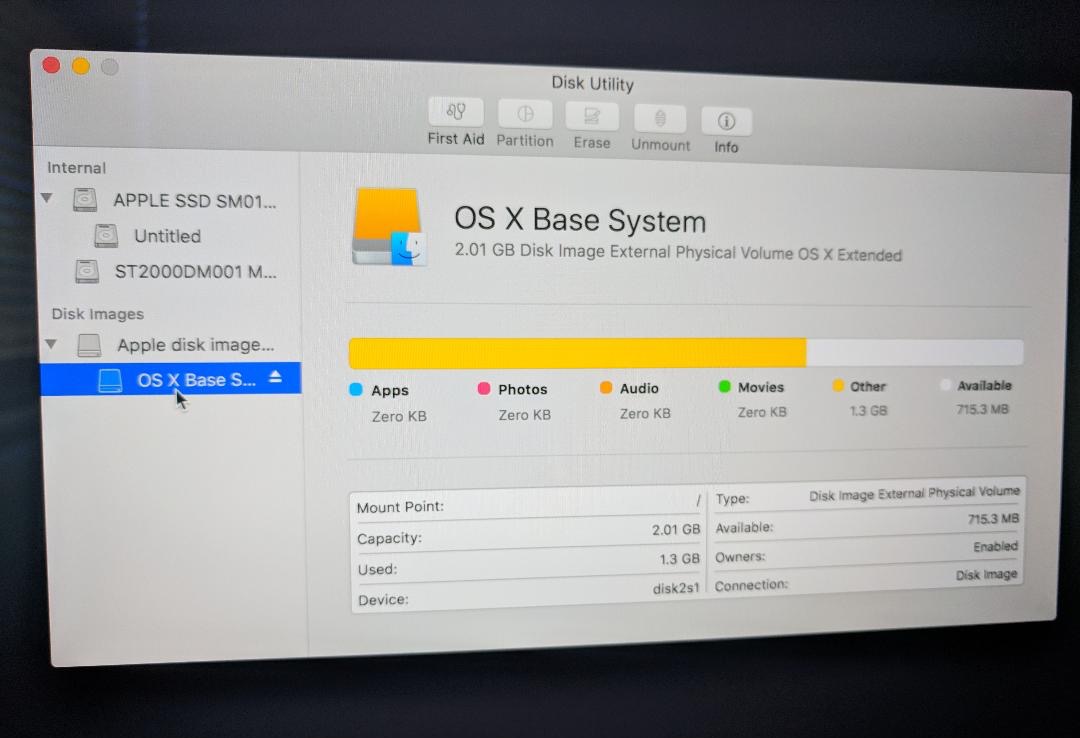
macOS Base System Vs. Macintosh HD
Macintosh HD is what you normally boot into when you turn on the Mac, where the macOS resides. macOS Base system is a separate volume that allows you to restore macOS to your Mac with a few clicks when macOS doesn’t work as expected. It’s a backup for users to repair their Mac, reinstall macOS and use other low-level utilities.
macOS Base System being the Only Disk Available
Due to incorrect operations, you may accidentally lose main volumes like Macintosh HD and find macOS Base System the only disk available to store the macOS installer. When you tap on the macOS Base System, you may experience errors indicating a locked drive or no enough space.
Problem 1: There is not enough free space in OS X Base System.
If you use a virtual machine for Mac tool to install macOS, you may encounter the «There is not enough free space on OS X Base System» failure.
It is caused when you don’t have a partition under VMware Virtual SATA Hard Drive Media (use VMware as an example), the container of Mac hard drive. Therefore, you can solve this by erasing the container to add a new partition for storing the macOS installer.
To fix the macOS Base System full problem:
Step 1: On the macOS installer window, click Utilities on the top-left menu bar and choose Disk Utility.
Step 2: Select the main container under the name like VMware Virtual SATA Hard Drive Media and click Erase.
Step 3: Name the partition, select APFS as Format for Mac running macOS 10.13 High Sierra or later. If your macOS version is older than macOS 10.13 High Sierra, choose Mac OS Extended (Journaled) instead. Choose GUID Partition Map as Scheme.
Step 4: Tap on Erase. Then close the window and choose the new partition to install the Mac operating system.
Problem 2: macOS Base System has the size of your Mac hard drive and shows that «The disk is locked.»
For some reason, you may accidentally restore Macintosh HD to macOS Base System and find it locked. In that case, you need to erase the macOS Base System in Internet Recovery mode.
To resolve the «The disk is locked» problem:
Step 1: Restart your Mac and immediately hold down Option + Command + R until you see the animated globe.
Step 2: On the Utilities window, click Disk Utility.
Step 3: Select macOS Base System and click Erase.
Step 4: Name the drive Macintosh HD and make sure the Format is APFS if you are running macOS 10.13 High Sierra or later. Otherwise, choose Mac OS Extended (Journaled). Then choose GUID Partition Map as Scheme.
Step 5: Hit Erase and exit Disk Utility. Then select Macintosh HD as the drive and reinstall macOS.
Note: To install the latest macOS compatible with your Mac: Option + Command + R. To install the macOS that came with your Mac or the closest available one to it: Shift + Option + Command + R.
Other solutions: If you are unable to erase the drive, boot from a USB installer should be able to fix it. Another solution is to restore from Time Machine by connecting your Time Machine backup disk with the Mac.
FAQ about macOS Base System
No, You can’t delete macOS Base System, nor you should. It is what gives you access to the macOS Utilities installed in the recovery partition. Without it, you can’t reinstall operating systems or fix problems when your Mac fails to boot up.
You may wonder whether you should erase the macOS Base System when you are trying a clean reinstallation of Mac operating system or to resale your Mac.
The answer is No. You shouldn’t erase it because it doesn’t occupy much space and doing so will result in your Mac being inoperable. Actually, when you attempt to erase it, you won’t succeed because the option is grayed out.
macOS Base System is the base of the Mac operating system, everything needed to keep your Mac running. It allows you into the recovery partition and accesses some basic tools such as Disk Utility in it.

Jenny is a technical writer at iBoysoft, specializing in computer-related knowledge such as macOS, Windows, hard drives, etc. She’s also been producing top-notch articles for other famous technical magazines and websites.

Jessica Shee is a senior tech editor at iBoysoft. Throughout her 3 years of experience, Jessica has written many informative and instructional articles in data recovery, data security, and disk management to help a lot of readers secure their important documents and take the best advantage of their devices.