ADB is not recognized as the name of a cmdlet: How to Fix
In this guide, we will show you the steps to fix the “ADB is not recognized as the name of a cmdlet” error in Windows. As soon as you step into the custom development, your first course of action will be to interact with the Android SDK Platform Tools. These are the official ADB binary files provided by Google and are needed by your PC so that it could identify your device in the ADB Commands.
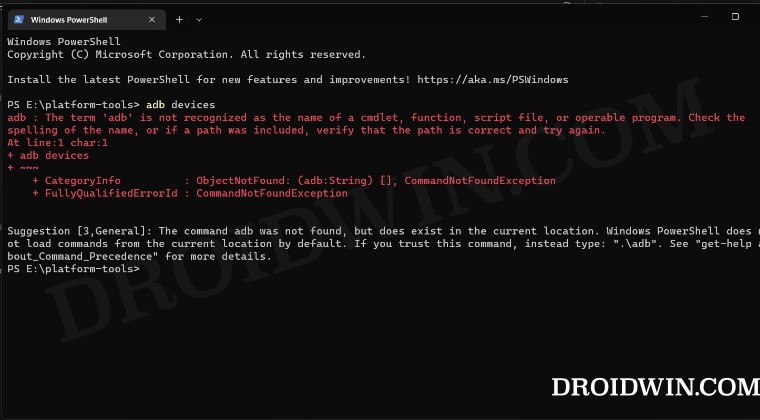
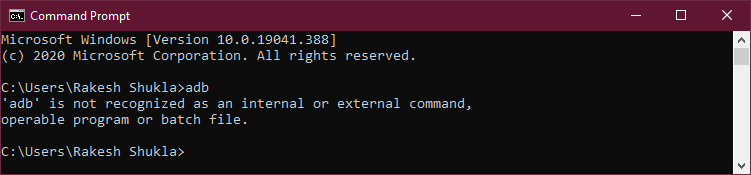
Once that happens, you could then execute the desired ADB commands, such as booting to recovery or Fastboot, performing ADB sideload, or using adb shell commands. However, some users have reported that they are unable to pass the first step itself. Whenever they try to run the adb devices command, they are instead being greeted with the following error message:

“The term adb is not recognized as the name of a cmdlet, function, script file, or operable program”. If you are also getting bugged with this issue, then this guide will make you aware of numerous methods to rectify this issue. But first and foremost, it is extremely important to understand the reason behind this issue.
Table of Contents
Reason for “ADB is not recognized as the name of a cmdlet” Error
There could be two primary reasons why you are getting bugged with this issue:
- You are using the commands that are made for the Command Prompt in Powershell.
- The CMD/Powershell window is not opened in the platform-tools folder.
So in this guide, we will be addressing both these issues which in turn should help you fix the “ADB is not recognized as the name of a cmdlet” error on your Windows PC.
How to Fix ADB is not recognized as the name of a cmdlet
It is recommended that you try out each of the below-mentioned workarounds and then see which one spells out success for you. So with that in mind, let’s get started.
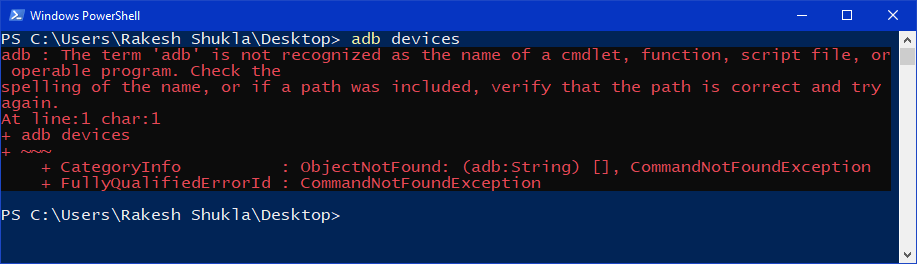
FIX 1: Don’t use Command Prompt commands in PowerShell
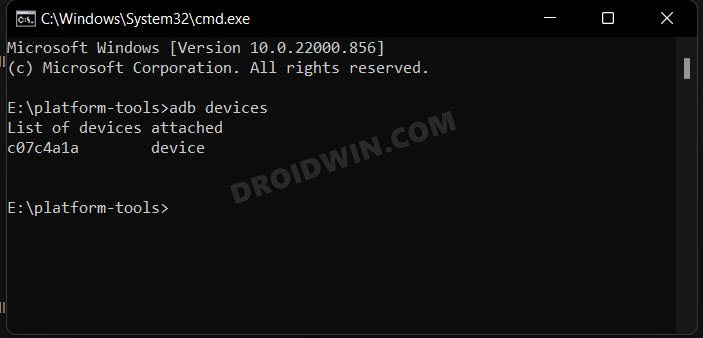
This is the single biggest reason why many users are bugged with this error. The thing is everywhere across the internet you will see commands listed in the normal format, such as adb devices. However, these commands are only valid for CMD, they are not in the correct syntax for the Powershell Window. For Powershell, you will have to add ./ before entering any ADB command. So the adb devices command will transform to ./adb devices.
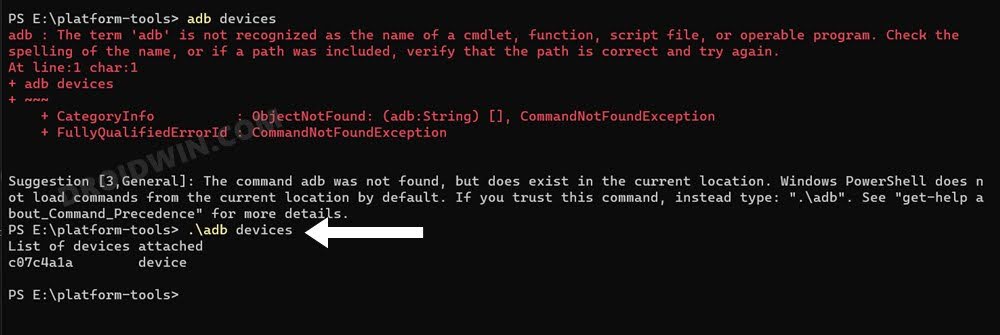
So your first course of action is to either use ./adb devices command in Powershell or use the adb devices command in the CMD window. Do so and it should fix the “ADB is not recognized as the name of a cmdlet” error on your Windows PC. Note: It is recommended that you opt for the CMD approach and stick to it in the near future as well.
FIX 2: Open CMD/PowerShell inside Platform Tools
Next up, you should always open CMD or Powershell inside the same folder where the Android SDK Platform Tools are extracted.
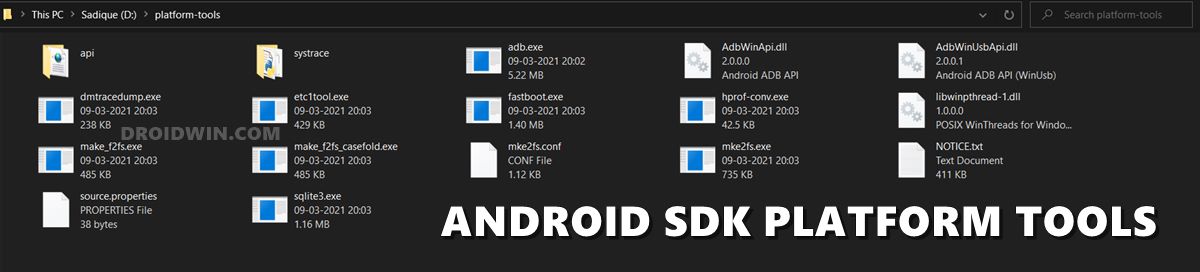
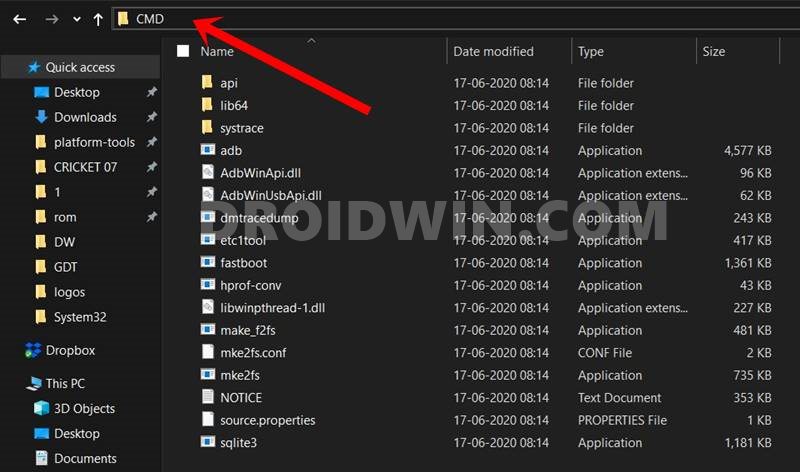
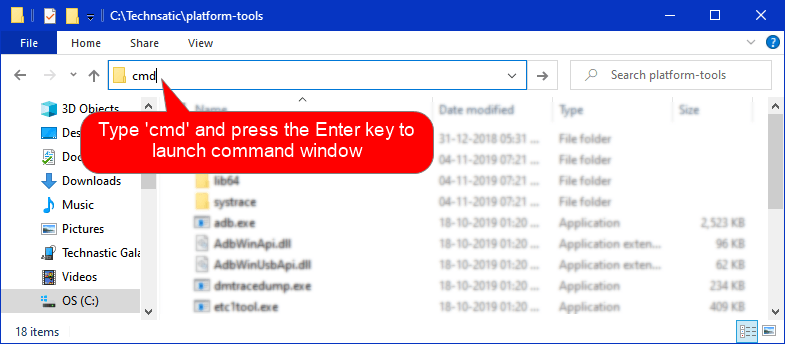
- For Command Prompt, head over to the platform-tools folder address bar, type in CMD, and hit Enter. This will launch CMD in which you could execute the desired commands.
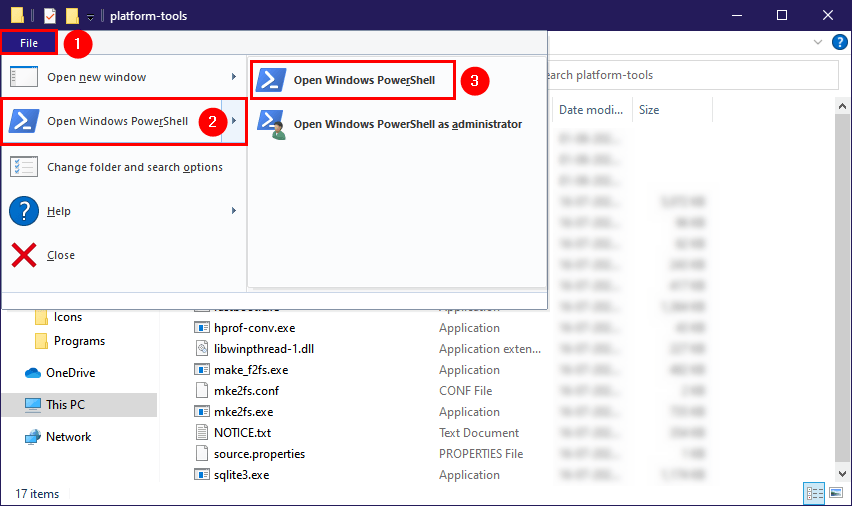
- For Powershell, right-click in an empty region in the platform-tools folder and select Open PowerShell window here. You may now execute the desired command in the Powershell window that opens.
FIX 3: Verify USB Debugging is Enabled
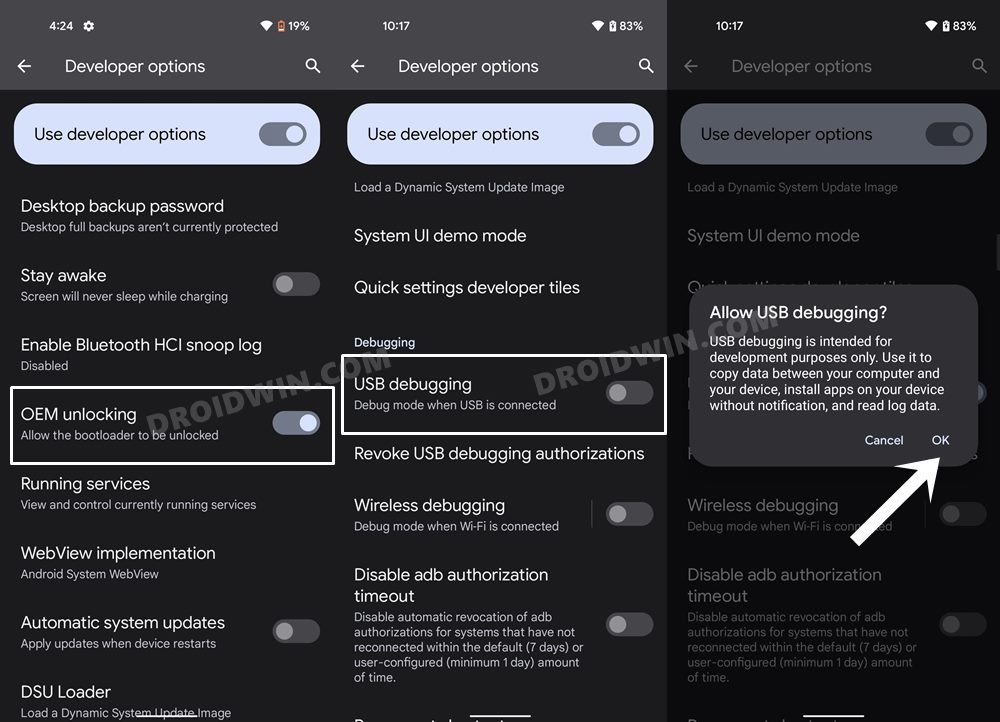
You should also verify that the USB Debugging is enabled on your device. This is needed so as to establish a successful ADB connection with your PC. So head over to Settings > About Phone > Tap on Build Number 7 times > Go back to Settings > System > Advanced > Developer Options > Enable USB Debugging. Check if it fixes the “ADB is not recognized as the name of a cmdlet” error.
FIX 4: Try these USB Tweaks
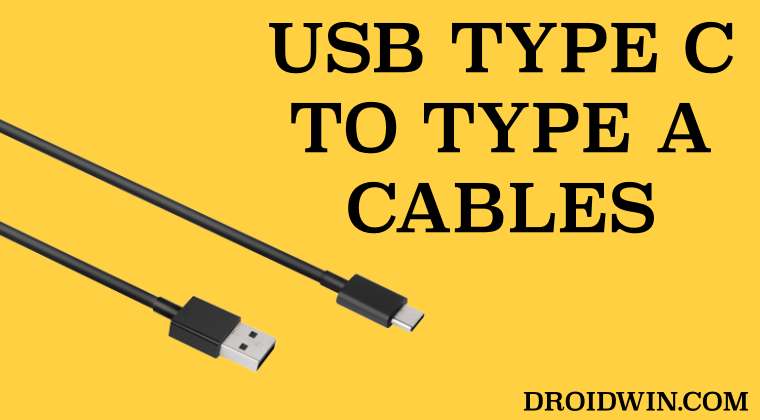
Sometimes, the issue might also arise due to the USB cables. So you should keep the following points in mind to avoid any USB-related issues.
- It is recommended to use the official USB cable that came with your device.
- Next up, use the USB 2.0 Port on your PC instead of the USB 3.0 Port.
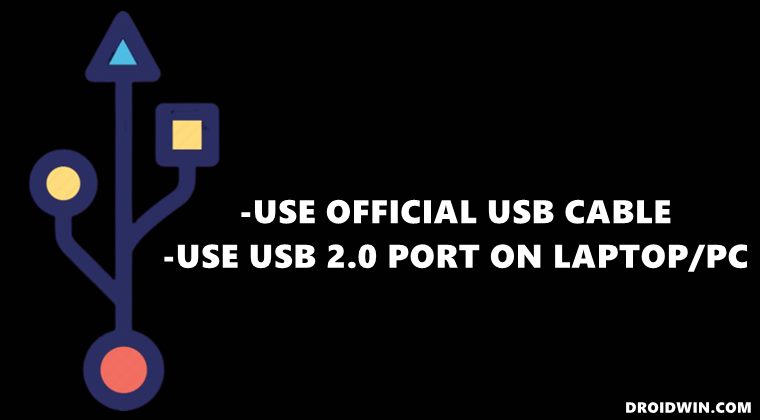
- Likewise, use USB Type C to Type A instead of USB Type A to Type A.
That’s it. These were the various methods that shall help you fix the “ADB is not recognized as the name of a cmdlet” error in Windows. If you have any queries concerning the aforementioned steps, do let us know in the comments. We will get back to you with a solution at the earliest.
About Chief Editor
Sadique Hassan
A technical geek by birth, he always has a keen interest in the Android platform right since the birth of the HTC Dream. The open-source environment always seems to intrigue him with the plethora of options available at his fingertips. “MBA by profession, blogger by choice!”
Имя adb не распознано как имя командлета
Reddit and its partners use cookies and similar technologies to provide you with a better experience.
By accepting all cookies, you agree to our use of cookies to deliver and maintain our services and site, improve the quality of Reddit, personalize Reddit content and advertising, and measure the effectiveness of advertising.
By rejecting non-essential cookies, Reddit may still use certain cookies to ensure the proper functionality of our platform.
For more information, please see our Cookie Notice and our Privacy Policy .
Fix ADB is not Recognized or ADB Command not Found Error
ADB and Fastboot are amazing command-line tools that let your computer connect with your Android device. ADB can communicate with your phone to debug and make changes. If you are getting “ADB is not recognized” or “ADB command not found”, or “Fastboot is not recognized” error while trying to use ADB commands, here are some easy fixes to make ADB detect your device.
Below is a list of just a few things that you can do using ADB commands.
Possible Reasons behind ADB Error
There may be various reasons why you are encountering the “adb is not recognized…” error in the Command Prompt. Depending on the scenario, the error message you get may differ. Below is a screenshot of the error that deliberately I recreated on my Windows 10 PC.
If you are using Windows PowerShell, you’ll get the following error.
‘fastboot’ is not recognized as an internal or external command, operable program or batch file.
So, if you’re getting the “adb is not recognized as an internal or external command” error in the cmd window, it could be due to one of the following reasons.
- Many people think that ADB and Fastboot are present on their Windows PC by default. The reality is, you must download and set up the ADB and Fastboot drivers additionally.
- You may also get the “ADB command not found” error if you have an outdated version of ADB and Fastboot drivers. Installing the latest Android SDK Platform-tools on your PC might fix the problem.
- If you are trying to run ADB command from a location where ‘adb.exe’ and ‘fastboot.exe’ are not present.
- You haven’t set up system-wide ADB and Fastboot on your Windows 10 PC. That’s to say, you haven’t set the correct path under User variables or System variables.
- In case you are trying to flash an OTA update.zip, a factory image, or a custom recovery image (twrp.img, for instance), make sure you have saved the files to flash in the ‘platform-tools‘ folder along with ‘adb.exe’, ‘fastboot.exe’, etc.
In case you are getting ‘adb or fastboot command not found error’ on Mac, read my tutorial to solve the issue.
Fixing ‘ADB is not Recognized…’ Error
Now that we know what could be the reason behind the ‘adb’ is not recognized as an internal or external command error, let’s try to solve the problem.
Fix 1: Download Latest SDK Platform Tools
If you have installed Koush’s Universal ADB Drivers, Minimal ADB and Fastboot, 15 seconds ADB Installer, or Minimal ADB Setup, it’s most likely that you have an outdated version of ADB and Fastboot drivers on your Windows PC. Moreover, most of such tools are unsafe as they may contain a Trojan virus.
You must remove and uninstall any such 3rd-party drivers if you have them installed. The best and safest source to download the latest ADB and Fastboot driver is Google itself. I would recommend you download the latest version of Android SDK Platform Tools zip for Windows directly from Google servers. In case you have a very old version of Platform-tools, you should update them.
Fix 2: Execute ADB Command from the ‘platform-tools’ Folder
Since the official ADB and Fastboot drivers are not installer files, you are supposed to direct the Command Prompt to the exact path or location of the ‘platform-tools‘ directory. Now, there are 3 ways to do that.
- Open the ‘platform-tools‘ or the folder that contains the ADB and Fastboot files. Click in the folder address bar, type “cmd” and press the Enter key.
- Open the ‘platform-tools‘ folder. Click on the file explorer’s File tab and select Open Windows PowerShell.
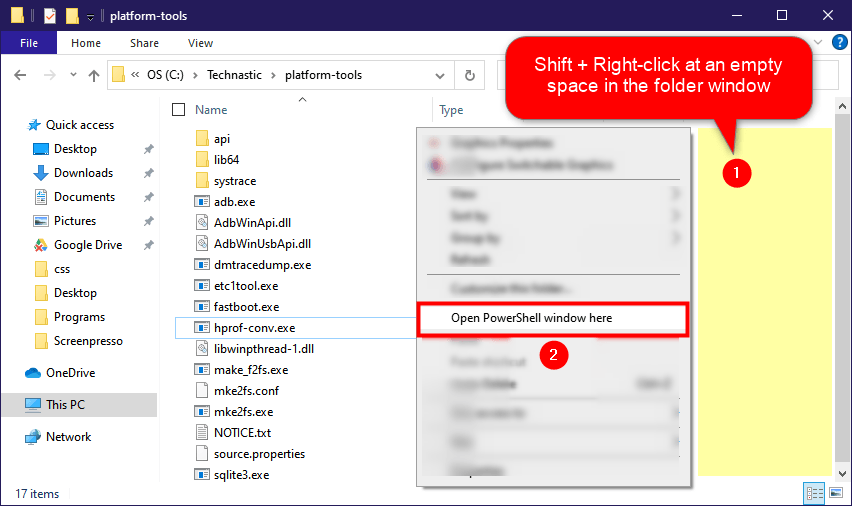
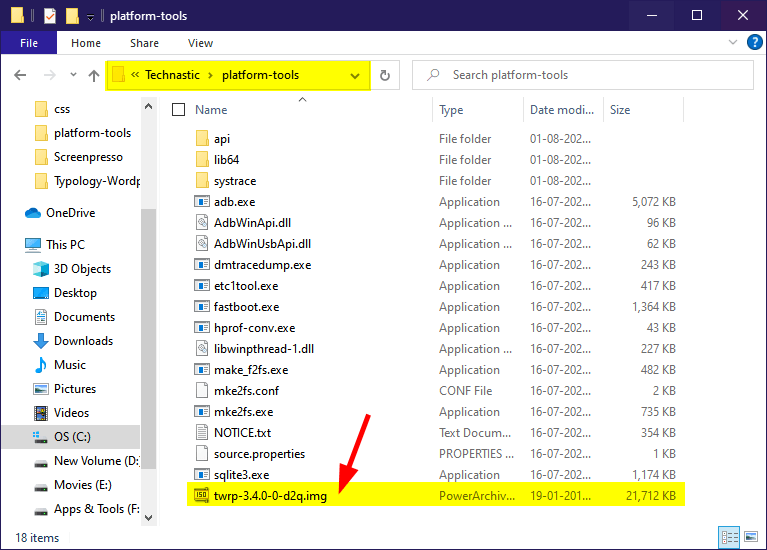
- While in the ‘platform-tools‘ folder, hold the Shift key and right-click at an empty or white space (highlighted with yellow) in the folder window. Select the Open PowerShell window here option from the context menu. If you want, you can add a permanent option to launch the command prompt to the Windows context menu.
Fix 3: Use ‘platform-tools’ Folder Path in CMD
Suppose you have saved the ABD and Fastboot drivers in the C Drive and you are trying to run an ADB command by launching the Command Prompt on your Desktop screen you’ll get the ‘adb’ is not recognized as an internal or external command error.
There’s a simple workaround to make the ADB command not found error go away by using cd or chdir (change directory) command. This command tells the Command Prompt to trigger ADB or Fastboot from a given path. Just launch the command window and type cd followed by the platform-tools folder path . as shown below.
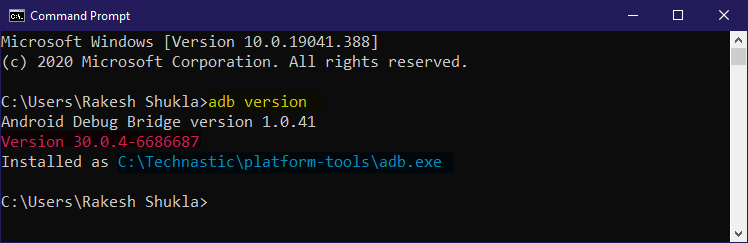
If you don’t know the path of the folder, here are 7 ways to find the path of a file or folder on Windows. As you can see in the screenshot below when I executed the adb devices command I got the following result.
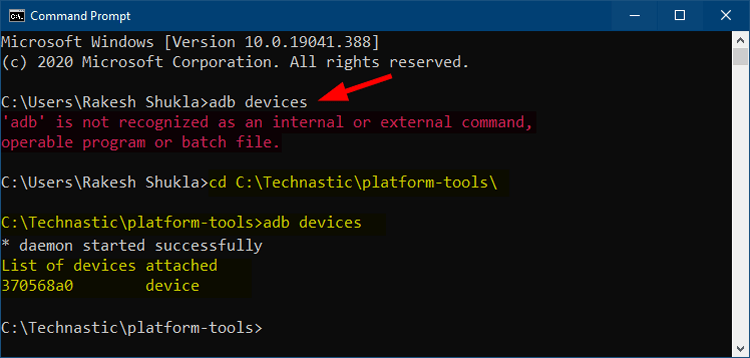
However, when I tried cd c:\technastic\platform-tools followed by adb devices , there ADB is not found error disappeared.
Fix 4: Add a User or System Variable Path for ADB and Fastboot
Although the CD method gives the expected result, I find it a bit time taking as you need to type the folder path every time you use ADB or ADB Shell commands. The easiest way to access ADB and Fastboot universally from any screen on your Windows PC is to set up system-wide ADB and Fastboot.
This method involves adding System or User Variables for the path of the ‘platform-tools‘ folder and below we’ll see how to do that.
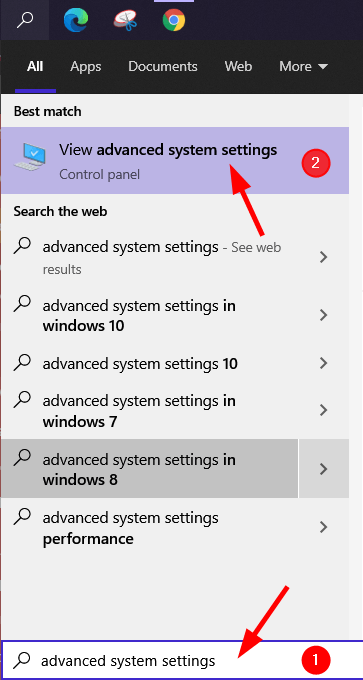
- Open Advanced system settings on your Windows PC. You can go to those settings in 3 ways.
- Type ‘Advanced system settings‘ in the Windows search bar and launch it.
- Right-click on This PC found on the right pane in the File Explorer window and click on Properties> Advanced system settings.

- Open the Control panel and navigate to System and Security> System> Advanced system settings.
Done! You have successfully set up system-wide ADB and Fastboot on your Windows PC. Now, you are all set to execute ADB or Fastboot commands from any screen without navigating to the ‘platform-tools’ folder.
Fix ‘adb.exe: no devices/emulators found’ Error

If you are getting adb.exe: no devices/emulators found error it means that the ADB daemon is unable to detect your device. It might be due to the following reasons.
- Your Android phone or tablet is not connected to the computer.
- You haven’t turned on USB debugging from the Developer options on your device.
Take care of the above things, reconnect your device, and try again. The error should have gone away.
Bonus Tip
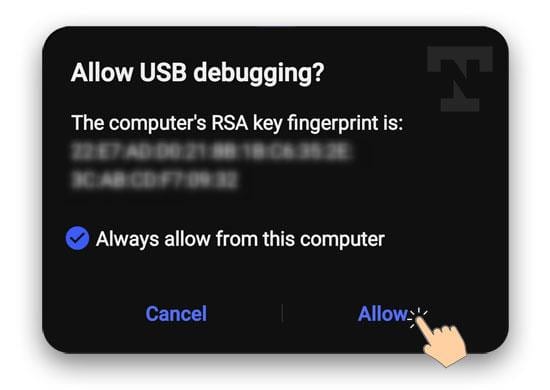
So that your Windows computer can communicate with your Android device, you must keep USB debugging enabled on your device. Not just that, don’t forget to extend the screen timeout duration. As soon as you run the first ADB command, you’ll be prompted to Allow USB debugging on your device. You must select ‘Allow‘ to authorize ADB.
Launch the Command Prompt or Windows PowerShell again to check whether the ADB is not recognized… error is fixed or not. Try any of the following commands:
Fix Fastboot is not Recognized Error
The fixes I suggested above to solve ADB or ADB command not recognized error will also fix the following issue.
However, if you’re still getting the Fastboot is not recognized error while flashing TWRP.img file, a factory image, or root your Android device, here’s how to fix it. The solution should also work if Fastboot is not detecting a connected device.
- First of all, make sure you have downloaded the SDK Platform tools from above and extracted the downloaded zip file.
- Open the ‘platform-tools‘ folder.
- Now, copy or move the files you want to flash to your Android device to the same folder where ‘adb.exe‘ and ‘fastboot.exe‘ files are present.
- Reboot your Android device into the Fastboot Mode using the following command.
- While your device is in Fastboot Mode, use a compatible USB cable to connect it to the PC.
- Then launch a command window from the ‘platform-tools‘ folder. I have already described 3 ways to do that above.
- It’s time now to execute the following command.
- If you get the list of attached devices in the command window, it means everything is fine. However, if encounter any of the following issues, try plugging out the USB cable and inserting it again. If it still doesn’t help, try to reboot your phone and PC and try again.
- Fastboot not detecting device
- Fastboot devices not showing in cmd
- Fastboot waiting for device
The Fastboot is not recognized error should be gone.
If you are still getting any ADB or Fastboot-related issues, please let us know!
Имя adb не распознано как имя командлета
Platform-tools: r34.0.4 rev.2
ADB: 1.0.41 (34.0.4-10411341)
Fastboot: 34.0.4-10411341
Make_f2fs (casefold): 1.16.0 (2023-04-11)
Mke2fs: 1.46.6 (1-Feb-2023)
Последнее обновление утилит в шапке: 27.07.2023- Посмотреть какие устройства подключены и могут работать с ADB.
- Просматривать логи.
- Копировать файлы с/на аппарат.
- Устанавливать/Удалять приложения.
- Удалять (очищать) раздел data.
- Прошивать (перезаписывать) раздел data.
- Осуществлять различные скрипты управления.
- Управлять некоторыми сетевыми параметрами.
Если что-то неправильно, то в списке подключенных устройств (List of devices attached) будет пусто.
Скрытые команды ADB
adb -d Команда посылается только на устройство подключенное через USB.
Внимание: Выдаст ошибку, если подключено больше одного устройства.adb -e Команда посылается на устройство в эмуляторе.
Внимание: Выдаст ошибку, если подключено больше одного эмулятора.adb -s <серийный_номер_устройства> Команда посылается на устройство с указанным серийным номером:
adb -p <имя устройства или путь> Команда посылается на устройство с указанным именем:
Если ключ -p не указан, используется значение переменной ANDROID_PRODUCT_OUT.adb devices Список всех подсоединенных устройств.
adb connect <хост>[:<порт>] Подсоединиться к андроид хосту по протококу TCP/IP через порт 5555 (по умолчанию, если не задан).
adb disconnect [<хост>[:<порт>]] Отсоединиться от андроид подключенного через TCP/IP порт 5555 (по умолчанию, если не задан).
Если не задан ни один параметр, отключиться от всех активных соединений.adb push <путь на PC> <путь на андроид> Копировать файл/папку PC->девайс.
adb pull <путь на андроид> [<путь на PC>] Копировать файл/папку девайс->PC.
adb sync [<каталог>] Копировать PC->девайс только новые файлы.
Ключи:
-l Не копировать, только создать список.adb shell Запуск упрощенного unix shell.
Примеры использованияadb emu <команда> Послать команду в консоль эмулятора
adb install [-l] [-r] [-s] <название_приложения.apk> Послать приложение на устройство и установить его.
Пример: adb install c:/adb/app/autostarts.apk Установить файл autostarts.apk лежащий в папке /adb/app/ на диске с:
Ключи:
-l Блокировка приложения
-r Переустановить приложение, с сохранением данных
-s Установить приложение на карту памяти
Установка split apkadb uninstall [-k] <название_приложения.apk> Удаление приложения с устройства.
Ключи:
-k Не удалять сохраненные данные приложения и пользователя.adb wait-for-device Ждать подключения устройства.
adb start-server Запустить службу/демон.
adb kill-server Остановить службу/демон.
adb get-state Получить статус:
offline Выключен.
bootloader В режиме начальной загрузки.
device В режиме работы.adb get-serialno Получить серийный номер.
adb status-window Непрерывный опрос состояния.
adb remount Перемонтировать для записи. Требуется для работы скриптов, которые изменяют данные на.
adb reboot bootloader Перезагрузка в режим bootloader.
adb reboot recovery Перезагрузка в режим recovery.
adb root Перезапуск демона с правами root
adb usb Перезапуск демона, прослушивающего USB.
adb tcpip <порт> Перезапуск демона, прослушивающего порт TCP.
adb ppp <tty> [параметры] Запуск службы через USB.
Note: you should not automatically start a PPP connection. <tty> refers to the tty for PPP stream. Eg. dev:/dev/omap_csmi_tty1
Параметры:
defaultroute debug dump local notty usepeerdnsFastBoot — консольное приложение для PC. Используется для действий над разделами
fastboot devices Список присоединенных устройств в режиме fastboot.
fastboot flash <раздел> <файл> Прошивает файл .img в раздел устройства.fastboot erase <раздел> Стереть раздел.
Разделы: boot, recovery, system, userdata, radio
Пример: fastboot erase userdata Стирание пользовательских данных.fastboot update <имя_файла.zip> Прошивка из файла имя_файла.zip
fastboot flashall Прошивка boot + recovery + system.
fastboot getvar <имя_переменной> Показать переменные bootloader.
Пример: fastboot getvar version-bootloader Получить версию bootloader.fastboot boot <kernel> [<ramdisk>] Скачать и загрузить kernel.
fastboot flash:raw boot <kernel> [<ramdisk>] Создать bootimage и прошить его.
fastboot devices Показать список подключенных устройств.
fastboot continue Продолжить с автозагрузкой.
fastboot reboot Перезагрузить аппарат.
f astboot reboot-bootloader Перезагрузить девайсв режим bootloader.
Перед командами fastboot можно использовать ключи:
-w стереть данные пользователя и кэш
-s <серийный номер> Указать серийный номер устройства.
-p <product> Указать название устройства.
-c <cmdline> Переопределить kernel commandline.
-i <vendor id> Указать вручную USB vendor id.
-b <base_addr> Указать в ручную базовый адрес kernel.
-n <page size> Указать размер страниц nand. по умолчанию 2048.Команду logcat можно использовать с машины разработки
$ adb logcat
или из удаленного shell
# logcat Каждое сообщение лога в Android имеет тэг и приоритет
Тэг – это строка указывающая компонент системы, от которого принято сообщение (например: View для системы view)
Приоритет – имеет одно из нижеследующих значений (в порядке от меньшего к большему):
V — Verbose (Низший приоритет).
D — Debug
I — Info
W — Warning
E — Error
F — Fatal
S — Silent (Наивысший приоритет, при котором ничего не выводится).Получить список тэгов, используемых в системе, вместе с их приоритетами можно запустив logcat. В первых двух столбцах каждого из выведенных сообщений будут указаны <приоритет>/<тэг>.
Пример выводимого logcat сообщения:
I/ActivityManager( 585): Starting activity: IntentДля уменьшения вывода лога до приемлемого уровня нужно использовать выражения фильтра. Выражения фильтра позволяют указать системе нужные комбинации <тэг> и <приоритет>, остальные сообщения система не выводит.
Выражения фильтра имеют следующий формат <тэг>:<приоритет> . где <тэг> указывает нужный тэг, <приоритет> указывает минимальный уровень приоритета для выбранного тэга. Сообщения с выбранным тэгом и приоритетом на уровне или выше указанного записываются в лог. Можно использовать любое количество пар <тэг>:<приоритет> в одном выражении фильтра. Для разделения пар <тэг>:<приоритет> используется пробел.Пример ниже выводит в лог все сообщения с тэгом «ActivityManager» с приоритетом «Info» или выше, и сообщения с тэгом «MyApp» и приоритетом «Debug» или выше:
adb logcat ActivityManager:I MyApp:D *:S
Последний элемент в выражении фильтра *:S устанавливает приоритет «silent» для всех остальных тэгов, тем самым обеспечивая вывод сообщений только для «View» и «MyApp». Использование *:S – это отличный способ для вывода в лог только явно указанных фильтров (т.е. в выражении фильтра указывается «белый список» сообщений, а *:S отправляет все остальное в «черный список»).При помощи следующего выражения фильтра отображаются все сообщения с приоритетом «warning» или выше для всех тэгов:
adb logcat *:WЕсли logcat запускается на машине разработчика (не через удаленный adb shell), можно также установить значение выражения фильтра по умолчанию задав переменную окружения ANDROID_LOG_TAGS:
export ANDROID_LOG_TAGS=»ActivityManager:I MyApp:D *:S»Следует обратить внимание что задав переменную окружения ANDROID_LOG_TAGS она не будет работать в эмуляторе/устройстве, если вы будете использовать logcat в удаленном shell или используя adb shell logcat.
Вышеописанная команда export работает в ОС *nix и не работает в Windows.Контроль формата вывода лога
Сообщения лога в дополнение к тэгу и приоритету содержат несколько полей метаданных. Можно изменять формат вывода сообщений показывая только конкретные поля метаданных. Для этого используется параметр -v и указывается один из ниже перечисленных форматов вывода.
brief Показывать приоритет/тэг и PID процесса (формат по умолчанию).
process Показывать только PID.
tag Показывать только приоритет/тэг.
thread Показывать только процесс:поток и приоритет/тэг.
raw Показать необработанное сообщение, без полей метаданных.
time Показывать дату, время вызова, приоритет/тэг и PID процесса.
long Показывать все поля метаданных и отдельно сообщения с пустыми строками.При запуске logcat можно указать формат вывода используя параметр -v:
adb logcat [-v <format>]
Пример, который показывает сообщения в формате thread:
adb logcat -v thread
Нужно отметить, что можно использовать только один формат с параметром -v.Просмотр альтернативного буфера лога
Система логов Android держит несколько кольцевых буферов для лога сообщений и не все сообщения отправляются в основной буфер. Для отображения дополнительных сообщений лога нужно запустить logcat с параметром -b.
Таким образом можно посмотреть один из альтернативных буферов:
radio Просмотр буфера с сообщениями связанными с радио/телефоном.
events Просмотр буфера с сообщениями связанными с событиями.
main Просмотр основного буфера (по умолчанию).Пример ниже показывает буфер с радио и телефонными сообщениями:
adb logcat -b radioПросмотр stdout и stderr
По умолчанию система Android шлет вывод stdout и stderr (System.out и System.err) в /dev/null (удаляет). В процессах, которые выполняются в виртуальной машине Dalvik (Dalvik VM) может осуществляться запись копии вывода в лог файл. В этом случае система записывает сообщения в лог используя тэги stdout и stderr с приоритетом I.
Для перенаправления вывода нужно остановить эмулятор/устройство, затем выполнить команду shell setprop для включения перенаправления вывода. Пример того как это делается:
$ adb shell stop
$ adb shell setprop log.redirect-stdio true
$ adb shell start
Система сохраняет эту настройку, пока работает эмулятор/устройство. Чтобы использовать эту настройку по умолчанию в эмуляторе/устройстве, нужно добавить эту команду в /data/local.prop в эмуляторе/устройстве.Список параметров команды logcat
-b <buffer> Загрузить альтернативный буфер лога для просмотра, такой как event или radio. Основной буфер используется по умолчанию.
-c Очистить (сбросить) лог и выйти.
-d Вывести лог на экран и выйти.
-f <filename> Записать сообщения лога в файл <filename>. По умолчанию в stdout.
-g Вывести размер указанного буфера лога и выйти.
-n <count> Установить максимальное количество ротаций лога (количество хранимых сжатых фрагментов лога) <count>. По умолчанию 4. Требует параметр -r.
-r <kbytes> Выполнять ротацию каждые <kbytes> вывода (разделять лог на фрагменты по <kbytes>). По умолчанию 16. Требует параметр -f.
-s Устанавливает silent фильтром по умолчанию.
-v <format> Устанавливает формат вывода сообщений лога. По умолчанию brief. - Type ‘Advanced system settings‘ in the Windows search bar and launch it.