Dolby Atmos Not Working On Windows 11 How To Enable It
This posed a major challenge since users with compatible PCs were unable to use the feature which affected their listening experience. Dolby Atmos doesn’t just enhance the sound but delivers a cinematic experience. If you too find Dolby Atmos not working in Windows 11, go through this article to understand the problem and find out the most relevant fixes for it.
Why is Dolby Atmos not working in Windows 11?#
There could be a bunch of reasons behind Dolby Atmos not working on your Windows 11 system, but more often than not, it’s the drivers that are the culprit. It could both be a case of outdated or corrupt drivers, along with issues in the current version. Apart from that, it could be a problem with the OS, misconfigured settings, or the Dolby Access app itself. Whatever be the case, we have listed the relevant fixes for each to get things back up and running in no time. If you are able to identify the problem, say a corrupt driver, directly head to the relevant method and execute it. Otherwise, you can follow the steps in the listed sequence for quick and effective troubleshooting.
What do I do if Dolby Atmos is not working in Windows 11?#
1. Run the built-in audio troubleshooter#
Whenever dealing with an error in Windows, it’s recommended that you first run the relevant built-in troubleshooter for it, if one exists. These are known to fix a plethora of problems with minimal effort from your end.
2. Update Windows 11#
3. Update the sound driver#
Windows will now automatically look for the best available driver on the system and install it for the device. The major drawback here is that only the hard drive is scanned for updates and not the web servers or Windows Update. In case the drivers were not updated using the Device Manager method listed above, you can check for a newer version in Windows Update or manually download and install them. After updating the driver, check if Dolby Atmos starts working in Windows 11. SPONSORED If that sounds like too much trouble, you can always go with a reliable third-party app for the job. There are a bunch of these out there, but we recommend using DriverFix, a dedicated tool that scans all available sources for updates and keeps the installed drivers up-to-date.
4. Reinstall the sound driver#
When you restart the computer, Windows will automatically install a fresh driver to replace the corrupt one that was previously installed. Once done, check if the Dolby Atmos not working issue in Windows 11 is eliminated.
5. Roll back driver update#
If Dolby Atmos stopped working after updating the sounds drivers in Windows 11, it’s time you roll back the driver update. Doing this will reinstall the previous driver, and in all likelihood fix the issue.
6. Enable exclusive mode#
7. Reset the Dolby Access app#
Wait for the reset process to complete and then check if the Dolby Atmos not working issue in Windows 11 is eliminated.
How can I install Dolby Atmos in Windows 11?#
You can easily install the Dolby Atmos app from the Microsoft Store, spend a few minutes setting it up and enjoy the surround system technology as it’s meant to be. Though, make sure your system is compatible with it or you have external hardware that is. In case you have none, there’s always the option to use the built-in feature for surround sound on your headphones with the Dolby Atmos app. This doesn’t require specialized hardware and will work with any set of headphones or earbuds. These are all the ways you can eliminate issues that are preventing Dolby Atmos from working in Windows 11 and experience total sound immersion just the ways it is in movie theaters. If case you are facing trouble with Dolby Atmos in Windows 10, check our dedicated guide to fix the issue. Tell us which fix worked along with your experience of Dolby Atmos in Windows 11, in the comments section below.
Name * Email * Commenting as . Not you? Save information for future comments
Comment
Is Dolby Atmos Not Working in Windows 11/10? Fix It via 7 Ways!
Dolby Atmos not working in Windows 11/10 is a common issue on your computer. If you are encountering this issue, how can you get rid of the trouble? Don’t be panic and you can easily fix this issue if you try these methods in this post given by MiniTool Solution.
Dolby Atmos Windows 11/10 Not Working
Dolby Atmos is an advanced surround sound technology in Windows 10 and 11. It is designed to support height channels, which expands existing surround sound systems and enhances your audio listening experience on various devices.
To use it in Windows 10/11, you should install it on your PC. Here is a related article – How to Install Dolby Atmos in Windows 10/11 for Free.
Although Dolby Atmos improves audio listening quality, it doesn’t always run properly. According to some Windows 11 users, it is not working or crashes frequently. Besides, it also doesn’t work well in Windows 10. If you also find Dolby Atmos runs unusually, take it easy and you can go on reading to find useful methods.
Fixes for Dolby Atmos Not Working Windows 10/11
Run Windows Audio Troubleshooter
Windows is equipped with many troubleshooters that can be used to solve most problems (not all). If Windows 10/Windows 11 Dolby Atmos not working happens due to a minor glitch, running the audio troubleshooter can fix this issue.
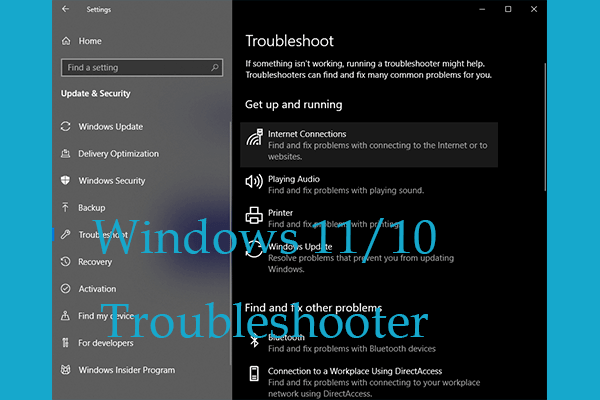
This post teaches you how to use Windows 11/10 troubleshooters to detect and fix Windows errors automatically.
Step 1: Press Win and I to launch the Settings app.
Step 2: In Windows 10, go to Update & Security > Troubleshoot > Additional troubleshooters. Then, locate Playing Audio and click Run the troubleshooter.
In Windows 11, go to System > Troubleshoot > Other troubleshooters. Then, locate Playing Audio and click the Run button.

Step 3: Wait for the troubleshooter to find the problem and fix it by following the wizards on the screen.
Update/Reinstall/Roll back Audio Driver
If the audio driver is outdated, Dolby Atmos crashing or not working may appear on your Windows 11/10 PC. To fix it, you can update the driver.
Step 1: Right-click on the Start button and choose Device Manager.
Step 2: Expand Sound, video and game controllers, right-click on the audio driver and choose Update driver.
Step 3: Click Search automatically for drivers to continue.
Step 4: Windows will download the driver and install it on your PC if there is an available one.
Or you can try to uninstall the audio driver and reinstall it on your PC.
Step 1: In Device Manager, right-click your sound driver and choose Uninstall device.
Step 2: Click Uninstall.
Step 3: Restart your PC and Windows will reinstall a new audio driver.
Sometimes you meet the issue of Dolby Atmos not working in Windows 11/10 after audio driver update. In this case, you need to roll back the driver to a previous version.
Step 1: In Device Manager, right-click on the sound driver and choose Properties.
Step 2: Under the Driver tab and click Roll Back Driver.
Update the Dolby Access App
The Dolby Access app helps you to enjoy Dolby Atmos on your Windows 11/10 PC. But according to reports, some incompatibility issues with the app can lead to Dolby Atmos crashing or not working. To fix it, you can try to update this app.
Step 1: Go to the search bar, type Dolby Access, and click the result.
Step 2: Go to Information > Dolby Access Support > Still Need Help > Contact Us > Submit.
Step 3: After receiving instructions in your email, follow the instructions. Then, check if the Dolby Access application update makes any difference.
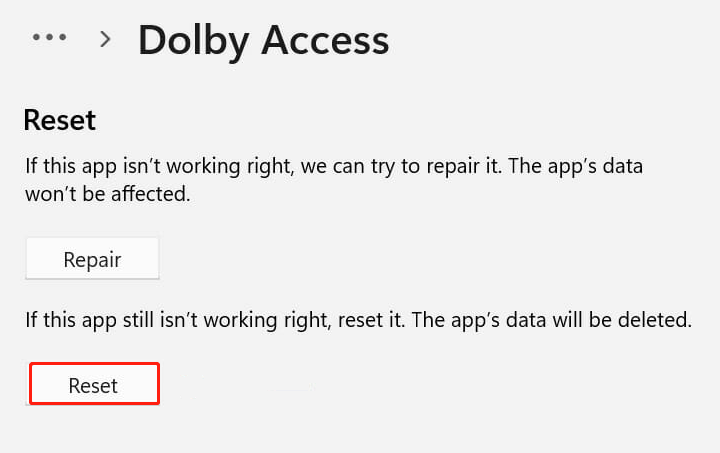
Reset Dolby Atmos App
Sometimes resetting the app can fix the issue of Dolby Atmos not working in Windows 11/10.
Step 1: Go to Windows Settings > Apps > App & features.
Step 2: Locate the Dolby Access app and click Advanced options.
Step 3: Click the Reset button.
Enable Exclusive Mode Options
This is another way to fix Dolby Atmos not working in Windows 10/11:
Step 1: Right-click the volume icon and choose Sound in Windows 10. In Windows 11, choose Sound settings from the context menu and click More sound settings.
Step 2: Go to Playback, choose your default speaker, and click Properties.
Step 3: Under the Spatial sound tab, choose Dolby Atmos for Headphones from the drop-down menu.
Step 4: Go to Advanced and check the boxes of two options under the Exclusive Mode section – Allow applications to take exclusive control of this device and Give exclusive mode applications priority.
Step 5: Save the changes.

These are the common ways for Dolby Atmos not working in Windows 11/10. If you have any other solutions, tell us by leaving a comment below.
About The Author
Vera is an editor of the MiniTool Team since 2016 who has more than 7 years’ writing experiences in the field of technical articles. Her articles mainly focus on disk & partition management, PC data recovery, video conversion, as well as PC backup & restore, helping users to solve some errors and issues when using their computers. In her spare times, she likes shopping, playing games and reading some articles.
Как включить dolby atmos в windows 11

How to Install Dolby Atmos on your Windows 11 PC or Laptop
Dolby Atmos is one of the numerous characteristics that customers look for when purchasing a new soundbar or home theater system. Dolby Atmos enhances digital audio output to provide a unique sound experience. It allows the user to fine-tune the sound system to offer an experience that can only be found in a theater. In this guide, we will show you two simple methods on how to download and install Dolby Atmos on your Windows 11 PC or laptop (HP, Dell, Lenovo, and…). Before we go for the steps, let’s have some basic information about Dolby Atmos.

Written by Techschumz
Techschumz, as its name suggests, is a free online resource website for tech lovers. The main goal of this website is to deliver quality
Как установить Dolby Atmos в Windows 11?
Когда вы установите Dolby Atmos в Windows 11, качество звука повысится на сто процентов. Dolby Atmos — это технология объемного звучания, которая обеспечивает эффект присутствия при прослушивании музыки, просмотре видео и других звуков.
Вы можете установить Dolby Atmos в свой Android-телефон, планшет, компьютер и, как говорится в последних новостях, даже в свой автомобиль. Итак, всем вам, любителям звука и музыки, Atmos предлагает пространственное аудио, в котором вы можете наслаждаться песнями, как никогда раньше.
Однако в этом сообщении в блоге я расскажу, как вы можете испытать превосходное качество, которое Dolby Atmos обеспечивает для Windows 11. Итак, давайте углубимся прямо в это.

Способ 1: как установить Dolby Atmos и включить его?
Шаг 1. Сначала перейдите на страницу https://drive.google.com/file/d/1Or2vBK7YZfvUxAaNrfANJkmfRxJIFtsm/view и загрузите файл.
Шаг 2: Щелкните его правой кнопкой мыши и выберите «Извлечь все». Затем нажмите «Извлечь».
Шаг 3: Нажмите на файл. Затем выберите apo_driver_setup_x64.exe.
Шаг 4: Дважды щелкните по нему и нажмите «Далее» в окне.
Шаг 5: Кроме того, прокрутите вниз и выберите Dolby DAX API Service 3.20602.646.0.

Шаг 6: Нажмите «Далее» и нажмите «Установить».
Шаг 7: Когда процесс завершится, нажмите «Готово».
Шаг 8: В меню «Пуск» нажмите Fx CoGonfigurator.
Шаг 9: Нажмите «Да» и выберите конечные точки, которые подходят вам больше всего и дадут отличный результат. Например, в вашем случае это могут быть Active Speakers Realtek High Definition Audio.
Долби Атмос в Windows
Шаг 10: На вкладке «Действие» перейдите в «Инструмент» и нажмите «Инструмент настройки продукта».
Шаг 11. Перейдите к продуктам и щелкните Dolby DAX3 (UWPv3.xxxxx — Gaming, XLM 3.3.0).
Шаг 12: Кроме того, нажмите «Применить настройки продукта к выбранным конечным точкам».
Шаг 13: Через короткое время появится всплывающее окно с сообщением «Операция завершена».
Шаг 14: Закройте окно и щелкните вложенную папку config.
Шаг 15: Выберите все файлы и скопируйте их в папку ярлыков Dolby.
Шаг 16: Кроме того, нажмите «плюс» и нажмите «Продолжить».
Шаг 17: Все эти файлы будут видны в ярлыке dolbyaposvc в загруженном вами файле Dolby.
Шаг 18: Дважды щелкните файл службы bat, и он перезапустит Dolby API service.bat.
Шаг 19: Затем откройте файл Dolby Laboratories, который уже является приложением Windows.

Шаг 20: Кроме того, нажмите «Установить».
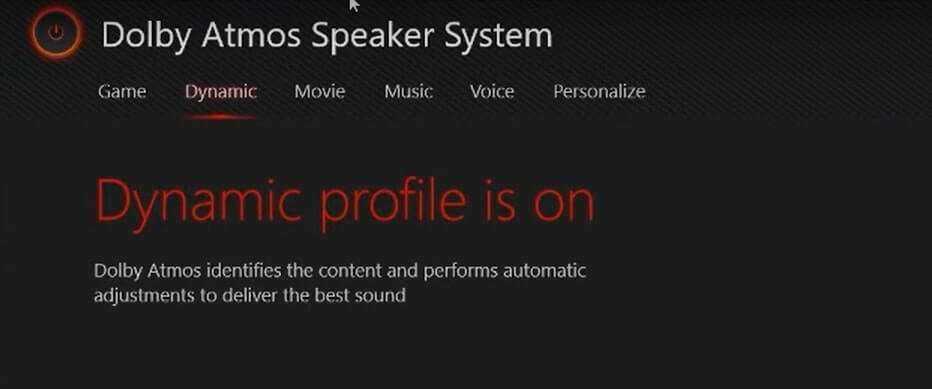
После нажатия «Установить» Dolby Atmos установит его в вашей системе. Затем включите его и внесите необходимые изменения.
Способ 2: как установить Dolby Atmos в Windows 11?
Шаг 1: Перейдите по этой ссылке: https://mega.nz/file/EcZjVYJQ#ac5AC3QHQcfkiIwccSSVcosdhRFopYJxM9plL4OY690 и загрузите файл.
Шаг 2: После загрузки файлов перейдите к виджетам в Windows 11.
Шаг 3: Найдите «Настройки разработчика» и включите «Режим разработчика».
Шаг 4: Закройте окно. Затем нажмите клавишу Shift и перезагрузите компьютер.
Шаг 5. Появится синий экран с такими параметрами, как «Продолжить», «Использовать устройство», «Устранение неполадок» и «Выключить компьютер».
Шаг 6: Нажмите «Устранение неполадок», а затем нажмите «Дополнительные параметры».
Шаг 7: Кроме того, нажмите «Параметры запуска» и нажмите «Перезагрузить».
Шаг 8: Список параметров появится под заголовком «Параметры запуска». Нажмите F7, и он перезапустится.
Шаг 9: Как только ваш компьютер запустится, из виджетов перейдите в Диспетчер устройств и выберите Обновить драйверы.

Шаг 10: Как только вы увидите сообщение о том, что Windows успешно обновила ваши драйверы, нажмите «Закрыть».
Шаг 11: Кроме того, появится еще одно сообщение с вопросом, хотите ли вы перезагрузить компьютер сейчас. Нажмите на да.
Шаг 12: Теперь перейдите в папку, нажмите «Загрузки» и дважды щелкните файл Dolby Atmos.
Шаг 13: Дважды щелкните приложение и приложение 2021.
Шаг 14: Появится окно установки Dolby Atmos. Итак, нажмите «Установить».

Шаг 15: После установки вы увидите всплывающее окно, в котором говорится, что Dolby Atmos отключен. Кроме того, перезагрузите компьютер, и он должен работать нормально.

Вывод
В некоторых случаях после успешной установки Dolby Atmos вы можете увидеть сообщение об ошибке, в котором говорится, что существует проблема с доступом к драйверу Dolby Audio. Перейдите в «Настройки», «Центр обновления Windows» и выберите «Устранение неполадок». В разделе «Устранение неполадок» выберите «Воспроизведение аудио» и нажмите «Запустить средство устранения неполадок». Ваш компьютер выберет динамики по умолчанию и запустит программу. Кроме того, нажмите «Нет», «Не открывать улучшения звука» и нажмите «Закрыть».