# Foreign Keys
Foreign keys enables you to define relationship between two tables. One (parent) table need to have primary key that uniquely identifies rows in the table. Other (child) table can have value of the primary key from the parent in one of the columns. FOREIGN KEY REFERENCES constraint ensures that values in child table must exist as a primary key value in the parent table.
In this example we have parent Company table with CompanyId primary key, and child Employee table that has id of the company where this employee works.
foreign key references ensures that values inserted in Employee.CompanyId column must also exist in Company.CompanyId column. Also, nobody can delete company in company table if there is ate least one employee with a matching companyId in child table.
FOREIGN KEY relationship ensures that rows in two tables cannot be "unlinked".
# Maintaining relationship between parent/child rows
Let’s assume that we have one row in Company table with companyId 1. We can insert row in employee table that has companyId 1:
However, we cannot insert employee that has non-existing CompanyId:
Msg 547, Level 16, State 0, Line 12 The INSERT statement conflicted with the FOREIGN KEY constraint "FK__Employee__Compan__1EE485AA". The conflict occurred in database "MyDb", table "dbo.Company", column ‘CompanyId’. The statement has been terminated.
Also, we cannot delete parent row in company table as long as there is at least one child row in employee table that references it.
Msg 547, Level 16, State 0, Line 14 The DELETE statement conflicted with the REFERENCE constraint "FK__Employee__Compan__1EE485AA". The conflict occurred in database "MyDb", table "dbo.Employee", column ‘CompanyId’. The statement has been terminated.
Foreign key relationship ensures that Company and employee rows will not be "unlinked".
# Adding foreign key relationship on existing table
FOREIGN KEY constraint can be added on existing tables that are still not in relationship. Imagine that we have Company and Employee tables where Employee table CompanyId column but don’t have foreign key relationship. ALTER TABLE statement enables you to add foreign key constraint on an existing column that references some other table and primary key in that table:
# Add foreign key on existing table
FOREIGN KEY columns with constraint can be added on existing tables that are still not in relationship. Imagine that we have Company and Employee tables where Employee table don’t have CompanyId column. ALTER TABLE statement enables you to add new column with foreign key constraint that references some other table and primary key in that table:
Создание связи (отношения) типа «один ко многим» между таблицами базы данных Microsoft SQL Server
Создание связи (отношения) типа «один ко многим» между таблицами базы данных Microsoft SQL Server
В данной теме показано, как создавать связь (отношение) между таблицами по некоторому полю. Данная тема базируется на знаниях предыдущих тем:
-
;;.
Содержание
Поиск на других ресурсах:
Условие задачи
Дана база данных Microsoft SQL Server . База данных размещается в файлах «MyDatabase.mdf» и «MyDatabase.ldf» . Загрузить архив с готовыми для работы файлами базы данных можно здесь.
В базе данных заданы две таблицы с именами Source и Emission. Таблица Source определяет источник загрязненных выбросов. Таблица Emission определяет время выбросов и число загрязненных выбросов, которое было сформировано источником.
Структура таблиц следующая.
| Название поля | Тип данных | Комментарий |
| ID_Source | int | Ключевое поле, уникальное поле (счетчик), первичный ключ |
| Name | char[50] | Название, строка символов |
| Address | char[100] | Адрес, строка символов |
| Название поля | Тип данных | Комментарий |
| ID_Emission | int | Ключевое поле, уникальное поле (счетчик) |
| ID_Source | int | Внешний ключ, значение Source.ID_Source |
| count | float | Количество выбросов |
| Text | char[100] | Комментарий |
| date | datetime | Дата и время выбросов |
Используя средства системы Microsoft Visual Studio необходимо реализовать связь (отношение) «один ко многим» между таблицами Source и Emission по полю ID_Source.
Выполнение
1. Запуск Microsoft Visual Studio
Запустить систему визуальной разработки приложений Microsoft Visual Studio .
2. Создание/подключение базы данных
На этом шаге нужно подключить (или создать) готовую базу данных «MyDataBase.mdf» , которая состоит из двух файлов:
- файл «MyDataBase.mdf» ;
- файл «MyDataBase.ldf» .
После подключения окно Server Explorer будет иметь вид, как показано на рисунке 1.

Рис. 1. Окно Server Explorer после подключения базы данных «MyDataBase.mdf»
3. Поля ID_Source и ID_Emission
Следует отметить, что поля ID_Source и ID_Emission есть уникальными счетчиками. Такие поля используются в базах данных для обеспечения уникальности каждой записи таблицы.
Поле ID_Source таблицы Source есть первичным ключом.
Подробный пример создания уникального поля, которое есть счетчиком, описывается в статье:
4. Установление связи между таблицами
4.1. Снятие опции «Prevent saving changes that require table re-creation»
По умолчанию, система MS Visual Studio запрещает сохранение изменений, которые требуют повторного создания таблиц. Чтобы разрешить вносить изменения в таблицы нужно настроить (снять выделение) опцию
Для этого нужно выполнить следующую последовательность шагов:
- перейти в меню Tools главного меню MS Visual Studio ;
- в меню Tools выбрать команду «Options…» . В результате откроется окно «Options» (рисунок 2);
- в левой части окна «Options» последовательно раскрыть вкладки «Database Tools» -> «Table and Database Designers» (рисунок 2);
- выбрать элемент «Table and Diagram Options» . В результате в правой части окна активируется группа элементов «Table Options» ;
- в группе «Table Options» снять пометку из опции «Prevent saving changes that require table re-creation» (рисунок 2) и подтвердить выбор (кнопка OK ).
После выполненных действий можно создавать связь между таблицами.

Рис. 2. Опция «Prevent saving changes that require table re-creation»
4.2. Установление первичного ключа ( Primary Key ) в таблице Source
Как видно из структуры таблиц (рисунок 1) общим для таблиц есть поле ID_Source. Связь между таблицами будет осуществляться по этому полю.
В таблице Source нужно установить поле ID_Source как «Первичный ключ» ( Primary Key ).
Чтобы установить первичный ключ нужно выполнить такие действия:
- перейти в режим редактирования таблицы Source выбором команды «Open Table Definition» (рисунок 3). Откроется окно редактирования таблицы;
- сделать клик правой кнопкой «мышки» на строке ID_Source и в контекстном меню выбрать команду «Set Primary Key» . В результате поле ID_Source будет обозначено как поле, которое есть первичным ключом (рисунок 5);
- сохранить и закрыть таблицу Source .

Рис. 3. Команда «Open Table Definition»

Рис. 4. Установление первичного ключа в таблице Source

Рис. 5. Поле ID_Source в таблице Source после установления первичного ключа
В таблице Emission не обязательно устанавливать первичный ключ.
4.3. Создание связи между таблицами по полю ID_Source
Для создания связей между таблицами используется элемент “Database Diagrams» базы данных «MyDataBase.mdf» . Чтобы создать связь между таблицами нужно выполнить следующие действия:
- с помощью клика правой кнопкой «мышки» вызвать контекстное меню (рисунок 6). В меню выбрать команду «Add New Diagram» . В результате, база данных создаст пустую диаграмму. Будет выведено окно «Add Table» добавления таблиц в диаграмму (рисунок 7);
- поочередно выбрать нужные таблицы (Source, Emission) и подтвердить выбор нажатием на кнопке «Add Table» ;
- закрыть окно «Add Table» .

Рис. 6. Команда добавления новой диаграммы

Рис. 7. Окно «Add Table» добавления таблиц в диаграмму
После выполненных действий окно диаграммы будет иметь вид, как показано на рисунке 8. Пока что таблицы не имеют связи между собой.

Рис. 8. Таблицы Source и Emission
Чтобы начать устанавливать отношение между таблицами, нужно сделать клик на поле ID_Source таблицы Source, а потом (не отпуская кнопку мышки) перетянуть его на поле Source таблицы Emission .
В результате последовательно откроются два окна: Tables and Columns (рисунок 9) и Foreign Key Relationship (рисунок 10), в которых нужно оставить все как есть и подтвердить свой выбор на кнопке OK .
В окне «Tables and Columns» есть такие поля (рисунок 9):
- поле «Relationship name» . В этом поле задается имя объекта, который символизирует соединение (отношение) между таблицами. С помощью этого объекта (имени) можно управлять некоторыми свойствами связи (отношения). В нашем случае соединение (отношение) имеет название FK_Emission_Source ;
- поле «Primary key table:» . Это поле задает таблицу, которая есть первичной по отношению к другой таблице. В нашем случае первичной есть таблица Source. Поле, которое служит первичным ключом таблицы имеет название ID_Source ;
- поле «Foreign key table:» указывает название таблицы ( Emission ) и поля в этой таблице ( ID_Source ), которое есть внешним ключом.

Рис. 9. Окно настройки параметров связи (отношения) между таблицами
В окне «Foreign Key Relationship» настраиваются свойства соединения. Можно оставить все как есть.

Рис. 10. Настройка свойств соединения FK_Emission_Source
4.4. Диаграмма связи
После создания связи окно диаграммы будет иметь вид, как показано на рисунке 11.

Рис. 11. Вид диаграммы после установки отношения (связи) между таблицами Source и Emission
Как видно из рисунка, конец соединения (отношения), что примыкает к таблице Source имеет вид ключа. А конец соединения, которое примыкает к таблице Emission имеет вид знака бесконечность ∞ .
Это означает, что в таблице Source числовое значение в поле ID_Source может встречаться только один раз. А в таблице Emission числовое значение ID_Source может повторяться (бесконечное количество раз). Таким образом можно представить любое множество уникальных объектов, которые имеют свойство повторяться в некоторой предметной области.
После закрытия диаграммы ее нужно сохранить под некоторым именем, например Diagram1 (рисунок 12). Система выдаст соответствующее окно уточнения.

Рис. 12. Задание имени для диаграммы
Также, система может вывести окно сохранения таблиц в базе данных (рисунок 13), поскольку между таблицами уже существует отношение (связь). В этом окне нужно указать «Yes» .

Рис. 13. Окно сохранения таблиц в базе данных в связи с изменениями
После выполненных действий, диаграмма Diagram1 отобразится в окне Server Explorer (рис. 14). С помощью команд контекстного меню есть возможность управлять диаграммой. Так, например, команда «Design Database Diagram» переводит диаграмму в режим редактирования, в котором можно изменять связи между таблицами базы данных.

Рис. 14. Команда редактирования связей (отношений) между таблицами
5. Программное управление данными
После создания связи (отношения) между таблицами можно создавать проект, который будет управлять данными в таблицах. Но это уже совсем другая тема.
SQL FOREIGN KEY: How to Create in SQL Server with Example
A Foreign Key provides a way of enforcing referential integrity within SQL Server. In simple words, foreign key ensures values in one table must be present in another table.
Rules for FOREIGN KEY
- NULL is allowed in SQL Foreign key.
- The table being referenced is called the Parent Table
- The table with the Foreign Key in SQL is called Child Table.
- The SQL Foreign Key in child table references the primary key in the parent table.
- This parent-child relationship enforces the rule which is known as “Referential Integrity.”
The Below Foreign Key in SQL example with diagram summarizes all the above points for FOREIGN KEY

How to Create FOREIGN KEY in SQL
We can Create a Foreign Key in SQL server in 2 ways:
- SQL Server Management Studio
- T-SQL
SQL Server Management Studio
Parent Table: Say, we have an existing Parent table as ‘Course.’ Course_ID and Course_name are two columns with Course_Id as Primary Key.

Child Table: We need to create the second table as a child table. ‘Course_ID’ and ‘Course_Strength’ as two columns. However, ‘Course_ID’ shall be Foreign Key.
Step 1) Right Click on Tables>New> Table…

Step 2) Enter two column name as ‘Course_ID’ and ‘Course_Strength.’ Right click on ‘Course_Id’ Column. Now click on Relationship.

Step 3) In ‘Foreign Key Relationship,’ Click ‘Add’

Step 4) In ‘Table and Column Spec’ click on ‘…’ icon

Step 5) Select ‘Primary Key Table’ as ‘COURSE’ and the new table now being created as ‘Foreign Key Table’ from the drop down.

Step 6) ‘Primary Key Table’ – Select ‘Course_Id’ column as ‘Primary Key table’ column.
‘Foreign Key Table’- Select ‘Course_Id’ column as ‘Foreign Key table’ column. Click OK.

Step 7) Click on Add.

Step 8) Give the Table name as ‘Course_Strength’ and click on OK.

Result: We have set Parent-child relationship between ‘Course’ and ‘Course_strength.’

T-SQL: Create a Parent-child table using T-SQL
Parent Table: Reconsider, we have an existing Parent table with table name as ‘Course.’
Course_ID and Course_name are two columns with Course_Id as Primary Key.

Child Table: We need to create the second table as the child table with the name as ‘Course_Strength_TSQL.’
‘Course_ID’ and ‘Course_Strength’ as two columns for child table Course_Strength_TSQL.’ However, ‘Course_ID’ shall be Foreign Key.
Below is the syntax to create a table with FOREIGN KEY
Syntax:
Here is a description of the above parameters:
- childTable is the name of the table that is to be created.
- column_1, column_2- the columns to be added to the table.
- fkey_name- the name of the foreign key constraint to be created.
- child_column1, child_column2…child_column_n- the name of chidTable columns to reference the primary key in parentTable.
- parentTable- the name of parent table whose key is to be referenced in the child table.
- parent_column1, parent_column2, … parent_column3- the columns making up the primary key of parent table.
- ON DELETE. An optional parameter. It specifies what happens to the child data after deletion of the parent data. Some of the values for this parameter include NO ACTION, SET NULL, CASCADE, or SET DEFAULT.
- ON UPDATE- An optional parameter. It specifies what happens to the child data after update on the parent data. Some of the values for this parameter include NO ACTION, SET NULL, CASCADE, or SET DEFAULT.
- NO ACTION- used together with ON DELETE and ON UPDATE. It means that nothing will happen to the child data after the update or deletion of the parent data.
- CASCADE- used together with ON DELETE and ON UPDATE. The child data will either be deleted or updated after the parent data has been deleted or updated.
- SET NULL- used together with ON DELETE and ON UPDATE. The child will be set to null after the parent data has been updated or deleted.
- SET DEFAULT- used together with ON DELETE and ON UPDATE. The child data will be set to default values after an update or delete on the parent data.
Let’s see a Foreign Key in SQL example to create a table with One Column as a FOREIGN KEY:
Foreign Key in SQL example
Query:
Step 1) Run the query by clicking on execute.

Result: We have set Parent-child relationship between ‘Course’ and ‘Course_strength_TSQL.’

Using ALTER TABLE
Now we will learn how to use Foreign Key in SQL and add Foreign Key in SQL server using the ALTER TABLE statement, we will use the syntax given below:
Here is a description of the parameters used above:
- childTable is the name of the table that is to be created.
- column_1, column_2- the columns to be added to the table.
- fkey_name- the name of the foreign key constraint to be created.
- child_column1, child_column2…child_column_n- the name of chidTable columns to reference the primary key in parentTable.
- parentTable- the name of parent table whose key is to be referenced in the child table.
- parent_column1, parent_column2, … parent_column3- the columns making up the primary key of parent table.
Alter table add Foreign Key example:
We have created a foreign key named fkey_student_admission on the department table. This foreign key references the admission column of the students table.
Example Query FOREIGN KEY
First, let’s see our Parent Table Data, COURSE.
Query:

Now let’s insert some row in Child table: ‘Course_strength_TSQL.’
We will try to insert two types of rows
- The first type, for which Course_Id in child table will exist in Course_Id of Parent table. i.e. Course_Id = 1 and 2
- The second type, for which Course_Id in child table doesn’t exist in the Course_Id of Parent table. i.e. Course_Id = 5
Query:

Result: Let’s run the Query together to See our Parent and Child table
Row with Course_ID 1 and 2 exist in Course_strength table. Whereas, Course_ID 5 is an exception.
Cascading Referential Integrity Constraints in SQL Server Management Studio
In the Microsoft SQL server if we want to delete any record or column from one table but that record or column is a foreign key for another table then we will get the error to solve this problem we use Cascading referential integrity constraint.
It allows the actions that SQL Server should take when a user tries to delete or update a key to which an existing foreign key points. Suppose we have two tables, the first table’s name is“Student” and the second is “Department” as follows,
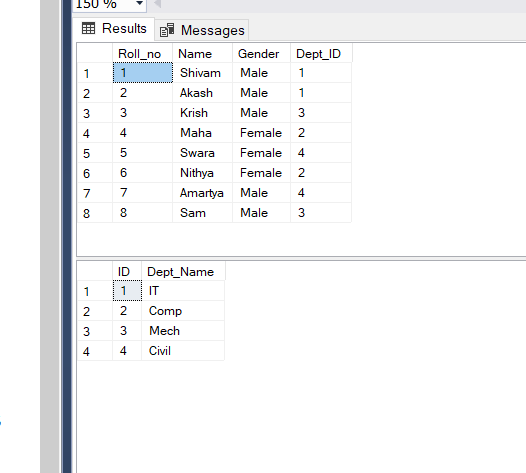
Student and Department Table
In the Student table “Roll_no” is the primary key which identifies each record uniquely and in the Department table “ID” is the primary key. Here the foreign key is Dept_ID in the Student table get the reference from the primary key ID from the Department table.
In the Department table, if you delete the row with ID=1 then the records with Roll_no=1 and 2 from the Student table become an unsupported records which is also called as Orphan Record. Consequently, you won’t be able to determine the Department of this row. Therefore, Cascading Referential Integrity Constraint (CRI) can be used to specify what SQL Server should do in this situation. By default, the DELETE or UPDATE statement is rolled back and we receive an error.