Channel Rack & Step Sequencer
The Channel Rack holds instruments that create sound and internal generators that control automation. Every pattern has access to all instruments in the rack. In other words, all patterns play from the same set of instruments. Patterns are not limited to a single instrument as they are in most other sequencers. Music data can come in the form of Step sequences and Piano roll scores.
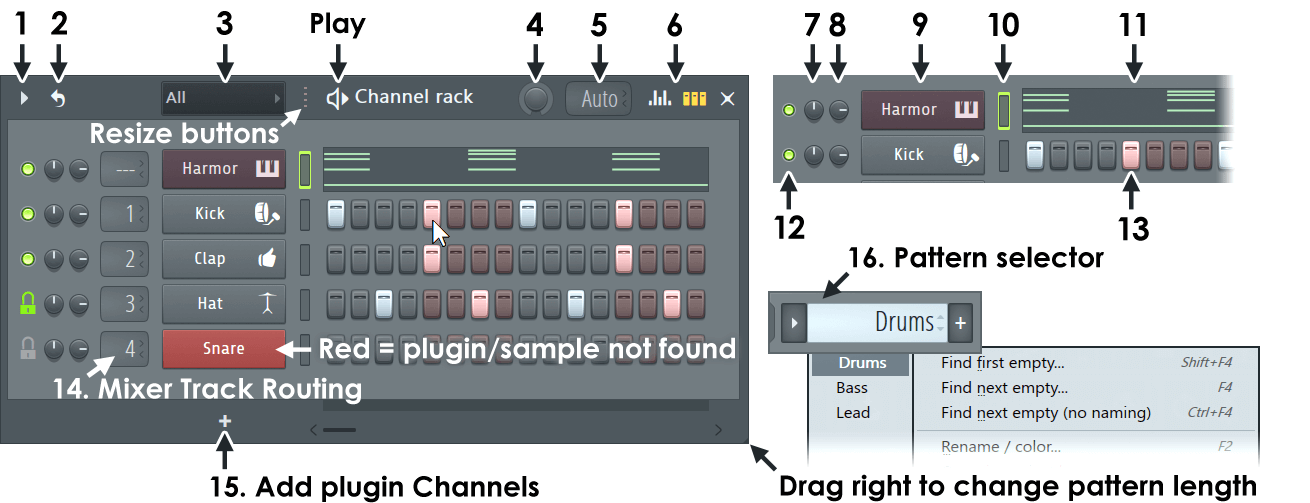
There is one Channel button ( 9 ) per instrument. The audio from each Channel is sent to one of the Mixer Tracks for effects processing and level mixing. When Instrument Channels are added or removed from the project the height of the Channel Rack will change dynamically. The Channel buttons also access Instrument Channel Settings (where a Mixer track is set) or the associated Piano roll. The Step Sequencer, ( Video Here) is a pattern-based grid sequencer ideal for creating drum loops and simple melodies.
The note and automation data visible across all Channels is known as a ‘pattern‘. Patterns include Piano roll, Step Sequencer and Automation data. Switch between patterns using the Pattern selector (16) shown below. As the pattern number is changed, note how the pattern data visible in the Channel Rack also changes, reflecting the selected pattern. Patterns are designed to be arranged in the Playlist as Pattern Clips to create a song.
Overview
Each row of controls in the Channel Rack belongs to a single Channel instrument. From left to right are: Mute, Pan, Volume, Mixer Track destination, Channel button (click this to open the instrument interface), Channel Selector (outer border) / Activity indicator (inner region) and Step Sequencer buttons or Piano roll preview (top row below), depending on how the Channel has been configured.
ON: Use ( Alt+Left-Click ) to open plugins without closing the currently open plugin.
1. Channel Options Menu
NOTE: The Channel Options Menu swapped places with the Pattern Menu at FL Studio 12.
- To open a Channel containing a plugin — Double-click the instrument name.
- To mark an instrument as a ‘favorite’ — Click the check box preceding the instrument name (all plugins preceded by a check mark will appear in the favorites list).
- To add newly installed plugins to this list — Click Manage plugins at the bottom of the window to open the Plugin Manager. We recommend selecting ‘Verify plugins‘ before you ‘Find plugins‘. After the scan is complete, your new plugins will be listed in the ‘Select plugin‘ window.
- Color — Channels are sorted Red (top) through Green, Blue, Indigo to Violet (bottom).
- Name — Alphabetically sorted by Channel name.
- Track number — Order will be Mixer track 1 to Max. Generator and Layer Channels will be sorted to the top.
- Gradient — Opens a dialog for selecting start and end colors. All selected Channels will be colored in sequence from the start to end points in the color space selected.
- Random — Colors Channels randomly. This function contains some rules on coloring so it won’t look as bad as you might expect.
- Set percentage — 0, 25, 50, 75 or 100%
- Custom. — Enter a custom value at the pop-up.
- Off — Height stays where it was set.
- Minimum height — Height adjusts to the minimum necessary to show all Channels.
- Maximum height — Height adjusts to the to maximum height based on the vertical space.
2. Looping Controls
When selected, Channels will loop their sequences independent of the length of others. Loop icon (Right-click for more options). When the Loop icon and ‘Loop all steps‘ are selected, the Stepsequencer will loop all Channels so they match the longest sequence in the Pattern. This replicates Channel looping mode in FL Studio 11. When looping ‘ghost steps‘ display to indicate how Channels that are being looped and extended. Right-click the Loop icon to access the advanced options:
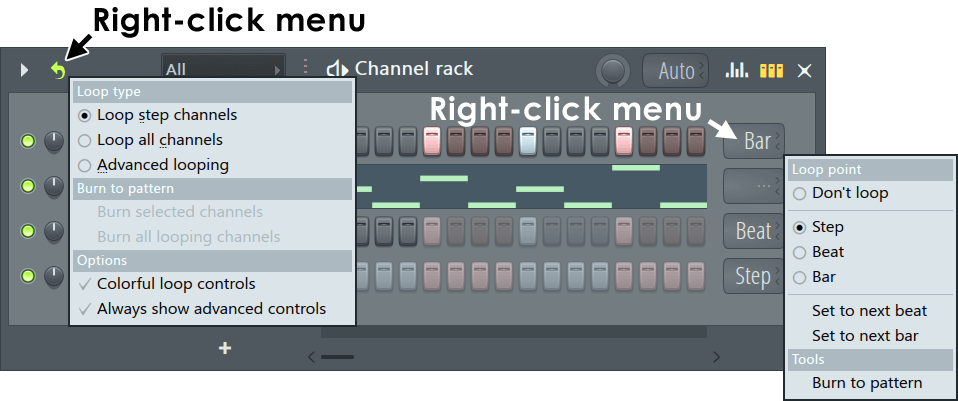
- Loop step channels — Loops Channels in Step Mode (not using Piano rolls) at the next Step.
- Loop all channels — Loops both Step and Piano roll Channels at the next Beat.
- Advanced looping — Opens additional controls at the end of each Stepsequence. These options apply per-channel, rather than globally:
- . — Indicates looping is disabled from that Channel.
- Bar — Loops the Channel at the next Bar.
- Beat — Loops the Channel at the next Beat.
- Step — Loops the Channel at the next Step.
NOTE: Bar, Beat and Step modes play to the end of the last used Bar, Beat or Step (i.e, at the next empty Bar, Beat or Step) before looping.
In Advanced looping mode Right-click the Channel control to access the following options:
- Don’t loop — Disables looping for that Channel.
- Step — Loops the Channel at the next Step.
- Beat — Loops the Channel at the next Beat.
- Bar — Loops the Channel at the next Bar.
- Set to next beat — Sets the loop length to the next beat after the last step or note in the Pattern.
- Set to next bar — Sets the loop length to the next bar after the last step or note in the Pattern.
- Burn to pattern — Convert from ghost to real steps in the Pattern or sequence.
NOTE: You can edit Patterns during playback. Automatic loop length settings will (if enabled) maintain fluid playback.
3. Channel Filter Groups (Display Filter)
As projects grow in size and the number of Channels increases, finding the right Channel can become difficult. To optimize workflow, combine several Channels in a group and set the Channel Rack to display only specific Channels (for example percussion group or lead synth group). Use the Channel Display Filter control ( 3 ) to choose which Channels should be visible. Left-click to open the Channel filter menu. Selecting ‘All‘ will show all Channels at once, regardless of whether they are part of a group or are unassigned. Selecting ‘Unsorted‘ displays only the unassigned Channels. If you have made any Channel groups, you can select them for display from this menu.
Channel Display Filter ( Page Down for next group ; Page Up for previous group ) — Allows you to set the group of Channels to show in the Step Sequencer (see the Channel Filter Groups section below for more information)
- Add an empty group — Right-Click Channel Display Filter ( 3 ) and select Add Filter Group.
- Rename/Delete group — Select a group and Right-Click Channel Display Filter ( 3 ) to display commands for renaming and deleting groups (NOTE: Deleting a group sets included Channels as unassigned and does not delete the Channels).
- Add selected Channels to a new group — Use the Group Selected command from the Channel Options Menu.
- Add a single Channel to an existing group — Select the desired group and add a new Channel to the Channel Rack. All new Channels will be inserted into the currently selected group.
- Move a Channel to a different group — Select the Channel/s and use the Group Selected command from the Channel Options Menu, and enter the name of an existing group.
NOTE: To disable Auto Switching of Channel Groups that sometimes happens as you work with content (Audio vs Pattern Clips), deselect the Channel Rack Menu option Auto switch display filter.
4. Global Swing
Swing — Turn right to add a ‘swing’ rhythm to Steps. In the case of the Step-sequencer, swing affects the length of odd vs even steps (every second step). If 4 beats per bar are set, ‘swing’ holds odd 16th notes (1,3,5,7,9,11,13,15) at the expense of even 16th notes (2,4,6,8,10,12 and 16) in the bar. The control determines the amount of swing.
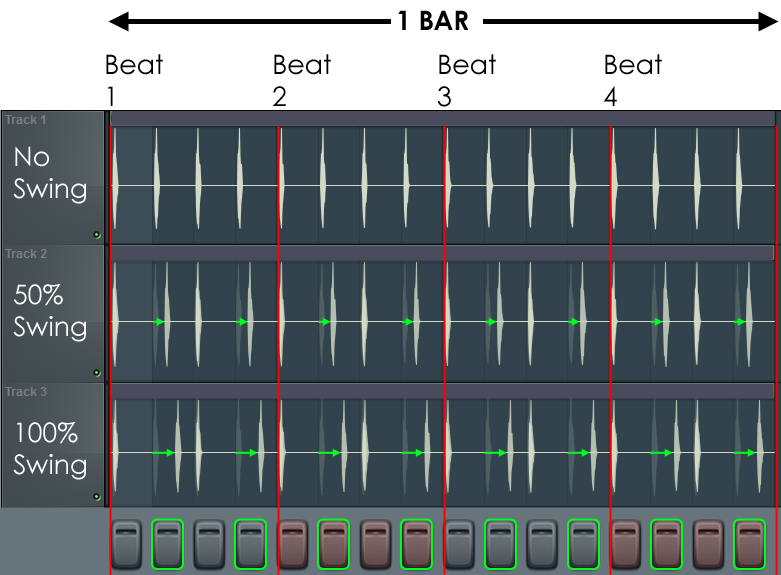
- There are two swing multiplier — Global Swing and Channel Swing. The Global Swing is a multiplier (0 to 100%) applied to all Channels. Channel Swing — ‘Miscellaneous Channel Settings > Time > Swing’ allows you to set per-channel swing relative to the global setting. Set this to 0% to prevent the Channel being swung, 100% to match the Global Swing amount.
- Global vs Channel Swing — Both controls are multipliers. The Global Swing activates swing for all Channels, Channel Swing decides how that Channel will respond. For example, if Global Swing is 100% and Channel Swing is 0% there will be no swing for that Channel. If the Global swing is 0% and the Channel Swing is 100%, there will still be no swing for the Channel. A Channel needs both Global Swing and Channel Swing values to be greater than 0% for swing to be active for that Channel.
- Set Swing Mix for multiple Channels — Use the Channel Rack Menu >Set swing mix for selected (Channels). For example, select set any Channels, in the current Pattern, you don’t want to swing then use ‘Set swing mix for selected’ and choose 0%.
- Double time — As swing is applied to every second step: If you step-sequence in double-time, that is spacing out beats over twice the steps, then swing won’t work as expected.
5. Pattern Length
Pattern Length — When set to Auto the length of the pattern will be set by the end of the last bar with data in it. Otherwise you can use this control to set Pattern length it from 1 to 512 steps (1/16th note to 64 bars in 4/4 time). Drag the bottom-right of the Channel Rack to expose more steps/bars. Set the default pattern length from the global value on the Project Settings. Right-click to select Pattern length in bars.
NOTE: There are a maximum of 512 steps in the Step Sequencer. If you need more then use the Piano roll.
6. Graph Editor & Step/Piano roll View
Graph Editor
Open the graph editor ( Ctrl+K ) and select the tabs to adjust per-step Note, Velocity, Release, Fine Pitch, Mod X, Mod Y and Shift.
- Edit bars — Left-click a column and drag up/down.
- Scale all values simultaneously — Hold Ctrl and adjust one column, the others will follow.
- Ramp values — Right-Click a value and drag to another, the values in between the first and last step will be interpolated.
- Reset values — Alt+Click (or Click and drag across) bars.
NOTES: The Channel Rack menu option ‘Mute removed steps‘ will decide if the graph data is remembered for deselect steps, after graph data was set. Most instruments will respond to Velocity and Pan, however, VST/AU plugins may not support all properties.
Target Parameters:
- Note — While the pitch property changes the note’s pitch it is intended for use with drum samples and effects; If you want to enter a melody, use the Piano roll.
- Velocity — Note velocity (volume).
- Fine pitch — +/- 100 cents.
- Release — Note release velocity.
- Pan — Note panning, left/right position.
- Mod X — Maps to Mod X on the Channel Settings > Instrument > Mod X controls. Normally Filter Cutoff for the Channel Sampler.
- Mod Y — Maps to Mod Y on the Channel Settings > Instrument > Mod Y controls. Normally Filter Resonance for the Channel Sampler.
- Shift — Note start time offset. 100% shift equals 99% of the note position equal to one 16th note. To move a step before the correct time, delay the preceding step.
Step vs Piano roll Preview
The Stepsequencer overlays the Piano roll and so switching to this mode allows you to edit stepsequences in Piano roll mode, so long as you respect the note length (zero length) and positioning (on beat) layout. NOTE: The Channel Rack Menu > Mute removed steps option will preserve note event data (volume, pan etc) associated with steps so settings are not lost when experimenting with different step-patterns. Deactivated steps will show in the Piano roll as muted notes. When deselected the event data is discarded and no muted notes preserved in the Piano roll.
- Convert from notes to steps — If you would like to convert a Piano roll to Step mode again, you need notes of zero length. Select all notes, set Snap to ‘none’ and Discard note lengths ( Shift+D ).
- Piano roll preview — When Piano roll preview mode you can ( Right-click ) the Piano roll preview, when the Channel Rack menu option > ‘Show complete piano roll preview‘ is selected, and the Piano roll will open scrolled to the point where you clicked on the preview window.
7 & 8. Pan & Volume
- 7. Channel Panning — Use to set the Channel panning. This is pan information sent to the plugin, so what this does will depend entirely on the plugin loaded in the Channel. All native plugins will pan, some VST/AU plugins won’t respond to this parameter. Normally you would use the Mixer track Pan controls.
- 8. Channel Volume — Use to adjust the Channel volume. Levels: Samples loaded into the Channel Sampler will be set to -5dB (78%) of the original level to allow headroom for the pattern sequencer to avoid clipping, set volume to 100% to restore the original level. Audio clips will play at 100% their original level. Channel Volume for native plugins affects note voice volume directly. For VST/AU plugins it’s likely to affect overall plugin output level. If this control is not working as expected, use the Mixer track Level Fader.
9. Channel Button
The Channel Button — Displays the Channel name (usually the name of the instrument). Clicked to open the interface. Additionally, there may be some icons on the left side of the button, as follows:
Audio track — An Audio Track is defined when a Audio Clip Channel is linked to a Playlist and Mixer Track. See here for more information. Instrument track — An instrument track is defined when a Channel is linked to a Playlist Track. See here for more information. - Left-click — Opens/Closes the Channel Settings window AND plugin interface (if applicable). NOTES: To keep the plugin interface open when another Channel is opened, hold ( Alt )/( option ) and click the Channel’s Button on the Channel Rack. Keep doing this for each new instrument you wish to open. To disable the auto-close interface behavior, deselect the F10General settings option Auto select linked modules. When ‘Auto select linked modules’ is OFF Channel buttons open plugins for editing and the Channel selector LEDs select Channels for live MIDI control. This allows you to play one instrument Channel live and edit another.
- Ctrl + Left-click — Preview Channel sound without opening the instrument.
- Piano roll — Opens the Piano roll for the Channel. Notice how step-data is opened, aligned with the grid and set to the minimum note length. This is how the Piano roll recognizes step events. You can use the Edit > Discard note lengths ( Shift+D ) + Quantize ( Shift+Q ), if necessary, to return any note data to step format.
- Graph editor — Opens the integrated Graph Editor that allows you to edit Note,
- Rename, recolor and icon. — Opens the combination control for these functions. Rename or re-color the Channel using the Color Selector tool. Click on the Channel name and type to rename, or Left-click on the color square (shown below) to open the re-color dialog or Right-Click to randomly assign a color from a palette pre-approved by the Image-Line Aesthetics Committee. Once the name dialog is open, press ( F2 ) to randomly select colors OR ( F3 ) to select the last used color:

- 1. An Input Portmust be set for the device to appear in the menu.
- 2. The Channel Button will display a Lock icon and the Activity LED/ Channel Selector will show Orange for locked Channels.
- 3. The linked controller will show in the Hint Bar when you mouse-over channels. See Lock Controller Notes to Instrument Channels for more information.
See a video tutorial here.
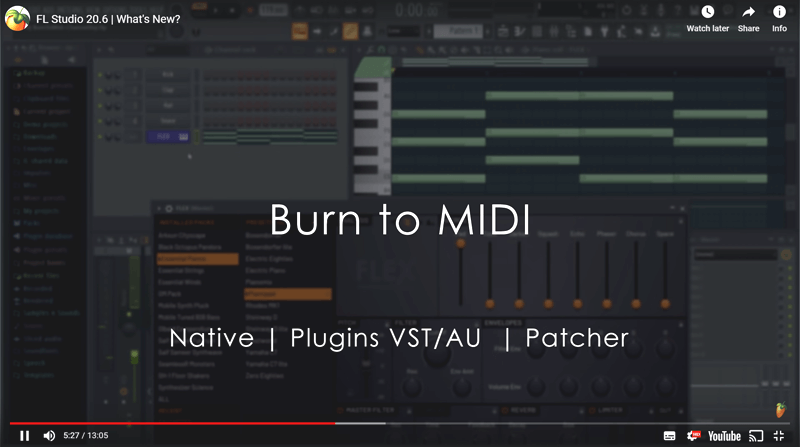
- Native plugins/features — Normally notes from Channel functions (Arpeggiator) or native plugins will record without any further steps necessary. When burning Arpeggiator notes, you will be presented with a pop-up to disable the Arpeggiator and Echo functions so as not to double-up on the note effects.
- Patcher — If you are using Patcher, there must be an ‘Events’ connection (green cable) direct from the VFX plugin (such as Key Mapper) or 3rd party plugin generating notes to a FL Studio MIDI Port. To make an ‘Events’ (note) connection to FL Studio, drag the Event cable from the plugin’s Event Output node to the ‘To FL Studio‘ Output icon. A pop-up will allow you to select (any) MIDI port. This allows FL Studio to see the note activity from within Patcher.
- VST/AU Plugins — You must select a MIDI Output port in the Wrapper Settings. The MIDI port does not need to be routed to anything, this simply exposes the plugins note output to FL Studio, so it can be recorded. NOTE: Very few plugins with an internal arpeggiator publish this data to the host. This means, more often than not, this will not work with most standard instrument VST/AU plugins. Just trying to let you down gently, and save our technical support staff repeated questions about why this isn’t working for plugin X or Y.
10. Channel Selector
- Select/deselect target Channel — ( Left-Click ). If multiple Channels are selected this will focus the selecton to the target Channel. NOTE: When Auto select linked Channels is off, the Channel Selector LED is used to choose the Channel to receive live MIDI input. This allows you to play one instrument Channel and edit another opened with the Channel button ( 9 ).
- Select/Deselect target Channel — ( Right-Click ). This allows independent selection/deselection.
- Select multiple Channels — ( Right-Click ). Right-Click (hold) and drag down the Channel Selectors to make multiple selections.
- Select all Channels — ( Double-Click ) any Channel selector.
- Move / reorder instrument Channels — Use the Channel selector to group and move Channels up and down the stack by holding the ( Alt ) key and pressing the ( up/down arrows ) on your keyboard. This does not affect mixer routing.
11. Piano roll Preview
This mini-note-preview replaces the steps when a Piano roll is active on the Channel. The preview allows you to see the notes in the Piano roll without opening it. You can’t edit notes in the mini-preview. Left-click the preview to show/hide the Piano roll window. Right-Click to open the Piano roll centered on the notes clicked. NOTES: 1. The lighter and darker blocks in the preview indicate the number of bars contained in the Piano roll sequence (each block is a bar). 2. To add a Piano roll Right-Click the Channel button and select ‘Piano roll’ from the pop-up menu.
12. Mute Control
- Mute/Unmute — ( Left-Click ) the Mute icon.
- Solo/Unsolo — ( Ctrl+Left-Click ), ( Alt+Left-Click ) OR ( Right+Click ) and Select ‘Solo’ on the Mute icon. NOTE: The General Settings > ‘Restore previous state after solo’ option will preserve the pattern of muted and unmuted items prior to a Solo action.
- Mute/Solo a group — ( Alt+Click ) a Mute icon for the Muted/Unmuted group. Groups are defined by Channel Filter groups.
- Lock state — ( Shift+Click ) a Mute icon.
13. Stepsequencer
- Each line in the Channel Rack belongs to a single Channel and the associated sequence data will only play the Channel instrument on the same line. From left to right you will see, the Pan, Volume, Channel button (opens the instrument interface) and Step Sequencer buttons or Piano roll preview, depending on how the Channel has been configured.
- Each button (step) in the grid represents a 16th note.
- Default beats per bar and bars — The default is 4 beats x 4 bars = 16 steps. Change the default number of bars and steps from the Project General Settings window.
- Activating & deactivating steps — Left-clicking a step button activates that step; Right-Clicking turns it off. NOTES: The Use Both Mouse Keys option in the General Settings page can be deselected so you can select and deselect steps with the left-mouse button. The Mute removed steps option will decide if deleted steps are muted, so their event data is preserved or discarded.
- Pitch — To set the pitch of a step use the left Graph Editor ( 6 ) or right Piano roll ( 6 ) then click on ( 11 ). Each note has some additional properties (panning, volume, etc.).
- Copy, Cut & Paste — This will work between Channels or Patterns. Select the source Channel, click on the Channel selector ( 10 ), and press ( Ctrl+C ) to copy or ( Ctrl+X ) to Cut the steps. Next, select the destination Channel and press ( Ctrl+V ), paste. NOTE: You can access the same functions from the Edit Menu
- Stopping or cutting notes — Step Sequencer steps do not have a ‘note off’ feature. You can stop a note either by activating step after the offending note with zero velocity or, preferably, by using the Piano roll. The Piano roll is ideal for working on more complex melodies.
- Edit steps in the Piano roll — Right-Click the Channel Button and select ‘Piano roll.
- Advanced features — Right-Clicking the Channel Button ( 9 ) opens a menu of commands for managing Channels (see Channel Button Menu). This menu also provides access to the Piano roll.
- NOTE: The main Edit menu also contains commands for working with Step Sequencer.
14. Mixer Track Routing
- The Mixer Track Routing — Controls are optionally shown ( Alt+M ). Click and drag vertically to change the Mixer Track the Channel is routed to. By default, all new instrument Channels are routed to the Master Mixer track (the display shows «—«). This control doesn’t appear for Channels that hold generators that don’t output audio, icons will be shown instead. The Mixer Track Routing control is also replicated on the Channel Settings.
- Instrument and Audio Track Mixer routing — Channels stay linked to the selected Mixer Track as the routing selector is changed. The selector dims to indicate that it is part of a grouping. Mixer Tracks then move instead of re-routing when the control is adjusted. When grouped routing automation is not possible. To re-route an Instrument or Audio track group, first Right-click the Playlist Track header and choose Track mode > Unassigned, then to re-route the Instrument Channels as needed.
15. Add Plugin Channels
Add a plugin — This is a shortcut to open the Channel Options Menu > Add one menu. To lean more ways to add both instrument and effect plugins to projects click here.
16. Pattern Selector vs Picker Panel (Playlist)
There are two main ways of managing and selecting Patterns. The Picker Panel and the Pattern selector. We recommend the Picker Panel. It has the advantages of being associated with the Playlist (so is always handy), allows drag-n-drop workflow and can multiple select, rename and color Patterns.
Red Channel buttons
- The samples or folders have been renamed, moved to another location or deleted.
- The format of the sample has been changed (FL Studio only loads .wav, .mp3 and .ogg files).
- The Browser extra search folders have been deleted from the search list.
- The VST/AU plugins extra search folder has been deleted from the search list or the plugin folder moved.
FL Studio searches its own installation folder for samples and the extra search folders as described above. If you have no idea where the samples are, one method is to put your root drive (usually C:) as one of the extra search folders, then reload the project. FL Studio will now search you entire hard-drive. Once you locate the samples it’s a good idea to remove the root from the extra search folders as is can make future searches very slow. See the section on missing VST/AU s or files for more information.
Linking Controllers to Play Instrument Channels
Use a keyboard or other controller to play selected Instrument Channels. By default FL Studio listens to all MIDI Channels, so any enabled controller will play the selected Channel. However, if you want to lock a controller to play a specific Instrument Channel, there are two options:
Lock Controller Notes to Instrument Channels
This method locks Instrument Channels to the note output from the specified controller. You can lock multiple Instrument Channels to a single controller to record layers OR even lock several controllers to a single Instrument Channel.
How to set a Channel to receive notes from a MIDI Controller:
- To set a specific MIDI Input Port (optional) — Pre-set an Input Port from the MIDI Settings > Input > Port options. Otherwise choose ‘No input port set (click to auto assign)‘ at the next step.
- Right-Click the Channel Button — Select ‘Receive notes from > [choose a controller] > No input port set (click to auto assign)‘.
- To set a specific MIDI Channel — After choosing the controller (Step 2), repeat the process and select a MIDI Channel. Normally choose ‘All MIDI channels‘. If you choose a specific MIDI Channel, the instrument will only respond to controller notes received from that controller and MIDI Channel. You can use your controllers ability to change MIDI Channel to swap between Instrument Channels on the fly. TIP: If your controller can transmit on different MIDI Channels across the keyboard/pad range, you can play different Instruments Channels with the left and right hands, or a drum kit consisting of up to 16 Sampler Channels.
IMPORTANT: Only the note information is locked to the Channel. To assign knobs and sliders (MIDI CC) to specific plugin targets, use Per-Project Links.
FL Studio Channel Rack Not Showing (Complete Workaround)
FL Studio channel rack not showing can be a real headache, but you can use your keyboard shortcut key (F6) to bring it into focus. If the rack doesn’t show immediately, close all open windows (F12) and then use F6 again.
It Was There Last Time…
The channel rack is an essential part of your FL Studio Workstation. It’s where all your plugins, samples, and MIDI notes are contained.
Misplacing it is undoubtedly stress that you don’t need! However, from time to time, we all know that windows, plugins, and files tend to wander, likely due to something we have inadvertently done.
But fear not. Follow these instructions to bring your channel rack back and learn why this happens in the first place.
What You Will Need For This Tutorial
- FL Studio
- Functioning Keyboard
Where Is The Channel Rack In FL Studio?
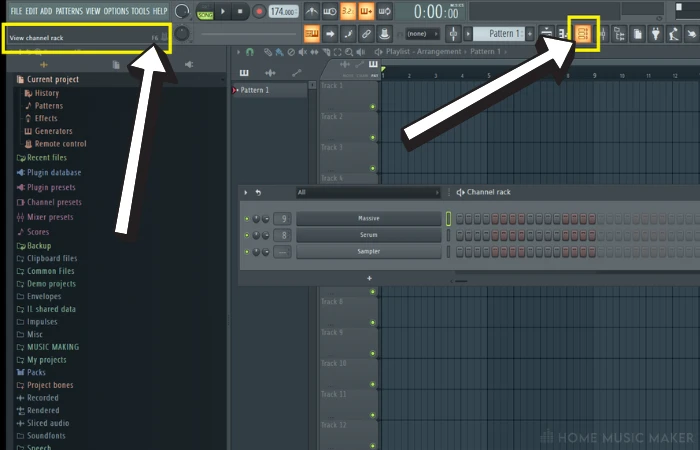
You will see an icon like the highlighted one below along your top toolbar. This is your channel rack icon which can also be accessed by hitting F6 on your keyboard.
Often the channel rack is automatically open when you start a new project; it is commonly known as the step sequencer.
Why Has It Been Removed/Lost?
In short – it hasn’t.
Chances are you’ve either closed it with the X button, hit F6 while trying to push a different button, or, more likely; it’s actually open in the background! (This is ALWAYS the case for me).
Remember, depending on your file size; there can be up to 100 windows or more active within your project.
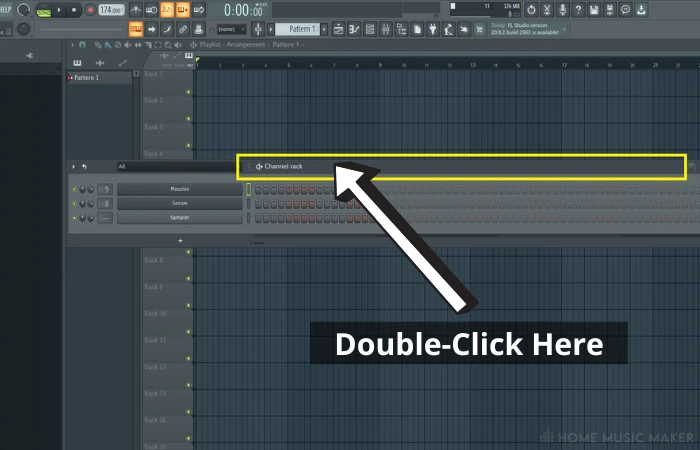
My Channel Rack Is Stuck To The Top Of My Screen…
This is a really simple fix (it was definitely a face-palm moment for me when it happened!).
Bring your mouse cursor to anywhere along the top line where it says Channel Rack and double-click… That’s it!
What has happened here is that the rack/step sequencer was maximized – this action applies to all windows, so take note!
How Do I Add A New Channel Rack In FL Studio?
Depending on what works best for you, there are a few easy ways to add a new rack. Each method will take you to pretty much the same place, each highlighted in the image above.
Firstly there is the add button in your project toolbar at the top, where you will see a drop-down of all the plugins you can insert.
Secondly, within the channel rack itself is the + button.
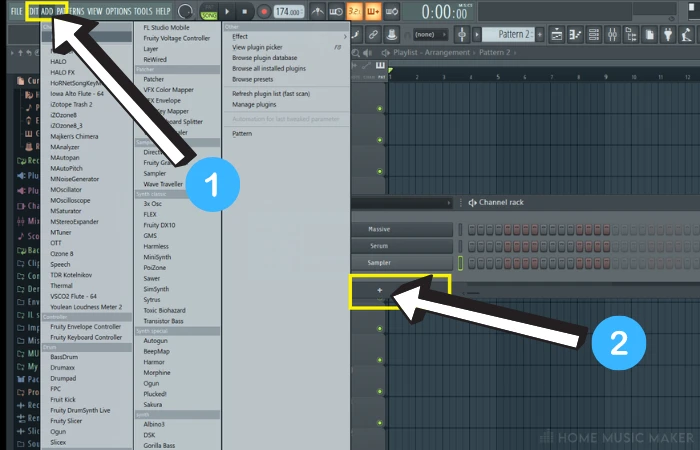
And lastly (but least used), you can right-click on any plugin currently in the rack and select insert. A window will also open up with your available list here.
NOTE: If you choose to go via the add button, bear in mind this will also display plugins that are used in your mixer as well, meaning they won’t be able to be inserted into the channel rack.
I recommend the + button as it only displays what can be used via your channel rack.
How To Change Or Replace A Channel Track?
A lot can be found out in FL Studio with the trusty right-click.
In this instance, using it on any of your current channel rack instruments or plugins gives you the option to replace it.
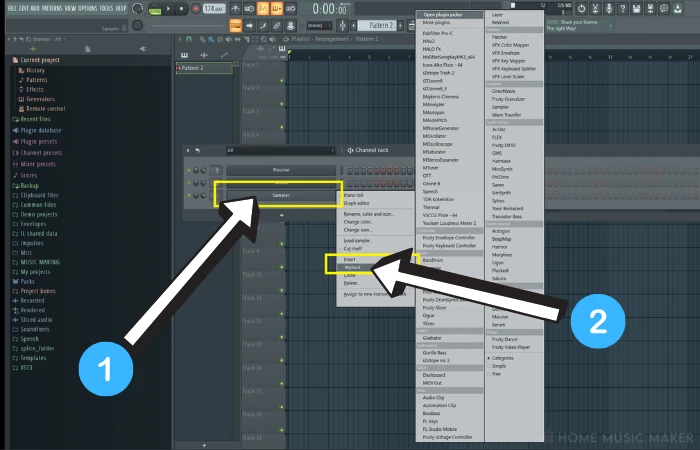
It is undoubtedly faster than having to delete and re-insert a new one!
How Do I Reset My Channel Rack? (Can’t See My Piano Roll Patterns)
I’ve had this question asked a few times over the years. It usually refers to the fact that not everything will be visible in the rack itself.
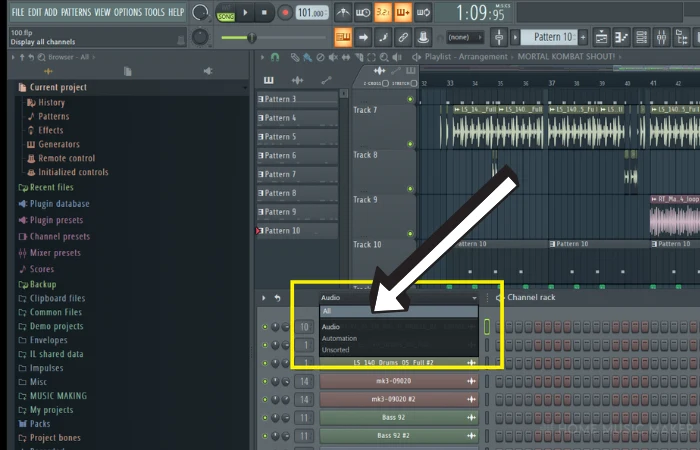
As you’ll see in the image below, none of my MIDI pattern data shows.
This is because FL Studio has swapped the view to audio only, usually because you’ve had an audio clip or sample open last.
Left-click the drop-down at the top of your rack and select ALL to bring them back.
Pro Tip
To prevent this from happening in the future or to essentially lock a channel rack, navigate to Options > General Settings and disable the ‘Auto select linked modules’ option. Now it will display All by default!
How To Remove A Channel Rack?
Right-click whichever channel you no longer want and look for the delete button. You’ll be prompted to confirm this as a failsafe – nothing worse than deleting the wrong thing!
Resizing The Channel Rack
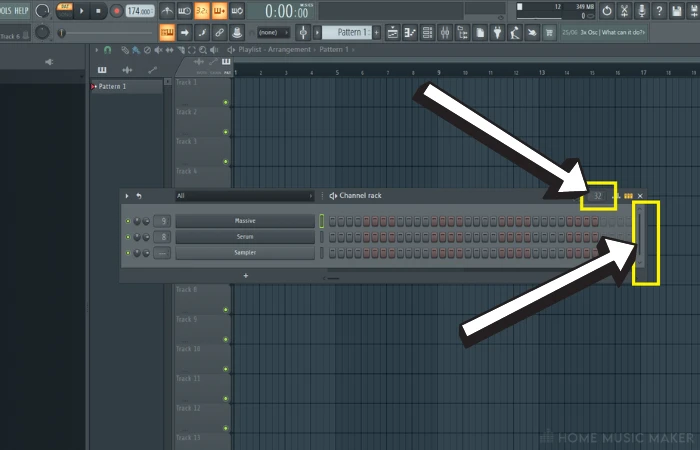
Like most other windows in FL Studio, the channel rack can be resized to your liking. Simply hover your mouse cursor at the far right of the window until the arrows appear. Then left-click + drag to set your desired size.
Pro Tip
If you want to set a specific number of beats for the rack to display for you. Left-click and drag where you see the number shown above.
How Can I Copy And Paste Channel Rack Patterns in FL Studio?
Step 1 – Input MIDI data
Right-click on your plugin to select Piano roll and paint in some piano notes. I usually test tricks out in FL Keys.
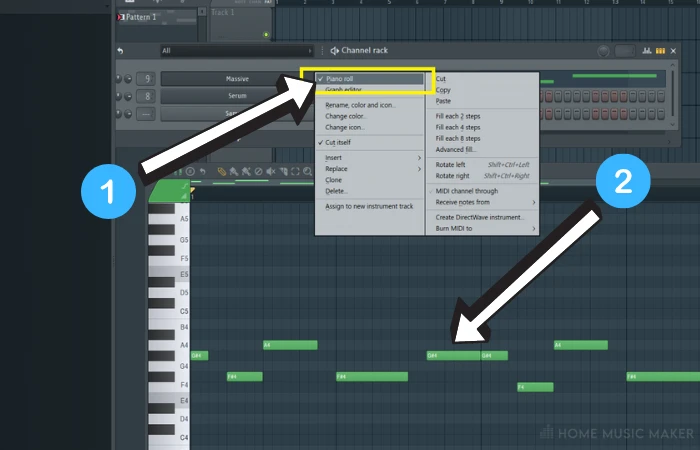
Step 2 – Select And Copy
Be sure to highlight the selected channel or track in your channel rack so that it glows green. Now hit CTRL+C on your keyboard to copy (COMMAND+C for Mac).
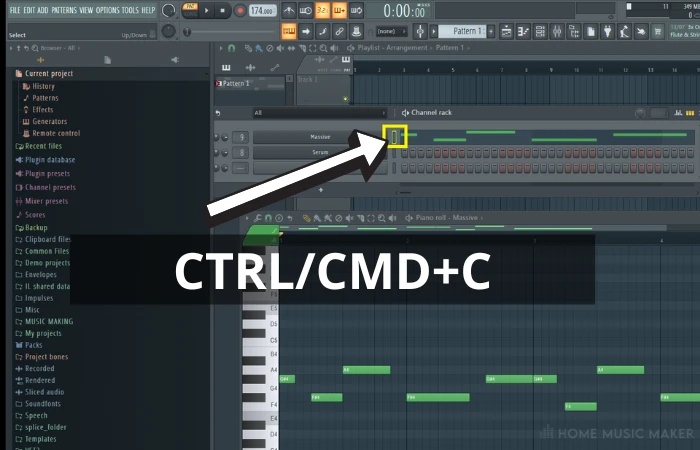
You can also cut and paste if you only need the new MIDI information to be on one plugin of your rack. Hooray for shortcuts!
Step 3 – Paste
Now highlight your chosen plugin or VST you want to paste into, and hit CTRL+V on your keyboard (COMMAND+V for Mac).
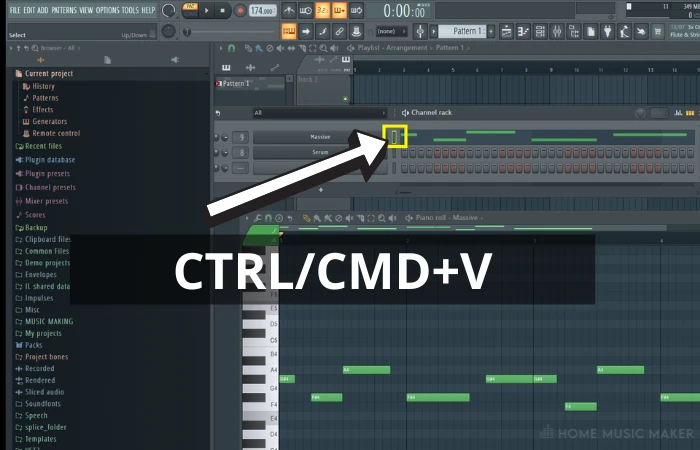
NOTE: If you select all your notes within the FL Studio piano roll and copy-paste, you will have to navigate into the destination piano roll for the selection to be pasted in. You won’t be able to use the highlighted green method.
How Do I Save A Channel Rack State In FL Studio?
What we will perform here is set up a template. This trick will apply to all aspects of your project (including all mixer settings).
Step 1 – Setup
In a new project, insert all the settings or files you wish to save – whether they are VST plugins, specific samples like kicks and snares, or even equalizer and post-processing effects on your mixer.
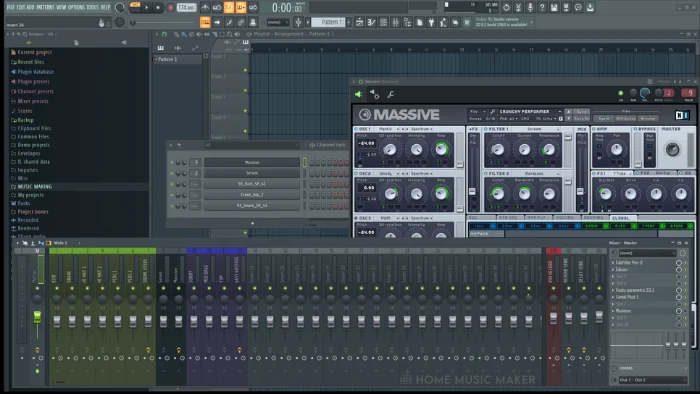
Step 2 – Save As Template
The location of your save can vary from computer to computer.
What you are looking for is the templates folder in the data subfolder of your FL Studio install.
They are usually as follows:
PC – C:\Program Files (x86)\Image-Line\FL Studio xx\Data\Projects\Templates.
Mac – ‘/Applications/FL Studio Mac Beta. app/Contents/Resources/FL/Data/Templates
Save your project inside this template folder with a name you can remember.
Step 3 – Open Your Template
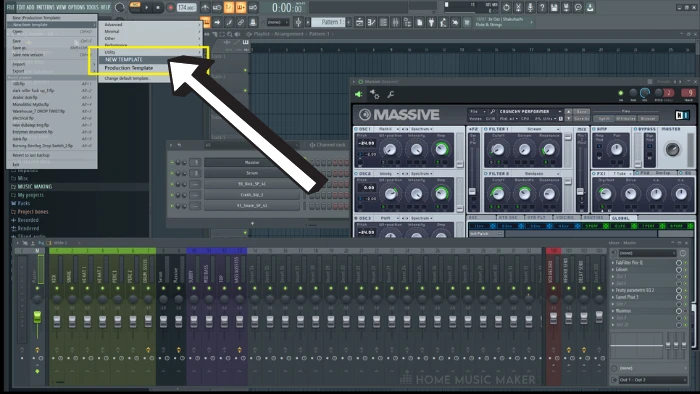
Navigate to File > New from template > “your named template” and left-click to open.
This will now be the default open template each time you start a new project, with all your setup ready to go!
Related Questions
How Do You Solo A Track In FL Studio?
You will see the green light next to each function on your playlist, channel rack, or mixer channel. Right-click this to solo it, and once more will re-enable all sound.
How Do You Copy A Pattern In FL Studio?
Ensure you have your channel rack open first. To duplicate the entire pattern, hit CTRL+SHIFT+C / CMD+SHIFT+C (Mac). If you only wish to copy a single MIDI pattern, you can left-click it in the playlist view and left-click again in a new empty space to paste it.
Be sure to hit the drop-down arrow and select make unique if you wish to make changes just to the new one but using the existing data.
What If I Want To Leave Something On All The Time, Even When Soloing Something Else?
This one is super handy. Locate the green light of the selected mixer track/channel/clips and hold SHIFT+left-click. A locked icon will show in its place, and whatever it is set to (on or off) will remain regardless of muting other functions.
Jammed Some Awesome Melodies But Forgot What You Played?
An absolute lifesaver of a tip! Ensure the VST or plugin you were using is open/active. Next, go Tools > Dump score log to selected pattern > Choose an option from last 2 minutes – 30 minutes > open Piano roll to see all your MIDI data pasted in!
Sick Of Different Windows Being Hidden By Other Ones?
There are two ways around this one. Often I will detach a window, keeping it on top of my other ones. Select the window’s drop-down and select detached (D as a shortcut on your keyboard). Alternatively, you can close all open windows with F12 to keep things tidy.
For more on changing how things look, check out this guide on FL Studio layouts.
Want to connect with other music producers for help and guidance?
Join our FREE forum today and become part of our community!
Click HereHow To Open Channel Rack in FL Studio

Whether you are a seasoned producer or just getting started with music production, it’s important to understand the basics of your DAW (Digital Audio Workstation) of choice.
FL Studio is a popular DAW, and one of its most essential features is the Channel Rack.
The Channel Rack is an important part of the workflow when using FL Studio, as it allows you to easily organize your projects and create mixes.
In this blog post, we’ll show you how to open the Channel Rack in FL Studio so you can take advantage of all its features.
We’ll also discuss some of the benefits of the Channel Rack and how to make the most of it.
By the time you finish reading, you’ll be ready to start creating music with the help of FL Studio’s Channel Rack.
Select the “Options” tab from the top menu bar.
To open Channel Rack in FL Studio, you will need to select the “Options” tab from the top menu bar.
Once you have selected this tab, you should see an option labeled “Channel Rack”.
Click on this tab and the Channel Rack should open up, revealing all the channels and sounds that you have added to your project.
You can use this tool to add, delete, and modify the channels in your project.
Click on “Channel Rack” from the drop-down list.
Once you’ve opened FL Studio, the next step is to locate the Channel Rack.
To do this, look at the top left of your screen and click the drop-down menu that says “Channel Rack”.
This will open a window that allows you to view the various elements of your project such as samples, synths, and effects.
From here you can create your own personalized channel rack to facilitate the production of your music.
You can also add and delete channels, as well as reorder them.
Once you have your channel rack set up, you are ready to begin producing your music.
Select “Rack” from the options on the left side of the screen.
Once you’ve opened FL Studio, the first step is to select “Rack” from the options on the left side of the screen.
This will open up the Channel Rack, which is where you can add and manage different instruments, samples, and effects.
To add a new instrument or sample, simply click on the “+” icon and select the instrument or sample you want to add.
From there, you’ll be able to adjust the settings to create the perfect sound.
You can also drag and drop samples or instruments into the Channel Rack directly from your computer.
With the Channel Rack, you can mix and match different samples and instruments to create the perfect sound.
Click “Open Channel Rack” from the available options.
After opening FL Studio, the first step to accessing the Channel Rack is to click the “Open Channel Rack” option from the available options.
This can be done by first clicking the “View” tab from the top menu bar, which will open up a drop down list of available options.
From this list, you will then need to select the “Open Channel Rack” option.
This will open up the Channel Rack window, in which you will be able to find all the different audio channels and other features included in FL Studio.
Choose the desired channel type from the drop-down list.
Once you have successfully opened the Channel Rack, the next step is choosing the desired channel type from the drop-down list.
You will find this list towards the top left corner of the window.
The list contains several channel types, including instrument, audio, automation, and others.
Select the type of channel that you want to use and the corresponding plugins, sounds, and other features will be added to the Channel Rack automatically.
Additionally, FL Studio also offers a variety of preset channel and mixer settings, which can be accessed from the same drop-down list.
Select “Create Channel” to add a new channel to the rack.
After you’ve chosen the kind of channel you want to create, click the “Create Channel” button to add it to your Channel Rack.
You can create audio, automation, and control channels, as well as patterned channels.
You’ll be prompted to name the channel and select the type before it gets added to your rack.
Once it’s added, you can open it and start adding clips, instruments, or samples.
Once everything is set up, you can start editing and producing your music.
Adjust the channel settings as needed.
Once you have opened the Channel Rack, you can adjust the settings as needed.
This can be done by right-clicking on the desired Channel and selecting “Settings”.
A new window will open where you can change the Channel Name, Color, Volume, and more.
You can also add effects such as EQ, Compression, Reverb, and Delay.
Be sure to click “OK” once you have finished adjusting the settings.
Now you are ready to start creating music with your new Channel Rack in FL Studio.
Click the “OK” button to save the changes.
After you’ve made all the desired changes to the channel rack, click the “OK” button to save them.
This will update the channel rack with your new settings.
Be sure to double-check that all the changes are correct before saving, as some settings may be irreversible.
Once you have saved the changes, you can start creating your music in FL Studio with the new channel rack configuration.
Conclusion
In conclusion, opening the Channel Rack in FL Studio is a very simple process.
Once you know the navigation menu and the keyboard shortcuts, you can easily open the Channel Rack and create the music of your choice.
With the Channel Rack, you can easily control the sounds and effects of the instruments you have loaded and create complex compositions.
Как открыть channel rack в fl studio 20
Reddit and its partners use cookies and similar technologies to provide you with a better experience.
By accepting all cookies, you agree to our use of cookies to deliver and maintain our services and site, improve the quality of Reddit, personalize Reddit content and advertising, and measure the effectiveness of advertising.
By rejecting non-essential cookies, Reddit may still use certain cookies to ensure the proper functionality of our platform.
For more information, please see our Cookie Notice and our Privacy Policy .