Как разогнать процессор Intel Core до 5 ГГц?
Ранее мы уже публиковали подробное руководство по разгону процессоров Intel семейства Kaby Lake на материнских платах ASUS, а теперь сконцентрируемся на оверклокинге устройств Core i9-9900K, Core i7-9700K и Core i5-9600K на платформе Z390 от MSI. Напоминаем о том, что для подобных занятий требуется основа с мощной подсистемой питания (топовая MEG Z390 ACE для экспериментов с тактовыми частотами подойдет наилучшим образом).
Разгон ЦП желательно совместить с оверклокингом ОЗУ.
Важно заметить, что в девятом поколении Intel Core (в отличие от восьмого) используется так называемый STIM (Solder Thermal Interface Material), а не менее эффективная термопаста. Этот факт положительным образом влияет на оверклокерский потенциал модификаций семейства Coffee Lake.
Разгон ЦП рекомендуем производить традиционным методом, то есть через интерфейс BIOS. Итак, приступаем.
Тестовый стенд:
Процессоры — Intel Core i9-9900K, Core i7-9700K и Core i5-9600K
Материнская плата — MSI MEG Z390 ACE
Оперативная память — Corsair CMK16GX4M2B3600C18
Меняем настройки в BIOS
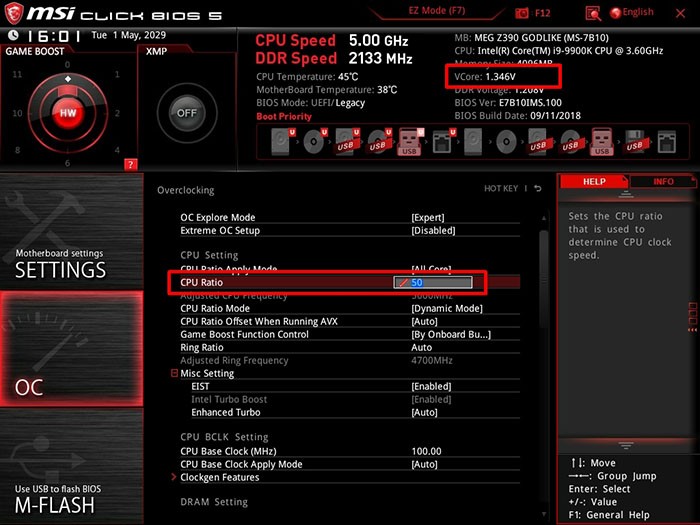
Первым делом необходимо перейти в «Расширенный режим» (Advanced Mode), для этого нажимаем на кнопку F7. Вкладку «OC Explore Mode» переключаем в положение «Expert», далее устанавливаем множитель х50 в поле «CPU Ratio», а для «Ring Ratio» прописываем значение 47 (это рекомендация разработчиков).
В «CPU Ratio Mode» есть два варианта: «Fixed mode» и «Dynamic mode». Останавливаемся на фиксированном значении.
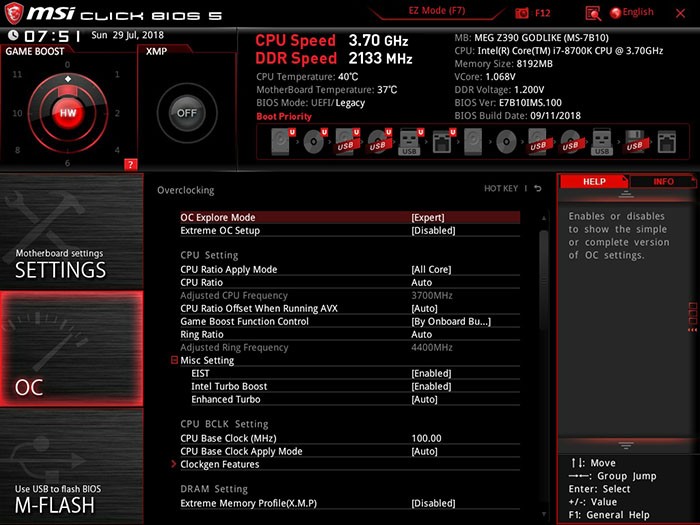
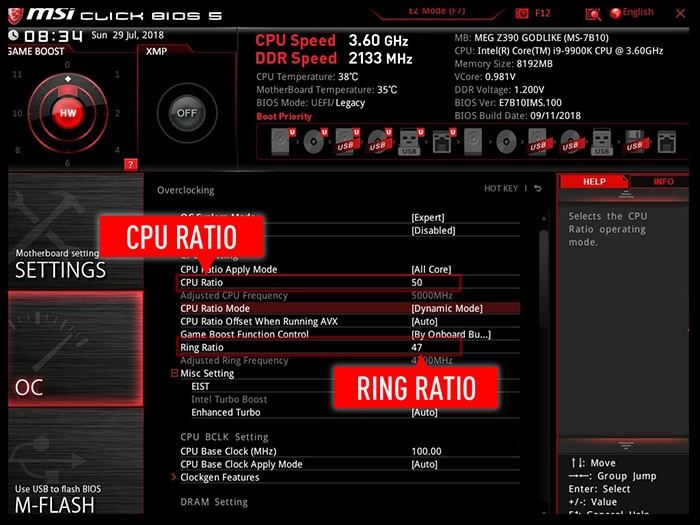
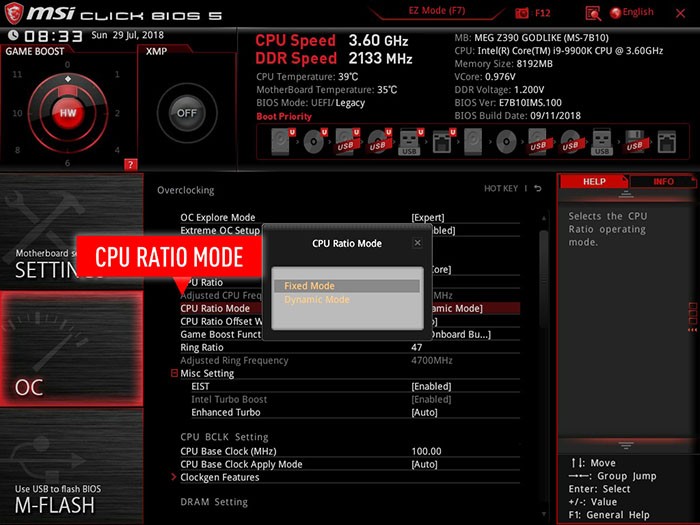
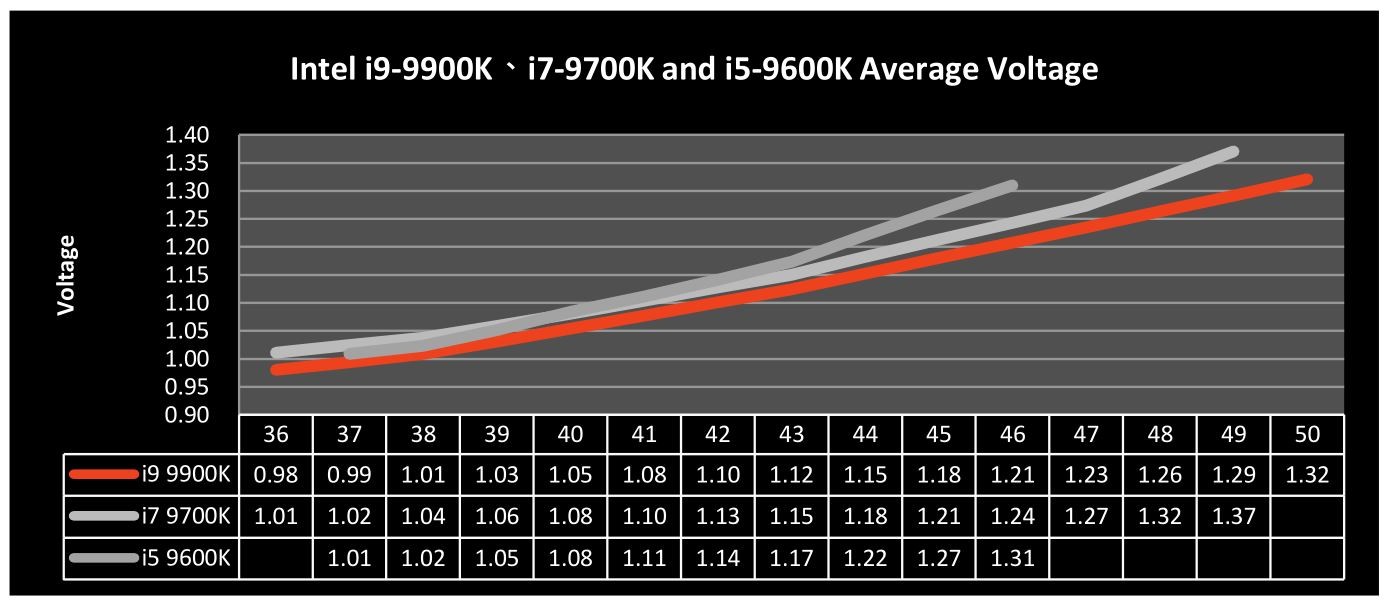
Пришло время поговорить о напряжении. Для Core i9-9900K на 5 ГГц не стоит выставлять показатель выше 1,32 В, норма для Core i7-9700K (на тех же 5000 МГц) — 1,37 В, для Core i5-9600K – 1,43 В. Очевидно, что каждому процессору для стабильной работы необходим «свой вольтаж». Если вам повезет с экземпляром CPU, указанные значения можно понизить.
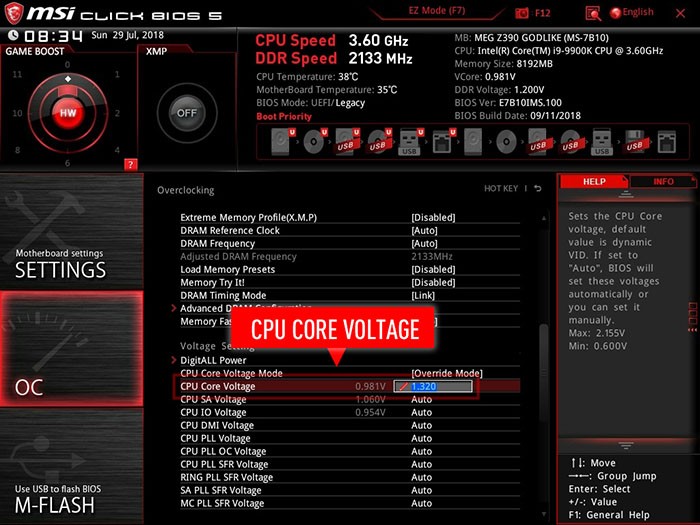
При желании вы можете вообще не заморачиваться с поиском оптимального вольтажа для ЦП, оставив параметр «CPU Core Voltage» в положении Auto. Современные материнские платы (в том числе от компании MSI) самостоятельно подгоняют эту опцию до нужного значения (встроенные в систему механизмы позволяют это сделать).
Однако «навязанные» автоматикой цифры могут быть неприемлемыми для вашего ЦП (либо слишком низкими, либо слишком высокими), поэтому настоятельно рекомендуем определить «верное положение» своими силами (методом проб и ошибок).
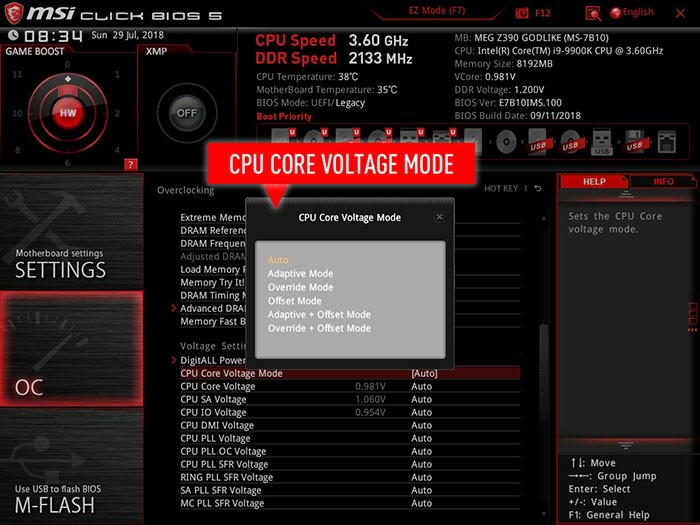
Во вкладке CPU Core Voltage Mode есть пять вариантов:
- Override Mode (фиксированный вольтаж при любой нагрузке)
- Adaptive Mode («плавающее» напряжение в зависимости от нагрузки)
- Offset Mode (дополнительный вольтаж приплюсовывается к номинальному)
- Override+Offset Mode
- Adaptive+Offset Mode
Для стандартного и наиболее эффективного оверклокинга рекомендуется выбрать первый вариант, то есть Override Mode.
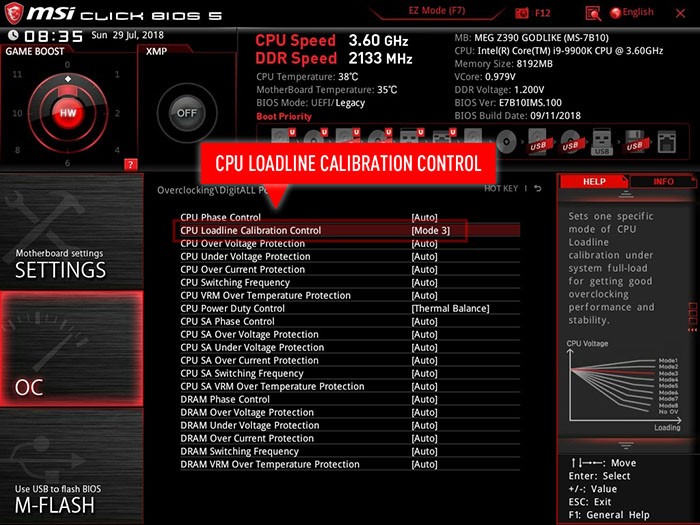
На практике увеличение нагрузки на ЦП приводит к снижению вольтажа на ядре, это явление называется «Vdroop». Описанная ситуация может негативным образом отразиться на успехе в процессе оверклокинга (система будет работать нестабильно), и параметр «CPU Loadline Calibration Control» создан для предотвращения отрицательного исхода. В этом пункте выбираем значение Mode 3.
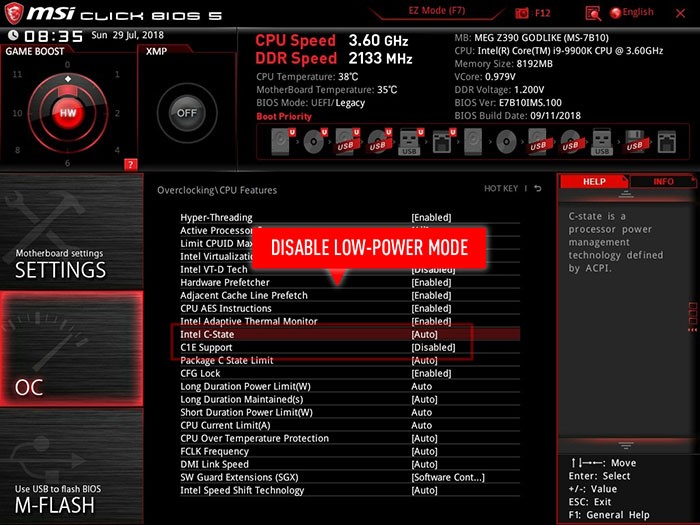
Для пущей стабильности во время работы ЦП на повышенных тактовых частотах разработчики рекомендуют отключить опцию Intel C-State (управление питанием). После этого нажимаем на клавишу F10 и перезагружаем компьютер.
Если вы планируете «проверять на прочность» ЦП с помощью программы Prime95 (с включенным AVX), рекомендуется увеличить параметр «температурного троттлинга» до 115 градусов (CPU Over Temperature Protection).
Разгон оперативной памяти
Оверклокинг центрального процессора желательно совместить с разгоном оперативной памяти (так общая производительность ПК будет еще выше). Самый простой способ это сделать — воспользоваться профилем XMP.
Однако в материнских платах от MSI есть полезная опция под названием «Dragon Alliance Mode», позволяющая «забраться» выше показателей XMP.
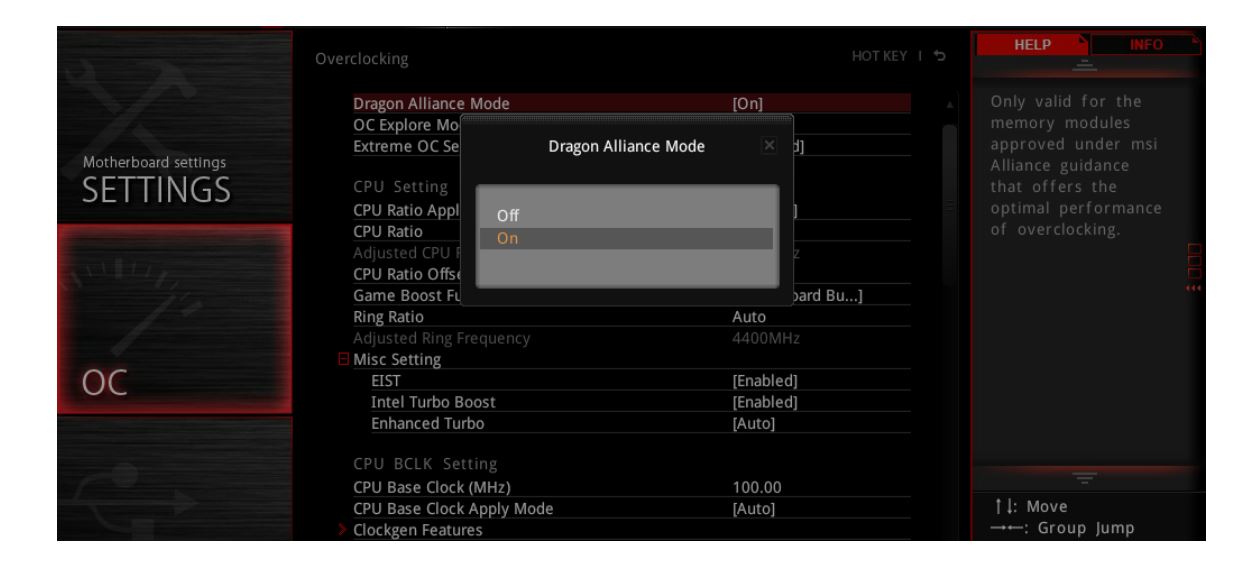
После активации параметра на выбор будут предложены дополнительные профили разгона. Если их нет, значит ваш комплект ОЗУ не поддерживает данную технологию (скажем, кит Corsair CMK16GX4M2B3600C18 с ней совместим).

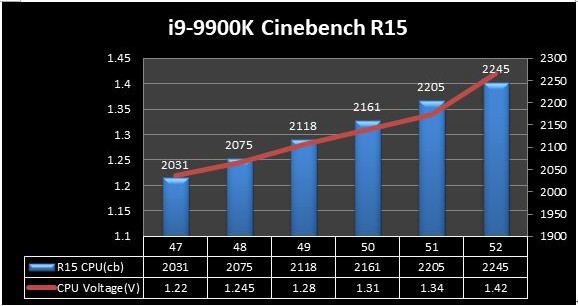
Тест на стабильность
Теперь осталось проверить систему на стабильность. Методов существует великое множество. Вот самый универсальный набор инструментов:
- CPU-Z для проверки тактовой частоты
- Core Temp или HwiNFO для мониторинга температуры и тепловыделения
- Cinebench R15 для быстрой проверки на стабильность и оценки общей производительности ЦП
- AIDA64 или Prime95 v26.6 (non-AVX)/Prime95 v27.9 (AVX) для запуска стресс-теста
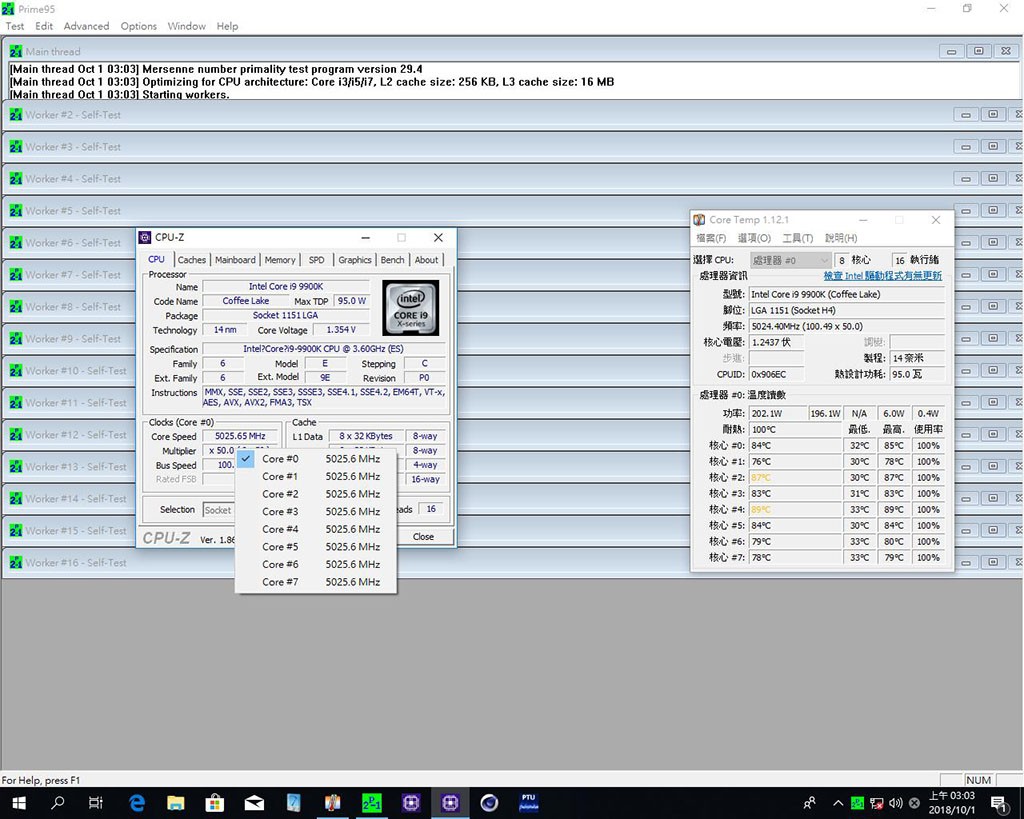
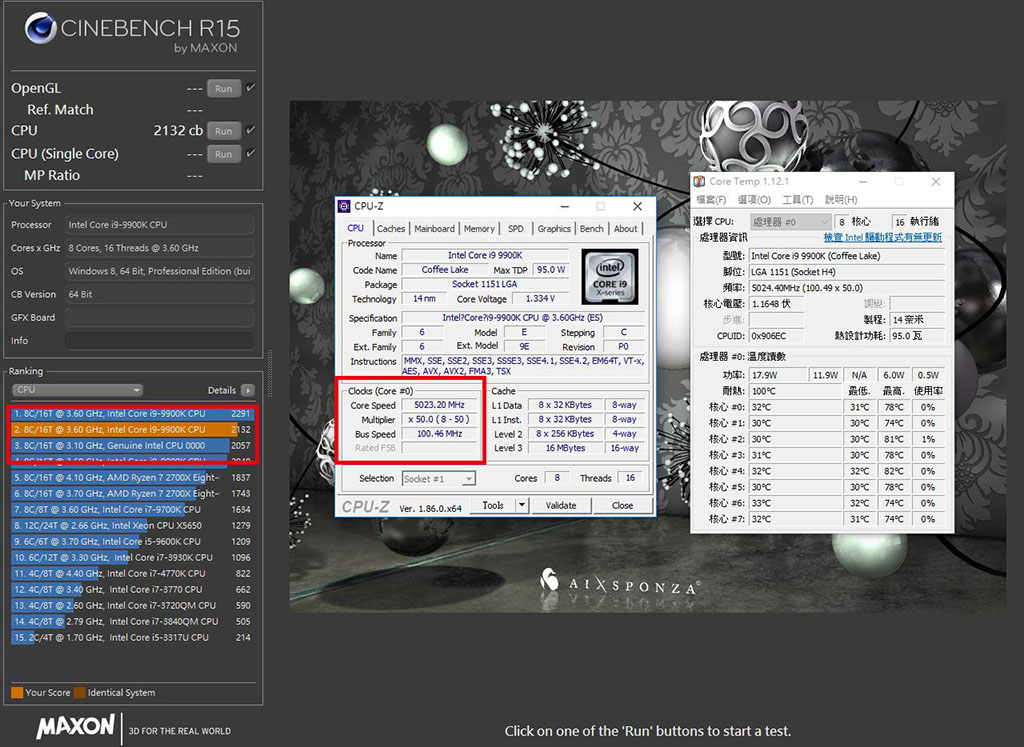
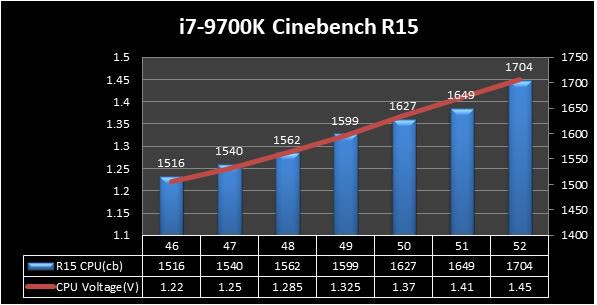
Cinebench R15 позволяет мгновенно загрузить все доступные ядра процессора на 100%. Если тест не завершился вылетом системы или BSOD’ом, значит результат разгона можно смело заносить в актив (и при желании даже увеличить тактовую частоту ЦП). Главное — следите за температурой чипа (за рамки 90 градусов лучше не переступать).
Quick & Easy MSI Z690/Z790 CPU Overclocking Guide — Beginner Friendly!
This is a very simple guide to overclocking your 12th or 13th Gen CPU on an MSI Z690 or Z790 motherboard.
It is not complex, and is designed to optimize your CPU for maximum performance at your desired voltage. Memory overclocking is not covered here.
Prerequisites
Monitoring: HWiNFO
Stress Testing: Cinebench R23 (Game Stability) OR y-cruncher (Relative Stability)
Patience
Ideal Voltage
Everyone's risk tolerance is different, and degradation is real. I've degraded a few chips already from my own testing, so I can speak from experience.
I won't tell you what is a "guaranteed" safe voltage to stay under, but Intel states for the 13900K/KF that 253W is the max they support.
You should also try to keep your max core temperature under 80
85C at the most. That's one possible metric to determine how much headroom you have.
If you only want to be bare minimum "game" stable, Cinebench R23 is enough. But you're going to experience issues with any intensive workload.
y-cruncher gets pretty much to rock stable under any workload, but hammers the CPU quite hard and requires a lot more voltage is pass.
So they are akin to the minimum and maximum voltages you would need for any workload.
If you want to settle in the middle, you will need to field test your own workloads over an extended period of time to see what voltage is required.
MSI has graced users by automatically clocking down CPUs and lowering their voltage and power consumption during idle/light loads.
Even with an override (manual) voltage setting, this feature effectively makes the CPU work as if it were set to adaptive voltage.
(Changing the power plans in Windows doesn't really do anything either in my experience.)
Hence, there is no reason to overcomplicate the overclocking process. Just stick with using the override voltage setting for simplicity.
Initial Settings
1) Enter the BIOS by holding DEL while booting up the PC.
If you have issues trying to get into it, try doing it just after the underscore on the screen disappears, but before the MSI logo appears.
2) If you are prompted to choose a cooler type, go with Water for now. You can always limit the wattage later.
3) On the main screen, go into Advanced mode by pressing F7 or clicking the button at the top.
Click Settings > Boot, and then enable GO2BIOS. This will make overclocking much easier.
Whenever you have issues getting into the BIOS, turn off the PC, and then press and hold the power button for four seconds to directly enter the BIOS.
Afterwards, navigate to the overclock (OC) section on the left.
4) Set the "P-Core/E-Core Ratio Apply Mode" to "All Core". Set the "Per P-Core/E-Core Ratio Limit" to "Manual".
5) Start with the stock settings of your CPU for now to establish a baseline.
Google for your CPU to figure out what the default P-Cores, E-Cores, and Ring (cache) clocks are.
For example, with the 13900KF, Intel states that the Performance and Efficient core max turbo frequencies are 5.40 GHz and 4.30 GHz respectively.
The Ring (cache) clock tends to be general knowledge, but if you can't find your chip's base value, just assume it is 4.00 GHz for now.
Plug in the values of each into the "X-Core Ratio" and "X-Core #" fields, like below.
Be sure to convert the frequencies to multiplier values by multiplying them by 10. (Example: 5.40 GHz => 54)
Plug in the baseline ring/cache frequency into the "Ring Ratio" field.
6) Enter the "Advanced CPU Configuration" menu.
Enable "BCLK 100 MHz Lock On".
You can disable "Hyper-Threading" here. You can also set the "Active E-Cores" to 0. I recommend leaving them, but everyone's use-case differs.
Disable "Intel C-State". You can set the "Long Duration Power Limit (W)" to limit your max desired wattage here.
And the "Short Duration Power Limit (W)" for instantaneous power spikes (it should be set equal to or higher than the Long Duration).
7) Enable "Extreme Memory Profile (XMP)".
There are more specifics to memory overclocking, but they are beyond the scope of this guide.
If you cannot boot to desktop after enabling XMP, you may need to change the "CPU IMC : RAM Clock" to Gear 2.
8) Set the "CPU Core Voltage Mode" to "Override Mode". Enter your desired voltage below.
To play it safe, start with 1.35V. You can always work your way down to 1.20V or less. If it doesn't boot, you might need to try higher instead.
9) If you are keeping your E-Cores active, set the "CPU E-Core L2 Voltage Mode" to "Override Mode". Enter 1.35V below for now.
This voltage helps stabilize higher ring/cache frequencies when the E-Cores are enabled. 1.35V is typically more than enough.
You will be optimizing this later, once the primary overclocking is done.
10) Enter the "DigitALL Power" menu. Set the "CPU Loadline Calibration Control" to "Mode 7" to start.
There are lots of specifics to get into about loadlines (LLC), but they are beyond the scope of this guide.
It's a bit time consuming to find the ideal LLC value, and as the Mode value increases, the Vdroop does as well.
Vdroop is healthy for CPUs, but if you want a flat LLC, go with Mode 2/3 instead.
Finding A Baseline
11) Boot up Windows, and run HWiNFO. Open the Sensors window. Look for the section that contains "VR VOUT". This is your true VRM voltage reading.
Note: This will not exist on Z790 boards, so refer to the Vcore instead and simply subtract -0.03V from all numbers.
The far left first column is the active (ongoing) value. The second column is the minimum. The third is the maximum. And the fourth is the average.
The "Current (IOUT)" and "Power (POUT)" are important values as well, as they are the true current and wattage readings.
If you're just a beginner, all that you should care about is the Power (POUT) reading.
(If your motherboard or BIOS does not reveal these values, the CPU Package Power reading is good enough, albeit somewhat inaccurate.)
12) Do a quick test with Cinebench or y-cruncher to determine if the voltage you set is enough to begin with.
With Cinebench (game stable only), you will want to do a quick 10 minute test to start.
Click File > Advanced Benchmark to show the "Minimum Test Duration" parameter, and select 10 minutes. Start the "CPU (Multi Core)" test.
With y-cruncher (virtually rock stable), you will want to run the main pi benchmark to start.
Press 0 and hit Enter. Then 1. Then enter the value which corresponds with the most memory your RAM capacity can handle.
For example, 16 GB would be 7, 32 GB would be 8, and 64 GB would be 9. Press Enter to start the test.
(Warning: y-cruncher requires much more voltage than virtually all other stress tests, which means it is more likely to degrade your CPU.)
There are various possibilities for how your tests will turn out:
If your Cinebench test is successful, the program will give you a score next to the start button for Multi-Core.
If your y-cruncher test is successful, the program will give you a "Total Computation Time" and a "Start-to-End Wall Time".
If either test is unsuccessful, you will either encounter an error, or your PC will crash with a BSOD (which is most likely pointing to too low voltage).
Note: With either test, if HWiNFO reveals any "Windows Hardware Errors" (WHEA errors), it is considered unsuccessful.
Note 2: On Windows 10, y-cruncher might have an issue forcing all cores to run at 100%. To verify this, monitor the Effective Clocks in HWiNFO.
If you notice that only the E-Cores are maxed out while the P-Cores are not active, you will need to run the full test instead (see Step 16 below).
If you are successful, move to Step 13. If not, set a higher CPU Core Voltage value. Increase it by +0.01V increments, retesting after each change.
At this point, you have found the minimum voltage required to run your CPU's baseline clocks on all-core.
13) Keep boosting up your CPU Core Voltage setting until you reach a true voltage/wattage which you no longer wish to go any higher.
Each time you gradually raise the voltage, you will need to retest the chip, but you don't need to run it for the full duration of time.
You can just let it run for 10-20 seconds and check the active voltage and power values. It's fine to interrupt the test to revise the voltage.
Once you have found the voltage that leads to the current and wattage you wish to permanently stick with, proceed to the next step.
If the voltage required to pass either test surpasses your maximum acceptable wattage, chances are, you have a poorly binned chip.
There's not much you can do about that, so you have to decide at this point whether you want to proceed, or resort to underclocking instead.
To underclock, reduce all of the multipliers of either the P-Cores or the E-cores in Step 5 by 1 until either test passes.
The errors/crashing could be from either the P-Cores or the E-Cores, so you will need to test both out to see which is the weaker link.
Core Optimization
14) After finding a baseline and establishing your maximum voltage, return to the BIOS's overclocking menu.
15) Raise the "P-Core Ratio" by 1 to raise the maximum. Do not raise all of the "P-Core #" multipliers at this time.
Go from top to bottom for simplicity. Raise a single "P-Core #" multiplier by 1.
Load up Windows and go through a short test. If it passes, raise the same multiplier by 1 again. And also raise the "P-Core Ratio" to follow suit.
When it fails, revert the change and make a note about how it failed.
For example: Did it BSOD? Or did it simply error? How quickly? Any WHEA errors? How high could the multiplier reach?
Repeat this process for each of the P-Cores. It will take some time. Based on your notes and findings, sort your P-Cores from strongest to weakest.
You do not need to revert a core back to the base multiplier to test a second one. If one is successful, keep it as-is and adjust the next.
16) After you've found the highest multipliers each core can pass tests at, run the full test instead and try to pass it.
In Cinebench, that would be the 30 minute stability test instead.
In y-cruncher, you enter 1, then 7, and then 0. (You only need to pass one loop, so stop the test after it does.)
If you succeed, proceed to Step 17. If not, then based on your notes, start reducing the weakest cores by 1 until it does pass.
You are done optimizing your P-Cores at this point.
17) Raise the "E-Core Ratio" by 1 to raise the maximum. Do not raise all of the "E-Core #" multipliers at this time.
Repeat the exactly same process as the one in Step 15. The E-Cores are built in clusters of four, so they cannot be adjusted individually.
You are done optimizing your E-Cores at this point.
18) Raise the "Ring Ratio" incrementally by 1 or 2. Keep retesting until it fails to pass.
19) Gradually reduce "CPU E-Core L2 Voltage" by -0.05V decrements and keep retesting until it fails to pass.
20) Attempt to increase the LLC Mode by 1 to see if you can optimize the voltage a little more. (But it's probably not going to work.)
CPU overclocking and performance maximization finished! Feel free to ask questions
For those who want more peace of mind, you're free to run other stress tests to see whether they pass as well. I've found that OCCT Large Extreme AVX2 can sometimes demand more Vcore than y-cruncher, and the RealBench V2.56 Stress Test demands a lot more VCCSA.
P core ratio apply mode что это
Reddit and its partners use cookies and similar technologies to provide you with a better experience.
By accepting all cookies, you agree to our use of cookies to deliver and maintain our services and site, improve the quality of Reddit, personalize Reddit content and advertising, and measure the effectiveness of advertising.
By rejecting non-essential cookies, Reddit may still use certain cookies to ensure the proper functionality of our platform.
For more information, please see our Cookie Notice and our Privacy Policy .
Get the Reddit app
Planning on building a computer but need some advice? This is the place to ask! /r/buildapc is a community-driven subreddit dedicated to custom PC assembly. Anyone is welcome to seek the input of our helpful community as they piece together their desktop.
Hi there! I just built a PC with an I9-10850K paired with an MSI Z490 Gaming Edge Wifi motherboard. In BIOS, the current CPU Ratio Apply Mode is set to “ALL CORE”. MSI Enhanced Turbo is also enabled by default but I heard that this is MSI’s version of “auto overclock multi-core enhancement” and that enhanced turbo is bad as it increases voltages. I’m not crazy into overclocking but I’m confused as to what settings to use for the best performance out of my CPU, should I set my CPU Ratio Apply Mode from “ALL CORE” to “Turbo Ratio”? What’re the differences between every CPU Ratio Apply Mode? Should I disable MSI Enhanced Turbo? Any help/advice would be appreciated! Thank you so much!
P core ratio apply mode что это
User Rating: 4 / 5


- Overclocking Guide for DDR4 RAM
- Intel i7 overclocking the 8086K
- Intel Overclocking Terminology FAQ
Article Index
- Intel i5 overclocking the 10600K.
- Introduction
- Getting Started
- Bios Settings
- Overclock Settings
- Stability Testing
- Vcore Curve
- All Pages
Overclock Settings: CPU Core Ratio, voltages, Ringbus, and misc voltages.
Now to start with some actual overclocking, you might want to make a reference score in your favourite benchmark before starting for comparisons. Make sure that all your settings are set to default like not having a memory overclock unless you are 100% sure this is stable.
AVX Offset.
Offset is useful for getting a higher clock speed normal loads like gaming vs rendering/encoding with AVX. But it is really brutal on the CPU and requires more voltage to remain stable. Good CPU’s can usually do with -1 AVX, consider -2 on bad CPU or using really small form factor builds.
- AVX offset for normal to bad chips should be 2 or 3.
- AVX offset for golden chips can be 1 or 0.
Starting with the CPU frequency marked in red in the image below make sure CPU Ratio Apply Mode is set to All Core and that the CPU ration is set to 49. Then Scroll down and select the CPU AVX offset to -1 or -2. Ring Ratio can be left on Auto and can be changed once the CPU overclock a 100% stable. Then marked in Purple is the DRAM settings unless you have a stable DDR4 overclock you want to turn XMP off and set the DRAM Frequency to the base speed of 2133 or 2400.
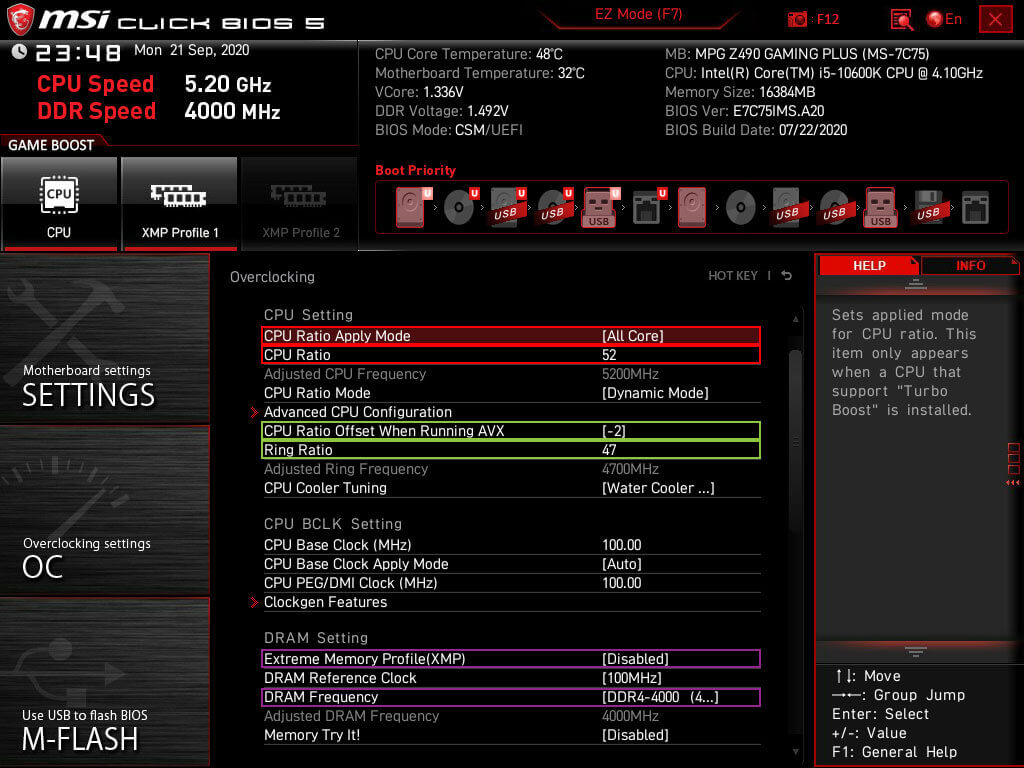
Scroll down, and now it is time to adjust the voltages. Since the 10600K is still on the 14nm node like the previous generation, the same voltage restrictions apply. Marked in red is the voltage settings for the CPU first unlock the voltage control but setting CPU Core Voltage Mode to Override Mode. This then allows the set that CPU Core Voltage. Take into account the table below as well as the binning information when setting your initial voltage. As an example below in red is the voltage for a golden chip reaching 5.2Ghz with 1.345Vcore. Marked in green are the voltages for DRAM overclocking you can leave these on Auto unless you have a 100% stable memory overclock.
-
Save Voltages for light overclocking, 1.2
Change the voltage to 1.25Vcore and daily in 49 in the CPU Core Ration marked in red in the above image. Press F10 to save and reboot the PC. Now you can run a quick CinebenchR20 to gauge if it stable at all if so follow up with five runs in Linpack Xtreme using 8GB of memory or more. If it crashes on either booting into windows or running a stress test, you will most likely end up in the 5.0Ghz to 5.1Ghz range. Important to note here that is also ties into the LLC level you selected for this overclock. Something you can also change and then try to run a short stress test.
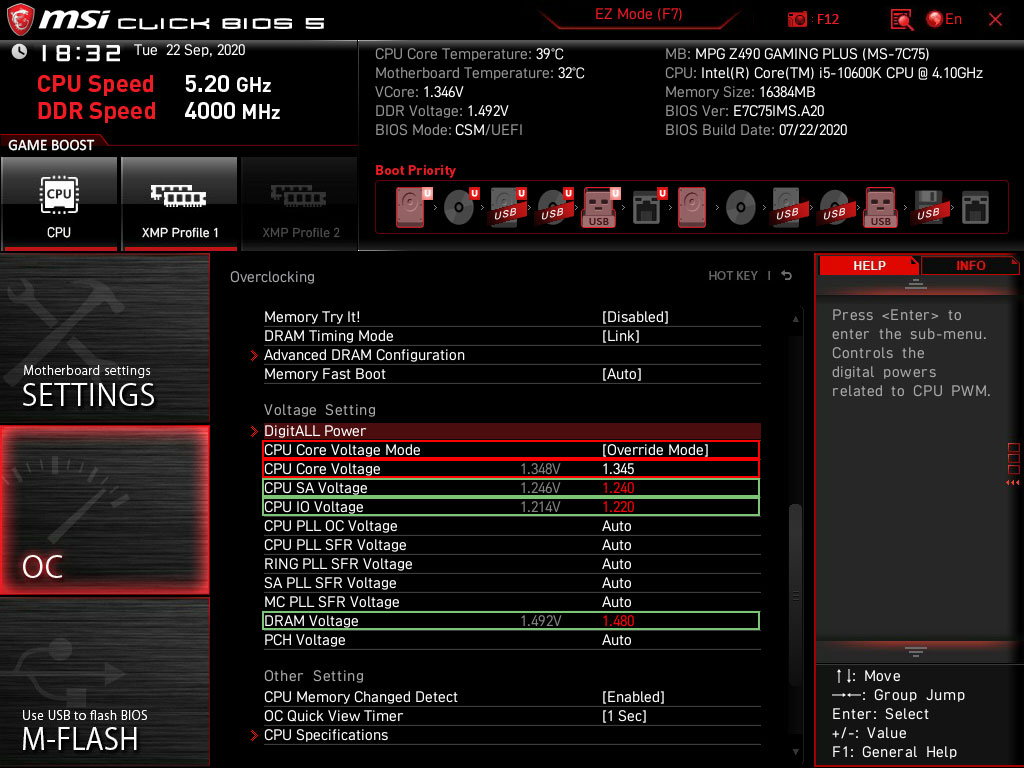
When 1.25Vcore crashed at 4.9Ghz, then you can increase the voltage or lower the multiplier. The preference here is just increasing the voltage since you are far from the max allowed voltage for the 10600K. Enter a voltage of 1.275Vcore and reboot the PC and run a CinebenchR20 if that is stable run Linpack Xtreme stress test on 8GB of memory with five runs. To find the right multiplier with 1.275Vcore keep chancing the multiplier until it is stable. 1.275Vcore also does not generate a lot of heat, so should work with most CPU coolers and will provide you with a good indication of how high your 10600K can overclock.
The 10600K used for this guide ran 5.0Ghz on 1.245Vcore with a 46 multiplier on the Ringbus. Important to note here that when you change the Ringbus only do so after getting a stable overclock on the CPU. As well as this 10600K was unstable with a Ringbus multiplier of 47 but was stable with a Ringbus multiplier of 46. To illustrate how important it is to only change the Ringbus after your done overclocking the CPU. Validation with CPU-Z: CPU-Z 10600K @ 5.0Ghz and a CinebenchR20 score of 3861 so you have an idea how a stable 5.0Ghz overclock looks like.
To do an initial confirmation of a stable overclock run Linpack Xtreme with the same settings as before but this time around do it ten times and use HWiNFO64 to keep an eye on the temperatures and CVID(Vcore). Then you can go for a higher CPU overclock and try 5.0Ghz and 5.1Ghz but make sure to not thermal throttle the CPU, so you are limited by your cooling solution. As well as exceeding 1.4Vcore what would degrade your CPU and most of the time thermal throttle your CPU. Make sure you keep your AVX offset to -1 and -2 for chips that overclock really bad most of the times you won’t need AVX instructions unless your rendering content for instance.
Some other tips are that IF you are not stable with 1.275Vcore and do not want to drop the CPU frequency you can increase the CPU voltage and reach a higher CPU overclock. The only limiting factors are your cooling capacity to prevent thermal throttling and staying below 1.40Vcore. Try 1.30Vcore for instance with your preferred frequency. To point out that 1.275Vcore is a starting point, not the end.
- Increase the voltage 0.025 per attempt, so from 1.250Vcore to 1.275Vcore to 1.300Vcore until stable with the preferred CPU frequency.
- When thermal throttling lower the voltage and keep thermals in the 85C
Ringbus.
Once you have established the CPU overclock is stable, you can set a higher Ringbus. Most overclocks will end up with a Ringbus multiplier of 47 or 46. Ideally, you want the Ringbus to run 500mhz or less from the CPU Mhz. Taking this 10600K as an example, a Ringbus of 4700Mhz was stable with 5.1Ghz and 5.2Ghz but was unstable with 5.0Ghz. But you will have to stress test any changes in the Ringbus separately and including any CPU or RAM overclocks. Ringbus impact DRAM overclocking the most as well as reducing latency it can be left on Auto if neither is a concern.