I. C++ project with VSCode
There are multiple ways of creating C++ project. You could choose to go with heavy lifting IDE(Microsoft Visual Studio, Eclipse, Code::Blocks, CLion,…), or go with plain notepad++, compiler, and a console.
But all of these IDE required you to install additional software on your PC, and the text editor, compiler combo make it hard when debugging your program.
Then you may want to start with VsCode, a perfect fit between two options above, simple but has enough extension for your needs, and you can use it for different programming languages.
Let’s start
1. Target system
As mention above, vscode is a code editor with a lot of powerful extensions. But at the core, it’s still a text editor, and to build your C/C++ program, you still need to provide the compiler.
The compiler, where and how to install it.
- Windows
- Linux or Windows Subsystem for Linux
- Should come with pre-install gnu-g++, you could test with type g++ —version to check. If it’s not installed, then sudo apt install g++ should do the job
2. VsCode extensions
There is a lot of extensions, which support C/C++ development on vscode. But to keep it simple, we usually go with one below.
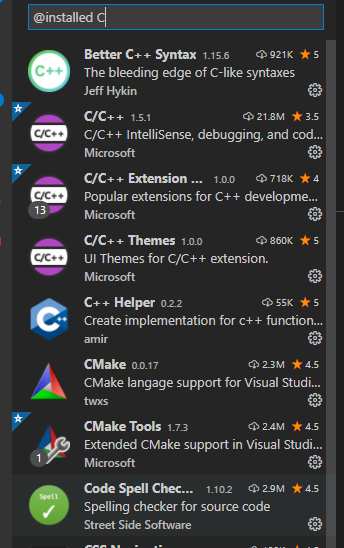 Ctrl + Shift + X, search for «C++» and you get everything
3. Let’s build and debug it
Alright, after you get all the extensions and compiler in place, let’s create a simple C++ program and try to build it.
- Create a folder for your project, open vscode then [Ctrl + k + o] to open your project folder.
- Create a main.cpp and input your sample code.
- [Ctrl + Shift + p]: type in “C/C++: edit configurations”.
You can choose UI option to show the UI for setting, go through it and change the setting your self, after you finished just [Ctrl + s] the configuration shall be save and store to ./.vscode/c_cpp_properties.json in your project folder
If you chose the JSON, the c_cpp_properties.json shall be open right away for you with default a default config for the available compiler in your environment. Below is sample configurations, 1st for mingw64 g++ compiler and 2nd is for msvc compiler.
[Ctrl + Shift + p]: “Select configuration” then you can create multiple configuration and switch between them.
[Ctrl + Shift + p]: “Build and Debug Active File”, you can build and debug a simple Cpp program, remember to open your main.cpp first as active file. Red one is default, green is Tasks option, which is created after 1st execute.
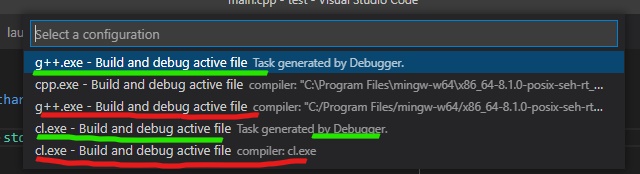 Build and Debug Active File
Select your target compiler, then your Cpp file will be build and executed. If you want to stop the program, place debug point on the line count ruler in the editor or else it will run to the end right away.
NOTE: To able to use the msvc compiler, vscode has to be lunched from “Developer Command Prompt for VS”. i.e. Start > Developer Command Prompt for VS > cd to project folder > code . to open vscode
After execute, your vscode shall spawn a new tasks.json file in .vscode folder of project. Below is sample tasks.json file, which is generated when you run with 2 different compiler (msvc and gnu-g++).
More on tasks.json setup here!
Basically you can change the tasks to call to external script command to build your project (i.e. make. ). But for now it’s a simple project so let’s just change some of its default value (label, compiler args) so we can refer to it in lunch debug.
[Ctrl + Shift + D] to lunch debug operations, we will refer to those build tasks before proceed with the debugger.
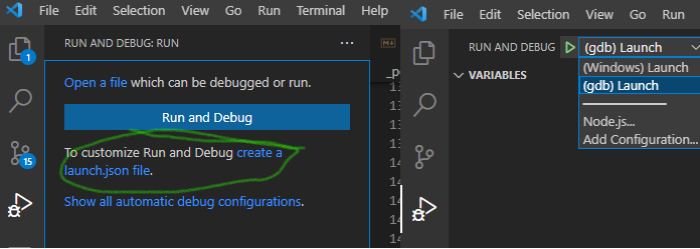 Lunch Debug
Select the target environment, a lunch.json file will be created in .vscode folder. Change some default value, so lunch operation shall prefer to your preLunchTask. After updates, in debug shall show you the available options.
Now open your main.cpp, press F5.
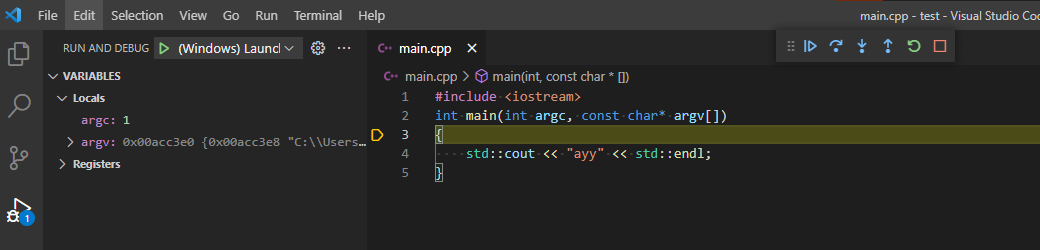 Tadaa, you ready to go, let’s write your program and debug it
II. (Too bland?) Let’s add CMake flavor
So in first section, we able to setup a simple project to build and debug your cpp file. If you want to extend the project, adding new file, using external library, you need to update the tasks.json so it will call to your build script or external build system to handle larger project.
But today we shall using CMake(build system generator). It basically generate build directory base our selected build tool and help us to move our project between platform and compiler easily.
Build system: Build automation involves scripting or automating the process of compiling computer source code into binary code. Ex: make, GNU make, nmake, bitbake, ninja
Build system generator: Generator tools do not build directly, but rather generate files to be used by a native build tool. Ex: CMake
Let’s get the CMake extension, install RemoteSSH/WSL if you want develop on remote machine(Linux) from your windows base environment.
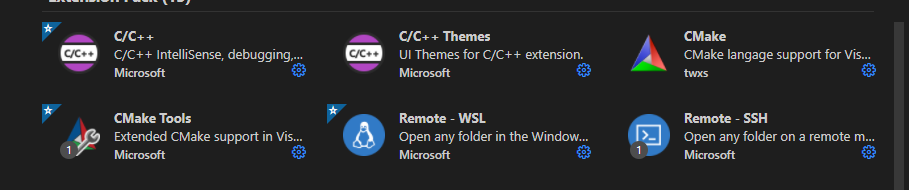 CMake, RemoteSSH/WSL
CMake project setup is pretty much the same for both windows and linux, so for the following section, we shall use vscode to setup a project on remote linux.
Let’s switch development environment to Linux from your windows machine
Click here. 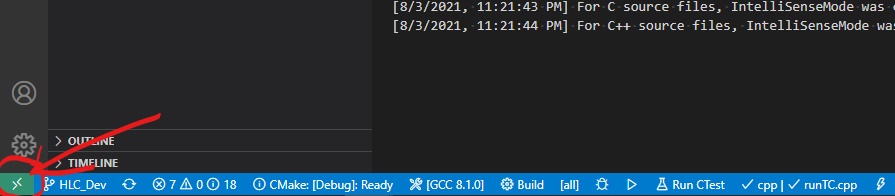 Select your target, could be either WSL on your windows or a remote linux machine with SSH
 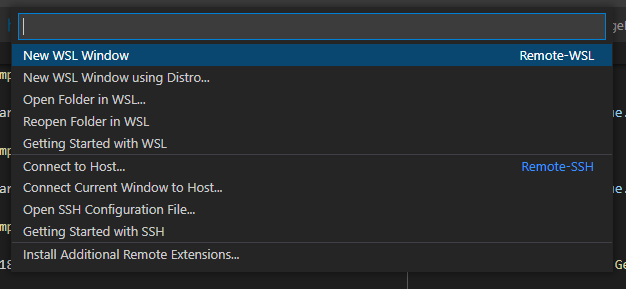 After that, vscode shall connect to your remote machine. Go to extension tab, it will show available extension that you can install on remote machine (it’s the the same as previous section).
[Ctrl + Shift + P]: “cmake”, it will show you available operation with cmake extension. Click on configure, select the compiler and enter your project name. 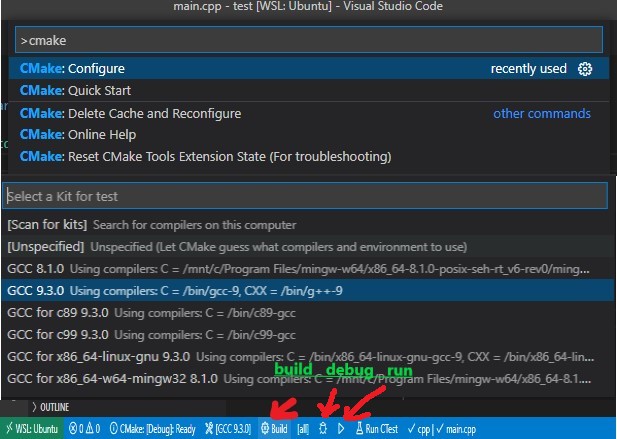 CMake extension request you to create a CMakeLists.txt for your project, and it should be like this.
In the status bar, you should able to see 3 action: Build, Debug, Lunch. Click on build or F7 and cmake shall create build directory and build your project in it. 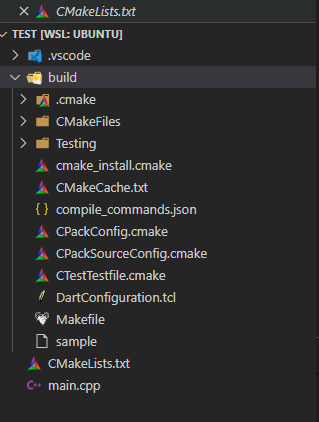 Let’s update the directory: add src and include folder and provide additional code there.
 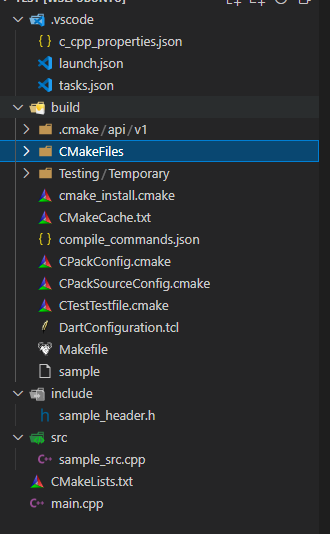 Then update your CMakeLists.txt as following (for more about CMake, please check CMake Documentation
Almost done, let’s update some setting of cmake, so we can push input args to our programs as previous debug session. Create a file settings.json in .vscode folder and input below content.
OK, now Ctrl + F5, it shall build your project and lunch debug mode.
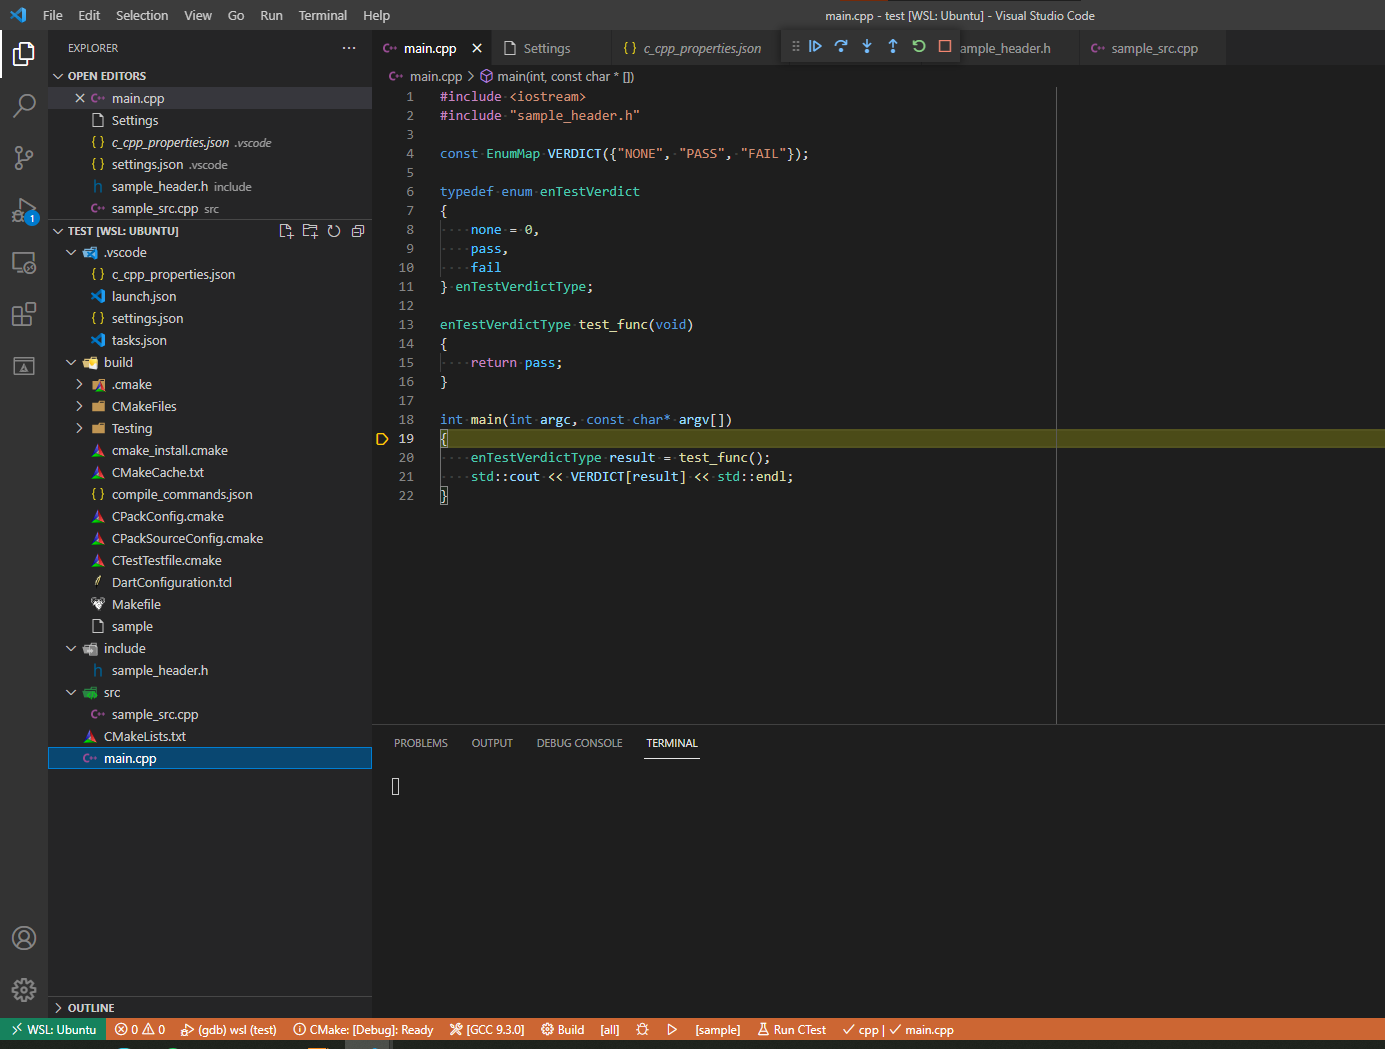 End result
Nice, now you can update your project, create additional modules, add external libraries, etc. Of course, you have to update the CMakeLists.txt correspondingly with the changes of project. We will have a CMake topic in the near future.
VSCode remote extension is pretty convenience when you want to create/build your project in remote machine(raspberry,…). You can just setup a raspberry with ssh enable and it’s good to go. No need for additional keyboard, mouse, monitor or using ssh with CLI.
Remote and debug?
When your program required su to run then normal debug will not work. Here is a workaround.
cd /usr/bin
sudo mv gdb gdb_origin
sudo vim gdb
Input:
How to Write And Run C and C++ Code in Visual Studio Code

Md. Fahim Bin Amin
Visual Studio Code (or VS Code for short) is a very common and widely used text editor and IDE (Integrated Development Environment). You can make VS Code very powerful like an IDE using a lot of extensions.
Before approaching the process of running your first C or C++ code on Visual Studio Code, let me guide you through the process and get it all set up based on the operating system you are using on your computer.
C and C++ compilers
For running C or C++ code, you just need to have a valid C/C++ compiler installed on your computer. If you are using a Linux operating system, then there is a high chance that it is already installed on your system. But we need to make sure that it is correctly installed.
For checking whether or not you have the compiler (GCC/G++/MinGW) installed on your system or not, you have to check the compiler version first.
Simply open your terminal and use gcc —version and g++ —version . If you get the version number, then the compiler is already installed on your system.
You can check the version using the same commands on any operating system, whether that is a Windows, Linux, or macOS-based operating system.
If you get feedback on your terminal that it does not know anything about GCC or G++, then you have to install the compiler correctly.
If you are using the most used Windows operating system, then I already have written an in-depth article showing you all the processes step-by-step on freeCodeCamp. Make sure to read the entire article first, as it also contains a complete video to provide you with complete support.
If you are using another operating system, and you don’t have the compilers installed, then make sure to install them before proceeding.
How to Install VS Code or VS Code Insiders
You have to download Visual Studio Code directly from the official website: https://code.visualstudio.com/.
If you want, you can also install VS Code Insiders, and the same process is applicable for that as well.
Visual Studio Code Insiders is actually the «Insiders» build of Visual Studio Code, which contains all the latest features that are shipped daily. You can think of VS Code as the stable release and the VS Code Insiders as the Insiders release of that.
If you want to experience the latest updates instantly, then you might also try Visual Studio Code Insiders (I use it myself). For downloading VS Code Insiders, you can visit the official website for VS Code Insiders here: https://code.visualstudio.com/insiders/
Make sure to download the exact file for your operating system.
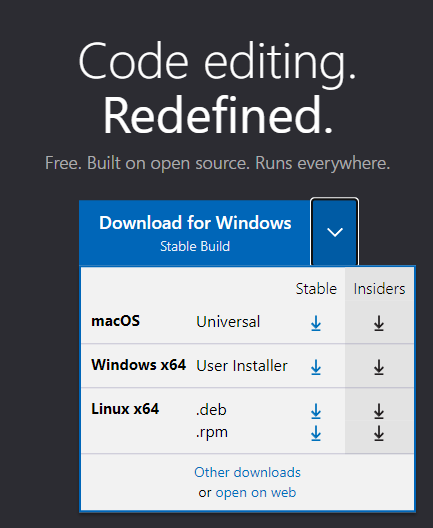 Download Page: VS Code
  Download Page: VS Code Insiders
The installation process is pretty basic. But I am going to show you all the steps sequentially. For now, I am going to show you the installation process using VS Code Insiders, but everything you will see here is going to be exactly the same for VS Code as well.
Make sure to click the box on the «I accept the agreement » box and click on Next.

Accept the agreement and click Next
Keep everything as it is. Do not change anything from here.

Click Next
Click Next. Again, simply click Next.

Click Next
Make sure to add the checkmark (✔) on all of the boxes. Then click on Next.

Check all of the boxes, and click Next
Click on Install.

Click Install
It might take a little time to finish the installation.

Let it finish.
Click on Finish.

Click Finish
Congrats — you’ve successfully installed VS Code/VS Code Insiders on your system. Now, cheers! ��
How to Prepare VS Code/VS Code Insiders For C and C++ Code
First, open VS Code or VS Code Insiders.
Go to the Extension tab. Search for «C» or «C++» and install the first one that is already verified by Microsoft itself.

Install C/C++ extension
Also, install C/C++ Extension Pack. It should also be verified by Microsoft.

Install C/C++ Extension Pack
Then you have to search for Code Runner and install the extension as well.

Install Code Runner Extension
Now, we need to change some settings.
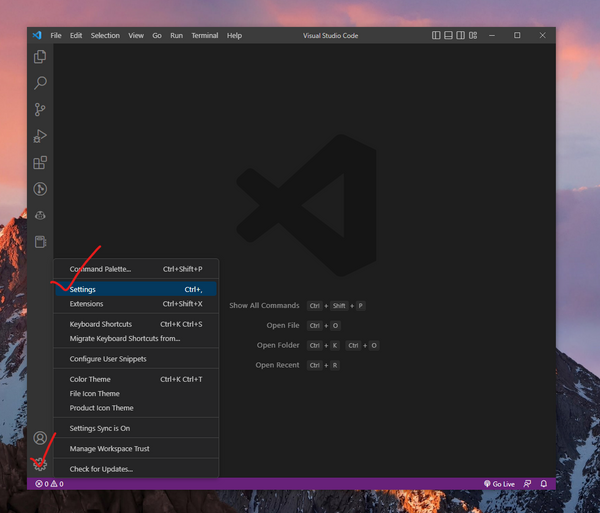
Change some settings
Click the gear box (It is called the Manage section), and then click Settings. Alternatively, you can also use the shortcut keys Ctrl + , . You need to replace the Ctrl key with the Command key for Mac.

Type «Run code in terminal» and press Enter key
In the search bar, type «Run code in terminal» and press the Enter key.
Scroll down a little bit until you find Code-runner: Run In Terminal . Make sure that the box is checked (✔).

Make sure to check the box
Now you need to restart your VS Code/VS Code Insiders. Simply close and reopen the program.
How to Test Your Code
Simply open VS Code/VS Code Insiders, open any folder, and create any file with the extension .c for the C file and .cpp for the C++ file.
After writing your code, you can run the code directly using the play button you’ll find in the upper right corner.

This is how you can run any C/C++ program from VS Code/Insiders
It will compile and then run the code directly. After running a code, the code runner button would be set default to run directly. So, your computer is 100% ready for compiling and running any C/C++ programming code. ��
Conclusion
Thanks for reading the entire article. If it helps you then you can also check out other articles of mine at freeCodeCamp.
If you want to get in touch with me, then you can do so using Twitter, LinkedIn, and GitHub.
You can also SUBSCRIBE to my YouTube channel (Code With FahimFBA) if you want to learn various kinds of programming languages with a lot of practical examples regularly.
If you want to check out my highlights, then you can do so at my Polywork timeline.
You can also visit my website to learn more about me and what I’m working on.
Как запустить проект на C# в Visual studio code?
Вкратце, я ещё не опытный и я не знаю как запустить свой код в Visual studio code.
Да, я знаю, что эта программа предназначена для опытных, но мне она очень понравилась своим оформлением) К сожалению, я только изучаю программирование, т.е. базовую часть. И хотелось бы понять, как компилировать свой код и запускать.
- Вопрос задан более двух лет назад
- 20782 просмотра
- Вконтакте

- Устанавливаешь .net 6 SDK
- Устанавливаешь все нужные плагины:
PS: Вообще, советую пользоваться полноценной студией — может она на первый взгляд и пугает, но она сильно удобнее, чем vs code. (ну и в ней всё работает из коробки, что важно для новичков)
PPS: А ещё существует Rider — для профессионального разработчика он стоит копеечные 15$ в месяц, а для школьника или студента вообще бесплатен. При этом он даёт целую кучу полезных инструментов, особенно для геймдева, если он вам интересен.
Как настроить Visual Studio Code для C, C++, Java, Python

Visual Studio Code — популярный редактор кода, бесплатный и с открытым исходным кодом. Но я уверен: каждый из нас, кто пытался настроить Visual Studio Code для разработки приложений на C++, Java или Python, прошел через стадию: “О Боже! Почему нельзя как-нибудь попроще?” Я сам пробовал настроить VS Code пару раз и в итоге закончил тем, что использовал CodeBlocks. ��
Прочитав много документации, посмотрев ряд роликов на YouTube и потратив несколько дней на саму настройку VS Code, я пишу эту статью, чтобы все это не пришлось проделывать уже вам!
Сегодня я покажу, как настроить среду разработки для спортивного программирования на C++, Java и Python в VS Code с нуля. Мы также посмотрим, какие расширения больше всего пригодятся, чтобы начать работу с VS Code. В конечном счете, ваша среда разработки будет выглядеть примерно так:
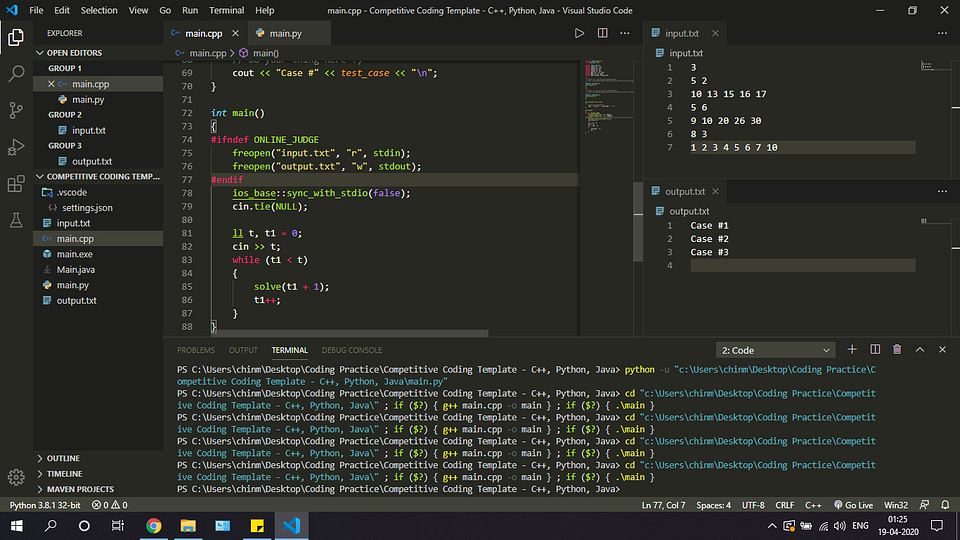
1. Устанавливаем Visual Studio Code
Скачайте последнюю версию Visual Studio Code с официального сайта. Рекомендуется загрузить системный установщик (System Installer), но если у вас нет прав администратора, то пользовательский установщик (User Installer) тоже подойдет. Выполните все обычные шаги по установке и обязательно проставьте все следующие чекбоксы:
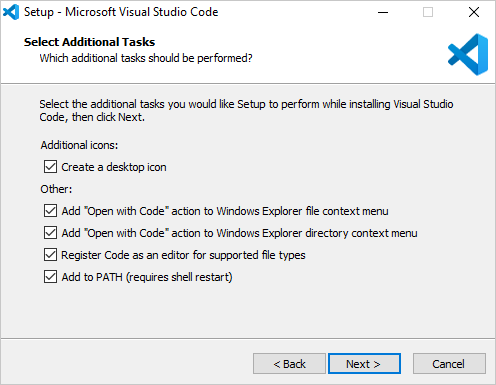
Если у вас уже установлен VS Code, но вы все равно хотите начать с чистого листа, следуйте этим инструкциям, чтобы полностью удалить VS Code.
2. Настраиваем расширения
Ниже приведен список расширений, которые нам понадобятся для правильной настройки VS Code. Откройте VS Code и перейдите на панель расширений (Ctrl + Shift + X), которая находится на левой панели инструментов, и начните загружать друг за другом следующие расширения:
-
от Microsoft — [Важно] Для корректной работы этого расширения нам понадобится установленный и добавленный в PATH компилятор MinGW. Если у вас его нет, следуйте этому руководству. от austin. от Microsoft — вам нужно будет настроить Python для работы этого расширения. Загрузите и установите последнюю версию отсюда. от Microsoft — [Важно] Перед установкой убедитесь, что в вашей системе настроены Java 8 JDK и JRE и указаны все необходимые переменные среды для Java. Если нет, посмотрите это видео о том, как настроить Java на вашем компьютере. от Jun Han — мы будем использовать это расширение для запуска всех наших программ. Для этого необходимо выполнить некоторые шаги по настройке. Мы увидим эти шаги в следующих разделах.
Расширения, перечисленные ниже, необязательны для дальнейшей настройки, но я рекомендую вам обратить на них внимание, посмотреть, заинтересуют ли они вас, и если нет, то перейти к следующему разделу.
- (Необязательно)Material Theme от Mattia Astronio — это расширение содержит множество приятных глазу тем. Вы можете выбрать любую, какая понравится. Лично я предпочитаю Monokai, которая доступна в VS Code по умолчанию, без каких-либо расширений.
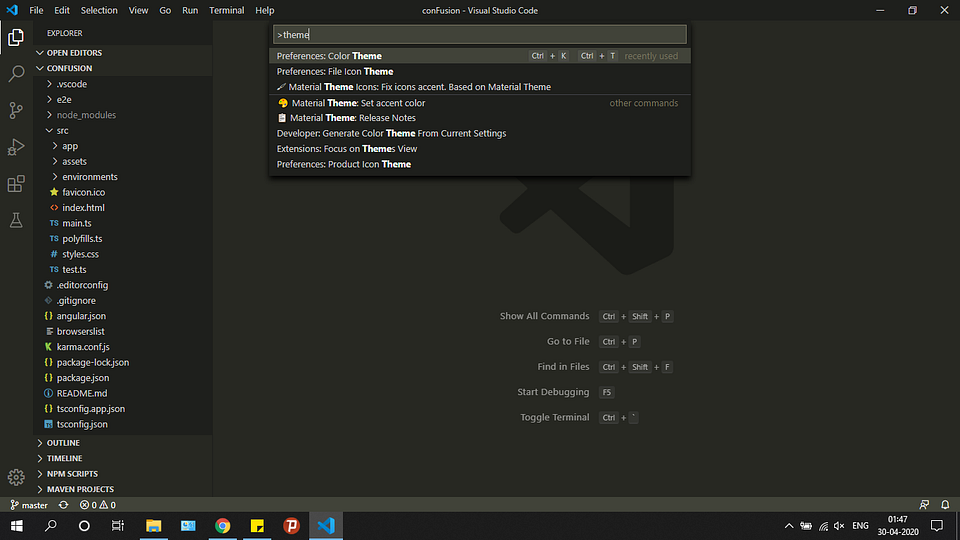
Чтобы выбрать тему, нажмите Ctrl + Shift + P. Откроется палитра команд. Осуществите поиск по слову “theme” и выберите опцию Color Theme. Чтобы настроить иконки, можете выбрать опцию File Icon Theme.
Расширения для тех, кто интересуется FrontEnd-фреймворками для веб-разработки, такими как Angular и React:
- (Необязательно) Angular Language Service от Angular.
- (Необязательно) Angular Snippets от John Papa.
- (Необязательно) ES7 React / Redux / GraphQL / React-Native snippets от dsznajder.
- (Необязательно) React Native Tools от Microsoft.
- (Необязательно) Live Server от Ritwick Dey.
3. Настраиваем внешний вид редактора
Итак, мы уже установили VS Code и несколько расширений. Теперь мы готовы настраивать среду разработки. Я создал шаблон для спортивного программирования в VS Code и загрузил его в свой профиль на Github.
Перейдите по этой ссылке и загрузите шаблон себе на компьютер. Распакуйте его в любое место по вашему выбору. После этого откройте получившуюся папку в VS Code. Вы должны увидеть что-то вроде этого:
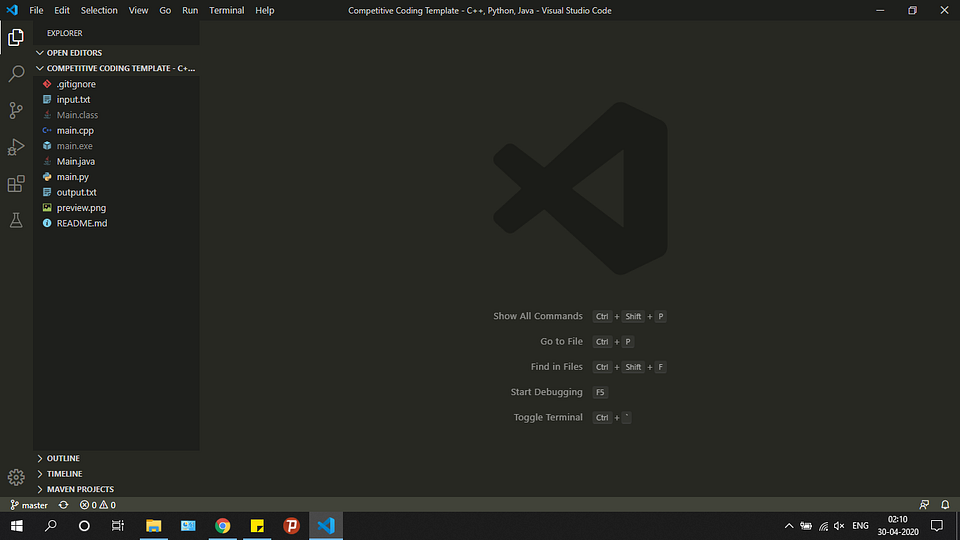
Пройдитесь по файлам main.cpp, Main.java и main.py и посмотрите на записанный в них образец кода. По сути, шаблонный код, предоставленный в образцах для каждого из этих трех языков, принимает входящие данные из файла input.txt и обеспечивает вывод в файл output.txt. Для каждой программистской задачи, которую вы хотите решить, просто создайте копию этого шаблона и напишите свой код в функции solve().
Теперь создадим ту разбивку экрана, которую вы могли видеть на самом первом изображении в этой статье. Эта разбивка позволяет сразу видеть как ввод, так и вывод вашего кода, что делает ее очень удобной в использовании.
- Откройте файлы в следующем порядке: main.cpp, input.txt, output.txt. Порядок, в каком были открыты файлы, можно видеть сверху на панели инструментов. Убедитесь, что порядок именно такой, как указано выше.
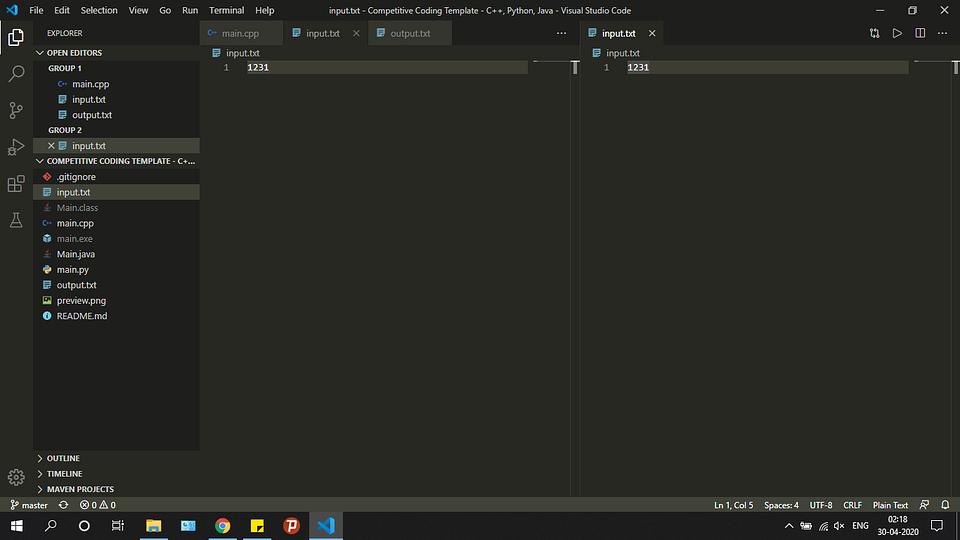
- Откройте input.txt. Выберите в меню View -> Editor Layout -> Split Right. Вы должны увидеть что-то подобное:
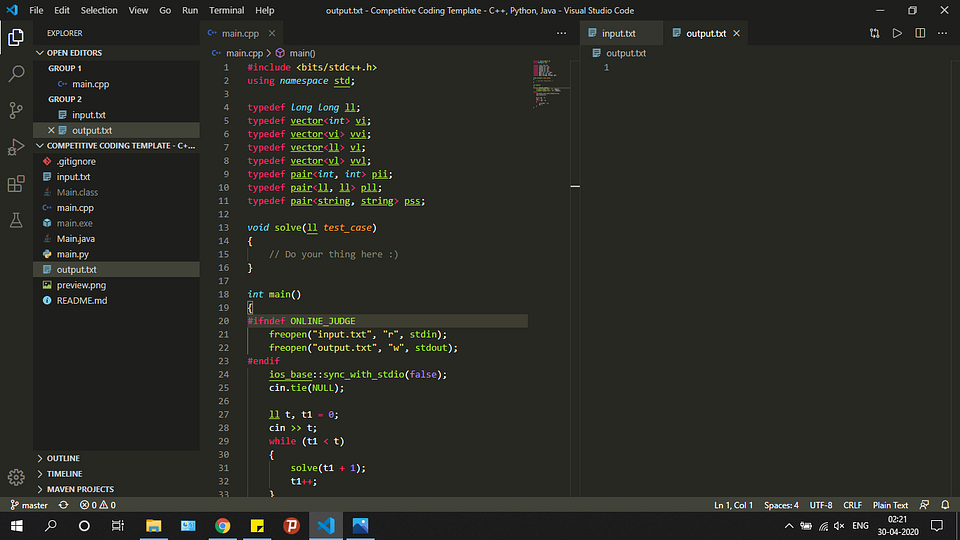
- У вас получится две группы. Перетащите output.txt из левой группы в правую. Закройте тот input.txt, что остался слева. Должно выйти примерно так:
- Далее откройте output.txt в правой группе. Выберите View -> Editor Layout -> Split Down. Уберите output.txt из верхней группы. После этого вы увидите:
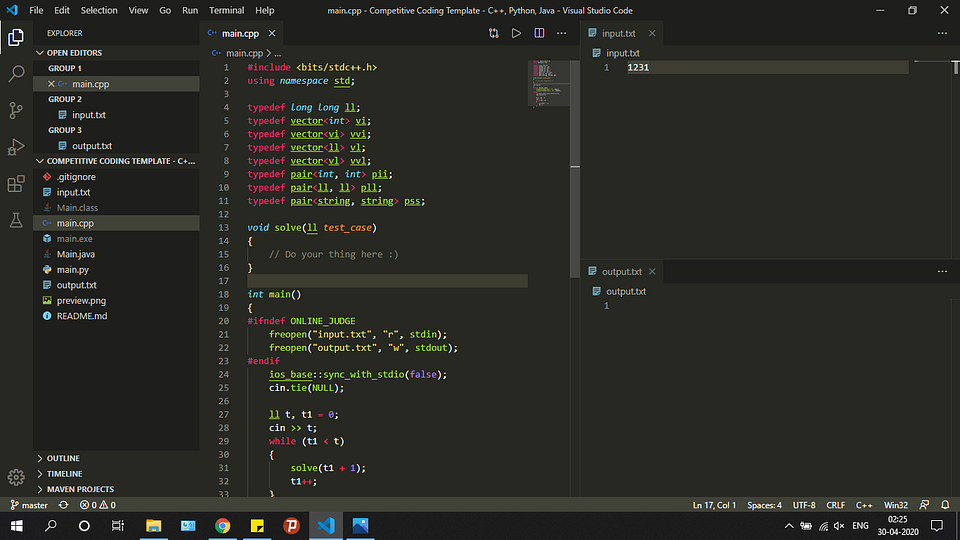
Готово! Мы настроили внешний вид редактора. А теперь давайте запускать код.
4. Запускаем код!
Для запуска нашего кода мы будем использовать расширение Code Runner, потому что ручная настройка VS Code для каждого языка — весьма сложная задача и потребует много затрат времени и сил.
Прежде чем использовать это расширение, нам нужно настроить его так, чтобы оно работало через терминал, иначе мы не сможем обеспечить консольный ввод нашего кода. Эти шаги очень важно проделать в точности:
- Выберите File -> Preferences -> Settings.
- Введите “code runner run in terminal” в поле поиска и установите галку в чекбоксе:
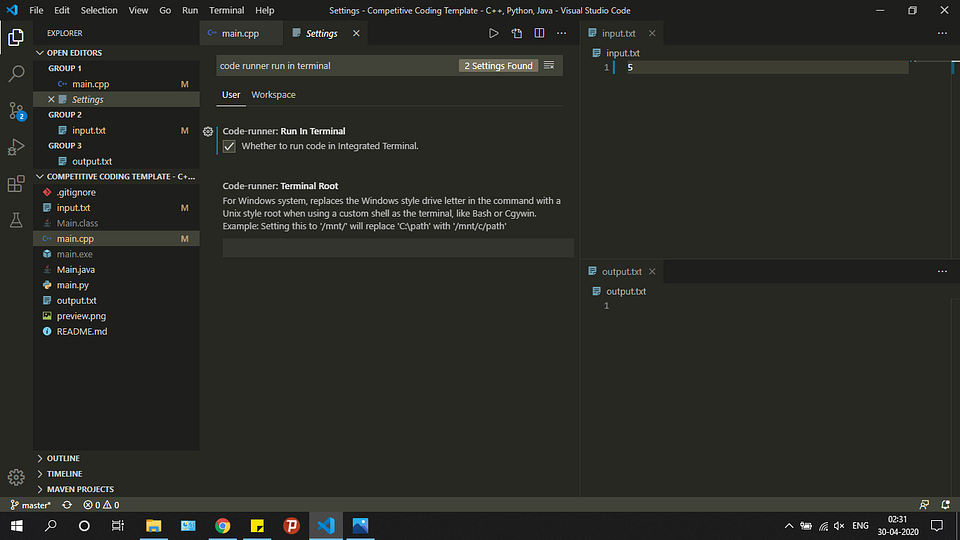
- Добавьте флаг -std=c++14.
По умолчанию Code Runner не добавляет флаг -std=c++14 при компиляции кода. Это ограничивает ваши возможности как программиста. Например, если вы попытаетесь сделать так:
То это вызовет предупреждение: “Расширенные списки инициализаторов доступны только с -std=c++11 или -std=gnu++11”.
Выполните следующие действия, чтобы добавить флаг:
- Выберите File -> Preferences -> Settings.
- Введите в поиске “Run Code Configuration”.
- Определите местонахождение “Code-runner: Executor Map” и выберите “Edit in settings.json”. Это откроет файл settings.json. Добавьте туда следующий код:
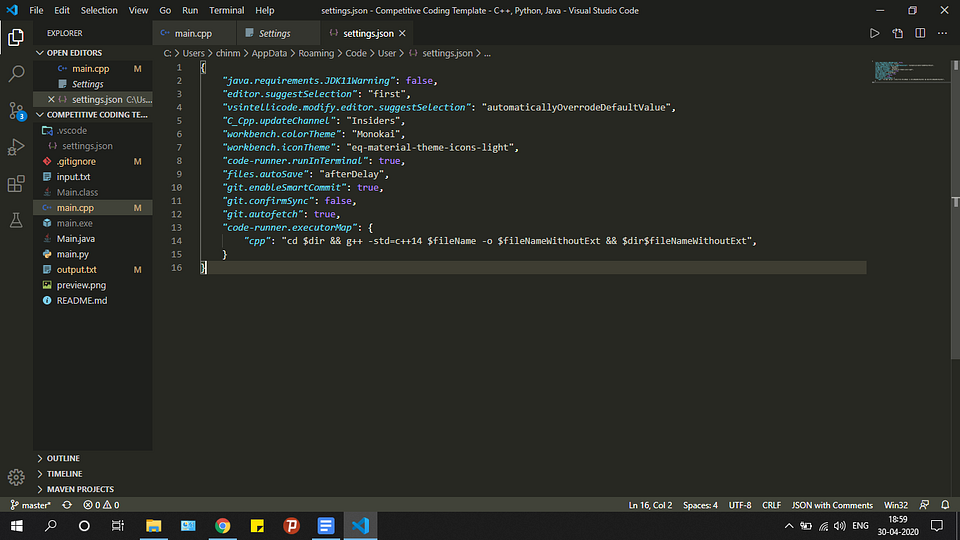
- Сохраните изменения — и готово!
Наконец-то всё настроено для запуска ваших программ на C++, Java и Python.
Откройте файл main.cpp. Нажмите правую кнопку мыши и выберите опцию Run Code. Попробуйте напечатать что-нибудь в функции solve(), чтобы проверить, происходит ли у вас вывод в файл output.txt или нет.
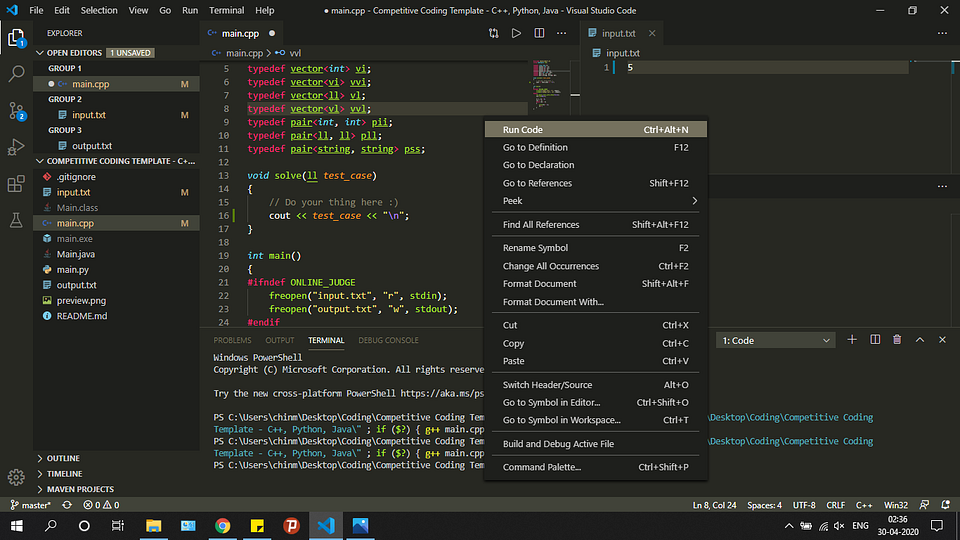
Следуйте той же процедуре с файлами Main.java и main.py. Расширение Code Runner возьмет на себя выполнение каждого из них.
Я надеюсь, что эта статья помогла вам настроить Visual Studio Code. Счастливого программирования!