How to run HTML program — Notepad, Notepad++ and Sublime
If you are wondering or having trouble while running HTML program in your Browser then you are at the Right Place. Because in this tutorial we will know how to Run HTML program using popular texts editors like Notepad, Notepad++ and Sublime 3 text editors.

How to run HTML program using Notepad
Text Editors like Notepad (not notepad++) does not come with an option where you can run your HTML program directly using Notepad. To run the HTML program you will need to follow these steps: Step 1: Save HTML File (with .html extension Example : myfile.html).
Step 2: Find your Saved HTML file
Step 3: Double click on it.
Step 4: (Only if your File isn't opening in your Browser) Right Click on the HTML file

Step 5: Select the "Open With" option from there.
Step 6: Select any browser from there.
How to run HTML program using Notepad++
Text Editors like Notepad++ (Note Notepad) come with an option where you can run your HTML program inside a Web Browser directly using Notepad++ Application.
To run the HTML program you will need to follow these steps:
Step 1: Save your HTML file first (with .html extension Example : myfile.html)
Step 2: Click the "RUN" button from the top navigation bar.
Step 3: Select any Bowser from there.

Step 4: (Only if you are not able to see any browser there) Slect the "Run" button or Press F5 on your keyboard.
Step 5: Select that Little Button shown after that Input button.
Step 6: Here you have to Fund your Browser .EXE file.


Find it, Open it and Save it.
EXE file locations for Popular Browsers
-For chrome the .exe file's location is
C:\Program Files\Google\Chrome\Application
-For Firefox the .exe file's location is
C:\Program Files\Mozilla Firefox\firefox.exe
-For Opera the .exe file's location is (But put your/Computer Name at the place of UserNameHere)
C:\Users\UserNameHere\AppData\Local\Programs\Opera\launcher.exe
-For Opera GX Browser the .exe file's location is (But put your/Computer Name at the place of UserNameHere)
C:\Users\UserNameHere\AppData\Local\Programs\Opera GX\launcher.exe
How to run HTML program using Subline text 3
In sublime text 3, you can easily run your HTML program directly with 1-2 click
To run the HTML program using Sublime text 3 Follow these Easy steps:
Step 1. Save your HTML file (with .html extension for Example: myfile.html)
Step 2: Right-click on empty space in Sublime and you will see a small menu on your Screen.

Step 3: Select / Click "Open in Browser" from there.
It will open your HTML file inside your Default Web-Browser.
FAQ about How to run HTML program
How to run the html program
Top run the html program inside your web browser you need to follow these easy steps
Step 1: Find your HTML file
Step 2: Slect your HTML file
Step 3: Doubble click to run it inside web browser
Step 4: (Only if your File isn't opening in your Browser) Right Click on the HTML file
Step 5: Select the "Open With" option from there.
Step 6: Select any browser from there.
Run HTML from notepad++
To run html from notepad++ you will need to follow these steps:
Step 1: Save your HTML file first (with .html extension Example : filename.html)
Step 2: Click the "RUN" button from the top navigation bar.
Step 3: Select any Bowser from there.
Step 4: (Only if you are not able to see any browser there) Slect the "Run" button or Press F5 on your keyboard.
Step 5: Select that Little Button shown after that Input button.
Step 6: Here you have to Fund your Browser .EXE file.
Find it, Open it and Save it.
How to save html file on desktop
In Desktop you need to Use a Text Editor to Create and Save a HTML file. But if you already have created an HTML file in any Text Editor, Then you just need to Look for File Option in the Editors menu where you have created your HTML file. After clicking the File Menu you will see more Option Like Open,
Save,
Save As
and Print ETC.
Select Save from there.
Give your File a Name Followed by the .html Extension (Example: myfile.html) and Click the Save button to Save your HTML File.
How to create an HTML web page using notepad
This Tutorial is about how to Open, Create and Save HTML file using Notepad Text Editor. But if you want to create a Entire HTML Web-page using Notepad. Then you need to Know about HTML Tags, Paragraphs, Headings, Images, Div, CSS and Other Impotent HTML Elements to do that.
How do i save a text file as html?
If you wan to Save a Text file as HTML then you need to Rename it and change its File Extension from (.txt) to (.html). Or open that Text file in Notepad Text Editor and Select file from top Navigation bar. A File menu will appear on the Screen select Save As Option from there and Save your File with .html Extension.
How to open html file in chrome
To Open or Run an HTML file in Chrome Browser we need to Double click on that HTML file. It will Automatically will open in your Web Browser.
If you file Isn’t opening in your Browser, Then Right click on that HTML file and Select Open with option from there.
A small Menu with all the browser list will appear on the Screen. Select Chrome form there and You HTML file will open / Run on your Chrome Web Browser.
How to run html code in sublime text 3
To run html code in sublime text 3 Follow these Easy steps:
Step 1. Save your HTML file (with .html extension for Example: myfile.html) in sublime text 3
Step 2: Right-click on empty space in Sublime and you will see a small menu on your Screen.
How to run HTML program — Sublime Open in Browser
Step 3: Select / Click "Open in Browser" from Sublime text 3.
It will open your HTML file inside your Default Web-Browser.
Шаг за шагом: запуск кода в Notepad++ для начинающих разработчиков
Notepad++ – это бесплатный текстовый редактор с открытым исходным кодом для Windows. Он предоставляет разрабатываемым возможность программировать на многих языках программирования. Например, Python, C++, C#, Java, HTML, CSS, JavaScript и других языках.
Если вы новичок в области разработки программного обеспечения, то запуск кода в Notepad++ может показаться еще одним заданием для выполнения. Однако, это не так сложно, как может показаться. В этой статье мы рассмотрим несколько шагов, которые помогут вам запустить код в Notepad++.
Шаг 1: установите и настройте Notepad++
Перед тем, как что-то делать в Notepad++, вам нужно его установить. Не волнуйтесь, это просто!
- Перейдите на официальный сайт Notepad++.
- Нажмите кнопку "Download".
- Установите Notepad++, следуя инструкциям на экране.
Теперь, когда вы установили Notepad++, настройте его под свои нужды. Этот шаг необязателен, но если вы хотите максимально использовать возможности редактора, то следует выполнить следующие действия:
- Откройте Notepad++.
- Нажмите "Settings" в верхней панели инструментов.
- Нажмите "Style Configurator".
- Выберите язык программирования в выпадающем меню "Select theme".
- Настройте цветовую схему, шрифты и другие параметры, которые помогут улучшить ваше взаимодействие с редактором.
Шаг 2: откройте файл с кодом
Notepad++ позволяет открыть множество файлов, содержащих коды на разных языках программирования. Для открытия файла с кодом выполните следующие действия:
- Откройте Notepad++.
- Нажмите "File" в верхней панели инструментов.
- Нажмите "Open".
- Найдите файл с кодом на вашем компьютере и откройте его.
Шаг 3: запустите код
Вот мы и подошли к главному этапу – запуск кода. Notepad++ не является средой для разработки, поэтому вы не можете запустить код в среде самого редактора. Однако, вы можете использовать другие инструменты для запуска кода на своем компьютере.
Например, если вы программировали на Python, вам нужно выполнить следующие действия:
- Откройте командную строку.
- Перейдите в папку, где находится файл с кодом.
- Напишите в командной строке "python filename.py" (где "filename.py" – имя вашего файла с кодом) и нажмите Enter.
Если код написан на другом языке программирования, то вам нужно использовать соответствующие инструменты для запуска кода.
Заключение
Запуск кода в Notepad++ не сложная задача. Вам нужно всего лишь настроить редактор, открыть файл с кодом и запустить его в соответствующем инструменте. Notepad++ предоставляет возможность легко редактировать коды на многих языках программирования. Надеемся, что этот небольшой гайд поможет вам начать программировать в Notepad++.
The simple and easiest way to execute python script from notepad++ | aipython

Notepad++ is a text editor and source code editor available, officially, only on Microsoft Windows. It is a FREE open-source editor that supports various programming languages and Python is one of them. Notepad++ is one of the widely used source code editors for Python. NPP is the short abbreviation for Notepad++ ( Notepad Plus Plus). In our previous tutorial, we have discussed Python IDLE, which is an integrated development environment to edit, execute and debug python code.
After reading, you will understand various features of Notepad++, how to install Notepad++ on windows, customize and configure NPP for executing python code.
Table of Contents
Compared to IDLE, NPP is preferred by the programming community because of its super-cool features. Now a day, developers are choosing Notepad++ for structuring their application, as it is lightweight, multi-language (almost 80 Programming Languages) support and highly flexible, compared to other editors.
Notepad++ Features helpful for Python coding
Notepad++ Based is based on the powerful editing component Scintilla and is written in C++. NPP uses pure Win32 API and STL ( Standard C++ Library ) which ensures a higher execution speed and smaller program size by optimizing as many routines as possible without losing user-friendliness. Notepad++ supports for their syntax highlighting (customizable), syntax folding, auto-completion, function list. Besides syntax highlighting, Notepad++ has many additional features that are especially very useful to programmers. It will allow you to create shortcuts to program calls, such as a Run Python menu item that will invoke python.exe to execute your Python code without having to switch over to another window running a Python shell.
a) Supported Languages
List of all Programming language supported by Notepad++ can be found here, as of March 2020. However, find the word cloud representation of supported language by NPP.
b) Multiple renaming and full column edit
In multiple renaming, one can select the multiple items (mostly arranged in the same column) and perform the edit. The items can be selected by either pressing and holding Alt key + mouse drag or pressing and holding Alt+Shift+ Arrow key. An animation showing the multiple renaming and column edit is shown below.
c) Multi editing (random selection)
Multi edit feature allows users to edit the same text present at multiple locations in a file. Multiple texts can be selected by pressing and holding Crtl + mouse click. Multi edit feature is disabled by default and it can be enabled by navigating to Settings -> Preferences -> Editing -> Select checkbox under the multi-editing section. An animation showing the multiple edit feature is shown below.
d) Side by side and Tabbed view
To create Dual View, drag and drop any tab that you want it to be in another view (or right-click on the tab) then choose “Move to Other View” command from the popup context menu. Once you’ve got 2 views, you can move files between 2 views by drag-and-dropping. An animation showing side by side (dual view) feature is shown below.
e) Clone document — edit at two places simultaneously
Drag and drop any tab that you want to clone (or right-click on the tab) then choose “Clone to Other View” command from the popup context menu. The cloned document is the same as its original one, but with the separated view. An animation showing working on cloned document feature is shown below.
f) Search within the same file and in many files
Similar to other text editors, Notepad++ also provide the feature to search a particular word in the same file or a group of files. Normally the searching process for a specific word in a particular document is pretty simple and the same way as many software, text editor or IDE have. Keyboard shortcut Crtl+F opens up a search dialogue and then the word can be keyed in and the search begins. Now, as far as searching a specific word in multiple documents, or a directory, is concerned, Notepad++ has this feature and can be activated by a combination of Crtl+Shift+F. The complete searching process is demonstrated via the animation provided below.
g) Keyword or Variable highlighting
Using a highlighting feature, a programmer can find, where all, a particular word/ variable has been used. This comes very handily when you want to edit the code or rename any variable. An animation below represents the highlight feature of Notepad++.
h) Autocompletion (Function/word)
Notepad++ offers automatic completion of various sorts of text after you have entered an initial substring (or prefix), which can save you having to type all of a long word (and potentially save you mistyping it). You accept the suggestion by typing the Enter or Tab key, and the word is completed within your buffer as if you’d typed it all out. If the suggested word is not what you want, keep typing. The completion list can be triggered automatically as you type, via settings in Settings > Preferences > Auto-Completion: Auto-Completion is enabled by a checkbox.
If more than one word in the list of candidate words matches what you’ve typed, Notepad++ will present a list containing the words; the highlighted word in the list is the one that will be selected on pressing the Enter key, but you can use the Down- & Up-arrow keys, or PageDown & PageUp, to move through the list; or, type Esc to dismiss the list.
i) Function Lists
Function List Panel is a zone to display all the functions (or method) found in the current file. The user can use the Function List Panel to access a function definition quickly by double-clicking function item on the list. Function List can be customized to list the functions for whichever language. A detailed method is described here.
j) Document map viewer
Document map help programmer when working with bulky code (> 1000 lines). It creates a compressed view of the document along the side of Notepad++ and provides users with ease of navigation. The highlighted box inside the document map helps to scroll up or down through the document. The image shown below shows a typical document map in NPP.
Downloading and Installing Notepad++ on windows
Notepad++ is available only for Windows OS. You can download Notepad++ from the official website. After downloading follow the simple and easy process to install it on windows. Step by step installation process is described below.
Double click on the installer [ npp.7.8.5.Installer.x64.exe] to get started with the installation process. Please note that the actual version number may be different for you. The first window will ask for choosing the installation language. Click on Ok button and proceed ahead.
Next window titled “ Welcome to Notepad++ setup”, Just click Next and proceed. The third window will be “License agreement”, click on ‘ I Agree’ button to proceed further.
The fourth window asks for the installation location, I would recommend to leave it default and click on the Next button.
The fifth window asks to choose the components that you want to install. Choose ‘Custom’ from the drop-down menu and put a checkmark on all the checkboxes as shown in the image below.
At last, put a checkmark on the checkbox which says to ‘create a desktop icon’ and hit the Install button.
Congratulation!! You have installed Notepad++
Styling notepad++ for Python
When you open up NPP for the first time, the interface (mainly editor portion, background colour, font colour and style) will look so dull. As a user, you probably won’t like the interface at all. Notepad++ has provided with hell lot of built-in themes that you can use to enhance the interface. The styling parameters can be accessed by navigating to Settings ->Style Configurator. There are various options available inside the configurator dialogue box such as Themes selector, Font colour, background colour, foreground colour and other language-specific features. The detailed process, to use style configurator, for styling Notepad++ is available in the video provided below.
Configuring Notepad++ for executing Python code
This is the most important part of this article. Here you will learn to execute python code from Notepad++. I assume you have written a python code in NPP. I will guide you through the complete process, so I need your attention, Please stay with me.
-
on your system (preferably Python 3)
- Notepad++ should be installed on the same system
- Write a Python script on NPP and save it in your system (at any location)
To Execute Python script, Navigate to the top menu bar and click on Run from the menu. You will get a drop-down, from the drop-down menu click on the Run option, alternatively press F5 from the keyboard, a new popup window will appear similar to the image shown below.
Now, we need to select Python.exe, installed on your machine, by clicking on the […] button. Navigate to the installed location and select python.exe, as shown in the image below.
The complete strings inside this box should be of the following format as shown in the following image. Copy the text followed after the term “Actual” from given below line and paste into Run dialogue.
Syntax: python.exe location path of the program code (aka current path)
Now, click on the Run button to execute the code.
IMPORTANT: You will notice that the program has executed very quickly and console (black window) disappeared within a fraction of second. Sometimes you may not even notice the console window.
In the next section, we will see how to configure, execution in, Notepad++ to keep the console window appeared until the user closes it as well as we will create a keyboard shortcut to run any Python code from NPP.
A nice video demonstration of executing Python code from Notepad++.
Executing Python Code from Notepad++
a) Keep the console window appearing
We will edit the syntax that we had used, in the last section, to run python code. The modified syntax now looks like,
Syntax: python.exe location -i path of the program code (aka current path)
“-i” in the middle of the sentence keeps the console window visible, as shown below
b) Create a keyboard shortcut to run any Python code
Now, we have verified that the above syntax works perfectly to execute python code. We will bind this to a keyboard shortcut. The keyboard shortcut can be created by clicking on the save button of the Run window dialogue, shown in the image below.
Clicking on the save button will popup a window to decide a shortcut.
- Write a convenient name for the shortcut like Run_Python
- Click on (any or all) checkboxes to include in the shortcut, I have chosen Ctrl and Alt
- From the drop-down menu select any convenient key, I have chosen E. This dialogue will also prevent you from creating any shortcuts which are already available, by throwing a message in the same window.
I had created my keyboard shortcut, Crtl+Alt+E, to execute Python code from Notepad++.
Working with two versions of Python on the same machine
If you have more than one version, or subversion, of Python, is installed on your system then you can create the shortcut for both the versions separately.
Follow the same process to create the shortcut and keep in mind to select respective python.exe path.
I have created two shortcuts,
For executing Python 3.6.8 -> Crtl+Alt+6
For executing Python 3.8.1 -> Crtl+Alt+8
Conclusion
In this article, you have learnt what is Notepad++, it’s various features such as multiple edits, numerous supported language, syntax highlight, various search option, function list, document map etc.. You have also learned to download and install Notepad++ on windows as well as to style and configure for executing Python scripts. Finally, you learned to manage two versions of python and execute the same python code using two versions of Python.
Don’t stop your learning here itself, take advantage of your learning and explore further. You can find sample python 3 codes and start practising on Notepad++.
If you need any further assistance then do not hesitate to write them in the comment below, we are always there to help our community.
Компилируем и запускаем Java-файлы из Notepad++

Приветствую всех! Для начала хочу сказать, что я изучаю курс Java 1 и, по рекомендации преподавателя, решил воспользоваться Notepad++ для экспериментов с кодом и подготовки домашнего задания. Нужно было настроить Notepad++ таким образом, чтобы я мог запускать код и сразу видеть результат выполнения программы. В интернете я нашёл несколько способов настройки Notepad++ под работу с Java. Самый быстрый из них я немного дополнил и хочу показать вам. За основу я взял данный гайд на английском — там всё кратко и сжато. Я же попытаюсь подробно описать процесс настройки, расскажу еще о нескольких дополнительных возможностях и решении некоторых проблем программы и плагина.
Если у вас что-то не получится или вы найдёте неточность в статье, напишите мне, и я с радостью попытаюсь помочь решить вашу проблему или устранить ошибку. Также буду рад вашим предложениям и дополнениям.
Готовим Java-инструменты и Notepad++
- У вас должны быть установлены JDK + JRE и правильно настроена переменная среды PATH.
- Скачиваем и устанавливаем последнюю версию NotePad++. Выберите версию 32-bit или 64-bit. Я буду показывать пример с 64-bit.
- Скачиваем плагин NppExec. По ссылке представлены несколько версий. Я выбрал v0.5.9.9 dev, архив — NppExec20160628_dll_x64-2.zip. В имени архива указана версия — x64. Если вы скачали Notepad++ для 32-bit, вам нужен другой файл — NppExec20160628_dll.zip . Если не получится, попробуйте другую версию — главное чтобы там был NppExec.dll файл. Распакуйте архив в директорию, где у вас установлена Notepad++\plugins. В моём случае полный путь выглядит так: «C:\Program Files\Notepad++\plugins«. Чтобы плагин заработал, перезапустите Notepad++, если он был запущен ранее.
Настраиваем плагин NppExec
В меню выберите Плагины (Plugins) -> NppExec и выполните следующие действия:
- отключите «Console Command History»;
- включите «Save all files on execute»;
- включите «Follow $(CURRENT_DIRECTORY)».
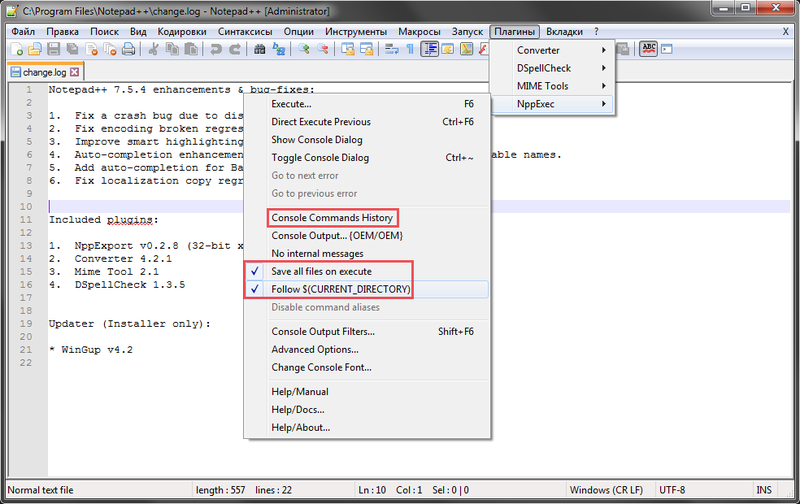
4. Добавьте команду компиляции:
- Перейдите в Плагины (Plugins) > NppExec > Execute. (или просто нажмите F6 — горячая клавиша).
- В открывшемся окне введите следующие команды:
- Нажмите кнопку Save. и введите имя скрипта, например — Compile, так как этот скрипт как раз будет выполнять компиляцию. Нажмите Save.
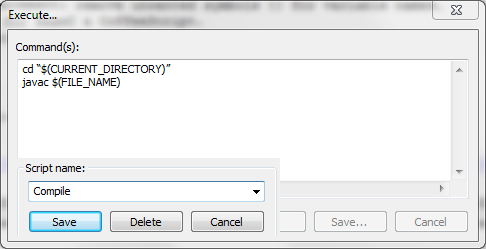
5. Чтобы добавить новые команды, снова перейдите в Плагины (Plugins) > NppExec > Execute. У вас будет в окне “ Command(s): «cd “$(CURRENT_DIRECTORY)” javac $(FILE_NAME)». Здесь нет кнопки для добавления новой команды, поэтому вы просто заменяем код на новый:
Затем Save. Обязательно измените имя скрипта, к примеру — «Run». Этот скрипт будет запускать выполнение программы. Нажмите Save.
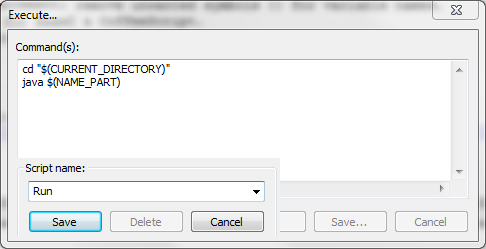
Повторите действия ещё раз, введите:
cd «$(CURRENT_DIRECTORY)»
javac $(FILE_NAME)
if $(EXITCODE) !=0 goto exit
java $(NAME_PART)
:exit

Сохраните и назовите скрипт — Compile and run, по смыслу уже понятно, что данный скрипт сначала будет компилировать, а затем запускать программу. Нажмите ОК.
6. Добавьте ваши команды в меню Макросы (Macro). Для этого:
1) Перейдите в Плагины (Plugins) > NppExec > Advanced options…

2) Поставьте галочку напротив Place to the Macros submenu.
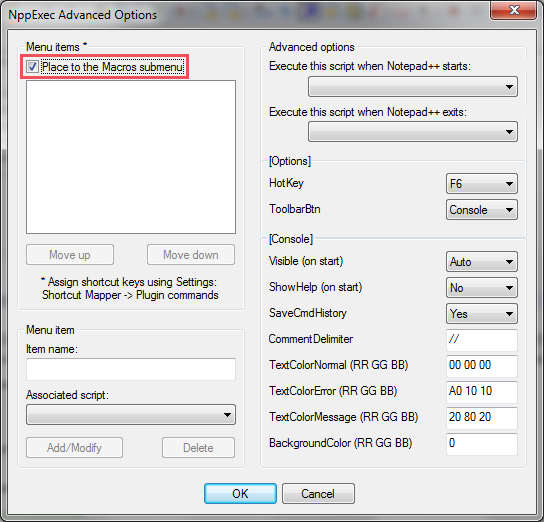
3) Введите «Run» в поле » Item name: «, затем нажмите на всплывающий список » Associated script: » и выберите скрипт под названием Run.
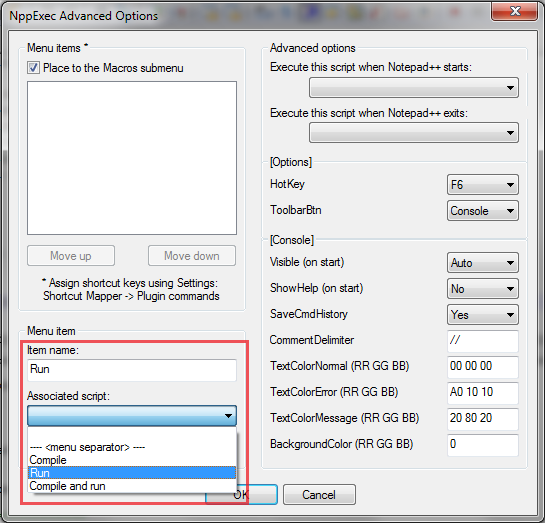
После этого нажмите на » Add/Modify «
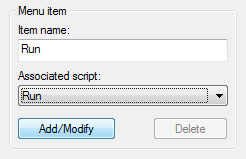
и в области Menu items * вы увидите, что появилась строка » Run :: Run «.
Повторите эти действия с скриптами Compile и Compile and run, чтобы они тоже появились в окне Menu items *.
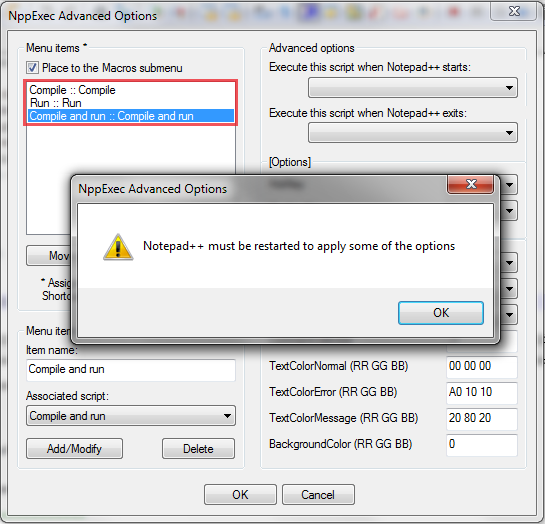
Нажмите Ок и перезапустите Notepad++.
7. Протестируйте созданные вами скрипты, открыв или создав java-файл. К примеру, создадим файл Test.java (при сохранении обязательно укажите тип — Java source file (*.java) ) и запишем в него:
public static void main(String[] args) <
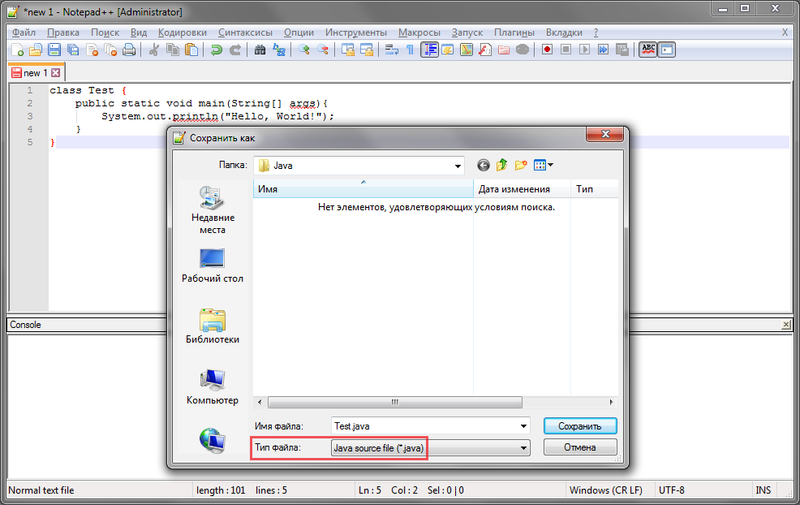
8. Перейдите в меню Макросы (Macro) и нажмите Compile. Затем снова зайдите в меню и нажмите Run. Или вы можете выполнить два действия сразу, по кнопке Compile and run.
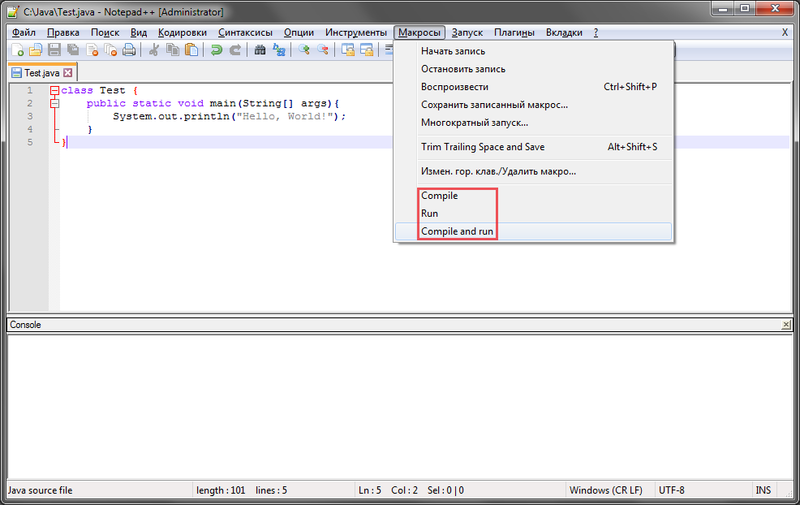
9. Если вы получили ошибку при компиляции или выполнении программы, измените команду Compile или Run (в зависимости от того где у вас ошибка).
Если ошибка при компиляции измените команду Compile:
C:\Program Files\Java\jdk-9\bin\javac $(FILE_NAME)
Если ошибка при выполнении, измените команду Run:
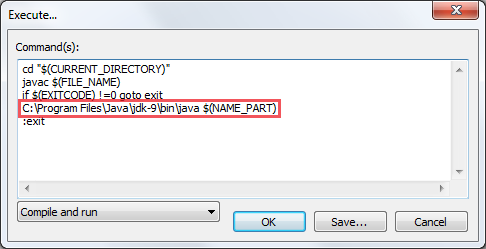
C:\Program Files\Java\jdk-9\bin\java $(NAME_PART)
Во второй строке укажите путь к файлу javac или java на вашем компьютере. Путь к этим файлам может отличаться, будьте внимательны! Ошибка может быть вызвана тем, что Windows не знает путь к программе javac, или тем, что вы используете Notepad++ Portable Version. После изменений в Compile и Run не забудьте также про Compile and run.
Вот пример ошибки:
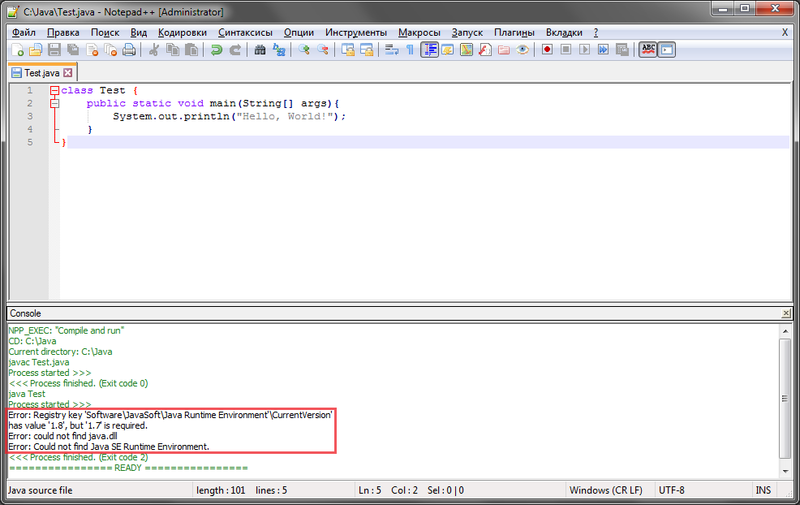
По сообщениям из консоли видно, что компиляция прошла успешно, но при выполнении программы произошла ошибка версий, а также не были найдены java.dll и SE Runtime Environment. Поэтому мы указываем путь для выполнения программы в скриптах Run и Compile and run.
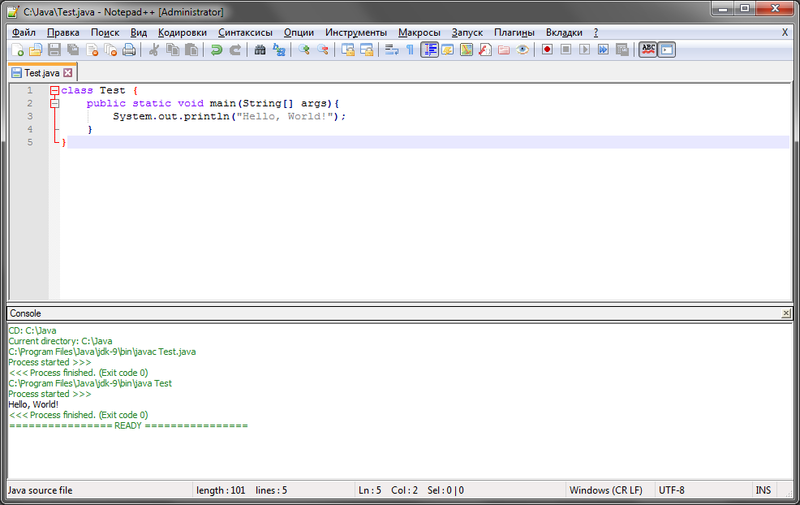
После этого программа выполняется успешно:
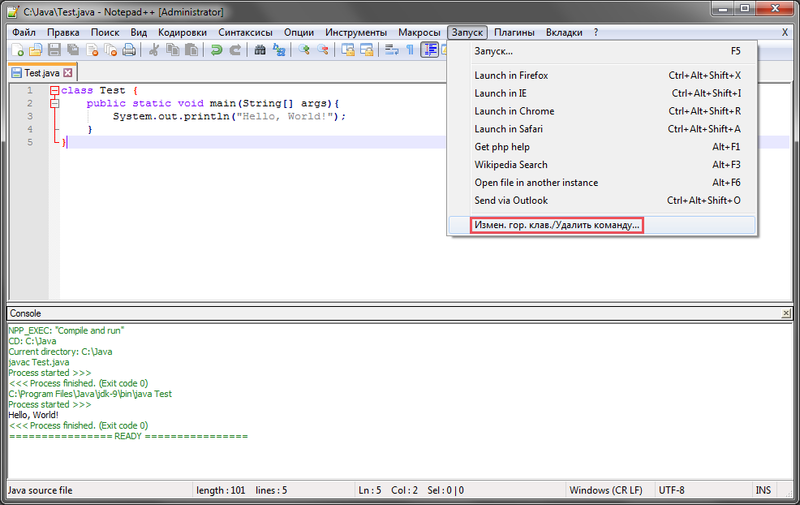
10. Чтобы было удобнее компилировать и выполнять программы, настроим горячие клавиши. Перейдите в меню Запуск (Run) и выберите «Изменить горячую клавишу/удалить команду (Modify Shortcut/Delete Command…)».
Во вкладке Plugin Commands настройте горячие клавиши для быстрого запуска скриптов. Найдите имена Compile, Run, Compile and Run, по двойному клику задайте удобное вам сочетание клавиш для быстрого запуска. У меня, например, Compile and Run настроен на клавиши Ctrl + Shift + C.
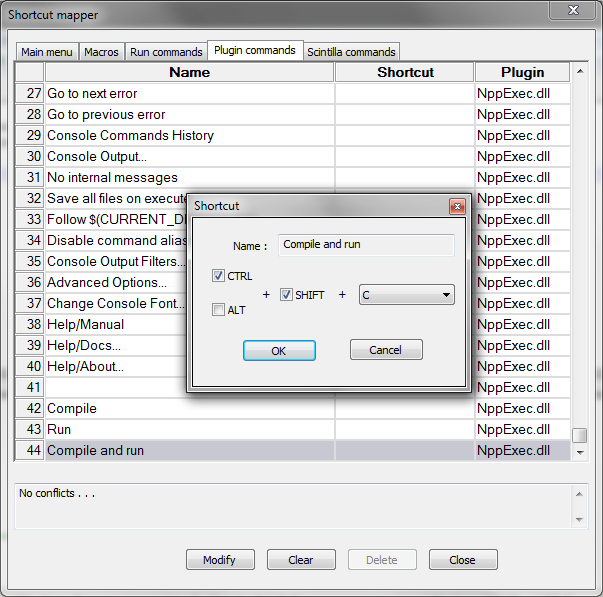
После написания кода достаточно будет нажать эту комбинацию клавиш, чтобы программа была скомпилирована и запущена.
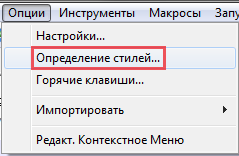
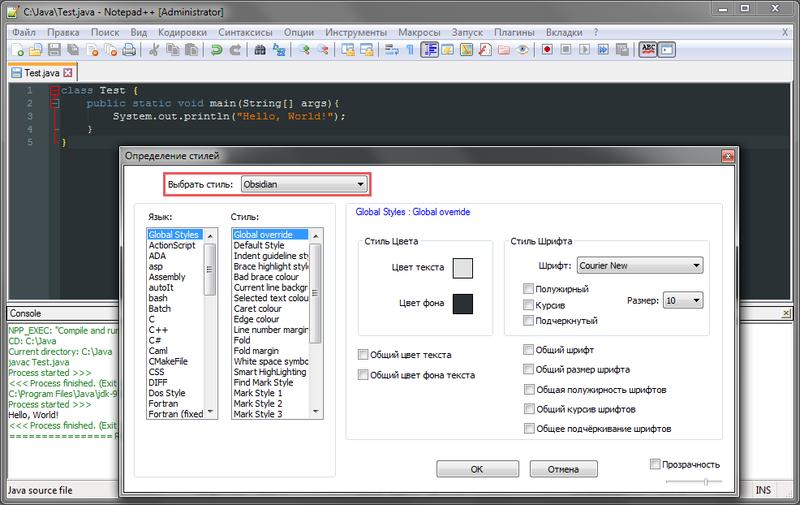
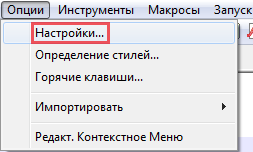
11. Если вы хотите изменить цветовую схему (тему) или выбрать другой шрифт, настроить его размер и начертание, выберите меню Опции (Settings) > Определение стилей (Style configurator…) :
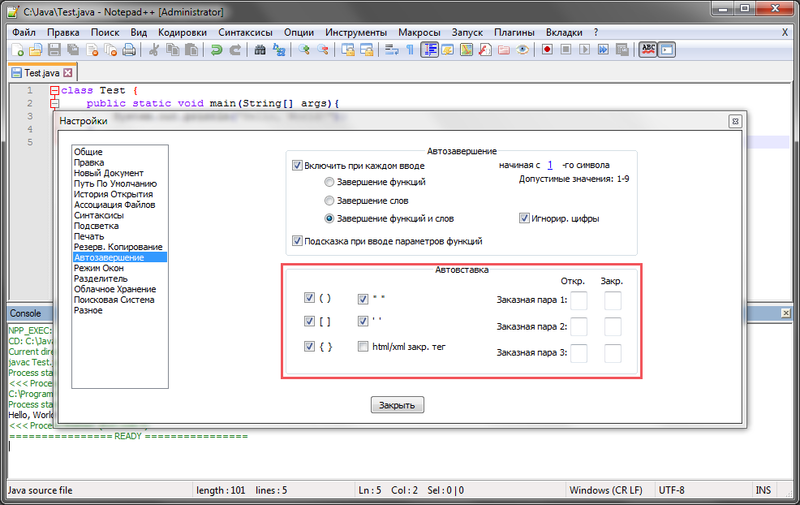
12. При написании кода мне очень помогает автовставка символов. Например, когда я ставлю круглую скобку “(“, закрывающая скобка “)“ ставится автоматически. Кто работал в средах разработки (наподобие IDEA IntelliJ), знаком с этим и согласится, что это, вроде бы, мелочь, а удобно. По умолчанию автовставка выключена. Для её включения зайдите в Опции (Settings) > Настройки (Preferences) > Автозавершение (Auto-Completion) и выберите, что вам нужно. Если нужных символов нет, можете сами создать “Заказную пару”(Matched pair).
13. При выполнении программ вы можете столкнуться с проблемой кодировки в консоли. Пример:
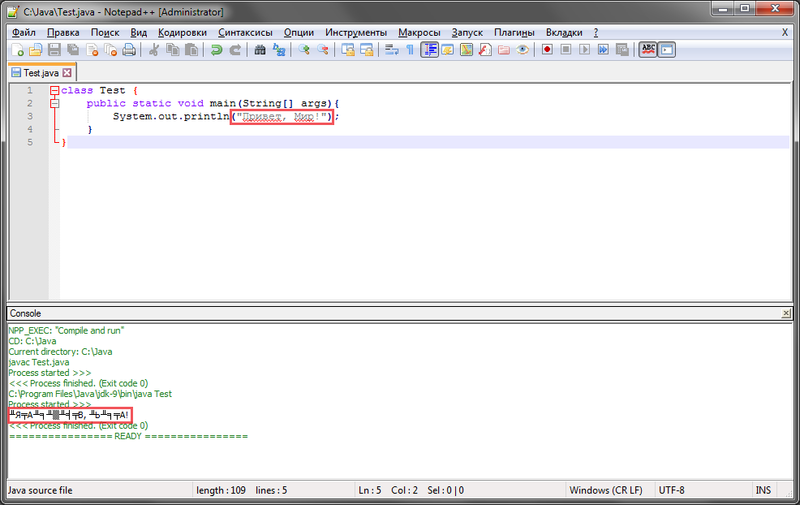
Решается это очень просто. Переходим в меню Плагины (Plugins) > NppExec > Console Output
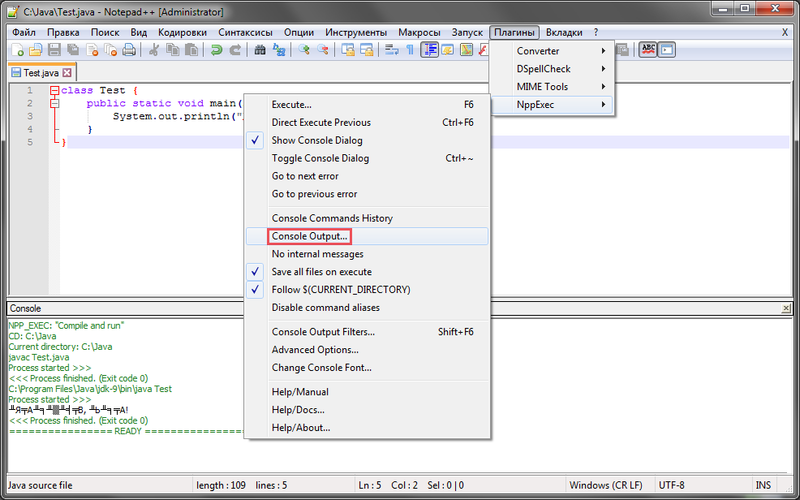
И здесь вы должны выставить в значении Console Output is — «UTF-8».

Если вдруг это не помогло, попробуйте поставить галочку — Console Input is the same as Output.

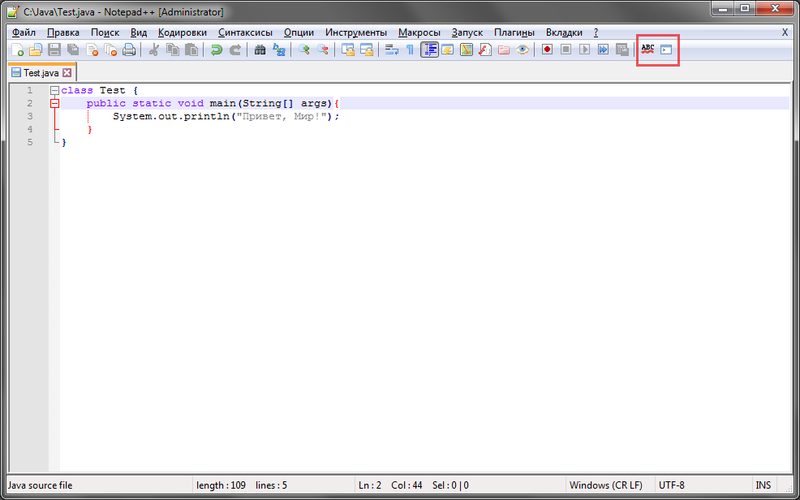
14. Если вы хотите отключить проверку орфографии, нажмите кнопку «Spell Check Document Automatically (ABC)» на панели задач. После этого
кириллица не будет подчеркиваться красным. Вы также можете включить/выключить консоль по кнопке, которая расположена справа — «Show Console Dialog».
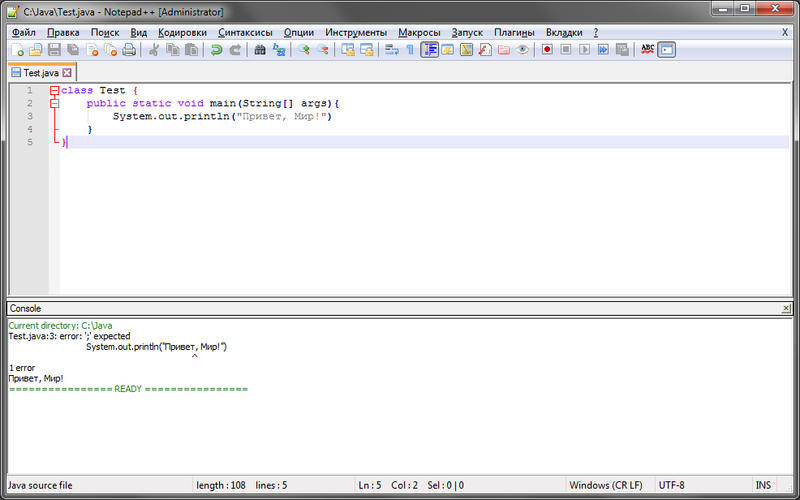
В разделе Плагины (Plugins) > NppExec > Advanced Options вы можете настроить отображение консоли при запуске программы. Выберите нужный вариант (Yes/No/Auto) в разделе Console — опция Visible (on start).
А ещё вы можете выбрать язык по умолчанию, для этого перейдите в Опции (Settings) > Настройки (Preferences) > Новый документ (New Document) и выберите Синтаксис по умолчанию (Default language). В нашем случае — Java. Теперь, когда вы открываете новую вкладку или запускаете Notepad++ с пустым файлом, типом по умолчанию будет Java и вам не придется выбирать его каждый раз.
15. Для удобства восприятия вы можете отключить системные (внутренние) сообщения консоли. Перейдите по вкладке Плагины (Plugins) > NppExec > No internal messages. После того, как вы поставите галочку, выполнение программы в консоли будет выглядеть так :
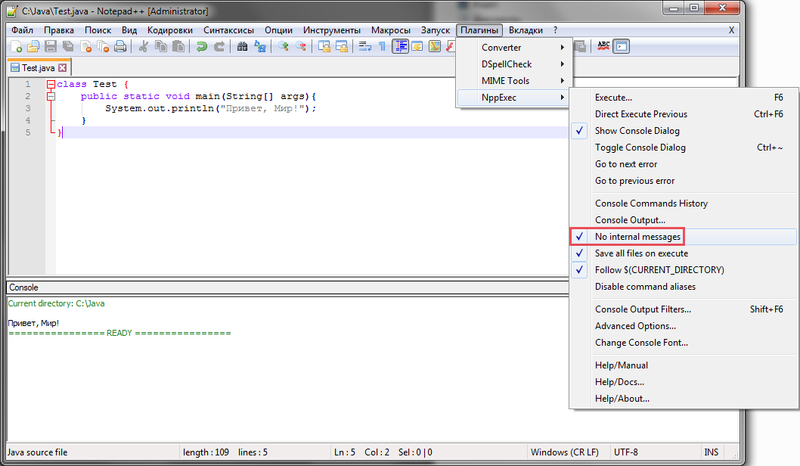
При этом ошибки будут всё равно выводиться в консоль, что весьма удобно:
Надеюсь, эта инструкция была вам полезна. Если заметите ошибки или неточности, напишите, и я исправлю! Всем удачи!