Ways to Strikethrough in Google Docs

Regarding formatting text, the three most common formatting features on both Microsoft Word and Google Docs are bold, italic, and underlined.
One of the lesser-known features is strikethrough, which people don’t use nearly as often. That doesn’t mean to say it’s not as useful as other formatting features because it can be.
So, even though we don’t see this feature being used very often, some users still want to know how they can strikethrough in Google Docs.
Microsoft Word users can find this formatting feature easily (it’s right next to the underline icon). Google Docs can be preferable due to how easy sharing your documents is with it.
This is one of the top reasons that businesses prefer the platform. For that reason, if you don’t know how to strikethrough text in Google Docs, we’ve got your back.
When You Should Use Strikethrough Text
Strikethrough text isn’t something that we use very often. But there are a few times when you’ll find that using strikethrough in Google Docs text is applicable.
- Replacing text in an article. If you publish an article or blog post on your website, there may be times when you have to change some of the information. To prevent confusion among readers, you can strikethrough it instead rather than deleting the original text.
- Crossing Out a Checklist. Maybe you use a Google Docs document to keep a list of things you need to do. Again, you can cross them out instead of just deleting them as you go. This also allows you to see the tasks you complete each day.
These are the two main uses of strikethrough online. You can also use it as a means to convey sarcasm and humor.
Also, if you need to send Google Calendar invitations, click to get the easy ways.
Keyboard Shortcut to Strikethrough on Google Docs
Learning the different keyboard shortcuts is one way of becoming more efficient as a computer user and working faster. Google Docs isn’t any different, and you can strikethrough in Google Docs text with a keyboard shortcut too.
This shortcut is different between Windows and Mac computers.
- Windows: On a Windows computer, the shortcut is ALT + SHIFT + 5. You can press this shortcut before or after you type the text you want to strikethrough. Alternatively, you can type the text, highlight it with your cursor, and then use the shortcut.
- macOS: For Mac computer users, the shortcut is COMMAND + SHIFT + X. Similarly, you can use it before and after typing the text or highlight and use it.
If you find that neither of these shortcuts works for you even though you have the respective computer, check the shortcut. You can do this by clicking “Format > Text,” and next to “Strike-through,” the shortcut will be shown.
Like any other keyboard shortcut, this is the best format for your text. Generally speaking, learning and practicing the different shortcuts you can access is a good habit.
Why You Should Learn More Keyboard Shortcuts
Before we move on to the next method, don’t underestimate the usefulness of keyboard shortcuts. They can help you by:
- Making tedious tasks more straightforward
- Making it less of a hassle to frequently save your work (CTRL + S on Windows)
- Enabling you to continue being productive rather than having to stop and search for a program’s function
- Easily accessing various functions without navigating the taskbar
You get the idea – it’s much easier to use a keyboard shortcut than to stop typing and search the menus. That’s why we recommend the shortcut method instead of the toolbar method, which we will cover next.
Besides, here is the full Strikethrough shortcut review for your reference.
Using the Toolbar to Strikethrough on Google Docs
Keyboard shortcuts might not be your style, or maybe you struggle with them. That’s fine! There is another way that you can strikethrough in Google Docs text. Like on Microsoft Word, you can access this formatting feature on the toolbar.
#1 – Use your web browser to open the Google Docs file on which you want to strikethrough text.
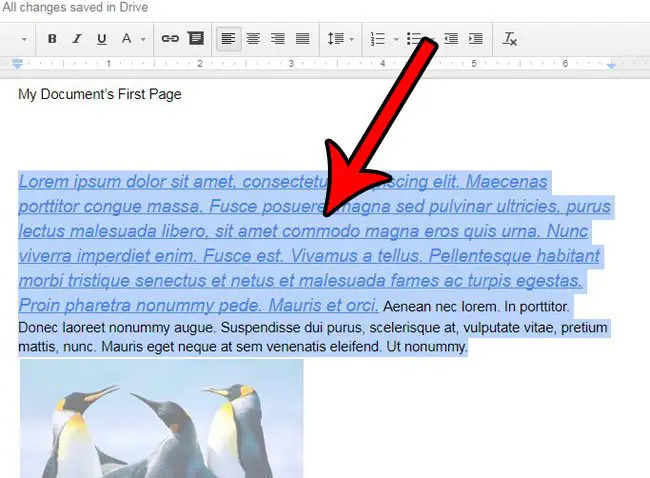
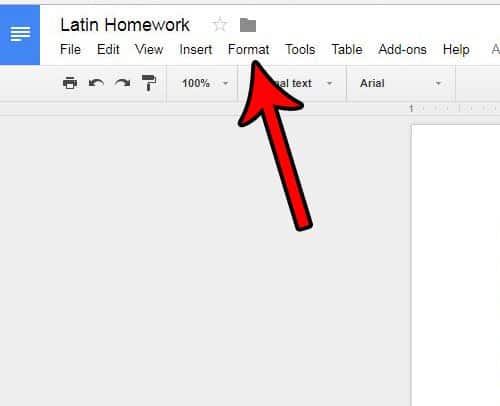
#2 – Locate the text and highlight it using your cursor.
#3 – Once you select the text, click on the “Format” drop-down menu from the toolbar.
#4 – Click on the “Text” option from the list of formatting options shown.

#5 – Another drop-down menu will appear. From this list, you must click on “Strike-through.”
#6 – Check that the formatting of your text is done and repeat this process for each phrase you want to strikethrough on Google Docs.
This is a lot more hassle than using the keyboard shortcut would be. The shortcut option will make your life much easier if you go through a document and use strikethrough several times.
However, we understand some people prefer the toolbar, so this is a suitable method.
Benefits of Using Strikethrough in Google Docs
Strikethrough formatting offers several benefits that can enhance your productivity and improve document clarity. Let’s explore some of these advantages:
Editing and Proofreading
When reviewing or editing a document, strikethrough allows you to clearly indicate text that needs to be removed or modified. By crossing out unnecessary information, you can focus on refining the content and ensure a smooth reading experience for your audience.
Marking Completed Tasks
In to-do lists, project plans, or collaborative documents, strikethrough can be a helpful visual cue to mark completed tasks or milestones. It provides a sense of accomplishment and makes it easier to track progress, especially when working in a team.
Visual Differentiation
Sometimes you may want to draw attention to specific text without deleting or altering it. Strikethrough formatting allows you to visually differentiate information, enabling readers to recognize updates or changes easily. This can be particularly useful when highlighting revisions or indicating alternate options.
Advanced Strikethrough Techniques in Google Docs
While basic strikethrough formatting covers most use cases, Google Docs offers advanced techniques to further customize your strikethrough experience. Here are a few options you can explore:
Customizing the Strikethrough Style
Google Docs provides the ability to adjust the style of strikethrough lines. By right-clicking on the text and selecting “Format options,” you can modify the line thickness, color, and even add a shadow effect. Experimenting with different styles can help you achieve the desired visual impact.
Strikethrough in Tables and Images
Strikethrough formatting is not limited to text alone. You can apply it to tables and images within your document. This feature comes in handy when you want to strike out specific cells in a table or visually indicate modifications in an embedded image.
Strikethrough Add-ons
To enhance the functionality of strikethrough in Google Docs, consider exploring add-ons available in the Google Workspace Marketplace. These add-ons can extend the capabilities of strikethrough formatting, providing additional options for customizing, managing, or automating the process.
Troubleshooting Strikethrough Issues
Although strikethrough formatting in Google Docs is generally straightforward, you may encounter a few issues or unexpected behaviors. Let’s address a couple of common problems and their solutions:
Inconsistent Strikethrough Formatting
If you notice inconsistent strikethrough formatting within your document, it might be due to multiple text styles or formatting conflicts. To resolve this, ensure that the entire text has a consistent style, or consider clearing formatting and reapplying strikethrough to achieve uniformity.
Missing Strikethrough Options
In some cases, you might not find the strikethrough option in the formatting toolbar or menus. This can occur if you’re using an outdated version of Google Docs or if the feature is disabled. To resolve this, update your Google Docs or check with your domain administrator to enable strikethrough formatting.
Also read: How to set up MLA format on Google Docs easily.
- Can I apply strikethrough to specific words within a sentence? Yes, you can apply strikethrough to specific words within a sentence in Google Docs. Simply select the desired words and use the strikethrough formatting option.
- Is there a way to remove strikethrough from selected text? To remove strikethrough from selected text, you can either use the “Format” menu and deselect the “Strikethrough” option or use the keyboard shortcut again to toggle off the formatting.
- Can I collaborate on a document with strikethrough formatting? Yes, when collaborating on a document, strikethrough formatting is visible to all collaborators. It helps in tracking changes, edits, and completed tasks, ensuring effective collaboration.
- Does strikethrough formatting affect the document’s word count? No, strikethrough formatting does not affect the document’s word count. The word count considers the actual content, excluding any formatting or stylistic elements.
- Are there any limitations to using strikethrough in Google Docs? Strikethrough formatting in Google Docs is generally versatile and easy to use. However, it’s worth noting that strikethrough formatting may not be available in some file formats when exporting or converting Google Docs to other formats.
To Conclude:
All in all, Google Docs has a lot of perks, but when it comes to strikethrough text, there’s no doubt that it’s not the easiest of features to use.
Hopefully, with one of the methods above, you can now use strikethrough in Google Docs and format your writing appropriately. If not, Microsoft Word is the next best option.
Most people will be able to get a copy of Microsoft Office for free (either through your employer or school), but if not, you can use the free trial instead. In particular, when it comes to strikethrough text, Word comes out on top as it is much easier.
Skilled software testing specialist with expertise in comparisons and research, passionate about blogging, reviews, and creating video tutorials.
Как зачеркнуть текст в гугл документах
Содержание
- Добавить подпись
- Вставить надстрочные и подстрочные символы
- Создать границу
- Зачеркнуть текст
- Создать содержание
- Изменить цвет фона
- Добавить рамку изображения
- Добавить новые шрифты
Добавить подпись
Этот прием позволит украсить любой документ. Вот как добавить подпись к тексту.
- Поставьте курсор там, где хотите добавить подпись.
- Нажмите «Вставка» — «Рисунок» — «Новый».
- Найдите иконку с линией и нажмите на перевернутый треугольник. Выберите «Рисованная».
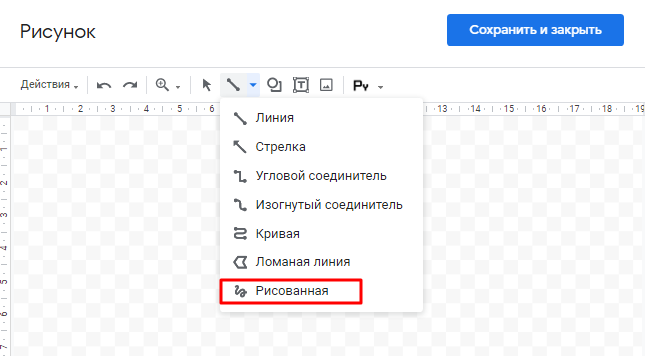
Можно нарисовать не только подпись, но и временную шкалу. Для этого потребуются инструменты «Стрелка», «Линия» и «Ломаная линия».
Вставить надстрочные и подстрочные символы
Правильно форматировать уравнения или химические формулы можно с помощью этих настроек.
- Выберите «Формат» — «Текст» — «Надстрочный» или «Подстрочный».
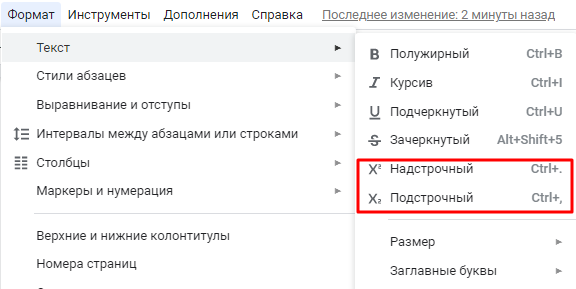
Это можно сделать и с помощью горячих клавиш:
- надстрочный: Ctrl + . (command + .);
- подстрочный: Ctrl + , (command + ,).
Создать границу
На самом деле, в Google Документах не предусмотрена возможность добавить границу. Однако есть обходные пути.
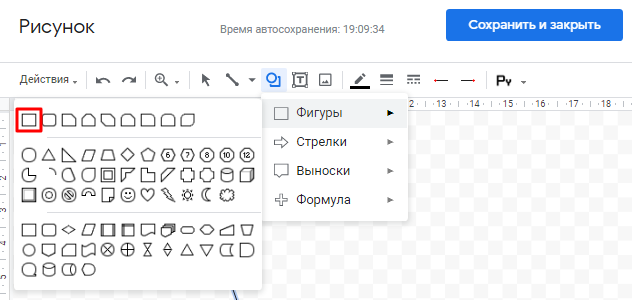
- выберите «Вставка» — «Рисунок» — «Новый»,
- нажмите «Фигура» и выберите в блоке прямоугольник,
- нарисуйте прямоугольник и нажмите «Сохранить и закрыть»,
- позже вы сможете отредактировать размер и форму рамки в документе, перетягивая границы.
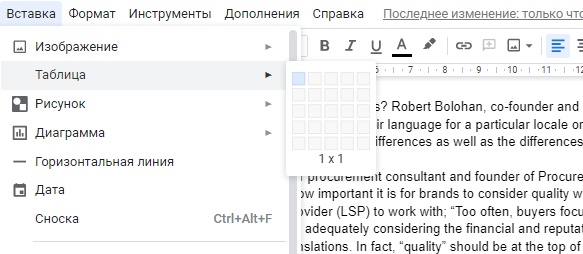
- нажмите «Вставка» — «Таблица» — 1×1,
- на странице появится квадрат, который можно растянуть на всю страницу,
- меняйте стиль границ (толщину или цвет линии), выбрав «Формат» — «Таблица» — «Свойства таблицы»,
- чтобы увеличить пространство между границей и текстом, можно использовать пункт «Поля ячеек».
Зачеркнуть текст
В Google Документах есть кнопки, чтобы выделить текст курсивом или полужирной заливкой. Чтобы зачеркнуть его, потребуется немного больше манипуляций:
- выделите текст, который нужно зачеркнуть,
- нажмите «Формат» — «Текст» — «Зачеркнутый».
Также это можно сделать с помощью сочетания клавиш Ctrl + Shift + x (Windows) или command + shift + x (Mac OS).
Создать содержание
Этот инструмент позволит добавить удобную навигацию в длинном документе. Вот как это сделать:
- поставьте курсор там, где требуется добавить содержание (например в начале текста),
- нажмите «Вставка» — «Оглавление» (последний пункт всплывающего меню).
Второй способ — включить отображение структуры. Для этого на вкладке «Вид» нажмите «Показать структуру документа». Но эта возможность действует лишь при просмотре. Если файл требуется распечатать, используйте оглавление.
Изменить цвет фона
Зачем нужен скучный белый, если Google Документы позволяют изменить цвет страниц? Эта функция особенно полезна, если документ должен соответствовать корпоративному стилю.
- Нажмите «Файл» — «Настройки страницы».
- Выберите цвет в соответствующем поле.
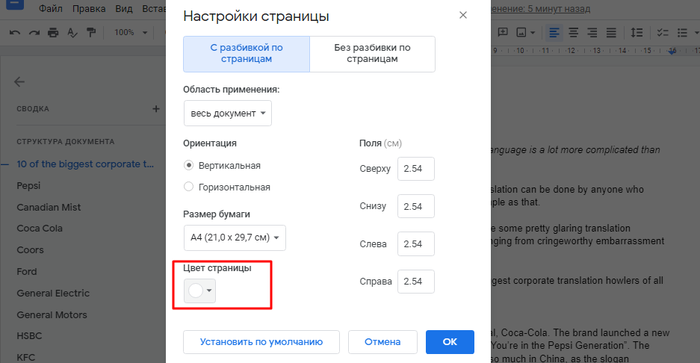
- Если выбранный цвет вам очень нравится, можно установить его по умолчанию с помощью соответствующей кнопки.
Добавить рамку изображения
Чтобы выделить изображения в Google Документах, используйте рамку.
- Выберите изображение и нажмите на иконку «Цвет границ».
- В открывшемся поле можно будет выбрать необходимый цвет. Для ввода кода HEX нажмите на + под словом «Другой».
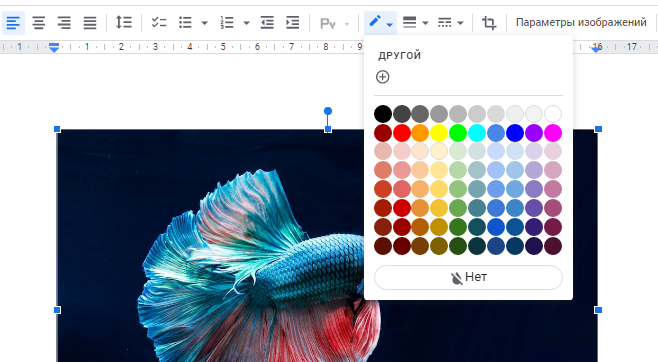
- Также можно настроить толщину и стиль границы.
Добавить новые шрифты
По умолчанию Google Документы используют Arial. Чтобы добавить другие шрифты, следуйте этим шагам:
- нажмите на название шрифта Arial и выберите пункт «Другие шрифты»,
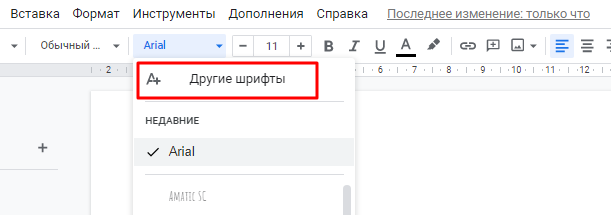
- найдите название нужного шрифта,
- нажмите на него, и название появится среди стандартных шрифтов.
Фото на обложке: Unsplash
Подписывайтесь на наш Telegram-канал, чтобы быть в курсе последних новостей и событий!
Как зачеркнуть текст в Google Docs
Зачеркнутый текст в Google Docs? (Strikethrough Text in Google Docs?) Google Docs — это мощное приложение для обработки текстов, входящее в пакет Google для повышения производительности. (Google) Он обеспечивает совместную работу редакторов в режиме реального времени, а также различные варианты обмена документами. Поскольку документы находятся в облаке и связаны с учетной записью Google , пользователи и владельцы Документов Google (Google Docs) могут получить к ним доступ с любого компьютера. Файлы хранятся онлайн и доступны из любого места и с любого устройства. Это позволяет вам поделиться своим файлом в Интернете, чтобы несколько человек могли работать над одним документом одновременно (т. е. в одно и то же время). Больше нет проблем с резервным копированием, поскольку оно автоматически сохраняет ваши документы.
Кроме того, сохраняется история изменений, что позволяет редакторам получать доступ к предыдущим версиям документа и проверять журналы, чтобы узнать, кто внес эти изменения. Наконец, Google Docs можно конвертировать в различные форматы (Google Docs can be converted to different formats) (например, Microsoft Word или PDF ), а также редактировать документы Microsoft Word .

Многие люди используют изображения в своих документах, поскольку они делают документ информативным и привлекательным. Одной из таких функций, используемых в Google Docs , является опция зачеркивания . (strikethrough) Если вы не знаете, как зачеркнуть текст в Google Docs , не волнуйтесь. Это руководство призвано помочь вам.
Как зачеркнуть текст (Strikethrough Text) в Google Docs
Что это за зачеркивание? (What is this strikethrough?)
Ну, зачеркивание — это зачеркивание слова, как в рукописных заметках. Например,
это иллюстрация Strikethrough.
Почему люди используют зачеркивание? (Why do people use strikethrough?)
Зачеркивания используются для отображения исправлений в статье, поскольку подлинные исправления не видны, если текст полностью заменен. Его также можно использовать для альтернативных имен, прежних должностей, устаревшей информации. Обычно его используют редакторы, писатели и корректоры, чтобы отметить содержимое, которое следует удалить или изменить.
Иногда зачеркивание (или зачеркивание) полезно для придания юмористического эффекта. Зачеркивания в основном предназначены для неформального или разговорного письма или для создания разговорного тона. Целое предложение с зачеркиванием также может указывать на то, что думает автор, а не на то, что он должен сказать. Иногда зачеркнутый текст может показывать настоящее чувство, а замена предполагает ложно-вежливую альтернативу. Это может показать иронию и быть полезным в творческом письме.
В любом случае зачеркивание обычно не предназначено для формального использования. И что еще более важно, вы должны избегать злоупотребления им, так как это затрудняет чтение текста.
Как зачеркнуть текст в Google Docs? (How do you Strikethrough text in Google Docs?)
Способ 1: зачеркивание с помощью ярлыков (Method 1: Strikethrough Using Shortcuts)
Во-первых, позвольте мне показать вам самый простой метод. Если вы используете Google Docs на своем ПК, вы можете использовать сочетания клавиш для перечеркивания текста в Google Docs .
Чтобы сделать это,
- Сначала выделите текст, который нужно зачеркнуть. Вы можете щелкнуть и перетащить указатель мыши по тексту, чтобы добиться этого.
- Нажмите (Press) сочетание клавиш, предназначенное для эффекта зачеркивания. Ярлыки указаны ниже.
На ПК с Windows: (In Windows PC:) Alt + Shift + цифра 5
Примечание: (Note:) Не рекомендуется использовать цифру 5 на цифровой клавиатуре, она может работать не у всех. Вместо этого используйте цифровую (Number 5) клавишу 5 из цифровых (Number) клавиш, расположенных под функциональными (Function) клавишами на клавиатуре.
В macOS: (In macOS:) клавиша Command + Shift + X (⌘ + Shift + X )
В Chrome OS: (In Chrome OS: ) Alt + Shift + цифра 5 .
Способ 2: зачеркивание с помощью меню «Формат» (Method 2: Strikethrough Using the Format Menu)
Вы можете использовать панель инструментов в верхней части Документов Google (Google Docs) , чтобы добавить к тексту эффект зачеркивания (add the strikethrough effect to your text) . Для этого можно использовать меню Формат . (Format)
1. Выделите текст с помощью мыши или клавиатуры. (Select your text with your mouse or the keyboard.)
2. В меню « Формат (Format ) » наведите указатель мыши на параметр « Текст (Text ) ».
3. Затем в появившемся меню выберите « Зачеркнутый». (Strike-through.)
4. Great! Now your text will look like this (refer screenshot below).
Как устранить зачеркивание? (How do you eliminate the Strikethrough?)
Теперь мы научились зачеркивать текст в Google документах, вы должны знать, как удалить его из документа. Если вам не нужен эффект зачеркивания текста, вы можете удалить зачеркивание, выполнив следующие действия:
1. Использование ярлыков: (1. Using shortcuts:) выберите текст, к которому вы добавили эффект зачеркивания. Нажмите клавиши быстрого доступа, которые вы использовали ранее, чтобы создать зачеркивание.
2. С помощью меню Формат: (2. Using the Format menu:) Выделите или выберите строки, (Highlight or select the lines) из которых нужно удалить эффект. В меню « Формат (Format ) » наведите указатель мыши на параметр « Текст (Text ) ». Щелкните Зачеркнутый. (Strikethrough.) Это удалит эффект зачеркивания текста.
3. Если вы только что добавили зачеркивание и хотите его удалить, вам может пригодиться опция «Отменить» . (Undo option) Чтобы использовать функцию « Отменить », в меню « (Undo) Правка (Edit ) » нажмите « Отменить». (Undo. ) Вы также можете использовать ярлыки для этого. Если вы хотите снова зачеркнуть, используйте опцию « Повторить ». (Redo )
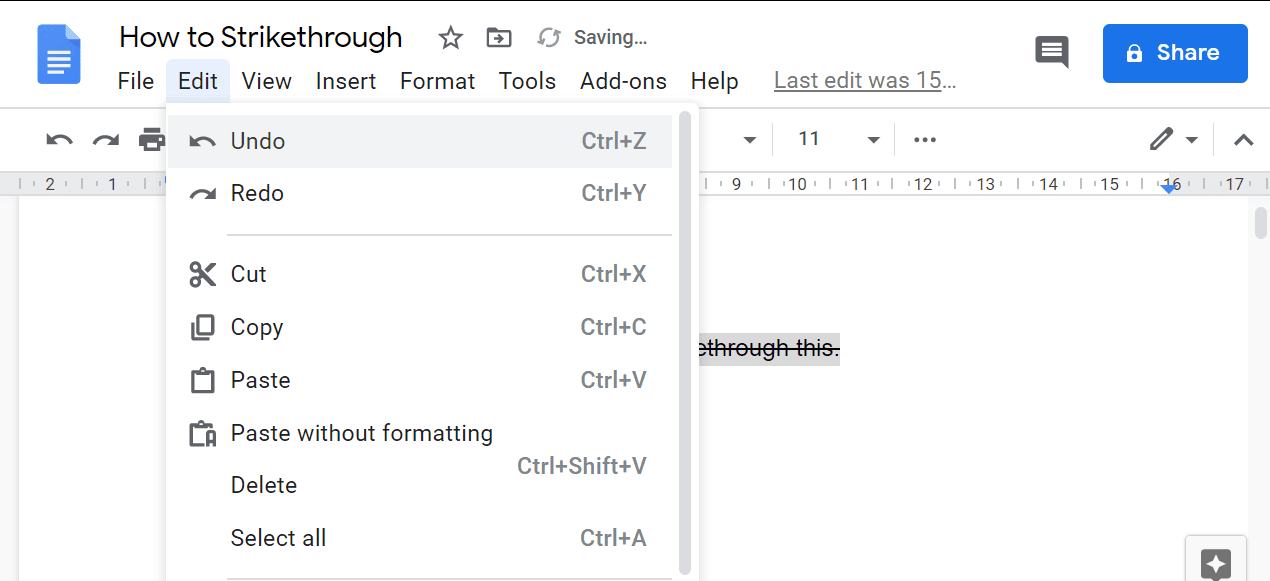
Несколько полезных ярлыков для Google Docs (Some useful shortcuts for Google Docs)
В макОС: (In macOS: )
- Отменить:⌘ + Z
- Повторить:⌘ + Shift + Z
- Выбрать все: ⌘ + A
В Windows: (In Windows:)
- Отменить: Ctrl + Z
- Повторить: Ctrl + Shift + Z
- Выбрать все: Ctrl+A
В ОС Chrome: (In Chrome OS:)
- Отменить: Ctrl + Z
- Повторить: Ctrl + Shift + Z
- Выбрать все: Ctrl+A
Рекомендуемые: (Recommended:)
-
(9 Best Free Data Recovery Software (2020)) (How to Quickly Wrap Text In Google Sheets?)
Я надеюсь, что эта статья была полезной, и вы можете зачеркивать текст в Google Docs . Поэтому, пожалуйста, поделитесь этой статьей со своими коллегами и друзьями, которые используют Google Docs , и помогите им. Не стесняйтесь (Feel) обращаться к нам, чтобы прояснить свои сомнения или оставить свои предложения в разделе комментариев.
How to Strikethrough Text in Google Docs
Strikethrough Text in Google Docs? Google Docs is a powerful word processing application in the Google productivity suite. It affords real-time collaboration between editors as well as different options for sharing documents. Because the documents are in the cloud and associated with a Google account, users and owners of Google Docs can access them at any computer. The files are stored online and can be accessed from anywhere and any device. It allows you to share your file online so that several people can work on a single document simultaneously (i.e., at the same time). There are no more backup issues as it automatically saves your documents.
Additionally, a revision history is kept, allowing editors to access the previous versions of the document and check logs to see who made those edits. Lastly, Google Docs can be converted to different formats (such as Microsoft Word or PDF) and can also edit Microsoft Word documents.
Many people use images in their documents as they make the document informative and attractive. One such feature used in Google Docs is the strikethrough option. If you do not know how to strikethrough text in Google Docs, then don’t worry. This guide is dedicated to helping you out.
How To Strikethrough Text In Google Docs
What is this strikethrough?
Well, strikethrough is the crossing out of a word, as one would do in hand-written notes. For example,
this is an illustration of Strikethrough.
Why do people use strikethrough?
Strikethroughs are used to show corrections in an article, as genuine corrections cannot be seen if the text is wholly replaced. It can also be used for alternative names, former positions, out of date information. It is usually used by editors, writers, and proof-readers to mark content that should be deleted or altered.
Sometimes the strikethrough (or strikeout) is useful to give a humorous effect. Strikeouts are essentially for informal or conversational types of writing, or for creating a conversational tone. A whole sentence with strikethrough can also indicate what the writer thinks instead of what they are supposed to say. Sometimes, the strikethrough text may show a real feeling, and the replacement suggests a false polite alternative. It may show irony and be useful in creative writing.
Anyway, strikethrough is usually not meant for formal usage. And more importantly, you should avoid overusing it sometimes as it makes the text harder to read.
How do you Strikethrough text in Google Docs?
Method 1: Strikethrough Using Shortcuts
First, let me show you the most straightforward method. If you are using Google Docs on your PC, you can use keyboard shortcuts to strikethrough text in Google Docs.
- First, select the text you need to strikethrough. You can click and drag your mouse over the text to achieve that.
- Press the keyboard shortcut designated for the strikethrough effect. The shortcuts are mention below.
In Windows PC: Alt + Shift + Number 5
Note: It is not recommended to use the number 5 key from the numeric keypad, it may not work for all. Instead, use the Number 5 key from the Number keys located below the Function keys on your keyboard.
In macOS: Command key + Shift + X (⌘ + Shift + X)
In Chrome OS: Alt + Shift + Number 5
Method 2: Strikethrough Using the Format Menu
You can make use of the toolbar at the top of your Google Docs to add the strikethrough effect to your text. You can use the Format menu to achieve this.
1. Select your text with your mouse or the keyboard.
2. From the Format menu, move your mouse over the Text option.
3. Then, from the menu that shows up, choose Strike-through.
4. Great! Now your text will look like this (refer screenshot below).
How do you eliminate the Strikethrough?
Now we have learned how to strikethrough text in Google docs, you must know how to remove it from the document. If you do not want the strikethrough effect on your text, you can remove the strikethrough using the below steps:
1. Using shortcuts: Select the text you to which have added the strikethrough effect. Press the shortcut keys which you’ve used before to create the strikethrough.
2. Using the Format menu: Highlight or select the lines from which you need to remove the effect. From the Format menu, place your mouse over the Text option. Click on Strikethrough. This will remove the strikethrough effect from the text.
3. If you have just now added the strikethrough and you want to remove it, the Undo option may come in handy. To use the Undo feature, from the Edit menu, click Undo. You can also use shortcuts for that. If you wish to have the strikethrough again, use the Redo option.
Some useful shortcuts for Google Docs
In macOS:
- Undo:⌘ + z
- Redo:⌘ + Shift + z
- Select All: ⌘ + A
In Windows:
- Undo: Ctrl + Z
- Redo: Ctrl + Shift + Z
- Select all: Ctrl + A
In Chrome OS:
- Undo: Ctrl + Z
- Redo: Ctrl + Shift + Z
- Select all: Ctrl + A
Recommended:
I hope this article was helpful, and you are able to strikethrough text in Google Docs. So, please share this article with your colleagues and friends who use Google Docs and help them out. Feel free to contact us to clarify your doubts or leave your suggestions in the comments section.

Лев Ильин
About the author
Я профессиональный аудиотехник и клавишник с опытом работы более 10 лет. Я работал в корпоративном мире в качестве консультанта и менеджера по продуктам, а в последнее время — инженером-программистом. Мои навыки и опыт позволяют мне работать над различными типами проектов от малого бизнеса до крупных компаний. Я также являюсь экспертом по Windows 11 и работаю над новой операционной системой уже более двух лет.
Как зачеркнуть текст в Google Docs
Документы Google стали одним из наиболее часто используемых текстовых процессоров на рынке. Есть два больших преимущества использования Google Docs. Во-первых, вы можете использовать его бесплатно – навсегда. И, во-вторых, Google Docs по-прежнему является королем, когда дело доходит до онлайн-сотрудничества. Тем не менее, людям, которые долгое время использовали Microsoft Word, может быть сложно настроить интерфейс Google Docs. Итак, в этой статье я собираюсь показать, как можно зачеркнуть текст в Документах Google, а также другие параметры форматирования.
Учитесь зачеркивать текст в Google Docs
Хотя Google Docs может показаться немного незнакомым, после того, как вы начнете его использовать, вы можете легко все выяснить за несколько дней, если не часов. Я считаю, что проще в использовании, чем большинство текстовых процессоров, таких как Microsoft Word. И хотя он не такой многофункциональный, он охватывает все основы. С учетом сказанного, давайте перейдем к нашему уроку, не так ли?
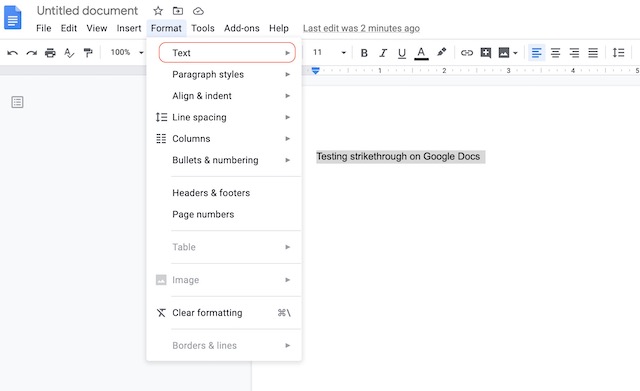
1. Выберите текст, который вы хотите зачеркнуть, и нажмите «Формат».
Программы для Windows, мобильные приложения, игры — ВСЁ БЕСПЛАТНО, в нашем закрытом телеграмм канале — Подписывайтесь:)
2. Теперь наведите курсор на параметр «Текст» и нажмите «Зачеркнутый».
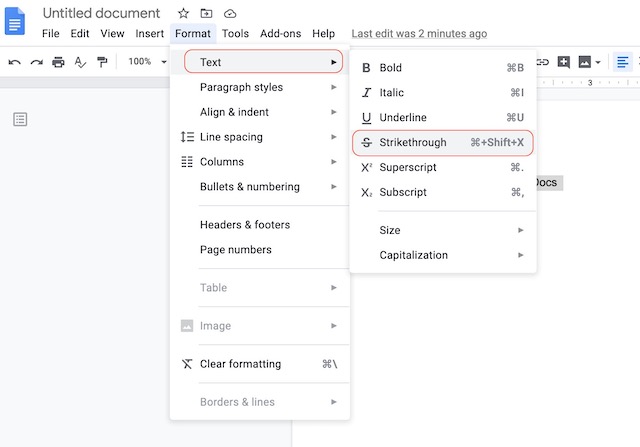
3. Вот и все. Теперь вы применили зачеркнутый текст к выделенному тексту, как показано ниже.
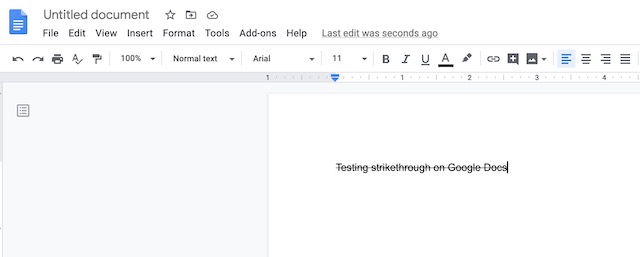
4. Если вы хотите сделать это быстрее, запомните комбинацию клавиш ниже для применения зачеркивания:
- В macOS: Command + Shift + X
- В Windows: Alt + Shift + 5
Другие ярлыки форматирования для Документов Google
Всякий раз, когда вы забудете сочетание клавиш, вы можете использовать то же самое меню «Формат», чтобы применить требуемый стиль к вашему тексту. Тем не менее, это будет намного проще, если вы помните некоторые из наиболее часто используемых сочетаний клавиш. Большинство из них похожи на Microsoft Word, поэтому у вас не должно возникнуть никаких проблем.
- Жирный текст:
- На macOS: CMD + B
- В Windows: Ctrl + B
- На macOS: CMD + I
- В Windows: Ctrl + I
- На macOS: CMD + U
- В Windows: Ctrl + U
- На macOS: CMD +.
- В Windows: Ctrl +.
- На macOS: CMD +,
- В Windows: Ctrl +,
- На macOS: CMD + Shift +>
- В Windows: Ctrl + Shift +>
- На macOS: CMD + Shift +
- В Windows: Ctrl + Shift +
- На macOS: CMD + Shift + V
- В Windows: Ctrl + Shift + V
Вот некоторые из наиболее часто используемых ярлыков, которые, я думаю, вам очень помогут. Если вы хотите узнать все соответствующие сочетания клавиш, перейдите на Документация Google на том же.
Легко применяйте форматирование текста в Документах Google
Документы Google изменили способ использования текстовых процессоров. Вместо того, чтобы приносить множество функций, которые никогда не будут использовать 90% людей, это приносит чистый опыт письма, который делает все проще. Да, вам может потребоваться несколько дней, чтобы привыкнуть к программному обеспечению, но это того стоит. Вы используете Google Docs? Дайте нам знать в комментариях ниже.