How to Add a Reference Image in Krita
When working with Krita, you may want to use an image as a reference while drawing. Whether it’s a picture of artwork you previously drew or an image from the internet, you can easily add a reference image in Krita.
Krita has a set tool for adding an image to use as a reference, and this tool offers a few functions while you use the picture. You can add a set of reference images to the page and adjust the saturation, opacity, and aspect ratio.
Here is everything you need to know when adding a reference photo in Krita.
Table of Contents
What Is the Reference Image Tool
If you haven’t worked with reference images before, you may be wondering what they are used for and how they behave in a Krita document. A reference image is a photo you can add to your Krita canvas to refer to while drawing and creating digital artwork.
Krita has a set tool to add this picture to your canvas, allowing you to adjust and use the image as needed.
You can use this image as a guide while drawing a tricky element, or you can use your previous artwork to keep the same feel while drawing the next graphic for a comic book or story.
Reference images can also be used to trace pictures or graphics, which is useful if you want to create a hand-drawn sketch of a photo.
You can add one or multiple reference pictures to your canvas. These images aren’t added as new layers, but you can still move, resize, and adjust a few settings, such as the opacity and saturation.
Since the photo isn’t an actual layer, the reference image won’t appear in the saved file if you export your document. You can also delete the image from the canvas if you’d like at any point.
For the example below, I will use multiple images from Pexels to show you how to add one or a set of reference images. I have chosen the following pictures: Human Eye Painting, Close Up Photo of an Eye, Close-up Photography Of Person’s Eye, A Grayscale Photo of a Human Eye, and Macro Photography of Brown Eye.
Overview of Adding a Reference Image
- Access the Reference Images Tool
- Add a Reference Image to the document using the tool
- Add a Reference Image by dragging and dropping
- Select Insert as Reference Image
- Resize the Reference Image(s)
- Move the Reference Image(s)
- Reduce the opacity of the Reference Image
- Reduce the saturation of the Reference Image
- Use the Reference Image(s)
- Delete a Reference Image or Set
How to Add a Reference Image in Krita Step-by-Step
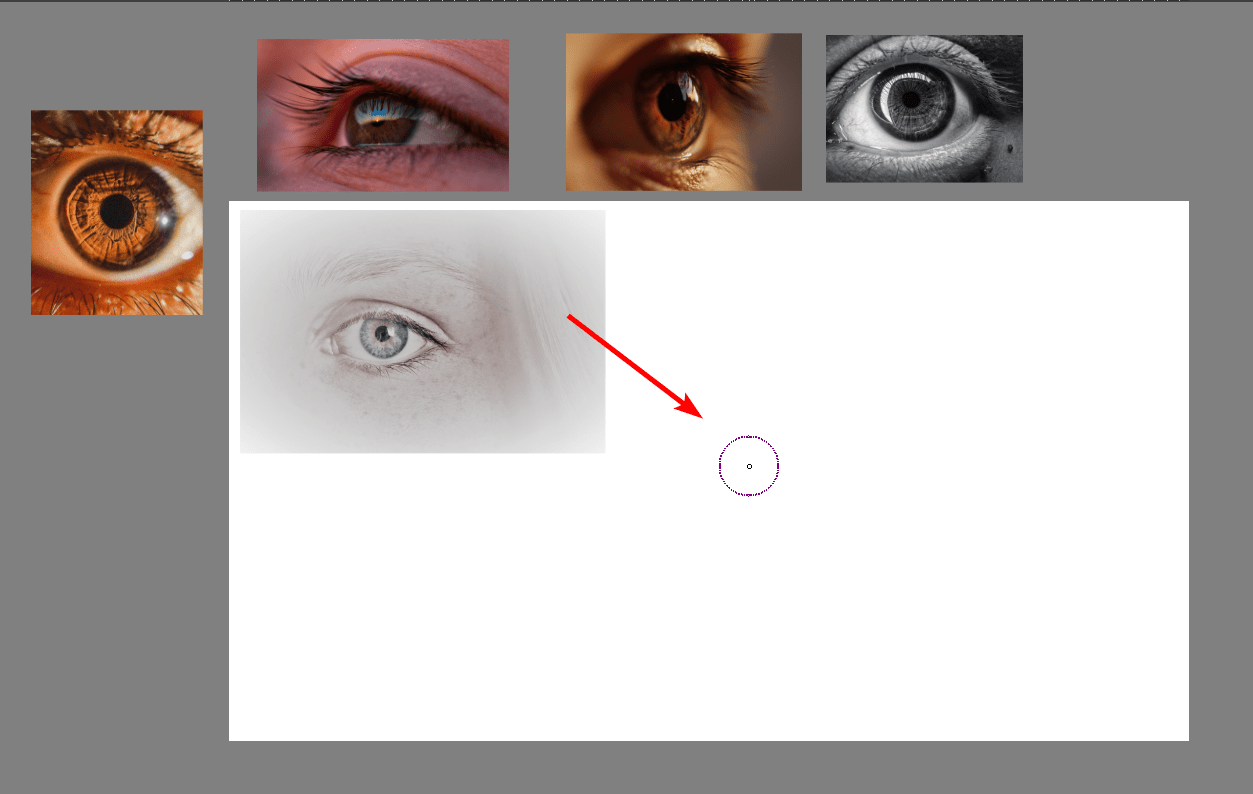
There are many reasons why you may need to add one or more images to your canvas to use as a reference. For example, if you are drawing a detailed eye, you may want to see different eye pictures at different angles to help you create a realistic eye. You can add these photos right next to your canvas, and here is how to do this.
Access the Reference Images Tool
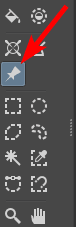
To place a reference image on your canvas and adjust the photo as needed, you need to activate the Reference Images Tool. You can find this tool in the toolbar, and it looks like a thumb tack pin.
Add a Reference Image to the Document Using the Tool
There are two ways you can add a reference image to the document. The first method is to use the Reference Images Tool after you activate it. Once the tool is active, you can locate the Tool Options Docker on the right-hand side of the screen.
In the Tool Options Docker, click the Add Reference Image icon, which is a plus sign. You can then locate the image from your files and click Open to add it to the canvas.
Add a Reference Image by Dragging and Dropping
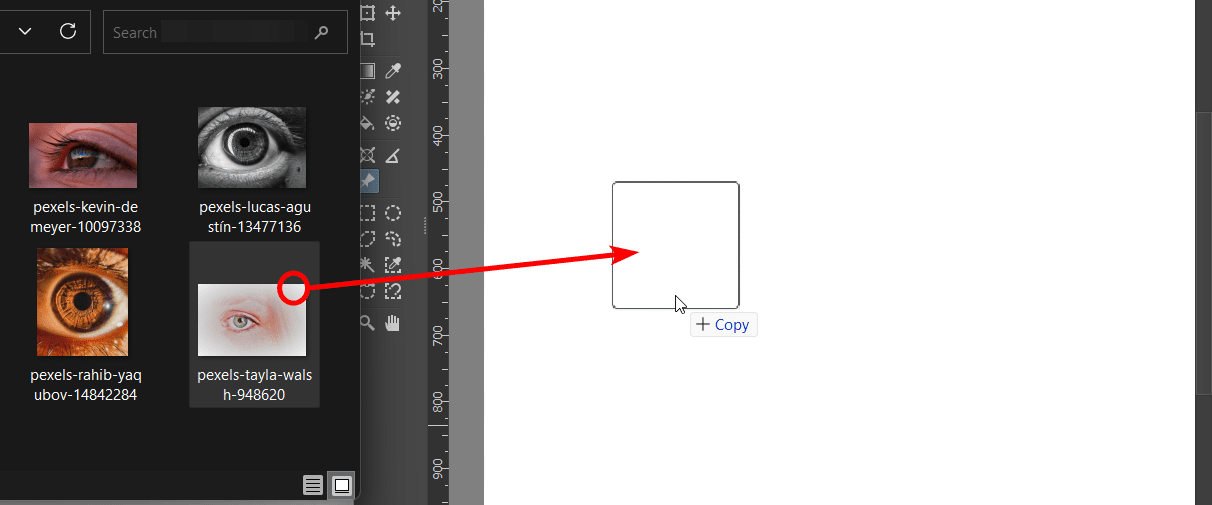
The second method to add the reference image is to open the photo in your files in a window next to your open Krita document. Then, click on the photo and drag it to the Krita workspace and let the mouse go when the image is hovering above the document.
Select Insert as Reference Image
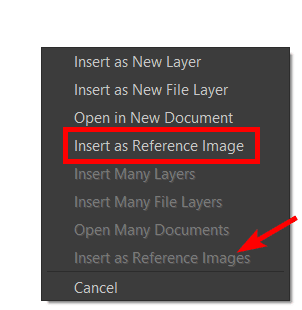
If you used the drag and drop method when you drop the image onto the canvas, a menu opens asking how you want to add the photo to the canvas. Select Insert as Reference Image if you have one image or Insert as Reference Images if you selected multiple photos.
Select, then drag and drop multiple images to create a reference image set.
Resize the Reference Image(s)
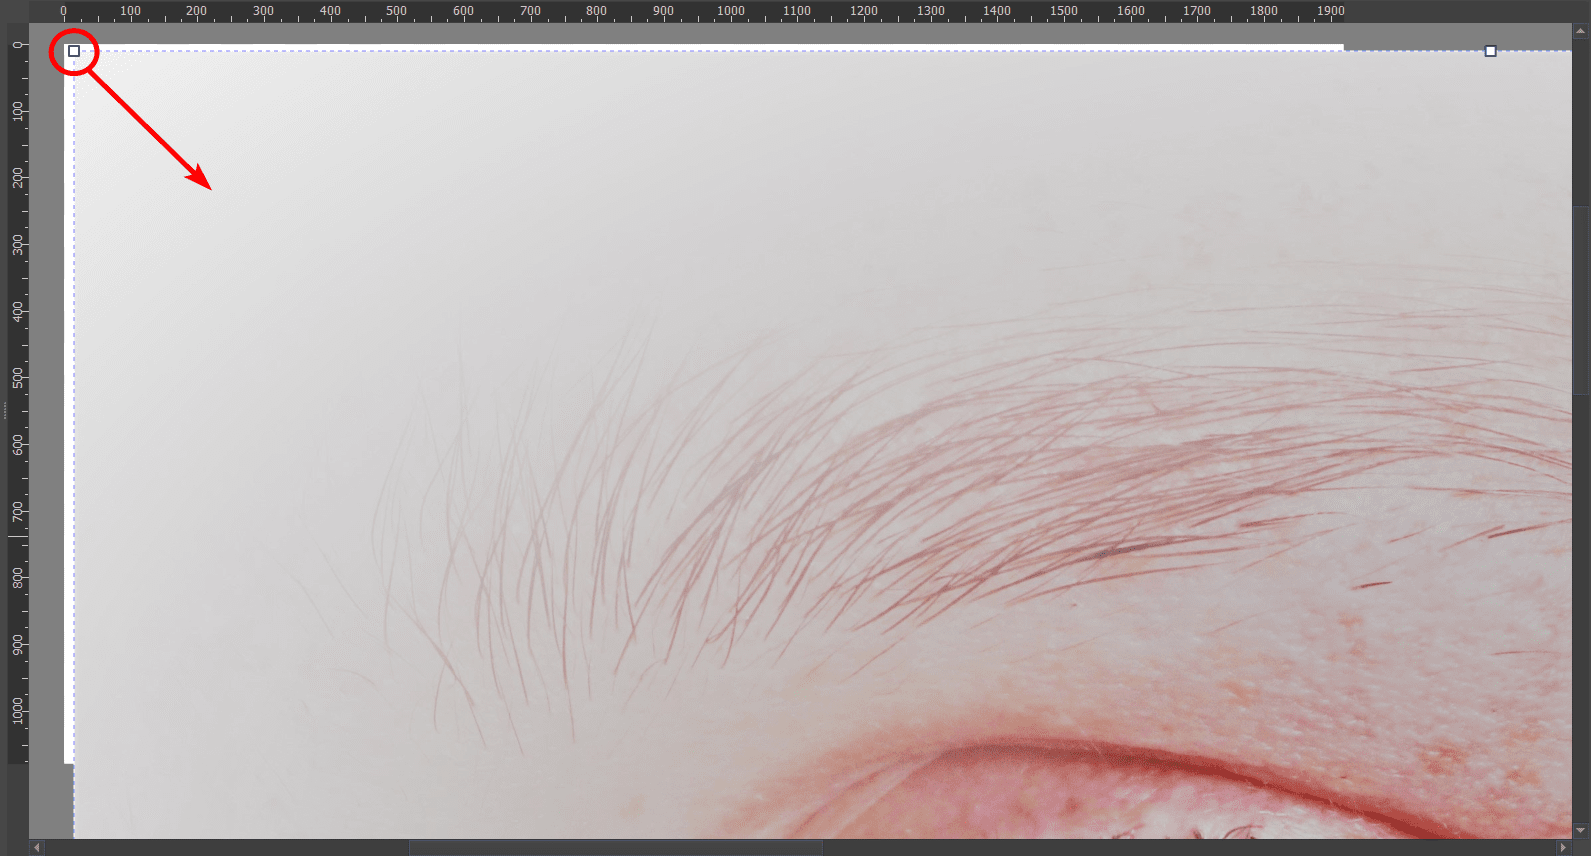
When the reference image or images are added to the canvas, the size may need to be corrected. In my case, the photo is too large. To resize the photo click on one of the corner handles and drag the handle inward to decrease the size. Drag the handle outward to increase the photo size if needed.
Move the Reference Image(s)
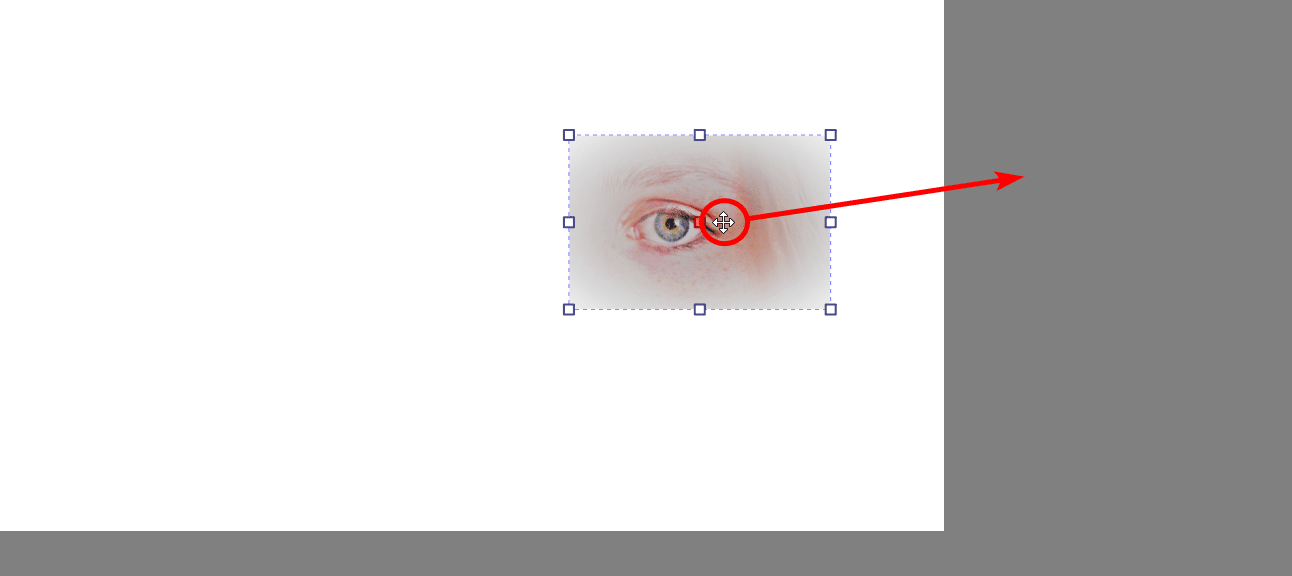
After resizing the photo(s), you can move them anywhere on the canvas or in the workspace. This enables you to move it away from your drawing so it’s not in the way. You can resize and move the picture anytime, but you must activate the Reference Images Tool first.
Reduce the Opacity of the Reference Image
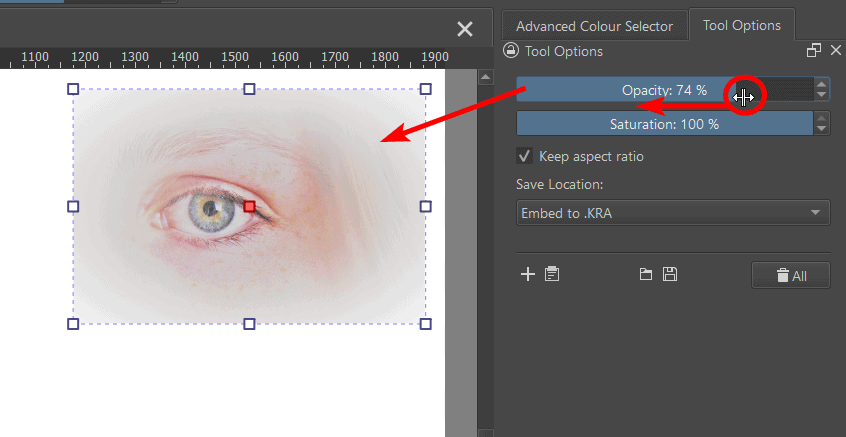
The reference image will always sit above your layers, so if you add brushstrokes to a layer, the photo may hide the brushstrokes. If you want to trace the image, you likely want to see the brushstrokes over the picture. You can do this by reducing the opacity of the reference image, so you can see the elements you add to your canvas.
To reduce the Opacity of the Reference Image, drag the Opacity slider to the left, found in the Tool Options Docker.
Reduce the Saturation of the Reference Image
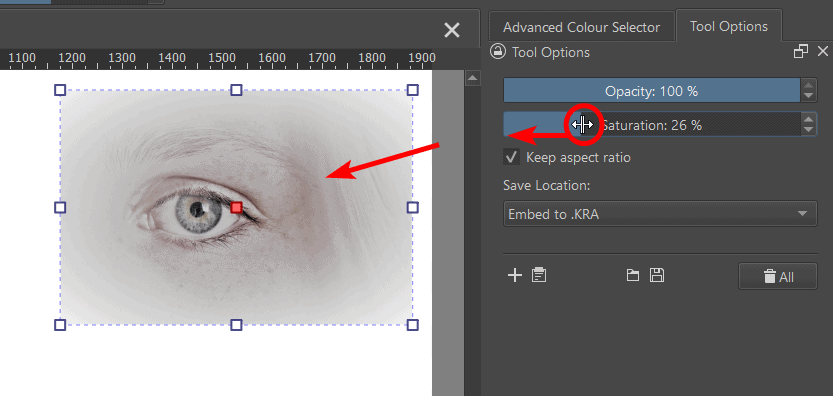
You can also de-saturate the image if you want to remove the color so that you can see the textures and lines of the photo better. Drag the Saturation slider to the left to minimize the color.
Use the Reference Image(s)
Once you have adjusted the setting for your photos, you can use the reference images. You can either trace an image or use the pictures around the canvas as a guide.
Delete a Reference Image or Set
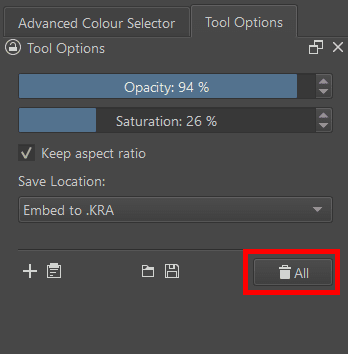
If you are finished with a reference image of multiple ones, you can delete them whenever you need to. You can select the photo with the Reference Images Tool active, and press Delete on your keyboard to remove an individual image.
You can also use the Delete All button in the Tool Options Docker to remove all the photos together.
Tools:
- Krita
�� Expert Krita Guidance: Learn Krita from professionals and uncover exclusive tips!
�� Always Up-to-Date: Courses continuously updated for the latest in Krita and creative trends.
�� Quality Content: Access hundreds of hours of premium Krita tutorials and more!
�� Start for FREE: Get your first month completely free. Cancel anytime.
Reference Images Tool
The reference images tool is a replacement for the reference images docker. You can use it to load images from your disk as reference, which can then be moved around freely on the canvas and placed wherever.
Tool Options
Load a single image to display on the canvas.
Paste as Reference Image
Load an image from the system clipboard and add it as a reference image.
Load a set of reference images.
Save a set of reference images.
Delete all reference images
Delete all the reference images.
Keep aspect ratio
When toggled this will force the image to not get distorted.
Lower the opacity.
Desaturate the image. This is useful if you only want to focus on the light/shadow instead of getting distracted by the colors.
How is the reference image stored.
Store this reference image into the KRA file. This is recommended for small vital files you’d easily lose track of otherwise.
Link to external file.
Only link to the reference image, krita will open it from the disk everytime it loads this file. This is recommended for big files, or files that change a lot. This option is only available when reference images are loaded from a local path.
You can move around reference images by selecting them with  , and dragging them. You can rotate reference images by holding the cursor close to the outside of the corners till the rotate cursor appears, while tilting is done by holding the cursor close to the outside of the middle nodes. Resizing can be done by dragging the nodes. You can delete a single reference image by clicking it and pressing Del . You can select multiple reference images with Shift and perform all of these actions.
To hide all reference images temporarily use View ‣ Show Reference Images .
© Copyright licensed under the GNU Free Documentation License 1.3+ unless stated otherwise. Build 2435.
Krita как добавить импортированное изображение к маске слоя

Импортируйте изображение в стек слоев, перейдя в меню «Слой» > Импорт Экспорт > Импортировать как слой краски . Затем оставьте этот недавно импортированный слой под слоем, на котором вы хотите добавить это изображение в качестве маски, а затем щелкните правой кнопкой мыши изображение маски, перейдите в раздел преобразования и нажмите преобразовать в маску прозрачности.
Как мне замаскировать слой в Krita?
Если вы выберете слой или набор слоев и нажмете сочетание клавиш Ctrl + Shift + G, вы создадите группу быстрой обрезки. То есть вы группируете слои, и сверху добавляется «маскирующий слой» с альфа-наследованием.
Как увеличить масштаб Крита?
- Ctrl + Пробел + + перетаскивание на холсте позволяет плавно увеличивать или уменьшать масштаб.
- Ctrl + + перетаскивание на холсте позволяет плавно увеличивать или уменьшать масштаб.
- Ctrl + Alt + Пробел + + перетаскивание на холсте будет увеличивать или уменьшать масштаб дискретными шагами.
Как повысить резкость изображения в Krita?
- И есть опция Sharpen. .
- Затем появится новое окно, в котором будут параметры фильтра, как и раньше. .
- Тогда ваше изображение будет четче.
Как объединить два изображения в Krita?
Вы можете объединить все видимые слои, выбрав все сначала Layer ‣ Select ‣ Visible Layers. Затем объедините их все, объединив Слой ‣ Слить со слоем ниже. Эти фильтры и маски доступны через контекстное меню (как показано на изображении ниже) и значок плюса в окне настройки слоев.
Как изменить размер изображения без потери качества Krita?
Re: Krita как масштабировать без потери качества.
просто используйте «коробочный» фильтр при масштабировании. другие программы могут называть это «ближайшей» или «точечной» фильтрацией. он не будет смешивать значения пикселей вообще при изменении размера.
Что такое маскирующий слой?
Маскирование слоя — это обратимый способ скрыть часть слоя. Это дает вам больше возможностей редактирования, чем постоянное стирание или удаление части слоя. Маскирование слоя полезно для создания составных изображений, вырезания объектов для использования в других документах и ограничения редактирования частью слоя.
Делать ![Illustrator создает эффект границы [дубликат]](https://annonces-tunisiennes.com/storage/img/images_2/illustrator_create_border_like_effect_duplicate.png)
Делать 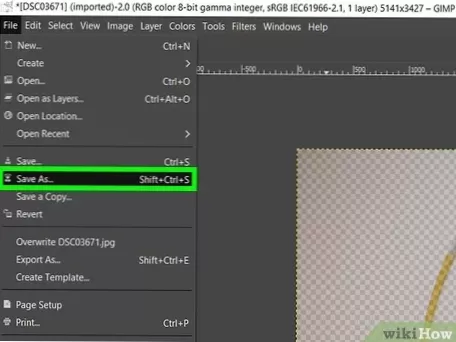
Делать 
Свежие новости, интересные статьи и полезные гайды, связанные с графическим дизайном. Здесь вы найдете ответы на самые часто задаваемые вопросы
С чего начать работу в Krita?

Запустите программу, кликнув дважды на ярлык на рабочем столе или в меню программ.
По умолчанию при запуске новый документ не создается автоматически и холста для рисования сразу не появится. Чтобы начать рисовать вам нужно создать документ воспользовавшись меню Файл — Создать, или меню Файл — Открыть, если вы хотите загрузить готовое изображение в редактор. Если готовый файл храниться на вашем компьютере, вы можете просто перетащить его из рабочего окна в окно Криты.
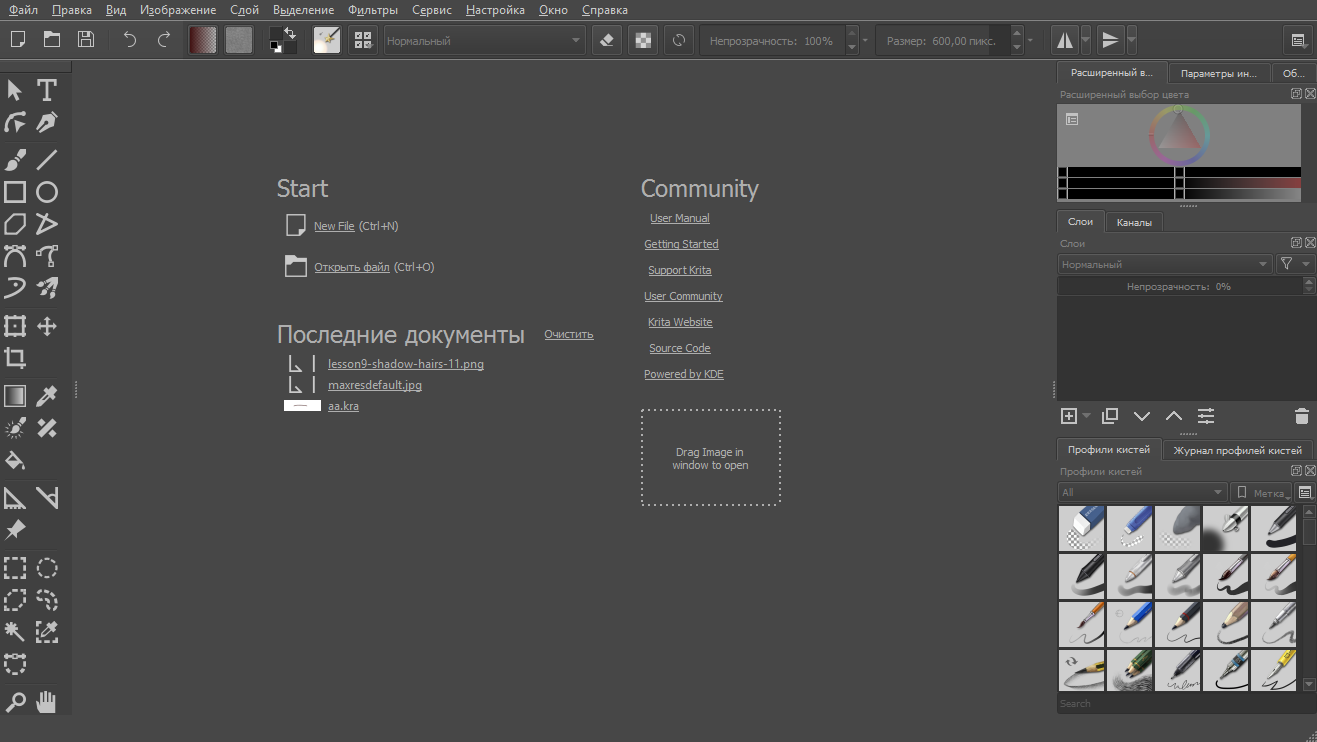
Создание нового документа
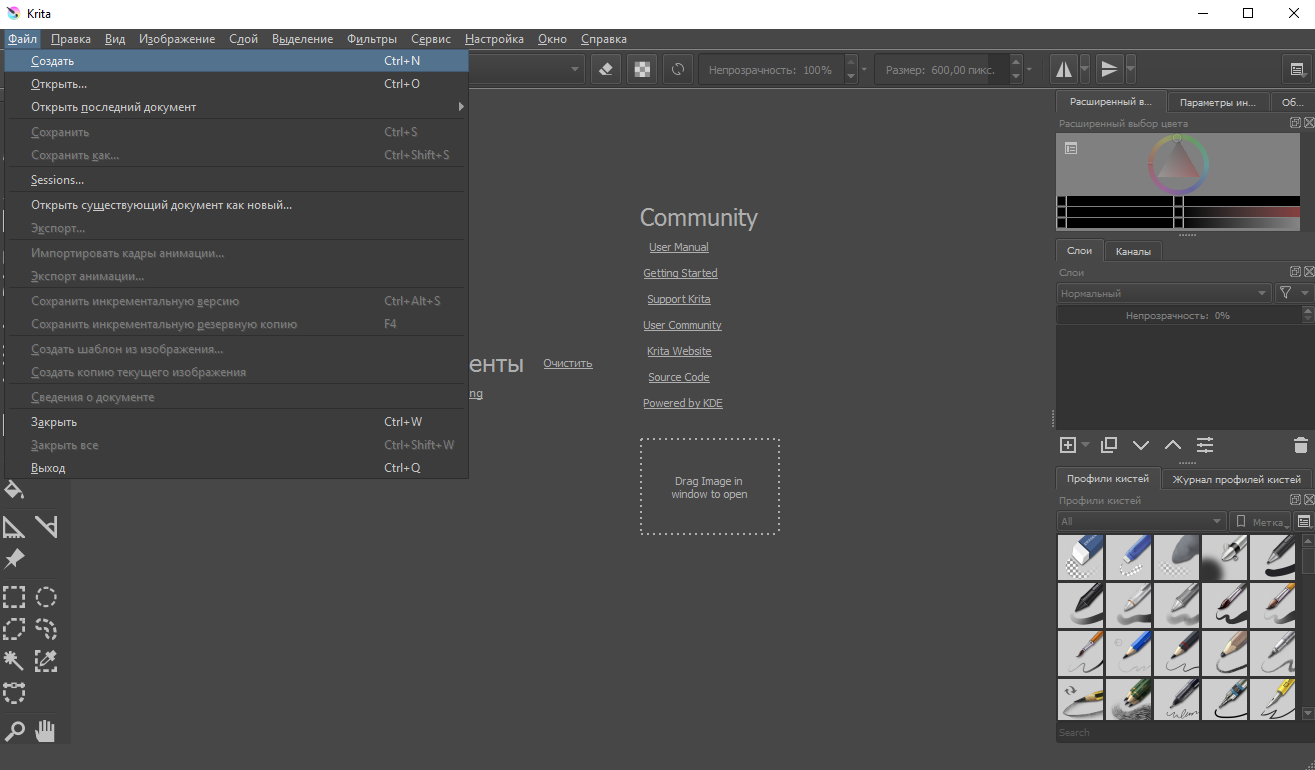
Новый документ создается следующим образом:
Нажмите на кнопку Файл в левом углу на самой верхней панели.
Затем выберите пункт Создать… Или нажать Cntrl + N.
Появится новое диалоговое окно, такое как на картинке внизу:
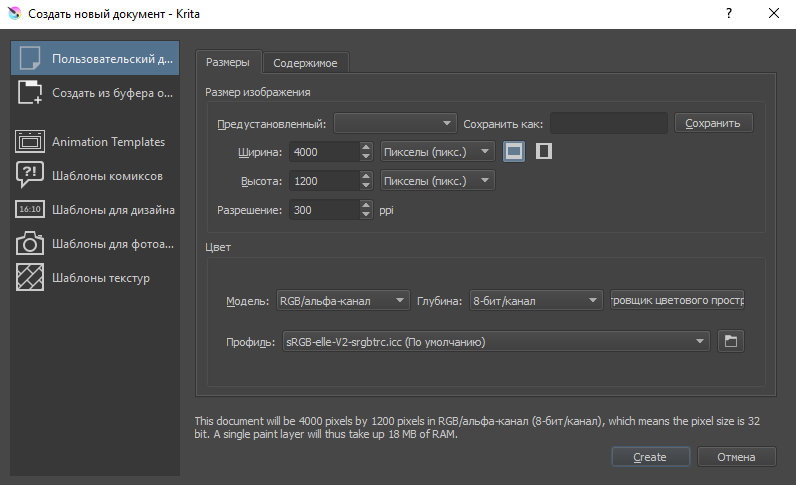
Крита является довольно сложной программой, которая умеет управлять разными режимами хранения файлов, поэтому разберемся по порядку.
Пользовательский документ
В этом разделе вы можете создать документ согласно своим пожеланиям: здесь вы можете указывать размеры, цветовой режим, глубину цветовой волны, разрешение и т.д.
Самая первая вкладка — Размеры. В первой строчке вы можете указать название своего документа. Имя из этой строки запишется в метаданные, и Крита сохранит файл под этим именем автоматически. Если это поле оставить незаполненным, то программа по умолчанию присвоит файлу имя “Безымянный”.
В строке Предустановленный размер вы можете задать пиксельное значение размера и показатель PPI (количество пикселей на дюйм).
Вы можете сохранить ваши настройки в отдельный пресет — для этого кликните по следующей строке — Создать из буфера обмена, и после заполнения всех полей нажать кнопку Сохранить.
Следующим идет раздел Цвет, в котором вы можете задать Цветовую Модель и Глубину канала.
Во вкладке содержимое вы можете задать цвет фона и количество слоев, которое вам потребуется для создания нового документа. Крита запоминает количество слоев предыдущего проекта, поэтому будьте внимательны и не забывайте указывать этот параметр для нового документа.
В разделе Описание можно сделать пометки о том, что вы собираетесь делать с документом. Это особенно удобно, если предстоит сложная, многоступенчатая работа.
Работа с сохраненными файлами
Эта функция позволит вам работать с сохраненными файлами на компьютере, либо работать с файлами из буфера памяти, например, сохраненный скриншот.
Шаблоны
В Крите для вашего удобства создано несколько готовых групп с шаблонами.Шаблоны хранятся только в формате .kra в специально отведенном для них месте. Это сделано для того, чтобы программа могла с ними быстро взаимодействовать.
Вы можете создать свой собственный шаблон из любого файла в формате .kra. Откройте меню Файл — Создать шаблон изображения. Эта операция добавит все настройки вашего изображения, учитывая количество и параметры слоев, в ваш новый шаблон.
Если вы все сделали правильно при создании документа, перед вами должен появиться белый холст (или не белый, если в настройках фона выбрали другой цвет).
Как пользоваться кистями?
Теперь попробуйте кликнуть по холсту левой кнопкой мыши. Если все хорошо, ты сейчас вы уже можете рисовать на холсте. При первом запуске кисть выбирается стандартная по умолчанию.
Если по какой-то причине, на данном этапе кисть у вас не рисует, то то кликните на это вспомогательное меню и активируйте функцию выбор кисти.
Разумеется, вам понадобится большое количество разнообразных кистей. Чтобы вам было удобнее выбирать нужный инструмент, все кисти сгруппированы в одно вспомогательное меню, которое можно вызвать клавишей F6. Все поле разделено по типу сетки, где в каждом окошке расположено название кисти или мелка, ее мини-изображение и ее графический эффект, который она дает.
Если вы хотите сделать собственный набор наиболее часто употребляемых кистей, откройте Редактор кистей. Это еще можно сделать нажав F5.
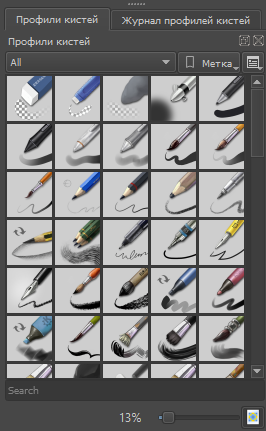
Выбирайте кисть кликнув на квадратик с нужным инструментов. Для смены рабочего цвета рисования нажмите на треугольник Расширенного выбора цвета.
Стерка
Существуют отдельные пресеты для того, чтобы подчистить изображение, но гораздо быстрее просто переключиться на режим Стерки. Для этого просто нажмите E.
Режим Стерки влияет практически на все техниками рисунка, включая простые штрихи, работу с геометрическими фигурами, а также и на градиент.
Сохранение файлов
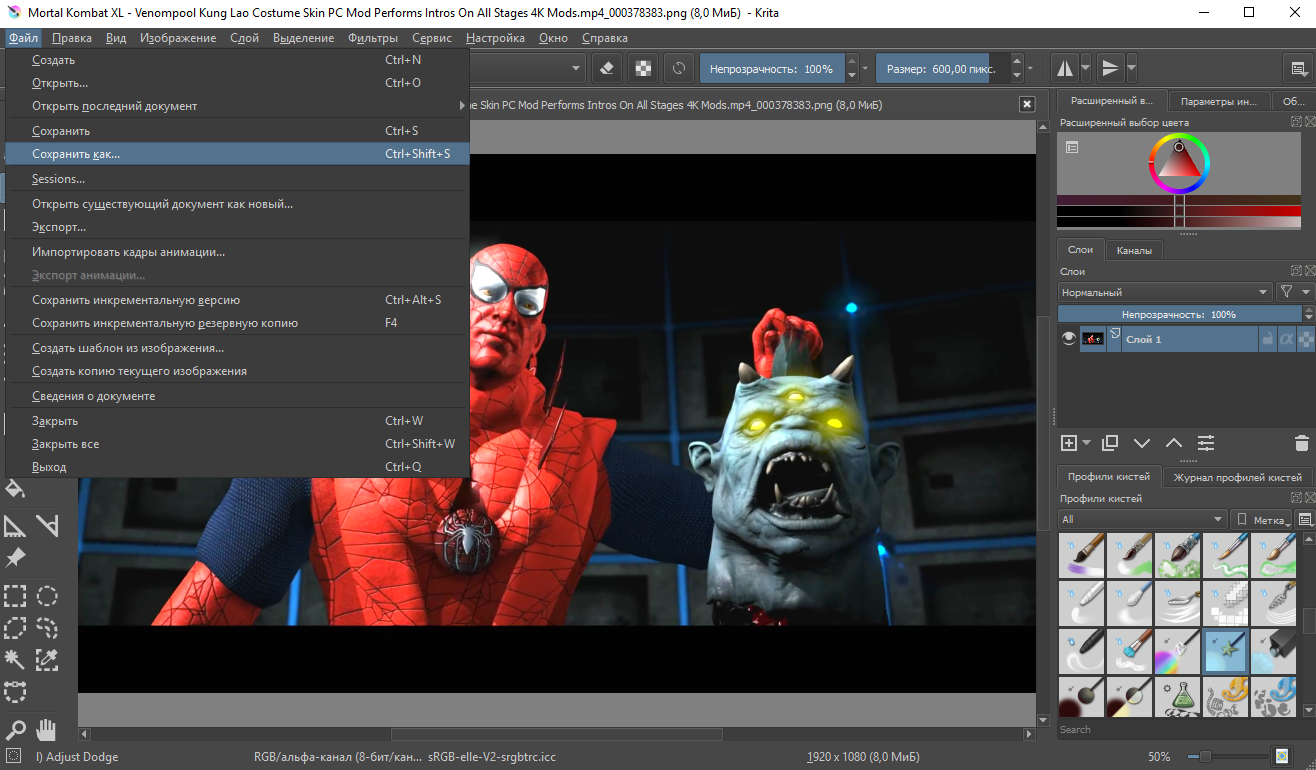
Теперь, когда вы научились рисовать в Крите, нужно научиться еще и сохранять наши рисунки. Эта опция по расположению сходна с большинством компьютерных программ — после нажатия на меню Файл — нажмите строку Сохранить.
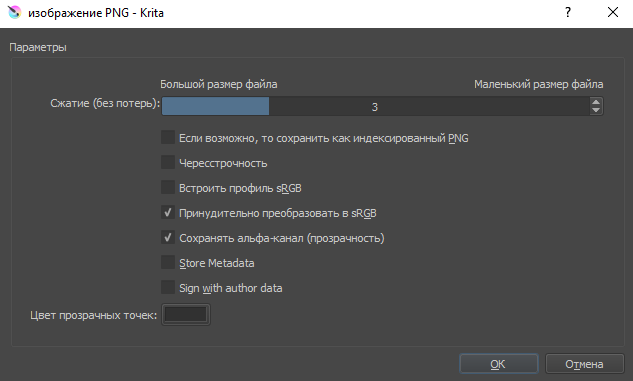
Выберите папку, куда вы хотите сохранить изображение. Потом выберите нужный формат — по умолчанию Крита сохраняет все файлы в формате .kra. В старых версиях Криты иногда попадался такой баг, при котором путь до нужной папки приходилось прописывать вручную. В последних версиях это исправили.
Если вы хотите сохранить свои файлы для последующей работы в сети, то ознакомьтесь с Рекомендацией по сохранению файлов для загрузки в интернет.