Как установить g на windows
This is the guide to install the C & C++ Compiler on Windows. Here we are going to use the GCC Compiler ( not Turbo C++ which was used in the old stone age).
The reason why we are not using the Turbo C++ is becasue the development was discontinued. The last stable verion was on September 5, 2006. Eventhough there is an updated version available school and colleges are using the version 3 which was released in 1991.
You may argue that the Turbo C++ compiler is simple and easy to use and that’s not true. Of course it’s good to start with Turbo C++ but if you are planning to choose your career in programming Turbo C++ won’t help you on this. You have to go for the standard compilers used by the developer community.
This guide will helps you to install the latest C & C++ Compilers available in the industry, which is the MinGW GCC Compiler.
MinGW GCC Compiler
MinGW is a port of GCC to Windows. It was created to support the GCC compiler on Windows Platform. It lets us to access the headers and support libraries on Windows. It produces standalone Windows executables ( exe files ) which may be distributed in any manner.
Downloading
Go to mingw.org/ and click on the Download Installer button in the top right corner.

It will take you to sourceforge for downloading.

Installation
After the download, run the setup as Administrator

Click on Install

It is going to be installed in C:\MinGW\ folder. Click on continue.

Then, it will fetch and update it’s database from the server, click on the continute button when it becomes clickable.

It will be on the Basic Setup Tab by default, there look for mingw-32-gcc-g++ , Right Click and Mark for Installation

Now, Click on the Installation menu and hit Apply Changes.

It will open the confirmation dialog box, there click on Apply.

It will start downloading the required files.

Once the download gets completed it will install the packages, click on Close to finish the setup.

Checking the Installattion
In order to check whether it has installed correctly or not, you have to go to C:\MinGW\bin folder . There holding the shift key, right click on the empty area. Click on Open command window here

In the command prompt type the command gcc -v . It will show the version of GCC installed on your computer. If the output doesn’t look similar as this one then there will be some problem in your Installation.

Configuring
Setting the Environment Variable
The purpose of setting the Enviroment Variable is to access the gcc command everywhere in the command prompt. Setting up the enviromnent varaible will tell the system where to look for the gcc command.
Copy the C:\MinGW\bin path and click on This PC

Now right click on the empty area and click on Properties.

There choose Advanced system settings

It will open the System Properties dialog box, There click on the Enviroment Variables

In the System variables section look for Path and click on Edit

Append the Path C:\MinGW\bin in the Variable Value and click on OK

That’s all now you have successfully configured the GCC Compiler on your Computer.
Usage
Here is the sample c program
Copy and paste this program on your Favorite code editor, save it as sample.c . If you are still using NotePad you have to read this guide Choosing the Best Code Editor.

Using from Command Prompt
Right Click on the Windows Icon (Start Menu Icon) and click on Command Prompt

Navigate the prompt to the place where you have saved the sample program ( use cd command to navigate ). Then type gcc sample.c to compile the program. Now a new executable named a will be generated in your folder. Type a on the command prompt to run the program.

That’s all this is how you have to compile and run C & C++ Programs on Windows.
How to Install GCC/G++ MinGW on Windows
The default compiler for Microsoft Windows is MSVC and it is installed when we install Visual Studio. Despite being a very powerful IDE, I recommend it for almost all situations, some libraries are more practical to work with in a more minimalist environment and this can be achieved using GCC/G++ on Windows.
The package developed by GNU to get you to use gcc/g++ on Windows is MinGW .
In this article we will see how to install on Windows 10 in the most basic and minimalist way possible!
Let’s go step by step!
1. Downloading MinGW
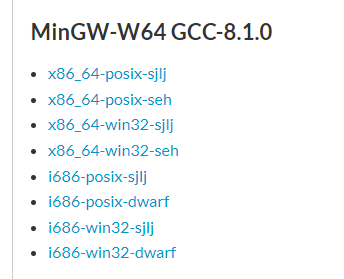
Access the address: https://sourceforge.net/projects/mingw-w64/ in the tab: Files and in MinGW-W64 GCC-8.1.0 (if you have a later version, choose her) and download the file: x86_64-posix-seh and after downloaded: unzip the file:

2. Installation
Move the unzipped folder to the C:\ drive and copy the address of the bin subfolder the full path is: C:\mingw64\bin
3. Create Environment Variables
Search the Startbar for the word Environment Variables , click on the first option and then on the button: Environment Variables, a new window will open:
In the bottom box (System Variables), select Path and click on the Edit button, in the window that opened click on the New button and paste the path address: C:\mingw64\bin : 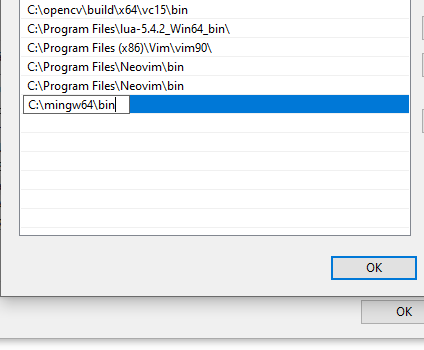
4. Testing in PowerShell and cmd
Open PowerShell or CMD, enter the folder where there is a C/C++ file, compile and run: 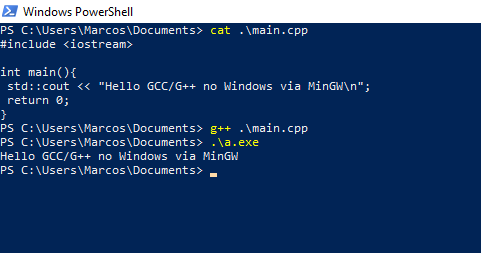
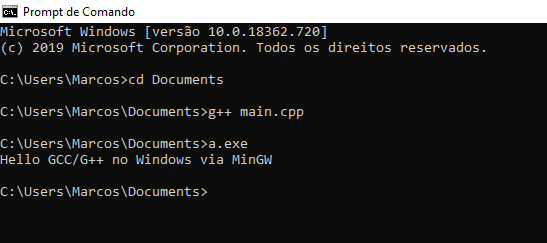
In VS Code it is easier to use: 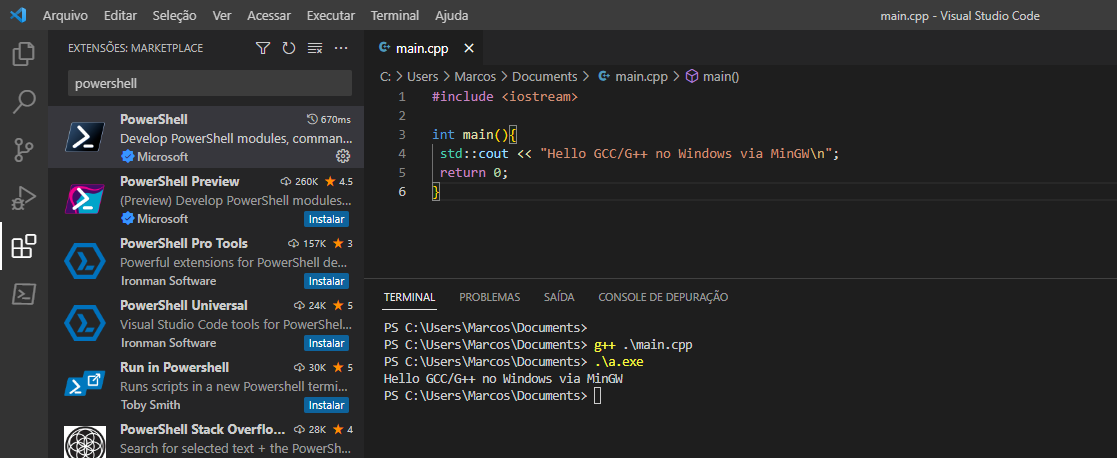
To facilitate the opening of PowerShell in VS Code you can install this extension.
If you wish, you can choose to follow this tutorial to install with MSYS2, however I find it messier, MSYS2 creates a bunch of shortcuts.
Installing g++ (C++ Compiler) on Windows
Follow these steps to install g++ (the GNU C++ compiler) for Windows. There is no room for creativity here; you must follow the directions exactly.
- Pick the drive and a folder in which you want to install g++. I’ll assume that it is C:, but you can choose a different one. If you choose a different drive or a different folder, you’ll need to adapt the directions below accordingly.
- Download full.exe, an about 14 megabyte executable, to C:\full.exe by right-clicking on the link. Use Save Link As… or Save Target As… Be sure the browser saves the file as C:\full.exe.
- Run the downloaded executable. This will install g++ (and a lot of other things that you don’t really need) on your hard drive. Go to the C: drive using Windows Explorer and double-click on full.exe. Or, open a DOS command prompt window (Start > Programs > Command Prompt), connect to the C: drive using the cd command, and type full.
- Locate where the bin folder was created for the g++ installation. On my Windows machine, it was created in the following path: C:\cygnus\cygwin-b20\H-i586-cygwin32\bin You now should add it to the PATH environment variable. You do that by following: Start -> Control Panel -> System -> Advanced -> Environment Variables At this point you can see the PATH variable either in the User Variables or in the System Variables. Add the g++ path into the PATH variable. You add it to the end of the existing value separated by a semicolon (‘;’). Make sure that you do not lose the original value. You are just appending more to the end separated by a semicolon.
- Restart your computer. A Cygnus Solutions entry will appear in your Programs menu, and an icon may appear on your desktop. Don’t use them! You will use it using the g++ command on a DOS command prompt as explained below.
You should now be able to run g++ from a DOS command prompt window. For example, to compile a file called C:\mine\hello.cpp, connect to the C:\mine folder and enter
You’ll then be able to run the compiled program by entering hello in the DOS command prompt window.
If you’ve installed Emacs as described here, you will also be able to run g++ from Emacs. If, when you do this, Emacs tries to compile with the command make -k, you made a mistake during the Emacs installation. (If you try to compile a C program, e.g., hello.c instead of a C++ program, e.g., hello.cpp, it will try to make -k. In that case enter the compile command, gcc -g hello.c -o hello -lm, manually. After you try it manually once, from the second time on it will do the right thing automatically.) If you want to learn how to run g++ on emacs, see here.
If you’d like to learn more about where this free compiler came from, we downloaded it from an older site of http://sourceware.org/cygwin/.
If you wish to clean up a little, you may delete the file: full.exe at this point. Your g++ compiler is installed under C:\cygnus.
Several modern C++ features are currently missing from Visual Studio Express, and from the system GCC compiler provided with many of today’s Linux distributions. Generic lambdas – also known as polymorphic lambdas – are one such feature. This feature is, however, available in the latest versions of GCC and Clang.
The following guide will help you install the latest GCC on Windows, so you can experiment with generic lambdas and other cutting-edge C++ features. You’ll need to compile GCC from sources, but that’s not a problem. Depending on the speed of your machine, you can have the latest GCC up and running in as little as 15 minutes.
- Install Cygwin, which gives us a Unix-like environment running on Windows.
- Install a set of Cygwin packages required for building GCC.
- From within Cygwin, download the GCC source code, and build and install it.
- Test the new GCC compiler in C++14 mode using the -std=c++14 option.
You can also install native GCC compilers from the MinGW-w64 project without needing Cygwin.
1. Install Cygwin
First, download and run either the 32- or 64-bit version of the Cygwin installer, depending on your version of Windows. Cygwin’s setup wizard will walk you through a series of steps. If your machine is located behind a proxy server, make sure to check “Use Internet Explorer Proxy Settings” when you get to the “Select Your Internet Connection” step.
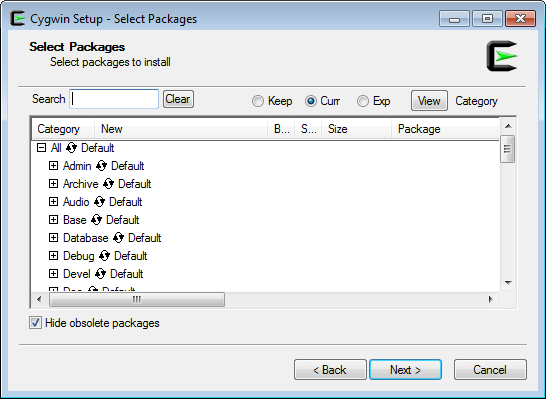
When you reach the “Select Packages” step (shown below), don’t bother selecting any packages yet. Just go ahead and click Next. We’ll add additional packages from the command line later.
After the Cygwin installer completes, it’s very important to keep the installer around. The installer is an executable named either setup-x86.exe or setup-x86_64.exe , and you’ll need it to add or remove Cygwin packages in the future. I suggest moving the installer to the same folder where you installed Cygwin itself; typically C:\cygwin or C:\cygwin64 .
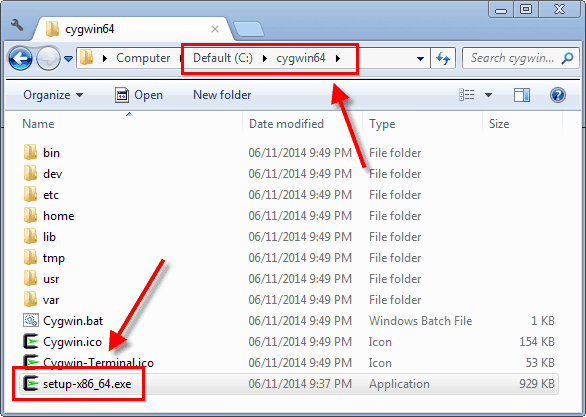
If you already have Cygwin installed, it’s a good idea to re-run the installer to make sure it has the latest available packages. Alternatively, you can install a new instance of Cygwin in a different folder.
2. Install Required Cygwin Packages
Next, you’ll need to add several packages to Cygwin. You can add them all in one fell swoop. Just open a Command Prompt (in Windows), navigate to the folder where the Cygwin installer is located, and run the following command:
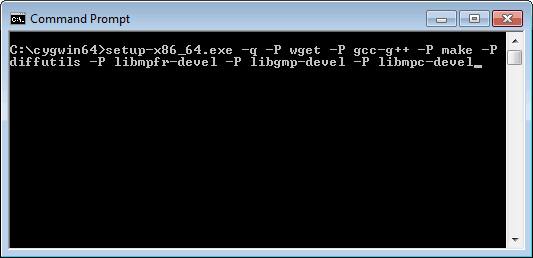
A window will pop up and download all the required packages along with their dependencies.
At this point, you now have a working GCC compiler on your system. It’s not the latest version of GCC; it’s whatever version the Cygwin maintainers chose as their system compiler. At the time of writing, that’s GCC 4.8.3. To get a more recent version of GCC, you’ll have to compile it yourself, using the GCC compiler you already have.
3. Download, Build and Install the Latest GCC
Open a Cygwin terminal, either from the Start menu or by running Cygwin.bat from the Cygwin installation folder.
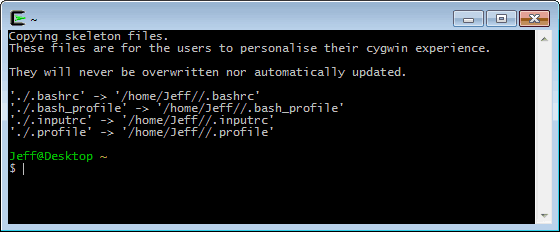
If your machine is located behind a proxy server, you must run the following command from the Cygwin terminal before proceeding – otherwise, wget won’t work. This step is not needed if your machine is directly connected to the Internet.
To download and extract the latest GCC source code, enter the following commands in the Cygwin terminal. If you’re following this guide at a later date, there will surely be a more recent version of GCC available. I used 4.9.2, but you can use any version you like. Keep in mind, though, that it’s always best to have the latest Cygwin packages installed when building the latest GCC. Be patient with the tar command; it takes several minutes.
That will create a subdirectory named gcc-4.9.2 . Next, we’ll configure our GCC build. As the GCC documentation recommends, it’s best to configure and build GCC in another directory outside gcc-4.9.2 , so that’s what we’ll do.
Here’s a description of the command-line options passed to configure :
- The —program-suffix=-4.9.2 option means that once our new GCC is installed, we’ll run it as g++-4.9.2 . This will make it easier for the new GCC compiler to coexist alongside the system GCC compiler provided by Cygwin.
- The —enable-languages=c,c++ option means that only the C and C++ compilers will be built. Compilers for other languages, such as Fortran, Java and Go, will be excluded. This will save compile time.
- The —disable-bootstrap option means that we only want to build the new compiler once. If we don’t specify —disable-bootstrap , the new compiler will be built three times, for testing and performance reasons. However, the system GCC compiler (4.8.3) provided by Cygwin is pretty recent, so —disable-bootstrap is good enough for our purposes. This will save a significant amount of compile time.
- The —disable-shared option means that we don’t want to build the new standard C++ runtime library as a DLL that’s shared with other C++ applications on the system. It’s totally possible to make C++ executables work with such DLLs, but it takes care not to introduce conflicts with C++ executables created by older or newer versions of GCC. That’s something distribution maintainers need to worry about; not us. Let’s just avoid the additional headache.
- By default, the new version of GCC will be installed to /usr/local in Cygwin’s virtual filesystem. This will make it easier to launch the new GCC since /usr/local/bin is already listed in Cygwin’s PATH environment variable. However, if you’re using an existing Cygwin installation, it might prove difficult to uninstall GCC from /usr/local later on (if you so choose), since that directory tends to contain files from several different packages. If you prefer to install the new GCC to a different directory, add the option —prefix=/path/to/directory to the above configure command.
We’re not going to build a new Binutils, which GCC relies on, because the existing Binutils provided by Cygwin is already quite recent. We’re also skipping a couple of packages, namely ISL and CLooG, which means that the new compiler won’t be able to use any of the Graphite loop optimizations.
Next, we’ll actually build the new GCC compiler suite, including C, C++, and the standard C++ library. This is the longest step.
The -j4 option lets the build process spawn up to four child processes in parallel. If your machine’s CPU has at least four hardware threads, this option makes the build process run significantly faster. The main downside is that it jumbles the output messages generated during the build process. If your CPU has even more hardware threads, you can specify a higher number with -j . For comparison, I tried various numbers on a Xeon-based machine having 12 hardware threads, and got the following build times:
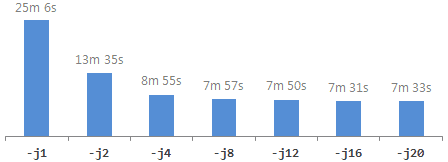
Be warned: I encountered a segmentation fault the first time I ran with -j4 . Bad luck on my part. If that happens to you, running the same command a second time should allow the build process to finish successfully. Also, when specifying higher numbers with -j , there are often strange error messages at the end of the build process involving “jobserver tokens”, but they’re harmless.
Once that’s finished, install the new compiler:
This installs several executables to /usr/local/bin ; it installs the standard C++ library’s include files to /usr/local/include/c++/4.9.2 ; and it installs the static standard C++ library to /usr/local/lib , among other things. Interestingly, it does not install a new standard C library! The new compiler will continue to use the existing system C library that came with Cygwin.
If later, you decide to uninstall the new GCC compiler, you have several options:
- If you installed GCC to a directory other than /usr/local , and that directory contains no other files, you can simply delete that directory.
- If you installed GCC to /usr/local , and there are files from other packages mixed into the same directory tree, you can run the list_modifications.py script from this post to determine which files are safe to delete from /usr/local .
- You can simply uninstall Cygwin itself, by deleting the C:\cygwin64 folder in Windows, along with its associated Start menu entry.
4. Test the New Compiler
All right, let’s compile some code that uses generic lambdas! Generic lambdas are part of the C++14 standard. They let you pass arguments to lambda functions as auto (or any templated type), like the one highlighted below. Create a file named test.cpp with the following contents:
You can add files to your home directory in Cygwin using any Windows-based text editor; just save them to the folder C:\cygwin64\home\Jeff (or similar) in Windows.
First, let’s see what happens when we try to compile it using the system GCC compiler provided by Cygwin:
If the system compiler version is less than 4.9, compilation will fail:
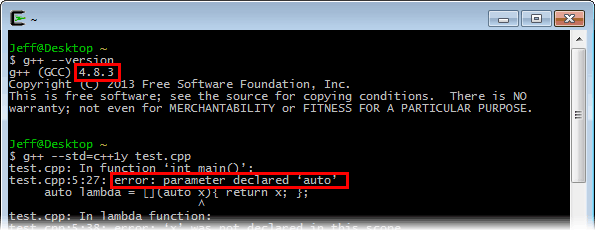
Now, let’s try it again using our freshly built GCC compiler. The new compiler is already configured to locate its include files in /usr/local/include/c++/4.9.2 and its static libraries in /usr/local/lib . All we need to do is run it:
GCC for Windows How to install gcc in Windows 10? (the easier way)
GCC, abbreviation for ‘GNU Compiler Collection’ (thanks @saphirakai ) (and not Gulf Cooperation Council, like I’d assumed) is a necessity if you (or your pesky college) is into C Programming.
Almost all Linux distros come pre-installed with it so they are out of the trouble. But for those of you who were constant users of Windows and Command Prompt, and never felt the necessity for a C compiler, GCC seems to come out of the blue and a tough nut to install. 1000 rage-quits later, I present you this article.
This article is written so that the installation process is made easier than most of the trashy articles I had to go through.
Installation
- Go to MinGW official website and click on ‘Downloads’ on the left panel. You’ll be redirected to the site which hosts the files. Important Edit: MinGW official website is now down (as of 24th March 2021). Hence, instead of their official website, download from MinGW SourceForge page
- Look for mingw-get-setup.exe for downloading. Download it and launch the installer. Accept the terms and move on.
- You’ll now see that the installer is connecting to the Internet and downloading a lot of tiny and small files. Wait till it ends.
- Right when it ends (which won’t take long), you’ll be presented a window with title MinGW Installation Manager. You should be in the ‘Basic Setup’ tab by default when it launches. If not, click on Basic Setup.
- Out of the numerous check boxes presented to you on the right side, tick «mingw32-gcc-g++-bin«. If you are prompted with a menu, click on Mark for Install.
- Then on the top left corner click on Installation > Apply Changes. And wait while it downloads a billion files and installs them.
- Now you gotta edit your «Environment Variables» as well, so that gcc works in cmd no matter the file location.
- For that go to Windows Explorer > Right click on This PC > Properties > Advanced system settings > Environment Variables or you could just search for «Environment Variables» in Windows Search.
At the bottom «System Variables» panel, look for a Variable named «Path» and double click on it. Some systems show a good UI for adding a New Path easily (by clicking New), else you just need to add ; at the end and add the following path
(This is assuming you didn’t manually change any installation paths and went with just clicking ‘Next’ during installation)
Click on OK, and OK and close the other windows. Open a Command Prompt Terminal and try typing gcc —version and press Enter.