 Create a SQL Developer User Account
 Before You Begin
This 15-minute tutorial shows you how to create a Data Miner user account and SQL Developer connection using a pluggable database (PDB).
Background
Oracle SQL Developer is a client to the Oracle Database software. An Oracle SQL Developer user account is required to access Oracle database tables and use Oracle Data Miner.
What Do You Need?
- Oracle Database 19c Enterprise Edition
 Create a User Account in a Pluggable Database
Your Oracle Database 19c instance should have at least one pluggable database (PDB) instance. You will use an account with the proper permissions to create a user account for your Data Miner user account.
Note: If you are using an Oracle Database instance in your corporate environment, you may need to request your DBA to perform these actions.
- Open SQL Developer.
- Right-click your PDB sys user account and select Connect.
- In the SQL Developer Connections tab, expand the connection.
- Right-click the Other Users node and select Create User from the pop-up menu.
- In the Create User window, select the User tab and specify a username, password, default tablespace, and temporary tablespace for the user account. Use the following parameters:
- User Name: DMUSER
Note: You must use an upper case user name. - Password: Create a password of your choice (it must be at least 9 characters and contain two upper case characters.)
- User Name: DMUSER
- Select the Granted Roles tab and click the check box in the Granted Column for CONNECT.
- Select the Quotas tab and click the check box to set the default USERS Tablespace to Unlimited.
- Click Apply to create the account. Then, click OK in the resulting «Successful» window.
 Create a SQL Developer Connection for the Data Miner User
You can create this connection either by using the SQL Developer Connections tab or the Data Miner tab. In either case, the same New / Edit Database Connection dialog box appears. All saved SQL Developer connections appears in both tabs.
- In the SQL Developer Connections tab, right-click Connections and select New Connection from the pop-up menu.
- In the New / Select Database Connection dialog box, enter the following parameters:
- Connection Name: PDB1-DMUSER
- Password: your chosen password
- Check Save Password
- Connection Type: Basic
- Hostname: The host name of your database server (localhost if the database is installed on your PC, or the IP address if it is remote)
- Port: Enter the appropriate port number (1521 is the default)
- Service name: The service name for your PDB, such as orclpdb1.example.com
- Click Test to test the connection. If the connection is successful, Status (just above the Help button) changes to «Success». Then, click Connect to save the connection and to also establish a connection to the database.
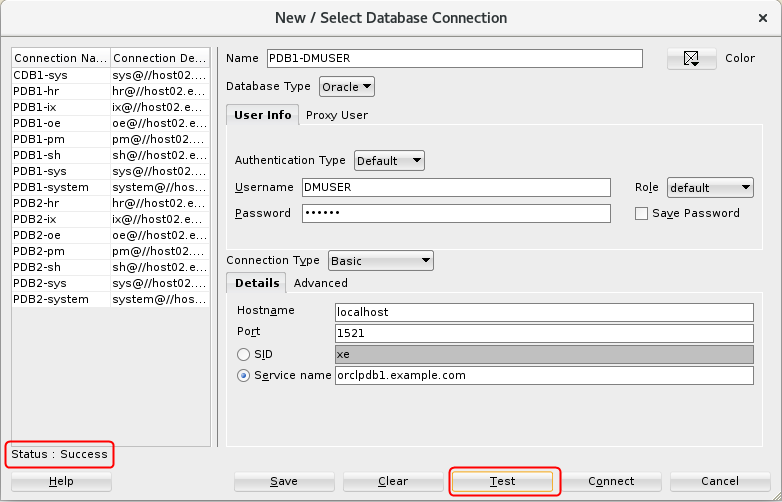 Description of the illustration create-dmuser-connection.png
 Next Tutorial
In the next tutorial, you’ll install the Data Miner sample data repository.
Создание пользователя БД Oracle — первое, что нужно сделать
После установки базы Oracle в вашем распоряжении будет как минимум два пользователя БД sys, system — эти стандартные системные пользователи (схемы) и их структуры должны оставаться неизменными, поэтому для дальнейшей работы создадим своего пользователся с правами администратора:
- Для начала убедитесь, что подключение к БД происходит с ролью SYSDBA

- В новых версиях Oracle имя пользователя должно быть формата «C##КакоеТоИмя», если вы не хотите называть своего пользователя с префиксом «C##», то выполните команду ниже, иначе возникнет ошибка ORA-65096: недопустимое имя общего пользователя или имя роли
Готово, пользователь создан, теперь в настроках SQL Developer укажите вашего нового пользователя и подключайтесь через него
How to create a user in Oracle SQL developer
I am newbie to oracle sql developer 3.1.07.42, and have just installed it on my machine. I want to make a new connection, but it requires a user and a password which I do not know. I have been googling about it since many days, and have learned that there are some commands to create user, but I do not know where should I run those commands, because I cannot run queries/commands until the connection is created. Would anyone let me know what should I do?
Создание пользователя с помощью Oracle SQL Developer
Есть множество способов создать пользователя в Oracle 10g Database. Но так как мы будем работать в Oracle SQL Developer – здесь будет описано, как создать пользователя с помощью этого средства.
1. Запустите Oracle SQL Developer из меню Пуск ® Программы ® SQL Developer (возможны отличия в пути).
2. Затем нужно настроить соединение с БД. На вкладке «Connections» нужно нажать «+» — New Connection, в результате появится окно создания нового соединения (рис. 10).

Рисунок 10 — Создание подключения в SQL Deveolper
3. В полях «Connection Name», «Username», «Password» нужно ввести имя соединение, затем имя пользователя – system и пароль, указанный при установке Oracle. На вкладке «Oracle» выбрать «TNS», затем выбрать «Network Alias», в выпадающем списке выбрать настроенную ранее нами сетевую службу ORCL.
4. На вкладке «Connections» нажмите на значок «+» (рис. 11).
Примечание: если Вы не выполняли процедуры сетевой настройки – выполнить этот шаг будет невозможно в том виде, как он здесь описан.
5. Теперь нажмем кнопку «Save» для сохранения настроенного нами соединения в списке «Connections», затем нажмем кнопку «Connect».
6. Нажмите «+» на узле «Other Users», вызовите контекстное меню правой кнопкой мыши на этом узле. Выберете «Create User».

Рисунок 11 — Вкладка «Connections»
7. Введите в поле «User Name» имя создаваемого пользователя, в полях «Enter Password» и «Confirm Password» введите дважды пароль для создаваемого пользователя, в полях «Default Tablepace» и «Temporary Tablespace» выбрать USERS и TEMP соответственно (рис. 12). Перейдите на вкладку «Roles».
8. Выберете в списке роли, отметив их галочками в колонке «Granted» как на рисунке 13. Перейдите на вкладку «System Privileges».
9. Выберете в списке системные привилегии, отметив их галочками в колонке «Granted» как на рисунке 14. Нажмите кнопку «Apply».
10. В результате программа перейдет на вкладку «Results», где будет отображаться ход создания пользователя (рис. 15). На вкладке «SQL» будет сформирован SQL-скрипт для создания пользователя. После вывода результа нажмите кнопку «Close».

Рисунок 12 — Окно создания пользователя вкладка «User»

Рисунок 13 — Окно создания пользователя вкладка «Roles»

Рисунок 14 — Окно создания пользователя вкладка «System Privileges»

Рисунок 15 — Окно создания пользователя вкладка «Results»
Создание пользователя завершено. Пользователь «TEST» появиляся в разделе «Other Users». Как было сказано вначале, есть несколько альтернативных способов создать пользователя. Далее мы кратко опишем способ как это можно сделать в Oracle Enterprise Manager, основанном на web-интерфейсе.
Понравилась статья? Добавь ее в закладку (CTRL+D) и не забудь поделиться с друзьями: