Mount Drives in Ubuntu Command Line
Mounting drives with a graphical user interface is easy. But it becomes a hassle when you don't have access to one.
Well, mounting via the command line is not as easy as doing it in GUI, but it is not super complicated either.
Let me show how to mount drives in Ubuntu command line.
Please enable JavaScript
An introduction to mounting
Mounting is the process in which a drive is made accessible to your Operating System to perform read/write operations. This is common to all OSes.
For example, Windows assigns a drive letter (C, D, E, etc) whilst Linux distributions assign a default path in the /media/<username> or /run/media/<username> folder.
To mount your drive, you should be aware of two things:
- What device you're mounting (/dev/sda2, /dev/vdb1, etc)
- Where you're mounting it (A mounting point)
Of course, there are other ways too, but let's stick to the simple and obvious one, the mount command.
The mount command
The mount command is a very popular one, which lets you mount a drive into a folder of your choice. It supports a wide range of partition types.
The general format of the mount command is
In this command, the following are the ones to note.
- <DEVICE> — The address of the drive you're mounting (/dev/sda2 or any hardware address)
- /PATH/TO/FOLDER — The absolute path of the folder where you're mounting the drive into
- -t <TYPE> — (Optional) Lets you specify the type of partition which is being mounted
Now, let's look at how you can mount the drive.
Step1: Check Partitions in your system
It is essential to know the drive name which you want to mount and for that purpose, you can list available drives using the following command:

The output of lsblk
From here, check what the drive address your device is pointing to. Here, let us mount a removable USB drive.
Step 2: Creating a mounting point
To mount a drive, first, you have to have a place where you can mount it. But to create a mounting point, you don't need anything else but a mkdir command (yes, the mounting point is nothing but a directory):
For example, here, I created a mounting point inside the media directory named Sandisk :
Step 3: Mount the drive
Once you are done creating the mounting point, you can use the mount command in the following manner to mount the drive:
For example, if I want to mount the drive /dev/sdc1 having ext4 FS on a previously created mounting point, I will be using the following:
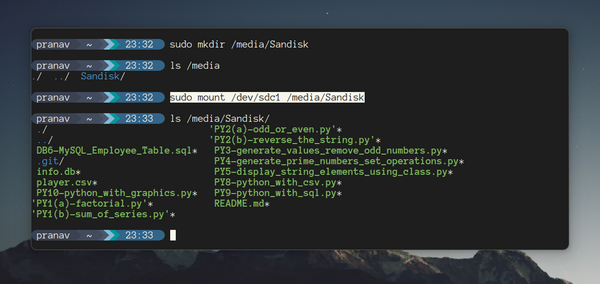
Mount the drive inside the folder
Our mount-point is also shown in the output of lsblk as follows:
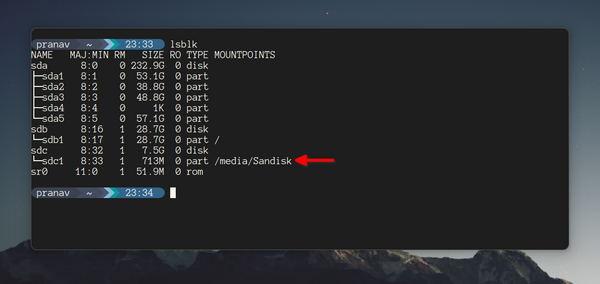
The mount point is displayed in the output of lsblk
Mount drive permanently in Ubuntu
As I mentioned earlier, using the mount command, you can only mount the drive on a temporary basis.
And to make changes permanent, you have to make some changes in the /etc/fstab file.
First, open the /etc/fstab file using the following command:
Go to the end of the file in the nano text editor using Alt + / and add one line in the following syntax:
So if I want to mount /dev/sdc1 having ext4 Filesystem, I will be using the following:
Unmount drives in Ubuntu
To unmount, you can type either the mount point (folder) or the device address with the umount command.
Both of them should do it.
But if any process is occurring while you're trying to unmount the drive, and you do not want that to fail, use the lazy option to unmount automatically when the process ends.
And if you mounted the drive permanently, open the /etc/fstab file and remove the line and then restart the device.
Getting error 'Umount Target is Busy'?
While unmounting, you may get an error saying "Umount Target is Busy" which is the result of the target being busy and you're trying to unmount it.
And here's the detailed guide on how to fix that issue:
Linux Handbook Sagar Sharma
Here's another article that deals with network shares in Ubuntu:
 It's FOSS Abhishek Prakash
Introduction To Filesystems
Data on a computer, as you may know, is stored in binary as a series of 1s and 0s. The way these are stored on a device and their structure is called the "filesystem". In Linux devices are referenced in /dev. Data is not actually stored on a device so you cannot access this data by going into /dev, this is because it is stored inside the filesystem on the device so you need to access these filesystems somehow. Accessing such filesystems is called "mounting" them, and in Linux (like any UNIX system) you can mount filesystems into any directory, that is, make the files stored in that filesystem accessible when you go into a certain directory. These directories are called the "mount points" of a filesystem. In other systems this is done differently. For example in Windows there is no distinction made between a device and the filesystem on it, and the user is restricted to mounting a device’s filesystem in a top-level volume which is automatically assigned a letter such as C:, D:, etc. and the files inside these filesystems are accessed inside each volume’s root such as "C:\", "D:\", "E:\", etc. (remember, Windows uses back slashes instead of the more common forward slashes you find in Linux)
Linux only has one top-level volume which is kept in the system’s RAM. It too has a root, but since there is only one top-level volume there is no point giving it a label (as there is nothing to distinguish it from) which means that all files in a Linux system are accessed via simply "/". This top-level volume is kept in RAM, but the files themselves are stored on various drives (some real and some fake) (also, files may be kept in the RAM before they are written to disc for reasons which I will explain further down). A Linux system needs only one "physical" (real) filesystem, which is that of /. However, it is very useful to keep some directories inside / separate. For example, users’ files are often kept on a separate hard drive partition and mounted on /home. Also, the "fake" filesystems can make it much easier to administer and run a Linux system. For example the folder "/proc" does not actually contain any data. In fact, it is "fake" since it shows various files containing useful pieces of information to do with your system, however none of these files actually exist until they are opened, in which case the system does a quick check to find the required information, displays it and pretends that it was there all along.
These system filesystems are all automatically set up, but it is creating custom filesystems and using removable media which allow for some interesting uses of mounting.
What Can Be Mounted
The most common thing to be mounted is a hard drive partition. Hard drives are kept in /dev and have different names depending on what type of drive they are. IDE/ATA drives are labelled as /dev/hda, /dev/hdb, /dev/hdc and /dev/hdd (since a PC’s IDE interfaces can only handle 4 devices at a time). Note that these can be devices such as IDE/ATA CDROMS, Compact Flash to IDE converters, and some special floppy drives (although they tend to appear mainly in laptops). For SCSI devices the labels are /dev/sda, /dev/sdb, /dev/sdc, /dev/sdd, /dev/sde, /dev/sdf, /dev/sdg, /dev/sdh and /dev/sdi (since a SCSI chain can contain up to nine devices). Other types of drive, such as USB, SATA, etc. are mapped to these SCSI devices by Linux. Therefore SATA and USB drives are labelled as /dev/sdX where X is a letter, starting at "a".
Since these are literally the devices you can issue a command such as:
If /dev/hdc is a CD drive then it will eject.
In the case of hard drives, there is another abstraction. A hard drive (and many devices such as USB "sticks" which act like hard drives) can be partitioned to allow many filesystems to be stored on them. This means that the filesystems themselves are accessible via the partition labels, such as /dev/hda1 (the first partition on /dev/hda). This means that we finally know about something we can mount, a partition, since it contains a filesystem.
Another physical filesystem which can be mounted is the ISO9660 filesystem used on CDROMs. Since there is only ever one CD in a CD drive there is no point creating /dev/hdc1 (where /dev/hdc is a CDROM drive) since there is only one filesystem on it. That means that you can mount CD drive devices explicitly, so if /dev/hdc is a CDROM drive then it is possible to mount /dev/hdc if there is a disc in it.
Floppy disks only contain one filesystem, and are labeled as /dev/fd0 for the first drive, /dev/fd1 for the second drive, etc. So now we know three things which can be mounted.
Devices like USB sticks are treated like hard drives (so /dev/sda1, for example, may contain a filesystem) and so are iPods (although I think the main data on an iPod is stored on the second partition)
Mounting is not restricted to physical devices. If you have a filesystem "image" (which IS a filesystem, whether an exact copy of an existing filesystem, or a filesystem created specifically for that file) then you can mount that through the use of a fake device called the "loopback device"
How To Mount/Unmount Filesystems
Unmounting
Firstly I will tell you how to unmount any filesystem you mount after trying these commands. Unmounting is done through the "umount" command, which can be given a device or a mount point so:
Would both unmount the filesystem on /dev/hda1 if it is mounted on /mnt.
Remember that a filesystem cannot be in use when it is unmounted, otherwise umount will give an error. If you know it is safe to unmount a filesystem you can use:
To do a "lazy" unmount
Note that files are often stored temporarily in the RAM to prevent filesystem fragmentation and speed up access times for slow devices like floppy disks. For this reason you should always unmount filesystems before you unplug or eject the device or you may find that your files have not actually been written to your device yet.
Mounting
Is responsible for mounting filesystems. The syntax for this command is quite simple (remember that mount must be run with super user privileges to change the system) so:
Will mount the filesystem on /dev/sda1 (which may be a USB drive, a SATA drive or a SCSI drive) into the folder /mnt. That means that going into /mnt will show you the filesystem which is on /dev/sda1.
Many options can be given to mount. A useful option is the "type" option, when automatic filesystem-type detection fails. An example would be:
That command tells mount to put the filesystem on the first floppy disk into the folder /floppy, and tells it to treat the filesystem as a FAT filesystem. If the wrong type is given then mount will not mount the filesystem and you will be told of the error.
To mount a filesystem contained in a file using the loopback device the command would look like this
To create a filesystem image you can either "dump" an existing filesystem into a file, for example by using the command:
Alternatively you can create an empty file by using:
And then creating a filesystem on this file as if it were a drive by using the command:
Which will create an ext3 filesystem on the device (ext2 with a journal). Images created using either method can be mounted via the loopback device.
An interesting ability of mount is it’s ability to move specific parts of a filesystem around. For example:
Will let the folder "/mnt/Files/Music" also be accessible in /home/user/Music. If you wish to "move" a folder (no data is copied or removed, it is merely displayed in a different place) then use:
Instead. This can come in handy, for example you may have your dual-boot Windows partition mounted in /windows. You can get easier access to your personal files by using:
For windows 98/95 users, and with:
For Windows XP users.
Mount can mount filesystems which are accessed remotely using NFS (the Networked Files System) (Please complete this as I do not know how to use NFS)
Windows NTFS Disks
Permanently mount internal Windows NTFS disks. Install and use the NTFS Configuration Tool (external link) To get it go to the Ubuntu Software Center -> System Tools -> NTFS Configuration Tool -> Install
Команда mount в Linux или все о монтировании разделов, дисков, образов ISO и SMB ресурсов.
Если Вам нужно подключить/примонтировать жесткий диск с файловой системой NTFS или ext2, ext3 к компьютеру на базе операционной системы Linux, то Вы читаете правильную статью.
Зачем делать это руками, если современные desktop-системы Линукс делают автоматически?
Есть отдельные случаи когда система Linux не может автоматически примонтировать/подключить диск в силу каких-то логических сбоев диска, вирусов, которыми заражены NTFS/FAT разделах или из-за еще чего-то аномального. Для этого настоящие системные администраторы делают это руками. И делают это командой mount.
Команда mount в линуксе является очень гибким инструментом в руках системного администратора. С помощью команды mount можно подключить сетевой диск, раздел жесткого диска или USB -накопитель.
Данная статья не является полным, исчерпывающим описанием команды mount (полное описание команды mount можно найти выполнив в консоли команду man mount), но стремиться к этому. Статья по описанию команды mount постоянно дорабатывается и видоизменяется. Все пожелания по статье можете оставлять в комментариях.
Устройства, которые в данный момент подключены к компьютеру, можно посмотреть набрав в консоли:
Эта команда показывает все устройства, которые подключенны. Они могут быть не примонтированы, но подключены. На экране Вы увидите примерно это:
Из листинга выше видно, что к операционной системе подключено:
- два жестких диска: /dev/sda – операционная система
- сменный USB -носитель: /dev/sdc
Просмотр примонтированых устройств осуществляется командой:
После этого на экране можно увидеть:
- в первой строке сообщается, что в качестве корневой ФС выступает файловая система reiserfs с параметрами монтирования: доступ на чтение и запись (rw)
- /dev/sda3 — это раздел диска /home
- /dev/sdc — это примонтированное сменное USB -устройство
Этого же результата можно достигнуть посмотрев содержимое файла /etc/mtab (в некоторых системах Linux файл называется /etc/mnt/tab)
Монтирование разделов жесткого диска
Из приведенного примера видно, что жесткий диск /dev/sdb подключен, но не примонтирован. Примонтируем раздел жесткого диска /dev/sdb1 к диску /dev/sda. Точку монтирования выберем, к примеру – /home/user/Видео. Точку монтирования можно взять любую.
где user — это название Вашего имени пользователя.
Все очень просто, сначала пишется команда mount, потом пишется то, что нужно присоединять (цифра показывает номер раздела, у нас он всего один), а потом куда присоединять. Почти всегда этого достаточно. Диск, командой mount, монтируется в указанную папку. В некоторых случаях, когда имеются логические ошибки на разделах подключаемого жесткого диска, нужно дополнительно указать тип файловой системы. В данном случае у нас ext3.
Так же этот параметр может принимать значения:
- -t ntfsили -t ntfs-3g
- -t vfat
- -t iso9660
Соответственно для NTFS , FAT и CD-дисков файловых систем. Последний нужен только для подключения CD/DVD- ROM устройств и образа диска .iso.
Чтобы вручную задать параметры доступа к примонтированному разделу следует указать параметр:
- -o rw
- -o ro
Первый разрешает чтение и запись, второй только чтение. Ну например, так:
Дополнительные параметры, которые помогают в некоторых случаях:
Первый явно задает кодировку системной локали, в нашем случае это utf8 (для разных дистрибутивов она своя, но чаще utf8), а другая добавляет поддержку русского языка.
Если все же жесткий диск отказывается монтироваться в операционной системе Linux, то можно примонтировать его вручную. Параметр -o force позволяет принудительно монтировать разделы жесткого диска в линуксе. Ну, к примеру, так:
У меня, к примеру, раздел жесткого диска не хотел монтироваться после подключения к Windows-машине, которая была заражена вирусами. Так получилось, что вирус кинул autorun.exe в корень моего раздела и Linux из-за этого не хотел монтировать этот раздел. Данный выше параметр команды mount помог примонтировать инфицированный раздел. После чего вирус успешно был удален вручную.
Есть в Linux уникальная возможность указать зеркало папки, которое получает все права и доступные над папкой действия. Допустим, раздел /dev/sdb1 применяется еще и для хранения документов. Зеркалим его в /home/user/Документы:
Действие команды mount —bind напоминает DOS -овский subst.
Посмотреть полную информацию(доступный объем диска, свободное место) о примонтированных устройствах можно командой:
Отмонтироватние устройства производится командой:
Монтирование дисков CD/DVD- ROM
Если Вам нужно примонтировать CD/DVD- ROM , то монтирование CD/DVD- ROM осуществляется точно так же, той же командой mount, которая были приведены выше:
Только при монтировании CD- ROM нужно указать тип файловой системы iso9660.
Монтирование образов диска ISO
Если Вы хотите примонтировать образ диска ISO , то это тоже достаточно просто сделать командой mount:
Где /home/file.iso — путь и имя файла ISO
/home/iso — точка монтирования
Добавился только параметр -o loop, который указывает, что используется файл .iso.
Монтирование сетевых дисков SMB
В некоторых случаях необходимо примонтировать удаленный сетевой диск. В некоторых дистрибутивах Linux, он так же монтируется автоматически (например в Ubuntu) при открытии его по сети. Можно примонтировать его вручную командой mount через консоль. Можно сделать ярлык и поместив его на рабочем столе активировать его когда нужен удаленный доступ к сетевому ресурсу. Ну или мало еще для чего.
Где username=vasja,password=pupkin — это имя и пароль доступа к удаленному сетевому ресурсу, а //pupkin_v/Video — имя сетевого ресурса, /home/user/video – точка монтирования
Графические инструменты монтирования в Linux
Есть альтернатива – графические инструменты монтирования в Linux. На просторах Internet`a можно найти много графических инструментов монтирования в Linux, но самым, наверное, продвинутым можно назвать – Mount Manager (Mount Manager – графический инструмент монтирования). Это продукт некоммерческой организации ViaLinx. Интерфейс программы простой, но функционал потрясает своей мощью, она может совершать абсолютно все действия, которые описаны в этой статье. Скачать программу можно с официального сайта или в репозиториях вашего дистрибутива (в Ubuntu этот менеджер есть).
Парашютист со стажем. Много читаю и слушаю подкасты. Люблю посиделки у костра, песни под гитару и приближающиеся дедлайны. Люблю путешествовать.
Комментарии (71)
Очередная статья про mount, каких мильон. Напиши FAQ по частым ошибкам команды mount, тогда цены не будет.
>Jimm
Вы можете привести частые ошибки? Просто в голову даже не приходит, что тут может не работать и вызывать ошибку.
Спасибо за статью, написана лёгким доходчивым языком.
>runlion
Рад, что помогла.
У меня вопрос: у меня есть сервер. Его жесткий диск нужно примонтировать к моему компу (пока не важно в какую папку). Как мне это сделать? Зарание спасибо.
>Asuka
Если на сервере расшаренный раздел (//server/razdel) с гостевым входом, то команда может выглядеть:
sudo mount -t smbfs //server/razdel /home/asuka/razdel
или
sudo mount -t smbfs //192.168.0.1/razdel /home/asuka/razdel
Вот, некоторое время эксперементировал, не мог примонтировать, смог вот так:
sudo mount -t smbfs -o guest,iocharset=utf8 //server/music /mnt/music
спасиб, очень доходчиво и без лишнего груза
Ну вот к примеру проблемы с вводом специальных символов в пароле. Например =,$,’ и т.п. как предлагаете обойти. Оно понятно, что в консоли можно пропустить пароль в команде и вводить в диалоге входа, а ежели у меня скрипт написан и я нубец?
Можно пароль в двойные кавычки обромить
Помогите мне пожалуйста,я не могу зайти из дебиана в раздел с минтом, не получается примонтировать. Вот результаты команд:
roza@debian:
$ su
Пароль:
debian:/home/roza# sudo fdisk -l
Disk /dev/hda: 120.0 GB, 120034123776 bytes
255 heads, 63 sectors/track, 14593 cylinders
Units = cylinders of 16065 * 512 = 8225280 bytes
Disk identifier: 0×34721919
Device Boot Start End Blocks Id System /dev/hda1 * 1 10333 82999791 83 Linux /dev/hda2 14264 14593 2650725 5 Extended /dev/hda3 10334 14263 31567725 83 Linux /dev/hda5 14264 14593 2650693+ 82 Linux swap / Solaris
Partition table entries are not in disk order
Disk /dev/sda: 2063 MB, 2063597568 bytes
16 heads, 32 sectors/track, 7872 cylinders
Units = cylinders of 512 * 512 = 262144 bytes
Disk identifier: 0×4d00db24
Device Boot Start End Blocks Id System /dev/sda1 * 1 7872 2015216 b W95 FAT32 debian:/home/roza# sudo mount /dev/hda1 on / type ext3 (rw,errors=remount-ro) tmpfs on /lib/init/rw type tmpfs (rw,nosuid,mode=0755) proc on /proc type proc (rw,noexec,nosuid,nodev) sysfs on /sys type sysfs (rw,noexec,nosuid,nodev) procbususb on /proc/bus/usb type usbfs (rw) udev on /dev type tmpfs (rw,mode=0755) tmpfs on /dev/shm type tmpfs (rw,nosuid,nodev) devpts on /dev/pts type devpts (rw,noexec,nosuid,gid=5,mode=620) nfsd on /proc/fs/nfsd type nfsd (rw) /dev/sda1 on /media/KINGSTON type vfat (rw,nosuid,nodev,uhelper=hal,shortname=lower,uid=1000) debian:/home/roza#
Колибри: Помогите мне пожалуйста,я не могу зайти из дебиана в раздел с минтом, не получается примонтировать.
Как пытаетесь примонтировать? Можете привести команду.
Получается примерно так:
debian:/home/roza# sudo mount /dev/hda3 /home/roza/Desktop
debian:/home/roza# sudo mount -t ext3 -o rw /dev/hda3 /home/roza/Desktop
mount: /dev/hda3 already mounted or /home/roza/Desktop busy
mount: according to mtab, /dev/hda3 is already mounted on /home/roza/Desktop
debian:/home/roza# В общем-то примонтировалось как будто, но я ничего не могу скопировать оттуда в эту систему. Выходит сообщение: “Ошибка копирования в «/home/roza/Desktop». У вас недостаточно права записи в эту папку”. На всех папках – красный кирпич. А вот посмотреть содержимое тех папок могу.
Давай-те по порядку.
Вы монтируете командой:
sudo mount -t ext3 -o rw /dev/hda3 /home/roza/Desktop
Так? То есть точка монтирования /home/roza/Desktop?
Если у Вас все монтируется и файловая система /dev/hda3 видно, но у Вас не достаточно прав, то нужно просто эти права добавить:
sudo chmod -R 0777 /home/roza/Desktop
Спасибо :), помогло, теперь копируется все! Пробовала монтировать как раз на рабочий стол. А можно ли этот раздел примонтировать в точку “мой компьютер” так, чтобы он оставался там все время и монтировался автоматом при запуске системы? При том, чтобы всегда был доступен.
Колибри: А можно ли этот раздел примонтировать в точку “мой компьютер” так, чтобы он оставался там все время и монтировался автоматом при запуске системы? При том, чтобы всегда был доступен.
после того, как я ввела эту команду: sudo chmod -R 0777 /home/roza/Desktop В Дебиане никаких сообщений об ошибке не было, а вот в Минте, во время загрузки , выходит сообщение со следующим содержанием:
Файл пользователя $HOME/.dmrc имеет некорректные права доступа и игнорируется. Это препятствует сохранению сеанса и языка по умолчанию. Владельцем этого файла должен быть пользователь и файл должен иметь права доступа 0644.Домашняя папка пользователя ($HOME) должна принадлежать пользователю и не должна быть доступна для записи другим пользователям.
Затем все замирает на несколько секунд и открывается рабочий стол. А тут уж не могу воспользоваться ни sudo, ни просто su – терминал матюгается не по русски. Возможно ли восстановить права на ($HOME).Может можно сделать это с помощью лайв диска Минт?
Колибри: Затем все замирает на несколько секунд и открывается рабочий стол. А тут уж не могу воспользоваться ни sudo, ни просто su – терминал матюгается не по русски. Возможно ли восстановить права на ($HOME).Может можно сделать это с помощью лайв диска Минт?
Ну попробуйте вернуть права обратно:
sudo chmod -R 0644 /home/roza/Desktop
И владельца:
sudo chown -R ВАШ_ЛОГИН_В_МИНТ /home/roza/Desktop
Все равно ничего не получилось:(. В общем, переустановила я раздел с минтом. Главное что научилась монтировать разделы (поняла как это делается, дальше – проще) И еще усвоила для себя урок – нужно раздавать права очень осторожно. В любом случае спасибо!
Колибри: Все равно ничего не получилось:(. В общем, переустановила я раздел с минтом. Главное что научилась монтировать разделы (поняла как это делается, дальше – проще) И еще усвоила для себя урок – нужно раздавать права очень осторожно. В любом случае спасибо!
Я бы на будущее рекомендовал Вам монтировать разделы к /mnt или к любой другой дериктории, находящейся в корневом разделе.
Создать можно так:
sudo mkdir /mnt2
A. Partitioning (for >2GB Harddisk) (New) (Updated on 18 Jan 2020)

2. But we cannot mount it right now, if we mount it now, errors will come out. We need to partition it first, we use parted to partition:
3. Within the parted, type the following to have gpt partition, gpt can allow partition larger than 2GB:
4. Set the size for partition, I here partition from 0GB to 4GB:
5. Then quit the parted:
B. Formatting
- Format the newly partitioned harddisk:
C. Mounting (including auto mount after reboot)
- Usually drive is mounted in /mnt/. Create a new directory in /mnt/ first.
2. Then we can mount it by:
3. But we need to mount it for every time we reboot. To mount it automatically after each reboot, I use nano to modify the file /etc/fstab:
4. Enter following at the end of file:
The first item is the path for the hard drive. The second one is the destination for the mounted drive, where we want to mount. The third one is the format type. The forth to sixth one I just kept as defaults, 0 and 0.
D. Checking whether the hard drive is mounted
To check if the drive sdb, is mounted? Use mount command:
- mount
E. Unmounting (Updated on 05 May 2020)
To unmount, simply using the umount command:
But sometimes, the mounted harddisk maybe still in use which makes you cannot unmount. To unmount under this condition, there is a lazy mode:
F. Partitioning Using fdisk (for <2GB Harddisk) (Old)
- First, after connecting the harddisk to the computer by SATA and power cables, we can check the new 4-TB harddisk by:
2. But we cannot mount it right now, if we mount it now, errors will come out. We need to partition it first: