How To Add Discord Chat to OBS (Text or Voice)
Having a chat as an overlay is a regular feature across most Twitch streams these days. Chances are, when you click a newly recommended stream on the platform, you’ll see their chat embedded into the side of their stream.
But what if you could go one step further and add your Discord chat to your stream? It would have all of the role colors, GIF capabilities, and everything that is available on Discord.
Read on to find out more about Discord and how to integrate it directly into your content! We will show you how to:
- Add Discord text chat to OBS
- Add Discord voice chat audio to OBS
Discord and Streaming
Discord and streaming are now synonymous with each other. Creating and managing an active Discord channel can form a vital sense of community. It enables you to engage with fans outside of your stream schedule and be more readily available to them.
Discord is a two-way conversation too. Not only can you supply your members with information, news, and additional media, but they can instigate chats with you in the relevant channels. Having these chats on screen is something creators have wanted to do for a long time, and now the plugins exist to help streamers achieve this goal!
To Chat Or Not To Chat (On Screen)?
Streaming trends are an ever-evolving topic. One day one thing is super popular with viewers, and the next, it is outdated and uninteresting.
Streaming trends change daily, and on-screen chat is one of the most highly debated recent changes. A large number of streamers still deem on-screen to be necessary since stream chat is disabled for VODs. However, a few large streamers have analyzed their stream statistics, realized that VODs only attract a small percentage of their views, and decided that on-screen chat takes up too much space.
Currently, it doesn’t seem to make much of a difference in viewer retention,, but it’s worth keeping an eye on the trend to make sure you’re all up to date with what’s hot and what’s not!
How To Add Discord Text Chat To OBS
There are currently two main ways to add an OBS overlay to your streams; StreamKit and Window Capture. One requires the use of a browser capture source, and the other utilizes the window capture source:
StreamKit Method
The Discord StreamKit is a fantastic tool that helps you set up three different overlay types on your stream; Server Status, Chat, and Voice Chat. To set up your text chat overlay:
- Got to: https://streamkit.discord.com/overlay. There, click on “Install for OBS.” (There is nothing to install really, it will just open a browser window with settings).
- Click the “Chat Widget” tab and choose the correct server and text channel you want to feature on stream.
- Add a new browser source in OBS Studio.
- Copy the URL from the StreamKit browser and paste it into your browser source URL settings. Set the dimensions to 580px x 215px and you’re good to go!
Window Capture Method
The second way to overlay your Discord chat is to set up a window capture of your discord window. This is slightly more reliable than the above method but has less customizability in terms of transparency and general format. It also requires that you stay on the chat channel of your discord for the entirety of your stream. If you change the channel, the overlay on your stream will also change!
- Set up a new window capture source on OBS Studio.
- Open Discord
- Set the Window source in OBS to [Discord.exe], and your discord preview should appear above.
- Crop the window to show only the chat using the crop filter or by holding ‘alt’ as you drag the tops and sides of the image.
How to Add Discord Voice Chat Audio to OBS
You might also want to add the audio from your Discord voice chat in OBS. This is also pretty simple to do.
Streamkit Method
- Go to: https://streamkit.discord.com/overlay and click on “Install for OBS.”
- You will be greeted by three tabs. Just open the “Voice Widget” tab.
- Here, you can simply input which Discord server and voice channel you want to record.
- Once you have put in all the info, Streamkit will spit out a Browser Source URL.
- Add the browser source in OBS and set the dimensions to width: 312px, height: 600px.
- So there you have it! You can now simply add the Discord widget wherever you want it to appear on your screen.
Audio Input / Output Method
- Open Discord and go to Settings > Voice & Video
- If you haven’t already, set your “input” and “output” devices. In your case, these are most likely your microphone and headset.
- Now open OBS Studio or SLOBS and go to Settings > Audio
- Set the exact “input” and “output” devices as in Discord. In OBS, these settings are called “Desktop Audio” and “Mic/Auxiliary Audio”
- Once set up, you can now adjust the settings in the sound mixer in OBS.
That wasn’t that hard. Was it?
Provided you have done everything correctly, your viewers will now hear when someone is talking to you on Discord as well as what you say.
How to Mute Discord Voice Chat When Live-Streaming
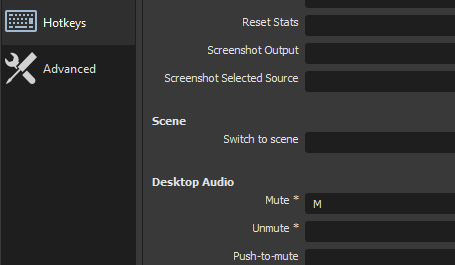
Once in-stream, it might be a good idea to be able to mute the voice chat. You can do this by setting up a hotkey to mute the OBS audio source.
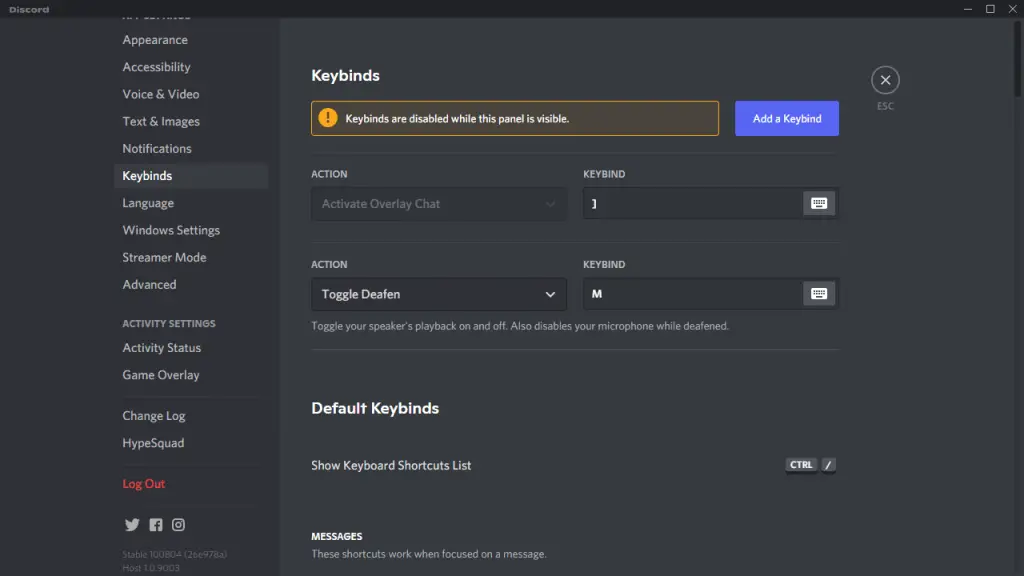
The second option is to use a hotkey to mute your Discord directly.
In Conclusion
Of the two methods, StreamKit is probably the most compatible and reliable. However, it is an online source, and should anything happen to the website; your source will be unavailable. Your best bet would be to set both methods up with StreamKit as your main and Window Capture hidden in the background as a backup. One thing’s for sure, with Discord chat on the screen, you’ve now linked two platforms that are vital to creation success!
Discord StreamKit Overlay Allows Chat Within Stream on OBS/XSplit
This post posted by MiniTool Technology focuses on the OBS StreamKit Overlay of Discord and teaches you how to set it up and integrate it with the OBS software. Read it within 3 minutes and get the info you want.
What Is Discord StreamKit Overlay?
Discord Overlay StreamKit servers as a customizable additional browser source to depict your text and voice chat while in-game. It will help you display crucial server info to your audience without eating up vital stream real estate for the whole client.
How to Use Discord StreamKit Overlay?
Below will take Open Broadcast Software (OBS) for example to show you how to use the Streamkit overlay.
How to set up discord OBS Overlay? In general, you are able to set up Discord OBS StreamKit Overlay in 3 steps, installation, customization, as well as implementation.
Step 1. Install and authorize the StreamKit Overlay.
1. Run both your Discord and OBS apps.
2. Click the Install for OBS button on the Discord StreamKit Overlay page.

3. Then, in your Discord program, a popup will appear asking you to authorize StreamKit Overlay to access your Discord account. Just click the Authorize button to continue.

Step 2. Customize OBS Discord Overlay
Right after you click the Authorize button in the pop-up window, you will be redirected to a page where you can customize the overlay settings. Generally, there are three widgets under your customization: STATUS, CHAT, and VOICE.
Each separate widget is customizable in different aspects and all of them can be used at the same time. When you personalize your status and chat widget, a preview window is on the right area to display the effect for you.

Step 3. Apply Discord StreamKit Overlay on OBS
When you have done all the customization for your overlay, finally, you have to implement it in the destination OBS app.
1. Copy the installation link on the customization page under the preview window.

2. Switch to the OBS app, click the Add icon (+) within the source section at the bottom, and select Browser.

3. In the new window, keep the default Create new option, rename the new browser, and click OK to continue.

4. In the next window, paste the copied installation link into the URL column and specify the Width and Height according to the width and height displayed under the installation link in the customization page.

Finally, you can see the Discord Overlay OBS live on your stream preview. You are able to drag and adjust it according to your needs.

Verdict
Not only OBS but also XSplit, the Discord StreamKit Overlay can be implemented to and the steps are similar to the above ones. It is a powerful feature that allows you to chat with your friends on text or voice or both while streaming your game to Twitch. What are you waiting for? Just have a try and you will find how useful the overlay is!
Also Read:
About The Author
Helen Graduated from university in 2014 and started working as a tech editor in the same year. Her articles focus on video creation, editing, and conversion. She also has a good knowledge of disk management and data backup & recovery. Through an in-depth exploration of computer technology, Helen has successfully helped thousands of users solve their annoying problems.
How to Add Discord Overlay to Your Twitch Stream | OBS Studio Setup Guide
When streaming multiplayer games live on Twitch, it can sometimes be difficult for viewers to tell who’s talking off-screen. With the Discord Streamkit Overlay, viewers can see vital server information (such as who’s talking when), without too much on-screen real estate being taken up. It’s also a really useful cross-collaboration tool, especially when participating in larger lobbies and streams.
Let’s jump in and take a look at how to add the Discord voice overlay to your stream.
How To Add Discord Overlay To OBS
To add a Discord overlay to your stream you will need to install Discord Stream Kit on Discord and then add it as a browser source to OBS or Streamlabs. This allows your viewers to see who is talking in your Discord chat.
Follow the steps below to set it up.
Step 1 – Installing and Authorizing Discord Overlay
To begin, open your Discord app and then visit https://streamkit.discord.com/overlay. You’ll see the option to install the Overlay for OBS.

Clicking Install will allow the Overlay to access your Discord client (allowing control to certain aspects of it). You can double-check that this has been authorized correctly under User Settings > Authorized Apps. (The information should be updated to show access).

The permissions granted allow the overlay to perform actions within your client, such as generating an invite to use in the status widget or to show the Discord chat via the chat widget.

Step 2 – Customizing your Overlay
Now that you’ve authorized the overlay in your client, you should be able to preview and customize your widget settings. If you look directly under the OBS logo, you should see the option to customize Status, Chat, and Voice. Each separate widget has several different customization options, and can all be used simultaneously If you so choose.
To start customizing your overlay, you need to select which server and voice channel the overlay will be displaying. Do this by selecting your chosen server in the “Server” dropdown menu at the top of the Voice Widget tab. From here, select the voice channel you would like to capture using the “Voice Channel’ dropdown menu.

To check that the overlay is connected correctly, try talking into the selected voice channel whilst previewing the overlay (you should see a green circle around your profile picture when talking, as shown below).

Now it’s time to edit the overlay how you see fit with many options to alter text size/color/background and more. These update the overlay preview in real-time, so you can double-check the overall look of your overlay before adding it to OBS.
Step 3 – How To Add Discord Overlay to OBS
Once you’ve finished setting up your overlay, copy the link from the installation panel, seen to the right hand of the overlay editor.

To add the overlay into OBS, you need to create a new browser source within your preferred scene. To do this, click the Add Source icon, and add a “Browser”.

Next, name your browser source. (We advise naming it accurately in case you need to make any amendments later on).

Paste the widget link into the URL box and adjust the height and width to match the dimensions given by the overlay website. (It’s important to use the exact dimensions given, which can be seen directly under the browser source link on the widget page).

After you click “OK”, you should be able to see the active overlay in OBS. From here, you can drag and adjust it as you need.

Once you have everything set up, you can share the overlay link with your collaborators so that they can add it to their streams (ensuring that everyone can be seen across each channel). Just to make sure to also share the correct dimensions with them.
Note: To make sure that everything works correctly, you’ll need to have the latest version of OBS Studio installed. Head over to the OBS website and grab the latest updates if you haven’t already.
Why You Should Add A Discord Overlay To Your Stream
The Discord Streamkit Overlay is incredibly useful, for several reasons:
- For any streams with more than 2 people, this overlay is vital. With some games (such as Among Us, or Dread Hunger), having upto 10 people in one game, it’s a good way to show who’s saying what. Especially when multiple people are talking at any one time.
- Youtube and podcast recording. Similar to Twitch, the overlay helps viewers distinguish between off-screen speakers. Many Youtubers (such as Disguised Toast and videogamedunky) often edit closeups of this overlay to inject humour when off-screen players are talking.
- Collaboration and cross promotion. By seeing each speaker’s name within the overlay, viewers are more likely to check out your collaborators’ content. By sharing your overlay link with your collaborators, you’re not only helping their viewers but cross-promoting yourself.
- Differentiation between similar voices. Some people sound similar, which can cause viewer confusion (Who made that joke? Who said that?). The overlay helps clear this up.
Other Discord Overlays in Streamkit
As mentioned above, there are 2 additional overlays that you can add to your stream: the Status and Chat widgets. The setup of these is very similar to the Voice Overlay but make sure to follow the specific dimensions and links provided on each widget tab (as they are all slightly different).
The Status Widget
You can display your Discord invite link on your stream using the Status Widget, allowing your viewers to easily join your Discord channel (handy when you have community games and want to invite viewers to a certain channel so they can join the fun straightaway).

Simply specify the Server to apply the widget to (under the “Server” dropdown menu). Under “Invite Channel”, choose the channel where viewers will first land within your Discord server.
From here, customize it how you like, and add the widget to OBS as a new “Browser” source.
The Chat Widget
The chat widget has many possibilities. Perhaps you want to entice people to join your Discord channel by showing them the sheer meme-ery of your community? Or maybe you want to show a particular Discord channel alongside your Twitch chat on your BRB screen?

Whatever your reasons, this widget is incredibly easy to install. Again, specify the server you want to show from the “Server” dropdown menu, and under “Text Channel”, choose the right channel to display.

Once you’ve finished customizing the Text Overlay and added it to OBS, you are free to place and resize the widget as you see fit.
Wrapping Up
Hopefully, you can now set up your own Discord Voice Overlay in OBS. Collaboration is one of the strongest ways to grow on Twitch, and by adding and sharing your voice chat overlay, you can ensure that more eyes can see you when playing in multiplayer lobbies and collaborating on video content. By adding this overlay, you’re adding another professional element to your stream and making it easier for your viewers at the same time.
Как добавить оверлей Discord в ваш поток Twitch | Руководство по установке OBS Studio
При прямой трансляции многопользовательских игр на Twitch зрителям иногда бывает трудно понять, кто говорит за кадром. С оверлеем Discord Streamkit зрители могут видеть важную информацию о сервере (например, кто когда говорит), не занимая слишком много места на экране. Это также действительно полезный инструмент для совместной работы, особенно при участии в больших лобби и потоках.
Давайте приступим и посмотрим, как добавить наложение голоса Discord в ваш поток.
Шаг 1 – Установка и авторизация оверлея Discord
Для начала откройте приложение Discord, а затем посетите https://streamkit.discord.com/overlay. Вы увидите возможность установить оверлей для OBS.
 Нажатие «Установить» позволит оверлею получить доступ к вашему клиенту Discord (позволяя контролировать некоторые его аспекты). Вы можете перепроверить правильность авторизации в разделе «Настройки пользователя» > «Авторизованные приложения». (Информация должна быть обновлена, чтобы показать доступ).
Предоставленные разрешения позволяют оверлею выполнять действия в вашем клиенте, такие как создание приглашения для использования в виджете статуса или отображение чата Discord через виджет чата.
Шаг 2. Настройка наложения
Теперь, когда вы авторизовали оверлей в своем клиенте, вы сможете просмотреть и настроить параметры виджета. Если вы посмотрите прямо под логотипом OBS, вы увидите возможность настроить статус, чат и голос. Каждый отдельный виджет имеет несколько различных параметров настройки, и все они могут использоваться одновременно, если вы того пожелаете.
Чтобы начать настройку оверлея, вам нужно выбрать, какой сервер и голосовой канал будет отображать оверлей. Сделайте это, выбрав выбранный вами сервер в раскрывающемся меню «Сервер» в верхней части вкладки Voice Widget. Отсюда выберите голосовой канал, который вы хотите захватить, используя раскрывающееся меню «Голосовой канал».
Чтобы убедиться, что наложение подключено правильно, попробуйте говорить в выбранный голосовой канал во время предварительного просмотра наложения (во время разговора вы должны увидеть зеленый кружок вокруг изображения вашего профиля, как показано ниже).
Теперь пришло время отредактировать наложение так, как вы считаете нужным, с множеством опций для изменения размера/цвета/фона текста и многого другого. Они обновляют предварительный просмотр оверлея в режиме реального времени, поэтому вы можете дважды проверить общий вид своего оверлея, прежде чем добавлять его в OBS.
Шаг 3 — Добавление оверлея в OBS
Когда вы закончите настройку оверлея, скопируйте ссылку с панели установки, расположенную справа от редактора оверлеев.
Чтобы добавить оверлей в OBS, вам нужно создать новый источник браузера в предпочитаемой вами сцене. Для этого щелкните значок «Добавить источник» и добавьте «Браузер».
Затем назовите источник вашего браузера. (Мы советуем назвать его точно, если вам нужно будет внести какие-либо изменения позже).
Вставьте ссылку на виджет в поле URL-адреса и отрегулируйте высоту и ширину, чтобы они соответствовали размерам, заданным веб-сайтом оверлея. (Важно использовать точные указанные размеры, которые можно увидеть непосредственно под ссылкой на источник браузера на странице виджета).
После того, как вы нажмете «ОК», вы сможете увидеть активный оверлей в OBS. Отсюда вы можете перетащить и настроить его по своему усмотрению.
После того, как вы все настроите, вы можете поделиться ссылкой на оверлей со своими соавторами, чтобы они могли добавить ее в свои потоки (гарантируя, что все будут видны на каждом канале). Просто чтобы убедиться, что вы также поделились с ними правильными размерами.
Примечание. Чтобы убедиться, что все работает правильно, вам необходимо установить последнюю версию OBS Studio. Зайдите на сайт OBS и скачайте последние обновления, если вы еще этого не сделали.
Почему вы должны добавить оверлей Discord в свой поток
Оверлей Discord Streamkit невероятно полезен по нескольким причинам:
- Для любых стримов с участием более 2 человек это наложение жизненно необходимо. В некоторых играх (таких как «Среди нас» или «Ужасный голод»), когда в одной игре участвует до 10 человек, это хороший способ показать, кто что говорит. Особенно, когда несколько человек разговаривают одновременно.
- Запись ютуба и подкаста. Подобно Twitch, наложение помогает зрителям различать говорящих за кадром. Многие ютуберы (такие как Disguised Toast и videogamedanky) часто редактируют крупные планы этого оверлея, чтобы добавить юмора, когда говорят игроки за кадром.
- Сотрудничество и перекрестное продвижение. Увидев имя каждого выступающего в оверлее, зрители с большей вероятностью проверят контент ваших соавторов. Делясь ссылкой на оверлей со своими соавторами, вы не только помогаете их зрителям, но и продвигаете себя.
- Различие похожих голосов. Некоторые люди звучат одинаково, что может вызвать недоумение у зрителей (Кто пошутил? Кто это сказал?). Наложение помогает прояснить это.
Другие оверлеи Discord в Streamkit
Как упоминалось выше, есть 2 дополнительных наложения, которые вы можете добавить в свою трансляцию: виджеты «Статус» и «Чат». Их настройка очень похожа на Voice Overlay, но обязательно следуйте определенным размерам и ссылкам, указанным на каждой вкладке виджета (поскольку все они немного отличаются).
Виджет статуса
Вы можете отобразить ссылку-приглашение в Discord в своем потоке с помощью виджета статуса, что позволит вашим зрителям легко присоединиться к вашему каналу Discord (удобно, когда у вас есть игры сообщества и вы хотите пригласить зрителей на определенный канал, чтобы они могли сразу же присоединиться к веселью).
Просто укажите сервер, к которому нужно применить виджет (в раскрывающемся меню «Сервер»). В разделе «Пригласить канал» выберите канал, на который зрители сначала попадут на ваш сервер Discord.
Отсюда настройте его по своему усмотрению и добавьте виджет в OBS в качестве нового источника «Браузер».
Виджет чата
Виджет чата имеет множество возможностей. Возможно, вы хотите побудить людей присоединиться к вашему каналу в Discord, показав им саму память о вашем сообществе? Или, может быть, вы хотите показать определенный канал Discord вместе с чатом Twitch на экране BRB?
Какими бы ни были ваши причины, этот виджет невероятно прост в установке. Снова укажите сервер, который вы хотите отобразить, в раскрывающемся меню «Сервер», а в разделе «Текстовый канал» выберите правильный канал для отображения.
После того, как вы закончите настройку наложения текста и добавите его в OBS, вы сможете разместить и изменить размер виджета по своему усмотрению.
Подведение итогов
Надеюсь, теперь вы можете настроить свой собственный Discord Voice Overlay в OBS. Совместная работа – один из самых эффективных способов развития на Twitch. Добавляя и делясь оверлеем голосового чата, вы можете быть уверены, что больше людей увидит вас во время игры в многопользовательских лобби и совместной работы над видеоконтентом. Добавляя этот оверлей, вы добавляете еще один профессиональный элемент в свою трансляцию и в то же время упрощаете ее для своих зрителей.