Глава 13 – Работа с макросами в LibreOffice
Чаще всего, макрос это сохранённая последовательность команд или нажатий клавиш, предназначенная для последующего использования. Например, можно сохранить и «впечатывать» свой адрес. Язык программирования LibreOffice очень гибок и позволяет автоматизировать как простые, так и сложные задачи. Макросы часто используются, когда мы хотим повторять ещё и ещё раз определённую последовательность действий в схожих условиях.
Макросы в LibreOffice обычно записываются на языке, называемом LibreOffice Basic или просто Basic. Конечно можно долго изучить Basic и наконец начать программировать, но это руководство поможет вам сразу решать простые задачи. Начинающие пользователи часто с успехом применяют макросы, написанные кем-либо другим. Также, можно использовать функцию записи макросов, чтобы сохранить последовательность нажатий клавиш и использовать её ещё раз.
Большинство действий в LibreOffice выполняются путём отправки команды (посылки команды, dispatching a command), которая перехватывается и выполняется. Функция записи макросов позволяет записать непосредственные команды, которые обрабатываются (смотрите Платформа диспетчера).
Ваш первый макрос
Добавление макроса
Первый шаг в изучении программирования макросов, это найти и использовать существующие макросы. В этом разделе подразумевается, что у вас уже имеется макрос, который вы хотите использовать. Вы могли найти его в Интернете или в какой-нибудь книге. Рассмотрим пример 1. Чтобы записать этот макрос, вы должны предварительно создать библиотеку и модуль, и уже в модуле написать текст макроса, смотрите Организация макросов.
Пример 1: Простой макрос, который пишет “Hello, World”:
Чтобы создать библиотеку, необходимо выполнить следующие шаги:
- Выберете пункты главного меню Сервис ‣ Макросы ‣ Управление макросами ‣ LibreOffice Basic , чтобы открыть диалог работы с макросами Libreoffice Basic.
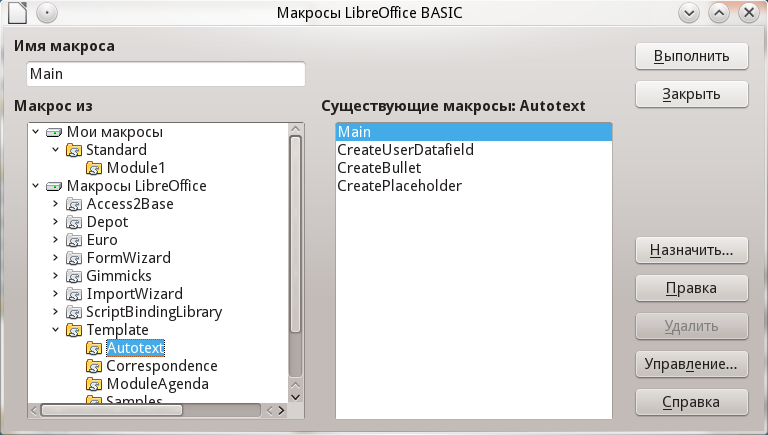
Диалог работы с макросами LibreOffice Basic
- Нажмите Управление, чтобы открыть диалог организатора макросов и выберите вкладку Библиотеки.
- Выберите в выпадающем списке Приложение/Документ пункт Мои макросы и диалоги.
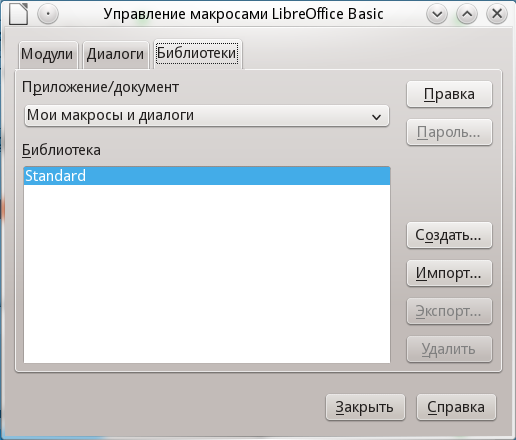
Диалог организатора макросов LibreOffice Basic
- Нажмите Создать, чтобы открыть диалог создания новой библиотеки.
- Введите имя библиотеки, например, TestLibrary и нажмите OK.
- Выберите вкладку Модули.
- В списке модулей раскройте Мои макросы и выберите TestLibrary. Модуль с именем Module1 уже существует, он может содержать ваши макросы. Если необходимо, том можно нажать Создать, чтобы создать другой модуль в библиотеке.
- Выберите Module1 или новый модуль, который вы создали и нажмите Правка, чтобы открыть интегрированную среду разработки (IDE). Интегрированная среда разработки это текстовый редактор, включённый в LibreOffice, который позволяет создавать и редактировать макросы.
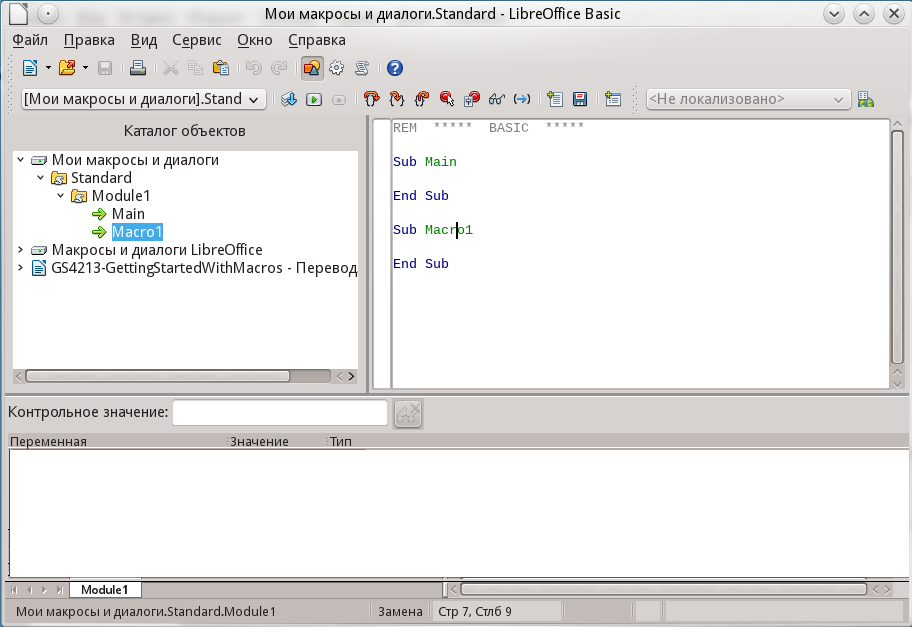
Интегрированная среда разработки макросов
- После создания нового модуля он содержит комментарий и пустой макрос, названный Main, который ничего не делает.
- Добавьте новый макрос или до Sub Main или после End Sub . В примере ниже приведен новый макрос, который был добавлен до Sub Main .
Пример 2: Module1 после добавления нового макроса:
- Нажмите на значок Компилировать
 на панели инструментов, чтобы откомпилировать макрос.
- Поставьте курсор в процедуру HelloMacro и нажмите на значок Выполнить BASIC
 на панели инструментов или нажмите клавишу F5 , чтобы выполнить HelloMacro в модуле. Откроется маленький диалог со словом Привет . Если курсор не находится внутри процедуры Sub или функции Function , откроется диалог выбора макроса для запуска.
- Нажмите OK, чтобы закрыть диалог.
- Чтобы выбрать и выполнить любой макрос в данном модуле, нажмите значок Выбрать макрос
 на стандартной панели инструментов или выберите Сервис ‣ Макросы ‣ Управление макросами ‣ LibreOffice Basic .
- Выберите макрос и нажмите Выполнить.
Запись макросов
Если вы хотите многократно ввести одинаковую информацию, вы можете скопировать эту информацию после того, как она введена в первый раз, затем вставлять эту информацию в ваш документ каждый раз по мере необходимости. Однако, если вы скопировали в буфер обмена что-то ещё, содержимое буфера меняется. Это означает, что вы должны заново скопировать вашу повторяющуюся информацию. Чтобы обойти эту проблему, вы можете создать макрос, который в процессе выполнения вводит нужную вам информацию.
Для некоторых типов многократно вводимой в документах информации более удобно создать файл автотекста. Описание работы с автотекстом смотрите в справочной системе и в главе Глава 3 – Использование Стилей и Шаблонов данного руководства.
- Убедитесь, что функция записи макросов активизирована, выбрав Сервис ‣ Параметры ‣ LibreOffice ‣ Расширенные возможности . Установите флажок Включить запись макросов. По умолчанию эта функция отключена, когда LibreOffice впервые установлен на ваш компьютер.
- Выберите Сервис ‣ Макросы ‣ Записать макрос из главного меню, чтобы запустить запись макроса. Появится маленький диалог, подтверждающий, что LibreOffice записывает ваши действия.
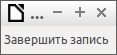
Диалог записи макроса
- Наберите желаемую информацию или выполните необходимые действия. Например, напечатайте ваше имя.
- Нажмите Завершить запись в маленьком диалоге, чтобы остановить запись, и появится диалог работы с макросами LibreOffice.
- Откройте библиотечный контейнер Мои макросы.
- Найдите библиотеку с именем Standard в Моих макросах. Обратите внимание, что каждый библиотечный контейнер содержит библиотеку Standard .
- Выберите библиотеку Standard и нажмите Создать модуль, чтобы создать новый модуль, содержащий макросы. Откроется диалог создания модуля.

Диалог создания модуля
- Задайте название для нового модуля, например, Recorded и нажмите OK, чтобы создать модуль. В диалоге работы с макросами теперь виден этот новый модуль в составе библиотеки Standard .
- В поле Имя макроса напечатайте имя для макроса, который вы только что записали, например, EnterMyName .
- Нажмите Записать, чтобы сохранить макрос и закрыть диалог работы с макросами.
- Если вы верно выполнили все шаги, описанные выше, библиотека Standard теперь содержит модуль Recorded , и этот модуль содержит макрос EnterMyName .
Когда LibreOffice создаёт новый модуль, в этот модуль автоматически добавляется процедура с именем Main .
Запуск макроса
- Выберите Сервис ‣ Макросы ‣ Выполнить макрос , чтобы открыть диалог выбора макроса.
- Например, выберите ваш только что созданный макрос EnterMyName и нажмите Выполнить.
- Можно также вызвать из главного меню Сервис ‣ Макросы ‣ Управление макросами ‣ LibreOffice Basic , чтобы открыть диалог работы с макросами, выбрать ваш макрос и нажать Выполнить.
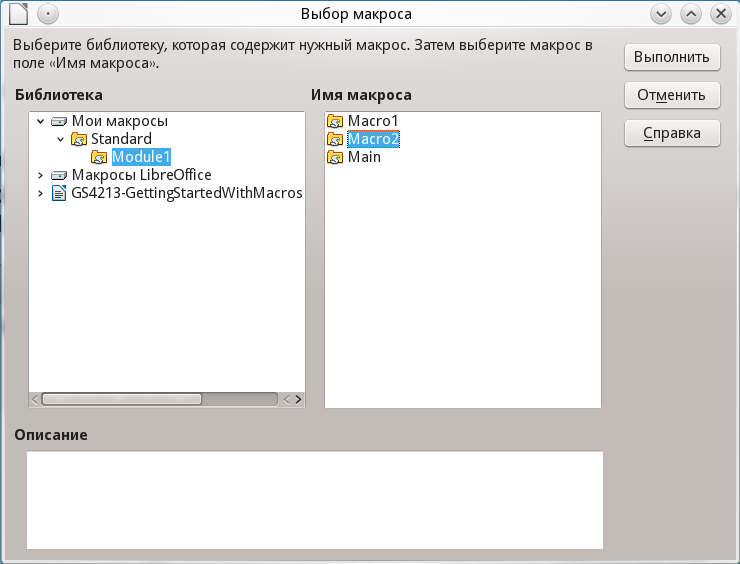
Диалог выбора макроса
Просмотр и редактирование макросов
Чтобы просмотреть или отредактировать созданные вами макросы выполните:
- Сервис ‣ Макросы ‣ Управление макросами ‣ LibreOffice Basic , чтобы открыть диалог работы с макросами.
- Выберите ваш новый макрос EnterMyName и нажмите Правка, чтобы открыть макрос в интегрированной среде разработки.
Макрос EnterMyName не так уж сложен, как может показаться. Изучение нескольких вещей существенно поможет в понимании макросов. Начнём сначала и посмотрим на самую первую строку примера.
Макрос EnterMyName не так уж сложен, как может показаться. Изучение нескольких вещей существенно поможет в понимании макросов. Начнём сначала и посмотрим на самую первую строку примера.
Пример 3: Сгенерированный макрос EnterMyname :
Комментарии
Подробные комментарии являются необходимой частью программы. Без комментариев и сам программист зачастую забывает, что же он написал несколько недель (а может и месяцев или лет) тому назад.
Все комментарии в макросах начинаются с ключевого слова REM . Весь текст строки после REM игнорируется компьютером при выполнении макроса. Можно также использовать символ одинарной кавычки ( ‘ ), чтобы начать комментарий.
Ключевые слова в LibreOffice Basic могут быть записаны в любом регистре, таким образом REM , Rem , и rem могут начинать комментарий. Если вы используете символические константы, определяемые в программном интерфейсе приложения (Application Programming Interface, API), безопаснее считать, что имена чувствительны к регистру. Символические константы не описаны в данном руководстве, они не нужны, когда вы используете функцию записи макросов в LibreOffice.
Определение процедур
Отдельные макросы сохраняются в процедурах, которые начинаются с ключевого слова SUB . Окончание процедуры обозначается END SUB . Код модуля в примере 3 начинается с определения процедуры, названной Main, в которой нет ничего, и она ничего не делает. Следующая процедура, EnterMyName , содержит сгенерированный код вашего макроса.
Когда LibreOffice создаёт новый модуль, в этот модуль всегда автоматически добавляется процедура с именем Main .
Существует много полезной информации, не вошедшей в данное руководство, однако знание о ней весьма интересно:
- Вы можете написать процедуры, которые используют некоторые “входные” величины, называемые аргументами. Однако, функция записи макросов не предоставляет возможности использовать аргументы в процедурах.
- Помимо процедур существуют также функции, которые могут “возвращать” значение. Функции определяются ключевым словом FUNCTION в начале. Однако, записанные макросы, – это всегда процедуры, а не функции.
Определение переменных
Вы можете записать информацию на листе бумаги и позднее воспользоваться этой информацией. Переменные, подобно листу бумаги, содержат информацию, которую можно изменять или читать. Ключевое слово Dim используется для описания типа переменной и для задания размерности массивов. Оператор dim в макросе EnterMyName используется подобно подготовке листа бумаги для записи информации.
В макросе EnterMyName переменные document и dispatcher определены с типом object (объект). Другие часто используемые типы переменных включают string (строка), integer (целое) и date (дата). Третья переменная с именем args1 – это массив значений свойств. Массивы это переменные, содержащие несколько величин, подобно тому, как в одной книге содержится несколько страниц. Величины в массивах обычно нумеруются начиная с нуля. Число в скобках задаёт максимальный номер, используемый для доступа к элементу массива. В данном примере в массиве содержится только одна величина, и она имеет номер ноль.
Как это работает
Разберёмся более подробно с кодом макроса EnterMyName . Может быть вы и не поймёте всех тонкостей, но разбор каждой строки в коде позволит вам осознать то, как работают макросы.
Информатика в экономике и управлении
Свободное программное обеспечение для бизнеса и дома.
Страницы блога
среда, 30 октября 2013 г.
Использование инструмента «Запись макроса» в LibreOffice
- глобальный (или надстройка) — доступный всегда при открытии программы;
- шаблонный — доступный при открытии конкретного шаблона;
- локальный — доступный при работе только в конкретном документе.
Подключение инструмента «Записать макрос» в LibreOffice 4.1
В LibreOffice 4.1 по умолчанию функция «Записать макрос» отключена. Поэтому, первое что нужно сделать, это включить её: Сервис → Параметры (Tools → Options) раскрыть группу LibreOffice и в самом низу в пункте «Расширенные возможности» («Advanced») поставить галочку на против «Включить запись макросов(ограничено)» («Enable macro recording (limited)»).
После этого в вашем меню: Сервис → Макросы (Tools → Macros) появится пункт меню «Записать Макрос» («Record Macro»).
Использование инструмента «Запись макроса» в LibreOffice 4.1
Для демонстрации инструмента «Запись макросов» приведем простой пример:
1. Откроем новый документ Calc и сохраним его на диск под удобным для вас названием;
2. Выделим ячейку A1;
3. Включим запись макроса Сервис → Макросы → «Записать Макрос» (Tools → Macros → «Record Macro»). Появится панель с единственной кнопкой «Завершить Запись» («Stop Recording»);
5. Выделим ячейку B1 и нажмем «Завершить Запись» («Stop Recording»);
6. Откроется следующее окно:
Мы делаем макрос с доступом только в этом документе, поэтому, откроем пункт с названием документа (у меня article.ods, у вас это будет название, под которым вы сохранили документ) и выделим единственную присутствующую библиотеку Standard. В ней пока нет модулей, поэтому создадим его.
7. Нажмем кнопку «Создать модуль» («New Module») и в открывшемся окне введем имя модуля.
По умолчанию модуль создается с пустым макросом под названием Main. Введем в поле «Имя макроса» («Macro name») желаемое имя я ввел «Main») и нажмем «Записать» («Save») чтобы сохранить записанный нами макрос. В моём случае появится предупреждение, что такое название макроса уже есть.
Макрос записан, и если мы теперь сохраним документ, то макрос сохранится вместе с ним. А значит, каждый раз открывая этот документ, мы можем пользоваться этим макросом.
Запуск и редактирование макроса LibreOffice 4.1
Запустить макрос в LibreOffice 4.1 можно двумя способами.
Первый, открыть окно «Выполнить макрос»: Сервис → Макросы → «Выполнить макрос» (Tools → Macros → «Run Macro. »), выделить нужный макрос и нажать «Запустить».
Второй, открыть окно «LibreOffice BASIC»: Сервис → Макросы → «Управление макросами» → LibreOffice Basic. (Tools → Macros → «Organize Macros» → «LibreOffice Basic. »), выделить нужный макрос и нажать «Запустить».
Посмотреть и отредактировать код макроса в LibreOffice 4.1 можно открыв редактор макросов. Сервис → Макросы → «Управление макросами» → LibreOffice Basic. (Tools → Macros → «Organize Macros» → «LibreOffice Basic. »), выделив нужный макрос и нажав «Правка» («Edit»).
Вот и всё, пожалуй, что я хотел сказать по поводу инструмента «Запись макроса» в LibreOffice 4.1.
Copyright
This document is Copyright © 2020 by the LibreOffice Documentation Team. Contributors are listed below. You may distribute it and/or modify it under the terms of either the GNU General Public License (https://www.gnu.org/licenses/gpl.html), version 3 or later, or the Creative Commons Attribution License (https://creativecommons.org/licenses/by/4.0/), version 4.0 or later.
All trademarks within this guide belong to their legitimate owners.
Contributors
To this edition
Jean Hollis Weber
To previous editions
Jean Hollis Weber
Feedback
Please direct any comments or suggestions about this document to the Documentation Team’s mailing list: documentation@global.libreoffice.org
Everything you send to a mailing list, including your email address and any other personal information that is written in the message, is publicly archived and cannot be deleted.
Publication date and software version
Published [Month] 2021. Based on LibreOffice 7.0.
Using LibreOffice on macOS
Some keystrokes and menu items are different on macOS from those used in Windows and Linux. The table below gives some common substitutions for the instructions in this document. For a detailed list, see the application Help.
Windows or Linux
Tools > Options
menu selection
Access setup options
Control +click or right-click depending on computer setup
Open a context menu
Used with other keys
Open the Styles deck in the Sidebar
Introduction
A macro is a set of commands or keystrokes that are stored for later use. An example of a simple macro is one that enters your address into an open document. You can use macros to automate both simple and complex tasks. Macros are very useful when you have to repeat the same task in the same way.
The simplest way to create a macro is to record a series of actions through LibreOffice’s user interface. LibreOffice saves recorded macros using the open source LibreOffice Basic scripting language, which is an implementation of the well-known BASIC programming language. Such macros can be edited and enhanced after recording using the built-in LibreOffice Basic Integrated Development Environment (IDE).
The most powerful macros in LibreOffice are created by writing code using one of the four supported scripting languages (LibreOffice Basic, BeanShell, JavaScript, and Python). This chapter provides an overview of LibreOffice’s macro facilities, mostly focused on its default macro scripting language, LibreOffice Basic. Some introductory examples are included for the BeanShell, JavaScript, and Python scripting languages. However, an in-depth discussion of how to use these languages for scripting is beyond the scope of this chapter.
Your first macros
Adding a macro
The first step in learning macro programming is to find and use existing macros. This section assumes that you have a macro that you want to use, which you may have found in a book or on the internet. For this example, the macro in Listing 1 is used. You should create a library and module to contain your macro; see “Macro organization” below for more information.
Listing 1: Simple macro that says hello
Use the following steps to create a library that will contain your macro:
Open any LibreOffice application.
Go to Tools > Macros > Organize Macros > Basic to open the Basic Macros dialog (Figure 1).
Click Organizer to open the Basic Macro Organizer dialog (Figure 2) and select the Libraries tab.
Set the Location drop-down to My Macros & Dialogs , which is the default location.
Click New to open the New Library dialog (not shown here).
Enter a library name, for example TestLibrary , and click OK .
On the Basic Macro Organizer dialog, select the Modules tab (Figure 3).
In the Module list, expand My Macros and select your library (in the example, TestLibrary ). A module named Module1 already exists and can contain your macro. If you wish, you can click New to create another module in the library.
Select Module1 , or the new module that you created, and click Edit to open the Integrated Development Environment (IDE) (Figure 4). The IDE is a text editor and associated facilities that are built into LibreOffice and allow you to create, edit, run, and debug macros.
Figure 1: Basic Macros dialog
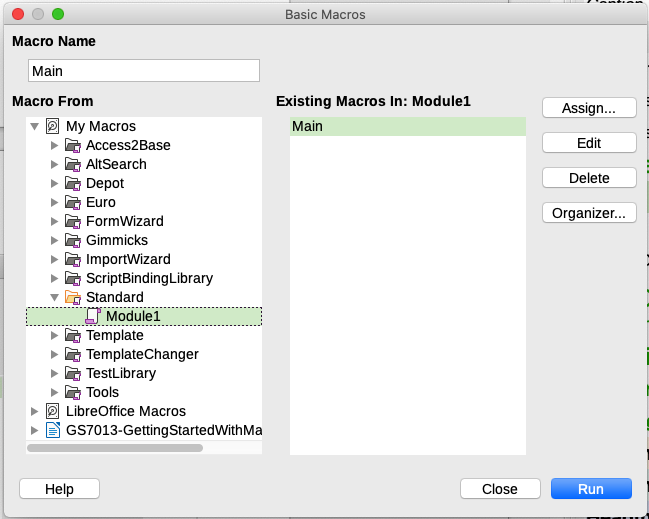
Figure 2: LibreOffice Basic Macro Organizer dialog, Libraries tab
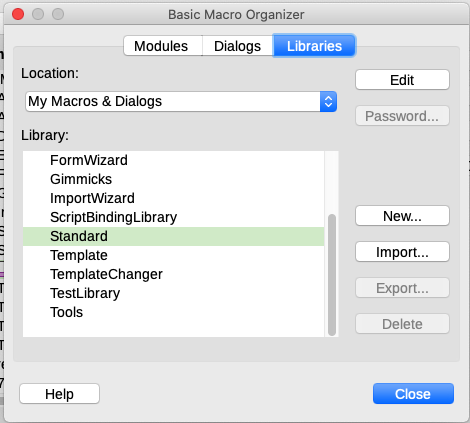
Figure 3: Basic Macro Organizer dialog, Modules tab
Figure 4: Integrated Development Environment window
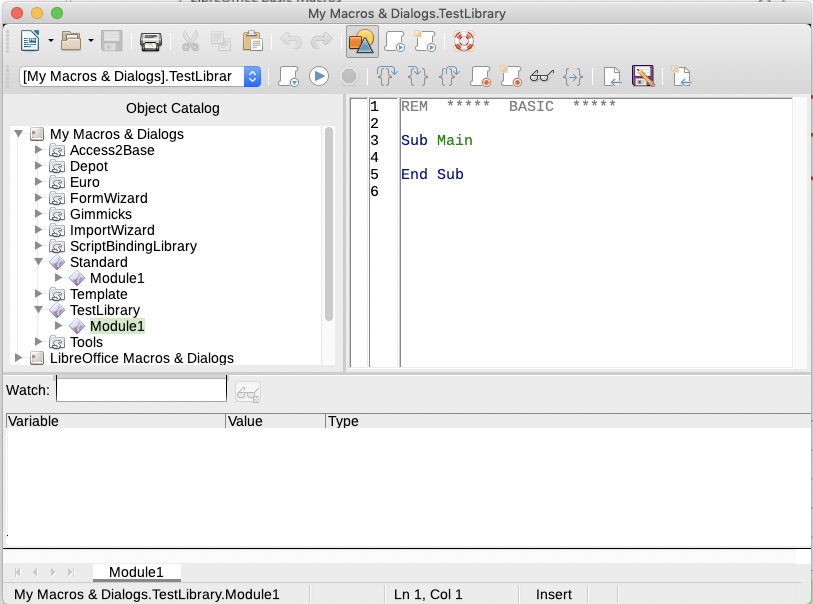
When a new module is created, it contains a comment and an empty macro named Main , which does nothing.
Add the new macro either before Sub Main or after End Sub . Listing 2 shows the new macro added before Sub Main .
Listing 2: Module1 after adding the new macro
Click the Compile icon on the Macro toolbar to compile the macro.
Select the HelloMacro subroutine in the Object Catalog window and click the Run icon on the Macro toolbar, or press the F5 key, to run the HelloMacro subroutine in the module. A small dialog will open with the word “Hello” displayed (see below).
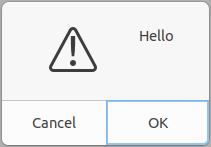
Click OK to close this small dialog.
If no subroutine or function is selected, a dialog like the one in Figure 5 will open. Then select the macro and click Run to execute it.
Figure 5: Dialog to select and run a macro
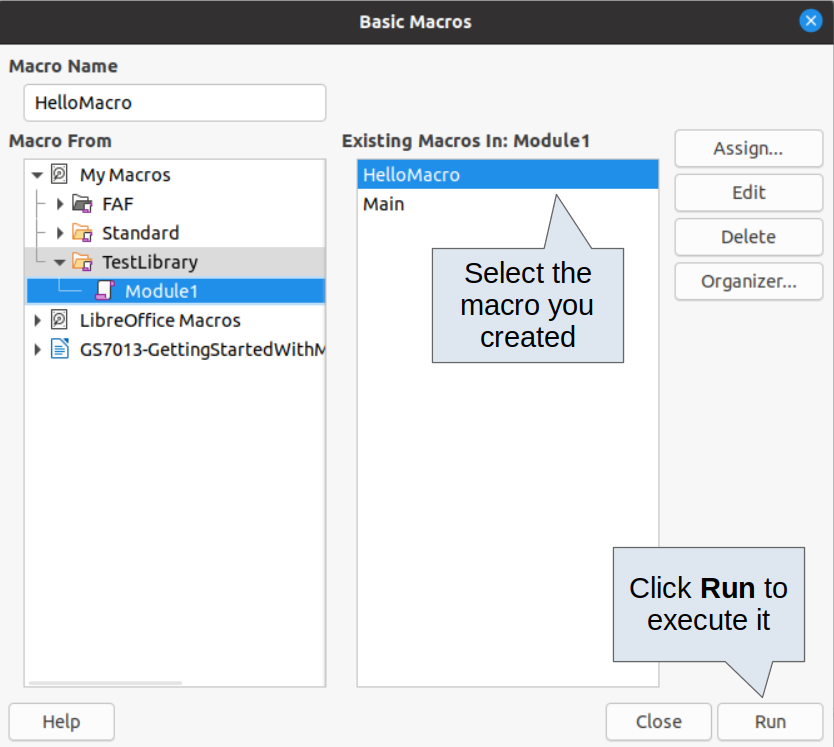
To select and run any macro in the module, click the Select Macro icon on the Standard toolbar or go to Tools > Macros > Organize Macros > Basic .
Select a macro and then click Run .
Recording a macro
When you record a macro in LibreOffice, you are actually recording the steps to perform a certain task using programming language. For example, consider that you have to repeatedly enter the same information into a document. You can copy this information after it has been entered into the document for the first time, then paste the information into the document each time you want to use it. However, if something else is copied to the clipboard, the contents of the clipboard are changed. This means that you have to re-copy this piece of information again to later paste it into the document. To overcome this problem, you can create a macro that enters this piece of information without having to copy it every time you need it.
For some cases when you want to repeatedly enter information into a document, it may be more convenient to create an AutoText. See Chapter 2, Working with Text: Basics, in the Writer Guide for more information.
Make sure macro recording is enabled by going to Tools > Options > LibreOffice > Advanced and selecting the option Enable macro recording under Optional Features . By default, this feature is turned off in LibreOffice.
Go to Tools > Macros > Record Macro to start recording a macro. A small dialog with a Stop Recording button is displayed indicating that LibreOffice is recording a macro.
Type the desired text you want to be entered when this macro is run. As an example, type your name.
Click Stop Recording on the small dialog. This will cause Basic Macros dialog to open (similar to Figure 1, but with different action buttons).
Open the library container My Macros .
Find the library named Standard in My Macros . Note that every library container has a library named Standard .
Select the Standard library and then choose an existing module in which to save the macro. Alternatively you can click New Module to create a new module to contain the newly recorded macro.
In the Macro Name text box at the top left section of the dialog, type a name for the macro you have just recorded, for example EnterMyName .
Click Save to save the macro and close the Basic Macros dialog.
If you followed all of the above steps, a macro named EnterMyName will have been created inside the selected module.
Whenever you create a new module in LibreOffice, a subroutine named Main is automatically added to the module.
Running a macro
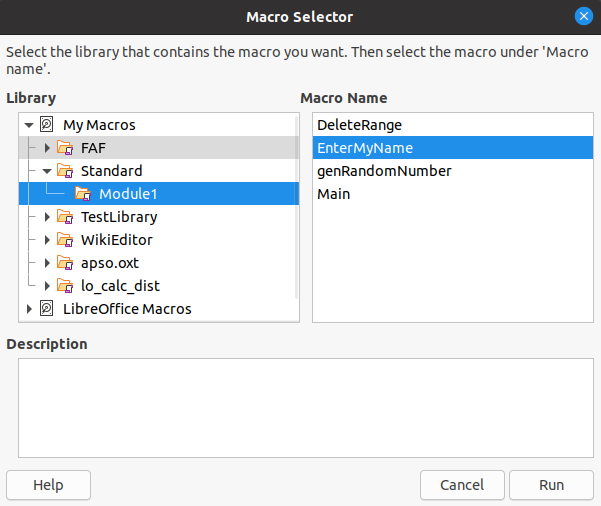
Go to Tools > Macros > Run Macro to open the Macro Selector dialog (Figure 6).
For example, select your newly created macro EnterMyName and click Run .
Alternatively, go to Tools > Macros > Organize Macros > Basic to open the Basic Macros dialog (Figure 1), select your macro and click Run.
Figure 6: Use the Macro Selector dialog to select and run an existing macro
Viewing and editing macros
To view and/or edit the macro that you created:
Go to Tools > Macros > Organize Macros > Basic to open the Basic Macros dialog.
Select your new macro EnterMyName and click Edit . The Basic IDE will open and the macro EnterMyName will be shown as in Listing 3.
This first macro is not complicated. A little explanation will significantly help you in understanding macros. The discussion starts with first line of the macro and describes features through the whole listing.
Listing 3: Code recorded for the EnterMyname macro
rem define variables
dim document as object
dim dispatcher as object
rem get access to the document
document = ThisComponent . CurrentController . Frame
dispatcher = createUnoService ( «com.sun.star.frame.DispatchHelper» )
dim args1 ( 0 ) as new com . sun . star . beans . PropertyValue
args1 ( 0 ).Name = «Text»
args1 ( 0 ). Value = «Your name»
dispatcher . executeDispatch ( document , «.uno:InsertText» , «» , 0 , args1 ())
Commenting with REM
All comments in Basic macro coding begin with REM, which stands for remark. All text after REM on the same line is ignored by the Basic interpreter when the macro is run.
As a short cut, you can use the single quote character (‘) to start a comment.
LibreOffice Basic is not case-sensitive for keywords, so REM, Rem, and rem can all start a comment. If you use symbolic constants defined by the Application Programming Interface (API), it is safer to assume that the names are case-sensitive. Symbolic constants are an advanced topic not covered by this user guide and are not required when using the macro recorder in LibreOffice.
Defining subroutines with SUB
Individual macros are stored in subroutines and these subroutines begin with the keyword SUB . The end of a subroutine is indicated by the words END SUB . The code starts by defining the subroutine named Main , which is empty and does nothing. Note that the code in Listing 3 for the EnterMyName macro starts with the keyword SUB and ends with END SUB .
There are advanced topics that are beyond the scope of this user guide, but knowing about them might be of interest:
You can write subroutines that accept input values to be used inside the macro. These values are called arguments. This can only be done when you create subroutines from scratch. Recorded macros in LibreOffice do not accept arguments.
Another kind of subroutine is called a function, which is a subroutine that can return a value as a result of its work. Functions are defined by the keyword FUNCTION at the beginning. Recorded macros in LibreOffice create subroutines only.
Defining variables using DIM
You can write information on a piece of paper so that you can look at it later. A variable, like a piece of paper, contains information that can be changed and read. The DIM keyword originally stood for Dimension and was used to define the dimensions of an array. The DIM statement used in the EnterMyName macro is similar to setting aside a piece of paper to be used to store a message or note.
In the EnterMyName macro, the variables document and dispatcher are defined as the type object . Other common variable types include string, integer, and date. A third variable, named args1 , is an array of property values. A variable of type array allows a single variable to contain multiple values, similar to storing multiple pages in a single book. Values in an array are usually numbered starting from zero. The number in the parentheses indicates the highest usable number to access a storage location. In this example, there is only one value, and it is numbered zero.
Explaining macro code
The following is an explanation of the code used in the EnterMyName macro. You may not understand all the details, but the explanation of each line of code may give you some idea of how a macro works.
Defines the start of the EnterMyName macro.
dim document as object
Defines document as an object variable. Objects are a specific variable type with multiple fields (s ometimes they are called properties) and actions (also they are called methods). The fields can be perceived like variables (including an object) and actions like subroutines which allow us to operate with the object.
Sometimes the word service is used. A service is supplied by a type of object which are distinguished in order to point out how they are used.
dim dispatcher as object
Defines dispatcher as an object variable.
document = ThisComponent . CurrentController . Frame
ThisComponent is a runtime object created by LibreOffice that refers to the current document.
CurrentController is a property referring to a service that controls the document. For example, when you type, it is the current controller that takes note of what you type. CurrentController then dispatches the changes to the document frame.
Frame is a controller property that returns the main frame for a document. Therefore, the variable named document refers to a document’s frame, which receives dispatched commands.
dispatcher = createUnoService ( «com.sun.star.frame.DispatchHelper» )
Most tasks in LibreOffice are accomplished by dispatching a command. LibreOffice includes a DispatchHelper service, which provides an easy way to dispatch a URL using one call instead of multiple ones and does most of the work when using dispatches in macros. The method CreateUnoService accepts the name of a service and it tries to create an instance of that service. On completion, the dispatcher variable contains a reference to a DispatchHelper .
dim args1 ( 0 ) as new com . sun . star . beans . PropertyValue
Declares the args1 array of properties. Each property has a name and a value. In other words, it is a name/value pair. The created array has one property at index zero.
The com.sun.star.beans.PropertyValue expression is a Universal Network Objects (UNO) structure. Structures are special variable types that contain other variables united by logical basis. They can be convenient to operate with sets of heterogeneous information that should be treated as a single whole. An explanation of UNO and user structures goes far beyond the scope of this book. For more information on creating and using structures, see the LibreOffice Help system and other Basic guides.
args1 ( 0 ).Name = «Text»
args1 ( 0 ). Value = «Your name»
Gives the property the name “Text” and the value “Your name”, which is the text that is inserted when the macro is run.
dispatcher . executeDispatch ( document , «.uno:InsertText» , «» , 0 , args1 ())
The dispatch helper sends a dispatch to the document frame (stored in the variable document ) with the command .uno:InsertText . The next two arguments, frame name and search flags, are beyond the scope of this book. The last argument is the array of property values to be used while executing the command InsertText .
In other words, this line of code executes the UNO command .uno:InsertText passing the value “Your Name” as the “Text” parameter.
The last line of the code ends the subroutine.
Creating a macro
When creating a macro, it is important to ask two questions before recording:
Can the task be written as a simple set of commands?
Can the steps be arranged so that the last command leaves the cursor ready for the next command or entering text or data into the document?
A more complex example of a macro
A common task is to copy rows and columns of data from a website and format them as a table in a text document as follows:
Copy the data from the website to the clipboard.
To avoid strange formatting and fonts, paste the text into a Writer document as unformatted text.
Reformat the text with tabs between columns so that it can be converted into a table using Table > Convert > Text to Table .
With the two questions above in mind, inspect the text to see if a macro can be recorded to format the text. As an example of copied data, consider the text copied from the API website describing the FontWeight constants (Figure 7). The first column in this example indicates a constant name and each name is followed by a space and a tab, and each line has two trailing spaces.
Figure 7: Example of copied data
The font weight is not specified/known.
specifies a 50% font weight.
specifies a 60% font weight.
specifies a 75% font weight.
specifies a 90% font weight.
specifies a normal font weight.
specifies a 110% font weight.
specifies a 150% font weight.
specifies a 175% font weight.
specifies a 200% font weight.
Suppose you want the first column in the table to contain the numeric value of the font weight, the second column the constant name, and the third column the text description. This task can be accomplished easily for every row except for DONTKNOW and NORMAL, which do not contain a numeric value.
Below are the steps to record this macro using keystrokes and assuming that the cursor is at the beginning of the line with the text “THIN”.
Make sure macro recording is enabled by going to Tools > Options > LibreOffice > Advanced and selecting the option Enable macro recording . By default, this feature is turned off when LibreOffice is installed on your computer.
Go to Tools > Macros > Record Macro to start recording.
Press Ctrl+Right Arrow to move the cursor to the start of the word “specifies”.
Press Backspace twice to remove the tab and the space.
Press Tab to add the tab without the space after the constant name.
Press Delete to delete the lower case “s” and then press Shift+S to add an upper case “S”.
Press Ctrl+Right Arrow twice to move the cursor to the start of the number.
Press Ctrl+Shift+Right Arrow to select and move the cursor before the % sign.
Press Ctrl+C to copy the selected text to the clipboard.
Press End to move the cursor to the end of the line.
Press Backspace twice to remove the two trailing spaces.
Press Home to move the cursor to the start of the line.
Press Ctrl+V to paste the selected number to the start of the line.
Pasting the value also pasted an extra space, so press Backspace to remove the extra space.
Press Tab to insert a tab between the number and the name.
Press Home to move to the start of the line.
Press Down Arrow to move to the next line.
Stop recording the macro and save the macro, see “Recording a macro” above.
It takes much longer to read and write the steps above than to actually record the macro. Work slowly and think about the steps as you do them. With practice you will learn how to organize the steps to create macros that can be used to automate repetitive tasks.
The generated macro code in Listing 4 has been modified to contain the step numbers in the comments to match the steps discussed above.
Listing 4: Copying numeric value to start of the column
rem define variables
dim document as object
dim dispatcher as object
rem get access to the document
document = ThisComponent . CurrentController . Frame
dispatcher = createUnoService ( «com.sun.star.frame.DispatchHelper» )
rem (3) Press Ctrl+Right Arrow to move the cursor to the start of “specifies”.
dispatcher . executeDispatch ( document , «.uno:GoToNextWord» , «» , 0 , Array ())
rem (4) Press Backspace twice to remove the tab and the space.
dispatcher . executeDispatch ( document , «.uno:SwBackspace» , «» , 0 , Array ())
dispatcher . executeDispatch ( document , «.uno:SwBackspace» , «» , 0 , Array ())
rem (5) Press Tab to add the tab without the space after the constant name.
dim args4 ( 0 ) as new com . sun . star . beans . PropertyValue
args4 ( 0 ).Name = «Text»
args4 ( 0 ). Value = CHR$ ( 9 )
dispatcher . executeDispatch ( document , «.uno:InsertText» , «» , 0 , args4 ())
rem (6) Press Delete to delete the lower case s .
dispatcher . executeDispatch ( document , «.uno:Delete» , «» , 0 , Array ())
rem (6) . and then press Shift+S to add an upper case S.
dim args6 ( 0 ) as new com . sun . star . beans . PropertyValue
args6 ( 0 ).Name = «Text»
args6 ( 0 ). Value = «S»
dispatcher . executeDispatch ( document , «.uno:InsertText» , «» , 0 , args6 ())
rem (7) Press Ctrl+Right Arrow twice to move the cursor to the number.
dispatcher . executeDispatch ( document , «.uno:GoToNextWord» , «» , 0 , Array ())
dispatcher . executeDispatch ( document , «.uno:GoToNextWord» , «» , 0 , Array ())
rem (8) Press Ctrl+Shift+Right Arrow to select the number.
dispatcher . executeDispatch ( document , «.uno:WordRightSel» , «» , 0 , Array ())
rem (9) Press Ctrl+C to copy the selected text to the clipboard.
dispatcher . executeDispatch ( document , «.uno:Copy» , «» , 0 , Array ())
rem (10) Press End to move the cursor to the end of the line.
dispatcher . executeDispatch ( document , «.uno:GoToEndOfLine» , «» , 0 , Array ())
rem (11) Press Backspace twice to remove the two trailing spaces.
dispatcher . executeDispatch ( document , «.uno:SwBackspace» , «» , 0 , Array ())
dispatcher . executeDispatch ( document , «.uno:SwBackspace» , «» , 0 , Array ())
rem (12) Press Home to move the cursor to the start of the line.
dispatcher . executeDispatch ( document , «.uno:GoToStartOfLine» , «» , 0 , Array ())
rem (13) Press Ctrl+V to paste the selected number to the start of the line.
dispatcher . executeDispatch ( document , «.uno:Paste» , «» , 0 , Array ())
rem (14) Press Backspace to remove the extra space.
dispatcher . executeDispatch ( document , «.uno:SwBackspace» , «» , 0 , Array ())
rem (15) Press Tab to insert a tab between the number and the name.
dim args17 ( 0 ) as new com . sun . star . beans . PropertyValue
args17 ( 0 ).Name = «Text»
args17 ( 0 ). Value = CHR$ ( 9 )
dispatcher . executeDispatch ( document , «.uno:InsertText» , «» , 0 , args17 ())
rem (16) Press Home to move to the start of the line.
dispatcher . executeDispatch ( document , «.uno:GoToStartOfLine» , «» , 0 , Array ())
rem (17) Press Down Arrow to move to the next line.
dim args19 ( 1 ) as new com . sun . star . beans . PropertyValue
args19 ( 0 ).Name = «Count»
args19 ( 0 ). Value = 1
args19 ( 1 ).Name = «Select»
args19 ( 1 ). Value = false
dispatcher . executeDispatch ( document , «.uno:GoDown» , «» , 0 , args19 ())
To run this macro, first place the cursor at the beginning of the line to which you want to apply the recorded steps. Then go to Tools > Macros > Run Macro, select the CopyNumToCol1 macro and click Run . Figure 8 shows the original line and the resulting line after applying the macro.
Figure 8: Result of applying the recorded macro
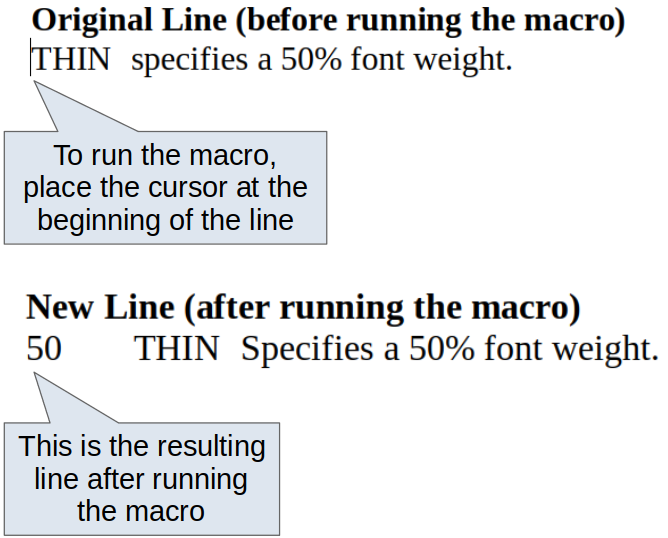
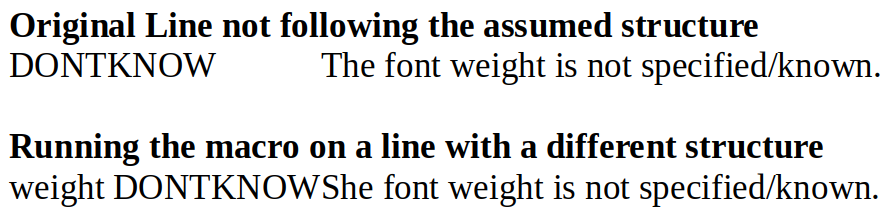
Keep in mind that the steps described above will only work properly if the line follows the format we assumed while creating the macro. If you run this macro on the “DONTKNOW” and “NORMAL” lines the results will not be as expected because these two lines have different formats. Figure 9 shows the original line starting with “DONTKNOW”.
Figure 9: Result of using the macro in a line with a different structure
Running a macro quickly
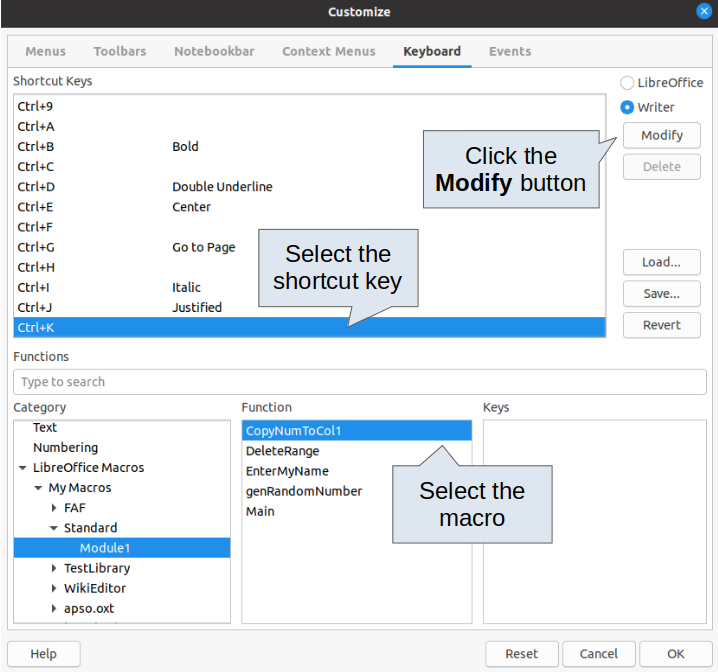
It is not convenient to repeatedly run macros using Tools > Macros > Run Macro . If you frequently need to use a certain macro, you can assign a keyboard shortcut to quickly run it. Next are the steps to assign the shortcut Ctrl+K to the CopyNumToCol1 macro.
Go to Tools > Customize . This will open the Customize dialog.
Select the Keyboard tab. In the Shortcut Keys section, select the Ctrl+K shortcut.
In the Category section, select LibreOffice macros . Navigate this section and select the CopyNumToCol1 macro.
Now click the Modify button to assign the Ctrl+K shortcut to the CopyNumToCol1 macro.
Click OK to close the Customize dialog.
Now you can run the CopyNumToCol1 macro using the Ctrl+K shortcut. This is very fast and easy to configure after you get used to the macro workflow. Figure 10 illustrates the steps described above.
Figure 10: Assigning a shortcut to a macro
Limitations of the macro recorder
The Macro Recorder has some limitations, which means that some actions may not be recorded. A deeper knowledge of LibreOffice internal workings helps to understand how and why the macro recorder will work. The main cause of these limitations is the dispatch framework and its relationship to the macro recorder.
Dispatch framework
The purpose of the dispatch framework is to provide uniform access to components (documents) for commands that usually correspond to menu items. Using File > Save , the shortcut keys Ctrl+S , or clicking the Save icon on the Standard toolbar are all commands that are translated into the same “dispatch command”.
The dispatch framework can also be used to send “commands” back to the user interface (UI). For example, after saving a new document, the list of recent files is updated.
A dispatch command is text, for example .uno:InsertObject or .uno:GoToStartOfLine . The command is sent to the document frame and this passes on the command until an object is found that can handle the command.
How the macro recorder uses the dispatch framework
The macro recorder records the generated dispatches. The recorder is a relatively simple tool to use and the same commands that are issued are recorded for later use. The problem is that not all dispatched commands are complete. For example, inserting an object generates the following code:
dispatcher . executeDispatch ( document , «.uno:InsertObject» , «» , 0 , Array ())
It is not possible to specify what kind of object to create or insert. If an object is inserted from a file, you cannot specify which file to insert.
If while recording a macro you use Tools > Options to open and modify configuration items, the generated macro does not record any configuration changes. In fact, the generated code is commented so it will not even be run.
rem dispatcher.executeDispatch(document, «.uno:OptionsTreeDialog», «», 0, Array())
If a dialog is opened, a command to open the dialog is likely to be generated. Any work done inside the dialog is not usually recorded. Examples of this include macro organization dialogs, inserting special characters, and similar types of dialogs. Other possible problems using the macro recorder include things such as inserting a formula, setting user data, setting filters in Calc, actions in database forms, and exporting a document to an encrypted PDF file. You never know for certain what will work unless you try it. For example, the actions from the search dialog are properly captured.
Other options
When the macro recorder is not able to solve a specific problem, the usual solution is to write code using the LibreOffice objects. Unfortunately, there is a steep learning curve for these LibreOffice objects. It is usually best to start with simple examples and then increase the scope of macros as you learn more. Learning to read generated macros is a good place to start.
Macro organization
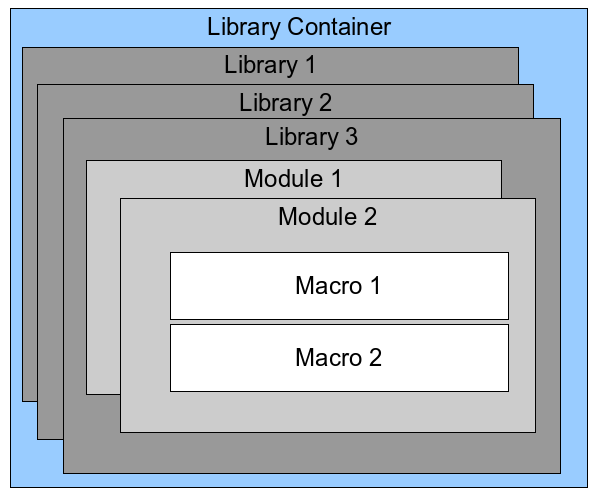
In LibreOffice, macros are grouped in modules, modules are grouped in libraries, and libraries are grouped in library containers. A library is usually used as a major grouping for either an entire category of macros, or for an entire application. Modules usually split functionality, such as user interaction and calculations. Individual macros are subroutines and functions. Figure 11 shows an example of the hierarchical structure of macro libraries in LibreOffice.
Figure 11: Macro Library hierarchy
Go to Tools > Macros > Organize Macros > Basic to open the Basic Macros dialog (Figure 1). All available library containers are shown in the Macro From list. Every document is a library container, capable of containing multiple libraries. The application itself acts as two library containers, one container for macros distributed with LibreOffice called LibreOffice Macros , and one container for personal macros called My Macros .
The LibreOffice Macros are stored with the application runtime code, which may not be editable to you unless you are an administrator. This helps protect these macros because they should not be changed and you should not store your own macros in the LibreOffice Macros container.
Unless your macros are applicable to a single document, and only to a single document, your macros will probably be stored in the My Macros container. The My Macros container is stored in your user area or home directory.
If a macro is contained in a document, then a recorded macro will attempt to work on that document, because it primarily uses ThisComponent for its actions.
Every library container contains a library named Standard . It is better to create your own libraries with meaningful names than to use the Standard library. Not only are meaningful names easier to manage, but they can also be imported into other library containers whereas the Standard library cannot.
LibreOffice allows you to import libraries into a library container, but it will not allow you to overwrite the library named Standard . Therefore, if you store your macros in the Standard library, you cannot import them into another library container.
Just as it makes good sense to give your libraries meaningful names, it is prudent to use meaningful names for your modules. By default, LibreOffice uses names such as Module1 , Module2 , and so on.
As you create your macros, you must decide where to store them. Storing a macro in a document is useful if the document will be shared and you want the macro to be included with the document. Macros stored in the application library container named My Macros , however, are globally available to all documents.
Macros are not available until the library that contains them is loaded. However, in contrast to other libraries, the Standard and Template libraries are automatically loaded. A loaded library is displayed differently from a library that is not loaded. To load the library and the modules it contains, double-click on the library.
Where are macros stored?
LibreOffice stores user-specific data in a folder inside the user’s home directory. The location is operating system specific. Go to Tools > Options > LibreOffice > Paths to view where other configuration data are stored. User macros written in Basic are stored in LibreOffice\4\user\basic . Each library is stored in its own directory inside the basic directory.
For casual use, it is not necessary to understand where macros are stored. If you know where they are stored, however, you can create a backup, share your macros, or inspect them if there is an error.
Exporting macros
The LibreOffice Basic Macro Organizer dialog allows you to export macro libraries so that they can be reused and shared with other people. To export a macro library:
Go to Tools > Macros > Organize Macros > Basic and the click the Organizer button.
Click the Libraries tab and choose which library you want to export.
Click Export and then select Export as BASIC Library (note that you cannot export the Standard library).
Choose where you want to save the library and click Save .
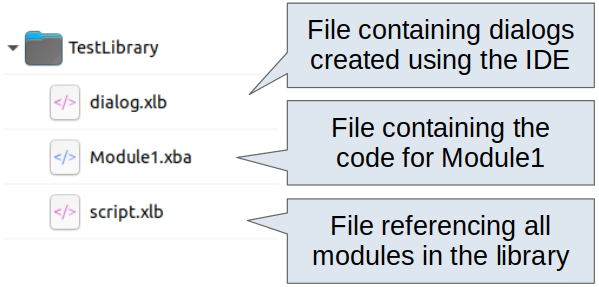
When a library is exported, LibreOffice creates a folder containing all files related to the library. Figure 12 shows an example of how a library named TestLibrary with a single module called Module1 would be exported.
Figure 12: Folder containing the exported library
Importing macros
The LibreOffice Basic Macro Organizer dialog allows you to import macro libraries into your document as well as creating, deleting, and renaming libraries, modules, and dialogs.
On the Libraries tab, select the library container to use and then click Import to import macro libraries.
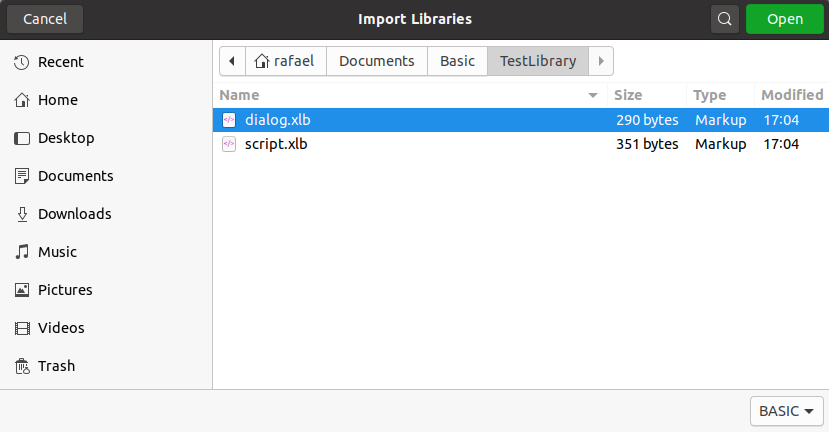
Navigate to the directory containing the library to import (Figure 13). There are usually two files from which to choose, dialog.xlb and script.xlb . It does not matter which of these two files you select; both will be imported. Macros can be stored in libraries inside LibreOffice documents. Select a document rather than a directory on disk to import libraries contained in a document.
Figure 13: Navigating to a macro library
Select a file and click Open to continue and open the Import Libraries dialog (Figure 14).
Figure 14: Choose library import options
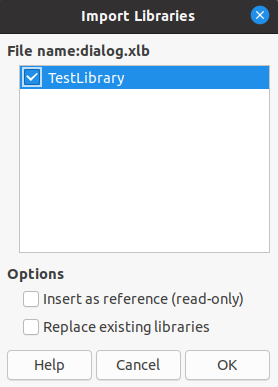
Select the following options for importing libraries:
If no options are selected, the library is copied to your user macro directory. However, if the library you are importing has the same name and you are importing into the same location, it will not be copied.
Select Insert as reference (read-only) if you want to use the library as reference, but not import it into the document. When a library is used as a reference, it remains in its current location and is fully functional, but cannot be modified in the Basic IDE.
Select Replace existing libraries if the library you want to import has the same name and you want to replace the existing library.
Click OK to import the macro library you selected.
You cannot export/import the library named Standard .
On Linux, LibreOffice-specific files are stored in the user’s home directory inside the .config folder. Directories and files with names beginning with a dot may be hidden and not shown in a normal file selection dialog. When using LibreOffice dialogs, rather than the operating system’s specific dialogs, type the name of the desired directory in the Name field.
Downloading macros to import
You can find macros created by the community to download from the internet. Some macros are contained in documents, some as regular files that you need to import, and some are published as text and need to be copied and pasted into the Basic IDE. See “Adding a macro” above on how to add macros to your macro library and “Viewing and editing macros” above on how to edit macros using the Basic IDE.
Some macros are available as free downloads on the Internet (see Table 1).
АКТИВИРОВАТЬ МАКРОСЫ
Работа конвертеров основана на макрокомандах (макросах). Обычно макросы применяют для выполнения рутинных действий. Мы же будем использовать их для формирования файлов в ИФНС.
По умолчанию использование макросов отключено в Excel и LibreOffice Calc. Нужно самостоятельно один раз включить их. Сделать это очень легко.
Как включить макросы в Microsoft Excel 2007, 2010
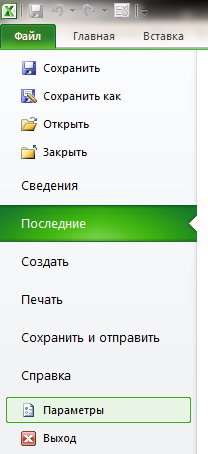
Щелкаем на кнопку Файл в левом верхнем углу и выбираем Параметры в открывшемся меню:
В появившемся диалоговом окне выбираем Центр управления безопасностью и Параметры центра управления безопасностью.
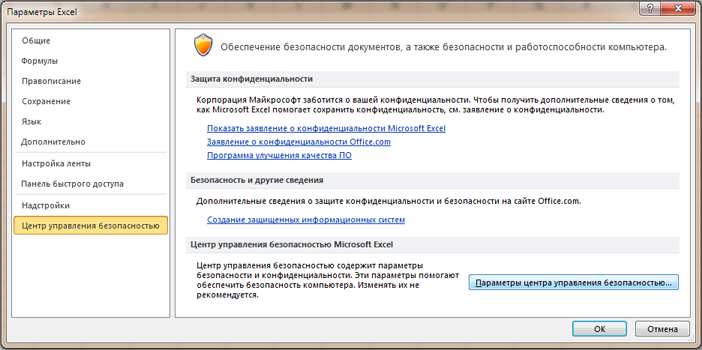
В окне выбирайте — Параметры макросов и затем отметьте пункт Включить все макросы
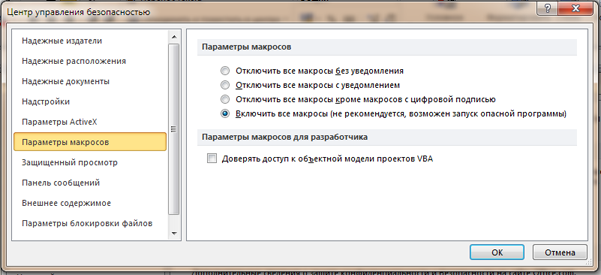
Подтвердите свой выбор, нажатием ОК во всех открытых диалоговых окнах.
После этого вам также необходимо закрыть и открыть файл Excel, чтобы изменения вступили в силу. В дальнейшем макросы будут запускаться в Excel 2007 автоматически.
Как включить макросы в LibreOffice Calc
LibreOffice является бесплатным программным продуктом, который можно скачать здесь (страница на английском) или здесь (страница на русском).
После установки откройте программу Calc. В меню Сервис выбираем Параметры.
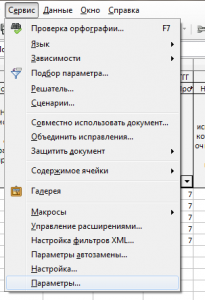
Выбираем пункт Безопасность и нажимаем на кнопку Безопасн. макросов
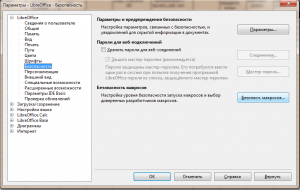
Выбираем уровень Средний (в этом случае при запуске макроса нужно подтверждать его работу дополнительным нажатием на кнопку) или Низкий.
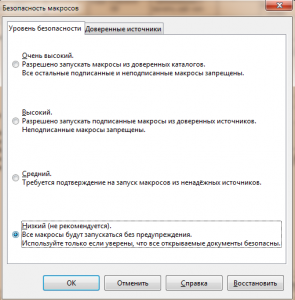
Подтвердите свой выбор, нажатием ОК во всех открытых диалоговых окнах.
Новости проекта:
Конвертер уведомления о контролируемых сделках — Конвертер обновлен до версии 5.04 отчетность за 2019г. !
Конвертер уведомления о контролируемых сделках — Добавлен импорт данных из формата 5.01 (до 2018) и 5.03 (после 2018г.) !
Мы восстановили возможность производить покупку он-лайн через сервис Робокасса. Оплачивайте конвертеры и получайте ссылку для скачивания самых новых версий!
Теперь подтвердить экспорт можно с помощью Конвертера реестра подтверждения экспорта. Как и все наши продукты этот конвертер поможет Вам эффективно использовать время при составлении декларации по НДС.
Заполнить декларацию по НДС за 1 квартал 2016г. помогут актуальные версии конвертеров. Мы по прежнему продолжаем поддержку всех наших клиентов во время декларационной компании.
Декларационная кампания за 4 квартал 2015г. — все версии конвертеров по прежнему актуальны и могут быть использованы для сдачи отчета. Последние версии конвертеров — самые удобные для использования.
19 июля появилась возможность формировать книги покупок и продаж для загрузки в Налогоплательщик ЮЛ напрямую (не через декларацию).
31 мая обновлены конвертеры для формирования декларации по НДС. Об изменениях можно прочитать здесь.
За декларационную компанию за 1 квартал по НДС мы получили по электронной почте более 300 «Спасибо» от налогоплательщиков 🙂 !
16 апреля 2015 на серверах хостинг провайдера произошел сбой, в связи с чем сайт работал нестабильно. В настоящий момент проблемы устранены.
15 апреля 2015 стал доступен конвертер Уведомления о контролируемых сделках.
14 апреля 2015 стал доступен Конвертер журнала учета счетов-фактур в формате Приказа ФНС России от 04.03.2015 N ММВ-7-6/93@. С его помощью можно из Excel загрузить в Налогоплательщик ЮЛ не просто декларацию по НДС, а сами счет-фактуры. Купить конвертер можно, связавшись с нами.