Sorry, you have been blocked
This website is using a security service to protect itself from online attacks. The action you just performed triggered the security solution. There are several actions that could trigger this block including submitting a certain word or phrase, a SQL command or malformed data.
What can I do to resolve this?
You can email the site owner to let them know you were blocked. Please include what you were doing when this page came up and the Cloudflare Ray ID found at the bottom of this page.
Cloudflare Ray ID: 801dc403ec162a19 • Your IP: Click to reveal 86.107.21.84 • Performance & security by Cloudflare
Object origin
The values in the Properties shelf refer to the position of the object origin. A new primitive (cube, torus, etc) has its origin in the center, but as we add change and add geometry, the origin does not change.
It is useful to change the objects origin to better position the object using the Properties shelf or to re-center the origin at the object’s new geometry.
If you need to catch up, you may want to start by downloading this .blend file: L.blend .
Exercise: resetting the origin
- To make coordinates easier to calculate, let’s move the “L” so that the bottom is at Z = 0.
- First, try setting the position to Z=0. Since the original origin was in the center of the cube, putting the origin at Z=0 means the bottom of the “L” dips below the Z=0 line.
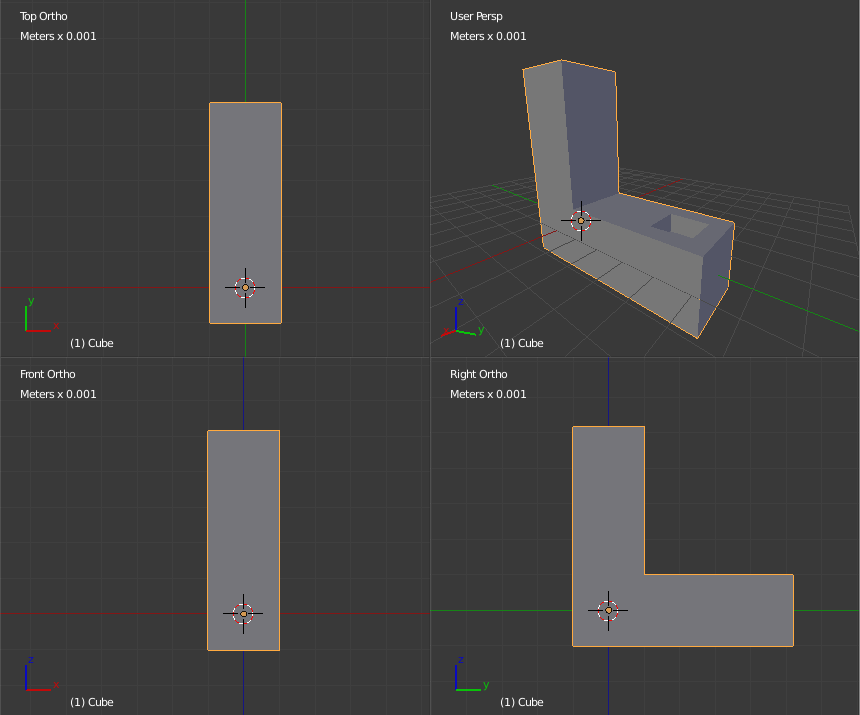
Even though the position in the Properties Shelf is (0, 0, 0), the “L” hangs below the Z=0 line. This is because the center (the orange circle, here highlighted by the 3D Cursor) is what those coordinates refer to.
- In Edit Mode, select the edge at the bottom corner of the “L”
- Snap cursor to selection
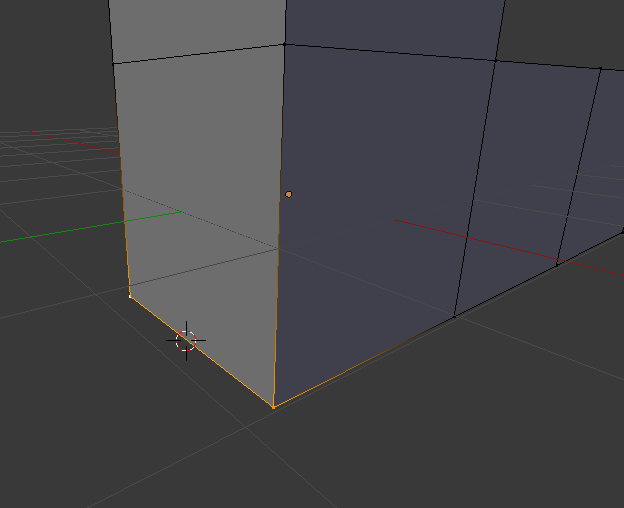
Bottom edge selected, and 3D cursor snapped to selection. Note that it snaps to the midpoint between the two selected vertices.
- Switch to Object Mode (otherwise we will get an error saying the origin can’t be set in Edit Mode)
- Set origin to cursor ( Space , search for “Set Origin”, Then choose “Origin to 3D Cursor”. Or Ctrl-Alt-Shift-C ).
- Set postion to Z=0
It’s also common to set the origin to the geometry, which puts it at the geometric center of the object.
How to move 3D cursor in Blender – And other tricks!

The 3D cursor in Blender is one of the most interesting and universal tools out of all 3D programs. You can use it as a pivot point, move objects to the 3D cursor, use it as a custom axis and much more.
In this blog, I’ll go through everything from simple to more complex usage. In the end, you’ll be using the 3d cursor for every project going forward.
What is the 3D Cursor in Blender?
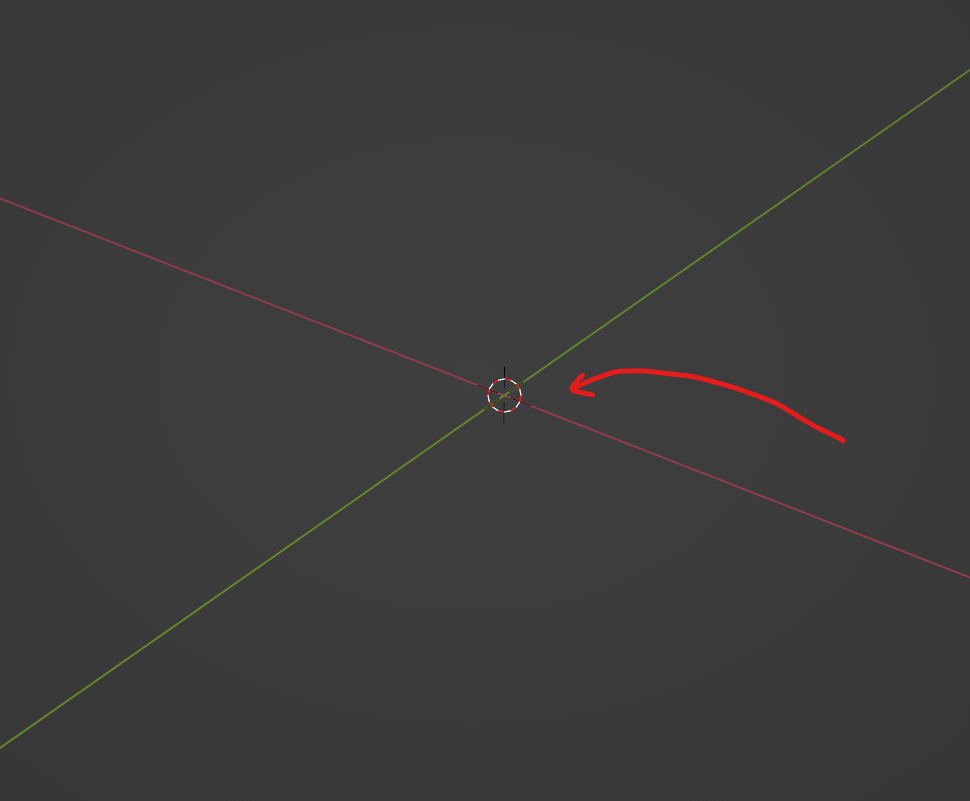
The 3D cursor is the little red and white crosshair that is usually sitting at 0,0,0 on the world grid. It is one of the most useful tools in Blender and if you are not already using it then you’re seriously missing out on some incredible functionality.
How do I move the 3d cursor?
To move the 3D cursor in Blender, hold the Shift button and press the right mouse button (RMB) anywhere on the screen to place the 3D cursor.
Move the cursor: SHIFT+RMB
After doing this, the 3D cursor will try and place itself where it thinks is most appropriate. For example, if you click on an object, it will attach itself to the surface of that object. It uses the depth of the geometry below the 3D cursor as a guide for where to place it.
If there are no objects below it, then it will hang itself in 3D space where you clicked it. Amazingly it usually does an incredible job at placing itself at the most useful distance away from the screen.
How do I put the 3D cursor tool back to world origin?
If you want to move the 3d cursor position to the world origin (0,0,0) then you should press CTRL and C. This can be very useful if you want to move it back to the origin, and then quickly move the object you’re working on to the 3d cursor. It is useful if you think you’ve lost something in the viewport or just want to keep it organized in a pinch.
Cursor to world Origin: CTRL + C
Putting the cursor back to world origin also moves the viewport to the centre and also fits all objects into the viewport. This is incredibly helpful if you’ve lost an object in the scene.
How to precisely move the 3d cursor
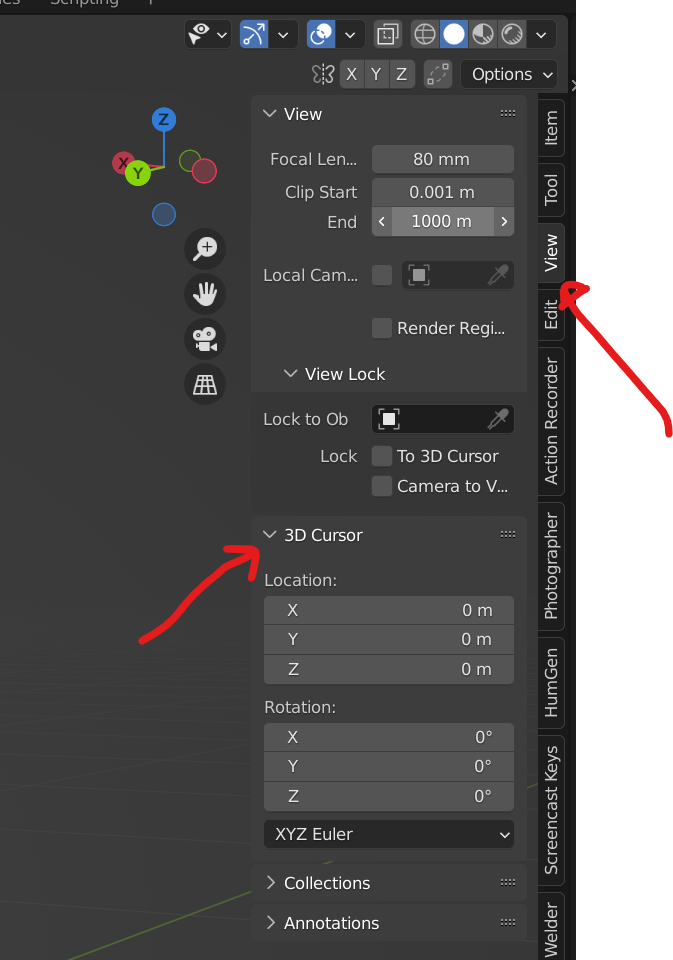
Not only can you use your viewport in object mode or edit mode to move the 3d cursor. But you can also use a dedicated cursor panel to precisely move and rotate the 3d cursor to anywhere you want.
Press N while you’re mouse is in the viewport window to bring up the properties panel. Then move to “View Tab” and look down for 3D Cursor. Here you can enter in any numbers you want to precisely move the 3d cursor.
I’ve lost my 3D cursor in Blender ��
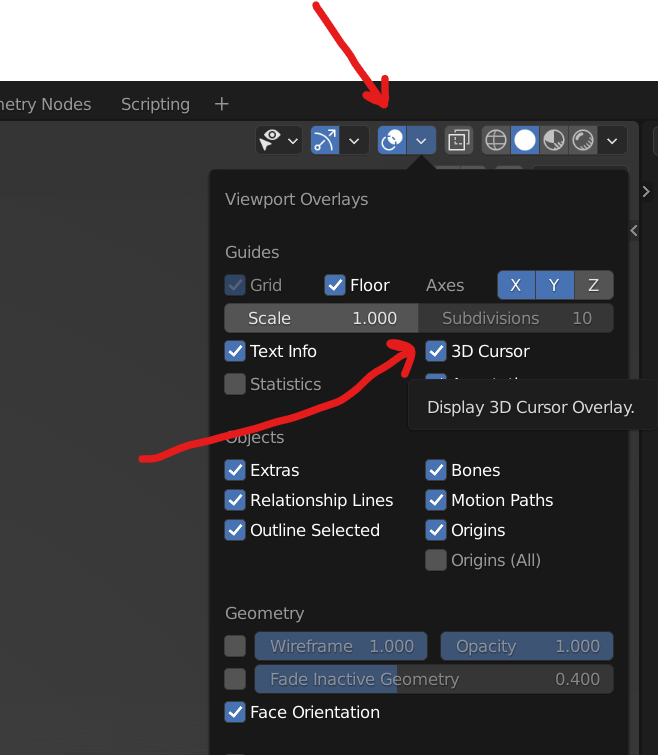
Usually if you’ve lost your 3D cursor, its easier to place it somewhere else with SHIFT+RMB or CTRL+C. If for some reason you cannot find the location of the 3d cursor, then there is a chance it is turned off in the overlays.
Head over to Overlays button and make sure that your 3D cursor is enabled. Now you’ll have your 3D cursor back.
What is the Blender cursor to selected?
This is another method of moving the 3D cursor and is incredibly useful. Honestly this is what I use it for mostly, along with “Selection to Cursor”
If you’re working on an object, vertex, collection, group of objects or just about any other item(s) in Blender, you may want to place the 3d cursor position in a very specific location against whatever it is you’re working on.
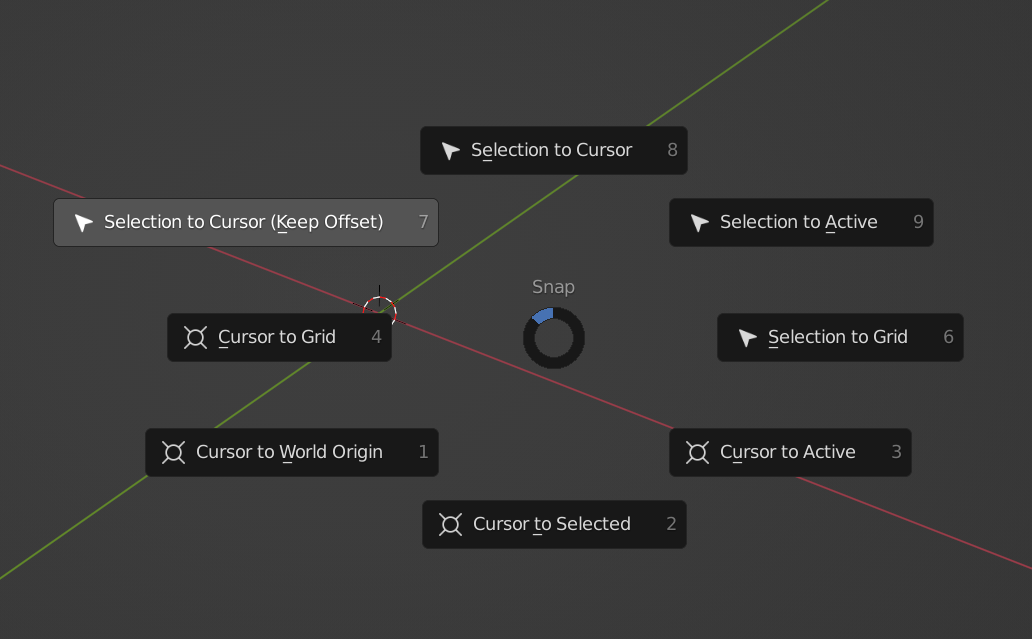
If that is the case, then you’ll need to pull up the Pie Menu which gives you a lot of controls about where you want the cursor or objects to go in relation to each other. Simply select the item you want, then use the shortcut key (below) and press Cursor to selected.
Cursor to Selected: SHIFT+S
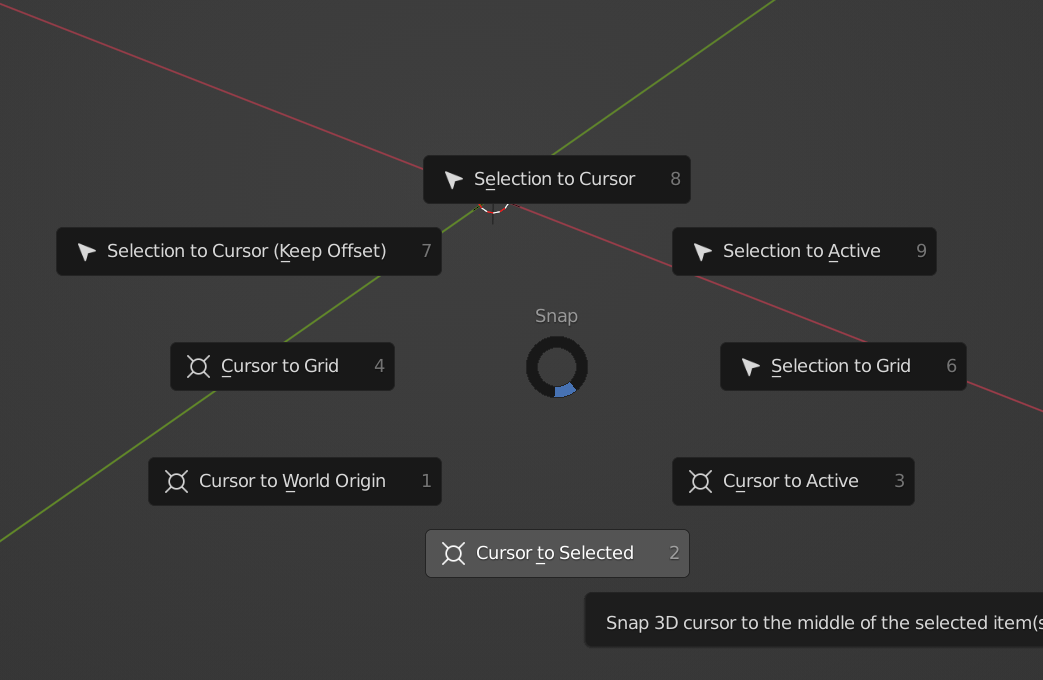
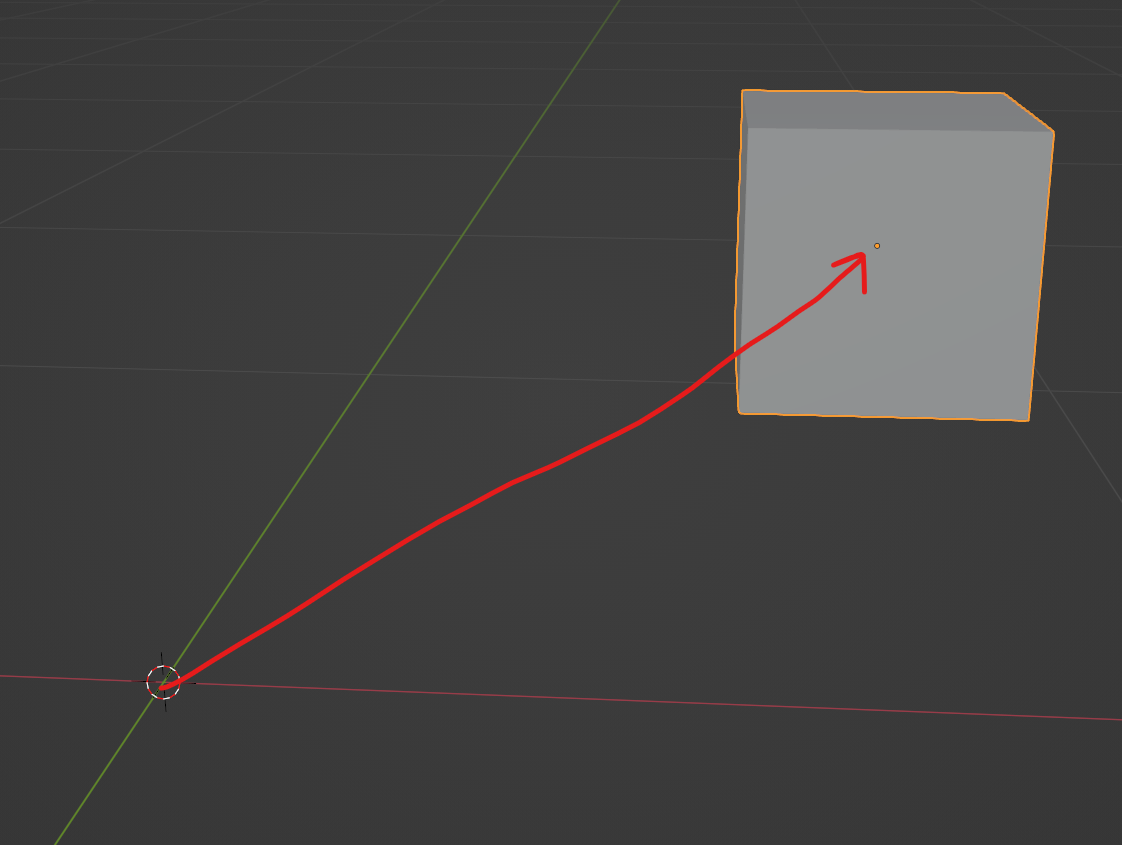
If you use “Cursor to selected” while in object mode, then the 3D cursor will move to the selected objects origin point.
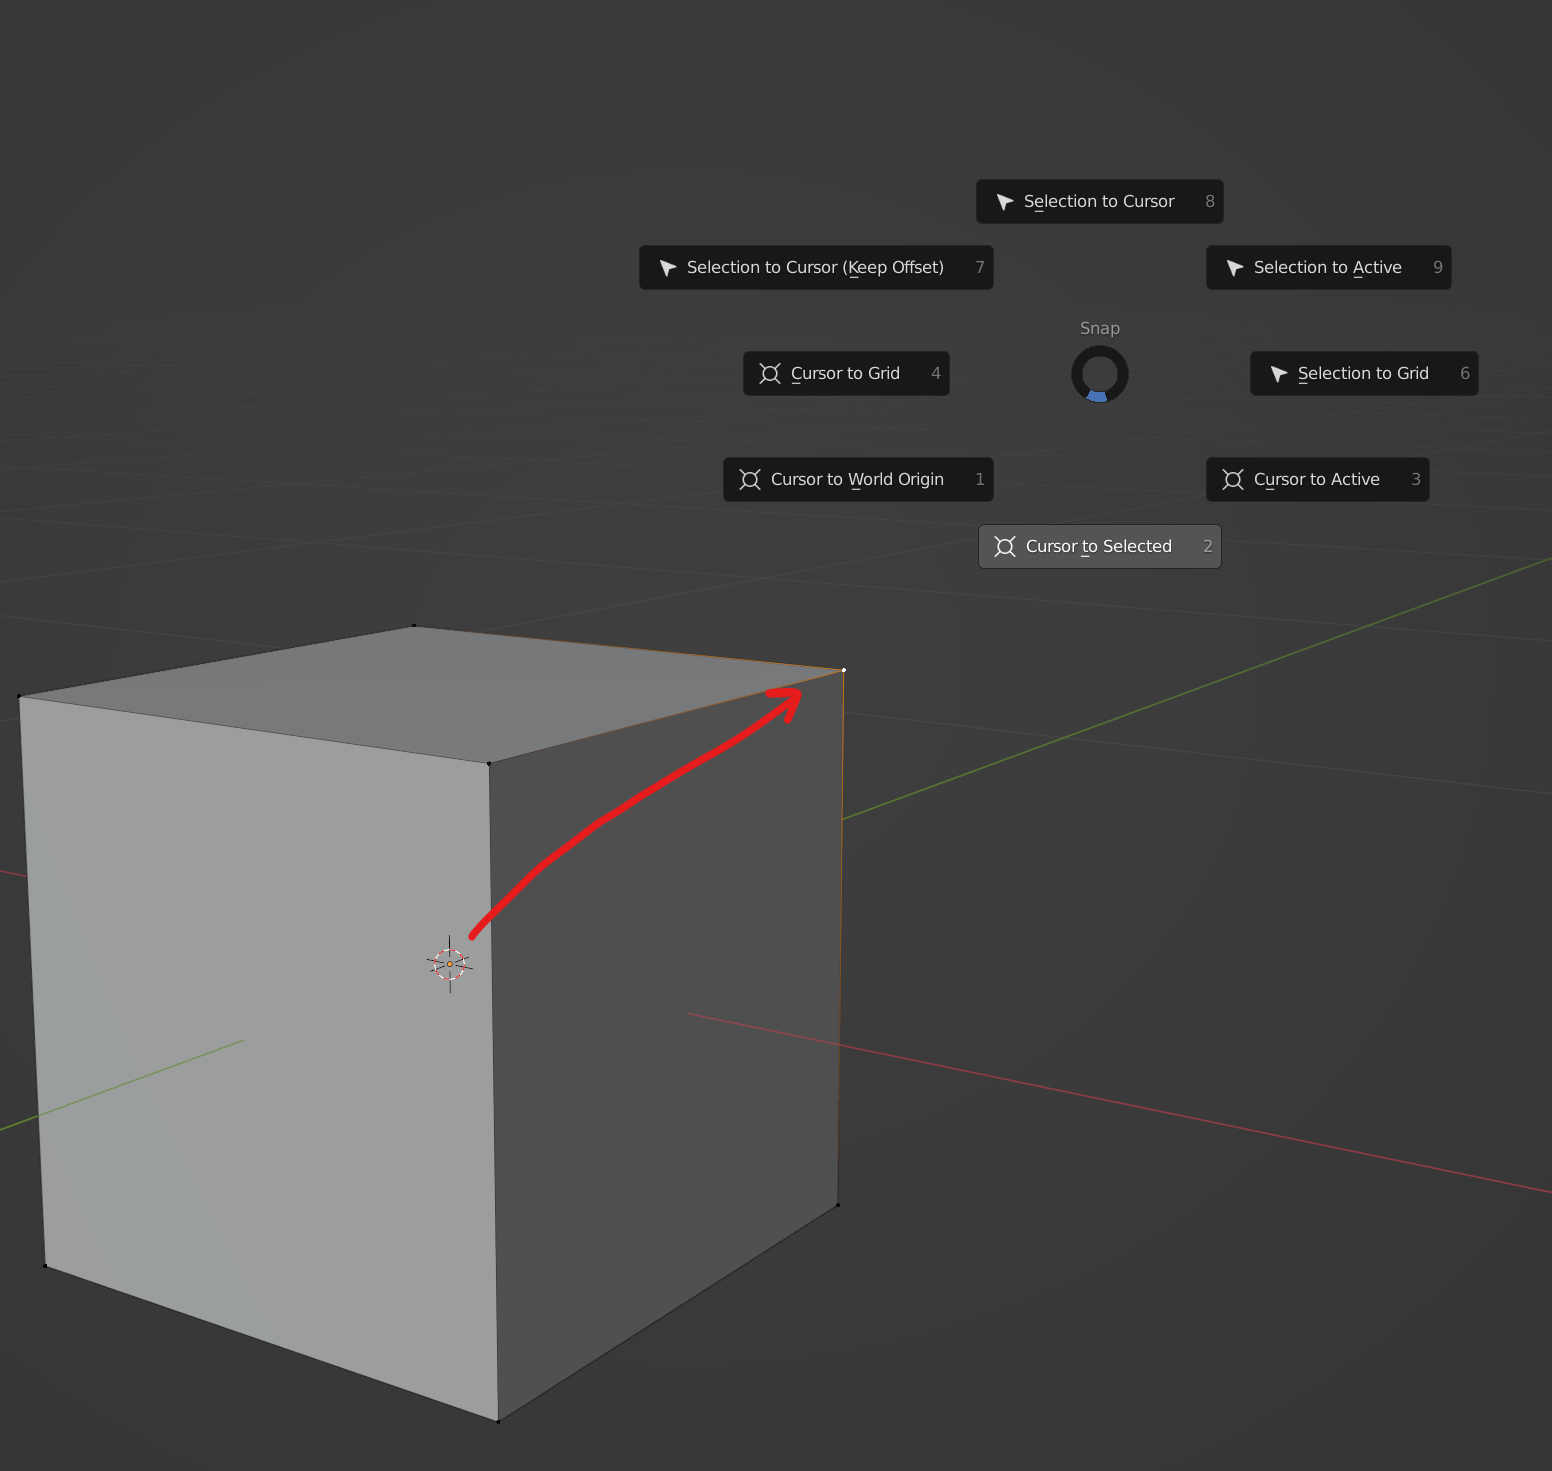
You can also use Cursor to selected in other modes such as edit mode. As an example, you may want to move the 3D cursor to a specific vertex. To do this, go into Edit mode: TAB, and then select the vertex you want, and press SHIFT+S and do the same thing as above.
In the image below shows where the cursor will end up if you clicked Cursor to selected with this vertex (in yellow) selected.
What is the Blender Selection to Cursor?
Selection to Cursor is the opposite of what was mentioned above. You can place the 3d cursor wherever you want on the screen and very quickly move the selected object or point to the 3d cursor. This too can be quickly found on the Pie menu as mentioned above
Selection to Cursor (Keep Offset): SHIFT+S
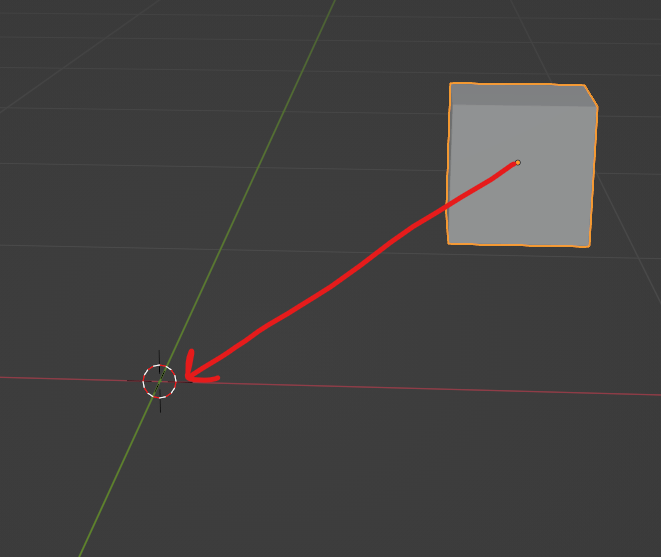
If you have an object selected in object mode then it will move the object to the 3D cursor based on the objects origin point.
Use the 3D cursor as a custom axis
Lets say you are working on an object, and you want to move this object along the surface of another. This is a very common use case and here (below) we can see that using the standard global X,Y,Z will not move the object along those axis.
The green cube also has applied rotation so using Local transform orientation will also not work.
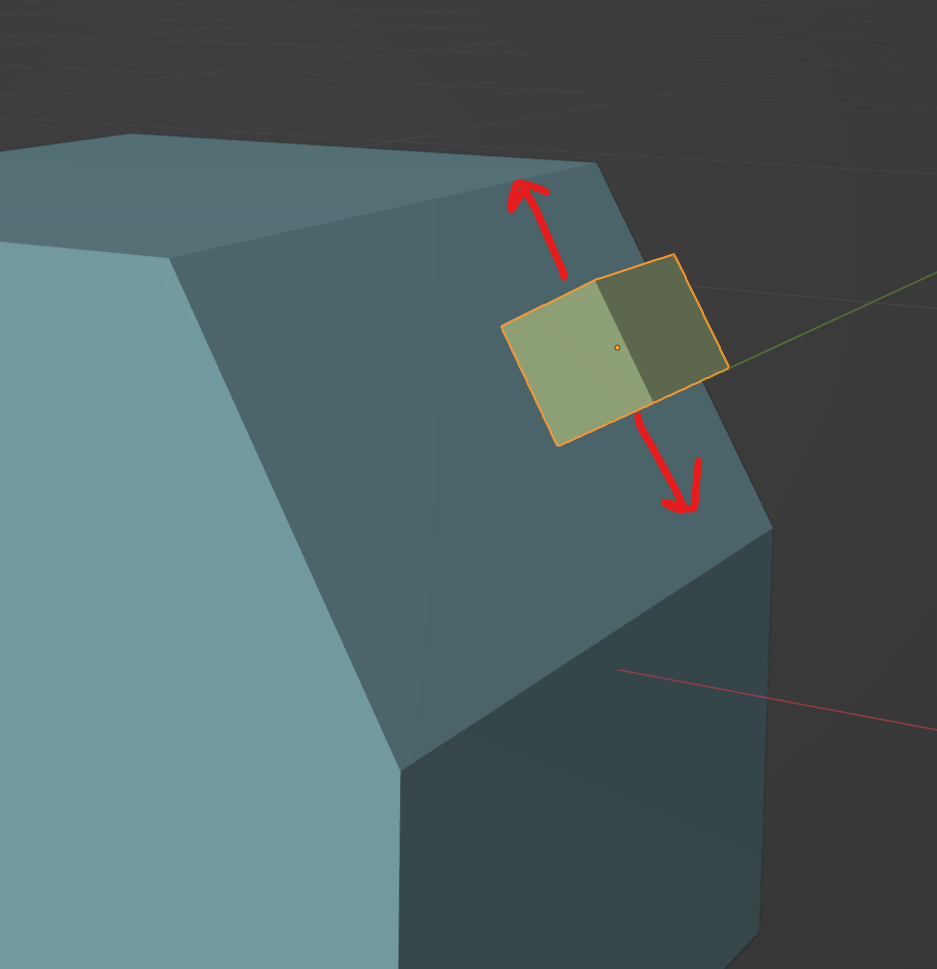
Luckily, this is where the 3D cursor can come in incredibly helpful. You’re able to position the 3d cursor on the main blue object, and use that surface to make a custom transform orientation axis which will look something like this.
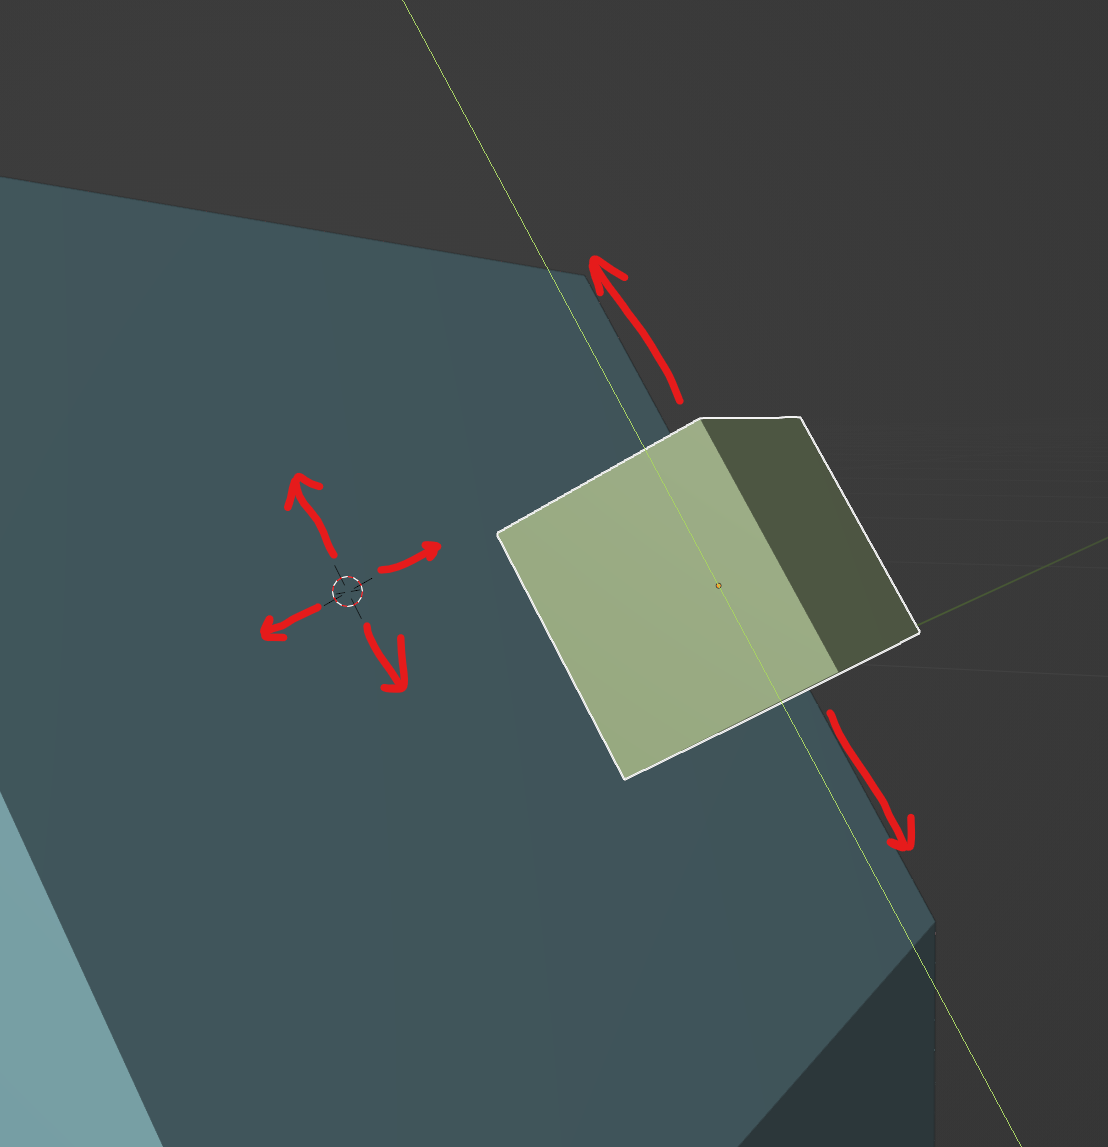
- Press T, then with the menu that appears on the left, click on the cursor symbol.
- Next, make sure the orientation is set to Geometry and click on any surface you want to use as the new transform orientation.
- Then under the transform orientation, make sure its set to Cursor
- Make sure to click back onto the Tweak button to turn back off the cursor tool. This prevents you from accidentally moving the 3D cursor.
Note, the menu with T can also be found by pressing SHIFT+SPACE. This will bring up a menu with all the tools, and by pressing SPACE again, you’ll select the 3D cursor tool.
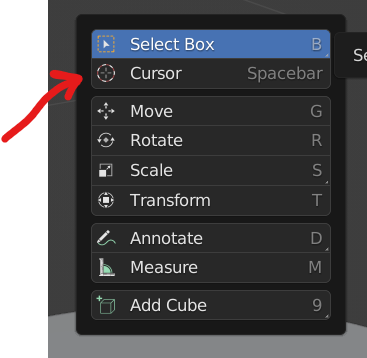
Align a new object to the Cursor Transform Orientation
Let’s say you’ve made an object and you want rotate it so that it fits perfectly onto another surface. As an example, we want the cube in the image below to sit on the surface below.
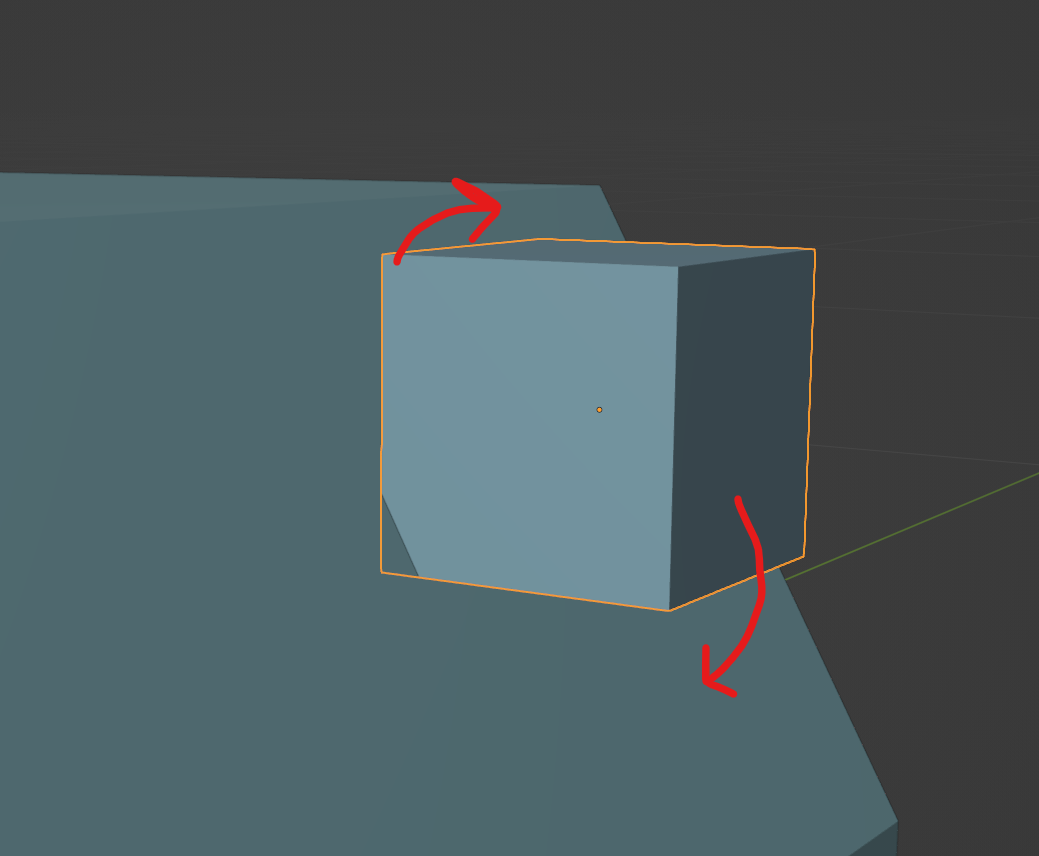
First we need to use the cursor to set the transform orientation. Using the method above I’m going to Press SHIFT+SPACE then SPACE, make sure the cursor is set to geometry mode and then click on the surface I want to use as the transform orientation.
Then we need to
- Make sure that the Transform Orientation method is set to Cursor
- Click Object > Transform > Align to Transform Orientation
Now we can see that the object has rotated and now sits perfectly onto the object below!
How to move the origin of the object
The 3D cursor can be used to also adjust the origin of the object. By default, Blender puts an objects origin to the center of the object. You can go into edit mode, move the object and then go back into object mode to move the origin. However, you can also do this with the 3D cursor!
To do this, all you need to do is position the 3D cursor anywhere you like by using some of the other methods mentioned above here, then:
- Click Object in the 3D Viewport
- Click Set origin
- Then click Set Origin to 3d cursor.
You can see now, that after clicking origin to 3d cursor, the origin is now in the center of the 3D cursor. If we were to scale or rotate this object now, it would do it all around its new origin.
How to scale or rotate around the 3D Cursor
By using the 3D cursor you can also use it as a pivot point. This pivot point can be used for scaling or rotating objects or any point around it rather than just the standard center point.
- Choose and position the 3d cursor.
- Select the object or points that you want to scale or rotate
- Change the Transform Pivot Point to 3D Cursor
- The Press S or R to scale or rotate the selection around the 3D cursor
Using the 3d cursor we can see that all the points after scaling are going to converge and meet at the 3D cursor in the viewport. This can also be done for the location of the 3d objects and not just vertices
Conclusion
As you can see there are an incredible amount of things you can do with the 3D Cursor tool. You can use it as a point for scaling rotating or transforming objects. You can use it to align objects onto new surfaces in the scene. You can use it as its own transform orientation to make very specific adjustments on unique axis!
It goes without saying, that there are of course a ton more ways to use the 3D cursor but hopefully this has given you enough of a deep dive into some interesting ways to use this tool.
Getting The Cursor Back To The World Origin And Other Cursor Tips
Don’t miss out on our biggest sale of the year. Get 70% OFF on our selected products.
Please enable JavaScript
If you are not used to working in 3D space, then there are a lot of things that you will need to work on to become habits. One thing that you may find surprisingly complex is the use of the 3D cursor, which is very different from manipulating the traditional 2D mouse cursor used in 99% of applications.
To reposition your 3D cursor back to the center of the world, origin used the hotkey Shift + C. Not only will this censor your cursor back to its original location, but it will also change your view so that you can visualize your entire scene.
The 3D cursor is used for a number of days for different tasks, most notably for the ability to add new objects to your scene. Most 3D artists prefer to add their new models at the center of their world origins and then move those models once completed.
Where Is The World Origin In The 3D Viewport?
The world origin is easy enough to locate in the 3D viewport, so long as we have the overlays turned on. When you open up a new project in Blender, you will always start out with a default cube. This default cube will always be located in the coordinates 0,0,0, meaning can always be found at the center of the world origin.
Even if we were to delete our default cube, it would still be very easy to locate the center of the world’s origin. Within the viewport, you will see green and red lines that will indicate the wire and X axes respectively.
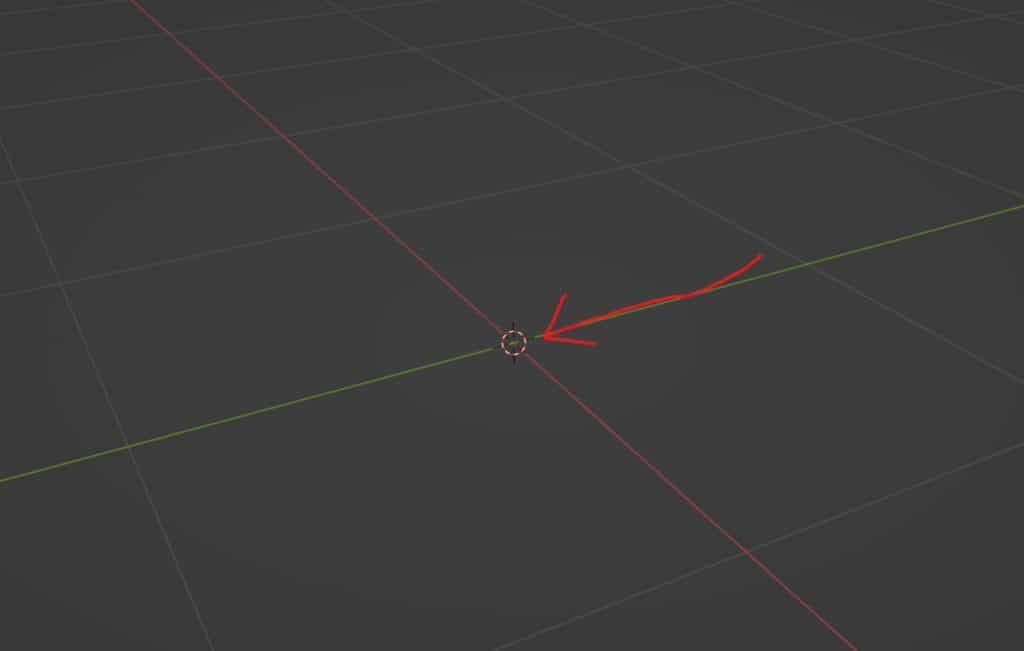 Center Of The World Origin
At the point where these two lines connect and crossover is the center of the world origin or the coordinates 0,0,0.
Note that while we can add in the blue line to indicate the Z-axis, it is not enabled by default and only the green and red lines are visible within our overlays when opening a new file in Blender.
How To Center The 3D Cursor To The World Origin?
In the tool shelf, we have the ability to select our cursor, which looks like a circle with red and white lines going around the circle.
When this tool is activated, we can use the left mouse button to reposition the 3D cursor anywhere in our scene.
A common mistake that artists make of varying levels is to accidentally move the 3D cursor to another location.
If you want to restore your 3D cursor back to its original location, which is at the centre of the world origin, there are two methods that we can use to achieve this.
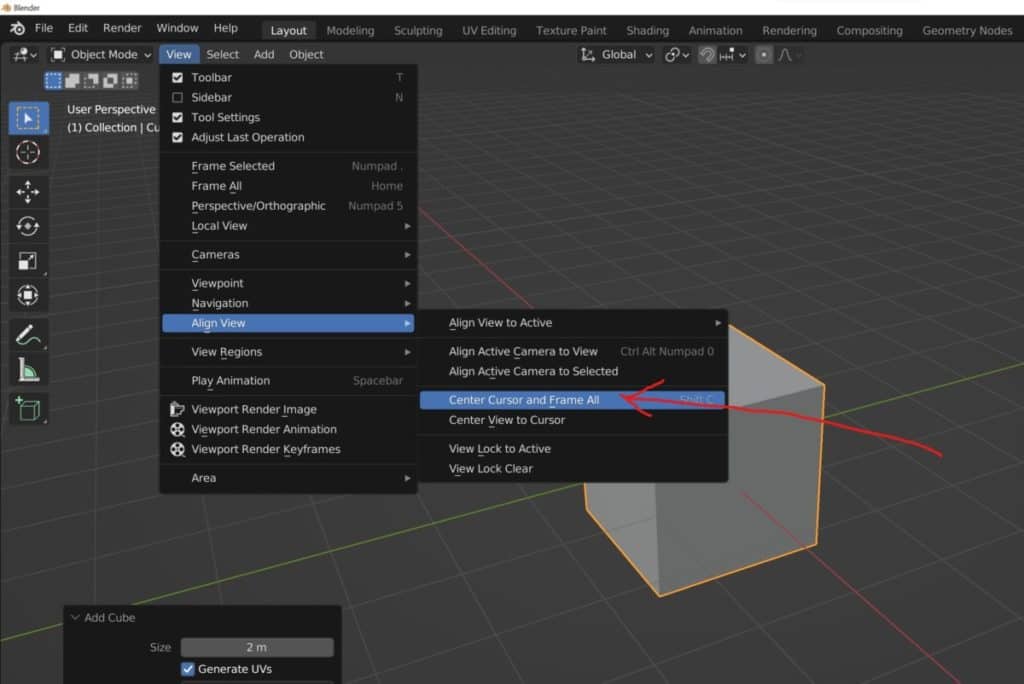 Center Cursor And View All
The first method is to center your cursor and view all, which can be done by either going to the few menu located in the 3D viewports header bar, hovering your cursor over the Align View option and then choosing the centre cursor and view all options from this sub menu. Alternatively, you can also use the hot key Shift + C to do the exact same thing.
The second method is to use the side panel to reposition your 3D cursor to a specific location. Press the N key to open up the side panel if it is not already visible.
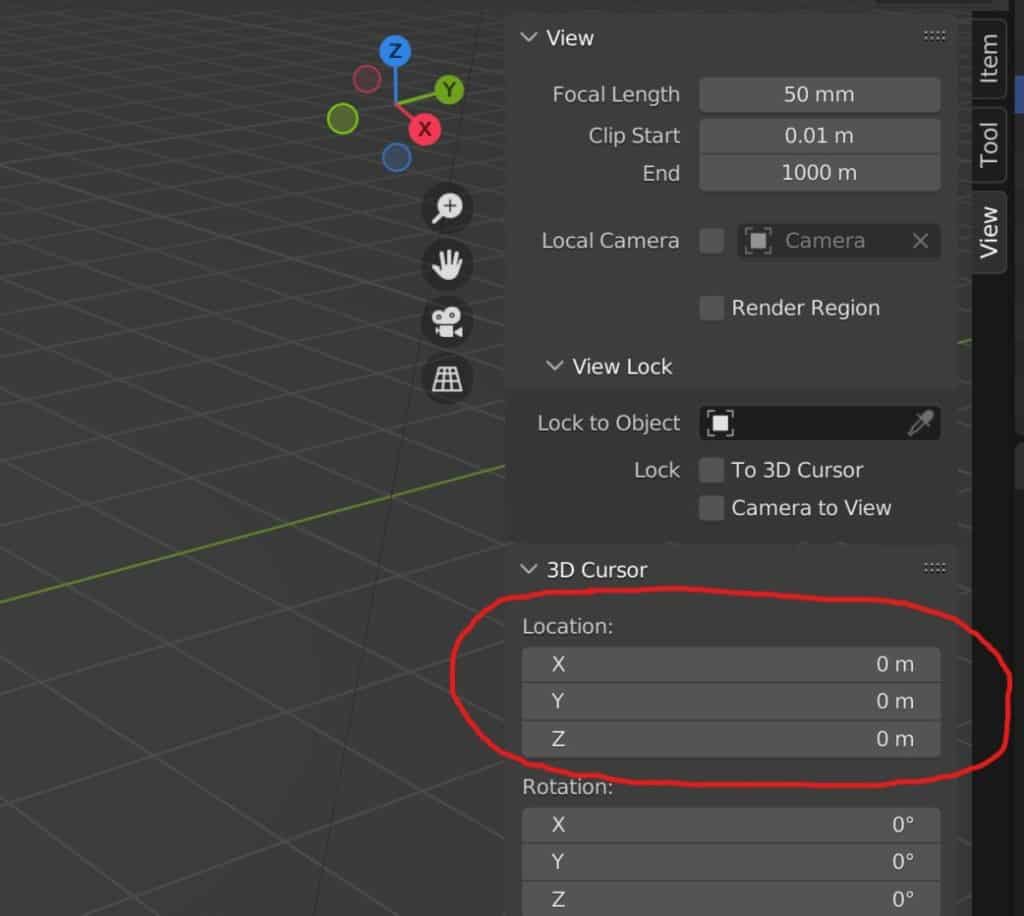 3D Cursor Location Coordinates
Then select the View tab in the side panel and scroll down until you can see the location values for your 3D cursor. You can re-position the cursor on the X. Y, and Z axes by typing in numerical values in the side panel.
By using the coordinates 0,0,0 on the three axes, you will be able to reposition your 3D cursor to the center of your world origin.
If you want to learn more about Blender you can check out our course on Skillshare by clicking the link here and get 1 month free to the entire Skillshare library.
Moving Objects Back To The World Origin Using The 3D Cursor
There are many reasons why the 3D cursor is one of the more valuable tools that you can learn in Blender. One example of using the 3D cursor is to move objects back to the world origin, or even to a custom location defined by the 3D cursor itself.
For example, if the 3D cursor was at the center of the world origin, then we could select an object in our viewport and then go to the object menu.
We can then access the origin sub-menu and select origin to cursor, which will position at the origin of the object at the location of the 3D cursor. This will normally be the world origin.
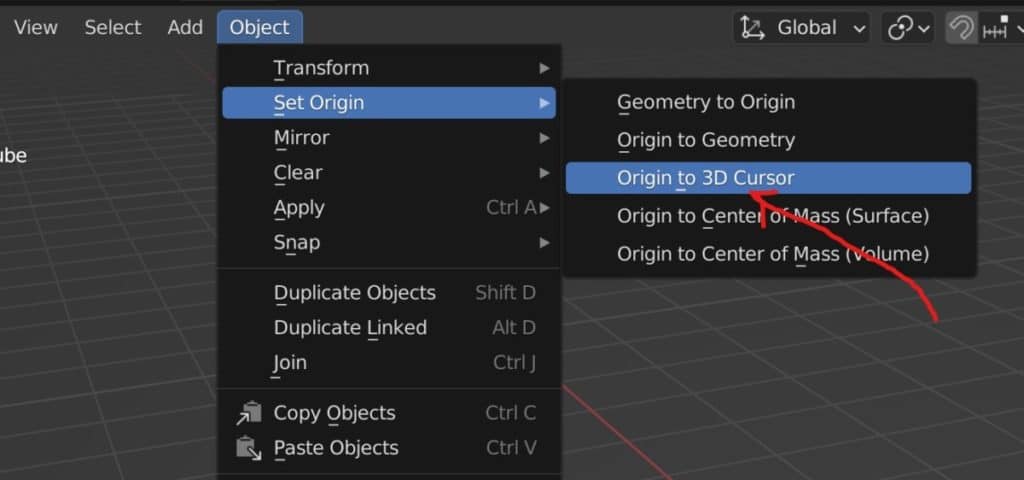 Origin To 3D Cursor
This would allow us to change the way that our objects behave whenever we rotate or scale them, as the object origin would be in a different position to the mesh geometry.
If we wanted to use this method to get the whole object back to the centre of the world origin, then we can do the process above and then return to the origin menu, before selecting geometry to origin from the menu.
Of course, a simpler approach would be to simply select the object itself and then type in the coordinates in the side panel for where you would want to position that object.
When sculpting or texture painting in Blender the best method is to always use a graphics tablet. But these come at many different price points and forms. If you want to get started with sculpting using a graphics tablet then we recommend this as your starting point. It served us well for over 4 years before we upgraded to a more expensive tablet ourselves.
Why Is The 3D Cursor Not Visible In The Viewport?
Occasionally you may find the 3D cursor is not visible within the 3D viewport, and there are a couple of reasons as to why it this could be the case.
The first reason is that you have moved the 3D cursor somewhere that is not visible within the current field of view, and so you may be required to orbit, pan, or zoom your view to locate it.
Go back to your location values of the 3D cursor in your viewports side panel and check to see if the values differ from the world origin. You can reset them back to 0,0,0 to move your cursor back to the center.
If that does not work then you will likely have hidden your 3D cursor from the overlays menu by accident.
To bring your cursor back into view, first, open the viewport overlays menu in the header of the 3D viewport.
Under guides, you will have the ability to turn on visibility for the 3D cursor if it is currently unticked. So enable this option to view your 3D cursor again.
If the cursor is still not visible and the rest of your guides, like the grid and origin, are also invisible, then click on the button next to the viewport overlays menu to enable your overlays. It should be highlighted blue when active.
Centering Your View Around The 3D Cursor?
Another way to use the 3D cursor is to have it as the focal point of your view, so that when you orbit, pan, and zoom in Blender you are doing so with the cursor as your ‘view’ origin, instead of the center of the world origin.
There are two ways to center the view to your 3D cursor. The first method is to go to the view menu in the header bar of the 3D viewport.
From the view menu, locate the align to view object and hover your mouse cursor over it to reveal the menu.
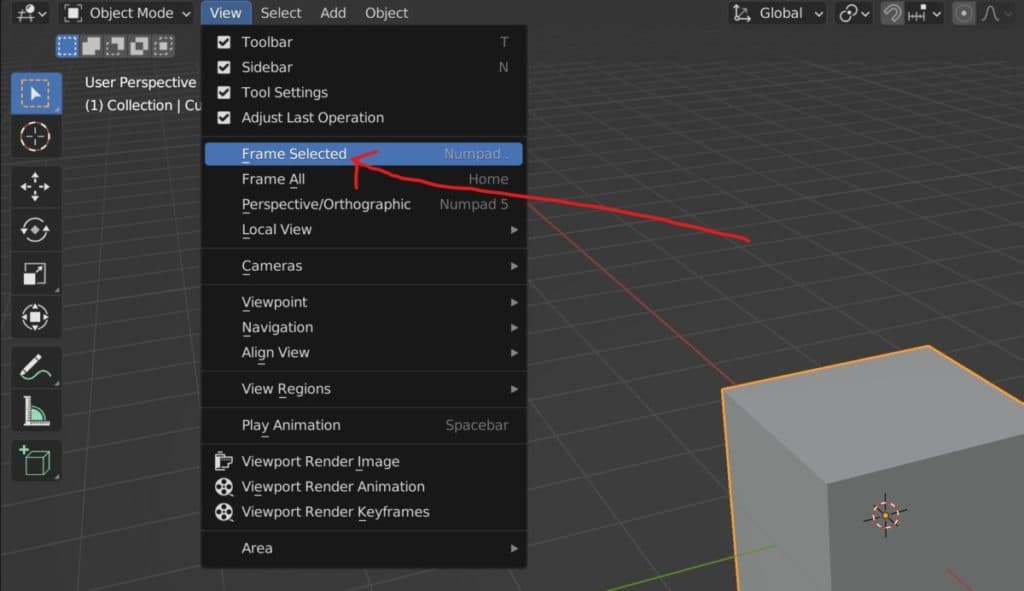 Frame Selected
Choose the option labeled ‘center view to cursor’ and then your view will snap its focus to the cursor regardless of where it is located.
The second option is to hard lock your view to the position of the 3D cursor. This can be done by opening up your side panel and then accessing the view tab.
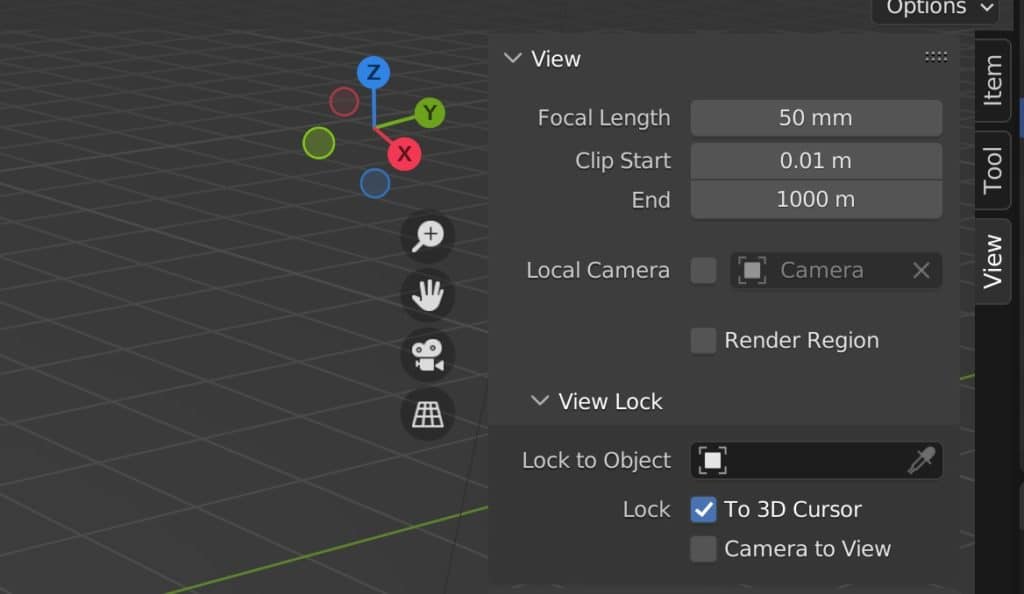 Lock To Cursor Option
In the view section, we have a sub-menu for view locking. In this menu, we have the ability to lock our view to either the camera object or the 3D cursor. Select the 3D cursor and then Blender will snap to that location.
Centering Your View Around The World Origin?
What if you wanted to center your view to the world origin but did not want your 3D cursor to be positioned there?
Blender always needs to use either an object or an element to act as the point of reference for the viewport camera.
So centering our view to the world origin requires us to have either an object (like a cube) or an element (3D cursor) at that location.
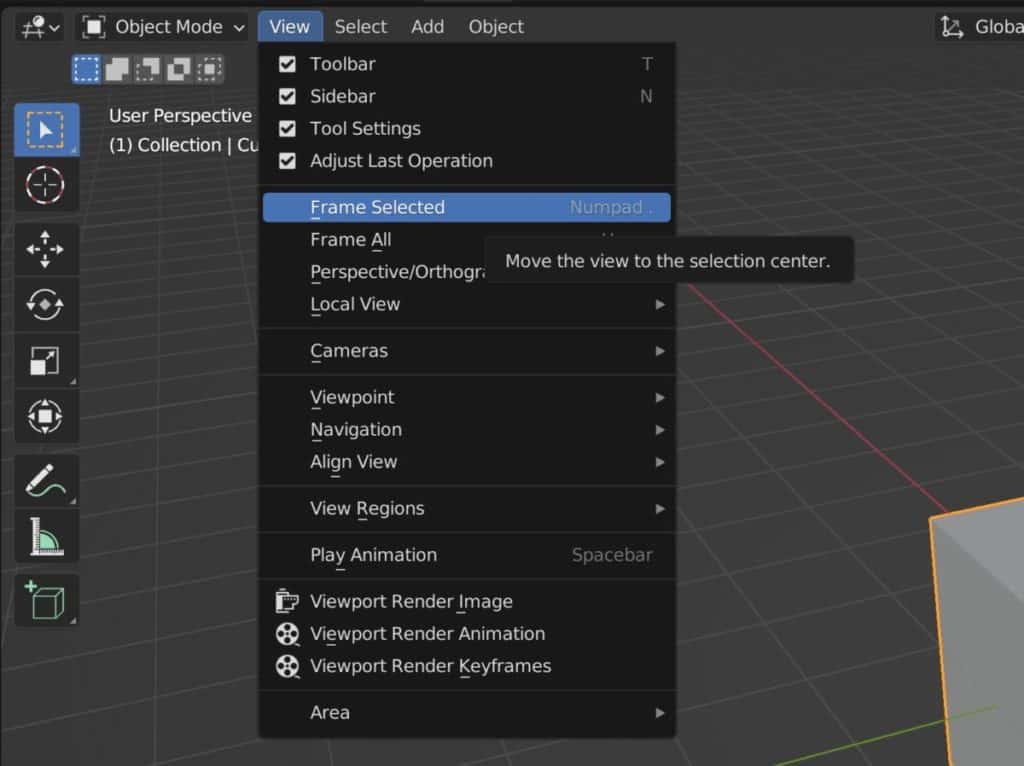 Frame Selected Option
If you don’t want to use a cursor, then use an object instead. Create a new object and then position it at the coordinates 0,0,0. Then you can center your view to the active selection by pressing the period key on your number pad or by going to View>Frame Selected.
Thanks For Reading The Article
We appreciate you taking the time to read through the article and we hope that you found the information that you were looking for. Below we have compiled a list of additional topics that we think you may be interested in reading.

What Are The Best Free Animation Applications To Use?
Animation has become an increasingly popular way to tell stories, educate, and entertain audiences of all ages. However, animation software can be expensive, making it difficult for beginners or those
What Is A 3D Printing Pen, And How Do We Use It?
3D printing technology has revolutionized the manufacturing industry, making it easy to create complex and customized objects. 3D printing pens are one of the latest innovations in this field, rapidly
How To Change The Handle Types For Keyframes?
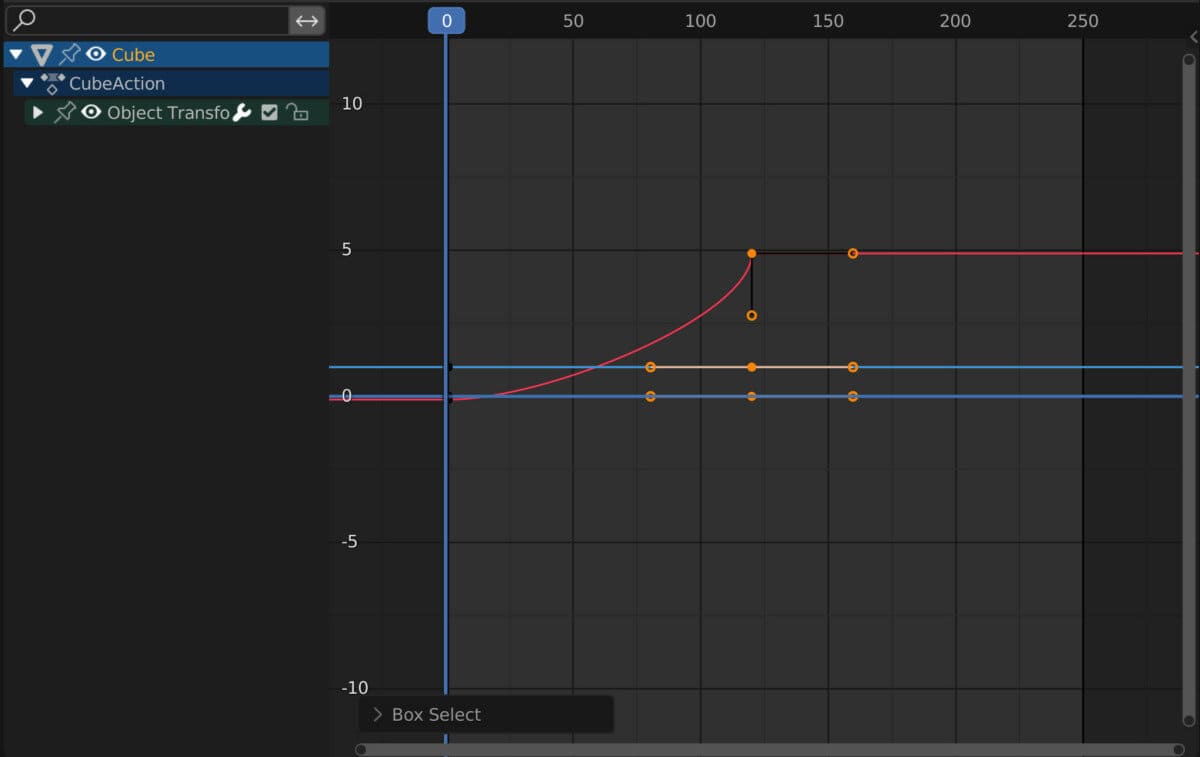
Animating in Blender requires us to not only create keyframes for our animations but also manipulate them by changing the interpolation of those frames and how they interact. The manual