Time and pitch manipulation effects
The Automatic Pitch Correction effect is available in both the Waveform and Multitrack editors. In the latter, its parameters can be automated over time using keyframes and external control surfaces.
Choose Effects > Time and Pitch > Automatic Pitch Correction , and set the following options:
Specifies the scale type that best suits the material: Major , Minor , or Chromatic . Major or Minor correct notes to the specific key of the music. Chromatic corrects to the nearest note regardless of key.
Sets the intended key for corrected material. This option is available only if Scale is set to Major or Minor (because the Chromatic scale includes all 12 tones and isn’t key‑specific).
The combination of scale and key determines the key signature.
Controls how quickly Adobe Audition corrects the pitch toward the scale tone. Faster settings are usually best for notes of short duration, such as a fast, staccato passage. An extremely fast attack can achieve a robotic quality, however. Slower settings result in more natural‑sounding correction on longer sustaining notes, such as a vocal line where the singer holds notes and adds vibrato. Because source material can change throughout a musical performance, you can get the best results by separately correcting short musical phrases.
Defines the threshold beyond which notes aren’t corrected. Sensitivity is measured in cents, and there are 100 cents per semitone. For example, a Sensitivity value of 50 cents means a note must be within 50 cents (half a semitone) of the target scale tone before it is corrected automatically.
Choose a source channel in which pitch changes are most clear. The effect analyzes only the channel you choose, but applies the pitch correction equally to all channels.
Sets the Fast Fourier Transform size of each pieces of data that the effect processes. In general, use smaller values for correcting higher frequencies. For voices, a setting of 2048 or 4096 sounds most natural. For short, staccato notes or percussive audio try a setting of 1024.
Specifies the tuning standard for the source audio. In Western music, the standard is A4 at 440 Hz. Source audio, however, may have been recorded using a different standard, so you can specify A4 values from 410 to 470 Hz.
When you preview audio, displays the amount of correction for flat and sharp tones.
Manual Pitch Correction effect
The Manual Pitch Correction effect lets you visually adjust pitch with the Spectral Pitch Display . The Spectral Pitch Display shows the fundamental pitch as a bright blue line, and overtones in yellow to red hues. Corrected pitch appears as a bright green line.
You can visually monitor pitch at any time, without using the Manual Pitch Correction effect. Simply click the Spectral Pitch Display icon in the options bar. To customize resolution, decibel range, and gridlines, adjust Pitch Display settings in the Spectral Displays preferences.
Choose Effects > Time and Pitch > Manual Pitch Correction .
In the Manual Pitch Correction window, set the following options:
Choose a source channel in which pitch changes are most clear. The effect analyzes only the channel you choose, but applies the pitch correction equally to all channels.
Create smoother transitions when using envelope keyframes to apply different pitch correction over time.
Pitch Curve Resolution
Sets the Fast Fourier Transform size of each piece of data that the effect processes. In general, use smaller values for correcting higher frequencies. For voices, a setting of 2048 or 4096 sounds most natural, and a setting of 1024 creates robotic effects.
In the Editor panel, do either of the following:
- To change pitch uniformly, drag the Adjust Pitch knob in the heads-up display.
- To change pitch over time, add keyframes to the yellow envelope line in the center of the waveform display.
To zoom in on specific pitch ranges, right-click and drag in the vertical ruler to the right of the Spectral Pitch Display. To reset the zoom level or customize the displayed scale, right-click the ruler and select options from the pop-up menu.
Pitch bender effect
Use the Pitch Bender effect to change the tempo over time to vary the pitch. The effect now uses a keyframe edit envelope laid across the entire waveform, similar to the Fade and Gain Envelope effects.
Choose Effects > Time and Pitch > Pitch Bender, and set the following options:

In the Editor panel, click the blue envelope line to add keyframes, and drag them up or down to change amplitude. To quickly select, reposition, or delete multiple keyframes, see Adjust automation with keyframes.
Select the Spline Curves option to create smoother, curved transitions between keyframes, rather than linear transitions. See About spline curves for graphs.
Controls the quality level. Higher quality levels produce the best sound, but they take longer to process. Lower quality levels produce more unwanted harmonic distortion, but they take less time to process. Usually, you won’t notice harmonic distortion for levels from Very Good and higher. Aliasing still occurs, however, when you shift the pitch up, but the higher quality levels greatly reduce the distortion when you shift the pitch down.
Sets the scale of the vertical ruler (y-axis) as semitones (there are 12 semitones to an octave) or as beats per minute. For a range in semitones, the pitch changes logarithmically, and you can specify the number of semitones to shift up or down. For a range in beats per minute, the pitch changes linearly, and you must specify both a range and a base tempo. You can specify the exact tempo of a selection to change to different rates, but this isn’t required.
Pitch shifter
The Pitch Shifter effect changes the musical pitch. It’s a real-time effect which can be combined with other effects in the mastering rack or the effects rack. In the Multitrack View, you can also vary pitch over time by using automation lanes.
Choose Effects > Time and Pitch > Pitch Shifter effect, and set the following options:
Contains options that adjust pitch:
- Semi-Tones Transposes pitch in semi-tone increments, which equalmusical half-notes (for example, the note C# is one semi-tone higher than C). A setting of 0 reflects the original pitch; +12 semi-tones is an octave higher; -12 semi-tones is an octave lower.
- Cents Adjusts pitch in fractions of semi-tones. Possible values range from -100 (one semi-tone lower) to +100 (one semi-tone higher).
- Ratio Determines the relationship between shifted and original frequency. Possible values range from 0.5 (an octave lower) to 2.0 (an octave higher).
Determines sound quality, with theHigh setting taking longest to process. Use the Low setting for 8-bit or low-quality audio, and use the High setting for professionally recorded audio.
To quickly determine which Precision setting to use, process a small selected range at each setting until you find the best balance of quality and processing time.
Control how audio is processed:
- Splicing Frequency Determines the size of each chunk of audio data. (The Pitch Shifter effect divides audio into very small chunks for processing.) The higher the value, the more precise the placement of stretched audio over time. However, artifacts become more noticeable as values go up. At higher Precision settings, a lower Splicing Frequency may add stutter or echo. If the frequency is too high, sound becomes tinny and voices have a tunnel-like quality.
- Overlapping Determines how much each chunk of audio data overlaps with the previous and next ones. If stretching produces a chorus effect, lower the Overlapping percentage. If doing so produces a choppy sound, adjust the percentage to strike a balance between choppiness and chorusing. Values range from 0 to 50%.
- Use Appropriate Default Settings Applies good default values for Splicing Frequency and Overlapping.
Stretch and Pitch effect (Waveform Editor only)
The Time And Pitch > Stretch And Pitch effect lets you change the pitch of an audio signal, the tempo, or both. For example, you can use the effect to transpose a song to a higher key without changing the tempo, or you can use it to slow down a spoken passage without changing the pitch.
This effect requires offline processing. While it is open, you cannot edit the waveform, adjust selections, or move the current-time indicator.
127: Quick Tip: Change the Speed & Pitch of your Voice in Adobe Audition (Fun Effects)

The Effect:
Sound like Alvin & The Chipmunks or sound like you’ve had just a little too much to drink.
Adobe Audition has some fun effects that may come in useful for some comedy in your podcast or videos or just having fun.
To Apply: Go to Effects…Stretch Time & Pitch and speed up and slow down your voice. Have some fun with this one
Video Tutorial:
Need Help?
or want to collaborate? If you are smarter than me and know how you might need a strategic thinker with a lot of technical knowledge and creative skills. I’m still figuring out what I want to be when I grow up.
My name is Mike Murphy, I’m a one man band and podcaster.
Learn. Create. Move Forward.
@mikeunplugged on Twitter or Instagram
How to Speed Up and Slow Down Audio in Adobe Audition?
To change the speed of your audio in Adobe Audition, you’ll have to use the Stretch and Pitch (process) effect.

Stretch and Pitch effect in Adobe Audition.
Follow these steps to apply the Stretch and Pitch (process) effect:
- Select audio track
- Go to Effects->Time and Pitch->Stretch and Pitch (process)
- Adjust the Stretch parameter to control the speed of your audio
- Check the Lock Stretch and Pitch Shift (Resample) box to adjust the pitch of your audio simultaneously (Optional)
Using the Stretch and Pitch effect you have control over the speed of your audio and the pitch. By adjusting the Stretch below 100% you’ll speed up and shorten your audio; by going above 100%, your audio will stretch out and slow down.
Also, if you check the Lock Stretch and Pitch Shift (Resample) box the Stretch and Pitch Shift parameters will be locked and change simultaneously relevant to each other. Increasing the Stretch will lower the Pitch Shift and vice versa.
If you want a fading effect when using Stretch and Pitch, you can check presets at the top of the effect box, among which you’ll find a preset named Cutting Power. This preset will create a fade in effect.
Adobe audition как ускорить трек
Уроки по всем программам компании Adobe
Доброго времени суток, дорогие читатели. Вы наверняка встречали записи или видеодорожки, в которых звук периодически замедлялся или ускорялся. На самом деле – это достаточно популярная практика, используемая как блоггерами, так и звукорями. И в сегодняшней статье мы расскажем вам, как добиться такого эффекта в Adobe Audition.
Итак, для того, чтобы перейти в эффекты настройки скорости звука, вам нужно будет выбрать, на верхней панели, вкладку «Effects». В открывшейся табличке выберите пункт «Time and Pitch», а в еще одной табличке выберите «Stretch and Pitch process».
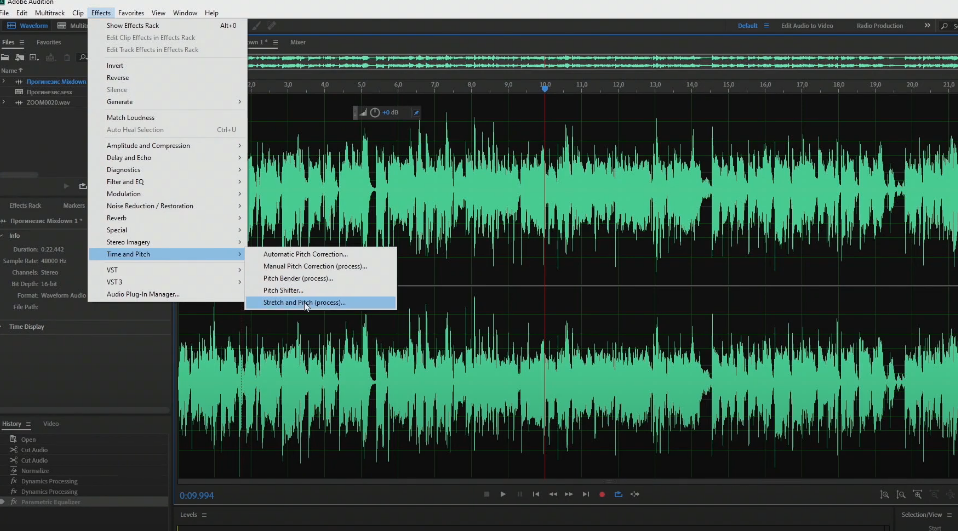
После этого у вас откроется табличка, в которой и будут настройки скорости. Обратите внимание на ползунок внизу, где Stretch. 100% — Это нормальная скорость воспроизведения вашего звука.

Чем ниже будет значение – тем быстрее будет воспроизводиться запись. Соответственно, чем больше будет показатель на ползунке, тем медленнее звук будет воспроизводиться, т.е. вы получите тот самый эффект замедления голоса или записи в целом.
Собственно, вам всего-то и нужно будет, что выбрать нужное значение на ползунке, а после нажать на «Apply», дабы принять все изменения, а после экспортировать ваш файл в нужную папку на вашем компьютере.