Export Project Dialog (*.wav; *.mp3, *.ogg, *.flac, *.mid)
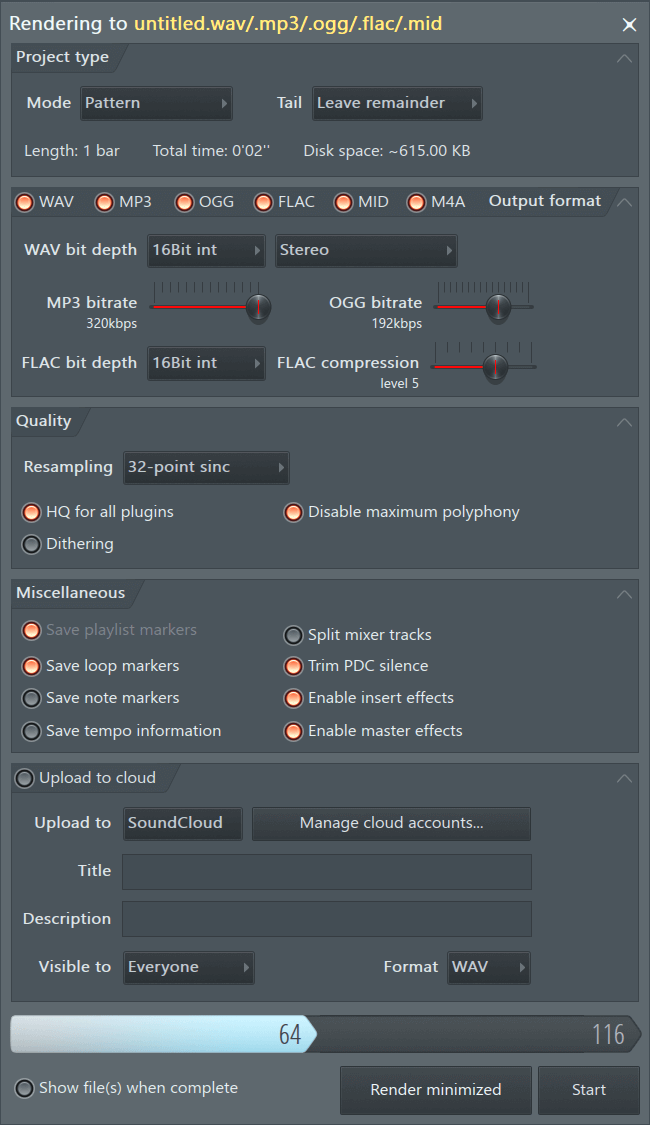
Export .wav or .mp3 audio files to be played in a media player, car stereo or hi-fi. The final mix is exported from FL Studio using the export option in the file menu in a non-real time process called ‘rendering’. The time taken will depend on export settings and project complexity. Rendered audio is usually better quality than the live sound from FL Studio.
About Rendering
- Master Mixer Track — By default, the Master Mixer track is rendered, unless you are using ‘Split mixer tracks’. This means any Mixer Track not routed directly, or indirectly to the Master won’t be included in the render.
- Export formats include:
- Audio — .wav, .mp3, .ogg, .flac & .m4a formats save an audio mix of your project. By default, the Master Mixer track is rendered, but you can export individual Mixer tracks with the ‘Split mixer tracks’ option. See the note below on including sounds from external synthesizers and audio hardware.
- MIDI — .mid saves Step Sequencer / Piano roll note data to standard MIDI files. MIDI is not an audio format.
- ‘Song mode‘ — Length is set by this hierarchy: 1. Any time-line selection, 2. The last time-marker beyond the last bar containing data. 3. The end of the last bar containing data AND 4. The Tail setting.
- ‘Pattern mode‘ — Length is set by this hierarchy: 1. The last time-marker beyond the last bar containing data in the Pattern. 2. The end of the last bar containing data in the Pattern AND 3. The Tail setting.
Recording External Hardware
- Make MIDI connections to the device from your computer AND audio connections from the device to your audio device inputs. as it is played by FL Studio (using a MIDI Out plugin to drive the hardware).
- Place the recorded audio as an Audio Clip in the Playlist.
- Render the project to audio as shown below.
Settings
We recommend watching the video A Digital Show and Tell (by Monty @ Xiph.org) to learn about how digital audio works. It will help you to understand why more and higher settings for ‘everything’ is not necessarily better.
Project type
- Mode — Choose to render the whole Song or the currently selected Pattern. In ‘Song‘ mode, the length of your rendered song rendered is set by this hierarchy: 1. Any time-line selection, 2. The last time-marker beyond the last bar containing data. 3. The end of the last bar containing data AND 4. The Tail setting.
- Leave remainder — Extends the render length to capture decaying sounds. If ‘Leave remainder’ fails to capture tail audio, add a PlaylistRepeat marker to extend the render end-point. If repeat markers are placed after the last Pattern, Audio or Automation Clip in the Playlist, the project will be rendered up to the position of the Repeat marker.
- Wrap remainder — Wraps any decaying sound at the end of the song back onto the beginning of the render. This is useful when rendering loops with effects to create the smoothest loop. NOTE: This feature works by starting the render at the last bar, then mixing any audio decaying after the last bar back into the start of the song. If the decaying sound comes from notes before the last bar it won’t be wrapped.
- Cut remainder — Cuts the render at the end of the last bar, selection or time marker.
Output format
Select the output format/s for the project render. To save in more than one format simply select multiple options.
NOTE: Sample rate — The output (Mixer) sample rate is set in the Audio Settings window.
- WAV — Wave (Lossless Uncompressed Audio). Wave is a lossless audio format and preferred for handling audio in a production environment (use it to save all your samples, sounds and archive material). The drop-down menu contains bit-depth options for the exported wave file.
- WAV bit depth — Bit-depth affects the noise-floor of the sample. This determines the quietest sound that can be captured or smallest changes in loudness that can be resolved. Generally 16 Bits is enough for music distribution. Use 24 or 32 Bit for archiving music production files.
- 16-Bit integer wave is the highest-quality audio file compatible with a wide range of playback devices. It’s also the CD audio format so if you want to create audio files compatible with CD format use 44.1 kHz, 16-Bit .wav files make sure to set 44.1 kHz in the Audio Settings window. NOTE: FL Studio does not burn to CD format, it creates audio files ready for burning. Use any VST CD burning program to create the audio CD.
- 24-Bit integer wave is a common bit-depth used by DAW hardware & some older DAW software. Use this bit-depth if 32-Bit (see below) float is not supported by the device or application.
- 32-Bit floating point is the native format of FL Studio’s mix engine. Render to 32-Bit float when you intend to continue mixing or editing the file in another application (wave editor or DAW) that supports the 32-Bit float format. 32-Bit float provides more precision for audio processing and so will ensure the highest quality is preserved during post-production activities.
- Sample rate affects the highest frequency that can be captured by the sample. Values between 22000 Hz (22 kHz) and 192000 Hz (192 kHz) are possible. As 44100 Hz (44.1 kHz)is the CD standard and is capable of capturing the entire frequency range humans can hear (20 Hz to 20 kHz), use it. You should have a specific reason for using sample rates above 44.1 kHz. For example, video often uses 48 kHz as the default sample rate for audio. Set the FL Studio sample rate in the Audio Settings.
- Stereo — Two channels for the Left and Right speakers.
- Mono (merged) — One channel where the left and right channels are merged into a single channel.
- Mono (left only) — One channel where the left channel data is saved as a Mono file.
- Mono (right only) — One channel where the right channel data is saved as a Mono file.
- What bit-rate should I use?
- 64 kb/s (or less) is useful for low-quality ‘demo’ tracks. Compression artifacts will be noticeable.
- 128 kb/s is the point where ‘acceptable’ quality starts for the majority of people. It is useful for e-mailing music files.
- 160 kb/s is the point where it becomes difficult for many people to distinguish CD from MP3 (not discerning FL Studio producers, of course, but. ). It is a good minimum bit-rate to use for music distribution and listening purposes. Some material may still produce audible compression artifacts. Listen carefully to the entire track with headphones if quality is important and consider a higher bit-rate.
- 224 kb/s (or greater) and mp3/ogg become practically indistinguishable from CD under normal listening conditions. It is a good minimum Bit rate to use for archival of a quality compressed copy of audio. bit-rates of 224, or greater, can be useful when collaborating over the Internet and you need to share audio files that may be impractical in CD .wav format (1400 kb/s).
NOTES: The maximum bit-rate for MP3 is 320 kbps and 450 kbps for ogg. The relationship between kbps setting and the audibility of artifacts will depend on the material being rendered and the listening environment. You should always check your rendered files with a good pair of headphones prior to release. Sample rates — the MP3 standard only supports 3 rates (32000, 44100 and 48000 Hz). Setting the FL Studio sample rate outside these values will result in MP3 rendering errors. The MP3 conversion introduces a small silence at the start of the file in addition to the original audio. For this reason it’s not suitable for use where time-alignment of the audio is critical (loops, samples, vocal tracks etc). Where possible use at least 16-Bit .wav format when sharing or saving audio in a production environment.
- Compression Level — This setting determines the effort put into reducing the size of the audio file. The difference in file size between level 0 (least effort) and 8 (most effort) is usually around 10%, a relatively small difference, prepare to be underwhelmed.
- 0 — Fastest compression, slightly larger files.
- 5 — Default setting.
- 8 — Slowest compression, slightly smaller files.
NOTE: FL Studio automatically imports FLAC files and converts them to WAV format, when loaded on the Playlist or in plugins such as Edison or Slicex.
- Make sure to save your project in its current state, the next step will replace Channel instruments.
- Use the macro Prepare for MIDI export on the main Tools menu that replaces all Channels with auto-configured MIDI Out plugins. This is necessary to export project-wide MIDI in the correct multi-channel format. To export individual Piano roll data as MIDI files use the Piano roll menu option ‘Export as MIDI file’.
- Select MIDI on the Export Project Dialog and press Start.
- Don’t save your project in this state you will lose the original Channel settings. Save to a new project if required.
Quality (Numerical Processing)
These quality settings relate to the computational accuracy of FL Studio synthesizers and effects when exporting. Leaving these at the default settings and you definitely will not ruin any mix. They do not normally play an important role in the Audible quality of the exported files.
- Resampling — Select the waveform interpolation method used for Sampler/Audio-Clip channels. Interpolation is a curve fitting process that computes intermediate sample amplitude data between the known sample points (filling in the gaps). This is required when samples are transposed from their original pitch or sample-rate and the program calls for a sample value out of sync with the source data-points. Without interpolation quantizing (amplitude) errors can create unwanted high-frequency harmonic artifacts (aliasing & quantizing errors). FL Studio provides several methods of increasing computational complexity and therefore accuracy:
- Linear interpolation is the fastest method. It provides basic linear averaging between samples, however it can result in aliasing (high frequency noises) if samples are transposed far from their original pitch.
- 6-point Hermite has been optimized to be a quick curve interpolation method with superior quality to linear interpolation. It is ideal for exporting ‘good quality’ audio files. Explore the higher settings if you notice aliasing in the render.
- 16, 24. 512-point Sinc methods provide increasingly higher quality interpolation, but they are also very slow. We recommended that you use setting above 64-point Sinc on your final render if you hear aliasing with lower interpolation methods. Or when in doubt, you can always just use 512-point Sinc, but be prepared for longer render times.
What is dithering? Simply, hiss. Yes really. Dithering randomizes the value of the least significant bit when making bit-depth conversions (32 to 16 for example). The least significant bit in the digital audio file represents the smallest possible change in output level. This then is noise added at about -96 dB for 16 Bit export. The purpose of dither is to break up the predictability of rounding errors that happen during the bit-depth conversion. Rounding errors affect only the value of the least significant bit so dithering randomizes this value (0 or 1), according to the dither formula used. If dithering is not used, these rounding errors correlate with the audio signal and so generate alias frequencies. When dithering is used these alias frequencies are replaced by an additional background hiss. Hiss is generally less distracting or noticeable than aliasing and so dithering has become a standard process to apply to the final 16 bit render ready for CD.
Miscellaneous Options
- Save playlist markers — Slice markers will be saved to .wav format files at each Playlist Time Marker.
- Save loop markers — Saves loop markers in .wav files. Useful for creating looped samples for use in Sampler plugins.
- Save note markers — Each Note and Audio Clip (start) in the project adds a slice marker to the exported audio file so exported audio is perfectly sliced, ready for use. Use sliced loops in plugins such as Fruity Slicer and Slicex OR in the Playlist, with the specialty time-stretching options Time stretching > Mode > Slicestretch and map. NOTE: As each note and Audio Clip adds slices, complex projects will quickly get out of hand. Use this option with a few Channel Samplers, FPC or a limited number of note-driven plugins to specifically create sliced loops.
- Save tempo information — Saves project tempo in .wav files meta-data format. Useful for programs that can read this data type. NOTE You can change the tempo using the Edison Sample Properties dialog and the slice/region markers in Edison’s wave-edit window.
- This option does not export to flac/mp3/ogg formats.
- If you are using plugins with multiple-outputs to Mixer tracks, make sure the Mixer tracks have been renamed from the default ‘Insert N’ format. FL Studio uses this to flag they are being used, and will render them.
- Master FX are only included on the Master Track export. To include Master Effects use the Playlist Menu > Tools > Export all playlist tracks feature.
- Muted Mixer tracks, including the Master, will not be exported.
Upload to cloud
- Manage cloud accounts. — Opens a dialog to manage logins to your online accounts that accept audio or video uploads (in a future release).
- SoundCloud™ — soundcloud.com. You must have a SoundCloud account to use this feature.
Rendering Buttons
- Show file(s) when complete — Opens the file location after the render is completed.
- Background Rendering — Minimizes and renders in background mode, allowing you to work on other applications.
- Start — Starts Rendering. The name will change to Abort once rendering is underway.
Command line export options
-
Windows Rendering audio files — Open a Command Prompt window.
- All projects in a folder (including sub-folders) using a complete path — FL.exe /R /Emp3 /F»c:\src\», where c: is the target drive, src is the path to folder with .flp file and project.flp is the target project to render.
- Single project — FL.exe /Emp3 /R «c:\src\project.flp», where c: is the target drive, src is the path to folder with .flp file and project.flp is the target project to render.
- All projects in a folder (including sub-folders) using a complete path — Open «/Applications/FL Studio 21.app» —args -R -Emp3 -F»/Applications/FL Studio 21.app/Contents/Resources/FL/Data/Projects/Demo songs/»
- Single project — Open «/Applications/FL Studio 21.app» —args -R -Emp3 -F»/Applications/FL Studio 21.app/Contents/Resources/FL/Data/MyProjects/Target Project.flp»
-
/R[filename] /E<extensions> /F<foldername> [project.flp].
- /R: — Render project.flp to an audio file. The optional filename parameter (extension is ignored, path not) specifies the output filename. If no filename is specified, it renders to project.wav.
- /E: — specify which format you want to export to, separated by commas. Example: /Emp3,ogg,wav
- /F: — specify a source folder. All .flp files in this folder will be rendered. Example: /F»d:\MyProjects»
- /O: — specify a destination folder. All files specified by /R or /F will be rendered to this folder. Example: /O»d:\MyRenderings»
- /D: — Diagnostics option (will set specific diagnostics rendering defaults)
Syntax (Render MIDI File)
/M: Render all flp files in the folder to a MIDI files.
- /M<folder> Example: /M»d:\MyProjects»
- /M<filename> Example: /F»d:\MyProjects\ExampleProject.flp»
Export to ZIP file
/Z: Export all flp files in the folder, or the single specified flp file, to zip files.
The Best Export Settings for FL Studio
There are many configurations and settings when exporting audio in FL Studio. But in fact, one configuration will work for almost everything, and you may do yourself and others disfavor if you deviate from these settings.

This is the settings window you see when exporting audio in FL Studio. I will break down all of the settings further down on this page. But these are the optimal settings for almost every project.
- If you choose to export as MP3 then choose 320kbps
- If you export as WAV choose a bit depth of 24 or higher.
- At the top of the settings, go to Tail and change it to Cut remainder
If you got the above settings, the other settings are perfectly good by default.
Recommended Settings
The export settings are divided into different categories. Here is a more advanced breakdown of the recommended settings as well as what each setting does.
Project type
- Mode: Full Song
- Tail: Cut Remainder
Firstly we have the settings for Mode as well as Tail. The tail is an extra split second that is added when exporting audio. But by choosing the “cut remainder” option, you export only the area you select and nothing more. This is important for keeping the timings of stems, samples, and loops consistent.
Quality
- WAV bit depth: 24Bit int
- MP3 bitrate: 320kbps
Bitrate and bit depth is the resolution of the audio you’re exporting. It’s the same as with pictures, higher resolutions yield higher fidelity, but there is a point at which you don’t need a higher resolution because you can’t see it.
I recommend the 24 Bit int as it’s the standard resolution in modern audio production. You can go with higher bit depths and bitrates at the expense of having bigger filesizes. But always export MP3 at 320kbps, because sometimes projects break or get lost over time. And by saving your files in 320kbps you are storing a backup of high-quality audio files.
- 24-point sinc
- HQ for all plugins: On
- Disable Maximum polyphony: On
Resampling only applies to transposed audio clips. In short, this is when FL Studio has to bridge volume levels between sample points. Lower resampling rates take less CPU power to compute, but 24-point sinc is a good average level. You can increase this as much as you want, but your project may a longer time to export.
Disable max polyphony exists within the quality settings because of the setting “limit polyphony” within FL Studio, which limits instruments’ maximum polyphony. By activating Disable maximum polyphony you override this setting if it’s activated.
Dithering should only be applied in certain circumstances and you do not need to enable it for most purposes.
Miscellaneous
- Activate Save Tempo Information
Lastly, we have the Miscellaneous section with a little bit of everything. I am not going to go in-depth about all of the settings here. But I recommend you to activate save tempo information, as this will embed the tempo into the MP3 or Wav which is useful in some situations.
Use the default settings for every other option.
Recommended
Latest from the Studio
When you buy through our links, we may earn a commission. Learn more here!
Best Export Settings in FL Studio 21 | Ultimate Guide
FL Studio can export audio files in a variety of formats and bitrates. The following sections will explain the different options, but first, let’s look at how to access them:
Click on File > Export Audio (or press Ctrl + E) . This will open a window where you can select your desired format, bitrate and other options (see below).
You can also right-click on an audio track in your project window and choose «Export Audio» from the context menu.
Now you have to choose the export settings .
Before you choose the setting let’s compare the two file formats .
Export to MP3 or WAV?
First, let’s compare the two files.
MP3 files are compressed and smaller, while WAV files are uncompressed and larger. MP3 files sacrifice some audio quality for smaller file sizes, while WAV files retain the original audio data for better sound quality.
Okay, but what file format should you choose when exporting in FL Studio 21?
Here are some examples of when to export audio to MP3:
Sharing music or podcasts: If you’re an independent artist or podcaster, exporting your audio files to MP3 will make it easier for your audience to download and listen to your content on various devices.
Sending audio files via email: When you need to send an audio file through email, it’s best to compress it to an MP3 format so that it takes up less space and can be easily received by the recipient.
Here are some examples of when to export audio to WAV:
Professional Music Production: When working on professional music production, sound engineers and producers need the highest audio quality possible. Exporting to WAV format ensures that the audio remains uncompressed and maintains its original fidelity, allowing for further editing and mixing in the production process.
Audio for Video Projects: When incorporating audio into video projects, it is essential to maintain high-quality sound. Exporting audio to WAV format ensures that the audio will not degrade due to compression, resulting in a better overall viewing experience for the audience.
Sound Design and Effects: When creating sound effects or designing audio for games, movies, or other multimedia projects, the quality of the audio is critical. Exporting to WAV format ensures that the sound designer has access to an uncompressed, high-quality audio file that can be easily manipulated and edited to create the desired effects.
Okay, I hope you have decided on which file format suits your needs the best.
Now, let’s dive into the best export settings for the two file formats in FL Studio.
The best export settings for WAV files in FL Studio
If you are planning to send this file off to a record label, then choosing a file format in 24bit Wav might be the best solution.
Go to the export options in FL Studio 21.
Select WAV file format .
Then set WAV bit depth to 24Bit int .
Under Quality, set the Resampling to 512-point sinc (it will take the longest to export, but gives the best audio quality)
Remember to tick on both “HQ for all plugins” and “Disable maximum polyphony” .
And there you have it.
A high-quality 24-bit WAV file export in FL Studio 21.

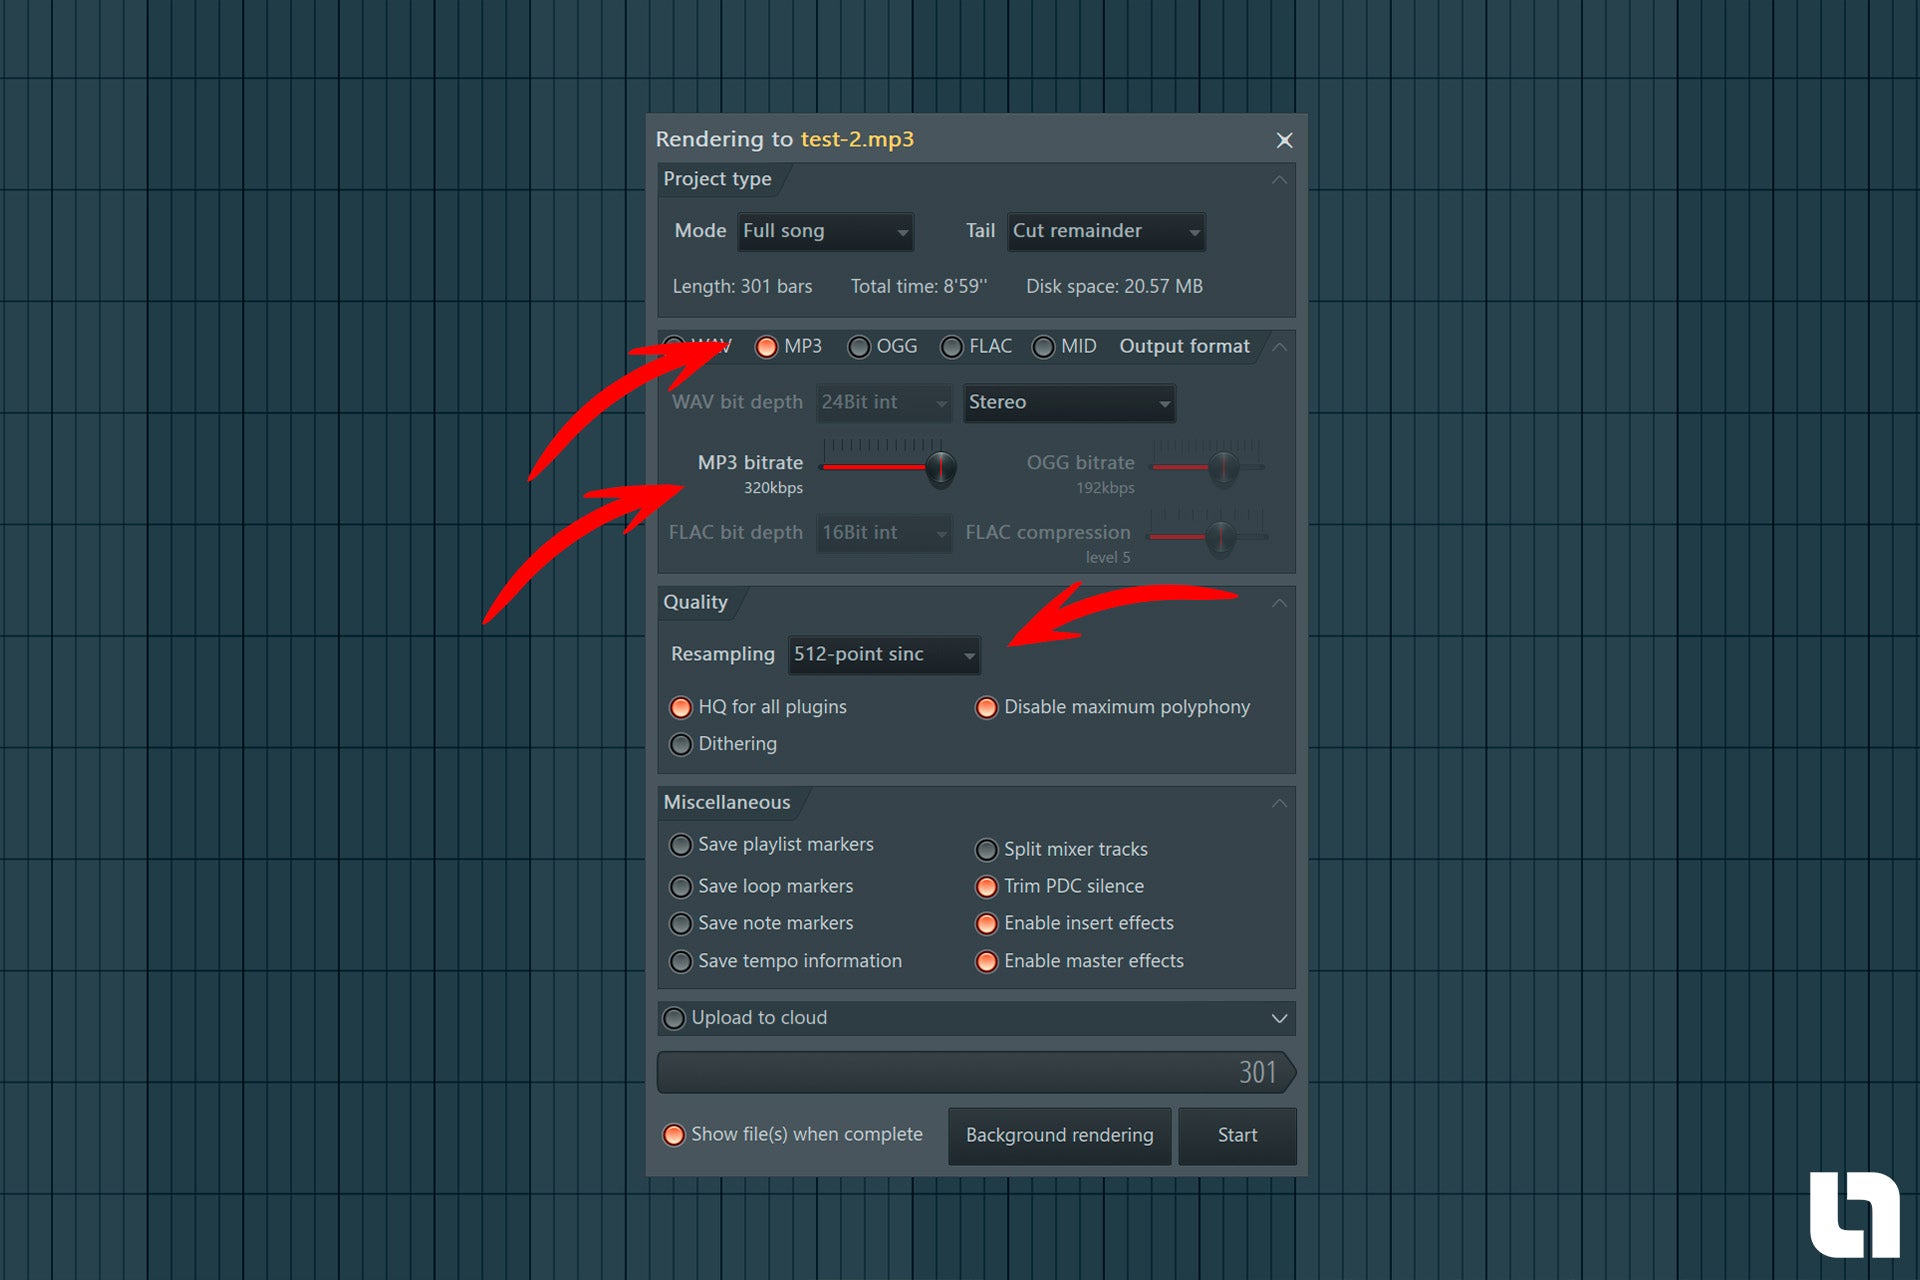
The best export settings for MP3 files in FL Studio
For MP3 file export, you can use almost the same settings as for the WAV files.
Select MP3 format.
Set the “MP3 bitrate” to 320kbps.
Under Quality, set the Resampling to 512-point sinc.
Tick on both “HQ for all plugins” and “Disable maximum polyphony”.
Export the file.
Done! Now you have a high-quality MP3 file ready to be sent out in the world.
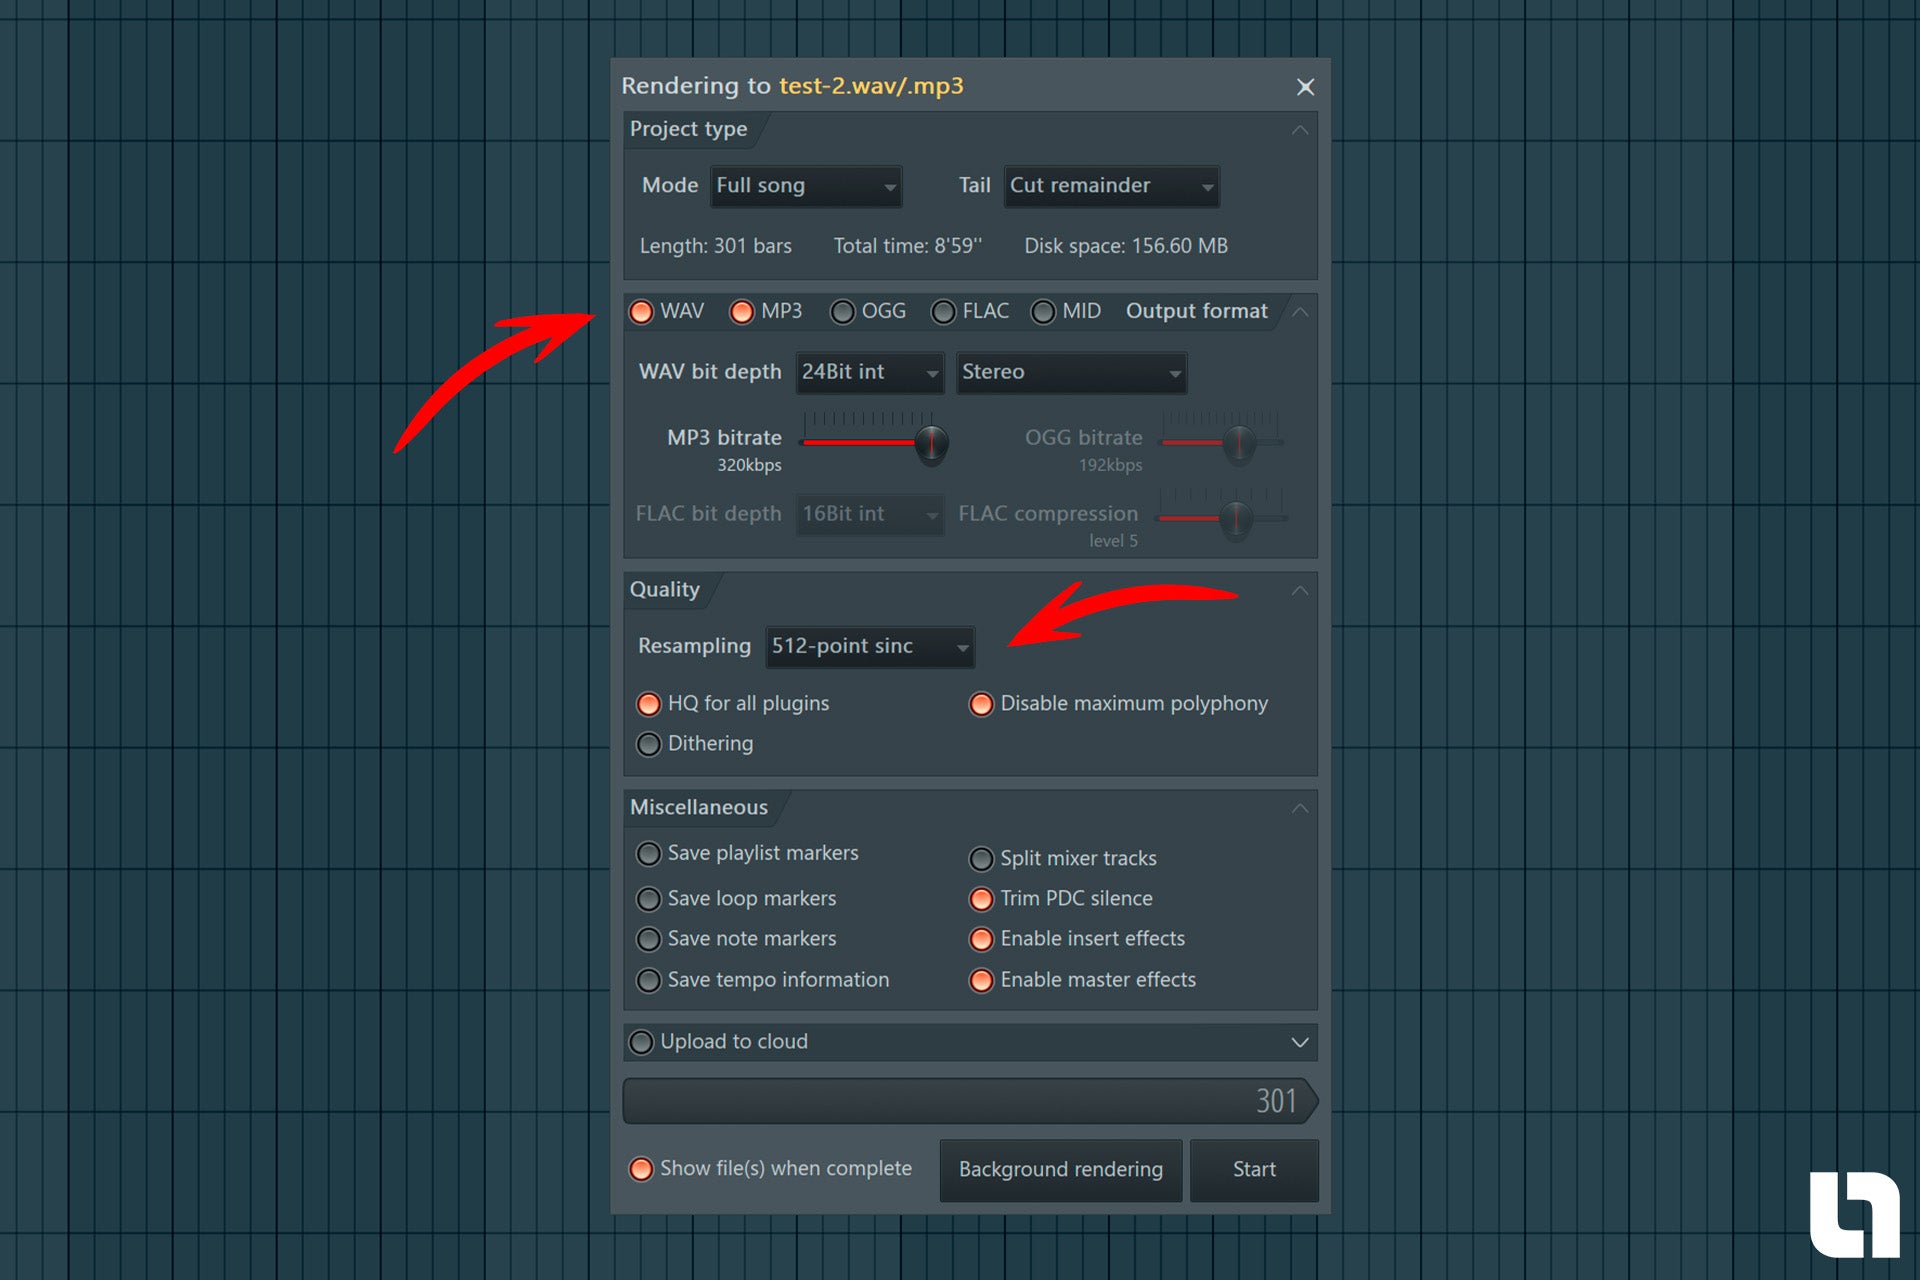
Export MP3 and WAV at the same time in FL Studio
If you, for example, like me, want to export both an MP3 and a WAV file of your new song, you can do that pretty quickly in FL Studio 21.
Just open up the Export window and select both MP3 and WAV when exporting .
Make sure all the above-mentioned export settings for each file format are selected.
Boom. Now you have the two formats on your hard drive.
Pros and cons of exporting audio to 24bit WAV
Pros of WAV files:
Higher bit depth: Exporting audio to 24bit WAV provides a higher bit depth than other formats like 16bit. This means there’s more dynamic range, which can improve the overall sound quality and allow for greater detail in the audio.
Uncompressed: WAV files are uncompressed, meaning you’re retaining the original audio quality without any loss in data. This is beneficial for preserving the integrity of your recordings and ensuring the best possible sound.
Wide compatibility: WAV files are widely supported across various devices, software, and platforms. This makes it easy to share and collaborate on projects with others without worrying about compatibility issues.
Easier audio editing: Editing audio in a 24-bit WAV format can be easier because it provides more headroom for adjustments, allowing you to make precise changes without risking audio distortion.
Cons of WAV files:
Larger file size: One of the main drawbacks of exporting audio to 24-bit WAV is the larger file size. Uncompressed audio can take up a significant amount of storage space, which could be a problem if you’re working with limited storage or need to share your files online.
Longer processing times: Due to the increased file size, exporting and encoding audio in 24-bit WAV can take longer than other formats. This could slow down your workflow, especially if you’re working on a large project with many audio files.
Overkill for some applications: Depending on your project, 24-bit WAV audio may be unnecessary. Many consumer playback systems, such as smartphones and computers, are not optimized to handle 24-bit audio, so the extra bit depth may go unnoticed by the average listener.

Pros and cons of exporting audio MP3
Universal compatibility: MP3 is a widely supported audio format, making it compatible with almost all devices and software. This ensures that your audio files can be played on virtually any platform.
Smaller file size: MP3 uses lossy compression to significantly reduce file sizes while maintaining a relatively high level of audio quality. This makes it an ideal format for sharing and storing audio files, especially when dealing with limited storage space or bandwidth constraints.
Easy to share: The reduced file size of MP3s makes them easier to share via email, social media, or other online platforms, allowing users to quickly and easily distribute their audio content.
Loss of audio quality: As a lossy compression format, MP3 sacrifices some audio quality to achieve smaller file sizes. This can result in a noticeable difference in sound quality when compared to lossless formats like WAV or FLAC, particularly at lower bitrates.
Not ideal for professional use: Due to the loss of audio quality, MP3 may not be the best choice for professional applications, such as music production or mastering. In these cases, lossless formats like WAV or AIFF are generally preferred.
Not ideal for editing: Due to its lossy nature, MP3 is not the best format to use when editing audio, as each time the file is saved or exported, it undergoes further compression and quality loss. For audio editing purposes, it’s better to use lossless formats like WAV or AIFF.
Exporting MIDI Files in FL Studio
Exporting MIDI files is a great way to save your work and share it with others. You can also use exported MIDI files as a starting point for new projects , which is especially helpful if you’re working on a collaborative track.
MIDI files are much smaller than audio files, so they take up less space on your computer or hard drive.
They also don’t require any additional software or plugins to open them—just open the file in FL Studio 21 and start editing!
The best way to Export MIDI Files:
Go to the Sequencer and open the piano roll for the specific pattern you want to save the MIDI file for.
Click the drop-down menu in the upper left corner and select “Export as MIDI file”.
Name your file and press “Start”.
Awesome. Now you can easily reuse that MIDI file for perhaps future projects or send it off to another producer.

Exporting FL Studio Project Files
Sometimes you perhaps want to send your project files to another producer or artist.
But you have to remember to include all audio files, presets and midi files in the folder. Either way, the FL Studio project file cannot open properly.
There is a very easy way to export your FL Studio Project files.
Go to “File” .
Select export and choose “Zipped Loop Package” .
Locate the folder where you want to save the Fl Studio Zip project file .
Now all your files used in this FL Studio project are neatly placed in one folder for easy access.
This function is a game-changer for me!
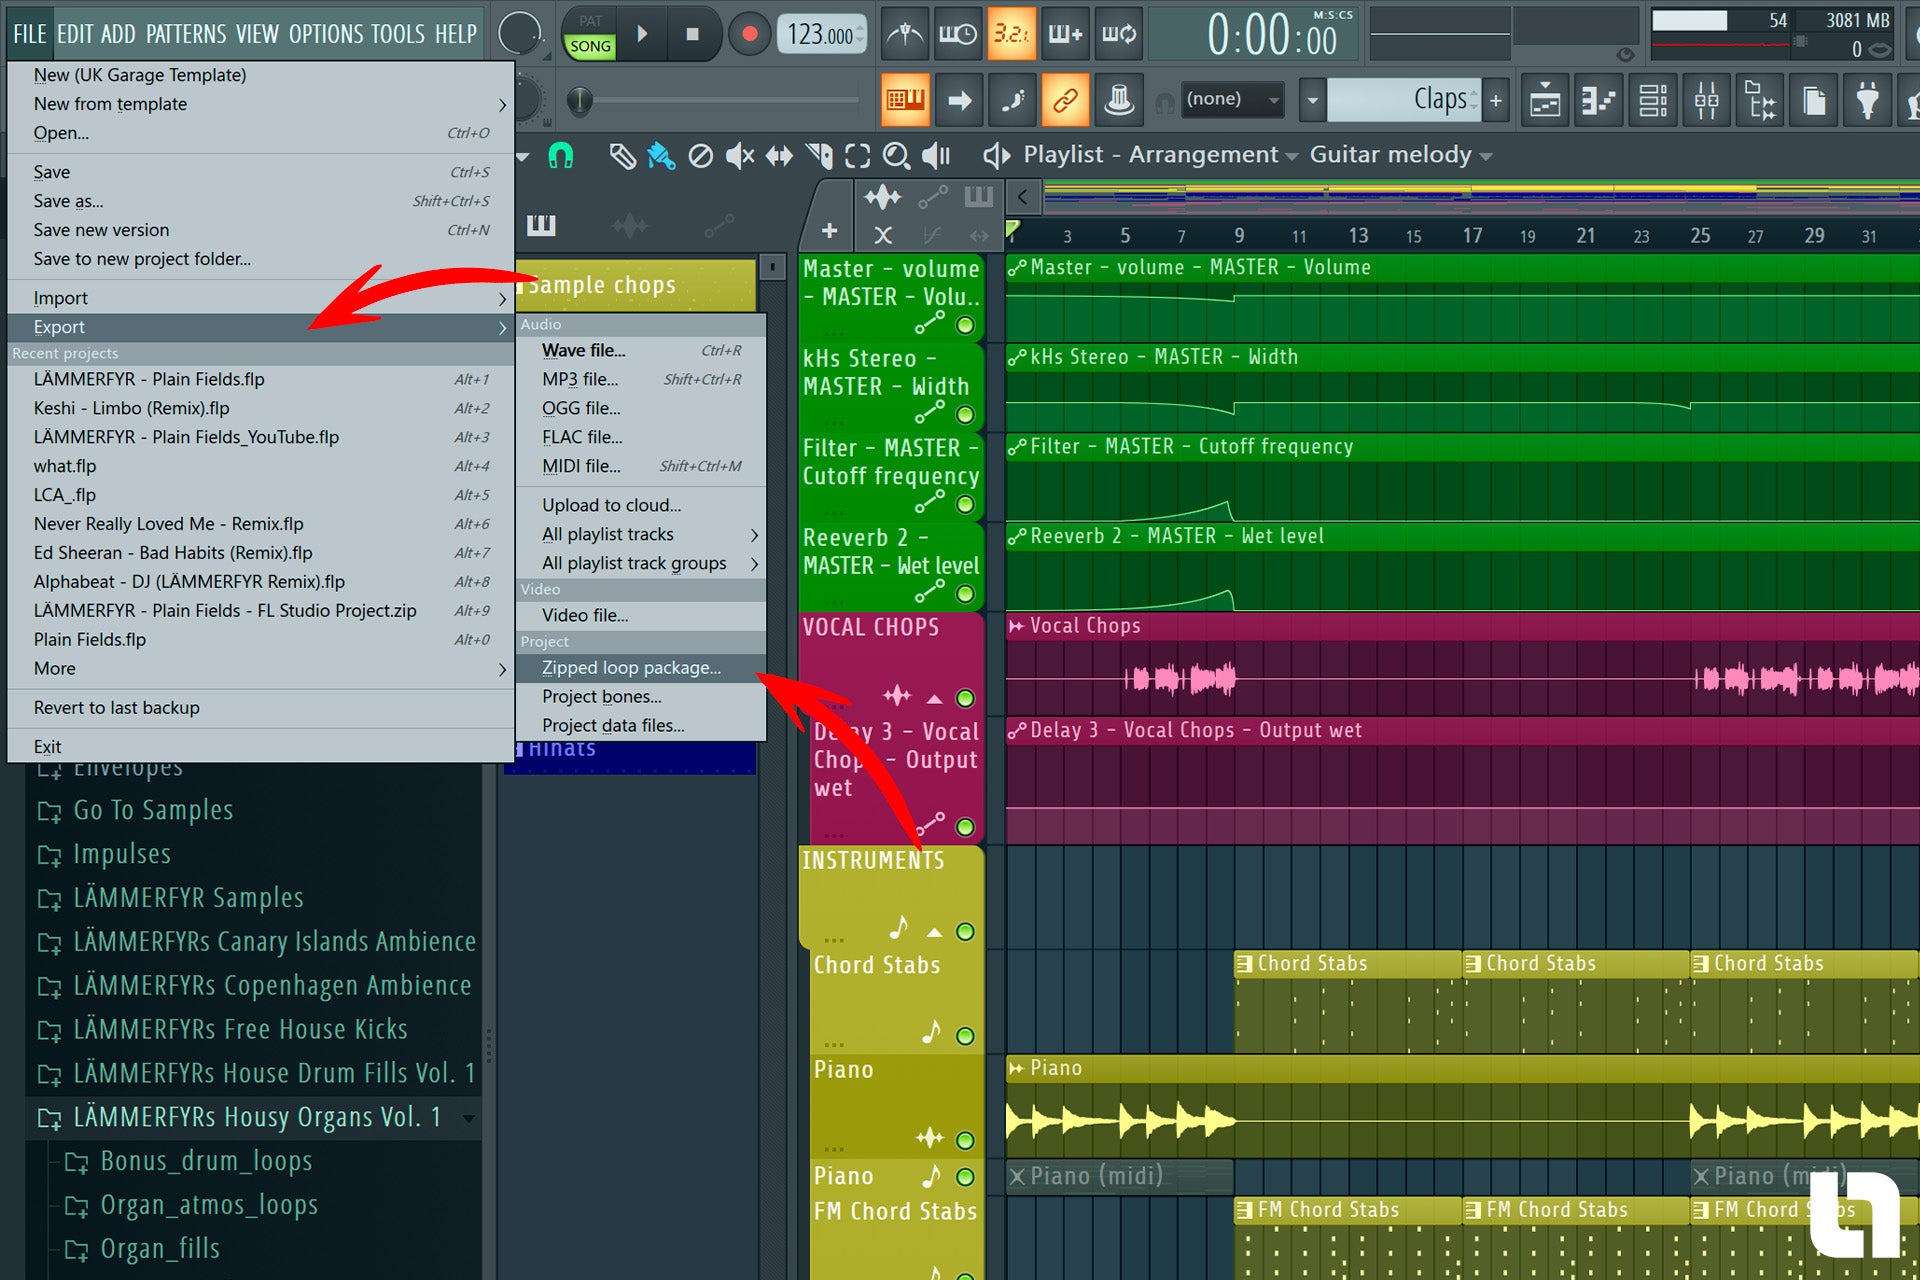
Benefits of exporting as a Zipped Loop Package in FL Studio
Easy Collaboration
When working with other musicians, producers, or engineers, you may need to share your FL Studio project files. Exporting your project as a zipped loop package ensures that all associated files, including samples, presets, and MIDI data, are included in a single, easy-to-share file. This makes collaboration more efficient and prevents any missing files or compatibility issues when sharing your work.
Backup and Archival
Exporting your project as a zipped loop package serves as an excellent way to create a backup of your work. By consolidating all the necessary files into a single archive, you can easily store your projects on external drives or cloud storage services. This not only protects your work from potential data loss but also helps you stay organized by keeping all your project files in one place.
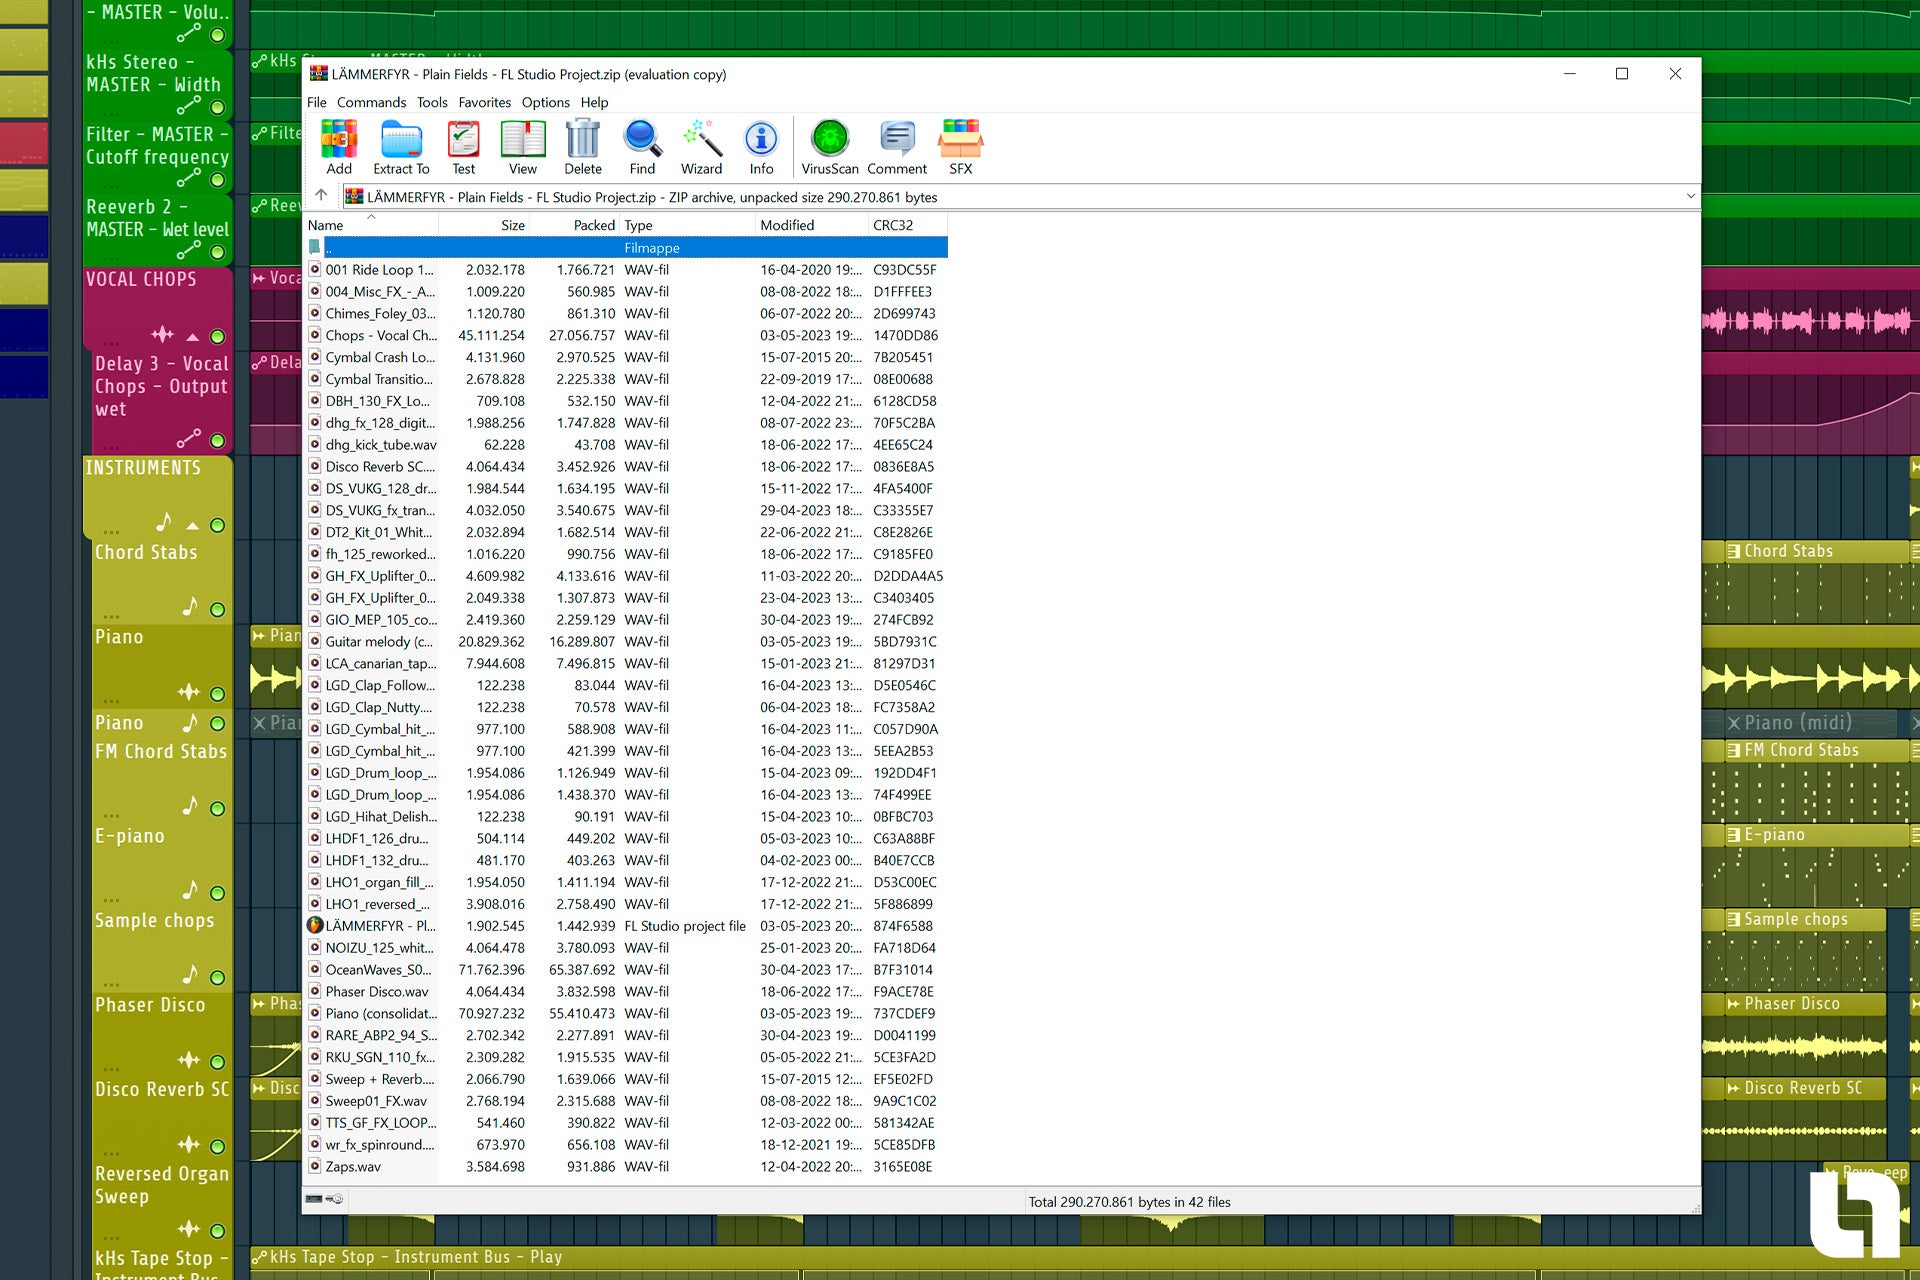
Simplified File Management
When working on multiple projects or different versions of a project, file management can become chaotic. Exporting as a zipped loop package helps you keep all project-related files in a single archive, making it easier to manage your files and avoid confusion. This can be especially helpful when revisiting older projects or when you need to find a specific version of your work.
Seamless Transfer Between Computers
If you work on multiple computers or plan to upgrade your system, exporting your FL Studio projects as a zipped loop package ensures that all necessary files are transferred seamlessly. This eliminates the need to manually locate and copy individual files, saving you time and reducing the risk of losing important data during the transfer process.
Export and Save Plugin Presets
In FL Studio 21 you can easily export and save plugin presets for future use. It’s also a great way to share your plugin settings with other FL Studio users.
You just navigate to the plugin you want to save as a preset.
Press the options menu and select “Save preset as” .
Select the folder where you want to save the preset file.
You can save and export presets for both instrument and effect plugins in FL Studio.

Benefits of exporting and saving plugin presets in FL Studio
Time-saving: Exporting and saving plugin presets allows you to reuse your favourite settings in future projects, saving you time and effort in recreating the same sound.
Consistency: By using saved presets, you can maintain a consistent sound across multiple projects, making it easier to establish your unique sonic signature.
Collaboration: Sharing your presets with other producers and musicians can help streamline the collaboration process, as it ensures that everyone is working with the same sound settings.
Organization: Saving your presets allows you to create a library of your favourite settings, making it easier to find the perfect sound for your project.
Inspiration: Having a collection of presets can help jumpstart your creativity by providing you with a starting point for new projects or ideas.
Wrapping up:
I hope this guide helped you in finding the best exporting option for your FL Studio 21 project.
If you want more FL Studio tutorials, you can swing by my YouTube channel . It’s full of great tips, tricks and inspiration for your music production.
Правильный рендеринг твоих треков в FL Studio

Всем привет! С Вами проект FL Studio PRO и я, Nelson Norman. Сегодня поговорим о такой важной операции как рендеринг Ваших миксов и треков в FL Studio 20.
На что стоит обратить внимание при данном моменте, какие параметры стоит выбирать и что вообще представляет собой «рендеринг»? В конце статьи Вас ждет небольшой сюрприз, поехали…Итак, рендеринг – это конечный этап любой мультимедийной программы, в нашем случае — это DAW. Проще говоря – это процесс преобразования Вашего проекта в аудиофайл. На какие параметры стоит обратить внимание при начале данной операции, и что значат все эти пункты?
Теперь по порядку, кликаем на вкладку File – Export
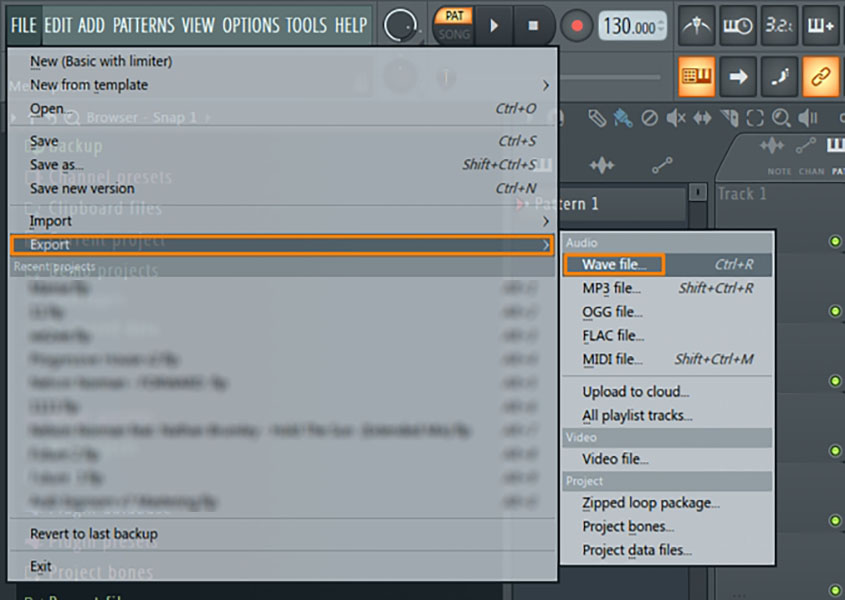
После выбираем папку сохранения проекта, и получаем такое окно:

Выбор области рендеринга
Начать стоит конечно же выбора области рендеринга Mode будь то Pattern или Full Song (Весь трек)
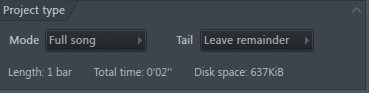
Ещё стоит обратить внимание на параметр Tail. Давайте разберём подробнее:
Tail – дословно это «хвост», или же «затухание» концовки композиции или паттерна, так я думаю более понятно.
В данном пункте на выбор у нас три категории данного параметра:
Cut Remainder – закончить экспорт аудио сразу как только завершился последний такт, и как следствии срезать и не включать все остатки и затухания после окончания такта.
Leave Remainder – оставить затухание, и экспортировать аудио до наступления тишины после полного затухания эффектов.
Wrap Remainder – (Полезно для экспорта Loop (Петель)) Связать затухание с началом аудио файла. То есть затухание автоматически будет подмешано в начало экспортируемого файла, таким образом получиться бесшовная петля Loop– без заметного перехода в воспроизведении в зацикленном режиме.
Зачастую тут выбирают второй параметр- это Leave Remainder, так мы получим плавную концовку нашего трека без резких обрывов громкости аудио сигнала.Выбор формата и качества
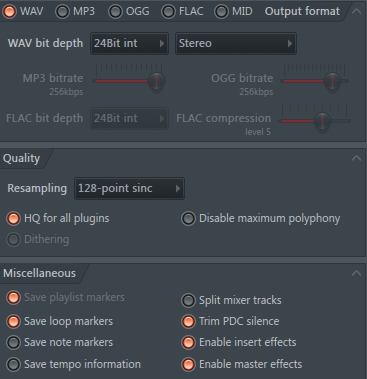
Узнаем о форматах подробнее:
Wav – это цифровой формат аудио, кодирующий аудиофайлы без потерь, для настроек глубины битности есть 3 варианта 16, 24, и 32 float.MP3/OGG– цифровое аудио с определенной долей потерь для экономии места. Ползунком справа, можно выставить битрейт качества звука для данных форматов, при увеличении глубины битрейта, будет соответственно увеличиваться и вес файла. Стоит отметить что для MP3 максимальное значение битрейт это 320 kbit\sec, значения выше устанавливаются и влияют только на формат OGG.
FLAC (англ. Free Lossless Audio Codec) — свободный кодек, предназначенный для сжатия аудиоданных без потерь. В отличие от аудиокодеков, обеспечивающих сжатие с потерями (MP3, AAC, WMA, Ogg Vorbis, Opus), FLAC, как и любой другой lossless-кодек, не удаляет никакой информации из аудио потока и подходит как для прослушивания музыки на высококачественной звуковоспроизводящей аппаратуре, так и для архивирования аудио коллекции.
MIDI (англ. Musical Instrument Digital Interface — цифровой интерфейс музыкальных инструментов) — стандарт цифровой звукозаписи на формат обмена данными между электронными музыкальными инструментами. Проще говоря, это не совсем привычный музыкальный формат, это протокол, больше пригодный для хранения и экспорта нотных (MIDI) данных с Piano Roll инструментов в FL Studio.
Чаще всего для экспорта музыки выбирают Wav формат, он универсален. Такой трек можно и на лейбл отправить, и скопировать на носитель для дальнейшего без проблемного прослушивания, что самое главное без потери качества! Но можно и воспользоваться форматом FLAC, увы не вся аппаратура воспроизводит данный формат, будьте аккуратны. Но потери качества в этом формате также нет, как и в Wav.
Если же Вам просто нужно сэкономить место к примеру, или же просто послушать музыку на том же смартфоне – то смело выбирайте формат MP3. Рендерив в этом формате Вы конечно рискуете потерять качество аудио сигнала, и мы настоятельно рекомендуем если уж и рендерить в этом формате, то минимум в качестве 256kB/s, чтобы потеря качества была минимальной.
Также стоит отметить, что рендерить материал можно сразу во всех форматах, не забывайте только выставлять качество.
Плавно перейдём к параметру «Quality», иначе говоря к качеству.Здесь мы видим четыре параметра:
Resampling – метод интерполяции семплов в каналах с Fruity Sampler и аудиоклипах (касается тех каналов, в которых есть любые аудио файлы (Sampler или Audio clips). Рекомендую оставить то значение, что стоит по умолчанию (128-pointsinc). Если вы растягиваете семплы по времени, либо меняете параметр питч, то изначальная частота дискретизации может поменяться, как следствие и качество семпла тоже теряется, можете поставить больше, если таких манипуляций в проекте достаточно много и вам важно компенсировать это.
Dithering – дизеринг производиться при преобразовании, например, 32 –х битного аудио (Wav– файла) в 16 битный. Дизеринг заполняет удалившиеся после преобразования дискретные доли в аудио случайными меньшими значениями для того что бы удалить образовывающиеся при уменьшении глубины битности артефакты. Так что, если в проекте используются 32-х битное аудио или семплы, стоит активировать эту функцию, так как в таких случаях это очень полезно.
HQ for all plugins – разрешает рендеринг высокого качества от всех встроенных в FL Studio плагинов, будь то синтезатор, эффект обработки или семплер. Disable Maximum Polyphony – отключение максимальной полифонии плагинов генераторов звука (если вы ставили в них какие-то ограничение в кол-ве их голосов).Остальные настройки
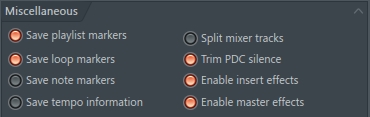
Плавно переходим к остальным параметрам рендеринга нашего проекта
Save Playlist Markers — сохраняет маркеры плейлиста проекта.
Save Loop Markers — сохраняет маркеры сэмпла/ loop.
Save Note Markers — сохраняет нотные маркеры.
Save Tempo Information — сохраняет информацию о темпе проекта.
Split Mixer Tracks – разбить каналы микшера. С данной функцией каждый канал микшера, в котором есть аудио будет экспортирован в отдельную аудио дорожку и назван соответствующим образом.
Trim PDC Delay – компенсация задержки на каналах микшера. Enable Insert Effects — включает обработку каналов микшера.
Enable Master Effects — включает обработку Мастер- канала.
Из эти всех параметров нам важны только три (нужно, чтобы были активны при обычном рендеринге финального трека):
- Trim PDC Delay;
- Enable Insert Effects;
- Enable Master Effects;
Собственно, для того чтобы компенсировать задержку, включить обработку каналов микшера и обработку мастер канала соответственно.
После данных манипуляций и выбора нужных Вам параметров, можно смело нажимать на кнопку «Start» и остаётся только дождаться окончания процесса, чтобы послушать свой материал.
Так же по Вы можете скачать нашу полезную графику по разбору данного окна рендеринга из FL Studio в одном изображении!
С Вами был проект FL Studio PRO и я, Nelson Norman, до встречи!поделись этим с друзьями или сохрани к себе:

- WAV bit depth — Bit-depth affects the noise-floor of the sample. This determines the quietest sound that can be captured or smallest changes in loudness that can be resolved. Generally 16 Bits is enough for music distribution. Use 24 or 32 Bit for archiving music production files.