Intellij IDEA перестала видить JAVA, как исправить?

Почему-то в Intellij сбросился стиль (шрифт и кнопки какие-то более крупные и не красивые) и, главное, что Intellij теперь не видит Java. В настройках (File->ProjectStructure) конечно выбрана версия и директория, которая установлена в JAVA_HOME. В настройках компиляции тоже установлена нужная версия. Случилось это после того, как спустя нескольких месяцей использования, обнаружил что в JAVA_HOME была старая версия 1.8. После обновления такое случилось.
Что это может быть, очень срочно нужно починить?(
Fix JAVA_HOME and Intellij IDEA’s broken JDK

If you’ve ever run across this error when using IntelliJ IDEA then you may be left wondering what to do to fix it.
ERROR: cannot start IntelliJ IDEA. No JDK found to run IDEA. Please validate either IDEA_JDK, JDK_HOME or JAVA_HOME environment variable points to valid JDK installation.Press
Enter to continue.
Well, here’s how to solve it on Linux Mint / Ubuntu. There was a lot of various solutions on the Internet and none of them worked. Most of them involve setting paths in the bash profile but none of them worked. The odd thing was it had just been working a couple of days before and then stopped. Intellij’s IDEA can be a bit of a pain on Linux but it is still full of awesome.
Install the JDK
Download the 32bit or 64bit Linux “compressed binary file” — it has a “.tar.gz” file extension i.e. “[java-version]-i586.tar.gz” for 32bit and “[java-version]-x64.tar.gz” for 64bit
Uncompress it
tar -xvf jdk-7u2-linux-i586.tar.gz (32bit)
tar -xvf jdk-7u2-linux-x64.tar.gz (64bit)
JDK 7 package is extracted into ./jdk1.7.0_02 directory. — Now move the JDK 7 directory to /usr/lib
sudo mv ./jdk1.7.0_02 /usr/lib/jvm/jdk1.7.0
Now run
sudo update-alternatives —install "/usr/bin/java" "java" "/usr/lib/jvm/jdk1.7.0/bin/java" 1
sudo update-alternatives —install "/usr/bin/javac" "javac" "/usr/lib/jvm/jdk1.7.0/bin/javac" 1
sudo update-alternatives —install "/usr/bin/javaws" "javaws" "/usr/lib/jvm/jdk1.7.0/bin/javaws" 1
sudo update-alternatives —config java
You will see output similar one below — choose the number of jdk1.7.0 — for example 3 in this list:
$sudo update-alternatives —config java
There are 3 choices for the alternative java (providing /usr/bin/java).
Selection Path Priority Status
————————————————————
* 0 /usr/lib/jvm/java-6-openjdk/jre/bin/java 1061 auto mode
1 /usr/lib/jvm/java-6-openjdk/jre/bin/java 1061 manual mode
2 /usr/lib/jvm/java-6-sun/jre/bin/java 63 manual mode
3 /usr/lib/jvm/jdk1.7.0/jre/bin/java 3 manual mode
Press enter to keep the current choice[*], or type selection number:
3 update-alternatives: using /usr/lib/jvm/jdk1.7.0/jre/bin/java to provide /usr/bin/java (java) in manual mode.
Check the version of you new JDK 7 installation:
java -version
java version “1.7.0” Java(TM) SE Runtime Environment (build 1.7.0-b147) Java HotSpot(TM) Client VM (build 21.0-b17, mixed mode)
Repeat the above for:
sudo update-alternatives —config javac sudo update-alternatives —config javaws
Enable mozilla firefox plugin:
32 bit: ln -s /usr/lib/jvm/jdk1.7.0/jre/lib/i386/libnpjp2.so
/.mozilla/plugins/ 64 bit: ln -s /usr/lib/jvm/jdk1.7.0/jre/lib/amd64/libnpjp2.so
Intellij can't find JDK
I couldn’t find any other answers on StackOverflow on this. I just installed Intellij, and it can’t find my JDK for some reason.
Here’s what I did:
Install Java JDK 9.0.1
- Open Intellij
- Open new project
- Clicked «new» button beside the find SDK.
- Found my java 9.0.1 bin folder under Program Files. It didn’t work.
- Tried java 8.something folder under Program Files (86x). It didn’t work.
- Went into advanced system settings and edited the path variable to the new java 9.0.1 bin as per (https://classroom.udacity.com/courses/ud282/lessons/8186340458/concepts/900a2a40-3921-4604-a258-c11ec355003c).
- Now I can’t even open Intellij. It just says: Cannot start under Java 1.7.0_79-b15: Java 1.8 or later is required.
Note: I also have Android studio and Netbean and both have been working no problem. Heard Intellij was better than Netbean so tried using it for the first time.
Почему в intellij idea нет java
A Software Development Kit , or an SDK , is a collection of tools that you need to develop an application for a specific software framework. For example, to develop applications in Java, you need a Java SDK (JDK). SDKs contain binaries, source code for the binaries, and documentation for the source code. JDK builds also contain annotations.
Generally, SDKs are global. It means that one SDK can be used in multiple projects and modules. After you create a new project and define an SDK for it, you can configure modules in this project to inherit its SDK. You can also specify an SDK for each module individually. For more information, refer to Change module SDK.
Supported SDKs
Configure SDKs
To define an SDK means to let IntelliJ IDEA know in which folder on your computer the necessary SDK version is installed. This folder is called an SDK home directory .
Global SDK
From the main menu, select File | Project Structure | Platform Settings | SDKs .
To add an SDK, click , select the necessary SDK and specify its home directory in the dialog that opens.
Only for JDKs: if you don’t have the necessary JDK on your computer, select Download JDK . In the next dialog, specify the JDK vendor, version, change the installation path if required, and click Download .
Project SDK
From the main menu, select File | Project Structure | Project Settings | Project .
If the necessary SDK is already defined in IntelliJ IDEA, select it from the SDK list.
If the SDK is installed on your computer, but not defined in the IDE, select Add SDK | ‘SDK name’ , and specify the path to the SDK home directory.
Only for JDKs: If you don’t have the necessary JDK on your computer, select Add SDK | Download JDK . In the next dialog, specify the JDK vendor, version, change the installation path if required, and click Download .
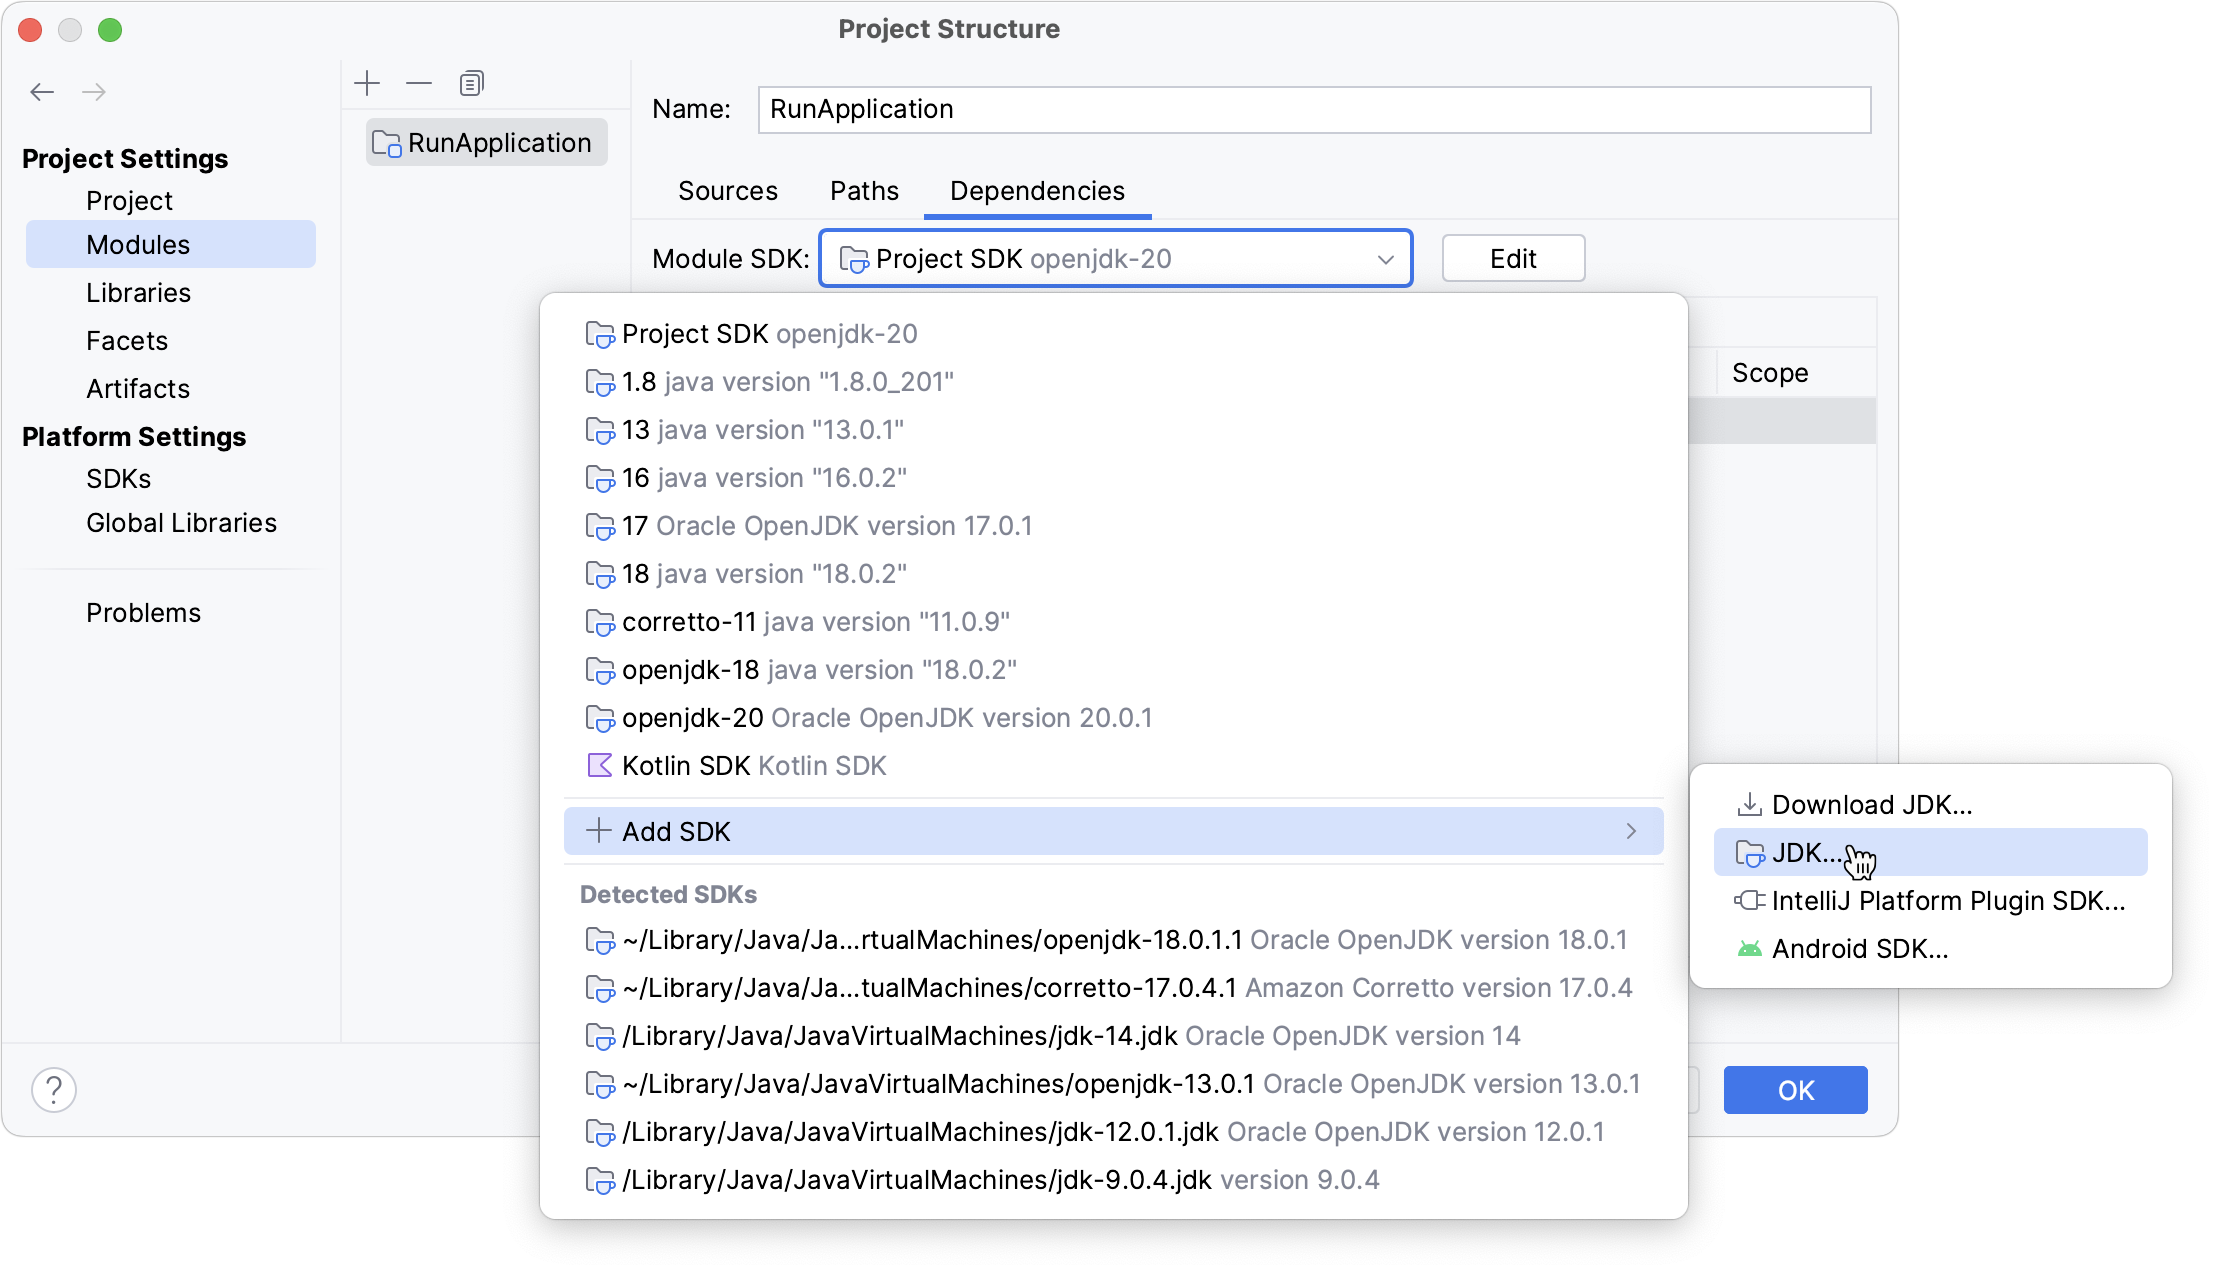
Module SDK
From the main menu, select File | Project Structure | Project Settings | Modules .
Select the module for which you want to set an SDK and click Dependencies .
If the necessary SDK is already defined in IntelliJ IDEA, select it from the Module SDK list.
If the SDK is installed on your computer, but not defined in the IDE, select Add SDK | ‘SDK name’ , and specify the path to the SDK home directory.
Only for JDKs: If you don’t have the necessary JDK on your computer, select Add SDK | Download JDK . In the next dialog, specify the JDK vendor, version, change the installation path if required, and click Download .
If you want a module to inherit a project SDK, select the Project SDK option from the Module SDK list.
Java Development Kit (JDK)
To develop applications in IntelliJ IDEA, you need a Java SDK (JDK). A JDK is a software package that contains libraries, tools for developing and testing Java applications (development tools), and tools for running applications on the Java platform (Java Runtime Environment – JRE).
The JRE can be obtained separately from the JDK, but it is not suitable for application development, as it doesn’t have essential components such as compilers and debuggers.
The bundled JRE is used for running the IDE itself, and it is not sufficient for developing Java applications. Before you start developing in Java, download and install a standalone JDK build.
Due to the changes in the Oracle Java License, you might not have the rights to use Oracle’s Java SE for free. We recommend that you use one of the OpenJDK builds to avoid potential compliance failures.
In IntelliJ IDEA, you can download a JDK package right from the IDE, or you can manually download the necessary JDK distribution and define it in the IDE.
For a manual download, use any available distribution that you like, for example:
If you don’t know which distribution to choose, and you don’t have specific requirements that instruct you to use one of the existing distributions, use Oracle OpenJDK.
Set up the project JDK
From the main menu, select File | Project Structure | Project Settings | Project .
If the necessary JDK is already defined in IntelliJ IDEA, select it from the SDK list.
If the JDK is installed on your computer, but not defined in the IDE, select Add SDK | JDK , and specify the path to the JDK home directory (for example, /Library/Java/JavaVirtualMachines/jdk-12.0.1.jdk ).
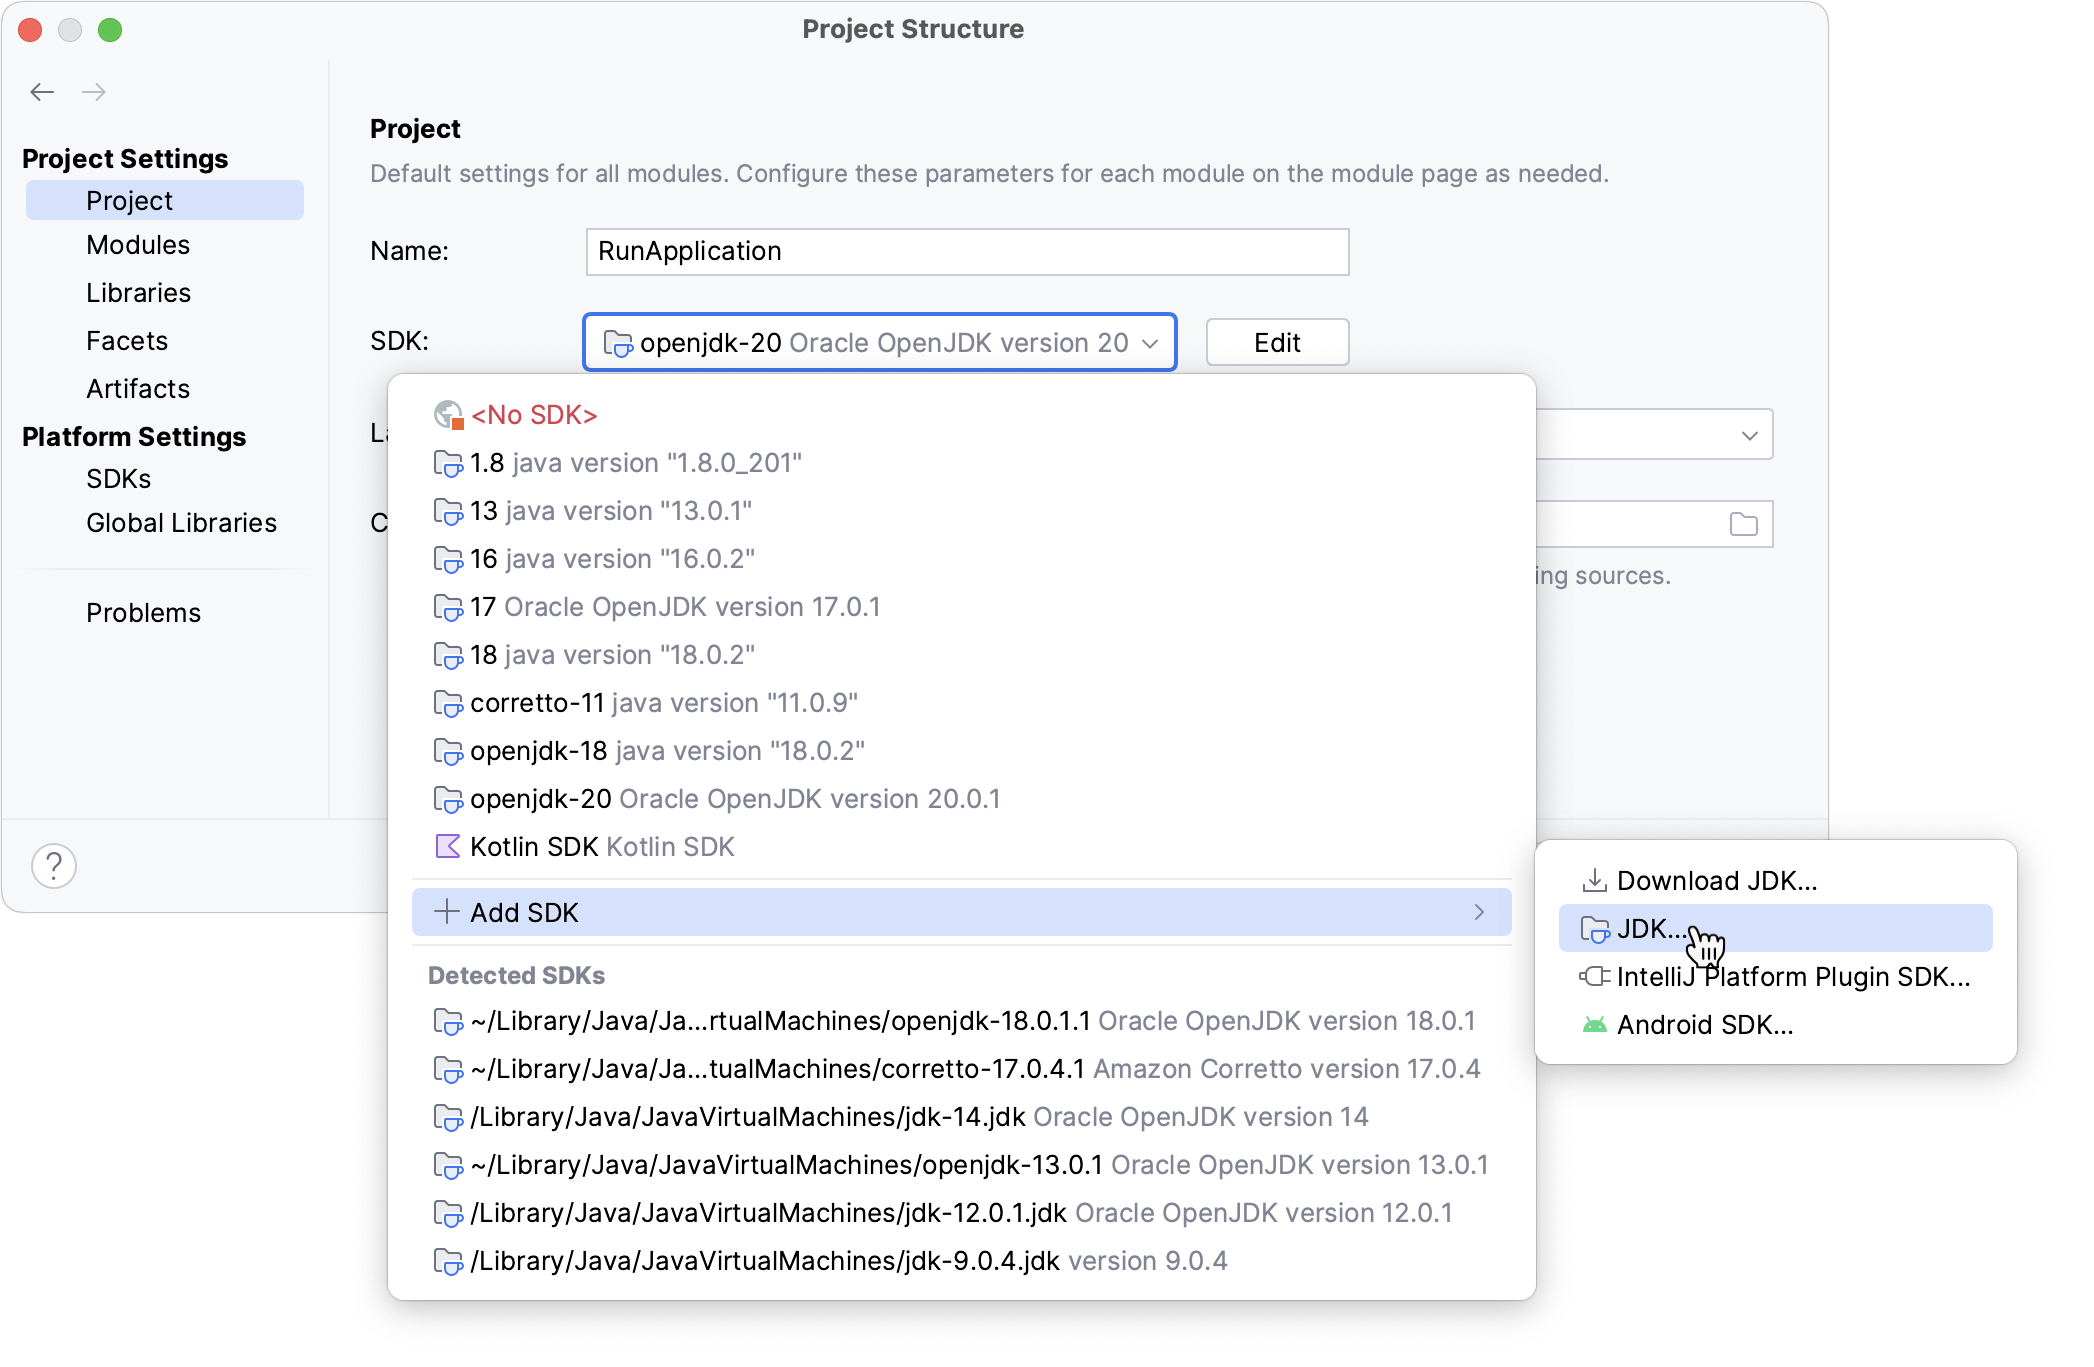
If you don’t have the necessary JDK on your computer, select Add SDK | Download JDK . In the next dialog, specify the JDK vendor, version, change the installation path if required, and click Download .
Click Apply to save the changes and close the dialog.
If you build your project with Maven or Gradle, refer to Change the JDK version in a Maven project and Gradle JVM selection respectively for more information on how to work with JDKs.
Configure SDK documentation
You can add SDK documentation to IntelliJ IDEA so that you can get information about symbols and method signatures right from the editor in the Quick Documentation popup.
You can also configure external documentation by specifying the path to the reference information online. External documentation opens the necessary information in a browser so that you can navigate to related symbols and keep the information for further reference at the same time.
Specify SDK documentation paths
To view external SDK documentation, configure the documentation URL first.
In the Project Structure dialog Control+Alt+Shift+S , select SDKs .
Select the necessary SDK version if you have several SDKs configured, and open the Documentation Path tab on the right.
Click the icon, enter the external documentation URL, and click OK .
For example, for Java 20, type https://docs.oracle.com/en/java/javase/20/docs/api/ .
Click Apply to save the changes and close the dialog.
Access SDK documentation offline
If you work offline, you can view external documentation locally.
Download the documentation package of the necessary version.
The documentation package is normally distributed in a ZIP archive that you need to unpack once it is downloaded.
For example, you can download the official Java SE Development Kit 20 Documentation and unzip it.
In the Project Structure dialog Control+Alt+Shift+S , select SDKs .
Select the necessary JDK version if you have several JDKs configured, and open the Documentation Path tab on the right.
Click the icon and specify the directory with the downloaded documentation package (for example, C:\Users\jetbrains\Desktop\docs\api ).